bsod after virus removal
- Thread starter bigjim18
- Start date
You are using an out of date browser. It may not display this or other websites correctly.
You should upgrade or use an alternative browser.
You should upgrade or use an alternative browser.
- Jan 24, 2011
- 9,378
Hi and welcome to the malwaretips.com forums!
I'm Jack and I am going to try to assist you with your problem. Please take note of the below:
Before we start:
Please be aware that removing malware is a potentially hazardous undertaking. I will take care not to knowingly suggest courses of action that might damage your computer. However it is impossible for me to foresee all interactions that may happen between the software on your computer and those we'll use to clear you of infection, and I cannot guarantee the safety of your system. It is possible that we might encounter situations where the only recourse is to re-format and re-install your operating system, or to necessitate you taking your computer to a repair shop.
Because of this, I advise you to backup any personal files and folders before you start.
<hr />
Start with changing BIOS boot order, so CD drive is listed first.
Then, I want to see, if you can get into recovery console:
<><span style="text-decoration: underline;">If you have Windows CD</span> </><em>(if you don't have Windows CD, scroll down)</em>
1. Insert your Windows XP CD into your CD and assure that your CD-ROM drive is capable of booting the CD.
2. Once you have booted from CD, do <>NOT</> select the option that states: <>Press F2 to initiate the Automated System Recovery (ASR) tool</>.
You’re going to proceed until you see the following screen, at which point you will press the <>“R”</> key to enter the recovery console:
<img src="http://icrontic.com/draco/images/articles/repairing_windows_xp_in_eight_commands/xp_src_welcome.gif" alt="Posted Image" />
3. After you have selected the appropriate option from step two, you will be prompted to select a valid Windows installation (typically number <>1</>).
Select the installation number, and hit <>Enter</>.
If there is an administrator password for the administrator account, enter it and hit <>Enter</> (if asked for the password, and you don't know it, you're out of luck).
You will be greeted with this screen, which indicates a recovery console at the ready:
<img src="http://icrontic.com/draco/images/articles/repairing_windows_xp_in_eight_commands/xp_src_console.gif" alt="Posted Image" />
4. There are eight commands you must enter in sequence to repair your problem..
<>NOTE</>. Make sure, you press <>Enter</> after each command. Make sure, all commands are exact, including "spaces".
These commands are as follows:
<>CD..
ATTRIB -H C:\boot.ini
ATTRIB -S C:\boot.ini
ATTRIB -R C:\boot.ini
del boot.ini
BOOTCFG /Rebuild</>
<>Note about the above command.</>
<>BOOTCFG /REBUILD</> command which searches for pre-existing installations of Windows XP and rebuilds sundry essential components of the Windows operating system, recompiles the BOOT.INI file and corrects a litany of common Windows errors.
It is very important that you do one or both of the following two things:
A.) Every Windows XP owner must use <>/FASTDETECT</> as <>OS Load Option</> when the rebuild process is finalizing.
B.) If you are the owner of a CPU featuring Intel’s XD or AMD’s <>NX buffer overflow protection</>, you must also use <>/NOEXECUTE=OPTIN</> as an <>OS Load Option</>.
For the <>Enter Load Identifier</> portion of this command, you should enter the name of the operating system you have installed.
If, for example, you are using <>Windows XP Home</>, you could type <>Microsoft Windows XP Home Edition</> for the identifier (it's not crucial, however what the name is, as long, as it's meaningful).
Here is your computer screen:
<img src="http://icrontic.com/draco/images/articles/repairing_windows_xp_in_eight_commands/xp_src_rebuild.gif" alt="Posted Image" />
5. Following command verifies the integrity of the hard drive containing the Windows XP installation. While this step is not an essential function in our process, it’s still good to be sure that the drive is physically capable of running windows, in that it contains no bad sectors or other corruptions that might be the culprit:
<>CHKDSK /R</>
6. This last command writes a new boot sector to the hard drive and cleans up all the loose ends we created by rebuilding the <>BOOT.INI</> file and the system files. When the Windows Recovery Console asks you if you are <>Sure you want to write a new bootsector to the partition C: ?</> just hit <>“Y”</>, then <>Enter</> to confirm your decision:
<>FIXBOOT</>
7. It’s time to reboot your PC by typing
<>EXIT</>
and pressing <>Enter</>.
With any luck, your PC will boot successfully into Windows XP as if your various DLL, Hive, EXE and NTLDR errors never existed.
-------------------------------------------------------------------------------------------------------------------------
<>If you don't have Windows CD</>
Download Windows Recovery Console: <a title="External link" href="http://www.thecomputerparamedic.com/files/rc.iso" rel="nofollow external">http://www.thecomputerparamedic.com/files/rc.iso</a>
Download, and install free <>Imgburn</>: <a title="External link" href="http://www.imgburn.com/index.php?act=download" rel="nofollow external">http://www.imgburn.com/index.php?act=download</a>
Using Imgburn, burn <>rc.iso</> to a CD.
Boot to the CD...let it finish loading.
When the "Welcome to Setup" screen appears, press R to start the Recovery Console.
Then, follow instructions from <>Step #3</> above.
I'm Jack and I am going to try to assist you with your problem. Please take note of the below:
- I will start working on your malware issues, this may or may not, solve other issues you have with your machine.
- The fixes are specific to your problem and should only be used for this issue on this machine!
- The process is not instant. Please continue to review my answers until I tell you your machine is clear. Absence of symptoms does not mean that everything is clear.
- If you don't know, stop and ask! Don't keep going on.
- Please reply to this thread. Do not start a new topic.
- Refrain from running self fixes as this will hinder the malware removal process.
- It may prove beneficial if you print of the following instructions or save them to notepad as I post them.
Before we start:
Please be aware that removing malware is a potentially hazardous undertaking. I will take care not to knowingly suggest courses of action that might damage your computer. However it is impossible for me to foresee all interactions that may happen between the software on your computer and those we'll use to clear you of infection, and I cannot guarantee the safety of your system. It is possible that we might encounter situations where the only recourse is to re-format and re-install your operating system, or to necessitate you taking your computer to a repair shop.
Because of this, I advise you to backup any personal files and folders before you start.
<hr />
Start with changing BIOS boot order, so CD drive is listed first.
Then, I want to see, if you can get into recovery console:
<><span style="text-decoration: underline;">If you have Windows CD</span> </><em>(if you don't have Windows CD, scroll down)</em>
1. Insert your Windows XP CD into your CD and assure that your CD-ROM drive is capable of booting the CD.
2. Once you have booted from CD, do <>NOT</> select the option that states: <>Press F2 to initiate the Automated System Recovery (ASR) tool</>.
You’re going to proceed until you see the following screen, at which point you will press the <>“R”</> key to enter the recovery console:
<img src="http://icrontic.com/draco/images/articles/repairing_windows_xp_in_eight_commands/xp_src_welcome.gif" alt="Posted Image" />
3. After you have selected the appropriate option from step two, you will be prompted to select a valid Windows installation (typically number <>1</>).
Select the installation number, and hit <>Enter</>.
If there is an administrator password for the administrator account, enter it and hit <>Enter</> (if asked for the password, and you don't know it, you're out of luck).
You will be greeted with this screen, which indicates a recovery console at the ready:
<img src="http://icrontic.com/draco/images/articles/repairing_windows_xp_in_eight_commands/xp_src_console.gif" alt="Posted Image" />
4. There are eight commands you must enter in sequence to repair your problem..
<>NOTE</>. Make sure, you press <>Enter</> after each command. Make sure, all commands are exact, including "spaces".
These commands are as follows:
<>CD..
ATTRIB -H C:\boot.ini
ATTRIB -S C:\boot.ini
ATTRIB -R C:\boot.ini
del boot.ini
BOOTCFG /Rebuild</>
<>Note about the above command.</>
<>BOOTCFG /REBUILD</> command which searches for pre-existing installations of Windows XP and rebuilds sundry essential components of the Windows operating system, recompiles the BOOT.INI file and corrects a litany of common Windows errors.
It is very important that you do one or both of the following two things:
A.) Every Windows XP owner must use <>/FASTDETECT</> as <>OS Load Option</> when the rebuild process is finalizing.
B.) If you are the owner of a CPU featuring Intel’s XD or AMD’s <>NX buffer overflow protection</>, you must also use <>/NOEXECUTE=OPTIN</> as an <>OS Load Option</>.
For the <>Enter Load Identifier</> portion of this command, you should enter the name of the operating system you have installed.
If, for example, you are using <>Windows XP Home</>, you could type <>Microsoft Windows XP Home Edition</> for the identifier (it's not crucial, however what the name is, as long, as it's meaningful).
Here is your computer screen:
<img src="http://icrontic.com/draco/images/articles/repairing_windows_xp_in_eight_commands/xp_src_rebuild.gif" alt="Posted Image" />
5. Following command verifies the integrity of the hard drive containing the Windows XP installation. While this step is not an essential function in our process, it’s still good to be sure that the drive is physically capable of running windows, in that it contains no bad sectors or other corruptions that might be the culprit:
<>CHKDSK /R</>
6. This last command writes a new boot sector to the hard drive and cleans up all the loose ends we created by rebuilding the <>BOOT.INI</> file and the system files. When the Windows Recovery Console asks you if you are <>Sure you want to write a new bootsector to the partition C: ?</> just hit <>“Y”</>, then <>Enter</> to confirm your decision:
<>FIXBOOT</>
7. It’s time to reboot your PC by typing
<>EXIT</>
and pressing <>Enter</>.
With any luck, your PC will boot successfully into Windows XP as if your various DLL, Hive, EXE and NTLDR errors never existed.
-------------------------------------------------------------------------------------------------------------------------
<>If you don't have Windows CD</>
Download Windows Recovery Console: <a title="External link" href="http://www.thecomputerparamedic.com/files/rc.iso" rel="nofollow external">http://www.thecomputerparamedic.com/files/rc.iso</a>
Download, and install free <>Imgburn</>: <a title="External link" href="http://www.imgburn.com/index.php?act=download" rel="nofollow external">http://www.imgburn.com/index.php?act=download</a>
Using Imgburn, burn <>rc.iso</> to a CD.
Boot to the CD...let it finish loading.
When the "Welcome to Setup" screen appears, press R to start the Recovery Console.
Then, follow instructions from <>Step #3</> above.
Last edited:
I followed your procedure after doing a little research on how to change the BIOS boot order. I was able to locate the Windows CD for my Dec 2006 Dell Dimension XPS 410 with Intel core 2 Duo Processor E6600.
It's been over a decade since I used any DOS commands. I managed to insert a space in the change directory command, cd .. and used /fastdetect because I'm a "Windows XP Media Center Edition" installation but I didn't think /noexecute=optin applied.
My Chkdsk /r ran for several hours and finally said it "found & fixed 1 or more sectors with 483,460,108 kb total space and 428,115,820 kb available.
I had to add the drive name after fixboot, FIXBOOT C: .
Unfortunately when I booted up, I first got a "Data Execution" popup screen saying "generic host process for win32 services" Publisher MicrosoftSoft" and another popup that a malwarebytes.dll was missing. Then the BSOD hit with STOP & Iastor.sys.
Subsequent boots would boot to my desktop and I'd be able to run things like solitaire and notepad for a couple of minutes before getting a BSOD. I noticed that the desktop incons would flicker a couple of times just before the BSOD. And I'd also get a McAfee screen warning me that I was at risk due to realtime scanning being OFF.
The computer still works in "safe mode".
I had trouble logging onto your site this morning which caused the delay in my response. Yesterday's password didn't seem to work and the new one emailed to me didn't work until this afternoon.
Any help on the problem would be appreciated. Thanks.
- Jan 24, 2011
- 9,378
Can you please try to run Combofix in Safe Mode with Networking?
STEP 1 : Run a scan with Combofix
Download ComboFix from one of the following locations:
COMBOFIX DOWNLOAD LINK #1 (This link will automatically download Combofix on your computer)
COMBOFIX DOWNLOAD LINK #2 (This link will automatically download Combofix on your computer)
VERY IMPORTANT !!! Save ComboFix.exe to your Desktop
<ul>
<li>Close any open browsers.</li>
<li>Close/disable all anti virus and anti malware programs so they do not interfere with the running of ComboFix.
-----------------------------------------------------------
<ul>
<li><>Very Important!</> Temporarily <>disable</> your <>anti-virus</>, <>script blocking</> and any <>anti-malware</> real-time protection <em><>before</></em>performing a scan. They can interfere with ComboFix or remove some of its embedded files which may cause <em>"unpredictable results"</em>.</li>
<li><em>Click on <a title="External link" href="http://www.bleepingcomputer.com/forums/topic114351.html" rel="nofollow external"><>this link</></a> to see a list of programs that should be disabled. The list is not all inclusive. If yours is not listed and you don't know how to disable it, please ask.</em>
-----------------------------------------------------------</li>
</ul>
<ul>
<li>Close any open browsers.</li>
<li><>WARNING: Combofix will disconnect your machine from the Internet as soon as it starts</></li>
<li>Please do not attempt to re-connect your machine back to the Internet until Combofix has completely finished.</li>
<li>If there is no internet connection after running Combofix, then restart your computer to restore back your connection.</li>
</ul>
-----------------------------------------------------------</li></ul>
How to run the Combofix scan :
Notes:
<ol><li> Do not mouse-click Combofix's window while it is running. That may cause it to stall.</li>
<li> Do not "re-run" Combofix. If you have a problem, reply back for further instructions.</li>
<li> If after the reboot you get errors about programms being marked for deletion then reboot, that will cure it.</li></ol>
<hr />
What's next?
Please post in your next reply:
1.Combofix log
2.Let me know if you had any problems with the above instructions and also <>let me know how things are running now!</>
STEP 1 : Run a scan with Combofix
Please read and follow very carefully the below instructions
Download ComboFix from one of the following locations:
COMBOFIX DOWNLOAD LINK #1 (This link will automatically download Combofix on your computer)
COMBOFIX DOWNLOAD LINK #2 (This link will automatically download Combofix on your computer)
VERY IMPORTANT !!! Save ComboFix.exe to your Desktop
<ul>
<li>Close any open browsers.</li>
<li>Close/disable all anti virus and anti malware programs so they do not interfere with the running of ComboFix.
-----------------------------------------------------------
<ul>
<li><>Very Important!</> Temporarily <>disable</> your <>anti-virus</>, <>script blocking</> and any <>anti-malware</> real-time protection <em><>before</></em>performing a scan. They can interfere with ComboFix or remove some of its embedded files which may cause <em>"unpredictable results"</em>.</li>
<li><em>Click on <a title="External link" href="http://www.bleepingcomputer.com/forums/topic114351.html" rel="nofollow external"><>this link</></a> to see a list of programs that should be disabled. The list is not all inclusive. If yours is not listed and you don't know how to disable it, please ask.</em>
-----------------------------------------------------------</li>
</ul>
<ul>
<li>Close any open browsers.</li>
<li><>WARNING: Combofix will disconnect your machine from the Internet as soon as it starts</></li>
<li>Please do not attempt to re-connect your machine back to the Internet until Combofix has completely finished.</li>
<li>If there is no internet connection after running Combofix, then restart your computer to restore back your connection.</li>
</ul>
-----------------------------------------------------------</li></ul>
How to run the Combofix scan :
- Double click on ComboFix.exe & follow the prompts.
- Accept the disclaimer and allow to update if it asks
- When finished, it shall produce a log for you.
[*]Please include the C:\ComboFix.txt in your next reply.
Notes:
<ol><li> Do not mouse-click Combofix's window while it is running. That may cause it to stall.</li>
<li> Do not "re-run" Combofix. If you have a problem, reply back for further instructions.</li>
<li> If after the reboot you get errors about programms being marked for deletion then reboot, that will cure it.</li></ol>
<hr />
What's next?
Please post in your next reply:
1.Combofix log
2.Let me know if you had any problems with the above instructions and also <>let me know how things are running now!</>
Last edited:
[attachment=2103]I had trouble with disabling McAfee Security Center 11.0. The web site instructions don't match the screens I get from my version of McAfee.
But I was able to turn off both real time scanning and firewall.
I ran ComboFix. It said my machine didn't have MS windows recovery console installed and I was able to get ComboFix to download it and successfully install it.
I noticed in the ComboFix log that my newly created boot sector titled "...Media Center Edition2" has only /fastdetect whereas the previous boot sector has /noexecute=optin /fastdetect /usepmtimer parameters. Will that be an issue going forward?
When I booted up, the machine seemed stable for a couple of minutes but then I got a popup window from McAfee warning me that realtime scanning wasn't enabled. As soon as I clicked to dismiss the warning the BSOD with STOP and iastor.sys appeared. I've attached ComboFix.txt
Attachments
- Jan 24, 2011
- 9,378
Ok,can you please provide me the following log:
STEP 1: Run a HitmanPro scan
<ol>
<li><>Download the latest official version of HitmanPro</>.
<a href="http://www.surfright.nl/en/hitmanpro/" rel="nofollow" target="_blank"> <>HITMANPRO DOWNLOAD LINK</></a> <em>(This link will open a download page in a new window from where you can download HitmanPro)</em></li>
<li>Start HitmanPro by <>double clicking on the previously downloaded file.</> and then following the prompts.
>>> IF you are experiencing problems while trying to start HitmanPro, you can use the Force Breach mode.To start HitmanPro in Force Breach mode, hold down the left CTRL-key when you start HitmanPro and all non-essential processes are terminated, including the malware process. (How to start HitmanPro in Force Breach mode – Video)
<img src="http://malwaretips.com/images/removalguide/hpro4.png" alt="[Image: hitmanproscan4.png]" border="0" /></li>
<li>Once the scan is complete, a screen displaying all the malicious files that the program found will be shown as seen in the image below.After reviewing each malicious object click <>Next</> .
<img src="http://malwaretips.com/blogs/wp-content/uploads/2012/02/rsz_hpro5.png" alt="[Image: hitmanproscan5.png]" border="0" /></li>
<li>Click <>Activate free license</> to start the free 30 days trial and remove the malicious files.
<img src="http://malwaretips.com/images/removalguide/hpro6.png" alt="[Image: hitmanproscan6.png]" border="0" /></li>
<li>HitmanPro will now start removing the infected objects, and in some instances, may suggest a reboot in order to completely remove the malware from your system. In this scenario, always confirm the reboot action to be on the safe side.
</ol>
Add to your next reply, any log that HitmanPro might generate.
<hr />
2.Run a scan with Kaspersky TDSSKiller
<>Read carefully and follow these steps.</>
<ol>
<li>Download <><a title="External link" href="http://support.kaspersky.com/downloads/utils/tdsskiller.exe" rel="external">TDSSKiller</a></> and save it to your Desktop.
</li>
<li>Double-click on <>TDSSKiller.exe</> to run the application.
<img src="http://img4.imageshack.us/img4/1907/tdss1.png" alt="Posted Image" /></li>
<li>Click <>Change parameters</>
<img src="http://img593.imageshack.us/img593/288/tdss2.png" alt="Posted Image" /></li>
<li>Check the boxes next to <>Verify Driver Digital Signature</> and <>Detect TDLFS file system</>, then click <>OK</>
<img src="http://img521.imageshack.us/img521/1456/tdss3.png" alt="Posted Image" /></li>
<li>Click on the <>Start Scan</> button to begin the scan and wait for it to finish.
<>NOTE:</> Do not use the computer during the scan!</li>
<li>During the scan it will look similar to the image below:
<img src="http://img6.imageshack.us/img6/9136/tdss4.jpg" alt="Posted Image" /></li>
<li>When it finishes, you will either see a report that no threats were found like below:
<img src="http://img696.imageshack.us/img696/9898/tdss5.jpg" alt="Posted Image" />
If no threats are found at this point, just click the <>Report</> selection on the top right of the form to generate a log. A log file report will pop which you can just close since the report file is already saved.</li>
<li>If any infection or suspected items are found, you will see a window similar to below:
<img src="http://img854.imageshack.us/img854/905/tdss7.jpg" alt="Posted Image" />
<ul>
<li>If you have files that are shown to fail <em>signature check</em> do not take any action on these. Make sure you select <>Skip</>. I will tell you what to do with these later. They may not be issues at all.</li>
<li>If <em>Suspicious objects</em> are detected, the default action will be Skip. Leave the default set to Skip.</li>
<li>If <em>Malicious objects</em> are detected, they will show in the Scan results. TDSSKiller automatically selects an action (Cure or Delete) for malicious objects.
Make sure that <>Cure</> is selected. <>Important!</> - If <em>Cure</em> is not available, please choose <>Skip</> instead. Do not choose Delete unless instructed to do so.</li>
</ul>
</li>
<li>Click <>Continue</> to apply selected actions.</li>
<li>A reboot may be required to complete disinfection. A window like the below will appear:
<img src="http://img828.imageshack.us/img828/4812/tdss6.jpg" alt="Posted Image" />
Reboot immediately if TDSSKiller states that one is needed.</li>
<li>Whether an infection is found or not, a log file should have already been created on your C: drive (or whatever drive you boot from) in the root folder named something like <>TDSSKiller.2.1.1_27.12.2009_14.17.04_log.txt</> which is based on the program version # and date and time run.</li>
<li>Attach this log to your next reply.</li>
</ol>
<hr />
<>Step 3: Run a scan with OTL by OldTimer:</>
<ol><li>Download the OTL utility using the below link :
<><a title="External link" href="http://oldtimer.geekstogo.com/OTL.exe" rel="nofollow external">OTL DOWNLOAD LINK</a> <em>(This link will automatically download OTL on your computer)</em></></li>
<li>Double click on the icon to run it. Make sure all other windows are closed and to let it run uninterrupted.
<img src="http://malwaretips.com/blogs/wp-content/uploads/2012/07/OTL-logo.png" alt="" title="OTL-logo" width="106" height="118" class="alignnone size-full wp-image-3946" /></li>
<li>When the window appears, <>underneath Output</> at the top change it to <>Minimal Output</>.</li>
<li>Check the boxes beside <>LOP Check</> and <>Purity Check</>.</li>
<li>Click the<> Run Scan</> button.
<img src="http://malwaretips.com/blogs/wp-content/uploads/2012/07/OTL.png" alt="" title="OTL" width="658" height="584" class="alignnone size-full wp-image-3945" /></li>
<li>When the scan completes, it will open two notepad windows. <>OTL.Txt</> and <>Extras.Txt</>. These are saved in the same location as OTL.
<>Please post this 2 logs in your first reply.</>.</li></ol>
<em>Note: If OTL.exe will not run, it may be blocked by malware. Try these alternate versions: <a title="External link" href="http://www.itxassociates.com/OT-Tools/OTL.scr" rel="nofollow external">OTL.scr</a>, or <a title="External link" href="http://oldtimer.geekstogo.com/OTL.com" rel="nofollow external">OTL.com</a>.</em>
<hr />
What's next?
Please post in your next reply:
1.HitmanPro log
2.Kaspersky TDSSKiller log
3. OTL Logs
4. Let me know if you had any problems with the above instructions and also <>let me know how things are running now!</>
Last edited:
Jack said:...
Well I ran HitManPro and got a Master Boot sector, and 2 trojans that were removed. All the tracking cookies were deleted except doubleclick.net. Is that an issue?
TDSSKiller only found unsigned files & a TDSS file system and all were labeled as medium risk and "skipped".
OTL didn't seem to find any problems.
When I booted normally, McAfee warned me that I was at risk because security options were off. I turned security on and it downloaded some updates and I rebooted after that.
The machine has been stable for over an hour. I'm cautiously saying, HURRAY!!, my machine is cured.
I've attached the files you wanted. I added a .txt to HitManPro's log file because the thread attachment didn't like .log.
But I do have some questions,
1) Does the virus that I had have a name & was I multiply infected? Is it a particularly virulent virus?
2) Does the virus have a common method of infection? I'm a big space/astronomy nut and do a lot Internet searching on those topics. I didn't think that was a risky behavior.
3) If McAfee didn't detect the infection, is it worthwhile to keep running it? I get it for free from AT&T because I'm a Uverse customer.
4) What software would you recommend I use going forward from this point? I'll hold my web browsing until I get your response.
5) There is a couple of loose-end issues. If I'm using a boot sector with only /fastdetect and not the extra parameters of /noexecute=optin and /use pmtimer, is that an issue? Also my machine lists 2 OS's now the original MS Windows Media Edition and the MS Windows Media Edition2 that I created. Is there a way to get back to a single entry that would skip the prompt?
I can't thank you enough for recommending the steps and guiding be through the fixes. Your instructions were always extremely clear. It's been a long week of using the machine only in "safe" mode and I wasn't optimistic that the machine could be recovered without wiping out the entire hard drive. I'm definitely a big fan of you and Malware Tips. Thanks again.
Attachments
- Jan 24, 2011
- 9,378
Glad to see that we've manage to remove that nasty infection...
1.Cookies aren't dangerous and don't pose any kind of danger for your machine so it's ok.
2.Your were the victim of the TDL-4 (TDSS or Alureon) rootkit,you can find more details here : http://searchsecurity.techtarget.com/definition/TDL-4-TDSS-or-Alureon
3 and 4.No,you need to get rid of McAfee as it's a very poor security product.Avast Antivirus 7 Free is a very good and decent antivirus however I recommend that you start a thread in our Security Configuration Wizar Forum so we can help you build a decent security configuration
Next,please run the below steps:
STEP 1: Run a scan with RogueKiller
<ol>
<li>Please <>download the latest official version of </><>RogueKiller</>.
<a href="http://www.sur-la-toile.com/RogueKiller/RogueKiller.exe" rel="nofollow" target="_blank">RogueKiller Download Link</a> (This link will automatically download RogueKiller on your computer)</li>
<li><>Double click on RogueKiller.exe</> to start this utility and then <>wait for the Prescan to complete</>.This should take only a few seconds and then you can <>click the Start button</> to perform a system scan.
<img title="Click on the Start button to perform a system scan" src="http://malwaretips.com/blogs/wp-content/uploads/2012/04/roguek-1.png" alt="[Image: roguekiller-1.png]" width="600" height="450" border="0" /></li>
<li>After the scan has completed, <>press the Delete button</> to remove any malicious registry keys.
<img title="Press Delete to remove the malicious registry keys" src="http://malwaretips.com/blogs/wp-content/uploads/2012/04/roguek-2.png" alt="[Image: roguekiller-2.png]" width="600" height="450" border="0" /></li>
<li>Next we will need to restore your shortcuts, <>so click on the ShortcutsFix button </>and allow the program to run.
<img title="Click on the Start button to perform a system scan" src="http://malwaretips.com/blogs/wp-content/uploads/2012/04/roguek-3.png" alt="[Image: roguekiller-1.png]" width="600" height="450" border="0" /></li>
</ol>
The report has been created on the desktop.In your next reply please post:
All RKreport.txt text files located on your desktop.
<hr />
STEP 2: Run a aswMBR scan:
<hr />
STEP 3: Run a scan with Kaspersky Virus Removal Tool
Click <a title="External link" href="http://www.kaspersky.com/antivirus-removal-tool?form=1" rel="nofollow external" rel="nofollow"><>here</></a> to download the Kaspersky Virus Removal Tool.
<ol>
<li>Save it to your desktop.</li>
<li>Double click the setup file to run it.</li>
<li>Follow the onscreen prompts until it is installed</li>
<li>Click the Options button (the 'Gear' icon), then make sure only the following are ticked:
<ul>
<li><span style="color: #ff0000;">System Memory</span></li>
<li><span style="color: #ff0000;">Hidden startup objects</span></li>
<li><span style="color: #ff0000;">Disk boot sectors</span></li>
<li><span style="color: #ff0000;">Local Disk (C: )</span></li>
<li><span style="color: #ff0000;">Also any other drives (Removable that you may have)</span></li>
</ul>
</li>
<li>Then click on <>Actions</> on the left hand side</li>
<li>Click <>Select Action</>, then make sure both <>Disinfect</> and <>Delete if disinfection fails</> are ticked</li>
<li>Click on <>Automatic Scan</></li>
<li>Now click the <>Start Scanning</> button, to run the scan</li>
<li>After the scan is complete, click the reports button ('Paper icon', next to the 'Gear' icon) on the right hand side</li>
<li>Click <>Detected threats</> on the left</li>
<li>Now click the <>Save</> button, and save it as <>kaslog.txt</> to your <>Desktop</></li>
<li>Please attach kaslog.txt in your next reply.</li>
</ol>
<hr />
STEP 4: Run a scan with ESET Online Scanner
<ol>
<li>Download ESET Online Scanner utility.
<><a title="External link" href="http://download.eset.com/special/eos/esetsmartinstaller_enu.exe" rel="nofollow">ESET Online Scanner Download Link</a></> <em>(This link will automatically download ESET Online Scanner on your computer.)</em></li>
<li>Double click on the Eset installer program (esetsmartinstaller_enu.exe).</li>
<li>Check <>Yes, I accept the Terms of Use</></li>
<li>Click the <>Start</> button.</li>
<li>Check <>Scan archives</></li>
<li>Push the <>Start</> button.</li>
<li>ESET will then download updates for itself, install itself, and begin scanning your computer. Please be patient as this can take some time.</li>
<li>When the scan completes, push <>List of found threats</></li>
<li>Push <>Export to Text file </> and save the file to your desktop using a unique name, such as <>ESET Scan</>. Include the contents of this report in your next reply.Note - when ESET doesn't find any threats, no report will be created.</li>
<li>Push the <>back</> button.</li>
<li>Push <>Finish</></li>
</ol>
<hr />
STEP 5: Run Windows Repair All in One
<ol><li>Download the Windows Repair All in One utility from the below link.
<a title="External link" href="http://www.tweaking.com/content/page/windows_repair_all_in_one.html" rel="nofollow"><>WINDOWS REPAIR ALL IN ONE DOWNLOAD LINK</></a> <em>(This link will open a download page in a new window from where you can download Windows Repair All in One Portable version)</em></li>
<li>Double-click <>tweaking.com_windows_repair_aio.zip</> and extract the <>Tweaking.com - Windows Repair</> folder to your desktop.</li>
<li>Now open this folder and double-click <>Repair_Windows.exe</>.</li>
<li>Click the <>Start Repairs</> tab on the far right.</li>
<li>Click the <>Start</> button (bottom right)
Note: When asked if you would like to create a restore point. It is recommended just in-case something does not go as planned.</li>
<li>Click <>Unselect All</></li>
<li>Put a checkmark in the following items:
<ul>
<li>Repair Hosts File</li>
<li>Remove Temp Files</li>
<li>Remove Policies Set By Infections</li>
</ul>
Note: Leave everything else unchecked</li>
<li>Put a checkmark in <>Restart System When Finished</></li>
<li>Now click the <>Start</> button (bottom right)</li>
</ol>
<hr />
STEP 3:Run Malwarebytes StartupLite to remove unnecessary items at Windows startup
You have a lot of files loading at startup....lets make your computer a little faster..
<ol><li>Download StartUpLite and save it to a convenient location.
<a href="http://downloads.malwarebytes.org/file/startuplite"><>MALWAREBYTES STARTUPLITE DOWNLOAD LINK</></a> <em>(This link will open a new webpage from where you can download Malwarebytes StartUpLite)</em>
<li>Double click StartUpLite.exe and then select all options you would like executed and select continue.</li></ol>
<hr />
What's next?
Attach the following logs to your post (You can find here details on how to use the Attachment System):
1.RogueKiller logs
2.ESET log
3.Kaspersky log
4.aswMBR log
5.Let me know if you had any problems with the above instructions and also let me know how things are running now!
1.Cookies aren't dangerous and don't pose any kind of danger for your machine so it's ok.
2.Your were the victim of the TDL-4 (TDSS or Alureon) rootkit,you can find more details here : http://searchsecurity.techtarget.com/definition/TDL-4-TDSS-or-Alureon
3 and 4.No,you need to get rid of McAfee as it's a very poor security product.Avast Antivirus 7 Free is a very good and decent antivirus however I recommend that you start a thread in our Security Configuration Wizar Forum so we can help you build a decent security configuration
Next,please run the below steps:
STEP 1: Run a scan with RogueKiller
<ol>
<li>Please <>download the latest official version of </><>RogueKiller</>.
<a href="http://www.sur-la-toile.com/RogueKiller/RogueKiller.exe" rel="nofollow" target="_blank">RogueKiller Download Link</a> (This link will automatically download RogueKiller on your computer)</li>
<li><>Double click on RogueKiller.exe</> to start this utility and then <>wait for the Prescan to complete</>.This should take only a few seconds and then you can <>click the Start button</> to perform a system scan.
<img title="Click on the Start button to perform a system scan" src="http://malwaretips.com/blogs/wp-content/uploads/2012/04/roguek-1.png" alt="[Image: roguekiller-1.png]" width="600" height="450" border="0" /></li>
<li>After the scan has completed, <>press the Delete button</> to remove any malicious registry keys.
<img title="Press Delete to remove the malicious registry keys" src="http://malwaretips.com/blogs/wp-content/uploads/2012/04/roguek-2.png" alt="[Image: roguekiller-2.png]" width="600" height="450" border="0" /></li>
<li>Next we will need to restore your shortcuts, <>so click on the ShortcutsFix button </>and allow the program to run.
<img title="Click on the Start button to perform a system scan" src="http://malwaretips.com/blogs/wp-content/uploads/2012/04/roguek-3.png" alt="[Image: roguekiller-1.png]" width="600" height="450" border="0" /></li>
</ol>
The report has been created on the desktop.In your next reply please post:
All RKreport.txt text files located on your desktop.
<hr />
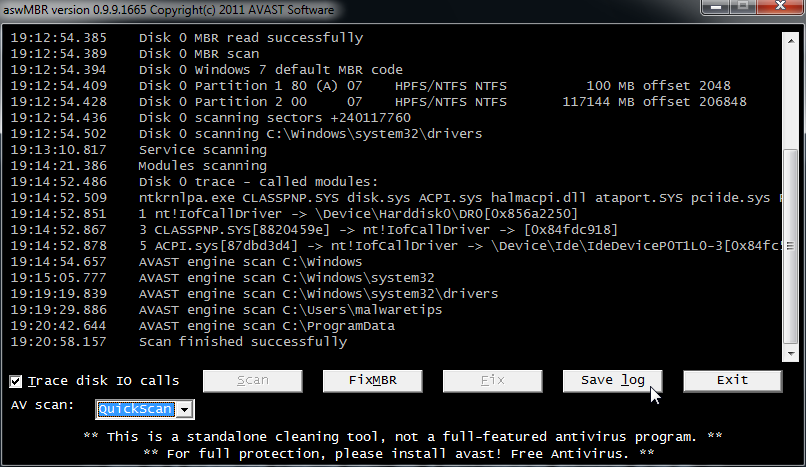
STEP 2: Run a aswMBR scan:
- Download aswmbr.exe from the below link:
aswMBR DOWNLOAD LINK <em>(This link will automatically download aswMBR on your computer)</em> - Double click the aswMBR.exe to run it.
- Click the [Scan] button to start scan

- On completion of the scan click [Save log], save it to your desktop and post in your next reply.
<hr />
STEP 3: Run a scan with Kaspersky Virus Removal Tool
Click <a title="External link" href="http://www.kaspersky.com/antivirus-removal-tool?form=1" rel="nofollow external" rel="nofollow"><>here</></a> to download the Kaspersky Virus Removal Tool.
<ol>
<li>Save it to your desktop.</li>
<li>Double click the setup file to run it.</li>
<li>Follow the onscreen prompts until it is installed</li>
<li>Click the Options button (the 'Gear' icon), then make sure only the following are ticked:
<ul>
<li><span style="color: #ff0000;">System Memory</span></li>
<li><span style="color: #ff0000;">Hidden startup objects</span></li>
<li><span style="color: #ff0000;">Disk boot sectors</span></li>
<li><span style="color: #ff0000;">Local Disk (C: )</span></li>
<li><span style="color: #ff0000;">Also any other drives (Removable that you may have)</span></li>
</ul>
</li>
<li>Then click on <>Actions</> on the left hand side</li>
<li>Click <>Select Action</>, then make sure both <>Disinfect</> and <>Delete if disinfection fails</> are ticked</li>
<li>Click on <>Automatic Scan</></li>
<li>Now click the <>Start Scanning</> button, to run the scan</li>
<li>After the scan is complete, click the reports button ('Paper icon', next to the 'Gear' icon) on the right hand side</li>
<li>Click <>Detected threats</> on the left</li>
<li>Now click the <>Save</> button, and save it as <>kaslog.txt</> to your <>Desktop</></li>
<li>Please attach kaslog.txt in your next reply.</li>
</ol>
<hr />
STEP 4: Run a scan with ESET Online Scanner
<ol>
<li>Download ESET Online Scanner utility.
<><a title="External link" href="http://download.eset.com/special/eos/esetsmartinstaller_enu.exe" rel="nofollow">ESET Online Scanner Download Link</a></> <em>(This link will automatically download ESET Online Scanner on your computer.)</em></li>
<li>Double click on the Eset installer program (esetsmartinstaller_enu.exe).</li>
<li>Check <>Yes, I accept the Terms of Use</></li>
<li>Click the <>Start</> button.</li>
<li>Check <>Scan archives</></li>
<li>Push the <>Start</> button.</li>
<li>ESET will then download updates for itself, install itself, and begin scanning your computer. Please be patient as this can take some time.</li>
<li>When the scan completes, push <>List of found threats</></li>
<li>Push <>Export to Text file </> and save the file to your desktop using a unique name, such as <>ESET Scan</>. Include the contents of this report in your next reply.Note - when ESET doesn't find any threats, no report will be created.</li>
<li>Push the <>back</> button.</li>
<li>Push <>Finish</></li>
</ol>
<hr />
STEP 5: Run Windows Repair All in One
<ol><li>Download the Windows Repair All in One utility from the below link.
<a title="External link" href="http://www.tweaking.com/content/page/windows_repair_all_in_one.html" rel="nofollow"><>WINDOWS REPAIR ALL IN ONE DOWNLOAD LINK</></a> <em>(This link will open a download page in a new window from where you can download Windows Repair All in One Portable version)</em></li>
<li>Double-click <>tweaking.com_windows_repair_aio.zip</> and extract the <>Tweaking.com - Windows Repair</> folder to your desktop.</li>
<li>Now open this folder and double-click <>Repair_Windows.exe</>.</li>
<li>Click the <>Start Repairs</> tab on the far right.</li>
<li>Click the <>Start</> button (bottom right)
Note: When asked if you would like to create a restore point. It is recommended just in-case something does not go as planned.</li>
<li>Click <>Unselect All</></li>
<li>Put a checkmark in the following items:
<ul>
<li>Repair Hosts File</li>
<li>Remove Temp Files</li>
<li>Remove Policies Set By Infections</li>
</ul>
Note: Leave everything else unchecked</li>
<li>Put a checkmark in <>Restart System When Finished</></li>
<li>Now click the <>Start</> button (bottom right)</li>
</ol>
<hr />
STEP 3:Run Malwarebytes StartupLite to remove unnecessary items at Windows startup
You have a lot of files loading at startup....lets make your computer a little faster..
<ol><li>Download StartUpLite and save it to a convenient location.
<a href="http://downloads.malwarebytes.org/file/startuplite"><>MALWAREBYTES STARTUPLITE DOWNLOAD LINK</></a> <em>(This link will open a new webpage from where you can download Malwarebytes StartUpLite)</em>
<li>Double click StartUpLite.exe and then select all options you would like executed and select continue.</li></ol>
<hr />
What's next?
Attach the following logs to your post (You can find here details on how to use the Attachment System):
1.RogueKiller logs
2.ESET log
3.Kaspersky log
4.aswMBR log
5.Let me know if you had any problems with the above instructions and also let me know how things are running now!
Last edited:
Wow! I thought we had the computer disinfected.
Is it more safe when you use these many tools? Is it the same viruses that keep poping up? I don't think so because these last ones were "trojan".
When I was running Kaspersky Virus Removal there seemed to be some interaction with McAfee. McAfee put up a couple of windows about removing a Trojan and Blocking a Potentially Unwanted Program. I then realized that I had McAfee real time scanning and Firewall both "on". Kaspersky seemed to finish ok with quarantining 2 trojans and deleting a third. Since Kaspersky took 1 hr 5 min to run, I thought I'd check with you before running it again. I did shut down McAfee real time scanning for the remaining programs.
Esetsmart found no threats, so there wasn't any log file.
With Malwarebytes startup lite I disabled 10 of the 12 apps. I only left a NuCpl Daemon and CtSysVol sound card controls with "no action"
So far I haven't noticed the start up process to be any quicker. But I'm still more concerned about BSOD's. I wonder if the number of objects on my desktop isn't slowing the machine. Adding the 10-12 virus checking software packages has made it even more congested.
Based on the logs, do you think the machine is clean now?
Attachments
- Jan 24, 2011
- 9,378
Kaspersky removed just some infections from your System Restore points, nothing really to worry about.......
As far all the tools that we've used, we will now remove them from your computer.
<hr/>
Unless you are having other problems, it is time to do the final steps.
<>Remove ComboFix</>
<ol>
<li>Hold down the <>Windows key</> + <>R</> on your keyboard. This will display the Run dialogue box</li>
<li>In the Run box, type in <>ComboFix /Uninstall</> <em>(Notice the space between the "x" and "/")</em> then click <>OK</> <a href="http://malwaretips.com/blogs/wp-content/uploads/2012/07/combofix-uninstall.png"><img class="alignnone size-full wp-image-4129" title="Uninstall Combofix" src="http://malwaretips.com/blogs/wp-content/uploads/2012/07/combofix-uninstall.png" alt="Combofix uninstall command" width="413" height="212" /></a></li>
<li>Follow the prompts on the screen</li>
<li>A message should appear confirming that ComboFix was uninstalled</li>
</ol>
<hr />
<>Remove the OTL utility</>
Run OTL and hit the <>CleanUp</> button. It will remove all the programs we have used plus itself.
Also,you can go to Add or Remove Programs section and remove any other programs that we have used.
</ul>
<hr />
<img src="http://users.telenet.be/bluepatchy/miekiemoes/images/javaicon.gif" alt="Posted Image" /> Your <>Java</> is out of date. Older versions have vulnerabilities that malware can use to infect your system. Please follow these steps to remove older version of <>Java</> components and upgrade the application. <></><>Upgrading Java</>:
<ul>
<li>Go to<a title="External link" href="http://java.com/en/" rel="nofollow external"> this site</a> and click <>Do I have Java</></li>
<li>It will check your current version and then offer to update to the latest version</li>
</ul>
<hr />
<>Clean your temporary files</>
<ol>
<li>You can download the TFC utility from the below link
<a title="External link" href="http://oldtimer.geekstogo.com/TFC.exe" rel="nofollow external"><>TFC DOWNLOAD LINK</></a> <em>(This link will automatically download Temp File Cleaner on your computer)</em></li>
<li>Please double-click <>TFC.exe</> to run it. (<>Note:</> If you are running on Vista or 7, right-click on the file and choose <>Run As Administrator</>).</li>
<li>It <>will close all programs</> when run, so make sure you have <>saved all your work</> before you begin.</li>
<li>Click the <>Start</> button to begin the process. Depending on how often you clean temp files, execution time should be anywhere from a few seconds to a minute or two. <>Let it run uninterrupted to completion</>.</li>
<li>Once it's finished it should <>reboot your machine</>. If it does not, please <>manually reboot the machine</> yourself to ensure a complete clean.</li>
</ol>
What's next?
1. I ly advise you,to start a thread in our Security Configuration Wizard forum, to build up your computer malware defenses.
2. It's good to know that the best way to prevent future infections is to know how to avoid them,so with this in mind I ly recommend that you read this article on how to avoid computer infections. > <a href="http://malwaretips.com/blogs/how-to-easily-avoid-pc-infections/">How to easily avoid PC infections</a>
Last edited:
I removed ComboFix and cleaned up OTL. I updated my Java to version 7 Update 5 and used TFC to free up about 40Mb in temp files.
I also posted a new thread in Security Config Wizard on what would be a recommended set of anti virus software.
There is one lingering question. My machine originally had a boot sector with these parameters,
multi(0)disk(0)rdisk(0)partition(2)\WINDOWS="Windows XP Media Center Edition" /noexecute=optin /fastdetect /usepmtimer
During reconfiguration I would up with a boot sector of,
multi(0)disk(0)rdisk(0)partition(2)\WINDOWS="Windows XP Media Center Edition2" /fastdetect
Will the loss of the 2 parameters be an issue for the machine?
- Jan 24, 2011
- 9,378
Can you please follow the below steps:
1.Go to Start > Run

2.Type MSCONFIG in the "Open:" box and then either press enter on your keyboard or click on the OK button.

3.Go to the Boot.ini tab and copy the content of this in here.
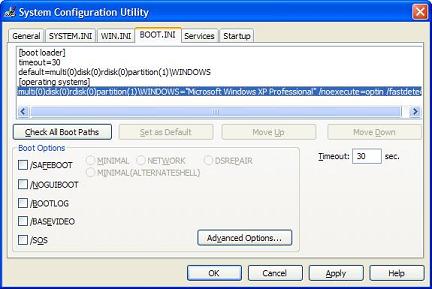
1.Go to Start > Run
2.Type MSCONFIG in the "Open:" box and then either press enter on your keyboard or click on the OK button.
3.Go to the Boot.ini tab and copy the content of this in here.
Sorry for the delay, there are some family matters happening that kept me away from the computer.
I was unclear what you wanted me to type in because the command line was truncated in the sceen shot.
Should I put in this entire line,
multi(0)disk(0)rdisk(0)partition(2)\WINDOWS="Windows XP Media Center Edition" /noexecute=optin /fastdetect /usepmtimer
when I recreate BOOT.INI?
Thanks.
I was unclear what you wanted me to type in because the command line was truncated in the sceen shot.
Should I put in this entire line,
multi(0)disk(0)rdisk(0)partition(2)\WINDOWS="Windows XP Media Center Edition" /noexecute=optin /fastdetect /usepmtimer
when I recreate BOOT.INI?
Thanks.
Similar threads
- Replies
- 2
- Views
- 318

- Replies
- 11
- Views
- 373

