- Apr 25, 2013
- 5,355
The days of burning operating system ISO images to a disc are long gone, today most PCs can boot from USB so it's just easier to update and more convenient to install Windows from a USB flash drive. Another good reason to install in this way is the installation speed, which is significantly faster than optical drive setup. Many modern devices do not come with an optical drive. Let's see how to transfer Windows 10 setup to a bootable USB stick. If you are running Windows 8 at this moment, then no third party software is required, but in Windows 7 you need some tool like 7-Zip archiver to extract the Windows 10 ISO file contents.
Warning! You will need to erase all data from the USB flash drive you use for this, so make a backup of the important data on it before you proceed.
You need to unpack the ISO file. In Windows 7, use the free and open source 7-zip archiver or install Virtual CloneDrive software which is also free. It creates a virtual drive which can mount ISO images and you can work with them like a regular DVD disk inserted in the physical DVD drive.
In Windows 8 and Windows 8.1, you don't need any third-party software to extract the ISO's contents to the USB flash drive: Windows 8 and Windows 8.1 have built-in support for ISO images. Simply double click the ISO to mount it; Windows 8 will create a virtual DVD drive inside the This PC folder. Then you can just copy and paste files from the virtual DVD drive to your USB stick.
Important Note: You cannot create a bootable 64-bit (x64) Windows 10 USB stick from a 32-bit (x86) edition of Windows. Use a 64-bit edition of Windows to create a 64-bit USB stick. However, you can create a USB drive with 32-bit (x86) edition of Windows from a 64-bit edition of Windows.
P.S. In fact, once you make the USB drive bootable by writing the boot sector, as long as you don't format the drive, you can simply erase all the files on it and copy newer files from an updated ISO to the same flash drive, and it will still boot. e.g. you can do it when Windows 10 will reach the RTM stage.
Source
Warning! You will need to erase all data from the USB flash drive you use for this, so make a backup of the important data on it before you proceed.
You need to unpack the ISO file. In Windows 7, use the free and open source 7-zip archiver or install Virtual CloneDrive software which is also free. It creates a virtual drive which can mount ISO images and you can work with them like a regular DVD disk inserted in the physical DVD drive.
In Windows 8 and Windows 8.1, you don't need any third-party software to extract the ISO's contents to the USB flash drive: Windows 8 and Windows 8.1 have built-in support for ISO images. Simply double click the ISO to mount it; Windows 8 will create a virtual DVD drive inside the This PC folder. Then you can just copy and paste files from the virtual DVD drive to your USB stick.
Important Note: You cannot create a bootable 64-bit (x64) Windows 10 USB stick from a 32-bit (x86) edition of Windows. Use a 64-bit edition of Windows to create a 64-bit USB stick. However, you can create a USB drive with 32-bit (x86) edition of Windows from a 64-bit edition of Windows.
- Download Windows 10 if you do not have it as described here: Windows 10 Technical Preview direct download links.
- Open an elevated command prompt
- Type the following:
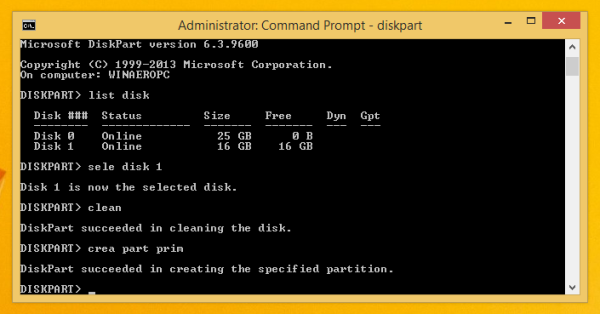
diskpart
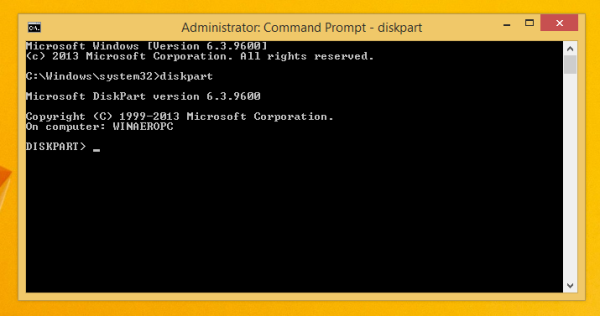
Diskpart is a console disk management utility which is shipped with Windows by default. It allows you to perform all disk management operations from the command line.
- Connect your USB stick.
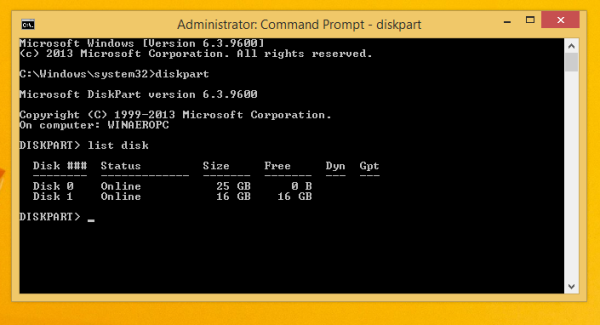
- Type the following in diskpart's prompt:
list disk
It will show a table with all your disks, including the currently connected USB stick. Note the number of the USB stick drive.
In my case, it is Disk 1
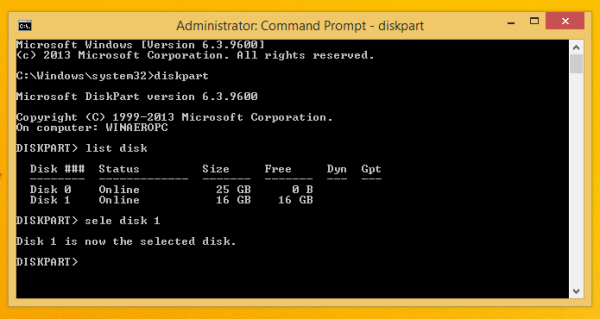
- Now, you need to select your USB disk in diskpart. Type the following:
sele disk #
Where # is the number of your USB stick drive. In my case, it is 1, so I have to use the following command:
sele disk 1
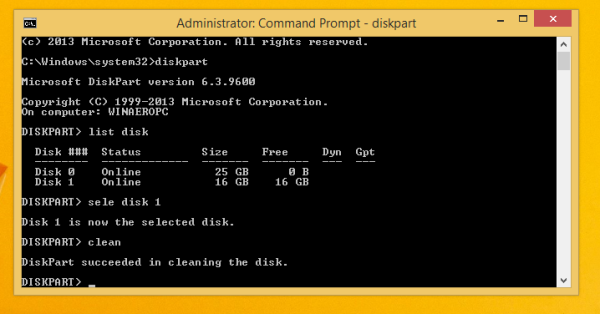
- Type the following command:
clean
This will erase all data from your USB drive.
Note: You can skip this step if you are an advanced user and know that your USB stick has a proper filesystem. If you are not sure, it is better to clean the partitions and data.
- Type the following command:
crea part prim
This will create a primary partition which will store your data.
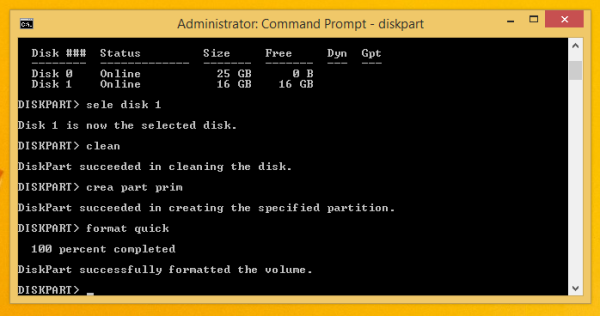
- Now you need to format the partition. Use the following command:
format quick
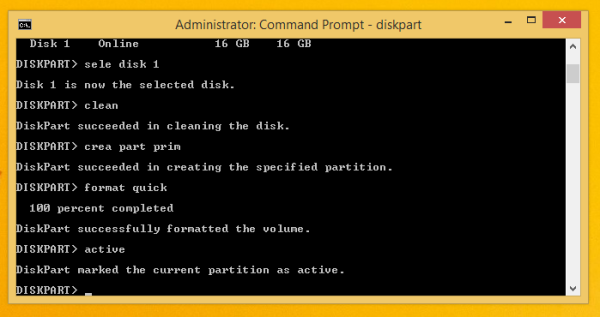
- Next, type the following command:
active
This is to allow your USB stick to be able to load some bootloader.
- Now your work in diskpart is finished. Type 'exit' to leave it. You will return to the elevated command prompt - do not close it.
- Double click the ISO image in Windows 8 to mount it, and copy all files from the Windows 10 ISO image to the USB stick. This will take a few minutes depending on the speed of your USB flash drive. On Windows 7, open the Windows 10 ISO with 7-Zip and extract all the files to the drive letter of your USB stick.
- The final part: you need to write a bootloader to your USB stick. Suppose your mounted ISO image has the drive letter, D: in the This PC/Computer folder, and your USB stick has the drive letter E:
Then you need to type the following command at the elevated command prompt:
D:\Boot\Bootsect /NT60 E: /force /mbr
This will write the NT6 boot sector to your USB stick. Replace the letters in my example with the appropriate letters in your OS.

P.S. In fact, once you make the USB drive bootable by writing the boot sector, as long as you don't format the drive, you can simply erase all the files on it and copy newer files from an updated ISO to the same flash drive, and it will still boot. e.g. you can do it when Windows 10 will reach the RTM stage.
Source
