
If Google Chrome has become slow, keeps crashing, or behaves abnormally, resetting it to the default settings can often fix the issue. A reset returns Chrome to its original factory state, removing custom settings, problematic extensions, and corrupted data that may be causing trouble. This simple step can quickly restore Chrome’s speed and stability.

When you reset Chrome, all installed extensions — including ad blockers, password managers, and other tools — are removed. Syncing is also temporarily disabled, so your bookmarks, history, and passwords stored in your Google account will disconnect until you sign back in. In addition, your startup page, homepage, and themes are reset to their default values.
Resetting Chrome also clears cookies and site data. This means your browsing history, cached files, and saved passwords will be deleted. You’ll need to re-enter login details and adjust site preferences after the reset. While this may seem inconvenient, it helps fix most browsing errors and improves performance.
On the plus side, clearing Chrome’s data removes old clutter, speeds up browsing, and enhances privacy by deleting tracking cookies. Resetting Chrome gives you a clean, fresh start, free of unwanted extensions, adware, or corrupted settings that can slow things down.
If Chrome is misbehaving or feels sluggish, performing a reset is a smart way to troubleshoot before reinstalling. Just make sure to back up your passwords or bookmarks if they’re not synced to your Google account.
What Happens When You Reset Google Chrome
Here’s what will be restored or removed when you reset Chrome to its default settings:
- Default search engines and saved engines are reset to the original defaults.
- The homepage button is hidden, and any custom URL you’ve set is removed.
- Startup tabs are cleared. Chrome will open with a new tab or continue where you left off (on Chromebooks).
- The New Tab page will return to blank unless an extension controls it, in which case it might remain.
- Pinned tabs are unpinned.
- Content settings are cleared and reset to their defaults.
- Cookies and site data are deleted.
- Extensions and themes are disabled.
How to Reset Chrome to Default Settings
Select your operating system below and follow the steps to reset Google Chrome to its factory settings.
Reset Google Chrome for Windows
Resetting Chrome on Windows restores your startup page, new tab page, search engine, and pinned tabs to their defaults. It also disables all extensions and clears temporary data such as cookies. Your bookmarks, saved passwords, and browsing history remain intact.
To reset Chrome for Windows, follow these steps:
Open the Chrome menu
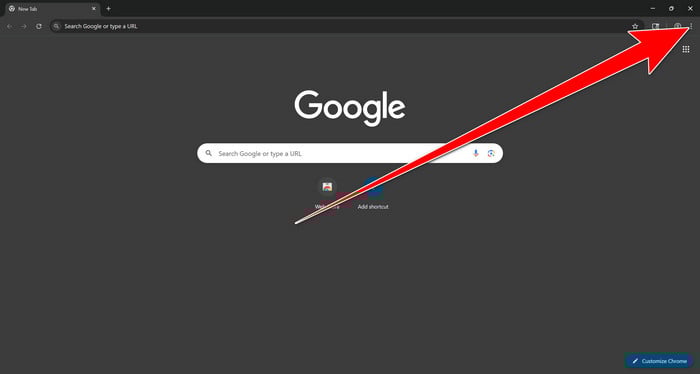
Open Google Chrome and click the three-dot (⋮) icon in the top-right corner.

Open Chrome Settings
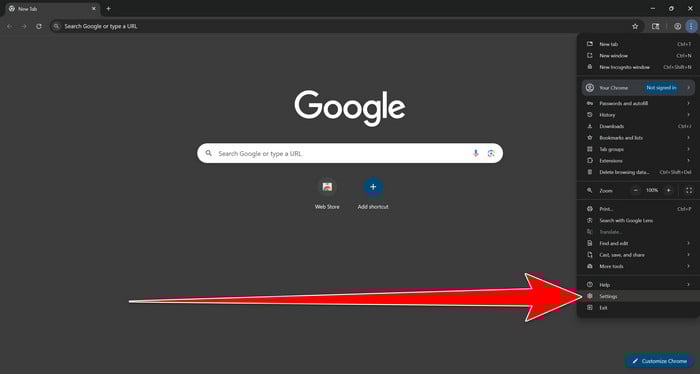
Select Settings from the Chrome menu.
Select “Reset settings”
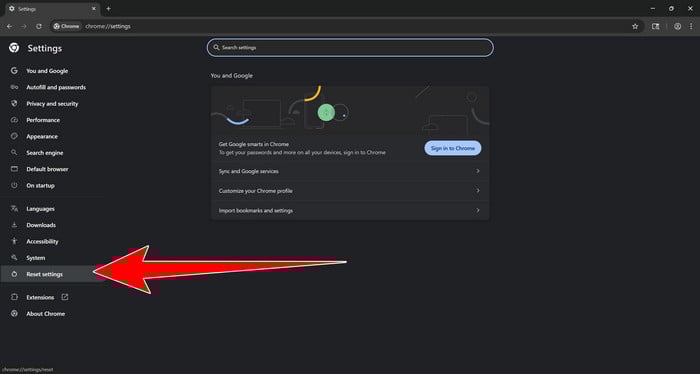
Look at the menu on the left side of the Settings page. Scroll down and click Reset settings.
Restore Chrome’s original settings
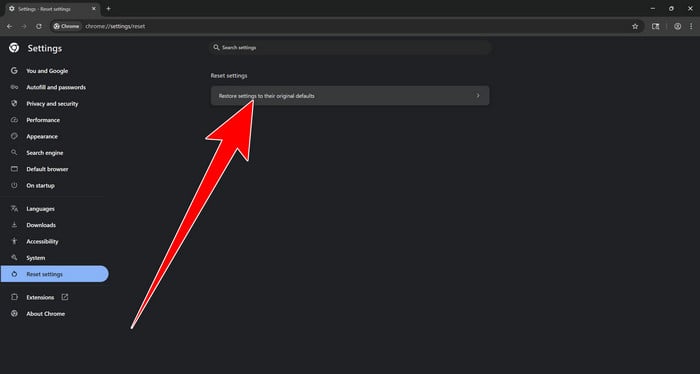
Click Restore settings to their original defaults.
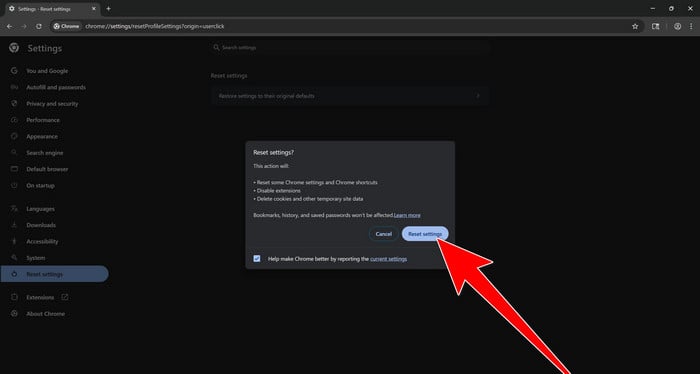
Confirm the Chrome reset
A confirmation window will appear. Click Reset settings.
This will:
- Restore the default search engine, homepage, and new tab page
- Reset startup pages and pinned tabs
- Disable installed extensions
- Clear temporary cookies and website data
Don’t worry: Chrome will not delete your bookmarks, browsing history, or saved passwords.
Restart Chrome and perform a test search. If your searches now open normally in Google, you can stop here.
If searches are still redirected through shady domains complete the additional step below.
Remove persistent search hijacker data
Only complete this step if the redirect continues after resetting Chrome.
Some browser hijackers hide inside Chrome’s local search-engine database. A standard Chrome reset may not remove this database, which is why searches can continue to pass through shady sites.
The following procedure creates a backup of the affected database and allows Chrome to build a new, clean version. This is safer and less disruptive than deleting the entire Chrome profile.
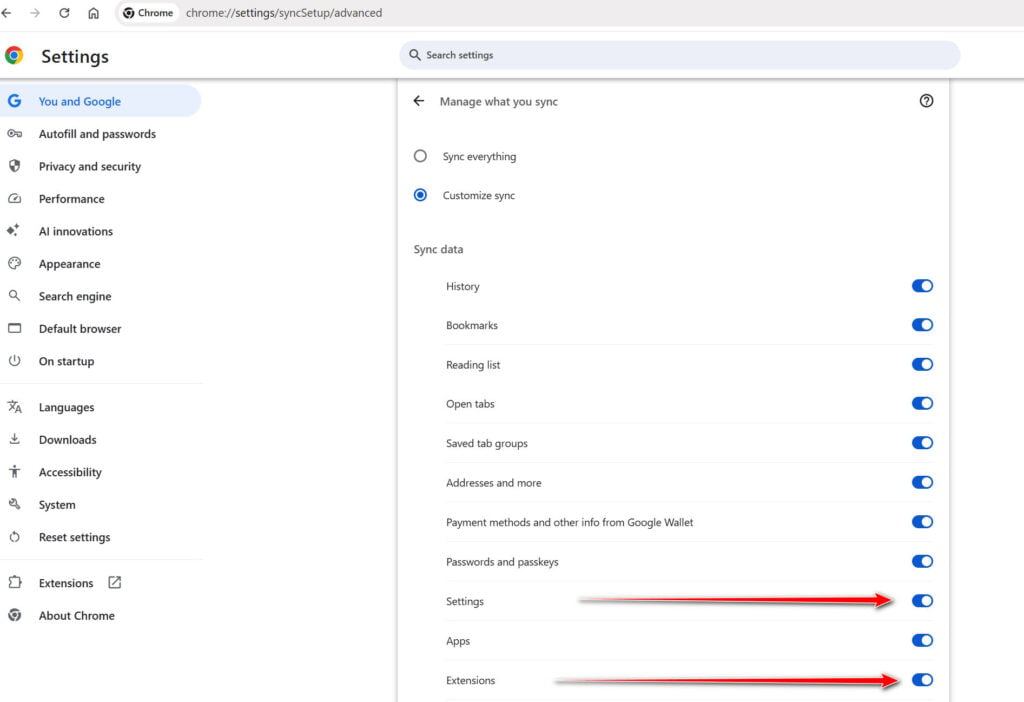
First, prevent Chrome Sync from restoring the hijacked settings:
- Open a new Chrome tab.
- Copy the following address, paste it into Chrome’s address bar, and press Enter:
chrome://settings/syncSetup/advanced - Under Manage what you sync, select Customize sync.
- Turn off Settings and Extensions.
- You can leave Bookmarks and Passwords enabled so your important data remains synchronized.
Note: Some newer Chrome versions may automatically redirect this address to the Google Account settings page. If that happens, locate the list of synchronized Chrome data and turn off Settings and Extensions there.
Now save anything you are working on and close every Chrome window.
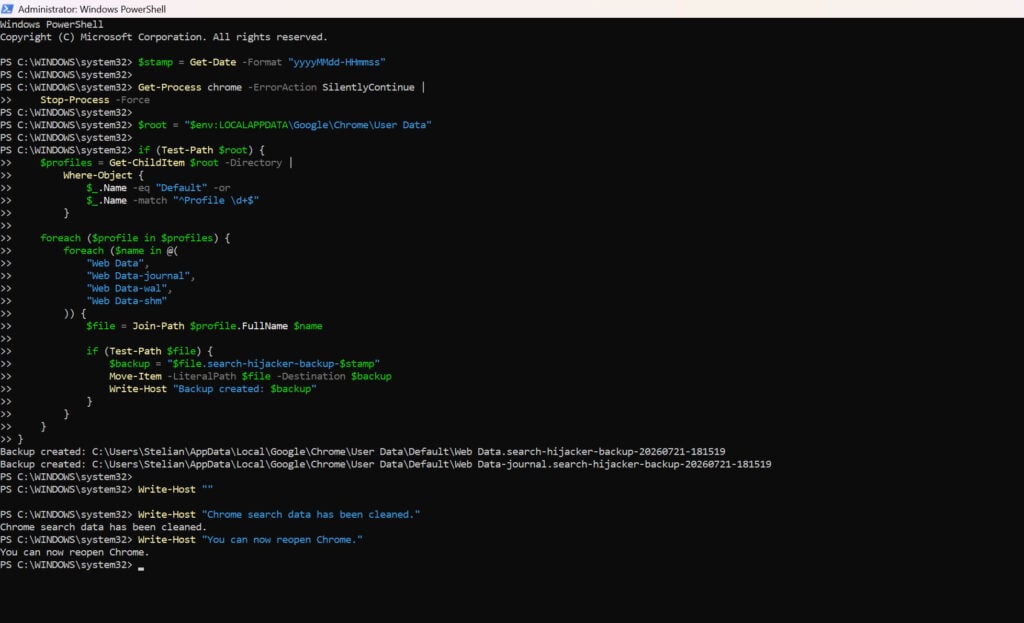
Run the cleanup command:
- Press the Windows key on your keyboard.
- Type PowerShell.
- Open Windows PowerShell. Administrator access is not required.
- Copy the entire command shown below.
- Right-click inside the PowerShell window to paste the command, then press Enter.
- If Windows warns you about pasting multiple lines, select the option to continue.
$stamp = Get-Date -Format "yyyyMMdd-HHmmss"

Get-Process chrome -ErrorAction SilentlyContinue |
 Stop-Process -Force

$root = "$env:LOCALAPPDATA\Google\Chrome\User Data"

if (Test-Path $root) {
 $profiles = Get-ChildItem $root -Directory |
 Where-Object {
 $_.Name -eq "Default" -or
 $_.Name -match "^Profile \d+$"
 }

 foreach ($profile in $profiles) {
 foreach ($name in @(
 "Web Data",
 "Web Data-journal",
 "Web Data-wal",
 "Web Data-shm"
 )) {
 $file = Join-Path $profile.FullName $name

 if (Test-Path $file) {
 $backup = "$file.search-hijacker-backup-$stamp"
 Move-Item -LiteralPath $file -Destination $backup
 Write-Host "Backup created: $backup"
 }
 }
 }
}

Write-Host ""
Write-Host "Chrome search data has been cleaned."
Write-Host "You can now reopen Chrome."
Wait until PowerShell displays the following message:
Chrome search data has been cleaned.
You can now reopen Chrome.
Close PowerShell and reopen Google Chrome. Chrome will automatically create a clean search database for every local profile.
Next, copy the following address, paste it into Chrome’s address bar, and press Enter:
chrome://settings/searchEnginesMake sure Google is selected as the default search engine. Test several searches from the address bar and confirm that they no longer pass through shady search engines.
Your important Chrome data is protected: the PowerShell cleanup does not remove bookmarks, saved passwords, browsing history, cookies, or installed extensions. However, it may reset locally stored Autofill addresses and form suggestions.
The original search database is not deleted. PowerShell renames it and adds
search-hijacker-backupto its filename so it can be recovered if necessary.Keep Settings and Extensions synchronization disabled while testing Chrome. Do not enable every extension at once. Enable only the extensions you recognize, one at a time, and test Chrome after each one.
If the redirect returns after enabling a particular extension, remove that extension immediately.
Reset Google Chrome for Mac
Resetting Chrome on macOS clears all custom configuration data, including homepage settings, form information, browsing history, and cookies. All installed extensions will be disabled, but your bookmarks will remain safe.
To reset Chrome for Mac, follow these steps:
-
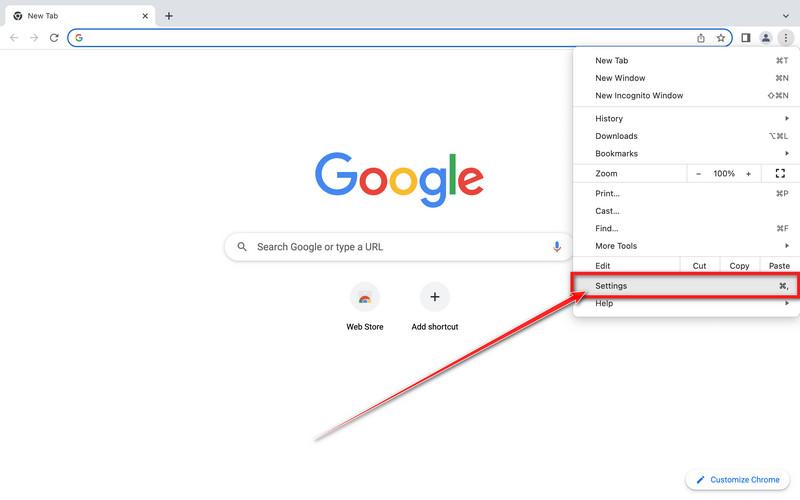
Click on the three dots at the top right and go to Settings.
Click on Chrome’s main menu button, represented by three dots at the top right corner. Now click on the menu option labeled Settings as shown by the arrow in the picture below, which will open the basic settings screen. -
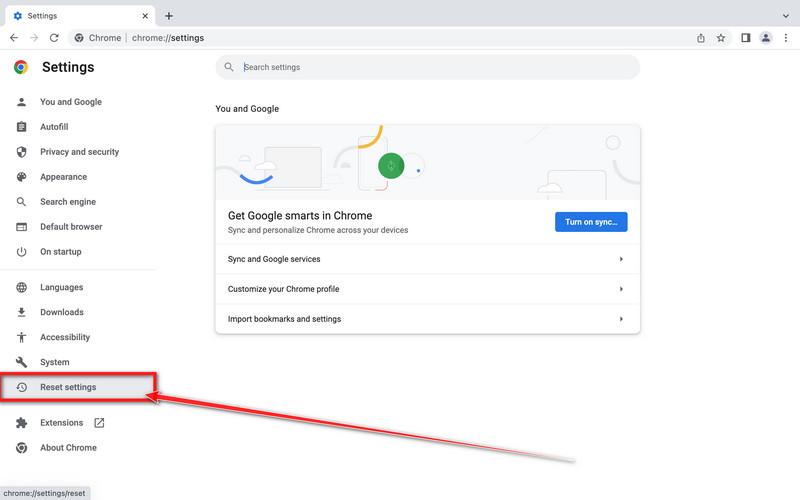
In the left sidebar, click on the “Reset and Cleanup” option.
In the left sidebar, click on “Reset and clean up“. -
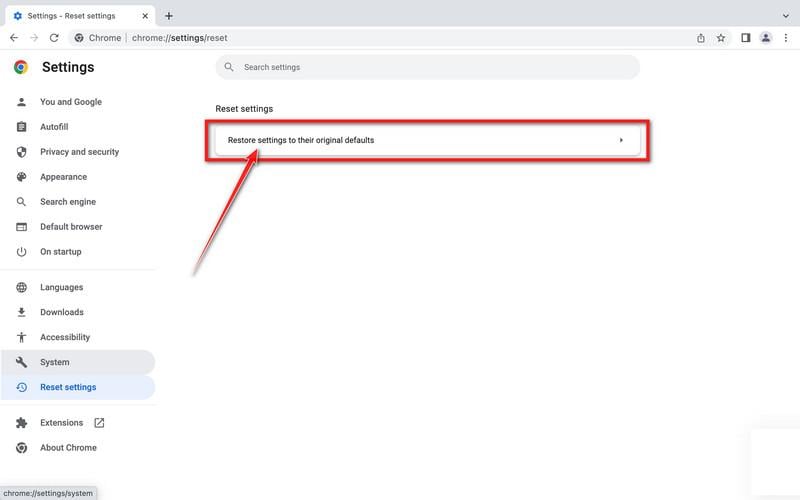
Click “Reset settings to their original defaults”.
Now click on the “Reset settings to their original defaults”. link as shown in the image below. -
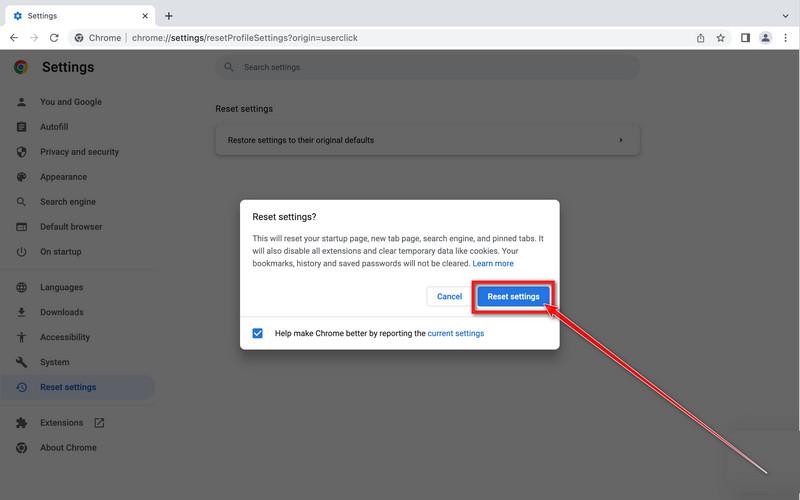
Click “Reset Settings” button.
A confirmation dialog should now be displayed, detailing the components that will be restored to their default state should you continue with the reset process. To complete the restoration process, click on the “Reset Settings” button. -
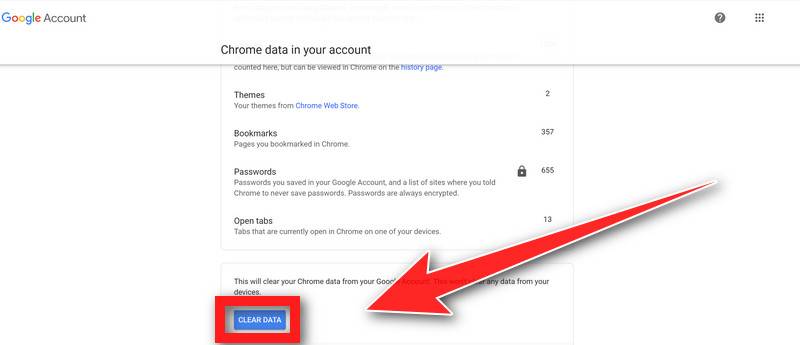
(Optional) Reset Chrome Data Sync.
In case a malicious extension reinstalls itself even after performing a browser reset, you have an additional option to reset the data sync for your browser. To do this, navigate to chrome.google.com/sync and click on the Clear Data button.
Reset Google Chrome for Android
Unlike the desktop version, Chrome for Android does not include a built-in reset option. However, you can restore it to default by clearing the app’s data. This removes cookies, cache, and site settings, giving you a fresh start.
To reset Chrome for Android, follow these steps:
-
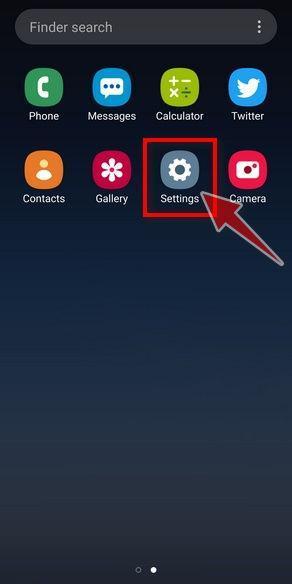
Open the “Settings” app.
Tap on the Settings app from your home screen or app drawer.
-
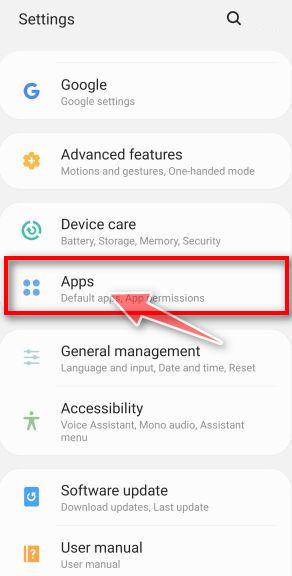
Tap on “Apps”.
In the Settings menu, tap Apps (or App Manager) to view all installed applications.
-
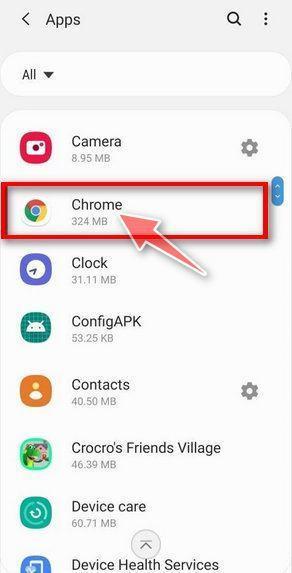
Find and tap on Chrome.
Scroll through the list until you find Chrome, then tap on it to open the app’s details.
-
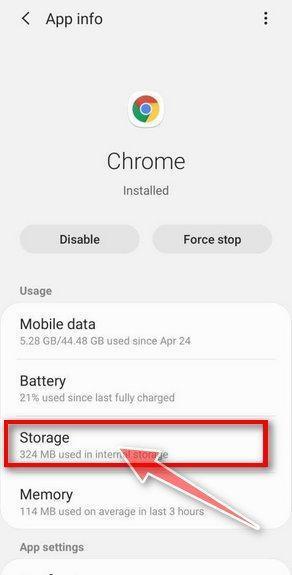
Tap “Storage”.
Once in the app info page, tap Storage.
-
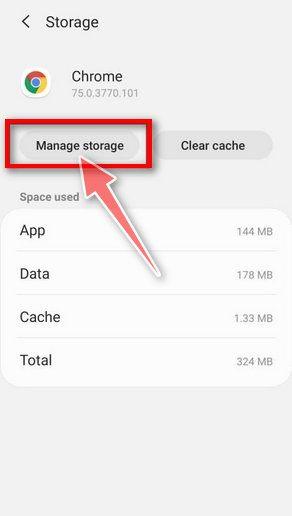
Tap “Manage Space”.
Under storage, tap Manage Space (or Manage Storage depending on your device).
-
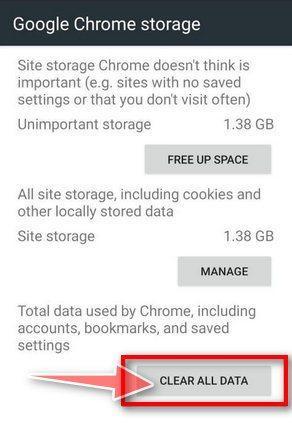
Tap “Clear all data”.
Tap Clear all data to delete Chrome’s data, including accounts, bookmarks, and settings.
-
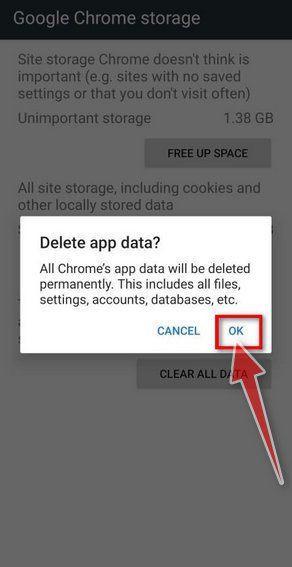
Confirm by tapping “OK”.
A confirmation screen will appear, explaining what will be deleted. Tap OK to complete the reset process.
That’s it — Google Chrome has been successfully reset to its default settings. To stay safe while browsing, we recommend installing an ad blocker like AdGuard [recommended] to block unwanted and malicious ads.
If Chrome still behaves abnormally after the reset, the problem may be caused by malware or malicious software on your device. Try the following:
- Run a system scan with Malwarebytes Free.
- Ask for expert help in our Malware Removal Help forum.