

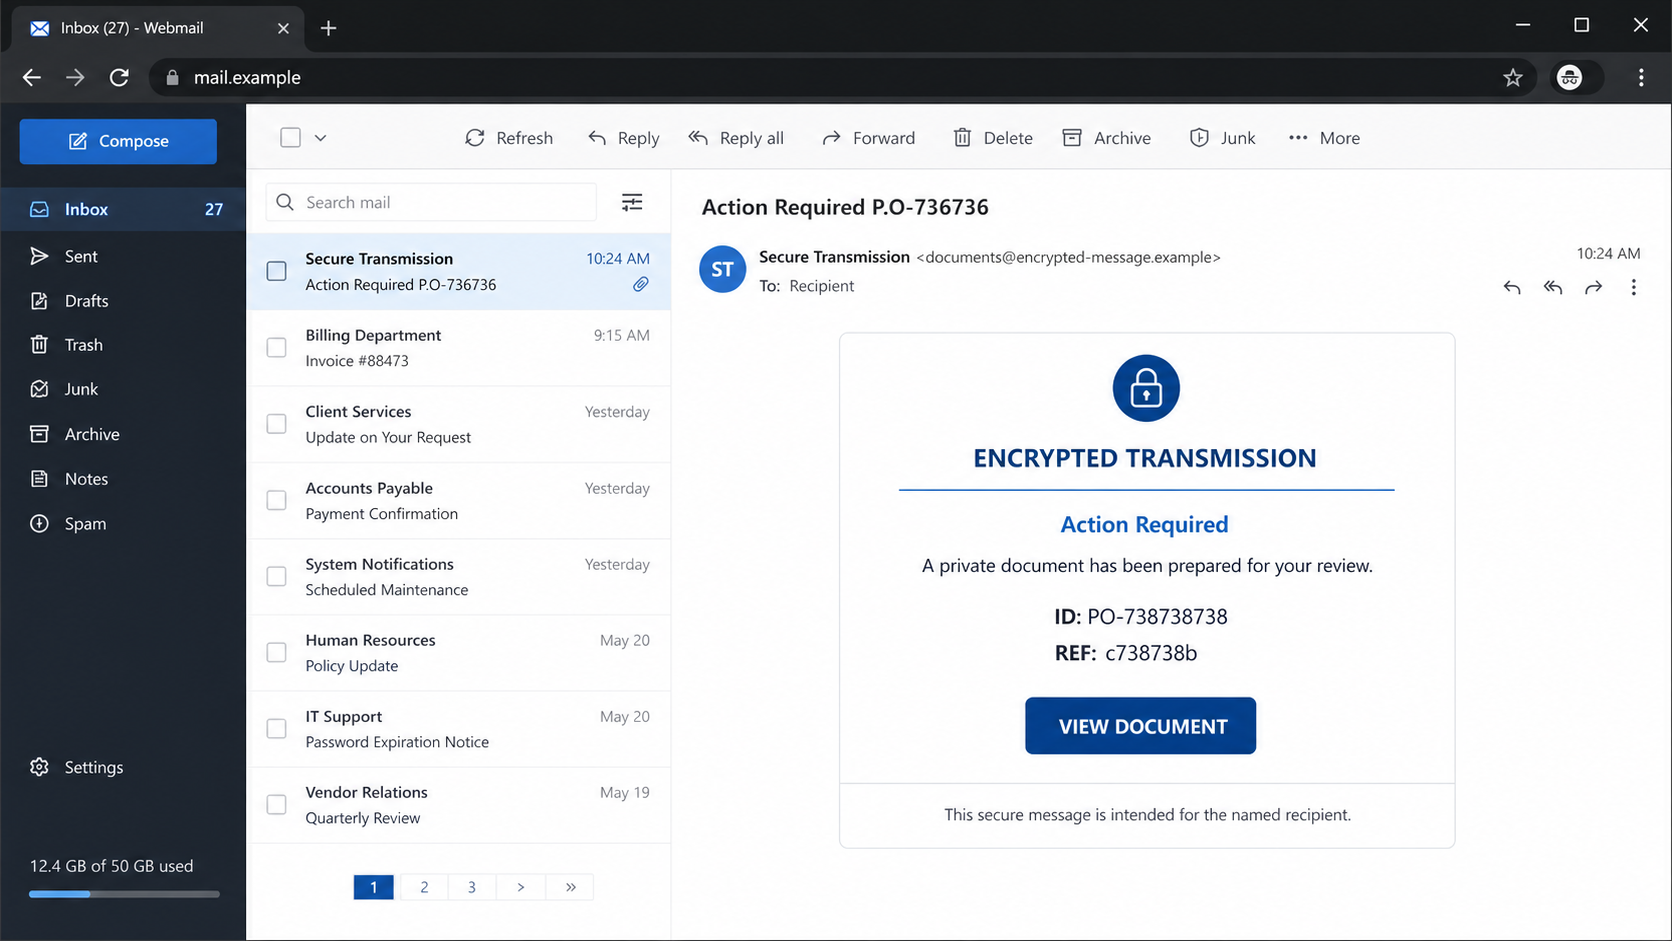
An “Encrypted Transmission” arrives with a purchase-order reference, a document ID, and one line saying a private document has been prepared for your review.
There is no sender name and no explanation of what the document contains. That missing context is intentional. Curiosity is expected to supply the click.
The Private Document Has Been Prepared email scam uses a fake secure-document notice to open a counterfeit webmail login and steal the recipient’s credentials.
Overview
The message makes an unknown document feel confidential
The email presents itself as an encrypted transmission requiring action. It displays an ID, reference code, and purchase-order-style number that look specific enough to belong to a real business process.
However, the message does not identify the sender, organization, project, contract, document title, or reason the recipient should have access. The metadata creates an appearance of precision without providing anything that can be verified.
The button labeled “View Document” is the only route to learning more. A recipient who handles invoices, contracts, orders, or legal files may click simply to determine whether the item is relevant.
The secure portal is actually a copied login page
The link leads to a phishing website designed to imitate webmail or a document-access portal. It may show the recipient’s email address and request the mailbox password to decrypt or view the file.
Real collaboration services sometimes require authentication, which gives the lure credibility. The difference is where that authentication happens. A legitimate service uses its documented domain or an organization’s established identity provider.
A random domain displaying a familiar mail logo is not a secure portal. The encryption wording describes the costume, not the connection to any genuine document.
The attackers want the inbox behind the document
No valuable private file needs to exist. The promised document is a pretext for collecting:
- The recipient’s full email address and password
- A one-time code or MFA approval
- Recovery information supplied during a follow-up
- Access to confidential conversations and attachments
- A trusted identity for business-email fraud
Once criminals control a business inbox, they can study actual projects and payment routines. Future fraud can then use real names, signatures, suppliers, and conversation history.
Why the Document Notification Is Not Trustworthy
The sender is the most important missing field
A legitimate confidential file should have an identifiable owner. Even automated notification systems state who shared the document, which organization hosts it, and often a recognizable document name.
This email may literally leave the “From” field empty inside the message body. A recipient cannot verify a private file when nobody claims responsibility for sending it.
Random reference codes do not authenticate anything
Numbers such as PO-738738738 and short reference strings can be generated automatically. They may resemble order records while having no connection to the recipient’s company.
Useful identifiers match an existing system, known project, vendor, or conversation. Unrecognized codes presented without context should increase caution, not trust.
Encryption claims are easy to print in an email
Words such as encrypted, private, protected, and secure are not proof. A criminal can place them in a heading, add a padlock icon, and serve the page over HTTPS.
Security depends on the real service, exact domain, access method, and relationship with the sender. Visual security symbols cannot establish those facts.
How the Private Document Has Been Prepared Email Scam Works
Step 1: The lure reaches employees who routinely receive files
Attackers target accounting, purchasing, sales, legal, human resources, and administrative inboxes because those teams open documents from outside organizations as part of normal work.
The campaign can also reach personal addresses. A vague private document may be mistaken for a tax record, medical notice, legal letter, employment form, or financial statement.
Step 2: A purchase-order-style subject earns attention
The subject may include “Action Required” and a PO number. This combination suggests both urgency and a business process already in motion.
Recipients may search their memory for the unknown order instead of asking why a legitimate partner failed to identify itself.
Step 3: Sparse content turns uncertainty into curiosity
The body says only that a private document is ready. It supplies codes but withholds the sender and topic, making the button appear necessary to resolve uncertainty.
This is a deliberate information gap. The email does not need to tell a convincing story if the recipient clicks to discover the story.
Step 4: The view button opens a remote phishing site
The destination may be hosted on a compromised site, disposable domain, or abused cloud platform. Redirects can hide the final address from basic email scanning.
The page may claim that authentication is required because the file is encrypted. In reality, it is collecting credentials, not decrypting a document.
Step 5: The portal copies webmail or a file-sharing service
Some versions imitate a generic Webmail login, while others borrow design cues from Microsoft, Google, or a document-signing platform. The targeted address may already appear in the form.
The exact domain remains decisive. Branding can be copied, and a prefilled address can be passed through the link. Neither proves that the service is genuine.
Step 6: The victim submits credentials to the attacker
The form records the email address and password. It may reject the first attempt and ask again, giving criminals another credential or confirming the spelling.
A later screen may request a one-time code. Supplying that code can let the attacker complete a real-time login before it expires.
Step 7: A blank file or redirect ends the performance
After collecting data, the site may show an error, display an irrelevant document, or redirect to a genuine mail homepage. The victim may blame a broken sharing link.
Because the original message never described the file, there is no clear expected result. That ambiguity helps the criminals hide failure.
Step 8: The inbox supports more credible document fraud
Attackers can search the mailbox for real contracts, order numbers, signature blocks, and partners. They may then send tailored files or payment requests within existing conversations.
A stolen mailbox can also reset accounts connected to the address, expose cloud links, and spread phishing to people who trust the victim.
How to Verify an Unexpected Private Document
Start with the sender. If a known person or company supposedly shared the file, contact them through a number, messaging channel, or email thread you already trust. Do not use contact details introduced by the suspicious message.
Open the official document service independently and check its activity or shared-items area. A legitimate invitation should often have a corresponding record there.
For business purchase orders, compare the reference with the organization’s procurement system. Ask whether the vendor, amount, project, and expected document match. An unexplained PO number is not evidence of a real order.
If the sender cannot be identified, the portal is on an unrelated domain, or no corresponding share exists, report the email and do not open its link.
Warning Signs in the Private Document Email
- No named sender, company, department, or document owner
- An unexplained purchase-order number unrelated to existing records
- Generic labels such as Encrypted Transmission and Action Required
- A private-document claim without a title, purpose, or recognizable project
- A button that leads outside the real document or identity provider
- A portal asking for an email password rather than using an established sign-in route
- A prefilled address used to create false familiarity
- An error or redirect after credentials are submitted
Secure Documents Do Not Eliminate the Need to Verify
Encryption protects information only when the communicating parties and keys are legitimate. A fraudulent email can claim encryption while sending the victim to an ordinary credential-collection form.
Businesses should use known collaboration platforms, restrict external sharing, and teach employees how invitations are normally delivered. Unexpected document requests can then be compared with a consistent process.
Organizations can also require phishing-resistant MFA, monitor unusual inbox rules, and provide a simple reporting button. These controls limit the damage when one recipient clicks.
Why Purchase-Order References Work So Well
Purchase orders move between employees, vendors, shipping teams, and accounts payable. A recipient may not recognize every number immediately, especially in a large organization where another department can begin a transaction.
The scam takes advantage of that normal uncertainty. An unexplained PO reference sounds like a record the recipient ought to know, creating concern that an important request was overlooked.
Real procurement records have context. The number should connect to a vendor, requester, amount, approval path, and delivery purpose. If those facts are absent from both the email and the internal system, the digits provide no reassurance.
Organizations can reduce this exposure by requiring external vendors to use a documented portal and by teaching employees where legitimate purchase-order notifications originate.
Credential Phishing Can Become Business Email Compromise
The initial email may look crude, but the stolen inbox gives criminals better material. They can learn how the victim greets colleagues, which signature is used, who approves payments, and when a vendor expects a response.
An attacker can monitor a real transaction and intervene shortly before payment. A message requesting a new bank account may then arrive from the correct mailbox inside the correct thread.
This is why companies should verify changes to payment instructions through a separate, known channel. Replying to the same email thread is not independent confirmation when the mailbox itself may be compromised.
Security teams should also search for newly created inbox rules, unusual downloads, and access to cloud documents. A document-themed phish may be the first stage of a much broader data and payment incident.
The Browser Address Bar Is Stronger Evidence Than Page Design
A phishing portal can reproduce logos, colors, icons, and form labels almost perfectly. It may even use the recipient’s organization name in a background image.
The attacker cannot legitimately move the provider’s real domain into the address bar. Users should read the registrable domain carefully, not merely look for a familiar word somewhere in a long address.
When the domain is unclear, close the page and open the service from a trusted bookmark. A genuine shared document should still be available through the official account or confirmed by the sender.
What to Do if You Have Fallen Victim to This Scam
- Close the page and use the official service. Do not revisit the email link. Open the provider or company portal through a trusted bookmark or manually entered address.
- Change the exposed password. Create a strong, unique replacement. Update every other account where the same or similar credential was used.
- Revoke access paths. Sign out unfamiliar sessions, remove unknown applications and app passwords, and check that recovery details still belong to you.
- Review the mailbox for persistence. Inspect forwarding rules, delegates, automatic replies, sent mail, trash, and filters that hide security alerts.
- Protect MFA. Reject login requests you did not initiate, generate fresh recovery codes, and adopt a passkey, security key, or authenticator where possible.
- Alert your organization. Security staff can block the domain, preserve message headers, revoke tokens, check other recipients, and investigate access logs.
- Contact the impersonated party independently. If a real vendor or colleague was named, warn them through an established channel. Do not continue the suspicious thread.
- Scan files or software that were opened. If the site delivered a download, Malwarebytes can inspect the device for malicious attachments, scripts, or installed threats.
- Block repeat malicious pages. AdGuard can reduce exposure to known phishing domains and harmful redirect chains, while careful domain checking remains essential.
- Report losses and preserve evidence. Save screenshots, headers, URLs, login alerts, and transaction records. Report identity or financial harm to the FTC and IC3.
Is Your Device Infected? Run a Free Malware Scan
Slow performance, constant pop-ups, or strange behavior? These are classic signs of a malware infection. The fastest way to find out is to scan your device with Malwarebytes Free — one of the most trusted malware removal tools available.
The free version detects and removes the most common threats, including:
- Adware — the cause of those annoying pop-ups
- Browser hijackers — unwanted redirects and changed homepages
- Trojans and spyware — hidden programs stealing your data
- Potentially unwanted programs (PUPs) — software you never asked for
👉 Select your device below — Windows, Mac, or Android — then follow the simple steps to download Malwarebytes, scan your system, and remove any threats it finds. The scan usually takes 5 to 20 minutes.
Run a Malware Scan with Malwarebytes for Windows
Malwarebytes is one of the most popular and trusted anti-malware tools for Windows — and it’s completely free for removing infections. It catches threats that many antivirus programs miss, including adware, browser hijackers, and trojans. Follow the steps below to scan and clean your PC in just a few minutes.
Download Malwarebytes
Click the button below to download the latest version of Malwarebytes for Windows from the official source. The free version is all you need — it will scan your computer and remove adware, browser hijackers, and other malicious software at no cost.
Download MalwarebytesOfficial installer for Windows 11 and 10. Your download starts right away.Want real-time protection? See Malwarebytes Premium Malwarebytes Free for WindowsScans and removes malware at no cost
-
Install Malwarebytes
When the download finishes, open your Downloads folder and double-click the MBSetup file. If Windows shows a User Account Control pop-up, click “Yes” to allow the installation.

Follow the On-Screen Prompts to Install Malwarebytes
The setup wizard will walk you through a few quick screens:
-
Choose where you’re installing the program — “Personal Computer” or “Work Computer” — then click Next.

-
Malwarebytes will now install on your device. This usually takes under a minute.

-
When installation is complete, the “Welcome to Malwarebytes” screen will open automatically.

-
On the final screen, click Open Malwarebytes to launch the program.

-
Enable “Scan for Rootkits”
Before scanning, turn on rootkit detection so Malwarebytes can find even the most hidden threats. Click the Settings gear icon on the left side of the screen.

In the settings menu, find “Scan for rootkits” and click the toggle so it turns blue.

Done? Click “Dashboard” in the left pane to return to the main screen.
Start the Scan
Click the blue Scan button. Malwarebytes will automatically update its virus database and start checking your computer for malware.

-
Wait for the Scan to Finish
The scan checks your entire system for browser hijackers and other malicious programs, so it can take 5 to 20 minutes depending on your computer. Feel free to do something else — just check back occasionally to see the progress.

-
Quarantine the Detected Threats
When the scan is done, you’ll see a list of everything Malwarebytes found — malware, adware, and potentially unwanted programs. Click the “Quarantine” button to remove all of them at once.

Malwarebytes will now remove the malicious files and registry entries and move them safely into quarantine.

-
Restart Your Computer
Some threats can only be fully removed after a reboot. If Malwarebytes asks you to restart, click Yes. Once you’re logged back in, Malwarebytes has finished removing the threats it found.

That’s it — your Windows PC is now clean of trojans, adware, and other malware, and should be back to running smoothly.
If you are still having problems with your computer after completing these instructions, then please follow one of the steps:
- Run a computer scan with ESET Online Scanner
- Ask for help in our Windows Malware Removal Help & Support forum.
Run a Malware Scan with Malwarebytes for Mac
Malwarebytes for Mac is a free on-demand scanner that removes the malware other security software tends to miss — adware, browser hijackers, and unwanted programs included. Cleaning an infected Mac with Malwarebytes has always been completely free, and it’s our go-to recommendation. Follow the steps below to scan and clean your Mac in just a few minutes.
-
Download Malwarebytes for Mac
Click the button below to download the latest version of Malwarebytes for Mac.
Download MalwarebytesOfficial installer for macOS. Your download starts right away.Want real-time protection? See Malwarebytes PremiumMalwarebytes Free for MacScans and removes malware at no cost -
Open the Malwarebytes setup file
When the download finishes, open your Downloads folder and double-click the setup file to begin the installation.

-
Follow the On-Screen Prompts to Install Malwarebytes
The Malwarebytes for Mac Installer will guide you through a few quick screens. Click “Continue” and keep following the prompts until the installation completes.



When the installation is complete, Malwarebytes opens to the Welcome to Malwarebytes screen. Click “Get started“.
-
Select “Personal Computer” or “Work Computer”
Malwarebytes will ask what type of computer you’re installing it on. Click either Personal Computer or Work Computer, whichever applies.

-
Start the Scan
Click the “Scan” button. Malwarebytes will automatically update its detection database and begin checking your Mac for malware.

-
Wait for the Scan to Finish
Malwarebytes will scan your Mac for adware, browser hijackers, and other malicious programs. This can take a few minutes, so feel free to do something else — just check back occasionally to see the progress.

-
Quarantine the Detected Threats
When the scan is done, you’ll see a list of everything Malwarebytes found. Click the “Quarantine” button to remove all the threats at once.

-
Restart Your Mac
Malwarebytes will now remove all the malicious files it found. Some threats can only be fully removed after a reboot — if Malwarebytes asks you to restart, allow it. Once you’re logged back in, your Mac is clean.

That’s it — your Mac is now free of adware, rogue browser extensions, and other potentially harmful software.
If you are still experiencing problems while trying to remove a malicious program from your computer, please ask for help in our Mac Malware Removal Help & Support forum.
Run a Malware Scan with Malwarebytes for Android
Malwarebytes for Android automatically detects and removes dangerous threats like malware and ransomware so you don’t have to worry about your most-used device being compromised. Aggressive detection of adware and potentially unwanted programs keeps your Android phone or tablet running smooth.
-
Download Malwarebytes for Android.
You can download Malwarebytes for Android by clicking the link below.
Get Malwarebytes for AndroidOpens Google Play in a new tab.Want real-time protection? See Malwarebytes Premium for AndroidMalwarebytes for AndroidScans your phone and removes malware at no cost -
Install Malwarebytes for Android on your phone.
In the Google Play Store, tap “Install” to install Malwarebytes for Android on your device.

When the installation process has finished, tap “Open” to begin using Malwarebytes for Android. You can also open Malwarebytes by tapping on its icon in your phone menu or home screen.

-
Follow the on-screen prompts to complete the setup process
When Malwarebytes will open, you will see the Malwarebytes Setup Wizard which will guide you through a series of permissions and other setup options.
This is the first of two screens that explain the difference between the Premium and Free versions. Swipe this screen to continue.
Tap on “Got it” to proceed to the next step.
Malwarebytes for Android will now ask for a set of permissions that are required to scan your device and protect it from malware. Tap on “Give permission” to continue.
Tap on “Allow” to permit Malwarebytes to access the files on your phone.
-
Update database and run a scan with Malwarebytes for Android
You will now be prompted to update the Malwarebytes database and run a full system scan.

Click on “Update database” to update the Malwarebytes for Android definitions to the latest version, then click on “Run full scan” to perform a system scan.

-
Wait for the Malwarebytes scan to complete.
Malwarebytes will now start scanning your phone for adware and other malicious apps. This process can take a few minutes, so we suggest you do something else and periodically check on the status of the scan to see when it is finished.

-
Click on “Remove Selected”.
When the scan has been completed, you will be presented with a screen showing the malware infections that Malwarebytes for Android has detected. To remove the malicious apps that Malwarebytes has found, tap on the “Remove Selected” button.

-
Restart your phone.
Malwarebytes for Android will now remove all the malicious apps that it has found. To complete the malware removal process, Malwarebytes may ask you to restart your device.
That’s it — your Android phone is now clean — no more malicious apps, adware, or browser redirects.
If you are still having problems with your phone after completing these instructions, then please follow one of the steps:
- Restore your phone to factory settings by going to Settings > General management > Reset > Factory data reset.
- Ask for help in our Mobile Malware Removal Help & Support forum.
Stay Protected: Block Ads and Malicious Sites
Now that your device is clean, keep it that way. Most infections start with a malicious ad or a fake download button — so blocking them at the source is your best defense.
We recommend AdGuard, which blocks malicious ads, phishing pages, and dangerous redirects before they can reach you.
👉 Download AdGuard and browse safely
Frequently Asked Questions
Is the document itself infected with malware?
This campaign primarily uses a link to steal login credentials. No real document may exist. Any separate download should still be treated as potentially unsafe and scanned.
Why does the email include a PO number?
A purchase-order number makes the lure feel business-related. Random digits cost attackers nothing. Verify the number inside the real procurement system before trusting it.
Can a legitimate secure portal ask me to sign in?
Yes, but authentication should occur on the documented service or organizational identity domain. Reach that service independently instead of through an unexpected link.
What if the email came from a known contact?
Their mailbox may be compromised or sender information may be spoofed. Confirm the share using a separate known channel before opening it.
I entered my password but saw no document. What happened?
The document was likely a pretext. Change the password immediately, revoke sessions, secure MFA, and inspect mailbox settings for unauthorized changes.
Should I delete the email immediately?
Report it first if your organization or provider has a reporting process. Security teams may need the original message and headers. Delete it after evidence is preserved.
The Bottom Line
The Private Document Has Been Prepared email scam uses confidentiality, unexplained reference codes, and curiosity to make an unknown file feel important. Its “View Document” button leads to a credential trap.
Verify the sender and document through an independent channel. If credentials were entered, secure the mailbox immediately and tell the organization before the stolen account can be used in a more convincing second attack.

Join the discussion
0 commentsShare your experience or ask a question about this article.
Discussion
Start the conversation
Have a question or something useful to share? Add the first comment.