

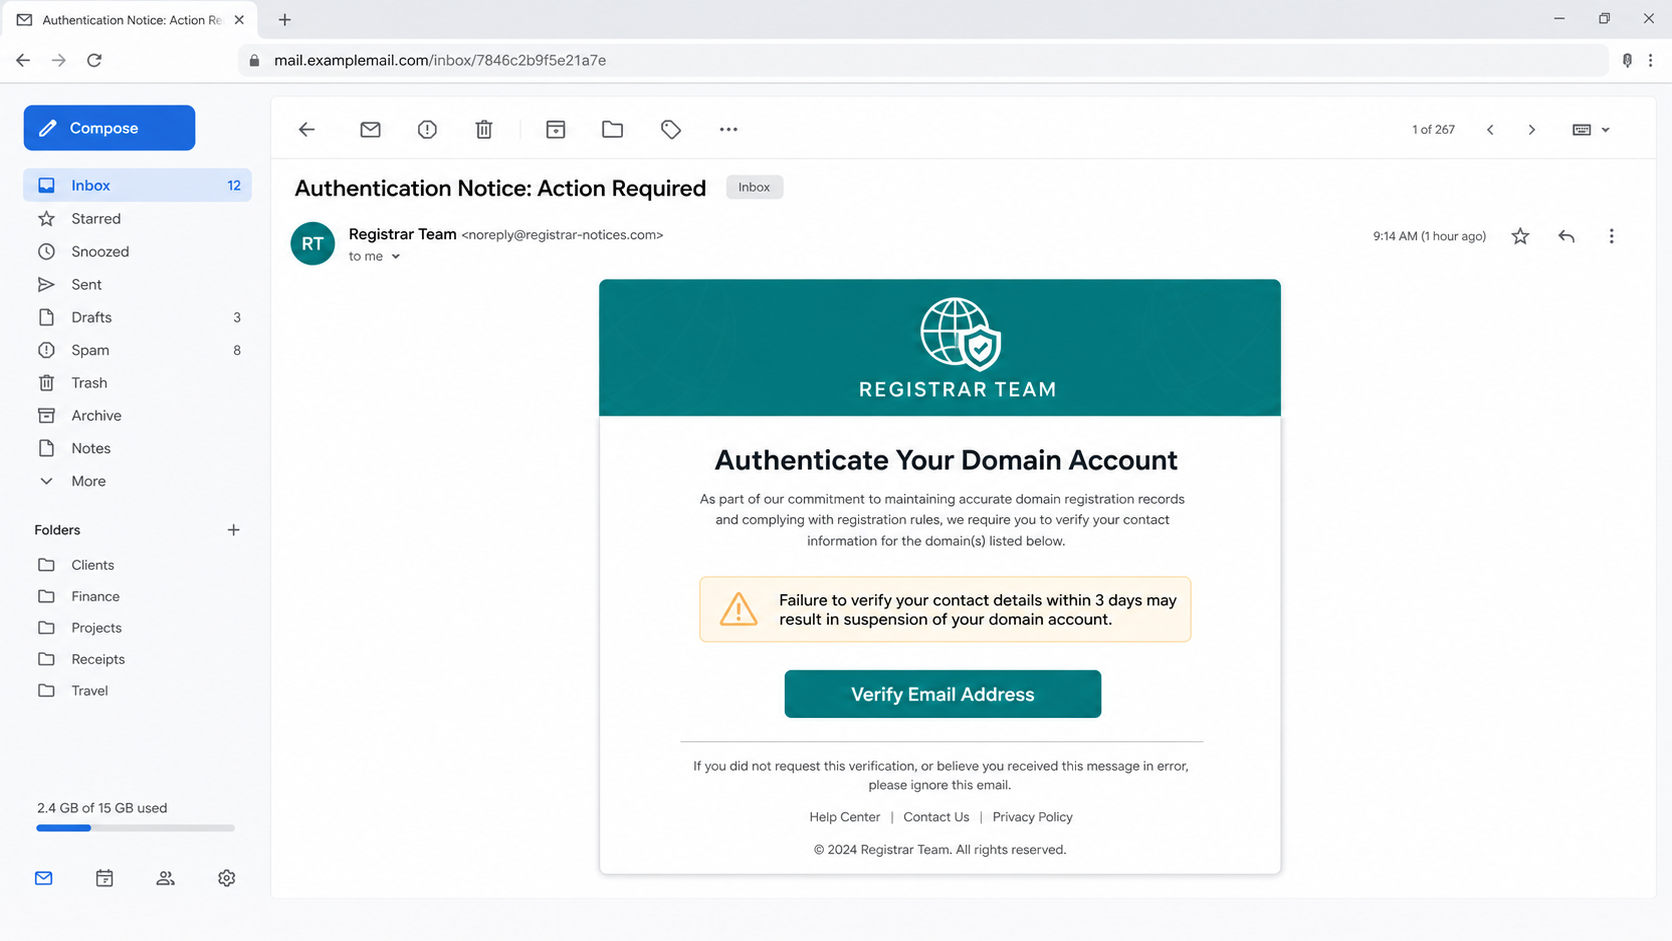
An alarming email says your domain contact email failed a required domain contact verification. You have three days to act, it warns, or your domain account may be suspended.
The subject line makes the situation sound even worse, claiming your domain access may be suspended because a contact verification is incomplete. The message offers one prominent button that supposedly fixes everything.
The warning is not a real maintenance notice. The Authenticate Your Domain Account email scam is a credential-stealing trap built to turn fear of losing an inbox into a rushed login on a fraudulent page.
Overview
The email invents a mandatory three-day deadline
The message presents itself as a notice from a technical support team. It claims the recipient has not completed a required verification and update process connected with routine security maintenance.
Several consequences are listed to make the threat feel official. The recipient may supposedly lose the ability to send or receive messages, have domain service suspended, and eventually lose the account permanently.
A blue button labeled “VERIFY EMAIL ADDRESS” is positioned as the only way to prevent deletion. The email then repeats that the action is irreversible and says saved messages cannot be restored.
The subject and body tell two unrelated stories
The subject claims the domain contact must be authenticated under registration rules. The body says nothing meaningful about a registrar, registered domain, contact record, or verification event. It switches to an account-verification story instead.
That mismatch is an important clue. Large spam campaigns are assembled from reusable templates, and attackers sometimes combine a subject from one lure with the body of another.
A genuine provider would identify the affected service, explain the actual account event, and direct the customer to a familiar account dashboard. It would not threaten to suspend an unspecified domain through a generic link.
The real target is your email password
The update button does not perform maintenance. In the campaign examined, it opened a phishing site that displayed a fake sign-in form. The page could imitate Gmail or another provider based on information embedded in the link.
The criminals are trying to collect:
- The recipient’s complete email address
- The current domain-linked email account password
- Any one-time code requested during a follow-up attempt
- Recovery information revealed during conversation
- Access to messages, contacts, files, and connected accounts
Google and legitimate email providers are not connected with this campaign. Their names and familiar sign-in designs are copied because recognition can make a fraudulent form feel safe.
Why This Verification Warning Is Not Legitimate
A provider does not need your password to perform maintenance
Mail servers are updated by administrators on the service side. Customers may occasionally be asked to review new terms or security settings, but they do not need to submit a password to an unrelated website so a provider can maintain its systems.
If an account setting truly needs attention, the safe route is to open the provider’s known app or type its official address into the browser. The alert should also appear inside the authenticated account.
The threat is vague where a real notice would be precise
The email does not name a subscription, invoice, failed charge, device, provider, account plan, or support case. It uses broad phrases such as “routine security maintenance” and “Technical Support Team.”
That vagueness lets one template target many domains. A recipient mentally fills in the missing service name, while the attacker avoids writing details that could be checked.
The deletion threat is designed to prevent verification
Losing years of messages, photos, receipts, and contacts would be painful. The scam uses that fear to keep the recipient from asking an administrator or visiting the real provider independently.
Three days sounds like a formal compliance window, but the unusually short threat is meant to create immediate emotional pressure. The safest response is to stop and verify through a separate channel.
How the Authenticate Your Domain Account Email Scam Works
Step 1: The campaign reaches a personal or business inbox
Attackers distribute the same message to large address lists collected from breaches, public company pages, newsletters, or earlier phishing operations. Some versions insert the recipient’s address to create basic personalization.
Receiving the message does not prove that a device was hacked or that the criminals know the domain-linked email account password. In many cases, the address is the only accurate information they possess.
Step 2: A frightening subject line earns the first click
The subject says domain authentication is required and access may be suspended. It combines compliance, security, and urgency to make the recipient act before checking the registrar.
The contradiction with the body is not always noticed. People often scan messages quickly on a phone, especially when the subject suggests an immediate danger.
Step 3: The body threatens domain suspension
The email shifts to a mandatory account-update story. A short list predicts blocked mail, suspended service, and permanent deletion if the recipient refuses to comply.
This sequence escalates the cost of doing nothing. The criminal wants the victim to see the button as a rescue action instead of an unverified external link.
Step 4: The update button opens an attacker-controlled site
The visible label does not reveal the destination. In the observed campaign, the linked site was not operated by an email provider. A padlock icon or HTTPS connection would only mean that traffic to that site is encrypted, not that the site is honest.
On a computer, hovering over the button may reveal a mismatched domain. On a phone, pressing and holding the link can sometimes show a preview, but the safest choice is not to interact with it at all.
Step 5: The page copies a familiar login screen
The phishing page can display a Gmail-style form or another webmail design. It may place the fake form over a familiar-looking background and prefill the email address passed through the link.
Prefilling is not proof that the page recognizes a real account. It simply reflects information already included in the URL or entered by the attacker when the message was prepared.
Step 6: Submitted credentials are sent to the criminals
When the victim enters a password, the form transmits it to infrastructure controlled by the campaign. It does not update the domain-linked email account, verify anything, or communicate securely with the real provider.
The page may display an error and request the password again. That can help attackers capture a second password when the victim assumes the first entry was mistyped.
Step 7: Attackers test the password and pursue additional access
Stolen credentials can be tested quickly against the real domain-linked email account. If the account uses multi-factor authentication, the victim may receive an unexpected approval request or a follow-up message asking for a one-time code.
Criminals may also try the same email and password on shopping, cloud-storage, social-media, and financial accounts. Password reuse turns one phishing submission into several potential compromises.
Step 8: The compromised inbox supports more fraud
Once inside, an attacker can search for invoices, password-reset messages, identity documents, private attachments, and valuable contacts. Rules may be created to hide security alerts or silently forward incoming mail.
A business inbox can be used to impersonate an employee, alter payment instructions, or send convincing requests from a trusted address. A personal account can become the recovery route for nearly every service tied to it.
What Criminals Can Do With a Stolen Mailbox
Reset passwords on connected services
Email is commonly the recovery channel for other accounts. An intruder can request resets, intercept the links, change the passwords, and delete the evidence before the owner notices.
Read sensitive conversations and attachments
Receipts, medical correspondence, contracts, tax files, travel plans, and scans of identity documents may all sit in an inbox. Even old messages can help build persuasive identity theft or impersonation attempts.
Target people who already trust the victim
Messages sent from a real compromised account can bypass a recipient’s normal skepticism. Attackers can study writing style and active conversations before requesting money, files, or login details.
Hide the compromise through domain-linked email account rules
Forwarding rules, filters, delegated access, recovery addresses, and app passwords can preserve access after the main password changes. That is why recovery requires reviewing settings, not only choosing a new password.
How the Fake Login Can Change for Each Recipient
The email address can select the copied provider
A phishing link may contain the recipient’s full address or domain. The landing page can read that value and display a Gmail-like, Outlook-like, or generic hosted-webmail screen that seems appropriate for the visitor.
This adaptation requires no access to the real account. It is a simple presentation rule inside the attacker’s page.
Logos and backgrounds can be loaded from public files
Brand artwork, browser icons, and sign-in layouts are publicly visible and easy to copy. A page can also embed remote images from legitimate websites, allowing it to look current without being hosted by the brand.
Trust the complete domain and the way you reached it, not the artwork inside the page. An accurate logo is not a security certificate.
The page may collect more than one credential
Some kits first request an email password, then display a second page for a telephone number, recovery address, or one-time code. Others claim the first password failed so victims will enter an alternate credential.
Stop when an unexpected workflow keeps adding verification requests. Open a fresh browser tab and inspect the real account separately before supplying any additional information.
Warning Signs to Check Before Clicking
- The message invokes registration rules but does not identify the registrar or registered domain.
- No registrar, domain name, registration date, or support case is identified.
- The greeting is generic and the sender calls itself a technical support team.
- The message threatens irreversible deletion through a single button.
- The linked domain is unrelated to the email service being imitated.
- The page asks for a password before explaining the supposed account issue.
- The recipient is discouraged from using a normal app or known account portal.
A professional layout does not cancel these warning signs. Email templates and copied login designs are easy to reproduce, while sender names and link labels can be changed without controlling the brand they display.
What to Do if You Have Fallen Victim to This Scam
- Close the phishing page and stop interacting with the message. Do not submit the form again, reply to the sender, or approve unexpected sign-in prompts. Keep the email temporarily if your provider or employer needs it for investigation.
- Change the domain-linked email account password from a trusted device. Open the real provider through its official app or a manually typed address. Choose a long, unique password that is not used anywhere else.
- Change reused passwords immediately. Prioritize financial, shopping, cloud, social-media, workplace, and password-manager accounts. A password manager can help generate different credentials for every service.
- Review sessions and security settings. Sign out unfamiliar devices, revoke unknown applications, inspect recovery phone numbers and addresses, and remove forwarding rules, filters, delegates, or app passwords you did not create.
- Enable multi-factor authentication. Prefer an authenticator app, passkey, or physical security key when available. Never give an unsolicited caller or message a one-time code.
- Notify the appropriate support team. For a work account, contact IT or security promptly because other employees may be targeted. Report the phishing message through the provider’s official reporting function.
- Scan the device if you downloaded or opened anything. Entering a password on a webpage does not automatically install malware, but downloads and unexpected attachments add risk. Malwarebytes can perform a full scan and remove detected threats.
- Reduce exposure to repeat attacks. AdGuard can block many known malicious pages, deceptive ads, and tracking requests before they load. It is an additional safeguard, not a replacement for checking the sender and destination.
- Watch for follow-up fraud. Review sent mail, deleted items, account alerts, financial activity, and password-reset notices. Ignore anyone who promises guaranteed account recovery for an upfront payment.
Is Your Device Infected? Run a Free Malware Scan
Slow performance, constant pop-ups, or strange behavior? These are classic signs of a malware infection. The fastest way to find out is to scan your device with Malwarebytes Free — one of the most trusted malware removal tools available.
The free version detects and removes the most common threats, including:
- Adware — the cause of those annoying pop-ups
- Browser hijackers — unwanted redirects and changed homepages
- Trojans and spyware — hidden programs stealing your data
- Potentially unwanted programs (PUPs) — software you never asked for
👉 Select your device below — Windows, Mac, or Android — then follow the simple steps to download Malwarebytes, scan your system, and remove any threats it finds. The scan usually takes 5 to 20 minutes.
Run a Malware Scan with Malwarebytes for Windows
Malwarebytes is one of the most popular and trusted anti-malware tools for Windows — and it’s completely free for removing infections. It catches threats that many antivirus programs miss, including adware, browser hijackers, and trojans. Follow the steps below to scan and clean your PC in just a few minutes.
Download Malwarebytes
Click the button below to download the latest version of Malwarebytes for Windows from the official source. The free version is all you need — it will scan your computer and remove adware, browser hijackers, and other malicious software at no cost.
Download MalwarebytesOfficial installer for Windows 11 and 10. Your download starts right away.Want real-time protection? See Malwarebytes Premium Malwarebytes Free for WindowsScans and removes malware at no cost
-
Install Malwarebytes
When the download finishes, open your Downloads folder and double-click the MBSetup file. If Windows shows a User Account Control pop-up, click “Yes” to allow the installation.

Follow the On-Screen Prompts to Install Malwarebytes
The setup wizard will walk you through a few quick screens:
-
Choose where you’re installing the program — “Personal Computer” or “Work Computer” — then click Next.

-
Malwarebytes will now install on your device. This usually takes under a minute.

-
When installation is complete, the “Welcome to Malwarebytes” screen will open automatically.

-
On the final screen, click Open Malwarebytes to launch the program.

-
Enable “Scan for Rootkits”
Before scanning, turn on rootkit detection so Malwarebytes can find even the most hidden threats. Click the Settings gear icon on the left side of the screen.

In the settings menu, find “Scan for rootkits” and click the toggle so it turns blue.

Done? Click “Dashboard” in the left pane to return to the main screen.
Start the Scan
Click the blue Scan button. Malwarebytes will automatically update its virus database and start checking your computer for malware.

-
Wait for the Scan to Finish
The scan checks your entire system for browser hijackers and other malicious programs, so it can take 5 to 20 minutes depending on your computer. Feel free to do something else — just check back occasionally to see the progress.

-
Quarantine the Detected Threats
When the scan is done, you’ll see a list of everything Malwarebytes found — malware, adware, and potentially unwanted programs. Click the “Quarantine” button to remove all of them at once.

Malwarebytes will now remove the malicious files and registry entries and move them safely into quarantine.

-
Restart Your Computer
Some threats can only be fully removed after a reboot. If Malwarebytes asks you to restart, click Yes. Once you’re logged back in, Malwarebytes has finished removing the threats it found.

That’s it — your Windows PC is now clean of trojans, adware, and other malware, and should be back to running smoothly.
If you are still having problems with your computer after completing these instructions, then please follow one of the steps:
- Run a computer scan with ESET Online Scanner
- Ask for help in our Windows Malware Removal Help & Support forum.
Run a Malware Scan with Malwarebytes for Mac
Malwarebytes for Mac is a free on-demand scanner that removes the malware other security software tends to miss — adware, browser hijackers, and unwanted programs included. Cleaning an infected Mac with Malwarebytes has always been completely free, and it’s our go-to recommendation. Follow the steps below to scan and clean your Mac in just a few minutes.
-
Download Malwarebytes for Mac
Click the button below to download the latest version of Malwarebytes for Mac.
Download MalwarebytesOfficial installer for macOS. Your download starts right away.Want real-time protection? See Malwarebytes PremiumMalwarebytes Free for MacScans and removes malware at no cost -
Open the Malwarebytes setup file
When the download finishes, open your Downloads folder and double-click the setup file to begin the installation.

-
Follow the On-Screen Prompts to Install Malwarebytes
The Malwarebytes for Mac Installer will guide you through a few quick screens. Click “Continue” and keep following the prompts until the installation completes.



When the installation is complete, Malwarebytes opens to the Welcome to Malwarebytes screen. Click “Get started“.
-
Select “Personal Computer” or “Work Computer”
Malwarebytes will ask what type of computer you’re installing it on. Click either Personal Computer or Work Computer, whichever applies.

-
Start the Scan
Click the “Scan” button. Malwarebytes will automatically update its detection database and begin checking your Mac for malware.

-
Wait for the Scan to Finish
Malwarebytes will scan your Mac for adware, browser hijackers, and other malicious programs. This can take a few minutes, so feel free to do something else — just check back occasionally to see the progress.

-
Quarantine the Detected Threats
When the scan is done, you’ll see a list of everything Malwarebytes found. Click the “Quarantine” button to remove all the threats at once.

-
Restart Your Mac
Malwarebytes will now remove all the malicious files it found. Some threats can only be fully removed after a reboot — if Malwarebytes asks you to restart, allow it. Once you’re logged back in, your Mac is clean.

That’s it — your Mac is now free of adware, rogue browser extensions, and other potentially harmful software.
If you are still experiencing problems while trying to remove a malicious program from your computer, please ask for help in our Mac Malware Removal Help & Support forum.
Run a Malware Scan with Malwarebytes for Android
Malwarebytes for Android automatically detects and removes dangerous threats like malware and ransomware so you don’t have to worry about your most-used device being compromised. Aggressive detection of adware and potentially unwanted programs keeps your Android phone or tablet running smooth.
-
Download Malwarebytes for Android.
You can download Malwarebytes for Android by clicking the link below.
Get Malwarebytes for AndroidOpens Google Play in a new tab.Want real-time protection? See Malwarebytes Premium for AndroidMalwarebytes for AndroidScans your phone and removes malware at no cost -
Install Malwarebytes for Android on your phone.
In the Google Play Store, tap “Install” to install Malwarebytes for Android on your device.

When the installation process has finished, tap “Open” to begin using Malwarebytes for Android. You can also open Malwarebytes by tapping on its icon in your phone menu or home screen.

-
Follow the on-screen prompts to complete the setup process
When Malwarebytes will open, you will see the Malwarebytes Setup Wizard which will guide you through a series of permissions and other setup options.
This is the first of two screens that explain the difference between the Premium and Free versions. Swipe this screen to continue.
Tap on “Got it” to proceed to the next step.
Malwarebytes for Android will now ask for a set of permissions that are required to scan your device and protect it from malware. Tap on “Give permission” to continue.
Tap on “Allow” to permit Malwarebytes to access the files on your phone.
-
Update database and run a scan with Malwarebytes for Android
You will now be prompted to update the Malwarebytes database and run a full system scan.

Click on “Update database” to update the Malwarebytes for Android definitions to the latest version, then click on “Run full scan” to perform a system scan.

-
Wait for the Malwarebytes scan to complete.
Malwarebytes will now start scanning your phone for adware and other malicious apps. This process can take a few minutes, so we suggest you do something else and periodically check on the status of the scan to see when it is finished.

-
Click on “Remove Selected”.
When the scan has been completed, you will be presented with a screen showing the malware infections that Malwarebytes for Android has detected. To remove the malicious apps that Malwarebytes has found, tap on the “Remove Selected” button.

-
Restart your phone.
Malwarebytes for Android will now remove all the malicious apps that it has found. To complete the malware removal process, Malwarebytes may ask you to restart your device.
That’s it — your Android phone is now clean — no more malicious apps, adware, or browser redirects.
If you are still having problems with your phone after completing these instructions, then please follow one of the steps:
- Restore your phone to factory settings by going to Settings > General management > Reset > Factory data reset.
- Ask for help in our Mobile Malware Removal Help & Support forum.
Stay Protected: Block Ads and Malicious Sites
Now that your device is clean, keep it that way. Most infections start with a malicious ad or a fake download button — so blocking them at the source is your best defense.
We recommend AdGuard, which blocks malicious ads, phishing pages, and dangerous redirects before they can reach you.
👉 Download AdGuard and browse safely
Frequently Asked Questions
Is the Authenticate Your Domain Account email real?
No. This version uses a fabricated three-day domain-verification deadline and directs recipients to a credential-stealing login page.
Will my domain be suspended after three days?
No evidence in the email proves any legitimate deletion process exists. Check the real account dashboard or ask the provider through a known support channel.
Is it dangerous to read the email?
Simply reading the message normally does not hand over a password. The main danger begins when a recipient follows the link, submits information, downloads a file, or approves a login request.
What if I clicked but did not enter my password?
Close the page and avoid returning. Clear any downloaded files, update the browser and security software, and run a scan if the site initiated a download or requested software.
What if the fake page already knew my email address?
The address can be encoded in the phishing link and automatically displayed. That personalization does not mean the page is connected to the real provider or already knows the password.
Should I reply and ask whether the notice is genuine?
No. Replying confirms that the address is active and keeps communication inside the attacker’s channel. Contact the provider independently using its official website or app.
The Bottom Line
The Authenticate Your Domain Account email scam does not protect an inbox. It invents a three-day deadline, threatens permanent deletion, and routes the recipient to a fake login form.
Ignore the button and verify account warnings through the real service. If credentials were submitted, change them immediately, review every domain-linked email account security setting, and secure connected accounts before criminals can use the inbox as a doorway.

Join the discussion
0 commentsShare your experience or ask a question about this article.
Discussion
Start the conversation
Have a question or something useful to share? Add the first comment.