An unexpected email says two voice messages are waiting in a company portal, and unheard recordings may soon disappear from the server.
The alert feels routine enough to trust, especially when the sender uses workplace language and the recipient is already expecting a call.
Overview
The email borrows the rhythm of an office notification
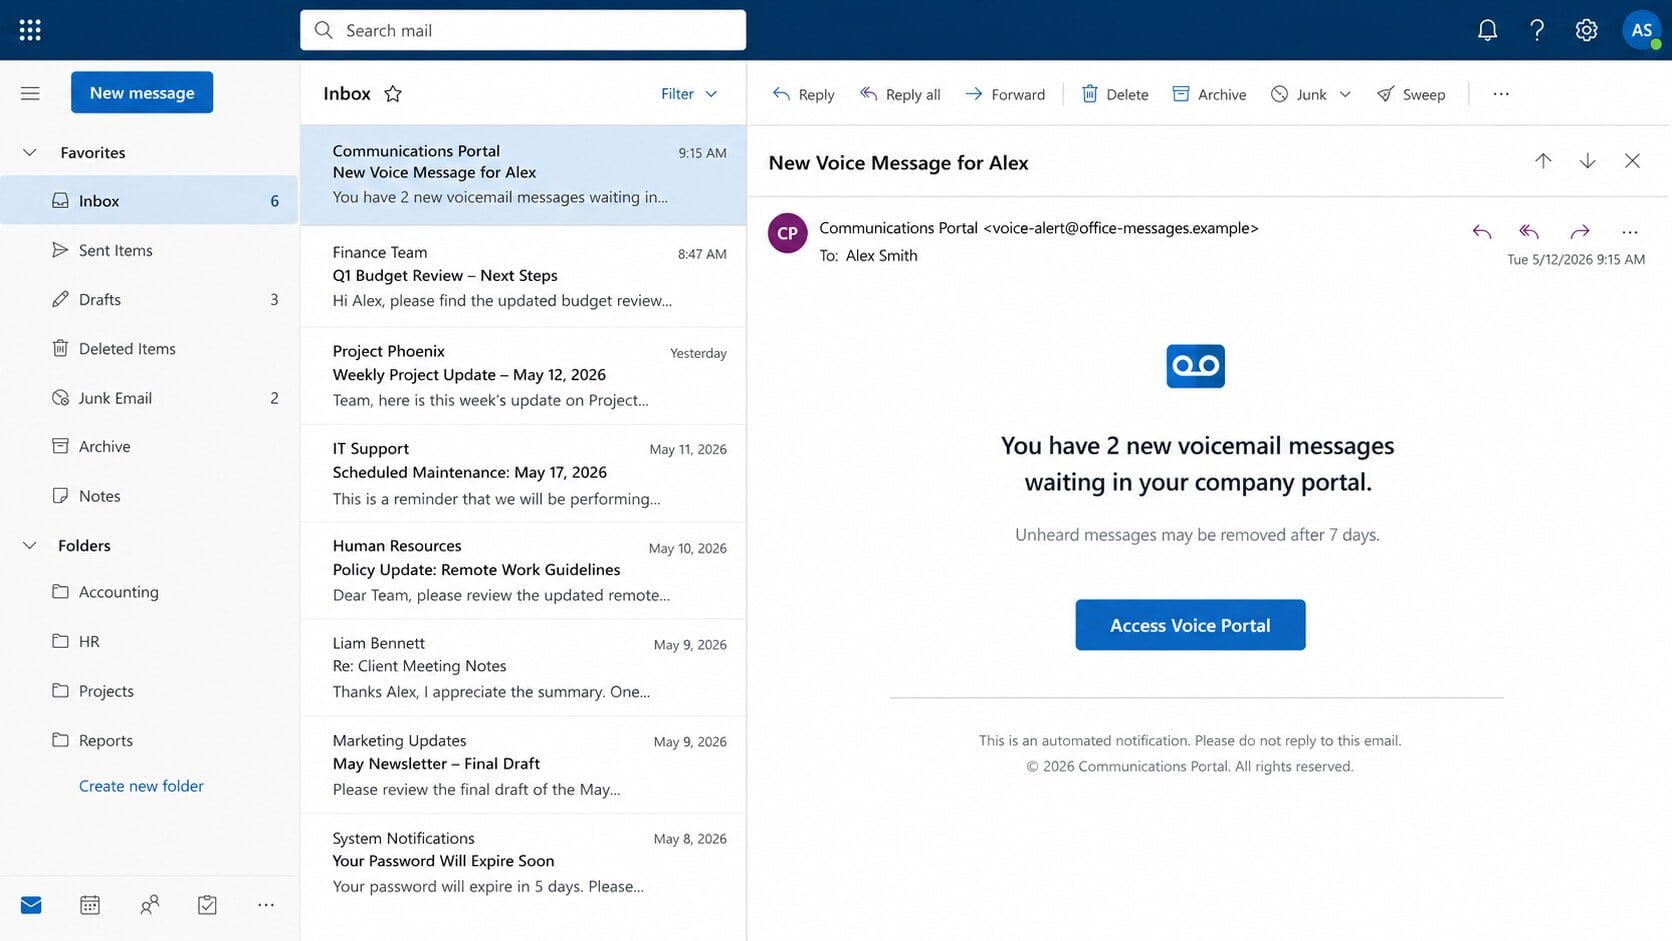
The Voicemail Notification email claims a communications portal received two new recordings for the recipient.
It includes a deletion warning, transmission time, and an “Access Voice Portal” button. Those ordinary details make the message resemble automated workplace mail.
The notification never identifies a real phone system, extension, administrator, or verified caller. Its professional tone hides a lack of accountable information.
The recording is only bait for a sign-in
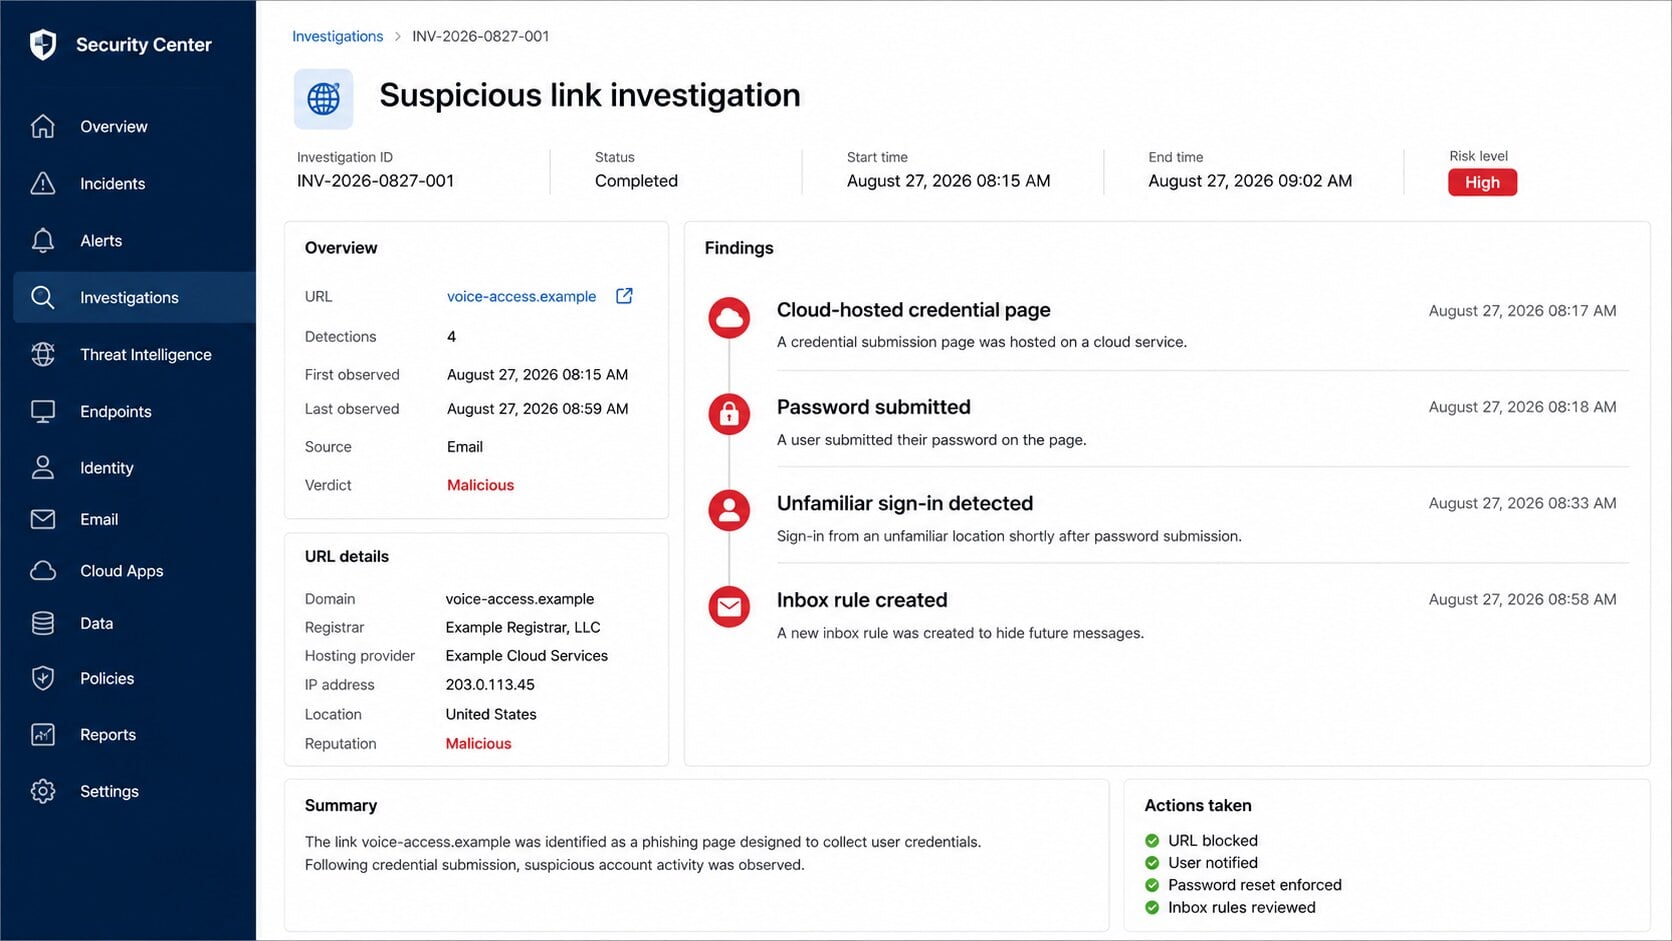
Following the button opens a fake voice portal, sometimes hosted inside legitimate cloud-storage infrastructure abused by the attackers.
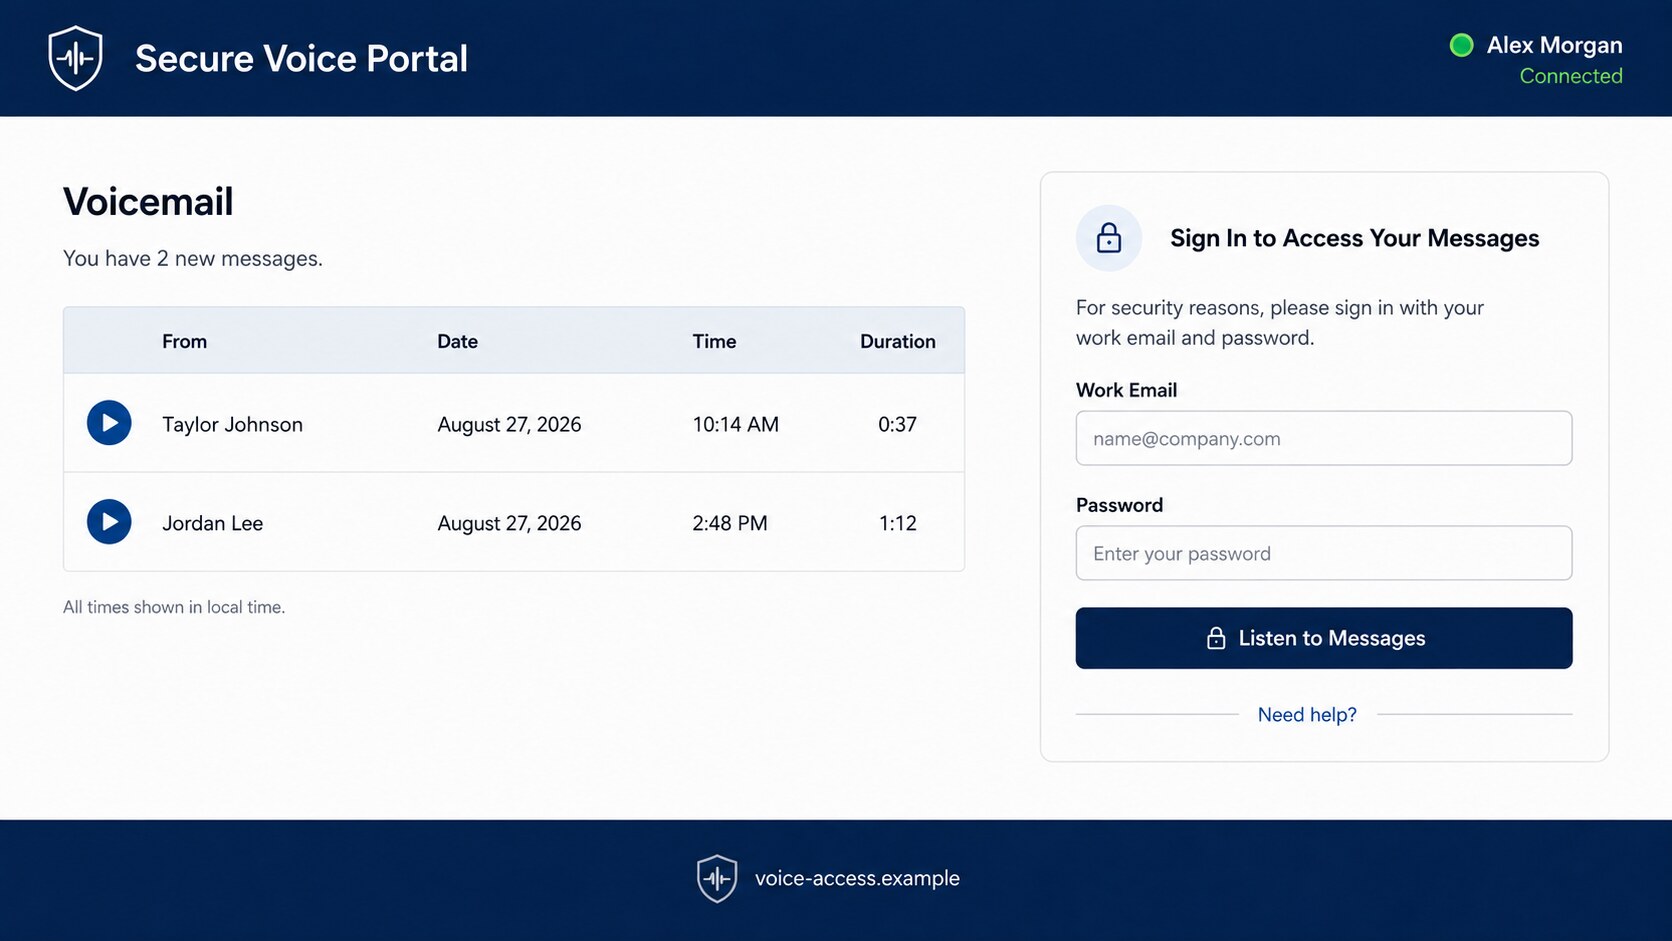
The page may show the recipient’s address, a profile image, message durations, or play controls. None proves that a recording exists.
Before any audio plays, the visitor is asked for a work email and password. Those credentials are the campaign’s real objective.
A stolen work inbox can open a much larger door
Business email often connects to document systems, shared drives, payroll tools, calendars, remote access, and password recovery.
An attacker can also read organizational language and reuse it in convincing messages to colleagues, suppliers, and customers.
The alert names no verified caller or internal extension.
A deletion deadline pressures the recipient to listen quickly.
The portal is reached through an unfamiliar external domain.
Playback is blocked until an email password is supplied.
Generic workplace branding allows the same template to target many companies.
Why Voicemail Is Such Effective Phishing Bait
Curiosity arrives before careful verification
A missed call creates a small information gap. People naturally want to know who called, what was said, and whether the message is urgent.
Email phishing exploits that gap. The recipient cannot judge the recording until opening the portal, so curiosity carries them toward the link.
The promise is deliberately vague. A named caller could be disproved, while “two new messages” fits almost any working day.
The notification resembles services employees already use
Many organizations legitimately deliver voicemail through email. A message containing a timestamp, duration, or playback link is therefore not automatically suspicious.
The difference lies in verification. Real notifications point to the organization’s known phone platform, established tenant, or attached audio governed by company policy.
A generic “company portal” on an unrelated host has no established relationship with the recipient’s telephone system.
Cloud hosting can make the URL feel safer than it is
Attackers sometimes place phishing pages on storage services operated by reputable companies. Security filters may initially trust those large domains.
The infrastructure provider is not endorsing the page. Criminals are using an ordinary hosting feature to publish deceptive content.
Users must evaluate the complete address and organizational context, not merely recognize the company that owns the wider hosting platform.
How the Voicemail Notification Scam Works
Step 1: Attackers send a generic workplace alert
The campaign begins with email addresses collected from public staff pages, breaches, professional directories, compromised mailboxes, or purchased lists.
The message may insert the recipient’s name or domain automatically. Basic personalization increases confidence without requiring knowledge of the person’s actual telephone service.
Because the lure concerns routine communication, it can reach executives, reception staff, sales teams, contractors, and remote employees with equal plausibility.
Step 2: A deletion warning creates artificial urgency
The email says unheard recordings may be removed from the server. That claim frames delay as a risk.
A recipient may click between meetings rather than asking the help desk whether the organization uses that portal.
Legitimate retention policies exist, but real systems do not become genuine simply because a phishing message mentions one.
Step 3: The button opens a staged voice portal
The page displays familiar interface pieces: message rows, timestamps, durations, a connected-user label, and prominent playback controls.
These elements are visual props. The play button may do nothing, display a login overlay, or redirect to another credential form.
A convincing layout can be copied quickly. The domain and authentication route provide stronger evidence than the design.
Step 4: The page requests workplace credentials
The visitor is told to sign in for privacy, encryption, or identity verification before listening.
That explanation feels reasonable because voicemail can contain sensitive information. The scam turns a legitimate security expectation against the user.
Submitted credentials are collected by the phishing operator. The page may respond with “incorrect password” to capture a second password variation.
Step 5: Criminals test access and bypass weak protections
The attackers attempt the stolen password against the real email service and connected workplace applications.
If multifactor authentication is required, they may send repeated prompts, request a one-time code, or operate a real-time proxy that steals session cookies.
A user who receives an unexpected approval request should deny it and notify the security team immediately.
Step 6: The compromised mailbox is searched for opportunity
Attackers look for invoices, employee records, password resets, cloud links, customer lists, and conversations involving payments.
They may create hidden rules, register a malicious application, or retain an active session after the victim changes the password.
Organizational charts and signatures help them choose valuable targets for the next message.
Step 7: The same voice story is sent from a trusted account
A hijacked address makes the follow-up campaign more convincing. Colleagues may recognize the sender and assume the portal is an approved internal service.
The attackers can reply inside real conversation threads, request documents, redirect payments, or deliver another malicious link.
One stolen password can therefore become an internal phishing chain rather than an isolated account problem.
What the Fake Portal Cannot Prove
A displayed name is not authentication. It may have been pulled from the email address, public directory, or query string inside the link.
Message durations are also easy to invent. A row showing “0:37” is ordinary text unless the portal belongs to the known telephone provider.
Likewise, words such as “secure,” “encrypted,” and “connected” describe the page’s appearance. They are not independent evidence of ownership or protection.
Confirm the service through the company intranet, documented phone-system address, or help desk. Never ask the suspicious page to prove itself.
Sender, Portal, Hosting, and Account Checks
The sender should match the organization’s phone service
Inspect the complete From and Reply-To addresses. Compare them with an older verified voicemail notice or the service documented by your employer.
A new external sender deserves verification even when the display name mentions the company.
The portal address must belong to an approved tenant
Hover over the button and read the hostname. An unknown storage bucket, unrelated website, or shortened link should not receive workplace credentials.
Open the normal communications portal from a bookmark instead. If messages exist, they should appear there.
Cloud ownership does not establish content ownership
A page hosted by a famous infrastructure company can still be attacker-controlled. Hosting services let customers upload content, including customers acting maliciously.
Report the exact malicious object or URL to the host, while recognizing that the wider provider is not part of the fraud.
The account audit must extend beyond the password
Review sign-ins, active tokens, connected applications, multifactor devices, app passwords, forwarding, inbox rules, delegates, and recovery contacts.
For workplace accounts, administrators should inspect identity and mail logs because individual users may not see every persistent access method.
How to Check a Voicemail Alert Without Taking the Bait
Start with the telephone itself or the organization’s known communications application. Check the voicemail area without using the email link.
If the notice names a colleague, contact that person through an existing directory entry. Do not rely on a number provided inside the suspicious message.
Ask whether the company recently changed phone providers or retention rules. A legitimate migration should be documented through established internal channels.
Compare the sender with an older genuine voicemail notification.
Check whether the organization recognizes the named portal.
Inspect the link without opening it.
Look for an unexpected external or cloud-storage address.
Refuse any request for an email password before playback.
Forward the alert to the security team as an attachment for analysis.
Why the Portal May Behave Differently During Investigation
Recipient-specific links can control the displayed page
A security scanner may open the base address without the encoded email information and receive an empty page or harmless-looking error.
The intended recipient sees a populated portal because their unique link includes the values needed to build the imitation.
This technique complicates automated detection and explains why colleagues may report different screens from the same campaign.
Geographic and device filtering can hide the credential form
Operators may show the phishing interface only in selected countries, during working hours, or when the browser resembles a normal employee device.
Known security scanners can be redirected elsewhere. Repeat visits may produce a blank page after the campaign marks the link as used.
A later harmless result does not erase the earlier credential request. Preserve the first screenshot and complete address.
A real redirect can be part of the deception
After password submission, the page may send the victim to a genuine communications or email service.
The familiar destination reduces suspicion and gives the impression that the first sign-in succeeded.
Authentication did not occur merely because the final page is genuine. The password may already have been transmitted beforehand.
Playback controls may be decorative or deliberately broken
A play icon can display a loading animation without referencing any audio file.
Some pages reveal the sign-in form only after the visitor tries playback, making the credential request feel like a natural second step.
Investigators should avoid entering test credentials. The page can log every submission and use supplied addresses for additional targeting.
Collect network evidence in a controlled environment, then report the specific malicious object to the hosting provider.
Mail administrators can search for the same destination across other inboxes and determine whether additional employees received or followed the notification.
Telephone administrators should compare call records with the times displayed. A portal listing messages absent from the real system exposes the fabrication.
That comparison also gives staff a concrete explanation they can share with colleagues before the campaign spreads internally.
What to Do if You Have Fallen Victim to This Scam
Do not blame yourself. The page is designed to resemble a familiar workplace tool, and quick containment matters more than embarrassment.
Stop interacting with the portal. Close it and record the URL, email headers, time, and any information you entered.
Call the workplace security desk. Use a known internal number and explain whether you submitted a password, code, or approval prompt.
Reset the password from a clean route. Open the genuine identity portal directly and choose a unique replacement.
Revoke sessions and tokens. Administrators should invalidate active logins, application consent, refresh tokens, and app passwords.
Strengthen multifactor authentication. Remove unknown methods and prefer phishing-resistant passkeys or hardware keys where the organization supports them.
Inspect the mailbox. Search for forwarding, hidden filters, deleted warnings, sent phishing, altered signatures, and messages marked read unexpectedly.
Review connected business systems. Check shared drives, payroll, billing, customer platforms, remote access, and collaboration tools reached through the same identity.
Warn likely contacts. Tell colleagues not to trust recent voicemail or document messages sent from the affected account.
Scan downloaded content. If the portal supplied a file, run Malwarebytes. AdGuard can reduce exposure to known malicious pages and deceptive advertising.
Document financial or data exposure. Preserve logs and notify legal, privacy, banking, or law-enforcement contacts when sensitive information or money is involved.
Is Your Device Infected? Run a Free Malware Scan
Slow performance, constant pop-ups, or strange behavior? These are classic signs of a malware infection. The fastest way to find out is to scan your device with Malwarebytes Anti-Malware Free — one of the most trusted malware removal tools available.
The free version detects and removes the most common threats, including:
Adware — the cause of those annoying pop-ups
Browser hijackers — unwanted redirects and changed homepages
Trojans and spyware — hidden programs stealing your data
Potentially unwanted programs (PUPs) — software you never asked for
👉 Select your device below — Windows, Mac, or Android — then follow the simple steps to download Malwarebytes, scan your system, and remove any threats it finds. The whole process takes about 5 minutes.
Malwarebytes for WindowsMalwarebytes for MacMalwarebytes for Android
Run a Malware Scan with Malwarebytes for Windows
Malwarebytes is one of the most popular and trusted anti-malware tools for Windows — and it’s completely free for removing infections. It catches threats that many antivirus programs miss, including adware, browser hijackers, and trojans. Follow the steps below to scan and clean your PC in just a few minutes.
Download Malwarebytes
Click the button below to download the latest version of Malwarebytes for Windows from the official source. The free version is all you need — it will scan your computer and remove adware, browser hijackers, and other malicious software at no cost.
(The link opens in a new page where your download will start)
Install Malwarebytes
When the download finishes, open your Downloads folder and double-click the MBSetup file. If Windows shows a User Account Control pop-up, click “Yes” to allow the installation.
Follow the On-Screen Prompts to Install Malwarebytes
The setup wizard will walk you through a few quick screens:
Choose where you’re installing the program — “Personal Computer” or “Work Computer” — then click Next.
Malwarebytes will now install on your device. This usually takes under a minute.
When installation is complete, the “Welcome to Malwarebytes” screen will open automatically.
On the final screen, click Open Malwarebytes to launch the program.
Enable “Scan for Rootkits”
Before scanning, turn on rootkit detection so Malwarebytes can find even the most hidden threats. Click the Settings gear icon on the left side of the screen.
In the settings menu, find “Scan for rootkits” and click the toggle so it turns blue.
Done? Click “Dashboard” in the left pane to return to the main screen.
Start the Scan
Click the blue Scan button. Malwarebytes will automatically update its virus database and start checking your computer for malware.
Wait for the Scan to Finish
The scan checks your entire system for browser hijackers and other malicious programs, so it can take several minutes. Feel free to do something else — just check back occasionally to see the progress.
Quarantine the Detected Threats
When the scan is done, you’ll see a list of everything Malwarebytes found — malware, adware, and potentially unwanted programs. Click the “Quarantine” button to remove all of them at once.
Malwarebytes will now remove the malicious files and registry entries and move them safely into quarantine.
Restart Your Computer
Some threats can only be fully removed after a reboot. If Malwarebytes asks you to restart, click Yes. Once you’re logged back in, your PC is clean and you can continue with the next steps in this guide.
When the scan finishes, click Quarantine to remove everything Malwarebytes found. That’s it — your Windows PC is now clean of trojans, adware, and other malware, and should be back to running smoothly.
If your current antivirus allowed this malicious program on your computer, you may want to consider purchasing Malwarebytes Premium to protect against these types of threats in the future. If you are still having problems with your computer after completing these instructions, then please follow one of the steps:
Malwarebytes for Mac is a free on-demand scanner that removes the malware other security software tends to miss — adware, browser hijackers, and unwanted programs included. Cleaning an infected Mac with Malwarebytes has always been completely free, and it’s our go-to recommendation. Follow the steps below to scan and clean your Mac in just a few minutes.
Download Malwarebytes for Mac
Click the button below to download the latest version of Malwarebytes for Mac.
When the download finishes, open your Downloads folder and double-click the setup file to begin the installation.
Follow the On-Screen Prompts to Install Malwarebytes
The Malwarebytes for Mac Installer will guide you through a few quick screens. Click “Continue” and keep following the prompts until the installation completes.
When the installation is complete, Malwarebytes opens to the Welcome to Malwarebytes screen. Click “Get started“.
Select “Personal Computer” or “Work Computer”
Malwarebytes will ask what type of computer you’re installing it on. Click either Personal Computer or Work Computer, whichever applies.
Start the Scan
Click the “Scan” button. Malwarebytes will automatically update its detection database and begin checking your Mac for malware.
Wait for the Scan to Finish
Malwarebytes will scan your Mac for adware, browser hijackers, and other malicious programs. This can take a few minutes, so feel free to do something else — just check back occasionally to see the progress.
Quarantine the Detected Threats
When the scan is done, you’ll see a list of everything Malwarebytes found. Click the “Quarantine” button to remove all the threats at once.
Restart Your Mac
Malwarebytes will now remove all the malicious files it found. Some threats can only be fully removed after a reboot — if Malwarebytes asks you to restart, allow it. Once you’re logged back in, your Mac is clean.
Once the scan is done, remove every threat it detected. Your Mac is now free of adware, rogue browser extensions, and other potentially harmful software.
If your current antivirus allowed a malicious program on your computer, you might want to consider purchasing the full-featured version of Malwarebytes Anti-Malware to protect against these types of threats in the future. If you are still experiencing problems while trying to remove a malicious program from your computer, please ask for help in our Mac Malware Removal Help & Support forum.
Run a Malware Scan with Malwarebytes for Android
Malwarebytes for Android automatically detects and removes dangerous threats like malware and ransomware so you don’t have to worry about your most-used device being compromised. Aggressive detection of adware and potentially unwanted programs keeps your Android phone or tablet running smooth.
Download Malwarebytes for Android.
You can download Malwarebytes for Android by clicking the link below.
In the Google Play Store, tap “Install” to install Malwarebytes for Android on your device.
When the installation process has finished, tap “Open” to begin using Malwarebytes for Android. You can also open Malwarebytes by tapping on its icon in your phone menu or home screen.
Follow the on-screen prompts to complete the setup process
When Malwarebytes will open, you will see the Malwarebytes Setup Wizard which will guide you through a series of permissions and other setup options. This is the first of two screens that explain the difference between the Premium and Free versions. Swipe this screen to continue. Tap on “Got it” to proceed to the next step. Malwarebytes for Android will now ask for a set of permissions that are required to scan your device and protect it from malware. Tap on “Give permission” to continue. Tap on “Allow” to permit Malwarebytes to access the files on your phone.
Update database and run a scan with Malwarebytes for Android
You will now be prompted to update the Malwarebytes database and run a full system scan.
Click on “Update database” to update the Malwarebytes for Android definitions to the latest version, then click on “Run full scan” to perform a system scan.
Wait for the Malwarebytes scan to complete.
Malwarebytes will now start scanning your phone for adware and other malicious apps. This process can take a few minutes, so we suggest you do something else and periodically check on the status of the scan to see when it is finished.
Click on “Remove Selected”.
When the scan has been completed, you will be presented with a screen showing the malware infections that Malwarebytes for Android has detected. To remove the malicious apps that Malwarebytes has found, tap on the “Remove Selected” button.
Restart your phone.
Malwarebytes for Android will now remove all the malicious apps that it has found. To complete the malware removal process, Malwarebytes may ask you to restart your device.
After the scan, tap Remove Selected to delete all detected threats. Your Android phone is now clean — no more malicious apps, adware, or browser redirects.
If your current antivirus allowed a malicious app on your phone, you may want to consider purchasing the full-featured version of Malwarebytes to protect against these types of threats in the future. If you are still having problems with your phone after completing these instructions, then please follow one of the steps:
Restore your phone to factory settings by going to Settings > General management > Reset > Factory data reset.
Now that your device is clean, keep it that way. Most infections start with a malicious ad or a fake download button — so blocking them at the source is your best defense.
We recommend AdGuard, which blocks malicious ads, phishing pages, and dangerous redirects before they can reach you.
If you opened only the email, no password was sent merely by reading it. Report and delete the message through the approved process.
Do not pay anyone who later promises to recover the account secretly. Legitimate recovery should occur through the employer and service provider.
Frequently Asked Questions
Is the Voicemail Notification email legitimate?
The campaign described here is phishing. Confirm real recordings inside your usual phone application or through the organization’s documented portal.
Why does the page show my name or email?
The link can carry identifying data. A phishing page reads it and creates a personalized screen without accessing the real phone system.
Can a cloud-hosted page still be malicious?
Yes. Attackers can abuse legitimate storage and hosting platforms. The provider’s reputation does not validate every customer-created page.
Should voicemail require my email password?
Only an approved organizational authentication flow should request credentials. An unfamiliar voice page reached from unsolicited mail should never receive them.
What if I approved a multifactor prompt?
Contact the administrator immediately, reset the password, revoke sessions, and remove unknown methods. An approval may have completed the attacker’s login.
Do I need a malware scan after clicking?
A scan is prudent if you downloaded or opened anything. Credential submission alone requires account recovery even when no malware reached the device.
The Bottom Line
The Voicemail Notification scam builds a convincing office portal around recordings that may never have existed.
Use the known phone system, verify the domain, and report unexpected login requests. If credentials were entered, treat the workplace identity as compromised immediately.
10 Rules to Avoid Online Scams
Here are 10 practical safety rules to help you avoid malware, online shopping scams, crypto scams, and other online fraud. Each tip includes a quick “if you already got hit” action.
Stop and verify before you click, log in, download, or pay.
Most scams win by creating urgency. Verify using a trusted method: type the website address yourself, use the official app, or call a known number (not the one in the message).
If you already clicked: close the page, do not enter passwords, and run a malware scan.
Keep your operating system, browser, and apps updated.
Updates patch security holes used by malware and malicious ads. Turn on automatic updates where possible.
If you saw a scary “update now” pop-up: close it and update only through your device settings or the official app store.
Use layered protection: antivirus plus an ad blocker.
Antivirus helps block malware. An ad blocker reduces scam redirects, phishing pages, and malvertising.
If your browser is acting weird: remove unknown extensions, reset the browser, then run a full scan.
Install apps, software, and extensions only from official sources.
Avoid cracked software, “keygens,” and random downloads. During installs, choose Custom/Advanced and decline bundled offers you do not recognize.
If you already installed something suspicious: uninstall it, restart, and scan again.
Treat links and attachments as untrusted by default.
Phishing often impersonates delivery services, banks, and popular brands. If it is unexpected, do not open attachments or log in through the message.
If you entered credentials: change the password immediately and enable 2FA.
Shop safely: research the store, then pay with protection.
Be cautious with brand-new stores, “closing sale” stories, and prices that make no sense. Prefer credit cards or PayPal for dispute options. Avoid wire transfers, gift cards, and crypto payments.
If you already paid: contact your card issuer or PayPal quickly to dispute the transaction.
Crypto rule: never pay a “fee” to withdraw or recover money.
Common patterns include fake profits, then “tax,” “gas,” or “verification” fees. Another is a “recovery agent” who demands upfront crypto.
If you already sent crypto: stop paying, save evidence (wallet addresses, TXIDs, chats), and report the scam to the platform used.
Secure your accounts with unique passwords and 2FA (start with email).
Use a password manager and unique passwords for every account. Enable 2FA using an authenticator app when possible.
If you suspect an account takeover: change passwords, sign out of all devices, and review recent logins and recovery settings.
Back up important files and keep one backup offline.
Backups protect you from ransomware and device failure. Keep at least one backup on an external drive that is not always connected.
If you suspect infection: do not connect backup drives until the system is clean.
If you think you are a victim: stop losses, document evidence, and escalate fast.
Move quickly. Speed matters for disputes, account recovery, and limiting damage.
Stop payments and contact: do not send more money or respond to the scammer.
Call your bank or card issuer: block transactions, replace the card if needed, and start a dispute or chargeback.
Secure your email first: change the email password, enable 2FA, and remove unfamiliar recovery options.
Secure other accounts: change passwords, enable 2FA, and log out of all sessions.
Scan your device: remove suspicious apps or extensions, then run a full malware scan.
Save evidence: screenshots, emails, order pages, tracking pages, wallet addresses, TXIDs, and chat logs.
Report it: to the payment provider, marketplace, social platform, exchange, or wallet service involved.
These rules are intentionally simple. Most online losses happen when decisions are rushed. Slow down, verify independently, and use payment methods and account controls that give you recourse.
Hello! I'm Lapain Epuran, your go-to source for detailed and honest product reviews. From tech gadgets to miracle cures, I provide insights to help you make informed choices. Join me as we discover what's truly worth your time and money.