


Is Chrome redirecting to Bing on Mac no matter what you choose? You set Google, run a search, and Bing shows up anyway, sometimes after an odd address flashes past.
Bing may also open as soon as Chrome starts. Below is a five-step quick fix, then a full walkthrough for removing whatever keeps dragging Chrome back to Bing.
Overview
Why is Chrome redirecting to Bing on Mac?
Bing itself is a real Microsoft search engine and the built-in choice in Microsoft Edge, so Bing inside Edge is normal. Bing inside Chrome, after you picked Google, isn’t.
Here’s what typically flips the switch:
- A Microsoft extension you accepted. Microsoft Bing Search for Chrome and Microsoft Bing Search with Rewards can both make Bing your default search engine.
- A third-party search or new-tab extension that sends what you type to Bing.
- Adware from a free download or fake update. Mac users have reported searches hopping through an unfamiliar site before Bing loads, a sign something sits in between.
- A configuration profile that forces Chrome’s settings and grays out the search option.
- A login item or background helper that resets Chrome to Bing whenever you log in.
Quick fix: get Google back in five steps
Do these in order, and run a test search after each one. Once Google sticks, you can stop.
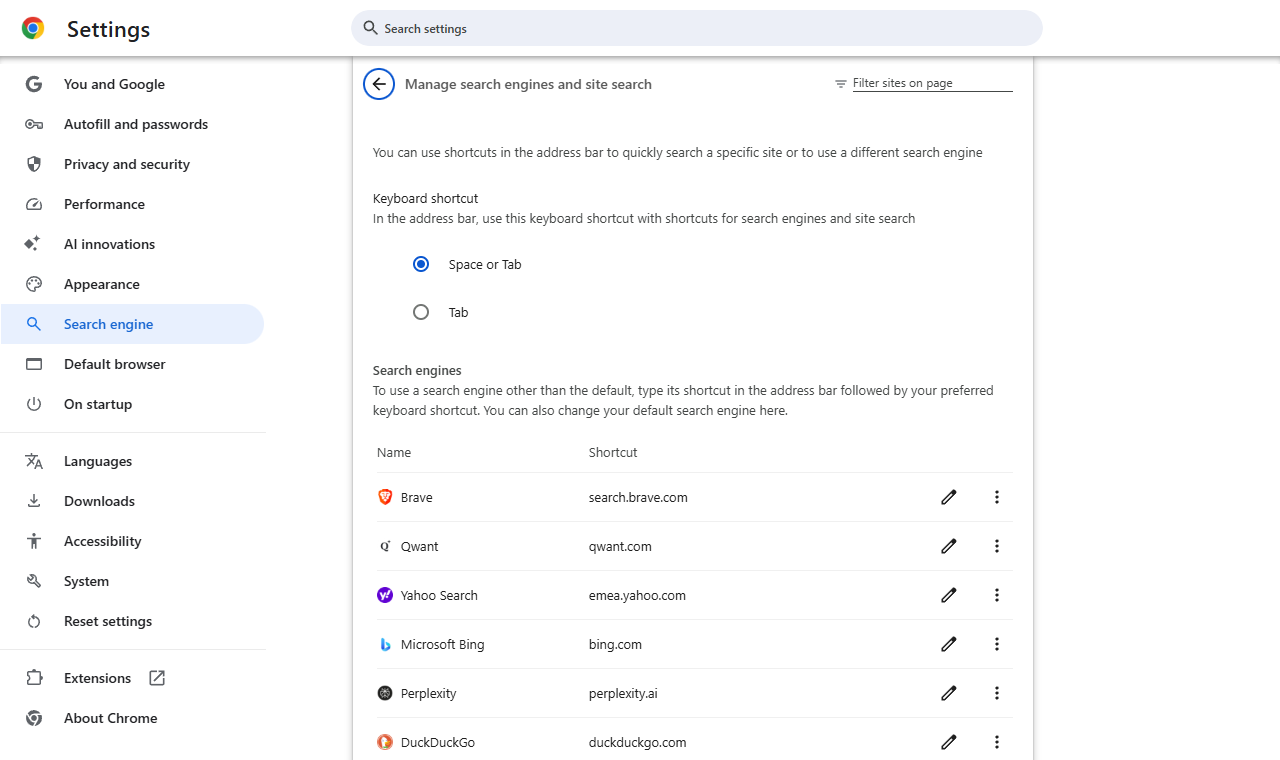
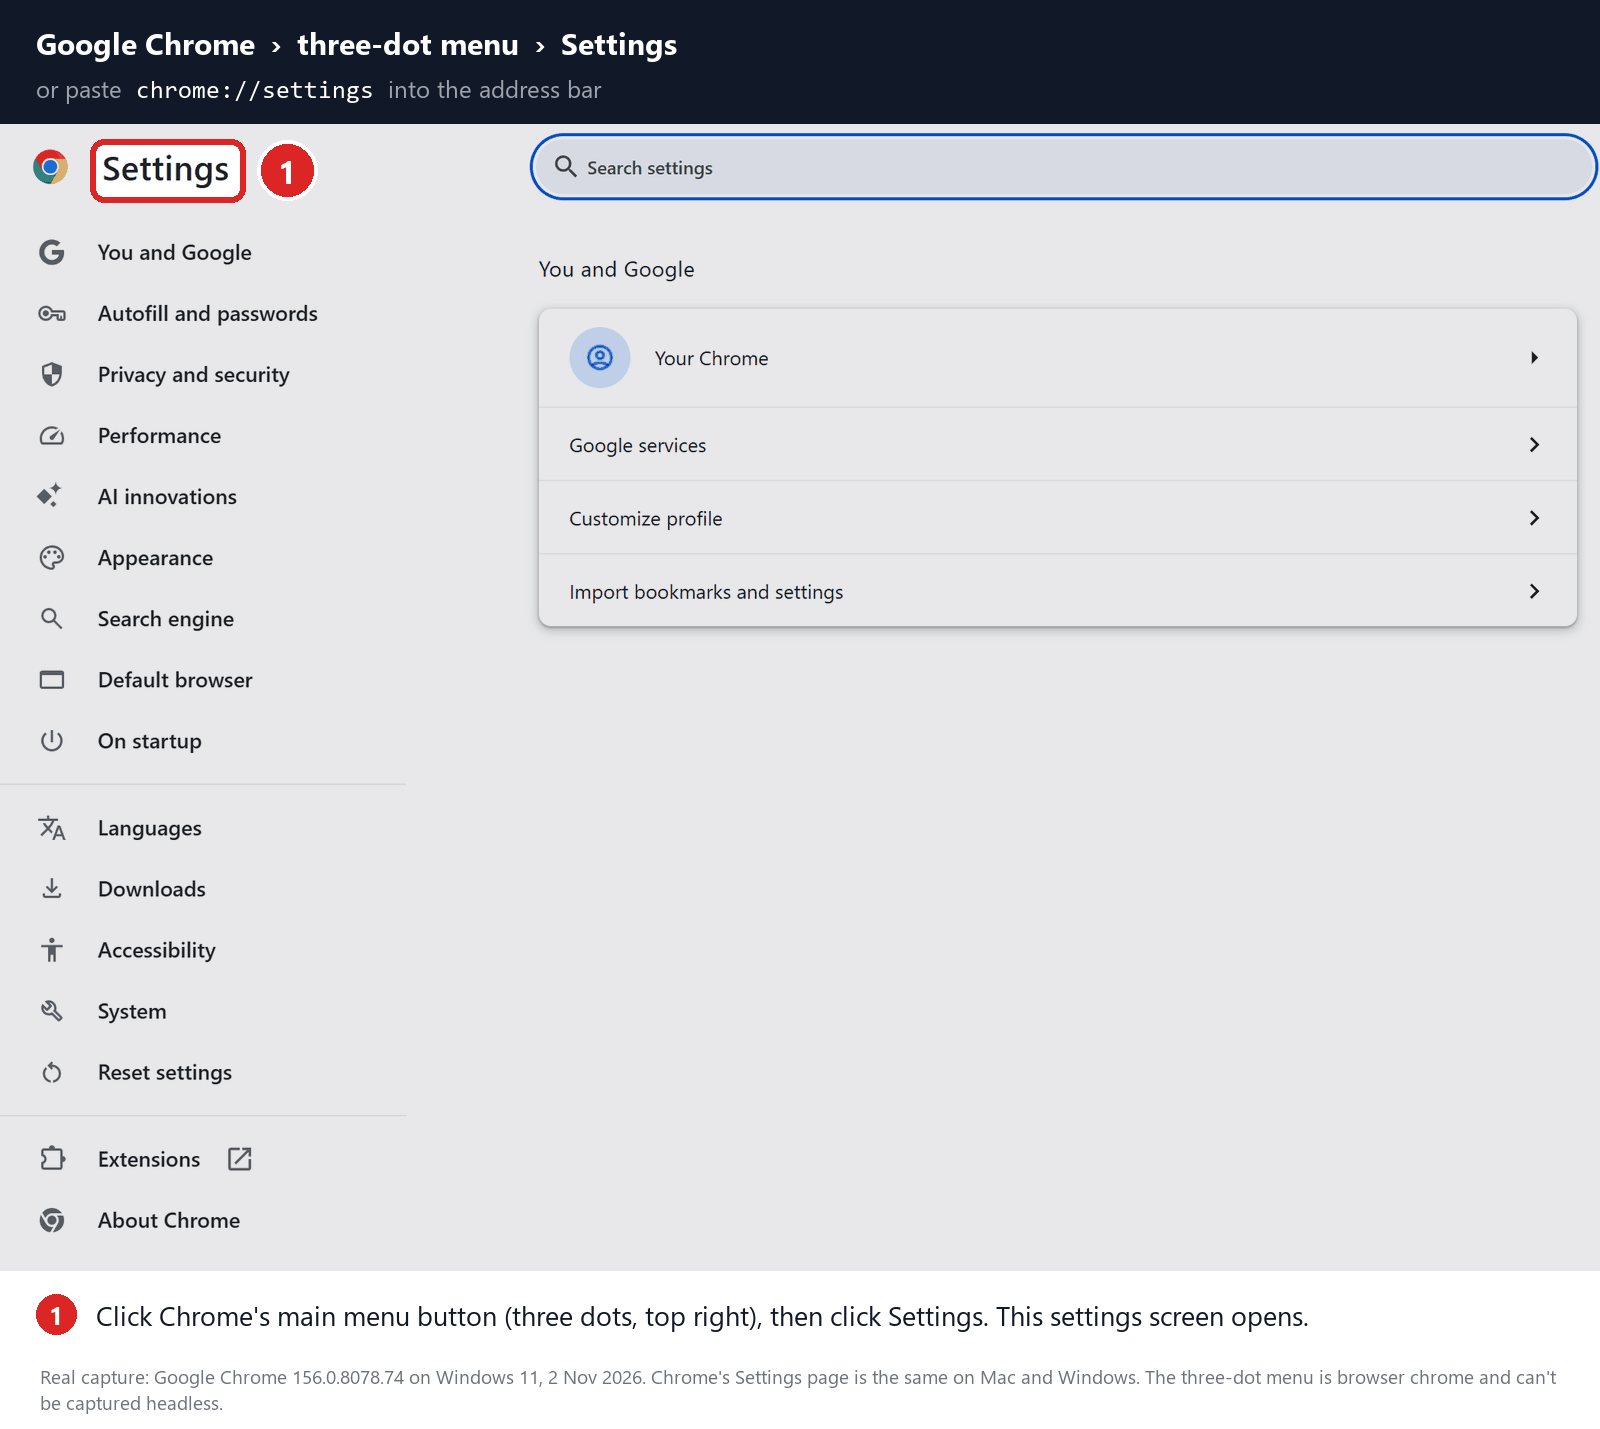
- Click the three-dot menu in Chrome and choose Settings. Open Search engine, click Change beside the engine in use, and select Google or your favorite.
- Go to chrome://extensions. Remove the Microsoft Bing extensions you don’t want, plus any unfamiliar search or new-tab add-on.
- In System Settings, open General and look for Device Management. If a profile on your Mac mentions Chrome or Bing, select it and click Remove. Ask IT on work Macs.
- Still in General, open Login Items & Extensions and turn off anything you can’t identify. If Bing then stays away, move that app from Applications to the Trash.
- Press Command+Q to quit Chrome, reopen it, and type a search in the address bar. Google results mean it worked.
What if Bing comes back after the fix?
Then something is reapplying it. Open Chrome’s menu: if “Managed by your organization” appears at the bottom, a policy is forcing your settings.
On a personal Mac, that policy often arrives through a configuration profile or an installed app. A company or school Mac may be managed on purpose, so talk to IT.
Keep any profile you installed yourself for Wi-Fi, a VPN, or work email. Deleting it deletes those settings too. The advanced section covers this safely.
Use this guide for search changes, hijacked browsers, unwanted add-ons, and adware. Stolen accounts and encrypted files are separate problems with their own fixes.
How to Get Rid of Bing in Chrome on Mac
Begin with Step 1 and test as you go. When Google stays put, jump to the final check rather than doing every step.
Step 1: Set Chrome back to your search engine
A few screenshots here come from Chrome on Windows. The Mac version has a different window frame, but the same labels.
Switch Chrome’s search engine
-
Go to the search engine page
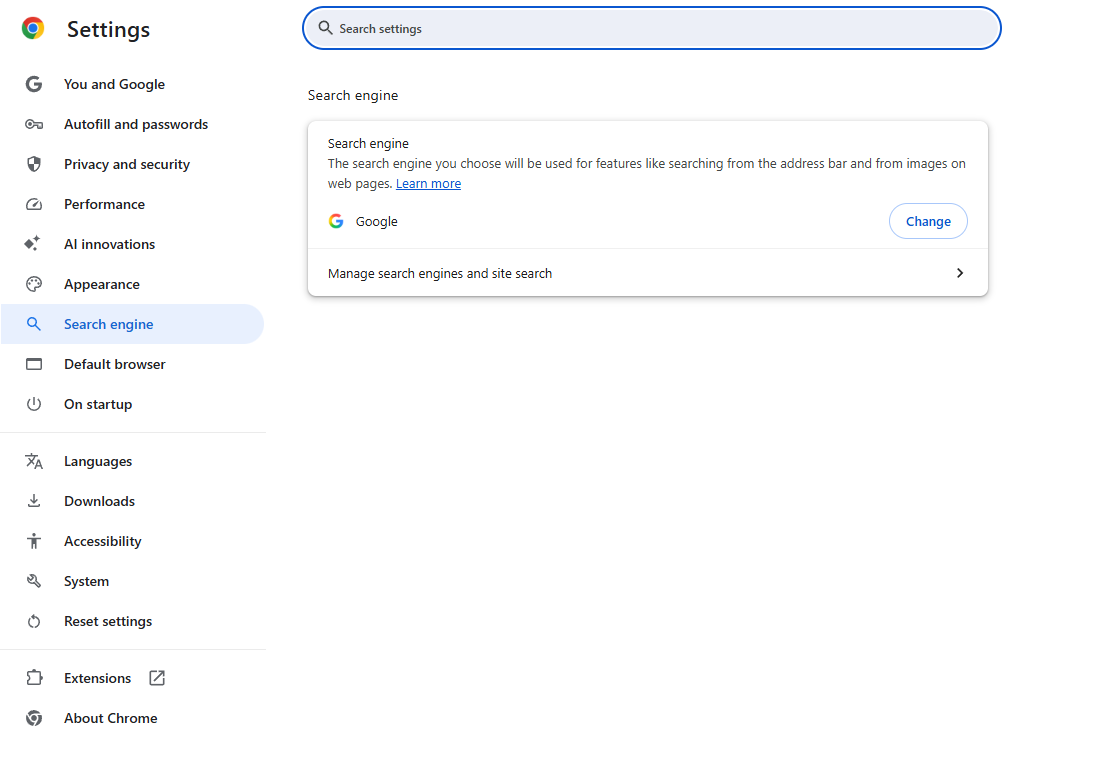
Enter chrome://settings/search in the address bar and hit Return. Chrome shows the engine it’s using right beside the Change button.
-
Select Google or another engine
Click Change, choose Google, DuckDuckGo, or whichever engine you like, and confirm it in the dialog that appears.
Now open a fresh tab and search from the address bar. Visiting google.com on its own won’t test this setting.
-
Test it right away
Did Google answer, and is it still selected? Then head to the final check. Switching engines doesn’t require a reset.
Bing back already? Continue to the extensions step. If the setting won’t change at all, see the advanced fixes.
Step 2: Disable the extension that switches you to Bing
Track down the extension switching search
-
Open the extensions page
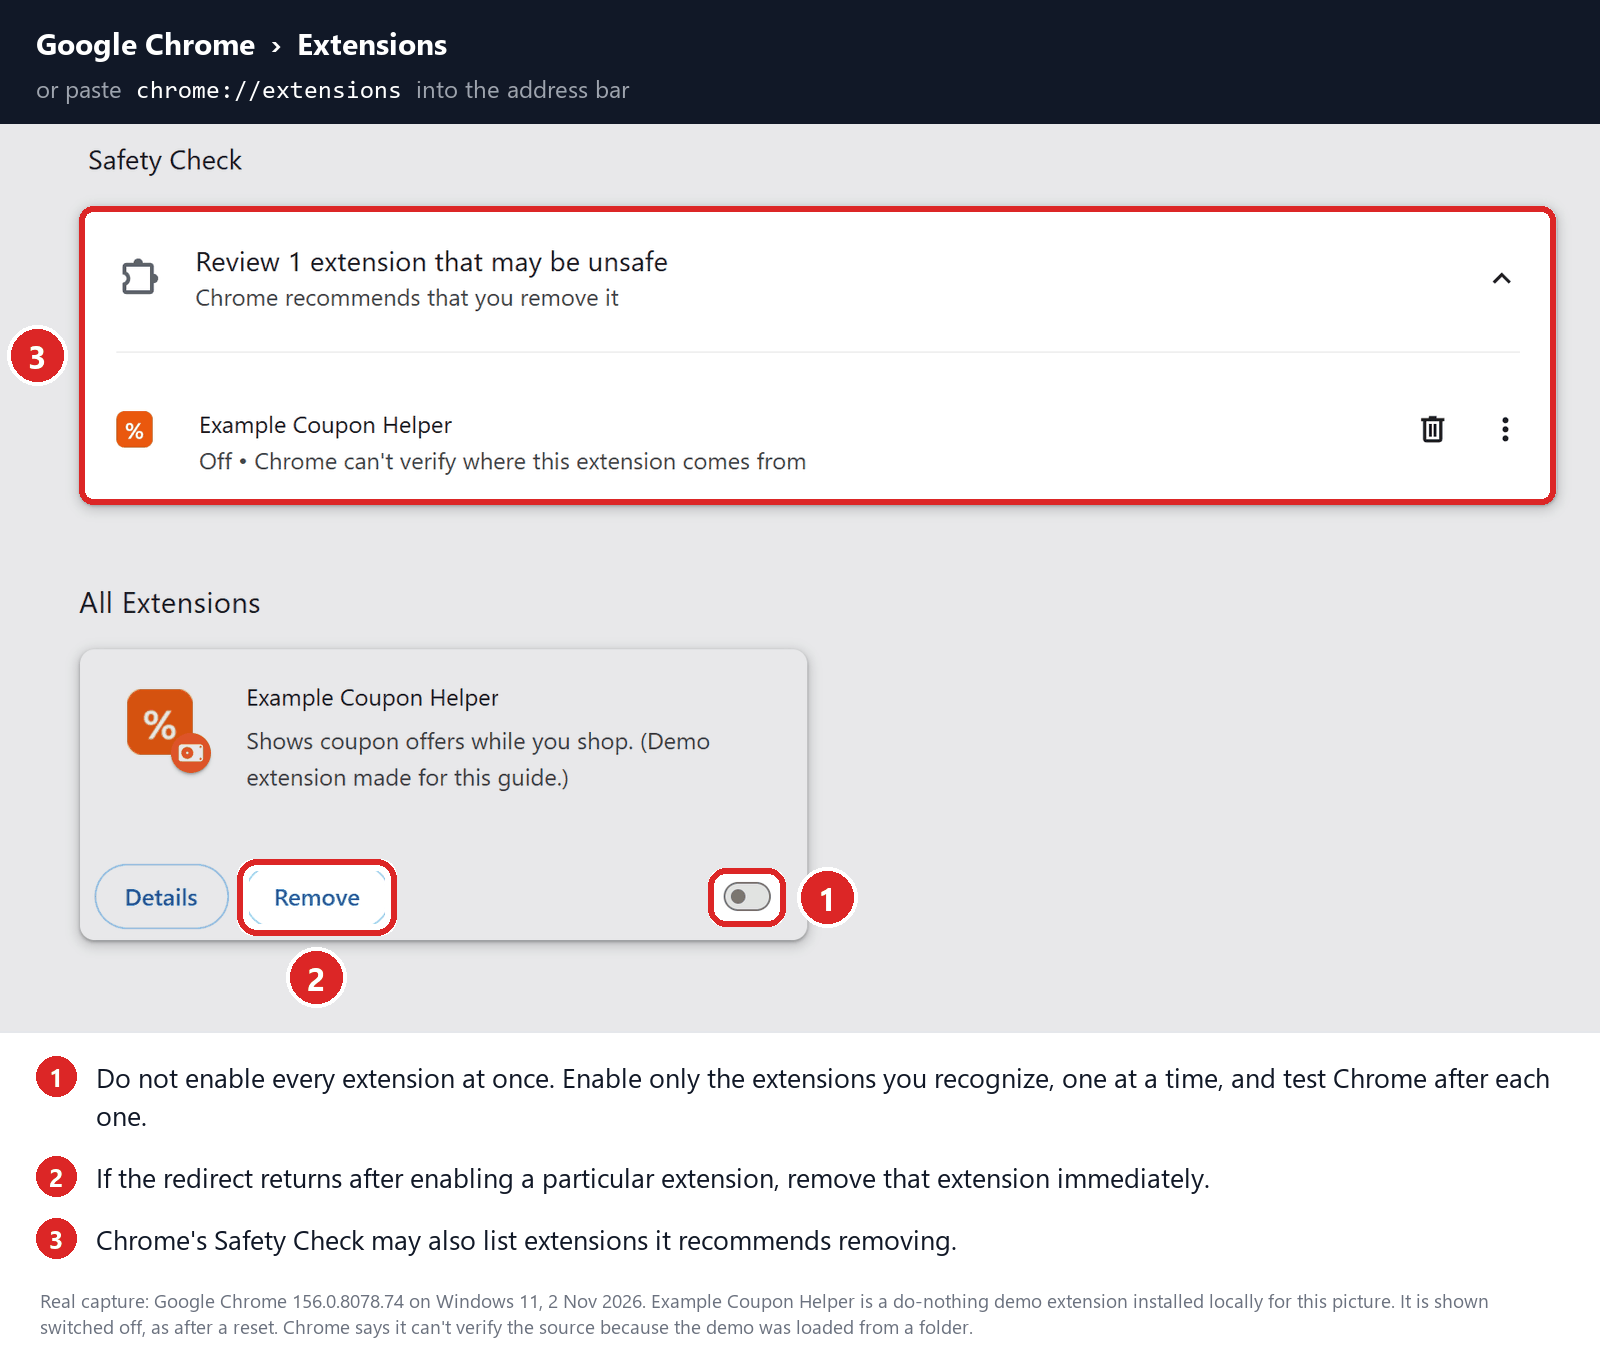
Go to chrome://extensions. The sample screenshot shows where the toggle and Remove button sit on each card. That sample isn’t a threat on your computer.
-
Turn off one extension at a time
Pick a recently added search, Bing, Rewards, or new-tab extension. Flip its toggle off, open a new tab, and search once more.
Search fixed? Click that extension’s Remove button and confirm. Leave password managers and trusted security add-ons in place unless they’re the one causing it.
Nothing suspicious installed? Move on. If you can’t remove an extension or it reappears, go to the locked-settings checks.
-
Make sure it lasts
Fully quit Chrome, open it again, and repeat the search. Still Google? Go to the final check and skip the scan and reset.
When alerts open Bing or random pages
This part only matters if pages pop open with no search from you. Letting a site send notifications is a different problem from a hijacked search engine.
-
Visit chrome://settings/content/notifications. In the list of sites allowed to send notifications, open the menu beside the site you don’t trust and pick Block or Remove.
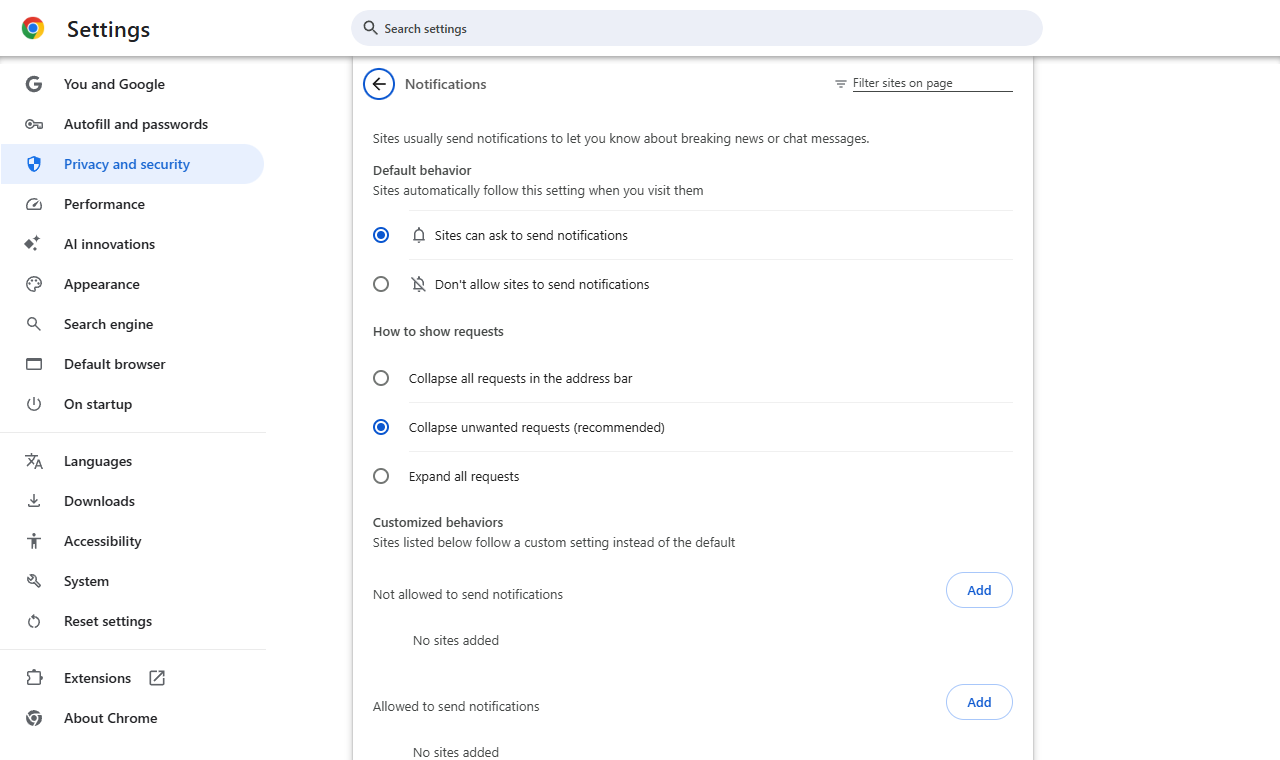
Always use Chrome’s own settings, not the buttons in a frightening alert. Once alerts stop and search behaves, there’s no need to scan or reset.
Step 3: Run a Mac malware scan if Bing won’t stay away
No need for this if Step 1 or 2 fixed things. Scan when an app or extension keeps reappearing, or Bing returns without an obvious reason.
Check your Mac with Malwarebytes
The installation pictures are from our Mac guide. Expect small differences in version and styling.
MalwareTips may receive a commission from optional purchases. You don’t need a paid protection plan to follow the manual browser checks.
-
Download Malwarebytes for Mac
Malwarebytes for MacMac-specific scan and threat reviewMake sure you grab the Mac package. The Windows installer and AdwCleaner (Windows only) won’t work here, and never use a cleaner that a warning page pushes at you.
-
Launch the installer
Open Finder, go to Downloads, and double-click the Malwarebytes file. Don’t worry if its version number differs from the picture.
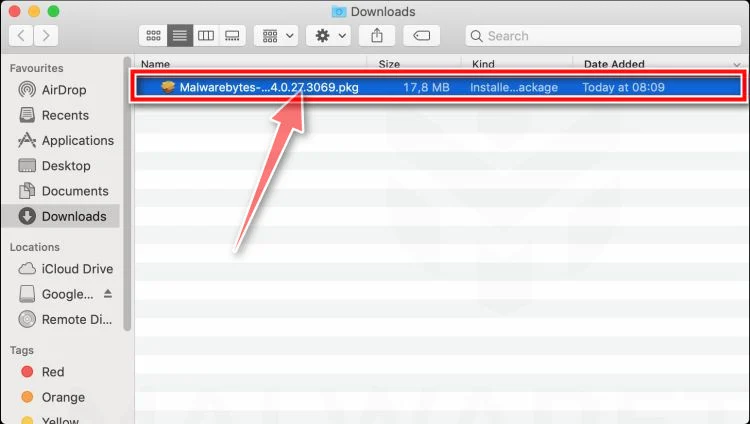
Confirm the file really comes from Malwarebytes. If the name or a prompt doesn’t match what you meant to install, stop there.
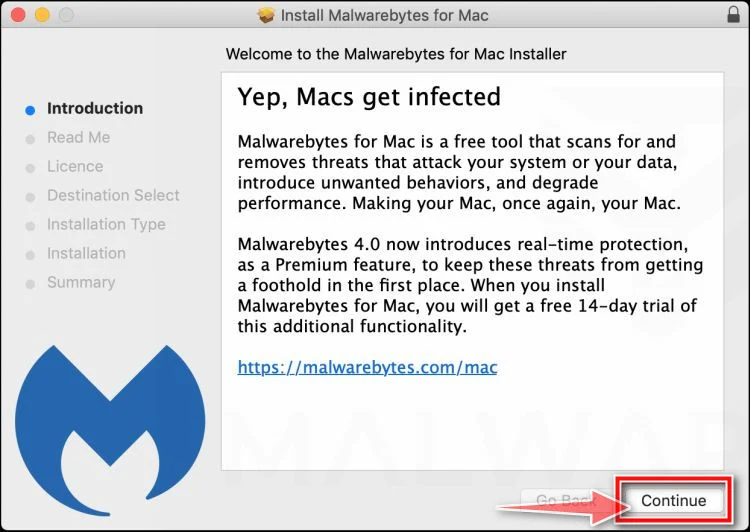
Click Continue on the installer’s welcome screen. The picture shows an older release, so your filename may differ.
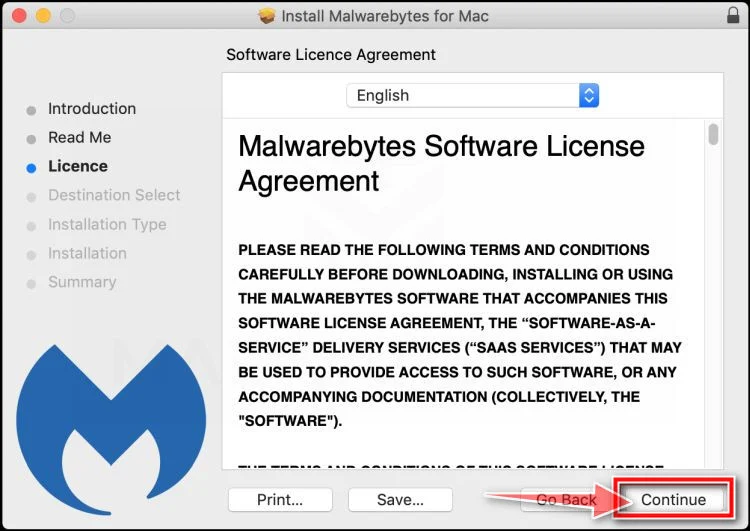
Read through the license and continue only if you agree. Agreeing to it is separate from any paid subscription offer.
-
Install and grant permissions
Move through the remaining installer screens and click Install when you reach that button.
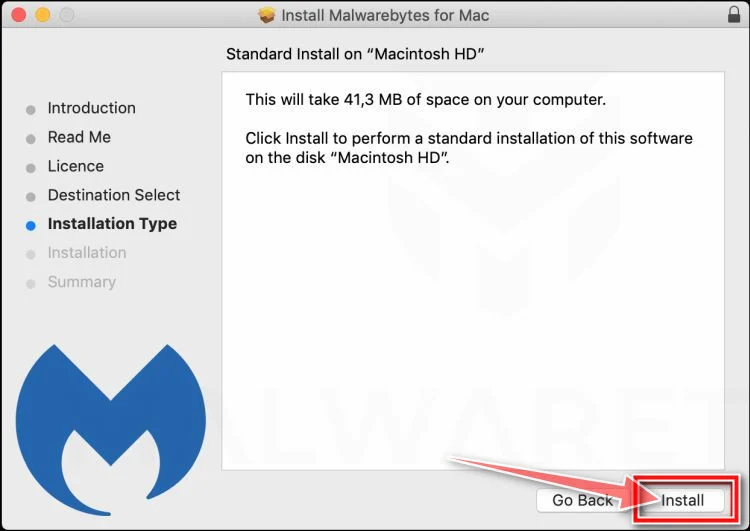
macOS will ask for your Mac password or Touch ID. Type it only into that macOS prompt, never into a website or for a stranger on the phone.
Asked for Full Disk Access? Go to System Settings, Privacy & Security, Full Disk Access, and switch on Malwarebytes. On older macOS, that’s in System Preferences.
Switch back to Malwarebytes when you’re done. Skip any trial or subscription you don’t want.
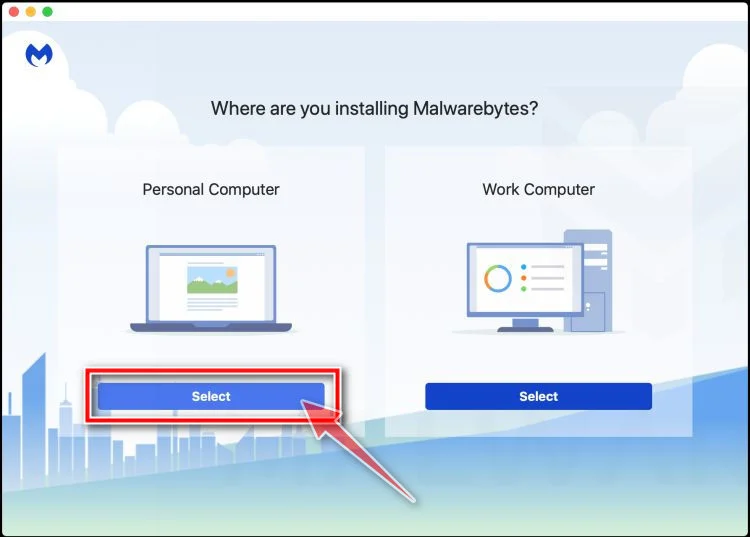
When the app asks about the type of computer, pick Personal Computer if the Mac is yours. A company Mac should follow whatever its IT staff tell you.
-
Run a free scan
Click the Scanner tile, not the Scan button on it. Go to the Scan tab, then Advanced scans, then Custom scan.
The free options are Quick scan and Custom scan. Threat Scan can require a trial or subscription, and nothing here requires you to buy it.

In the Finder window, choose the folder or app you want checked and click Open. Malwarebytes begins scanning that location.
Careful: the big Scan button on the dashboard may launch a Threat Scan. Stick to the Custom scan path for the free version.
Give the scan time to complete. Don’t cancel it or remove Malwarebytes mid-scan.
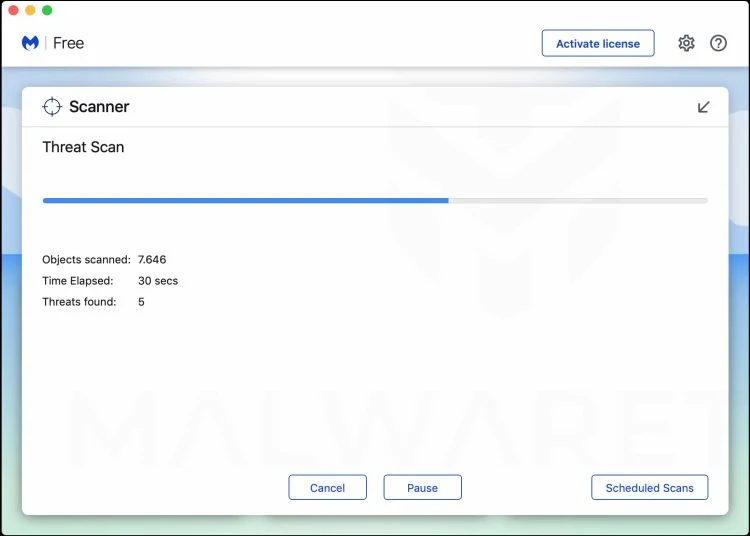
The older screenshot below is a Threat Scan rather than a custom one. Just wait until your own results appear.
-
Quarantine what it finds
Read each finding’s name and file location before you approve quarantine. If something puzzles you, keep the report for later.
The older version pictured uses a Confirm button for the selected items. Your version’s quarantine button may be labeled differently.
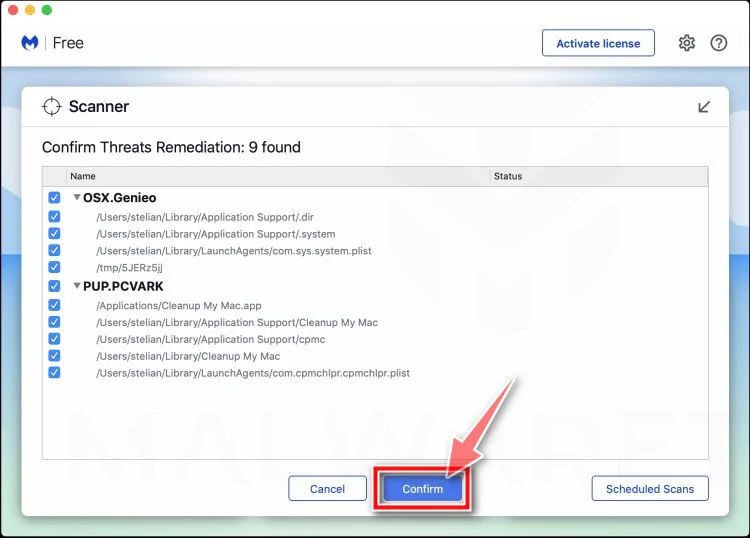
Those detections are just examples. Go by what your scan actually lists.
-
Restart when prompted
Some removals need a restart. Save any open files before you agree, then open Malwarebytes again afterward and keep its report.
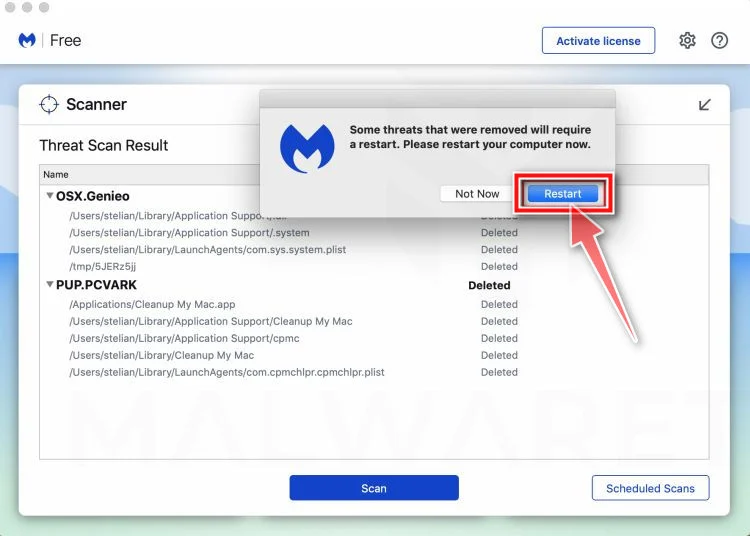
Test Chrome once more. A scan can miss a setting or a profile, so if Bing persists, look at your extensions and chrome://policy again.
-
Save details for expert help
Note the exact moment Bing returns, like right after login. Hold on to extension IDs, policy entries, and the scan report with private details blacked out.
Avoid wiping every profile or startup folder. When a detection is unclear, get advice before touching system settings.
Step 4: Reset Chrome if Bing is still the default
Search fine now? Go straight to Step 5. Reset Chrome only if the earlier steps couldn’t fix its settings.
Reset Chrome once the cause is removed
Think about sync before you reset. According to Google, a reset can affect other devices that use the same signed-in Chrome profile.
To be safe, pause sync for settings and extensions, or try a brand-new profile with sync off instead of resetting your main one.
These reset screenshots come from Chrome on Windows. On a Mac you’ll see the same page and confirmation, with a few wording differences.
-
Go to Chrome’s reset page
Save anything you’re working on and check you’re in the affected profile. Then enter chrome://settings/reset in the address bar and hit Return.
Or open Settings and choose Reset settings. Profiles that work, and profiles belonging to other people, don’t need resetting.
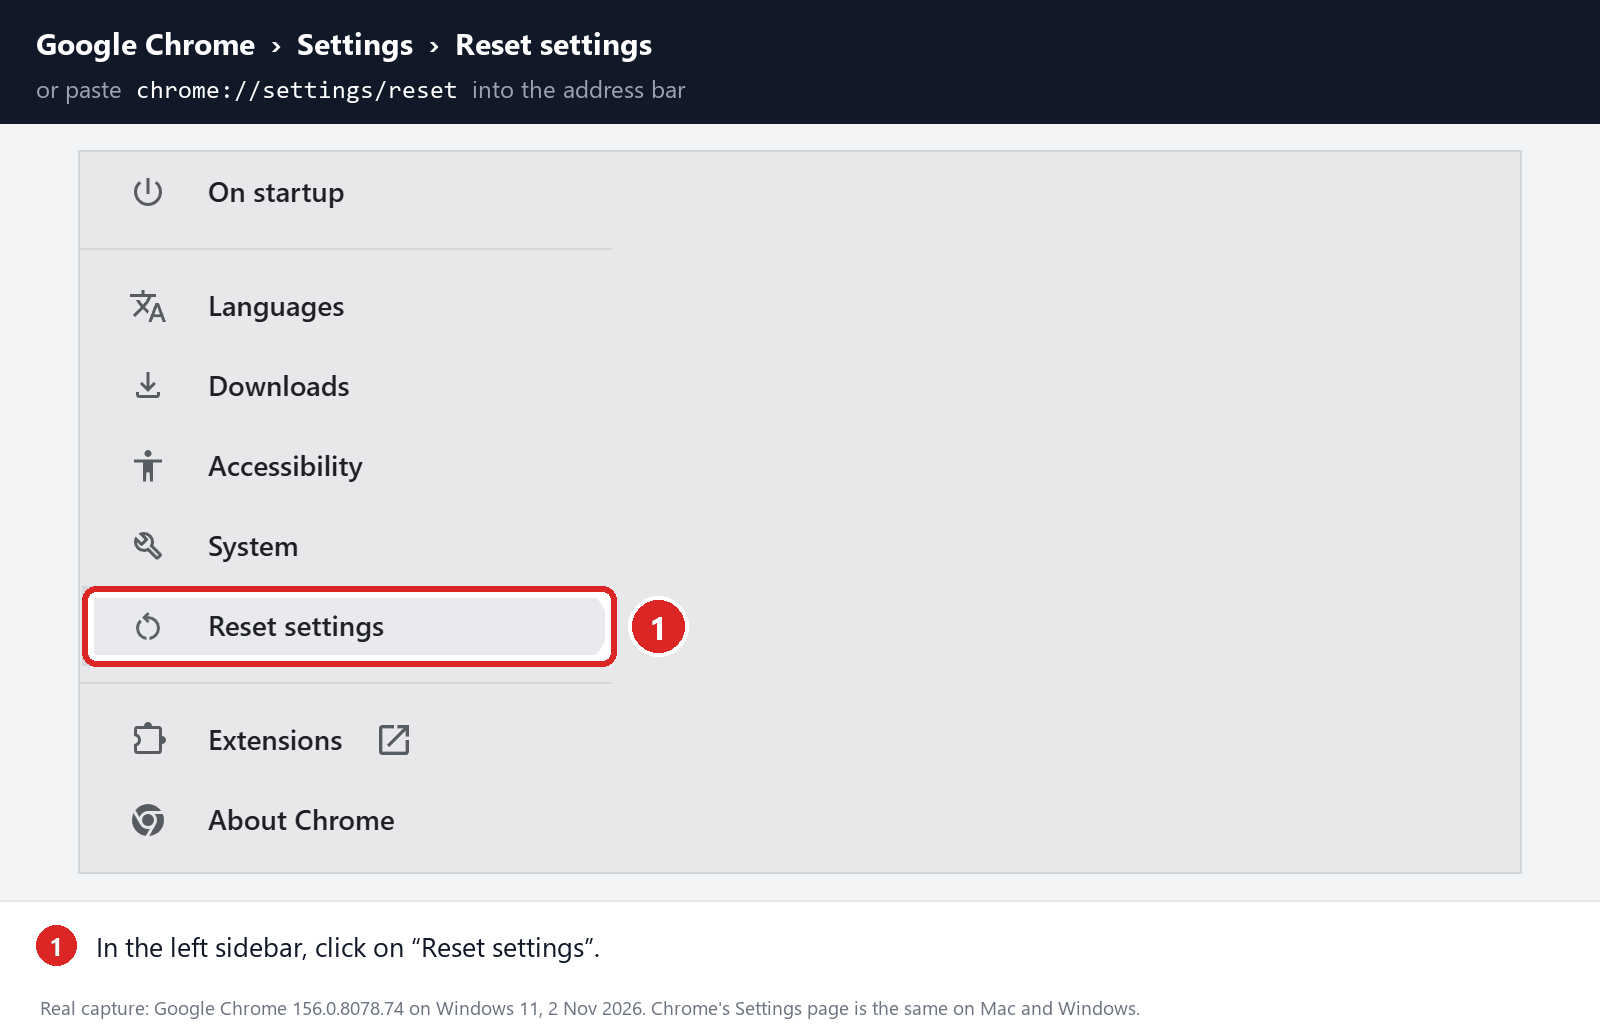
Prefer menus? Start in Settings. Reset settings sits in the sidebar on the left.
Choose Reset settings from that sidebar to reach the reset page.
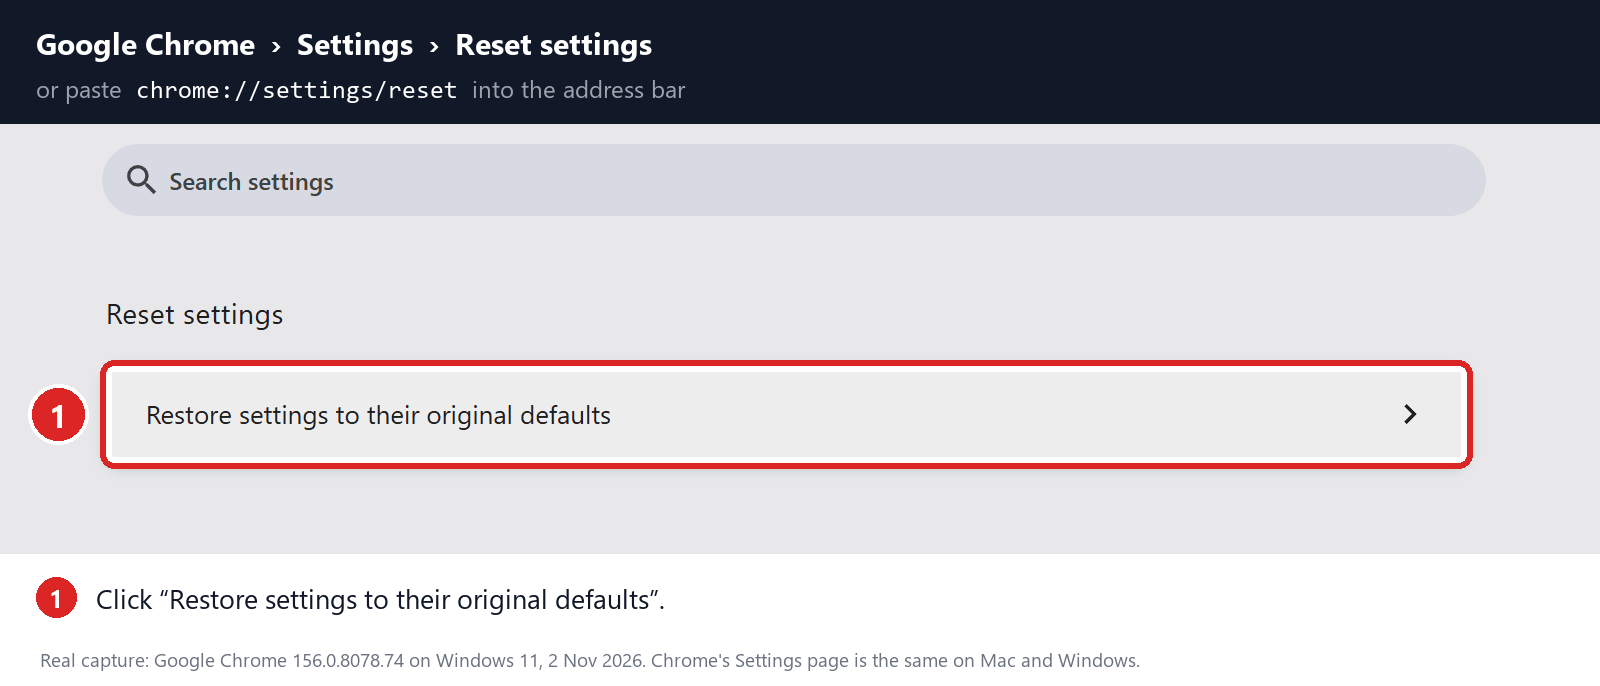
There, look for Restore settings to their original defaults.
-
Check the dialog, then reset
Click Restore settings to their original defaults. The dialog warns it resets your startup page, new tab page, search engine and pinned tabs, turns off extensions, and deletes cookies.
A reset keeps bookmarks, history, and saved passwords. Some sites may ask you to log in again.
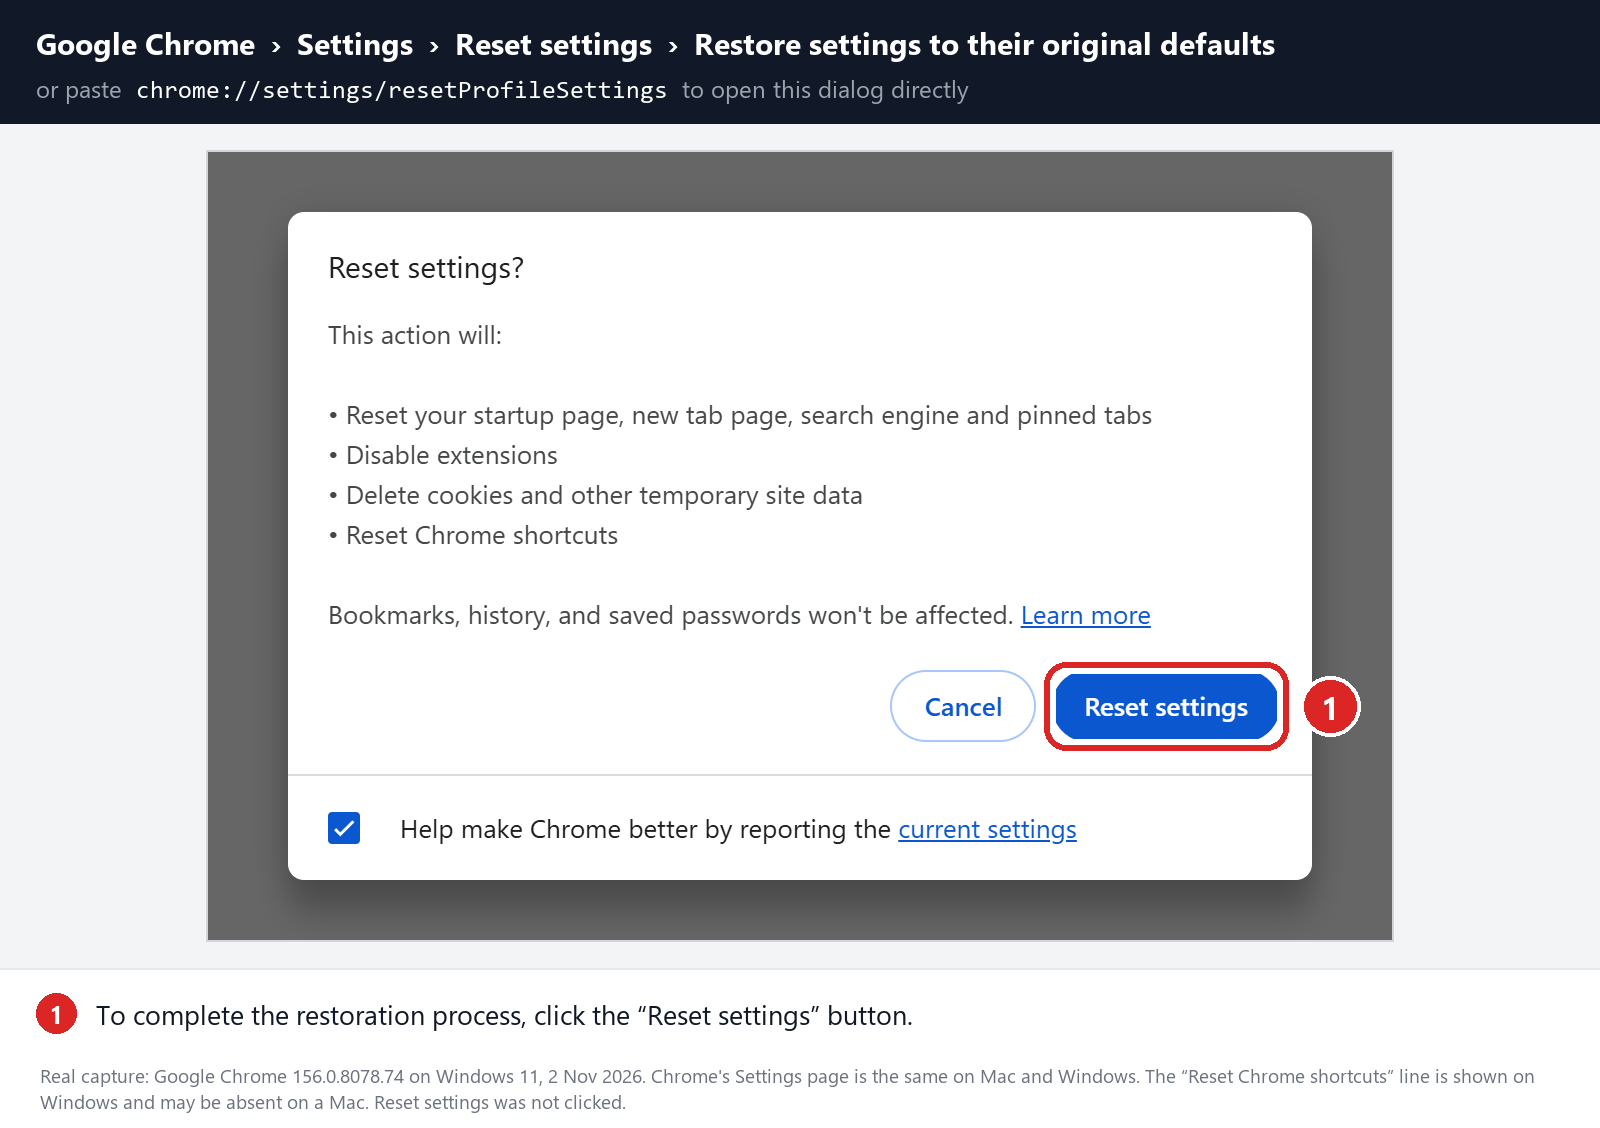
If you’re OK with that, click Reset settings. Keep in mind that a reset can’t remove a Mac app or profile that keeps forcing Bing.
-
Pick your engine, then re-enable extensions one by one
Visit chrome://settings/searchEngines and choose your search engine. Look over your startup pages as well, and run a test search before turning extensions back on.
Enable trusted extensions one at a time. If Bing returns after one of them, switch it off again and write down its name.
Step 5: Confirm Google sticks, then stop
Run the same search that used to land on Bing. Try it in the address bar, then in any new-tab search box and on the page Chrome opens at launch.
-
Quit Chrome completely and open it again. Your chosen search engine should still be selected.
-
If Bing used to reappear after logging in, save your files, restart the Mac, and repeat the test.
-
Turn sync back on gradually if you paused it. You’re finished once searches hold up through whatever used to trigger Bing.
All good? You can stop here. The advanced section is only for Bing that keeps coming back, settings you can’t change, or extensions you can’t remove.
Advanced Fixes When Bing Won’t Go Away
Open fixes for grayed-out settings, Mac profiles, and startup apps
Don’t need this if your fix held. Using a work or school Mac? Ask IT before you touch profiles, system files, or startup items.
See what’s locking Chrome’s search setting
Type chrome://policy into the address bar and click Reload policies. Write down any policy that sets a search engine, a startup page, or a forced extension.
A search address pointing at Bing, or an extension ID listed as force-installed, explains why the Remove button may be missing. Find where it comes from before deleting anything.
chrome://management adds context. Work accounts and antivirus apps can manage Chrome legitimately, so seeing it managed isn’t proof of malware.
If the Mac belongs to your employer or school, ask IT about that exact policy. Don’t try to remove profiles that give you access to work systems.
For your own Mac, open System Settings, General, Device Management. Sonoma and Ventura list profiles under Privacy & Security, Profiles. Older ones use System Preferences.
Double-click any unfamiliar profile to read its settings. Look for anything mentioning Chrome, Bing, a search address, or the extension you found.
Take a screenshot before removing it. Deleting a profile also deletes its accounts, certificates, VPN, and network settings, so remove only one you’re sure about.
Remove the Mac app or helper behind Bing
If Bing comes back after you log in, check Applications and System Settings, General, Login Items & Extensions. Look for things installed around when Bing first appeared.
Timing alone isn’t enough. Look for a real link, such as a matching extension, a profile mentioning the app, or an app that advertises browser search features.
Uninstall the unwanted app with its own uninstaller if it has one. Don’t remove genuine antivirus software just because it manages a Chrome setting.
Turn off that app’s background permission too. Choose reversible options where you can, and save your work before restarting.
Stubborn helpers sometimes run from a LaunchAgent or LaunchDaemon file. Ask someone experienced to check the exact file before you change it.
Never empty Library folders or delete every launch file. Those places also hold legitimate updaters, backup tools, and device drivers.
Test a clean Chrome profile first
Open Chrome’s profile menu and add a new profile just for testing. Leave sync off and skip importing extensions, then repeat your search.
Works there? Then the old profile’s settings or extensions are to blame, though an outside app might still be aiming at that profile alone.
Fails in both? Turn to policies and Mac apps. Keep the old profile intact, and don’t copy everything from it into the new one.
Hold on to the old profile until its bookmarks and passwords are safely saved. Import only what you need after you’ve found what was switching Chrome to Bing.
Only edit Chrome’s files with expert guidance
The Web Data file stores far more than search settings. Never rename it across all profiles or run cleanup scripts that touch every profile.
If an expert recommends a file-level fix, check chrome://version for the correct Profile Path. Quit Chrome entirely and back up that profile beforehand.
Keep notes on the one change you made and how to reverse it. Store browser backups privately, since they contain account and browsing data.
Search again before re-enabling sync. Resetting or editing files doesn’t prove the program forcing Bing has been removed.
If one shortcut goes to Bing, check site search
Site-search shortcuts work separately from your main engine, so one keyword can still open Bing. Check that shortcut at chrome://settings/searchEngines.
Find Out Where the Bing Redirect Starts
In a normal Chrome window, press Command+L and type a harmless search like weather. Then try the search box on a new tab, if there is one.
Watch each attempt. Does it go straight to Bing, or does an unfamiliar address flash first? That flash means something is sitting between you and Bing.
Open google.com directly for comparison. If searching there works, the problem is Chrome’s search setting, not Google.
Also notice whether Bing loads before you type anything. If it does, check Settings, On startup, and remove any Bing page you didn’t add.
Keep private searches and account names out of anything you post publicly. None of these fixes require wiping Chrome or your Mac.
When Bing Shows Up in Safari Too
Open Safari and search for something harmless. If Safari also lands on Bing, the cause is likely outside Chrome, such as a profile or app.
That said, Safari has its own search engine setting, so Bing there may simply be an old choice. Check Safari, Settings, Search before assuming the worst.
Network settings come last. Only look at proxy or DNS if every browser misbehaves, and write down the current values first.
A VPN rule or a hotel Wi-Fi login page can also send you somewhere unexpected. Those are network quirks, not a hijacked Chrome.
A search redirect doesn’t mean your passwords were stolen. If you typed a password into a strange page, change it on the real site.
Find a forced extension’s ID
Switch on Developer mode in chrome://extensions so each card shows its ID. Check that ID against chrome://policy or your scan results.
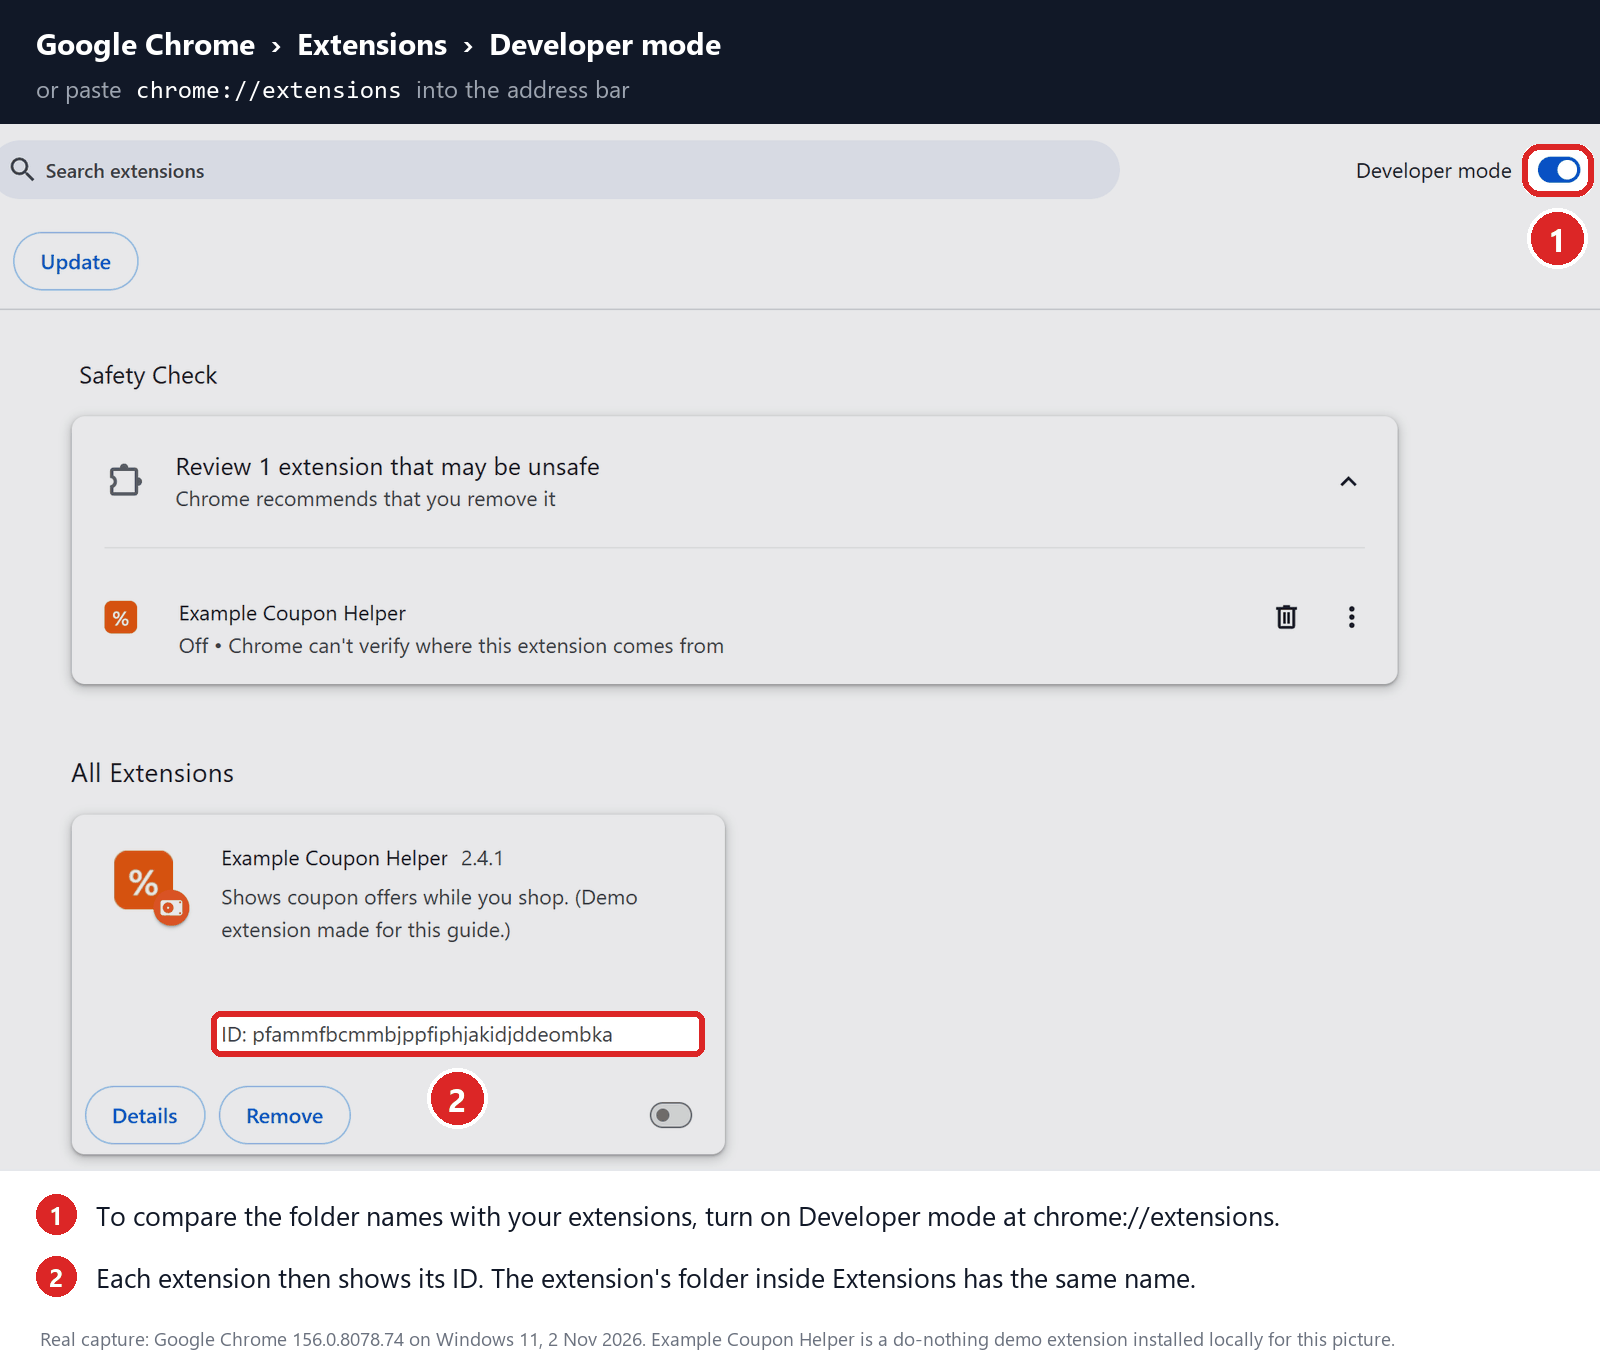
The card in the picture is a sample, not malware found on your Mac. Never load an unpacked extension or delete Chrome’s extension folders.
What to Do If You Still Can’t Get Rid of Bing
-
Jot down which search box fails, which Chrome profile you’re in, and when Bing comes back.
-
Save policy values, extension IDs, startup settings, and scan reports. Black out private paths and account details.
-
Post in the MalwareTips Mac removal-help forum or ask your administrator before touching profiles or startup files you can’t identify.
Ignore any cleaner advertised by the redirect itself. A pop-up shouting that your Mac is infected isn’t a real diagnosis.
Using more than one browser? Our complete Bing redirect guide covers Chrome, Edge, Firefox and Safari on Windows and Mac.
Related: Yahoo redirects in Chrome on Mac and Bing in Chrome on Windows.
Frequently Asked Questions
Why does my search engine keep changing to Bing?
Something keeps writing Bing back into Chrome. Common sources are a Bing or Rewards extension, a search add-on, a configuration profile, or an app that runs at login.
Note when it switches back: after quitting Chrome, after signing in to Chrome, or after restarting your Mac. That timing narrows down the cause.
Is the Bing redirect a virus?
Bing isn’t a virus. It’s Microsoft’s search engine. The redirect usually comes from adware or an extension you didn’t knowingly install. Security tools call that a browser hijacker.
Did Microsoft Rewards or a Microsoft extension switch Chrome to Bing?
It might have. Microsoft’s Bing Search and Rewards extensions for Chrome can make Bing your default search engine once installed.
Check chrome://extensions. If you don’t want one of them, remove it, then pick Google again under Settings, Search engine.
Why does Bing open when I open Chrome?
That’s a startup setting, not your search engine. Go to Settings, On startup, and choose Open the New Tab page, or delete Bing from your list of pages.
If that option is locked or keeps changing back, an extension or policy controls it. Start with Step 2. If the option is locked, use the advanced fixes.
How do I get rid of Bing on my Mac completely?
Fix every place it can live: Chrome’s search and startup settings, Chrome extensions, Mac profiles, and login items.
If Safari also uses Bing and you don’t want it, change it under Safari, Settings, Search.
Do I need to reset my Mac to stop Bing?
No. Erasing macOS isn’t a normal fix for a search redirect. Remove the extension, profile, or app responsible, and keep every change reversible.
The Bottom Line
To stop Chrome redirecting to Bing on Mac, set your search engine back, remove the Bing or search extension you didn’t want, and clear any unknown profile or login item.
If Bing returns, check chrome://policy and note what triggers it. Work Macs belong to IT, so leave their profiles alone.
For a case that won’t budge, share your notes and scan report in our Mac removal-help forum before deleting any system files.

Join the discussion
0 commentsShare your experience or ask a question about this article.
Discussion
Start the conversation
Have a question or something useful to share? Add the first comment.