


You set Google as your search engine, yet Edge on Mac keeps going back to Bing. Sometimes it’s only the new tab page, sometimes every search.
This guide explains when Bing is normal Edge behavior, how to make your choice stick, and how to remove any extension or Mac profile forcing Bing.
Overview
Why does Edge on my Mac keep going back to Bing?
Bing is Edge’s built-in search engine, and Microsoft encourages you to keep it. So a lot of Bing behavior in Edge is normal and has nothing to do with malware.
These are the harmless reasons Bing shows up after you pick another engine:
- The new tab page. Its search box uses Bing unless you tell Edge to send new-tab searches to the address bar instead.
- A reset. Restoring Edge’s settings to their defaults puts Bing back as the search engine.
- A second profile. Each Edge profile has its own search setting, so another profile may still use Bing.
- Sync. Edge syncs settings and extensions across signed-in devices, so test with sync paused if Bing returns right after you sign in.
- Work or school rules. An administrator can lock Edge’s search engine, and then you can’t change it yourself.
- Bing and MSN pages. A search box on those sites always uses Bing, whatever your Edge setting says.
The unwanted causes on a Mac are an extension that switches your search, an app that keeps resetting it, or a configuration profile that locks it.
Watch for a strange site that flashes before Bing. In 2026, Microsoft’s security team found an extension that logged address bar searches on a lookalike site, then passed them on.
The quick fix that makes your search engine stay
Do these in order and run a test search after each one. Stop once Bing no longer appears where you don’t want it.
- Type edge://settings/search, open Search engine used in the address bar, and choose Google or the engine you prefer.
- If the same page now shows a new-tab search option, choose Address bar so new tabs stop using the Bing box.
- Type edge://extensions and turn off anything you don’t recognize, especially search, new tab or AI helper extensions. Remove the one that brings Bing back.
- Open System Settings > General > Device Management, or Privacy & Security > Profiles on macOS Ventura and Sonoma, and remove any profile you didn’t install.
- Quit Edge with Command+Q, reopen it, and search from both the address bar and a new tab.
What to do if Bing comes back
If Bing returns after a restart or after you sign in to Edge, something is still resetting it. Follow the full steps below, including the Mac scan.
A grayed-out engine menu or a “managed by your organization” notice means a policy is in charge. Open edge://policy to see which rule is set.
On a work or school Mac, ask IT first. Microsoft only allows Edge’s search engine to be forced on Macs under device management, which is normal for company computers.
The steps here cover search changes, hijacking extensions and Mac adware. If an account was stolen, also change its password on that service’s real website.
How to Get Rid of Bing in Edge on Mac
Begin at Step 1. Once Bing stops showing up where you don’t want it, go straight to the final test instead of doing every step.
- Choose Edge’s search engine
- Final test: does your engine stay?
- Advanced checks for a locked or returning Bing
Step 1: Pick your search engine instead of Bing
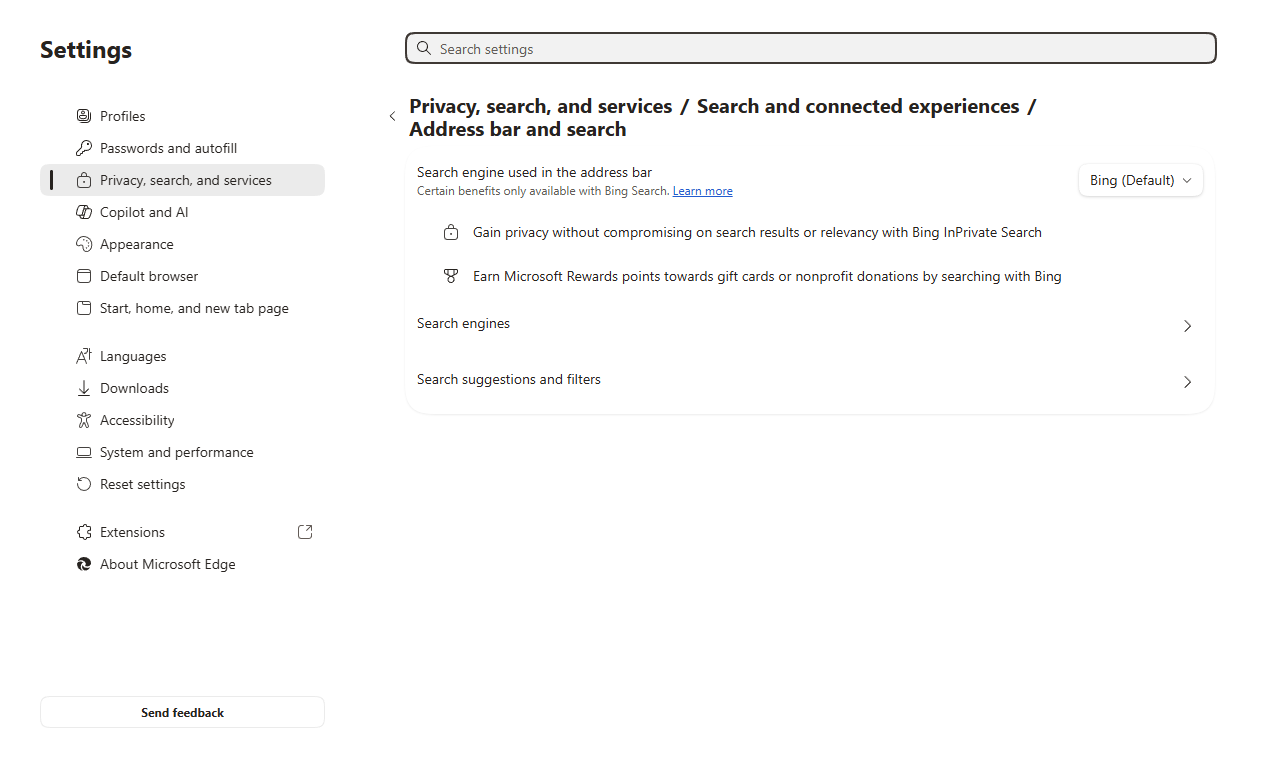
Our Edge screenshots come from a Windows test computer. Edge for Mac uses the same setting names, just inside Mac-style windows.
Edge: change the address bar search engine
-
Open Address bar and search
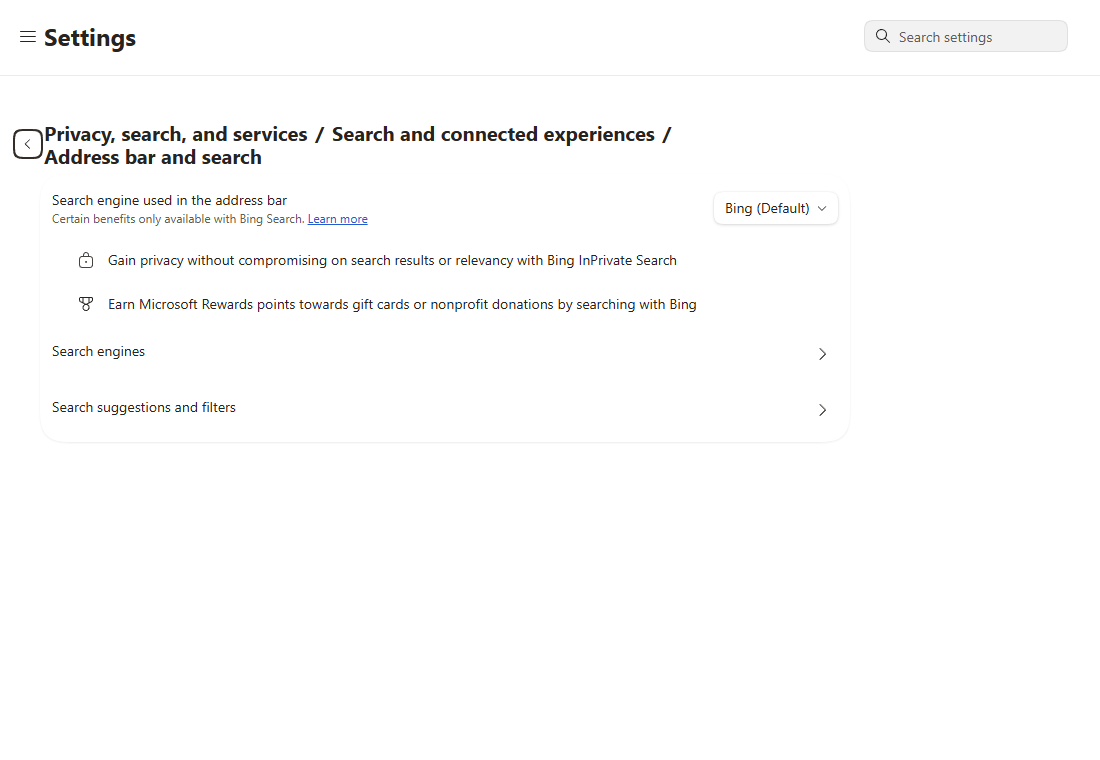
Paste edge://settings/search into the address bar and press Enter. You’ll land on Address bar and search, which may sit under Privacy, search, and services > Search and connected experiences.
-
Select the engine you want
Open the Search engine used in the address bar menu and select the engine you want. Bing sitting there at first is simply Edge’s factory default.
Can’t find your engine? Visit its official site, search for anything, then reopen this list. Edge picks up most engines that way.
-
Check new tabs as well as the address bar
Open a new tab and type a search in the address bar, not the box in the middle of the page. That box can still use Bing.
On the same settings page, Edge may offer a choice for searches on new tabs. Pick Address bar there. If you don’t see it, test from the address bar only.
Getting results from your engine? Go to the final check. Only move on to extensions if Bing still takes over.
Step 2: Find an extension that brings Bing back
Edge: switch off extensions that change search
-
Open the Extensions page
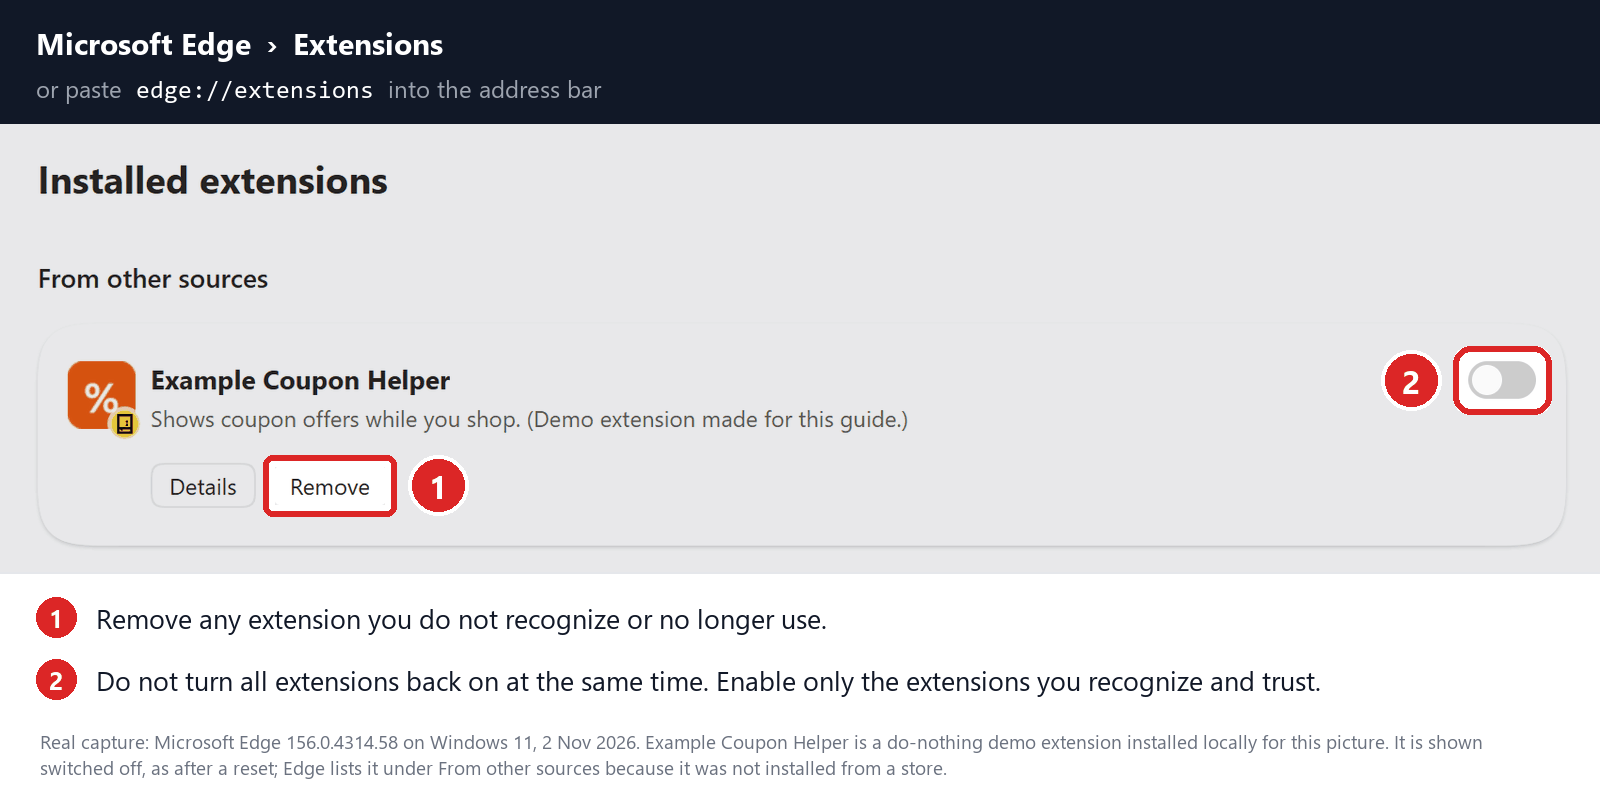
Paste edge://extensions into the address bar and press Enter. The picture marks Remove and the on/off switch on a sample extension, not one from your Mac.
-
Switch off one suspect at a time
Look for anything that changes search or replaces the new tab page. Turn its switch off, then repeat your address bar and new tab searches.
A briefcase icon next to the switch means the extension was installed by policy. Microsoft warns that extensions claiming to be managed by an organization can sometimes be malware.
Found the culprit? Click Remove, confirm, and check that your chosen engine is still set on the Step 1 page.
No extensions at all? Skip ahead. If one won’t uninstall or keeps reappearing, use the advanced checks rather than deleting extension folders.
-
Move on only if Bing persists
Quit and reopen Edge. If searches still go where you want, head to the final check and leave your other profiles as they are.
If pages open by themselves through notifications
Pages that pop open while you aren’t searching usually come from website notifications you allowed. Fixing those is separate from fixing Bing search.
-
In Edge, go to Settings and search for Notifications. Open the site permissions entry, locate the unwanted site in the Allowed list, and change it to Block or Remove.
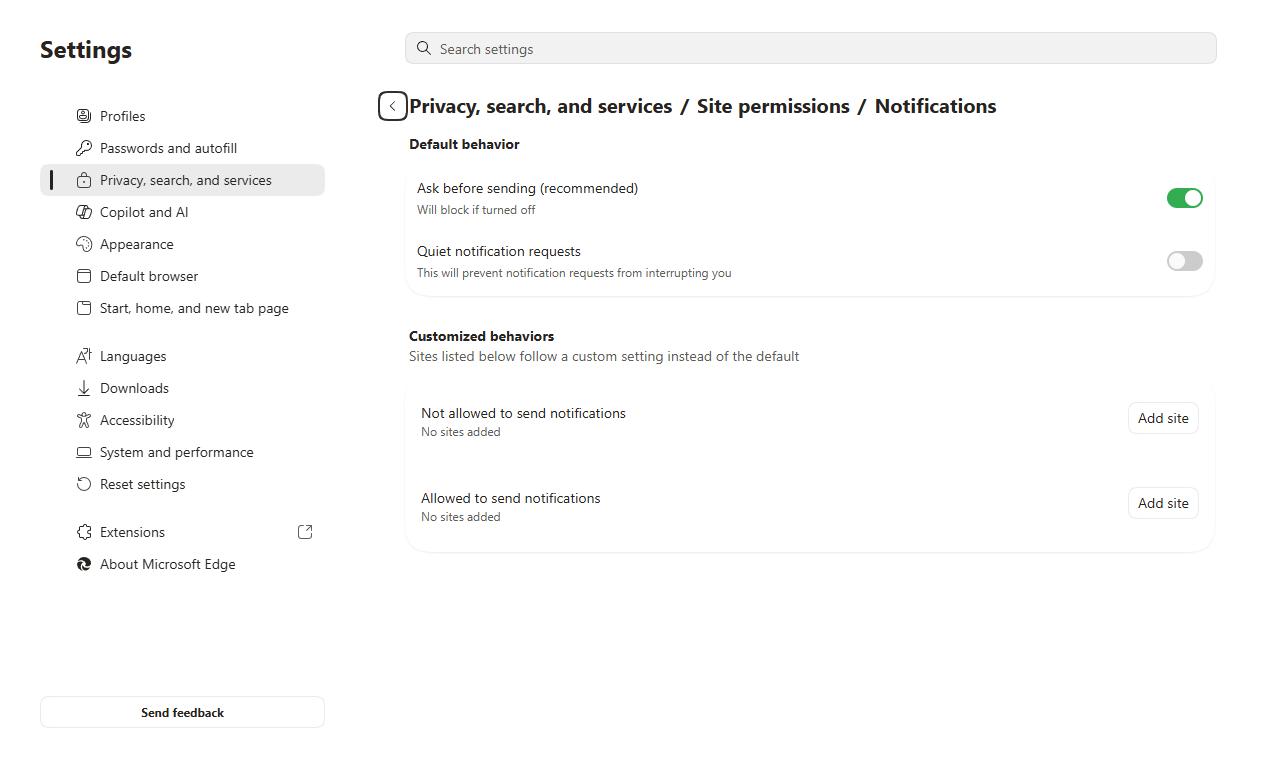
Change permissions here, never through buttons in the notification itself. Once the alerts stop and searches behave, you can skip the scan and reset.
Step 3: Scan the Mac if Bing keeps returning
Changing the setting already worked? Skip this step. Scan when Bing returns after every fix, an extension reinstalls itself, or you spot an unknown app.
Check your Mac for adware with Malwarebytes
A scan hunts for adware and unwanted apps that can keep resetting Edge. You don’t need one when Bing is simply Edge’s normal default.
The install pictures below show an older version from our Mac guide, so file names and window details can differ.
MalwareTips may receive a commission from optional purchases. You don’t need a paid protection plan to follow the manual browser checks.
-
Download Malwarebytes for Mac
Malwarebytes for MacMac-specific scan and threat reviewChoose the Mac download. The Windows installer and AdwCleaner won’t run on a Mac, and a cleaner pushed by a pop-up should never be trusted.
-
Open the downloaded package
Open Finder, go to Downloads, and double-click the Malwarebytes installer package. The version number on your file will differ from the screenshot.
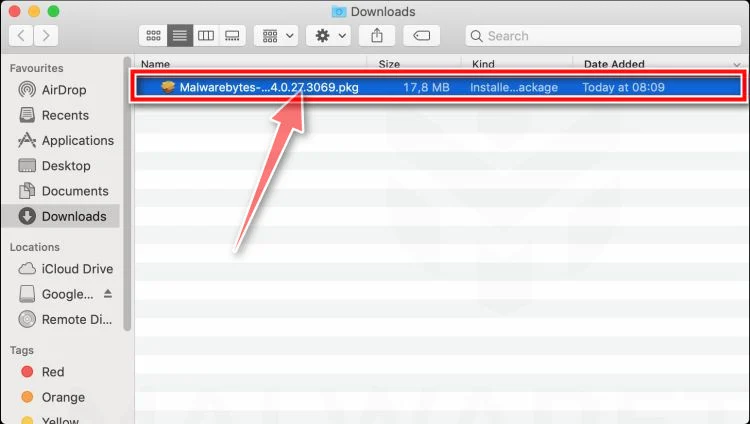
Confirm the package really comes from Malwarebytes. A file with an odd name or an unknown publisher should not be opened.
Click Continue on the installer’s first screen.
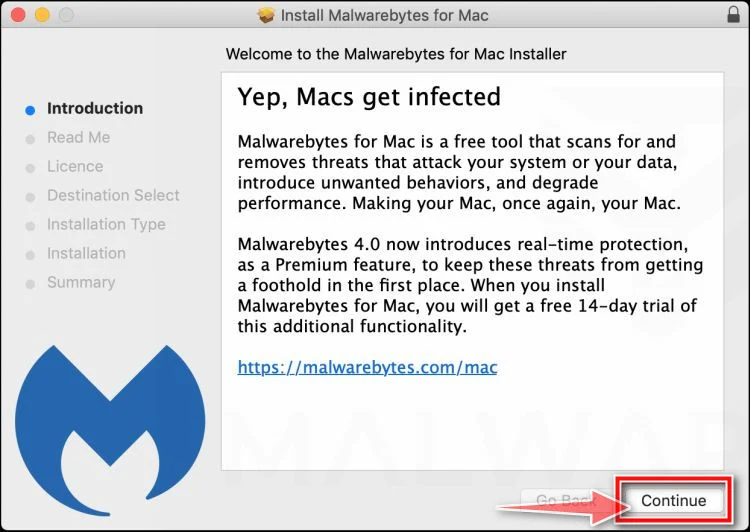
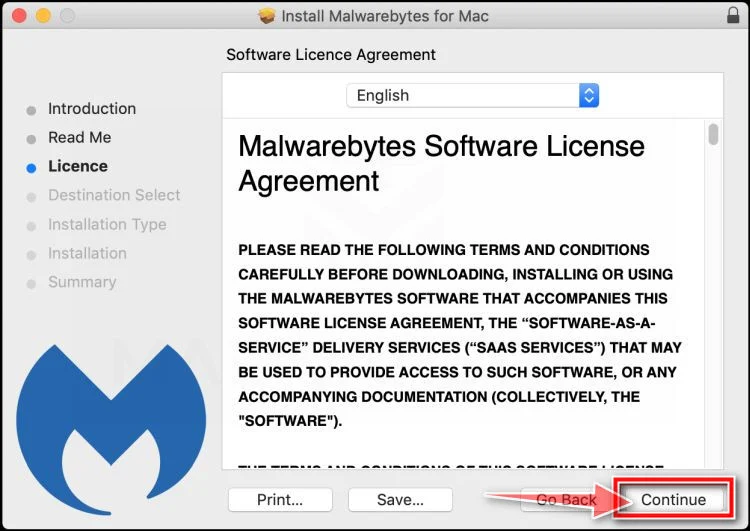
Read the license and continue only if you agree. Agreeing doesn’t buy anything; paid plans are offered separately.
-
Complete installation and required permissions
Work through the rest of the installer screens and click Install.
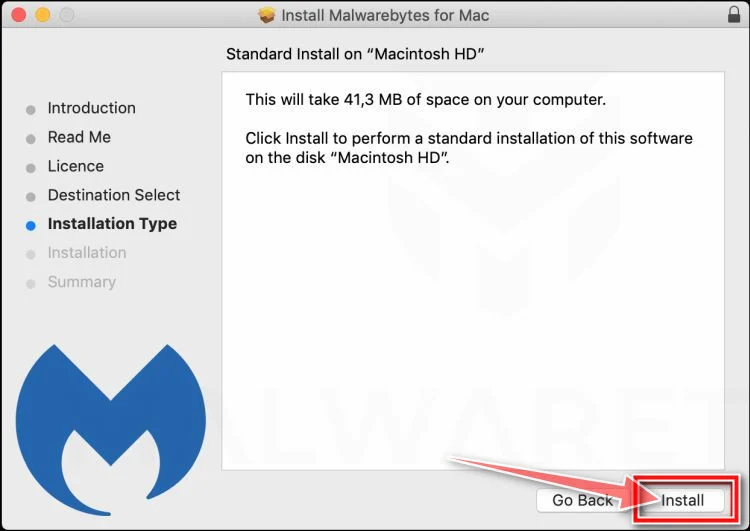
macOS will ask for your Mac password or Touch ID. Type it only into the macOS prompt; no website or phone caller should ever ask for it.
Asked for Full Disk Access? Go to System Settings, Privacy & Security, Full Disk Access and turn on Malwarebytes. On older macOS, look in System Preferences.
Back in Malwarebytes, you may see trial or subscription offers. Decline any you don’t want.
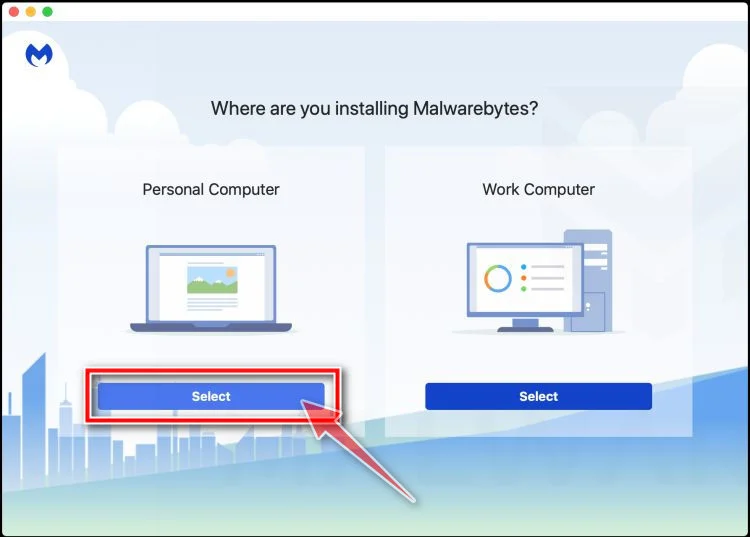
When it asks about the computer type, pick Personal Computer if the Mac is yours. A work Mac should follow its IT setup instructions.
-
Update the app and choose an available scan
Click directly on the Scanner tile rather than its Scan button. Next choose the Scan tab, then Advanced scans, then Custom scan.
Quick and Custom scans cost nothing. Threat Scan may need a trial or subscription; the older Threat Scan screenshot below isn’t telling you to buy one.

A Finder window opens. Select the folder or app to check and click Open, and the custom scan begins.
Avoid the dashboard’s Scan button if you want the free option, because it may launch a Threat Scan instead.
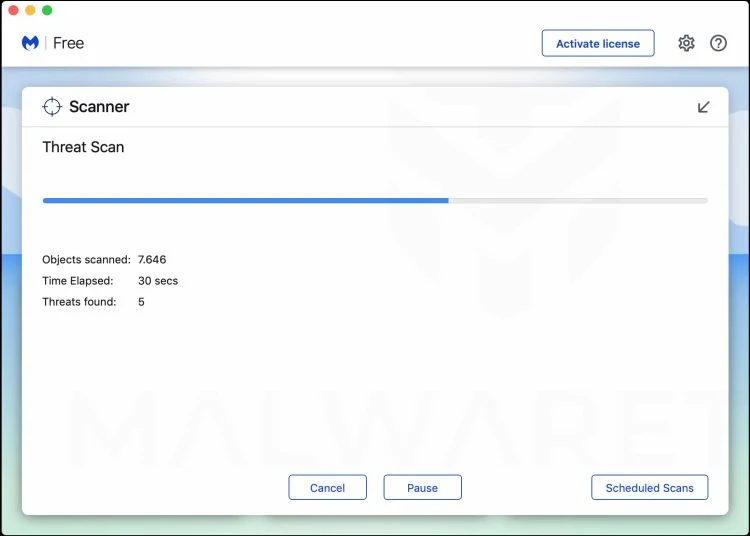
Leave Malwarebytes open and running until the scan completes.
The picture below is an older Threat Scan in progress. Wait for the results of the scan you actually started.
-
Check the results and quarantine threats
Read each detection’s name and file location before quarantining it. Keep the scan report in case you want a second opinion.
Older versions use a Confirm button for selected items, as shown. Click the equivalent quarantine button in your version.
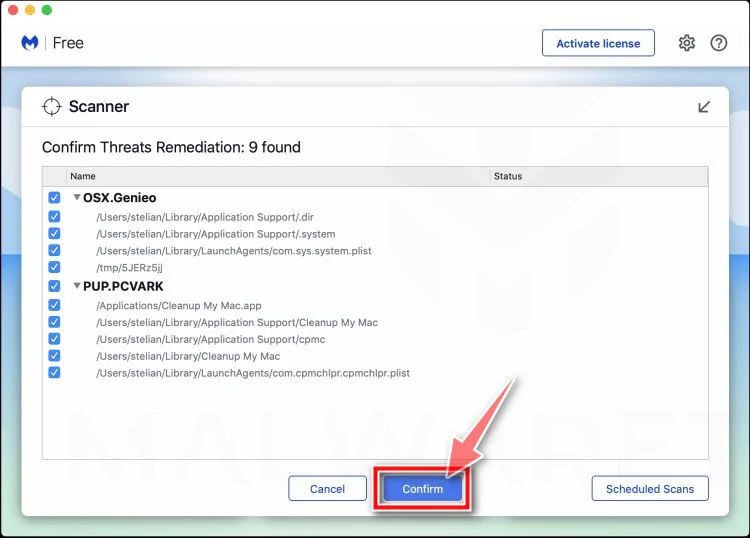
Those detections are samples. Work from the list your scan produced.
-
Restart only if requested
Save your work before agreeing to any restart Malwarebytes needs. Afterward, reopen it and keep the report.
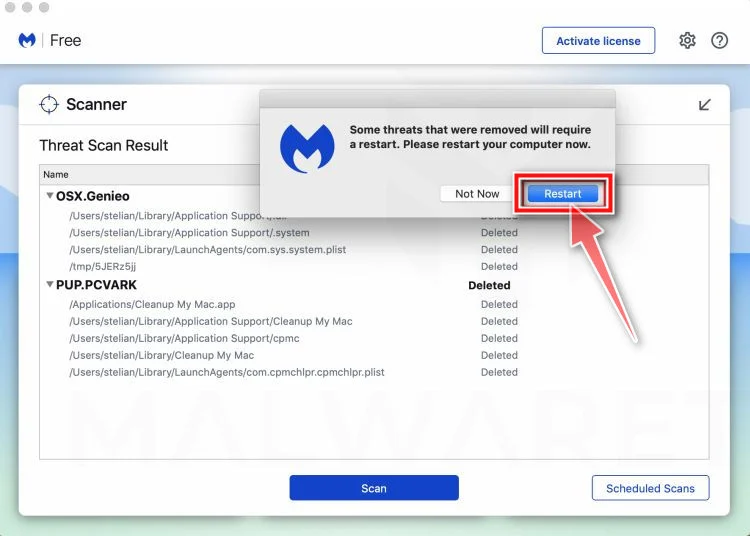
Then repeat your Edge search test. A scan can’t put every browser setting back, so recheck your engine and extensions too.
-
Write down what still happens
If Bing still comes back, note what triggers it: a restart, opening Edge, or signing in. Keep extension names, edge://policy entries and the scan report.
Don’t delete every profile or launch folder to force a fix. Identify what each item belongs to first.
Step 4: Reset Edge if your choice still won’t stick
If searches already work, skip to Step 5. Reset Edge only when the earlier steps haven’t fixed it.
Reset Edge once the cause is gone
Resetting Edge won’t remove a Mac app or a configuration profile. Remove those first, or the old behavior can return right after the reset.
Save important favorites first. If you sync, pausing Settings and Extensions sync lets you test without old data copying back.
These screenshots come from Windows, but Edge’s reset uses the same buttons and labels on a Mac.
-
Open the reset settings page
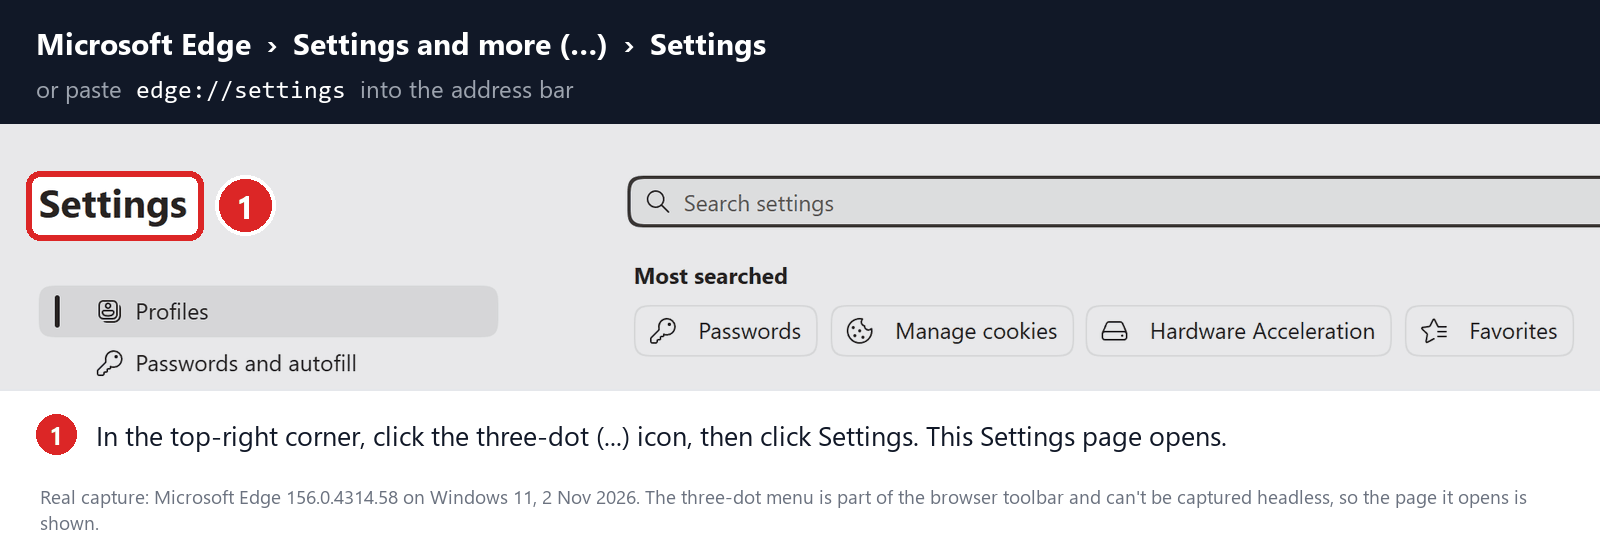
Make sure you’re in the profile with the problem. Type edge://settings/reset, press Enter, and click Restore settings to their default values.
You can also get there from Edge Settings. If the sidebar is hidden, search for reset in the settings search box.
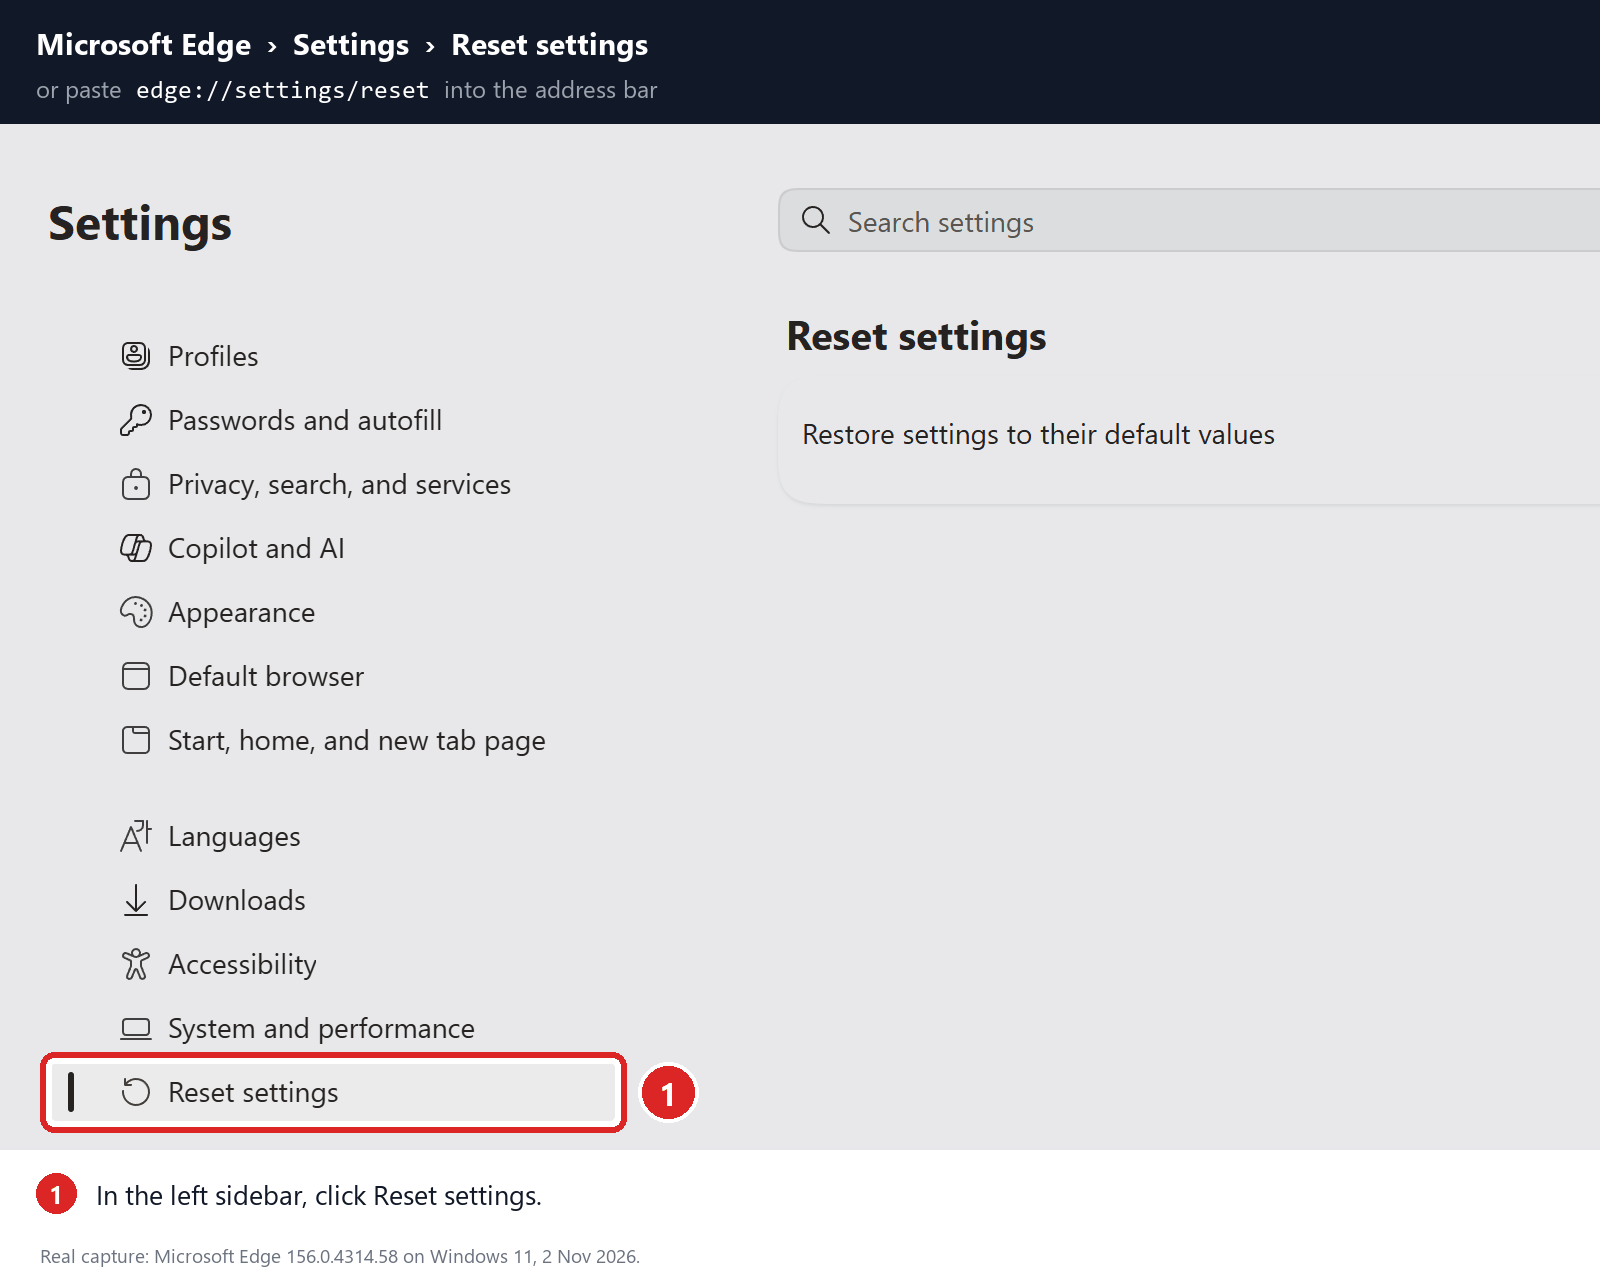
In the sidebar, choose Reset settings.
On the reset page, look for Restore settings to their default values.
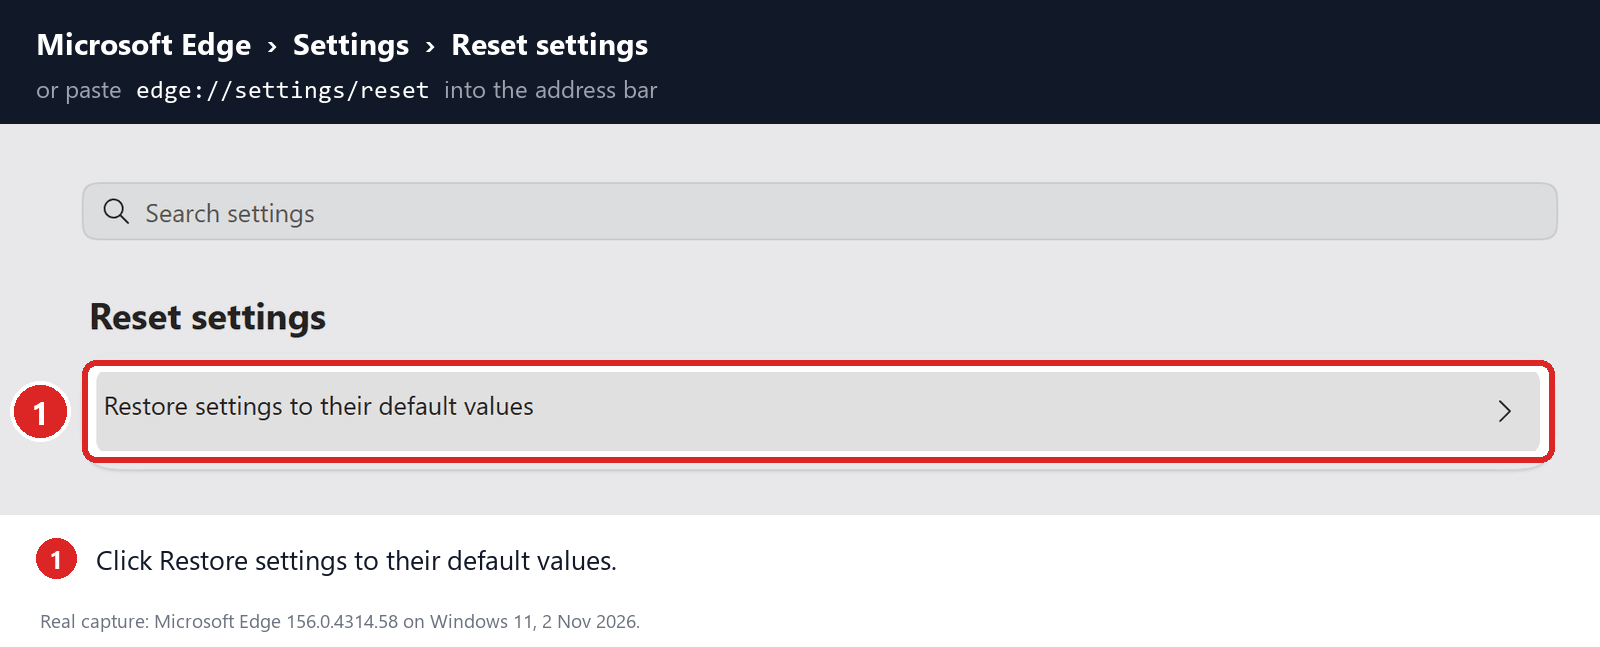
Only the current profile is reset. Any other Edge profiles on this Mac keep their settings.
-
Read the warning, then click Reset
Edge warns that the reset restores your startup page, new tab page and search engine, turns off extensions, and clears cookies. Favorites, history and passwords aren’t touched.
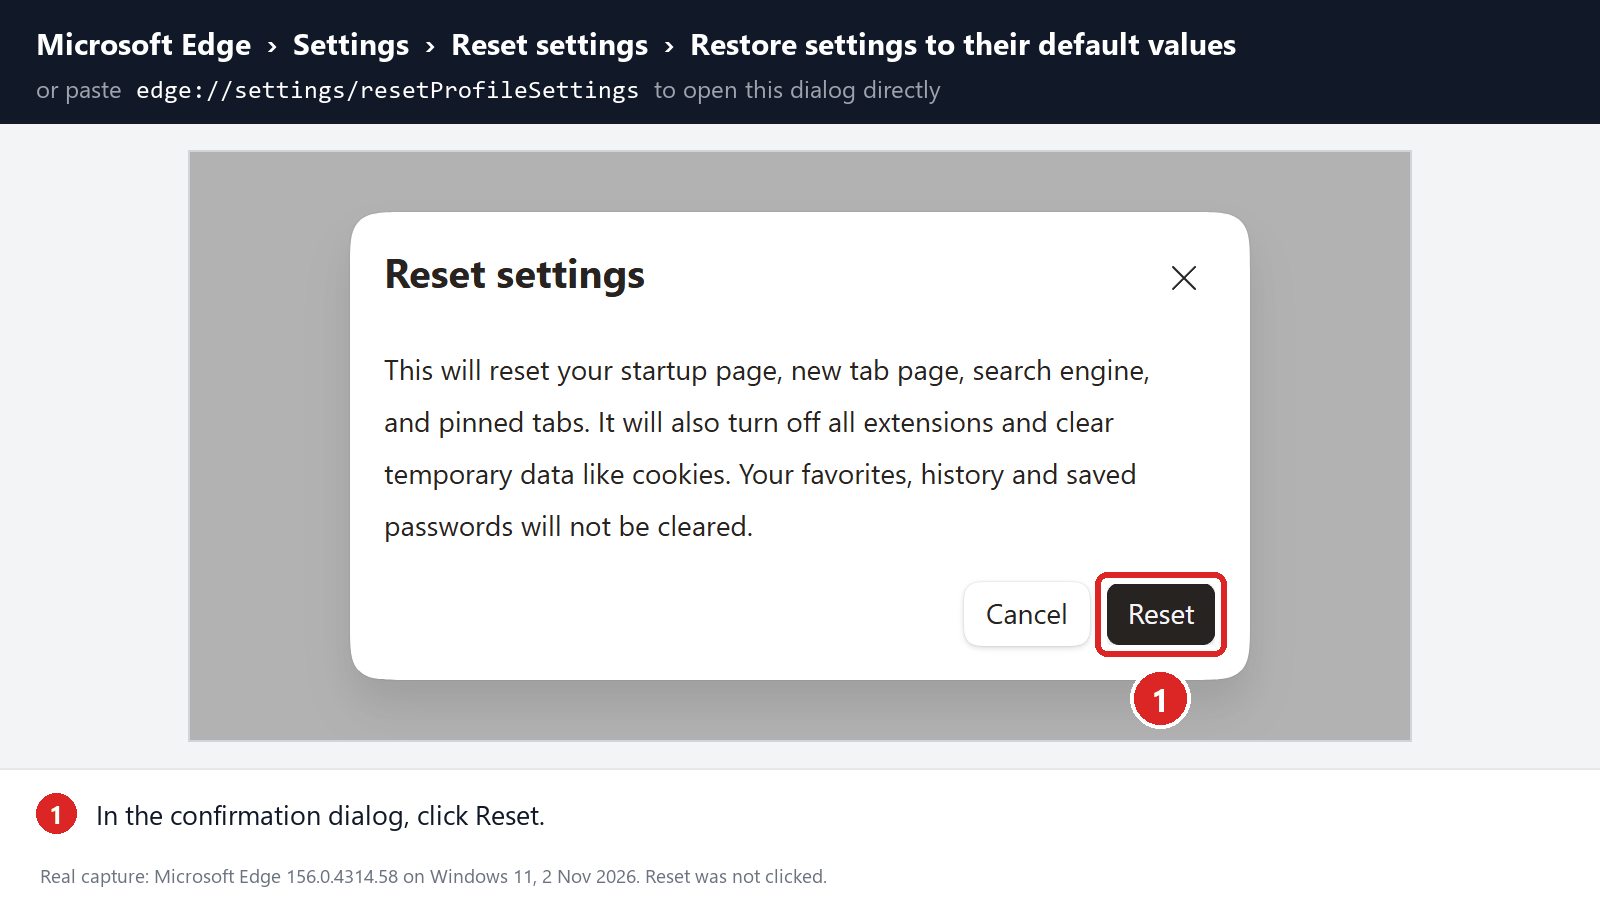
Click Reset if that’s acceptable. With cookies cleared, you’ll need to sign back in to most websites.
-
Pick your engine again, then add extensions back
A reset sets Edge’s search engine back to Bing. That is expected, not a new hijack, so repeat Step 1 right away.
Search once with every extension off. Then switch trusted extensions on one by one, testing between each, to catch the one that brings Bing back.
Step 5: Confirm Edge keeps your search engine
Repeat the search that used to open Bing. Try the address bar, a new tab, and the page Edge shows at startup.
-
Press Command+Q to quit Edge, reopen it, and check that your engine is still chosen.
-
If Bing used to return after the Mac restarted, save your work, restart now and test again.
-
Turn sync back on one data type at a time if you paused it. The fix holds once searches survive whatever used to undo it.
Passed every test? You’re done. The advanced section is only for a locked setting, an extension that won’t leave, or Bing that keeps coming back.
Advanced Checks for a Locked or Returning Bing
Show checks for policies, configuration profiles and startup apps
Skip this section if the fix has held. On a Mac owned by your employer or school, check with IT before touching profiles or startup items.
See which policy or profile locks Edge to Bing
Type edge://policy and click Reload policies. Look for entries about search, extensions or startup pages and note each value and source.
A search entry such as DefaultSearchProviderSearchURL shows the engine being forced. If it points to bing.com, someone set Bing on purpose, often an IT team.
An ExtensionInstallForcelist entry means an extension is installed by policy. It usually matches the extension showing a briefcase in edge://extensions.
For a company or school Mac, take this to IT. Don’t try to remove enrollment or work around required browser rules.
On your own Mac, check System Settings > General > Device Management. macOS Ventura and Sonoma list profiles under Privacy & Security > Profiles instead.
Double-click a profile to read who issued it and what it controls.
Removing a profile deletes the settings it installed, which can include email, certificates or VPN access. Screenshot its details first.
Change only the item tied to Bing. Avoid tools or commands that wipe all Edge preferences or every Microsoft support folder.
Still unsure where a rule comes from? Ask in our forum. Registry fixes written for Windows don’t apply to Edge on a Mac.
Remove the Mac app that keeps switching Edge to Bing
In Finder, open Applications and look for anything you don’t remember installing, especially apps that arrived with the extension or profile.
Remove it using its uninstaller, or drag it to the Trash. Microsoft AutoUpdate and your security software normally run in the background, so leave them installed.
Next, open System Settings > General > Login Items & Extensions. Find the app behind any login or background item you don’t recognize.
Turn off only items from the unwanted app. Switching off everything can break legitimate software.
Timing helps. Bing returning after a Mac restart suggests a startup item; returning after Edge sign-in suggests sync or an account policy.
Experienced users can inspect the LaunchAgents and LaunchDaemons folders. Check what each file runs, back it up, and change one item at a time.
Never empty those folders or quit every Microsoft process. Shared components serve other apps too.
Run the Mac scan from Step 3 if you find an unknown app or a returning extension. Edge simply using Bing doesn’t need a scan.
Compare with a clean test profile
From Edge’s profile menu, add a new profile called something like Test. Skip sign-in and don’t import any data yet.
Run your search there and open edge://policy. The new profile starts with clean settings, while rules set for the whole Mac still apply to it.
Test profile fine but the old one broken? The cause sits inside the old profile, often an extension or synced setting. Both broken? Look at Mac apps and profiles.
A clean test profile isn’t proof the whole Mac is clean. Unwanted software can affect just one profile or one user account.
Hold on to the old profile until you’ve saved what you need. Move favorites and passwords over, and leave old extensions behind.
Leave Edge’s data files alone
Guides sometimes suggest deleting Edge’s Web Data file. It stores much more than search settings, so only touch it if a trusted helper asks.
If that happens, note the Profile Path shown at edge://version, quit Edge fully, and copy the profile folder somewhere safe first.
Treat that copy as private, since it holds your browsing data. Test a search before switching sync back on.
Check Whether Edge Is Really Redirecting to Bing
Press Command+L in Edge and search for something harmless. Then search again from the box on a new tab page and compare where each one lands.
Visit your preferred engine’s website and search there too. If that works but the address bar opens Bing, Edge’s search setting is the problem.
Watch the address bar as results load. A different site flashing before bing.com means something is passing your searches through it.
If Bing opens before you type anything, check your startup page, bookmarks and restored tabs. That is separate from the search engine.
If Safari and Chrome Also Go to Bing
Search in Safari or another browser on the Mac. The clue is the same unknown site appearing first, not just Bing showing up.
An app or configuration profile can affect several browsers at once. Browsers you set to Bing yourself will also show Bing, so check each one’s setting.
If every browser is affected, check proxy, DNS and VPN settings. Write down the current values first, since work or school may require them.
Don’t reset all network settings or turn off security tools to fix one browser. That won’t remove an extension.
Run these tests on your usual home network. Hotel or office Wi-Fi sign-in pages can redirect traffic and confuse the test.
Check edge://policy before removing anything
In edge://policy, click Reload policies and check for rules about search or extensions. Record each one’s value and where it comes from.
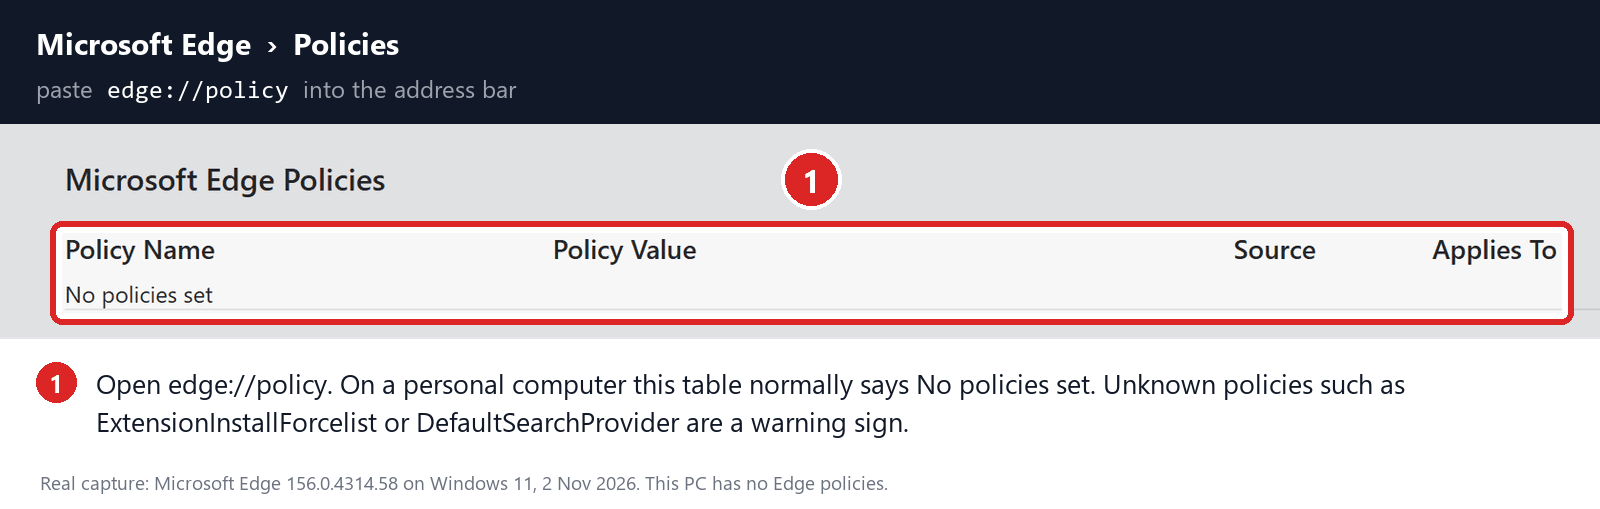
The message No policies set means nothing is locked. If rules are listed, work out who set them; work or school rules are IT’s call.
What to Do If Edge Still Switches Back to Bing
-
Describe what fails, which profile you used, your chosen engine, any site that appears before Bing, and what brings Bing back.
-
Keep edge://policy output, extension IDs, app names and the scan report. Remove your name, email and personal file paths before sharing.
-
Get personal help in the MalwareTips Mac support community, or contact your administrator if work or school manages the Mac.
If a page along the way asked for your login and you entered it, change that password on the real site. Fixing Edge won’t sign anyone out.
Don’t phone a number shown on a warning page or allow remote access you didn’t request. Use support you found yourself.
Using more than one browser? Our complete Bing redirect guide covers Chrome, Edge, Firefox and Safari on Windows and Mac.
Related: Yahoo redirects in Edge on Mac and Bing in Edge on Windows.
Frequently Asked Questions
Why does my search engine keep changing to Bing in Edge?
Usually because Bing is Edge’s default. A reset, a new profile or the new tab search box can all bring Bing back without anything being wrong.
If Bing returns after you’ve set everything correctly, look for an extension, an app or a configuration profile that keeps changing it.
Is Bing a virus on my Mac?
No. Bing is Microsoft’s search engine and Edge’s built-in default. The harm comes from an extension or adware that forces Bing or passes your searches through another site first.
How do I get rid of Bing on my Mac completely?
Bing is a website, so there’s nothing to uninstall. Choose another engine at edge://settings/search and set new-tab searches to use the address bar.
If Safari or Chrome also land on Bing, check those browsers’ own settings and look for an unknown configuration profile in System Settings.
Why does the Edge new tab page still search with Bing?
The new tab search box uses Bing by default. When your address bar engine isn’t Bing, Edge offers an option to send new-tab searches to the address bar instead.
Why does Google redirect to Bing in Edge?
A normal search on google.com doesn’t hand you to Bing. If yours does, an extension or other software is intercepting your searches. Check edge://extensions, then run the Mac scan.
Why can’t I change Bing in Edge on my work Mac?
A policy is controlling Edge, and on a company Mac that’s normal. Open edge://policy to see the rule, and ask IT if you need it changed.
On a personal Mac with the same lock, look for a configuration profile you didn’t install and remove it.
The Bottom Line
Bing in Edge only matters when it overrides you. Set your engine in edge://settings/search, send new-tab searches to the address bar, and remove unwanted extensions or profiles.
If Edge on Mac keeps going back to Bing after that, scan with Malwarebytes, reset Edge, choose your engine again, and check edge://policy for a locked rule.
Still stuck, or is the Mac managed by work or school? Share your notes in the MalwareTips Mac forum or ask your IT team.

Join the discussion
0 commentsShare your experience or ask a question about this article.
Discussion
Start the conversation
Have a question or something useful to share? Add the first comment.