

Why Does the Internet Stop Working After a Virus Removal?
When a virus infects your system, it often modifies your network settings to monitor your activity, redirect traffic, or block specific websites. Even after the virus is removed, these changes can persist, causing connection issues. Here are some common reasons:- Modified DNS Settings: Malware may change your DNS (Domain Name System) settings, redirecting your traffic through malicious servers.
- Corrupted Network Drivers: A virus can damage or corrupt your network adapter drivers, preventing your computer from connecting to the internet.
- Disabled Network Services: Certain malware disables critical Windows services, such as the DHCP client or DNS client, which are essential for internet access.
- Firewall or Security Software Issues: Some malware modifies your firewall settings, blocking internet access even after removal.
- Proxy Server Settings: Malware may enable a proxy server, causing your browser to fail to connect to the internet.
- System File Corruption: Some viruses damage essential Windows system files required for networking.
Fix internet connection after malware removal
Before changing network settings, check whether another device can connect to the same network. Keep a record of any custom DNS, VPN, or proxy settings. On a work or school device, ask the administrator before resetting them. If this PC is offline, download the scanner installer on a clean device; tools that require cloud updates may still need a working connection.
 Fix Internet Connection After Removing Malware for Windows PC
-
 Fix Internet Connection After Removing Malware for Mac
Fix Internet Connection After Removing Malware on Windows PC
- STEP 1: Remove Malicious Proxy Servers
- STEP 2: Remove Malicious DNS Servers
- STEP 3: Reset your browser settings to default
- STEP 4: Use AdwCleaner to remove DNS or Proxy Hijackers and Malicious Browser Policies
- STEP 5: Use Malwarebytes to remove DNS or Proxy Hijackers and Malicious Browser Extensions
- STEP 6: Use HitmanPro to scan for DNS or Proxy Hijackers and Other Malware
STEP 1: Remove Malicious Proxy Servers
In this first step, we will manually check if there are Malicious Proxy servers installed on the computer.-
Open “Run” and type INETCPL.CPL.
To open the Run Command box, press the Windows key and R key together on your keyboard. You can also right-click your Start button on your taskbar and select “Run” from the list. In the Run box, type INETCPL.CPL and then click OK.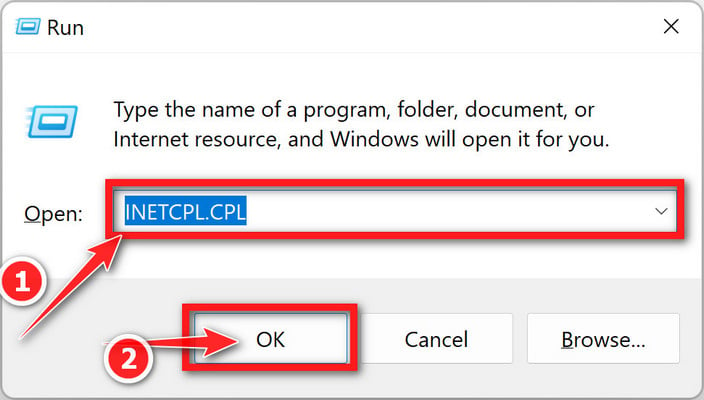
-
Click on “Connections”, then on “LAN settings”.
When the Internet Connections opens, click the “Connections”, then click on “LAN settings”.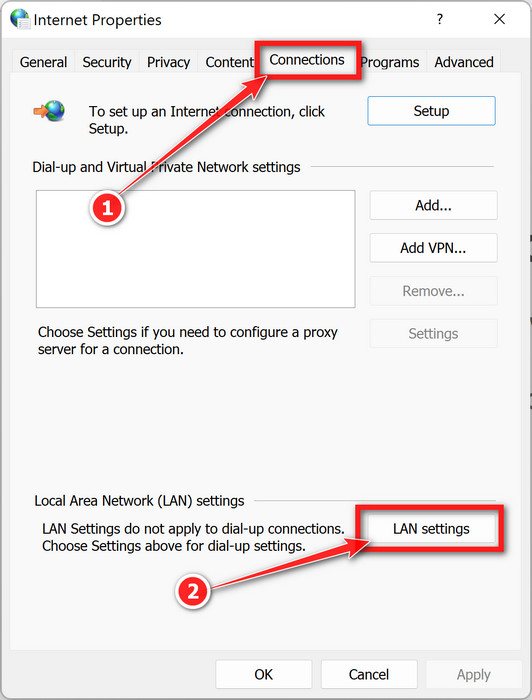
-
Uncheck “Use a Proxy server”.
In LAN Settings settings, uncheck “Use a Proxy server”, then click on “OK”.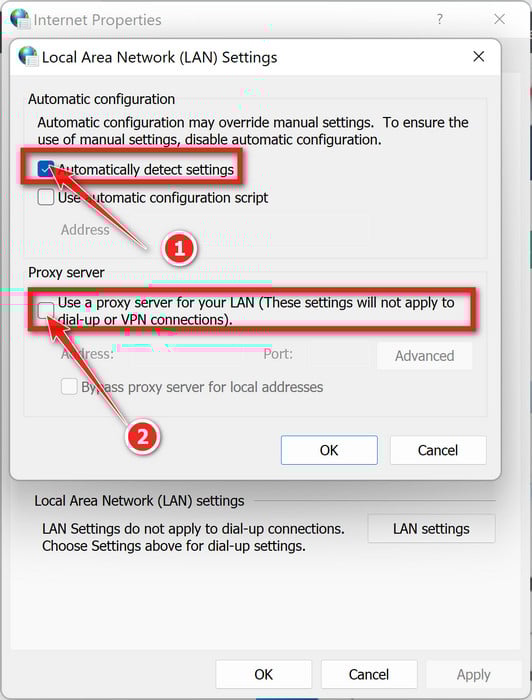
STEP 2: Remove Malicious DNS Servers
In this second step, we will manually check if there is a Malicious DNS server installed on the computer.-
Open “Run” and type ncpa.cpl.
Open a Run window by pressing the Windows key + R simultaneously. Type “ncpa.cpl” and hit OK.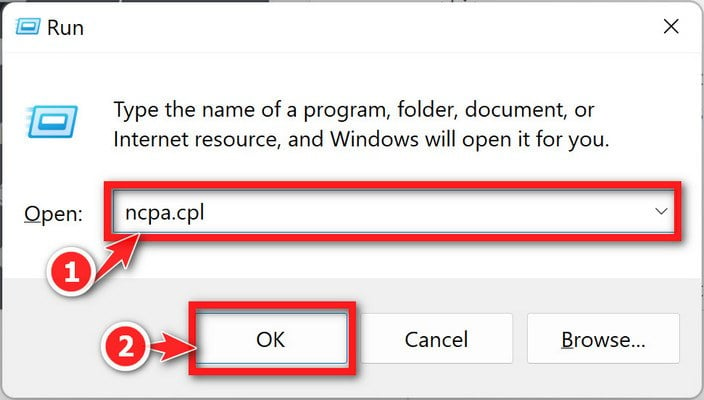
-
Find your active internet connection, open “Properties”.
A Network Connections screen will appear with a list of your network adapters. Find your active internet connection—which is typically labeled Ethernet, Local Area Network or Wireless– and right-click it, then select Properties.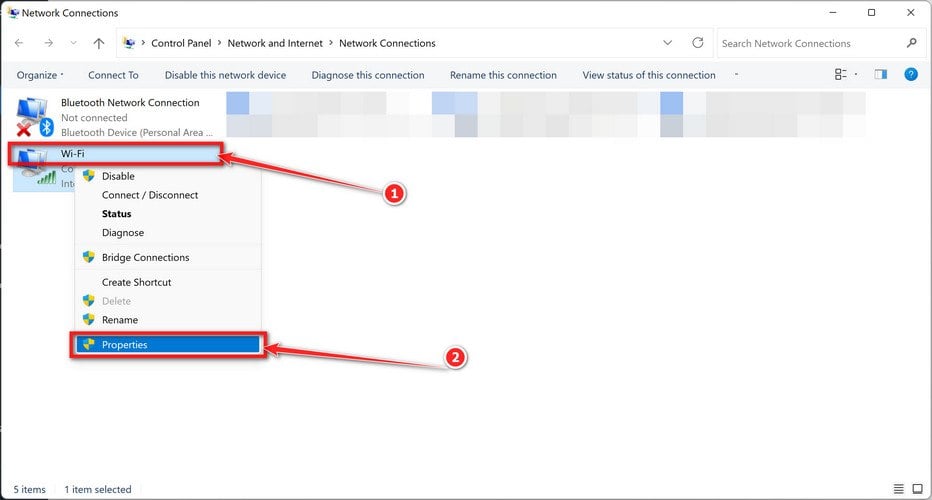
-
Double-click “Internet Protocol Version 4 (TCP/IPv4)”.
In the Ethernet or WiFi Properties box that appears, find the item labeled Internet Protocol Version 4 (TCP/IPv4) and double-click it.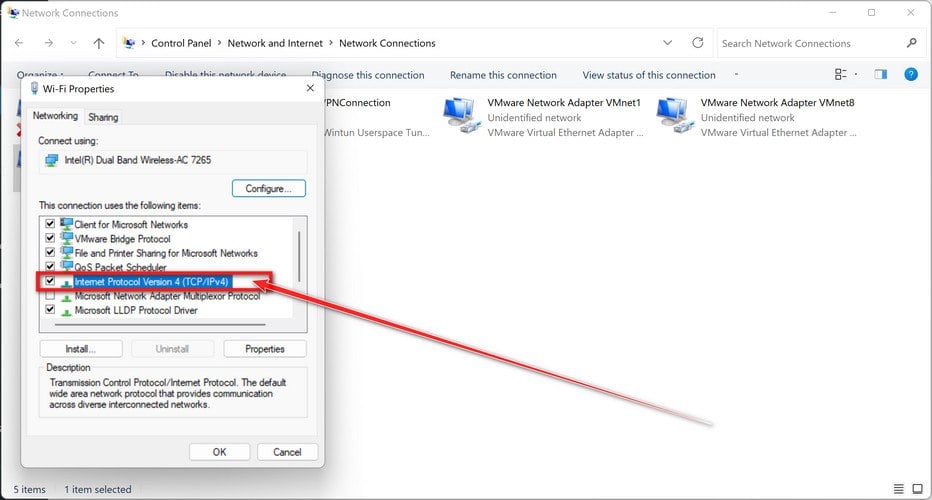
-
Select “Obtain DNS server address automatically”.
In the Properties box that appears, select Obtain DNS server address automatically. Click OK. Your DNS servers will now be restored.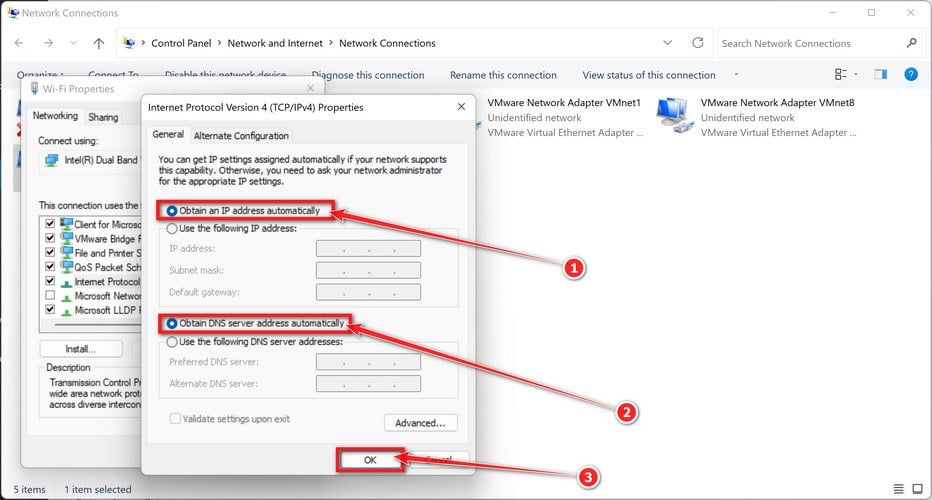
Select Obtain DNS server address automatically
STEP 3: Reset your browser settings to default
In this third step, we will reset your browsers back to their default configuration. Please note that this method will remove all extensions, toolbars, and other customizations but will leave your bookmarks and favorites intact. For each browser that you have installed on your computer, please click on the browsers tab below and follow the displayed steps to reset that browser.Remove DNS or Proxy Hijackers from Chrome for Windows
To remove DNS or Proxy Hijackers from Google Chrome, we will reset the browser settings to their original defaults. This will reset your startup page, new tab page, search engine, and pinned tabs. It will also disable all extensions and clear temporary data like cookies. Your favorites, history, and saved passwords will not be cleared.-
Click the three dots in the top-right corner and then click on “Settings”.
Open Chrome and click on the menu button (represented by three vertical dots) in the top right corner of the window. In the dropdown menu that opens, click “Settings“.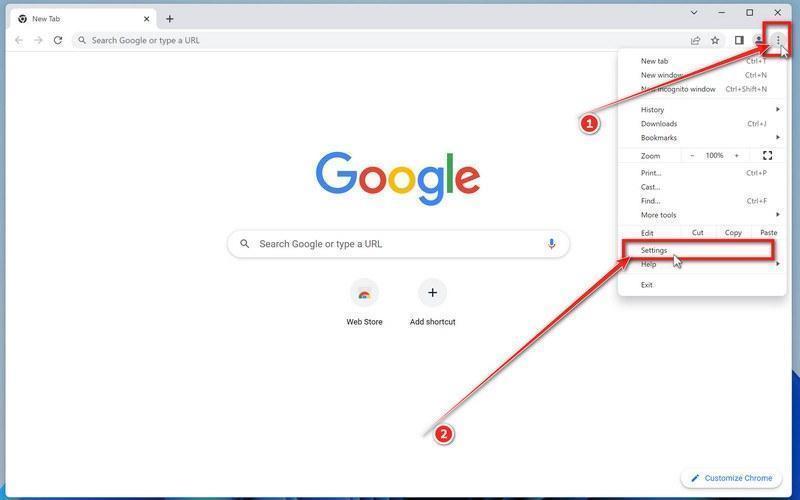
-
Open “Reset settings”.
In Chrome’s sidebar, select Reset settings, or open chrome://settings/reset directly. -
Click “Reset settings”.
Choose Restore settings to their original defaults. Read the confirmation before clicking Reset settings. -
Click “Reset settings to their original defaults”.
In the main window, the “Reset settings” section is visible, as shown in the screenshot below. Click on “Reset settings to their original defaults“.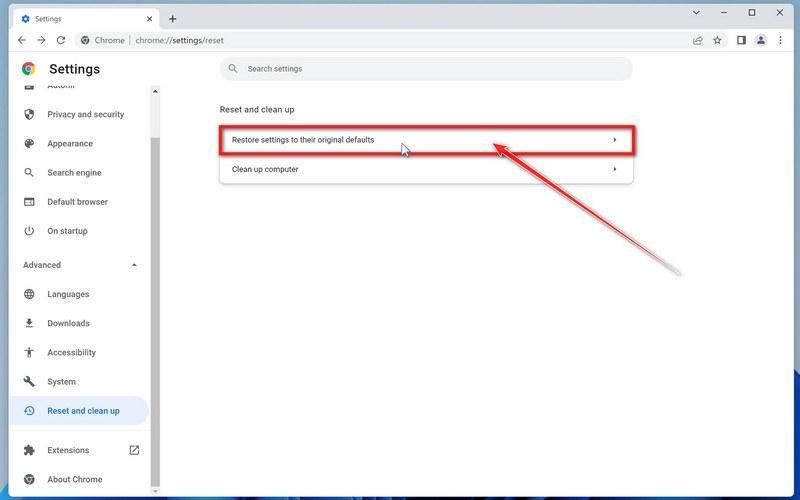
-
Click “Reset settings”.
A confirmation dialog will now be displayed, detailing the components that will be restored to their default state should you continue with the reset process. To complete the restoration process, click on the “Reset settings” button.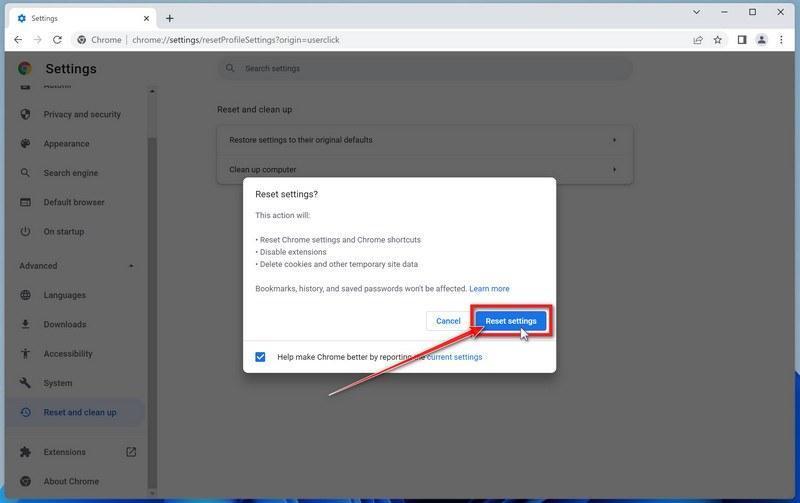
Remove DNS or Proxy Hijackers from Firefox for Windows
To remove the DNS or Proxy Hijackers from Firefox we will reset the browser settings to their default. The reset feature fixes many issues by restoring Firefox to its factory default state while saving your essential information like bookmarks, passwords, web form auto-fill information, browsing history, and open tabs.-
Click the three horizontal lines in the top-right corner and then click on “Help”.
Click on Firefox’s main menu button, represented by three horizontal lines. When the drop-down menu appears, select the option labeled “Help“.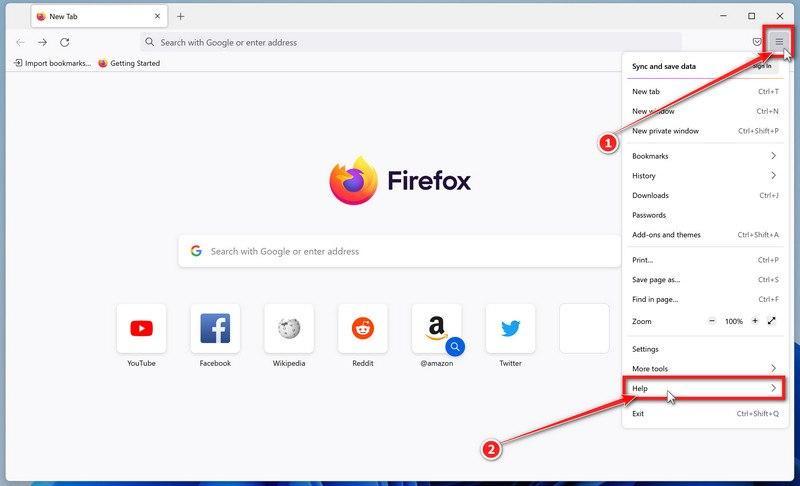
-
Click “More troubleshooting information”.
From the Help menu, click on “More troubleshooting information“.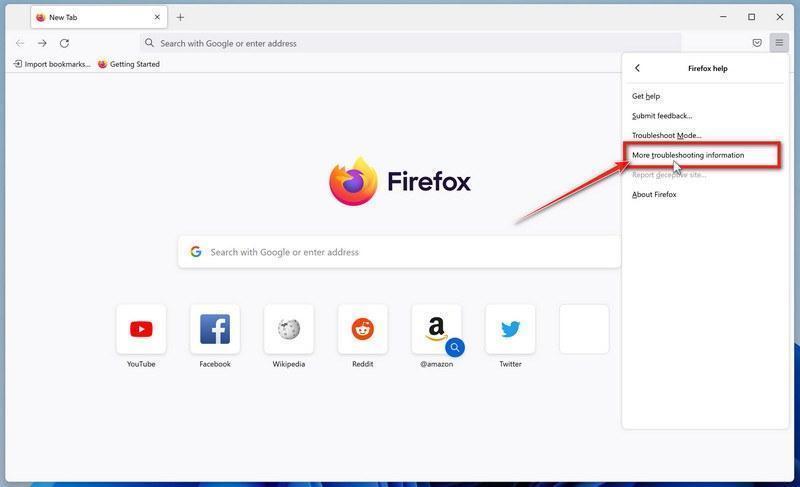
-
Click on “Refresh Firefox”
When the “More troubleshooting information” page opens, click on the “Refresh Firefox” button.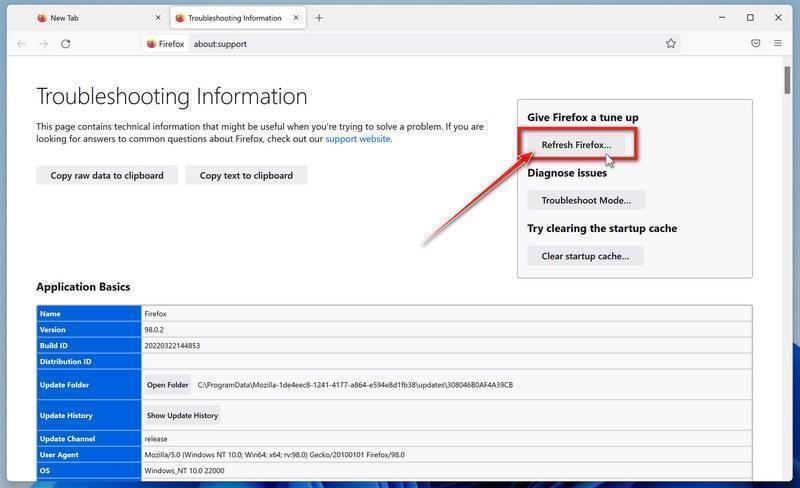
-
Confirm that you want to reset your browser settings.
To finish the reset process, click on the “Refresh Firefox” button in the new confirmation window that opens.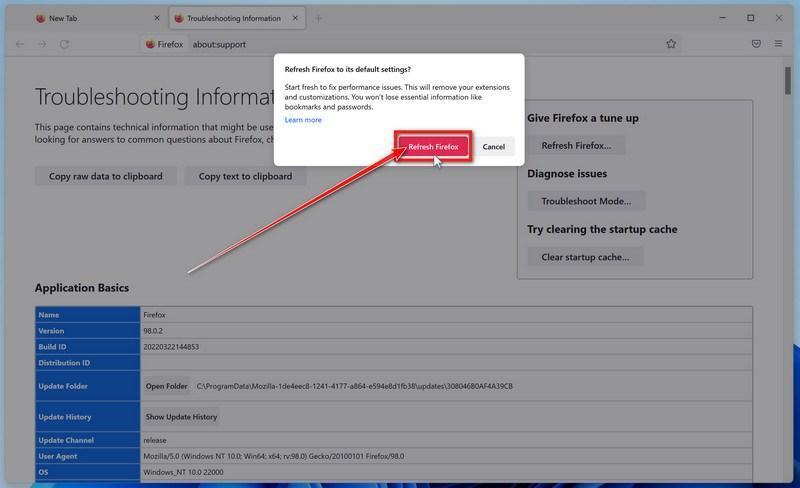
-
Click “Finish”.
Firefox will now close itself and will revert to its default settings. When it’s done, a window will list the information that was imported. Click on “Finish“. Your old Firefox profile will be placed on your desktop in a folder named “Old Firefox Data“. If the reset didn’t fix your problem you can restore some of the information not saved by copying files to the new profile that was created. If you don’t need this folder any longer, you should delete it as it contains sensitive information.
Remove DNS or Proxy Hijackers from Microsoft Edge
To remove the DNS or Proxy Hijackers from Microsoft Edge we will reset the browser settings to their default. This will reset your startup page, new tab page, search engine, and pinned tabs. It will also disable all extensions and clear temporary data like cookies. Your favorites, history, and saved passwords will not be cleared.-
Click the three dots in the top-right corner and then click on “Settings”.
In the top right corner, click on Microsoft Edge’s main menu button, represented by three horizontal dots. When the drop-down menu appears, click on “Settings“.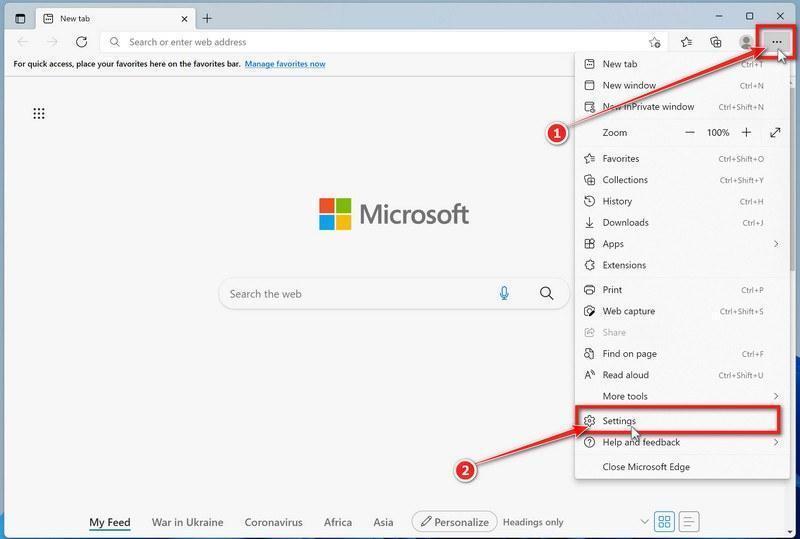
-
Click on “Reset Settings”.
On the left side of the window, click on “Reset Settings“.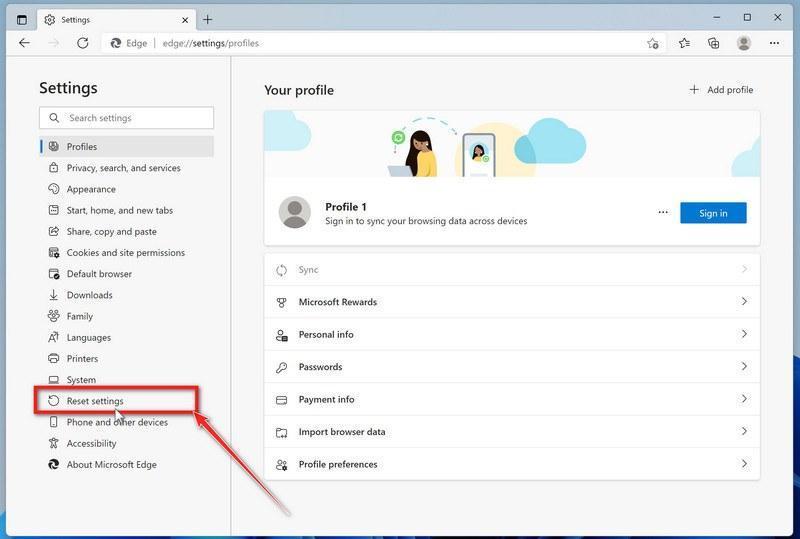
-
Click on “Restore settings to their default values”.
In the main window, click on “Restore settings to their default values“.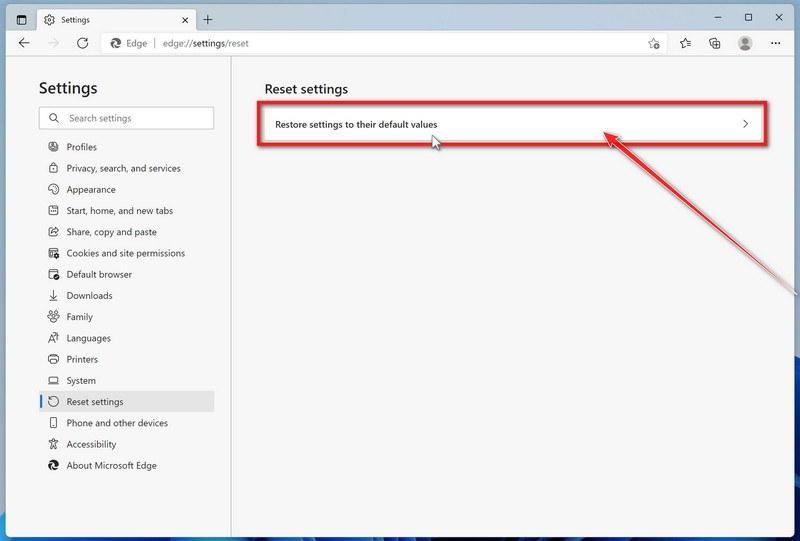
-
Click “Reset”.
A confirmation dialog should now be displayed, detailing the components that will be restored to their default state should you continue with the reset process. To complete the restoration process, click on the “Reset” button.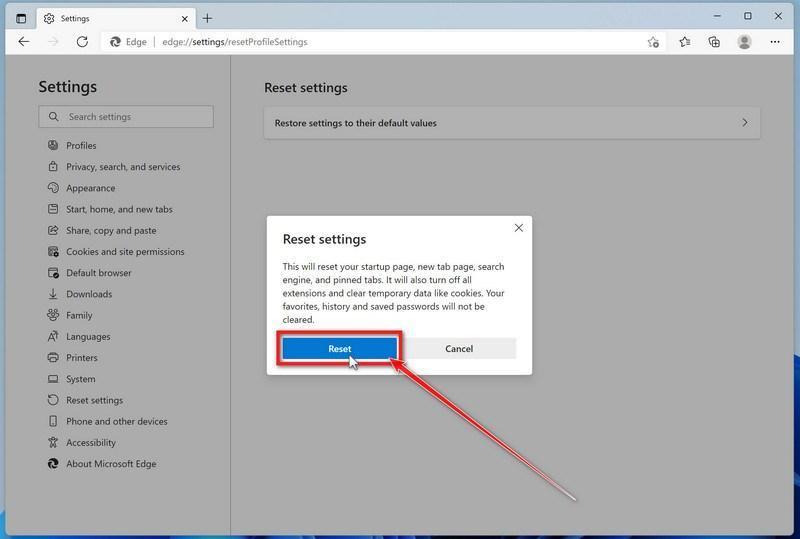 Microsoft Edge will now erase all your personal data, browsing history, and disable all installed extensions. Your bookmarks, though, will remain intact and still be accessible.
Remove DNS or Proxy Hijackers from Internet Explorer
To remove the DNS or Proxy Hijackers from Internet Explorer we will reset the browser settings to their default. You can reset Internet Explorer settings to return them to the state they were in when Internet Explorer was first installed on your computer.-
Go to “Internet Options”.
Open Internet Explorer, click on the gear icon in the upper-right part of your browser, then select “Internet Options“. -
Select the “Advanced” tab, then click “Reset”
In the “Internet Options” dialog box, select the “Advanced” tab, then click on the “Reset” button. -
Click on “Reset”.
In the “Reset Internet Explorer settings” section, select the “Delete personal settings” checkbox, then click on the “Reset” button. -
Click on “Close”.
When Internet Explorer has completed its task, click on the “Close” button in the confirmation dialogue box. Close your browser and then you can open Internet Explorer again.
STEP 4: Use AdwCleaner to remove DNS or Proxy Hijackers and Malicious Browser Policies
In this fourth step, we will use AdwCleaner to remove DNS or Proxy Hijackers and malicious browser policies that might be set on your computer. AdwCleaner is a free popular on-demand scanner that can detect and remove malware that even the most well-known anti-virus and anti-malware applications fail to find. This on-demand scanner includes a lot of tools that can be used to fix the side effects of DNS or Proxy Hijackers.-
Download AdwCleaner.
You can download AdwCleaner by clicking the link below.Download AdwCleanerOfficial download. Your download starts right away. Malwarebytes AdwCleanerRemoves adware and unwanted programs at no cost
 -
Double-click on the setup file.
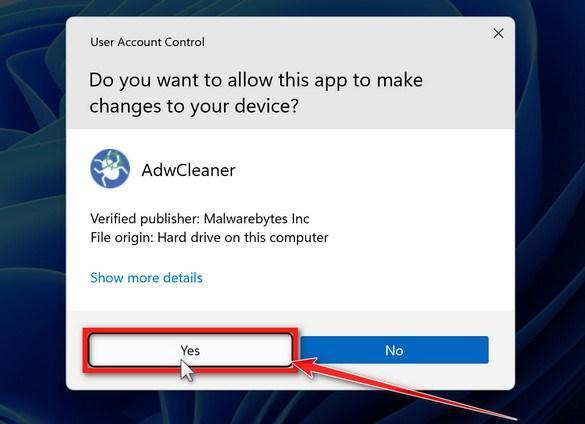
Double-click on the file named “adwcleaner” to start AdwCleaner. In most cases, downloaded files are saved to the Downloads folder.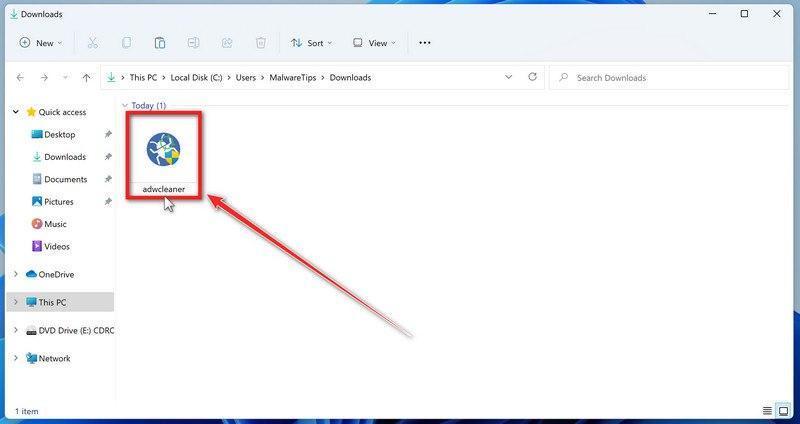 AdwCleaner program will now open and you will be presented with the program’s license agreement. After you read it, click on the I agree button if you wish to continue. If Windows prompts you as to whether or not you wish to run AdwCleaner, please allow it to run.
-
Check whether a Chrome policy reset is needed.
Leave policy resets off for an ordinary scan. On your own PC, enable Settings → Reset Chrome policies only after confirming an unwanted policy. Do not reset work or school policies; contact the administrator instead.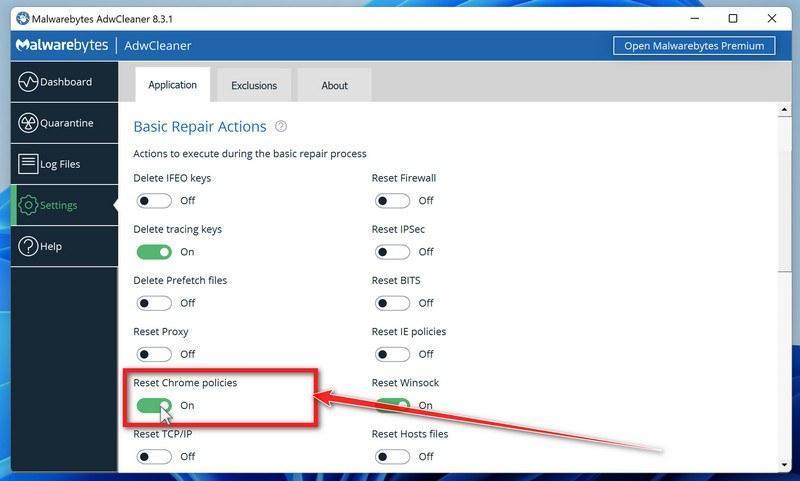
-
Click on the “Scan” button.
On the left side of the AdwCleaner window, click on “Dashboard” and then click “Scan” to perform a computer scan. -
Wait for the AdwCleaner scan to finish.
AdwCleaner will now scan your computer for DNS or Proxy Hijackers and other malicious programs. This process can take a few minutes.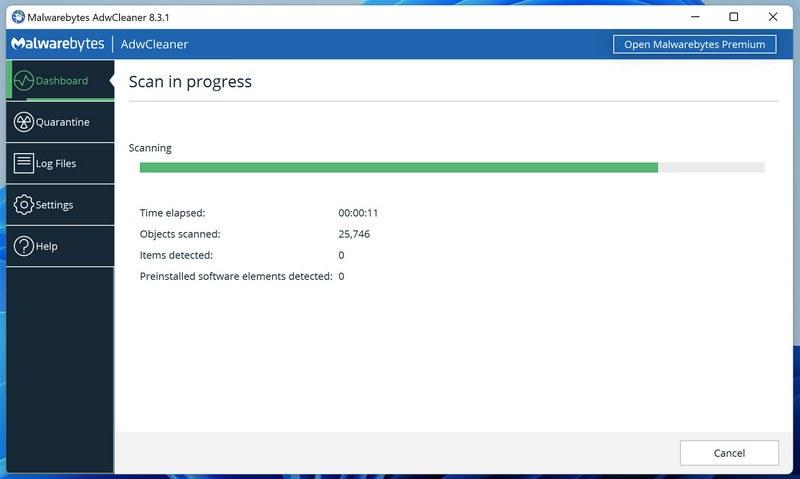
-
Click on “Quarantine” to remove malware.
Review the scan results and click Next. Check any separate list of preinstalled software, leave wanted programs unselected, and click Quarantine to process the selected items. -
Click on “Continue” to start malware removal.
AdwCleaner will now prompt you to save any open files or data as the program will need to close any open programs before it starts to clean. Click on the “Continue” button to finish the removal process.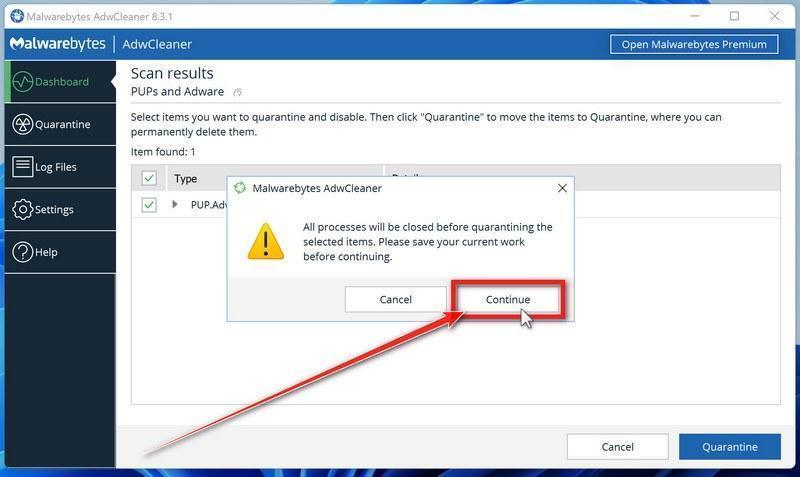 After quarantine, restart if requested. Review the log and choose Skip Basic Repair to finish; use Basic Repair only when a support agent has asked for it. Continue troubleshooting the network if the connection still fails.
STEP 5: Use Malwarebytes to remove DNS or Proxy Hijackers and Malicious Browser Extensions
In this next step, we will install Malwarebytes to scan and remove any infections, DNS or Proxy Hijackers, or potentially unwanted programs that may be present on your computer. Malwarebytes is one of the most popular and most used anti-malware software for Windows, and for good reasons. It is able to destroy many types of malware that other software tends to miss, without costing you absolutely nothing. When it comes to cleaning up an infected device, Malwarebytes has always been free and we recommend it as an essential tool in the fight against malware.-
Download Malwarebytes for Windows.
You can download Malwarebytes by clicking the link below.Download MalwarebytesOfficial installer for Windows 11 and 10. Your download starts right away.Want real-time protection? See Malwarebytes Premium Malwarebytes Free for WindowsScans and removes malware at no cost
 -
Double-click on the Malwarebytes setup file.
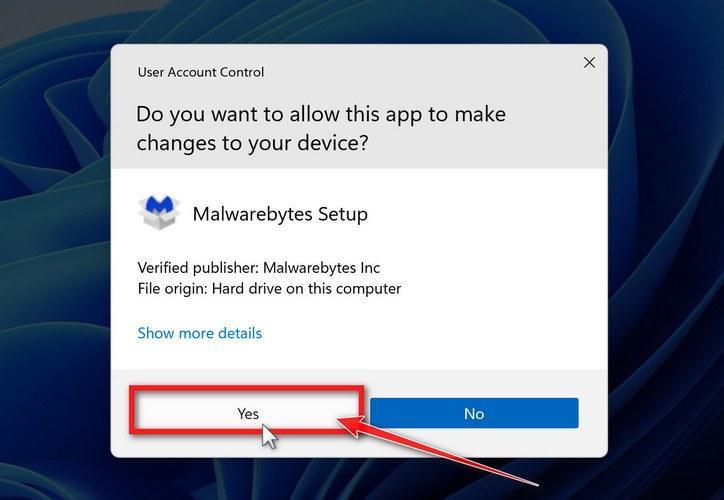
When Malwarebytes has finished downloading, double-click on the MBSetup file to install Malwarebytes on your computer. In most cases, downloaded files are saved to the Downloads folder.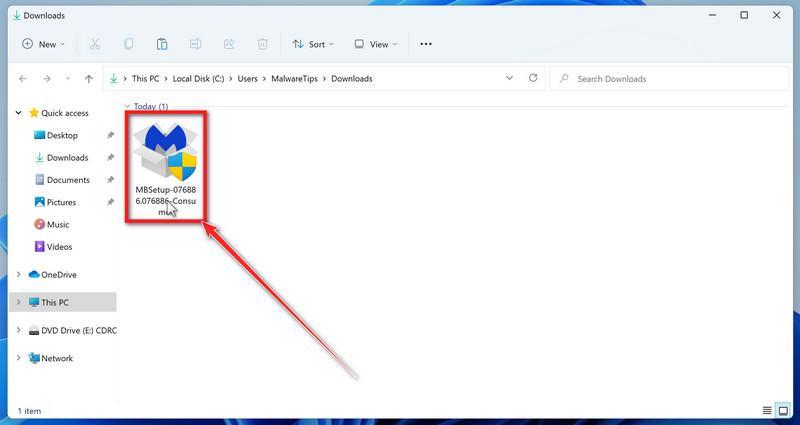 You may be presented with a User Account Control pop-up asking if you want to allow Malwarebytes to make changes to your device. If this happens, you should click “Yes” to continue with the Malwarebytes installation.
-
Follow the on-screen prompts to install Malwarebytes.
When the Malwarebytes installation begins, you will see the Malwarebytes setup wizard which will guide you through the installation process. The Malwarebytes installer will first ask you what type of computer are you installing this program on, click either Personal Computer or Work Computer.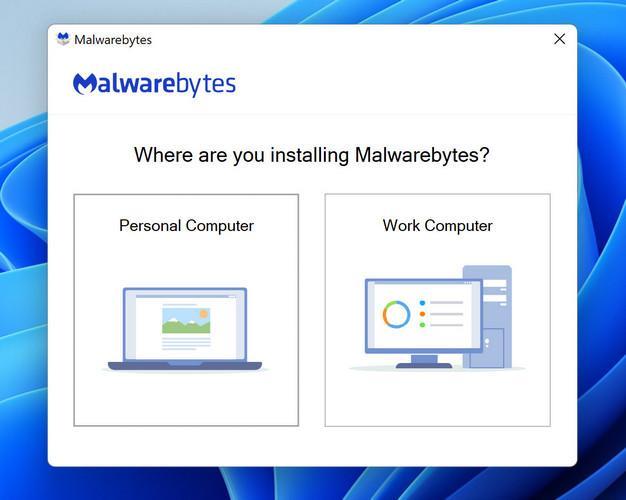 On the next screen, click “Install” to install Malwarebytes on your computer.
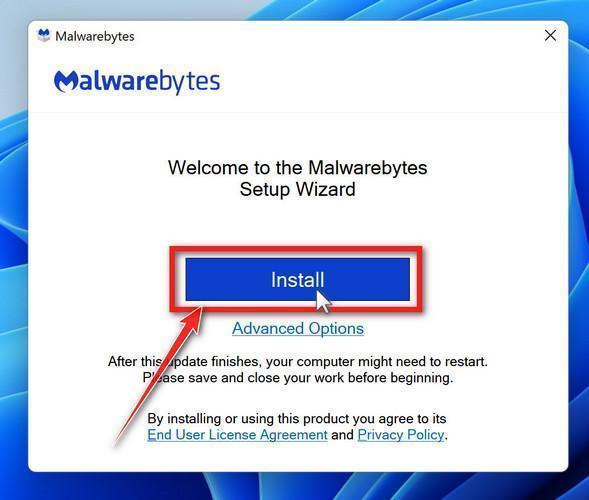 When your Malwarebytes installation completes, the program opens to the Welcome to Malwarebytes screen.
 -
Click on “Scan”.
Malwarebytes is now installed on your computer, to start a scan click on the “Scan” button. Malwarebytes will automatically update the antivirus database and start scanning your computer for DNS or Proxy Hijackers and other malicious programs.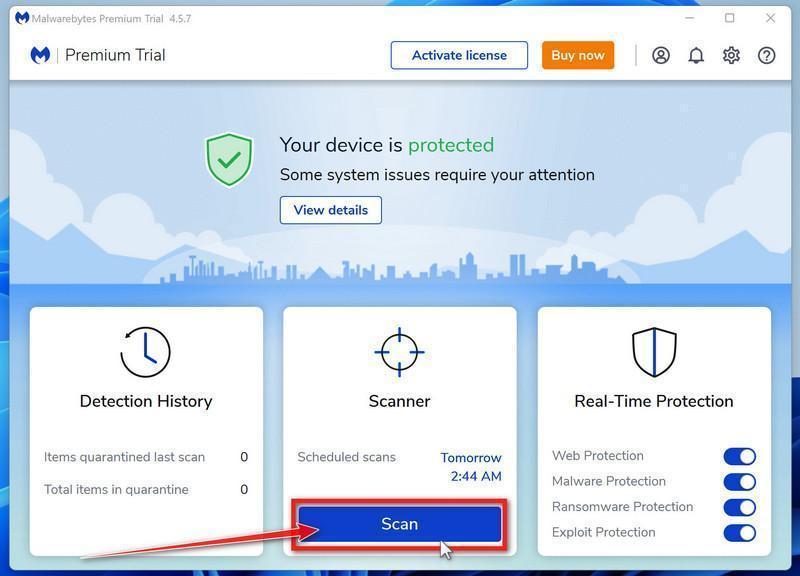
-
Wait for the Malwarebytes scan to complete.
Malwarebytes will now scan your computer for DNS or Proxy Hijackers and other malicious programs. This process can take a few minutes, so we suggest you do something else and periodically check on the status of the scan to see when it is finished.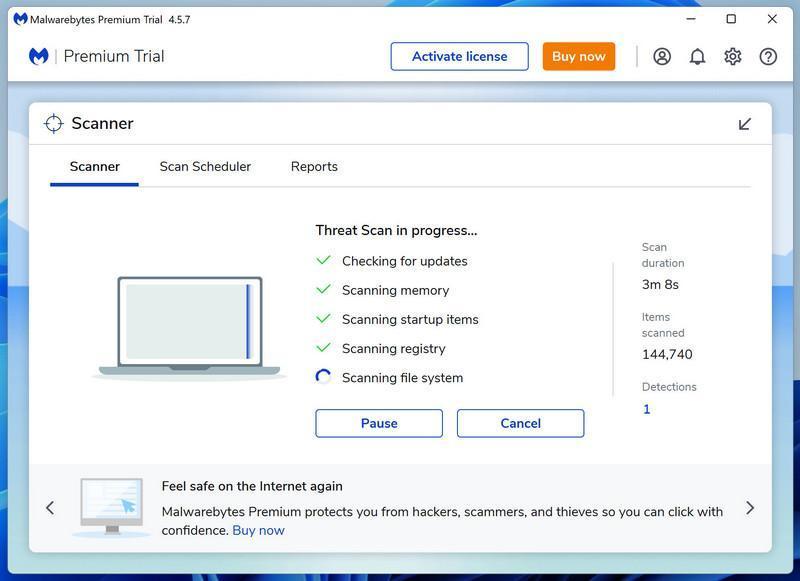
-
Click on “Quarantine”.
When the Malwarebytes scan is finished scanning it will show a screen that displays any malware, DNS or Proxy Hijackers, or potentially unwanted programs that it has detected. To remove DNS or Proxy Hijackers and other malicious programs that Malwarebytes has found, click on the “Quarantine” button.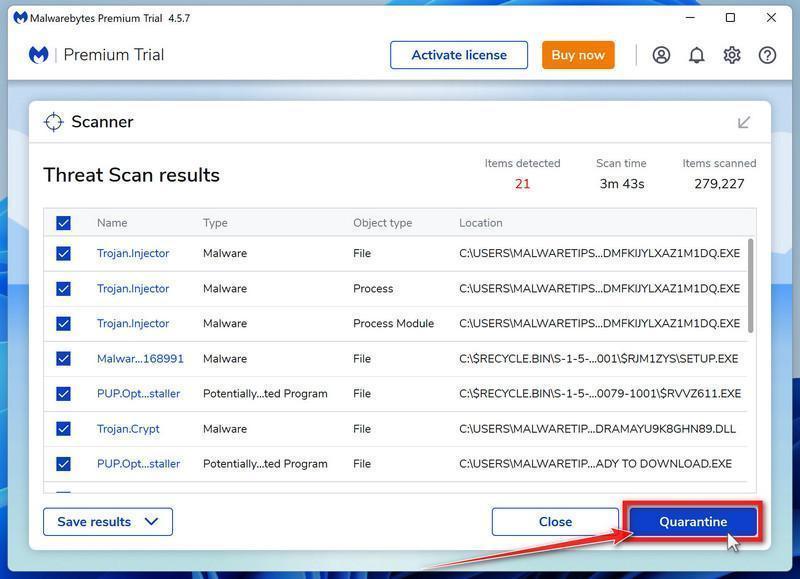
-
Restart computer.
Malwarebytes will now remove all the malicious files and registry keys that it has found. To complete the malware removal process, Malwarebytes may ask you to restart your computer.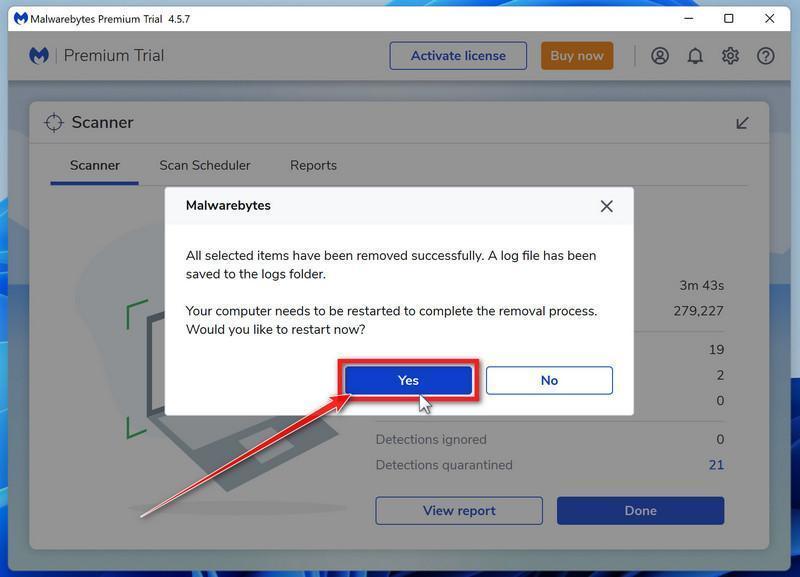 When the malware removal process is complete, you can close Malwarebytes and continue with the rest of the instructions.
STEP 6: Use HitmanPro to scan for DNS or Proxy Hijackers and Other Malware
In this final step, we will scan the computer with HitmanPro to ensure that no other DNS or Proxy Hijackers or malicious programs are installed on your device. HitmanPro is a second-opinion scanner that checks suspicious files and common malware locations. It uses cloud analysis from several security labs, including SophosLabs, so it needs an internet connection for those checks. Keep the report if anything is detected; another scanner can add evidence, but no result proves that every possible threat has been removed. You can scan with HitmanPro for free. Removing detected threats requires an eligible one-time 30-day trial or a paid license. A computer that has already used the trial may not qualify again. Check the current purchase price in the official application rather than relying on an old price quoted in a guide.-
Download HitmanPro.
You can download HitmanPro by clicking the link below.Download HitmanProFree scan. Removing threats needs the free 30-day trial. Your download starts right away. HitmanProSecond-opinion malware scanner from Sophos
 -
Install HitmanPro.
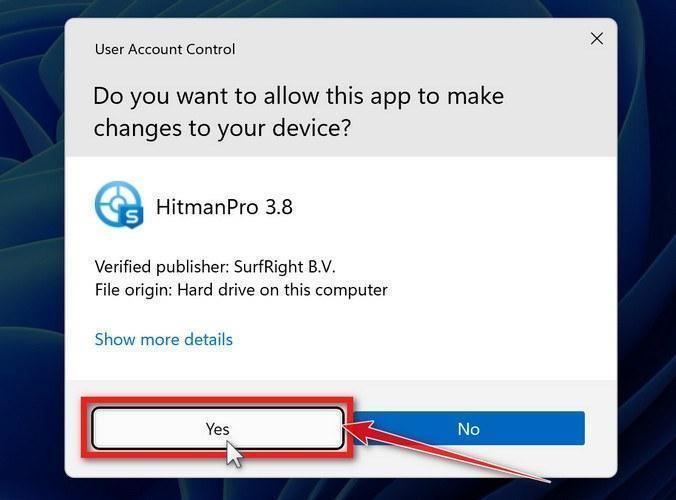
When HitmanPro has finished downloading, double-click on “hitmanpro.exe” (for 32-bit versions of Windows) or “hitmanpro_x64.exe” (for 64-bit versions of Windows) to install this program on your computer. In most cases, downloaded files are saved to the Downloads folder.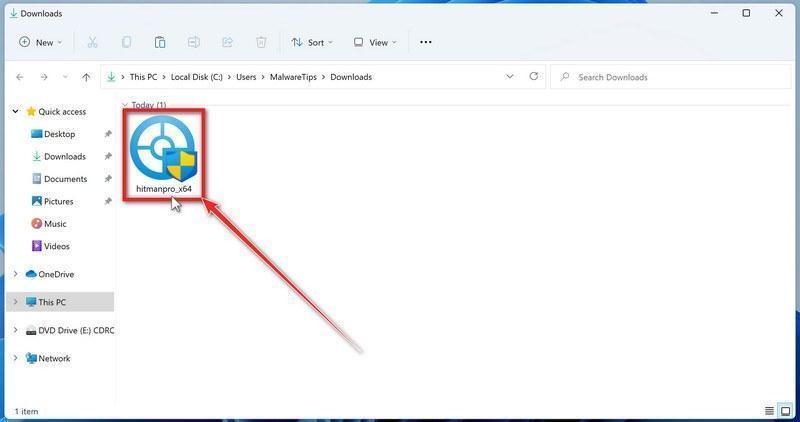 You may be presented with a User Account Control pop-up asking if you want to allow HitmanPro to make changes to your device. If this happens, you should click “Yes” to continue with the installation.
-
Follow the on-screen prompts.
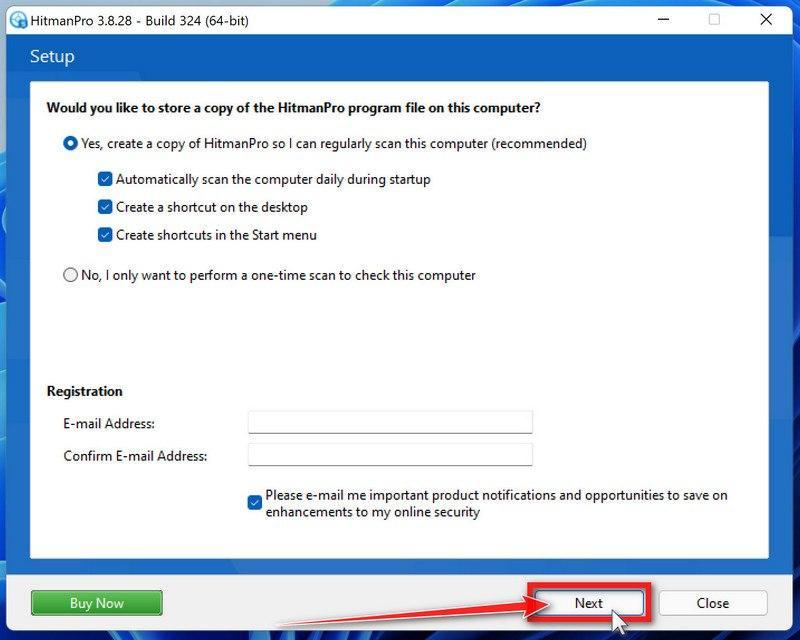
When HitmanPro starts you will be presented with the start screen as shown below. Click on the “Next” button to perform a system scan.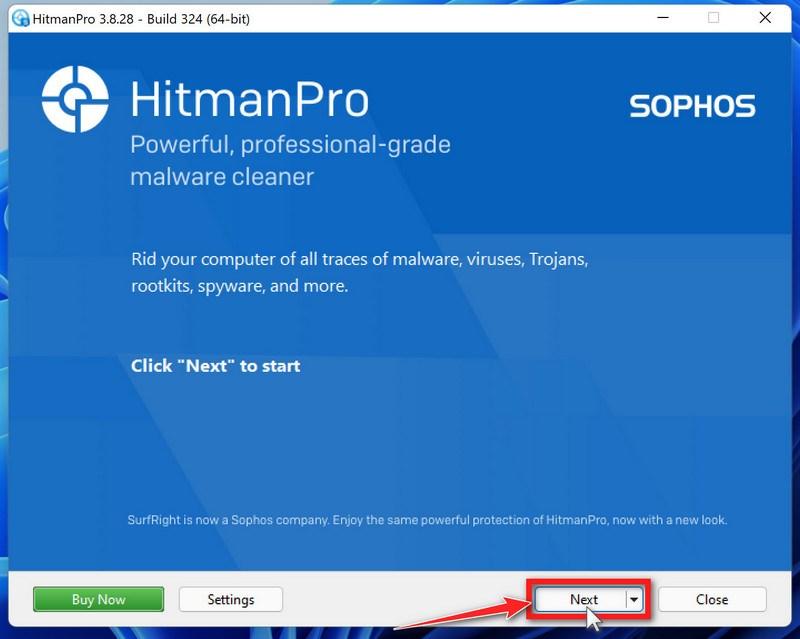
-
Wait for the HitmanPro scan to complete.
HitmanPro will now begin to scan your computer for DNS or Proxy Hijackers and other malicious programs.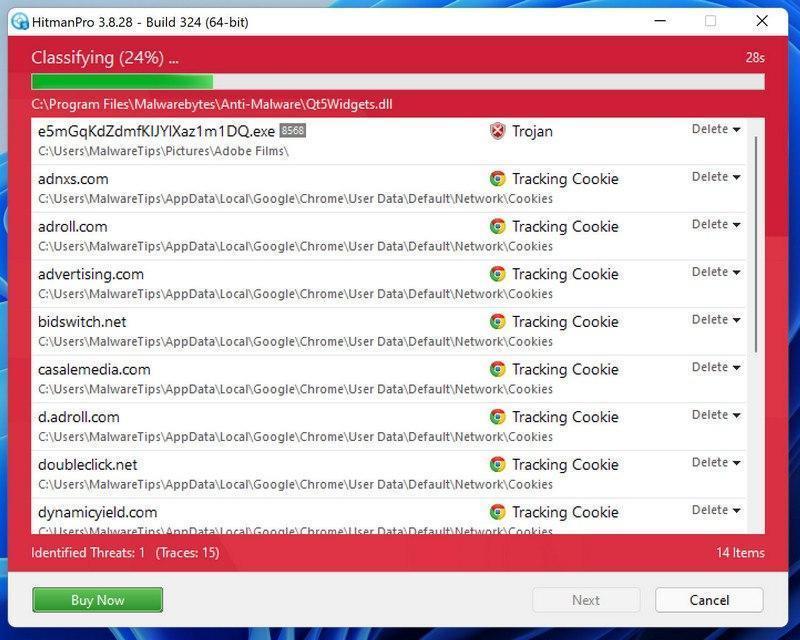
-
Click on “Next”.
When HitmanPro has finished the scan, it will display a list of all the malware that it has found. Click on the “Next” button to have HitmanPro remove the detected items.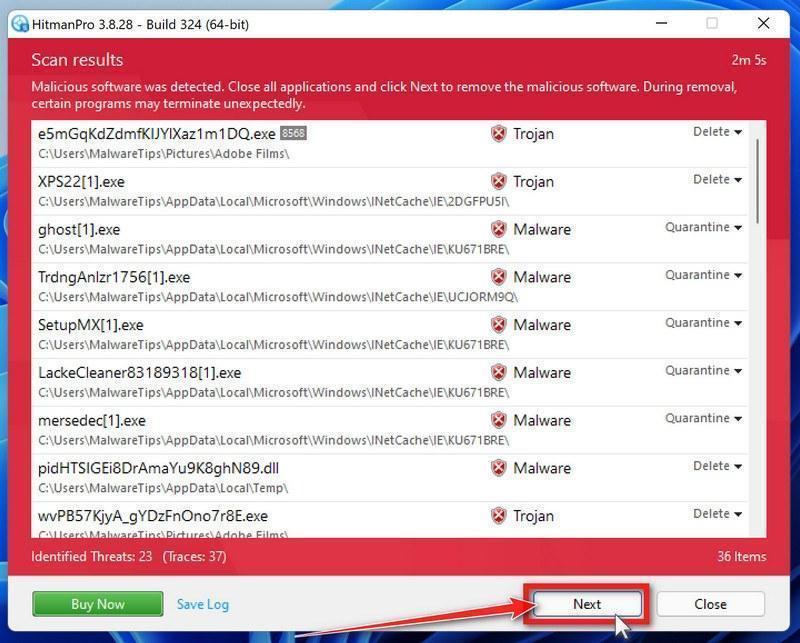
-
Click on “Activate free license”.
If available, click Activate free license and follow the activation prompts. If the trial was already used on this PC, use an existing license or save the report and ask for help. Review each selected detection before proceeding with removal.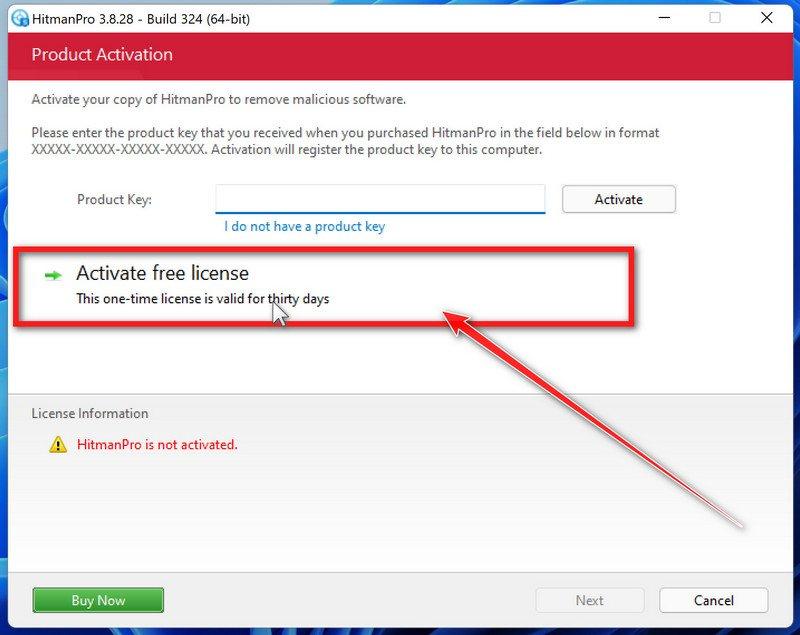 When the malware removal process is complete, it will display a screen that shows the status of the various programs that were removed. At this screen, you should click on the Next button and then if prompted you should click on the Reboot button. If HitmanPro does not prompt you to reboot, please just click on the Close button.
- Run a computer scan with ESET Online Scanner
- Ask for help in our Windows Malware Removal Help & Support forum.
Fix Internet Connection After Removing Malware for Mac
- STEP 1: Remove Malicious Proxy server from your Mac
- STEP 2: Remove Malicious Profiles from your Mac
- STEP 3: Remove DNS or Proxy Hijackers from your Mac Browser
- STEP 4: Remove Malicious Programs from Mac
- STEP 5: Use Malwarebytes for Mac to remove DNS or Proxy Hijackers
STEP 1: Remove Malicious Proxy server from your Mac
In this first step, we will check go through your Mac settings and remove any malicious server configuration.-
Open System Settings
Click the Apple icon then select the System Settings… option. -
Click Network
Select Network. -
Click Details
Select your active connection in System Settings → Network, click Details, and open Proxies. Record existing values before removing only a proxy you have confirmed is unwanted. -
Review Proxies and remove only unwanted entries
In Proxies, turn off only an entry you have confirmed is unwanted, then click OK. Keep legitimate work, school, VPN, or filtering settings. Test the connection; do not disable every proxy simply because one is configured.
STEP 2: Remove Malicious Profiles from your Mac
Profiles are used by IT admins in businesses to control the behavior of their Macs. These profiles can configure a Mac to do many different things, some of which are not otherwise possible. When it comes to home users, DNS or Proxy Hijackers are using the configuration profile to prevent users from removing malicious programs from the computer. This also prevents the user from changing that behavior in the browser’s settings. In this first step, we will check your computer to see if any configuration profiles are installed. To do this, follow the below steps:-
Open “System Settings”
From the Apple menu, select System Settings. -
Open General, then Device Management
In System Settings, choose General → Device Management. Select an unwanted profile and use the remove control only after checking what it manages. If it belongs to work or school, contact the administrator.If Device Management has no profiles, continue to the next step. That rules out a configuration profile as the cause of a locked setting, not other unwanted software.
-
Remove the malicious profiles
If there’s a Profile icon, click on it and select any suspicious profile that you want to remove, and then press the – (minus) button. Click Remove to remove the profile.
STEP 3: Remove DNS or Proxy Hijackers from your Mac Browser
In this third step, we will reset the browser back to its default settings to remove any malicious browser extension, unwanted search engine, or spam browser notifications.Remove DNS or Proxy Hijackers from Chrome for Mac
To remove malicious browser extensions, unwanted search engines, or spam browser notifications from Chrome for Mac we will reset the browser settings to their default.-
Click on the three dots at the top right and click “Settings”.
Click on Chrome’s main menu button, represented by three dots at the top right corner. Now click on the menu option labeled Settings as shown by the arrow in the picture below, which will open the basic settings screen.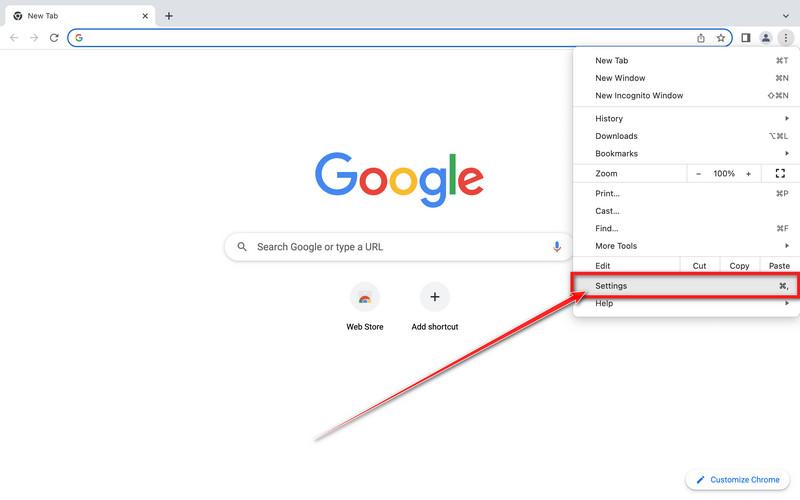
-
Open “Reset settings”.
In Chrome’s settings sidebar, click Reset settings. You can also type chrome://settings/reset directly in the address bar. -
Choose “Restore settings to their original defaults”.
Chrome’s advanced settings should now be displayed. Scroll down until the “Reset settings” section is visible, as shown in the example below. Next, click on the “Reset settings to their original defaults” button. -
Confirm by clicking “Reset”.
A confirmation dialog should now be displayed, detailing the components that will be restored to their default state should you continue with the reset process. To complete the restoration process, click on the “Reset Settings” button.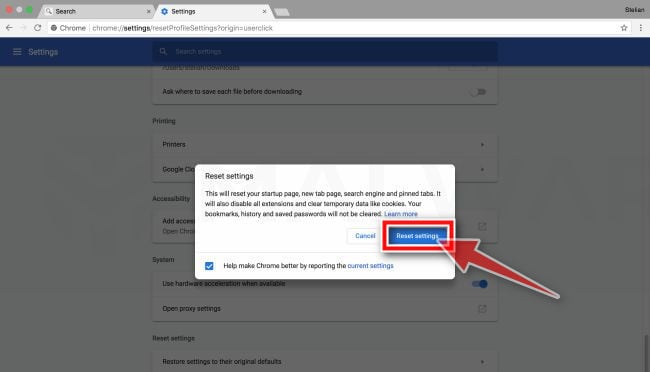
- Remove the unwanted policies created by malware from Chrome
In many cases, changes to Chrome may not be fixed with a simple browser reset. In such a case, a malicious program may have created unwanted policies on your browser. You can check if any unwanted policies are loaded into the browser by typing chrome://policy into the URL bar.
To reset these policies, follow these steps:
- Open a new Terminal window. To do this, go to Finder > Go > Utilities > Terminal
- Enter the following commands, pressing enter after each line:
- defaults write com.google.Chrome HomepageIsNewTabPage -bool false
- defaults write com.google.Chrome NewTabPageLocation -string “https://www.google.com/”
- defaults write com.google.Chrome HomepageLocation -string “https://www.google.com/”
- defaults delete com.google.Chrome DefaultSearchProviderSearchURL
- defaults delete com.google.Chrome DefaultSearchProviderNewTabURL
- defaults delete com.google.Chrome DefaultSearchProviderName
- defaults delete com.google.Chrome ExtensionInstallSources
- After running these commands, quit Chrome if you haven’t already done so, then launch it again and check chrome://policy to see if the same keys are still present (you may need to click the “Reload policies” button for changes to show up). If they’re gone, you should be able to change your search engine and home page back to your preferred defaults in Chrome’s settings.
- Remove the “Managed by your organization” policy from Chrome
Some malicious programs are known to install managed preferences to set the home page and search engine settings in Chrome. To check for these, do the following:
- Quit Chrome
- Click the desktop to make sure you’re in the Finder, choose “Go” then click on “Go to Folder“.
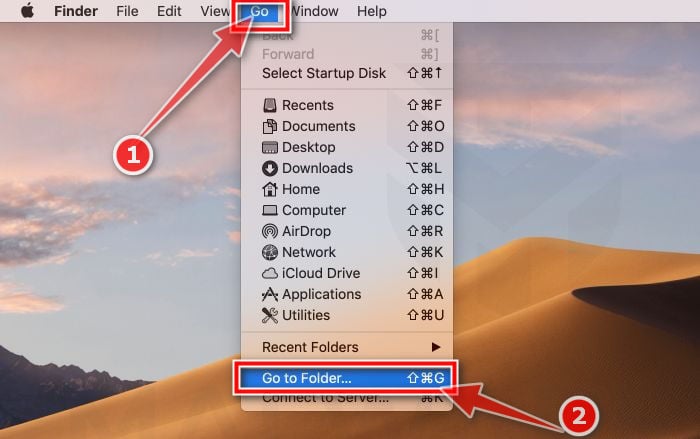
- Type or copy/paste the following path into the window that opens, then click Go: /Library/Managed Preferences/
- Paste the below path into the window that opens, then click Go:
Look for the following files, where [username] is your username:
- com.google.Chrome.plist
- [username]/com.google.Chrome.plist
- [username]/complete.plist
- Uninstall Google Chrome from your computer
Only if Chrome still cannot be repaired: back up your bookmarks and needed profile data first. Remove the Chrome application through Finder, then reinstall it from Google. The Google folders listed below may also contain data for other apps; do not delete them as a group. A reinstall does not remove legitimate organization policies or guarantee malware removal.
If Chrome still cannot be repaired, quit it, open Finder → Applications, and remove Google Chrome.app after backing up needed browser data. Reinstall from Google’s official website. Do not follow old instructions to erase every Google application folder. The paths below are reference locations from older Chrome troubleshooting, not a deletion list. Keep the shared Google folders: they can hold data for other applications. If a clean-profile test is needed, back up the affected Chrome profile and get help identifying that specific profile before moving anything.- /Applications/Google Chrome.app
- /Library/Application Support/Google/
- /Library/Google/
- ~/Library/Application Support/Google/
- ~/Library/Google/
- ~/Library/Preferences/com.google.Chrome.plist
Remove DNS or Proxy Hijackers from Safari
To remove malicious browser extensions, unwanted search engines, or spam browser notifications from Safari we will go through its settings.-
Go to Safari’s “Settings”.
On the menu bar, click the “Safari” menu and select “Settings”. -
Check Homepage.
This will open a new window with your Safari preferences, opened to the “General” tab. Some DNS or Proxy Hijackers may change your default homepage, so in the Homepage field make sure it’s a web page you want to use as your start-up page.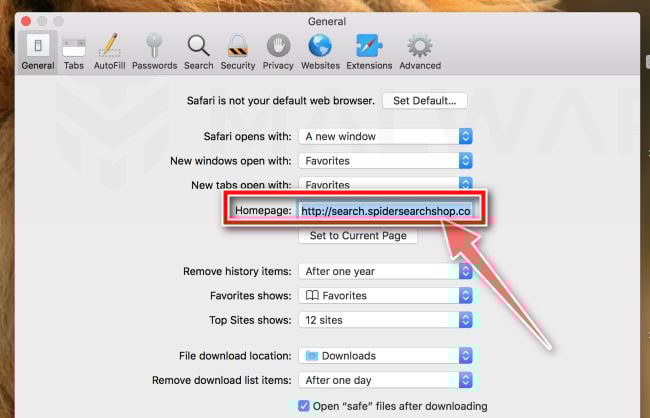
-
Click “Extensions”
Next, click on the “Extensions” tab.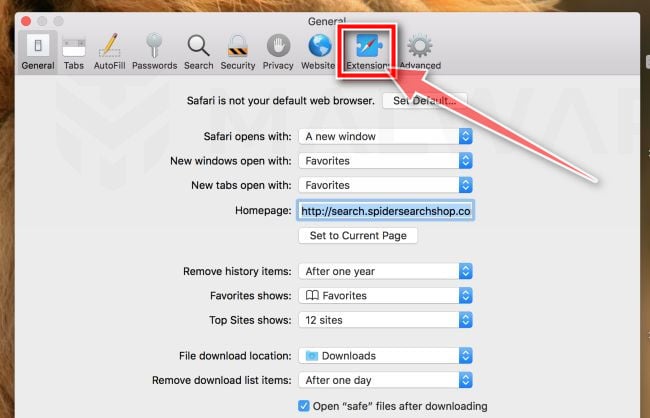
-
Find and uninstall malicious browser extensions.
The “Extensions” screen will be displayed with a list of all the extensions installed on Safari. Scroll through the list and search for any unknown or suspicious extension, and then click on “Uninstall” to remove it. Look out for any suspicious browser extension that could be behind all the drama – anything you don’t remember downloading or that doesn’t sound like a genuine extension. By default, there are no extensions installed on Safari so it’s safe to remove any extension.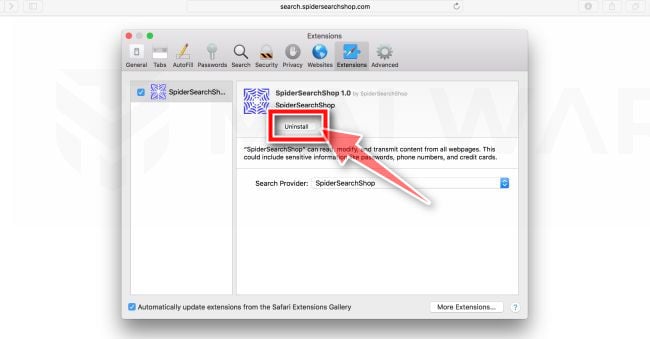
-
Remove spam push notifications.
Click Settings, click Websites, then click Notifications. Deselect “Allow websites to ask for permission to send push notifications”.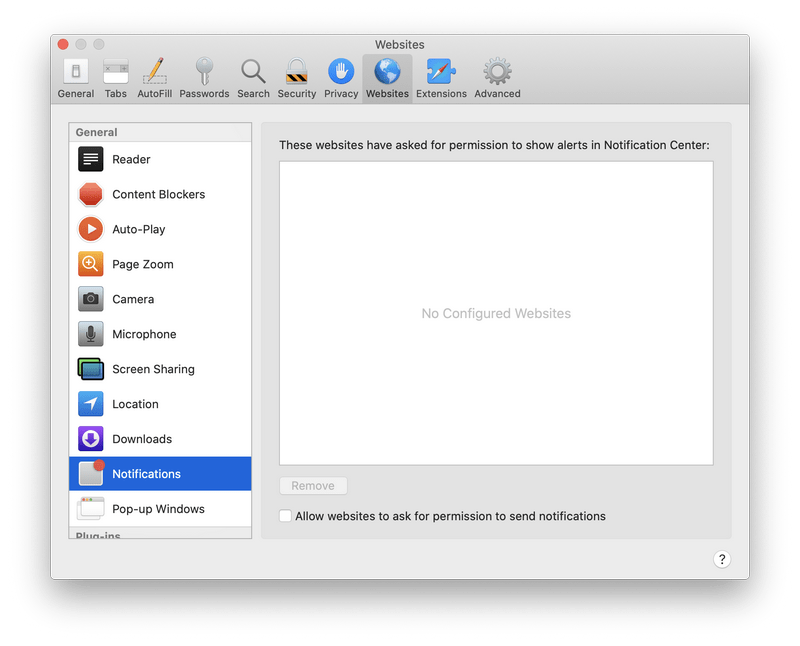
- Workaround for greyed out Safari’s homepage
In some cases, after being changed by DNS or Proxy Hijackers or malware, Safari’s home page can become stuck (greyed out). You will be able to edit the Homepage field in Safari’s preferences, but the change will not stick. This appears to be a bug, and there is an odd workaround. Try this:
- In Safari, choose Settings from the Safari menu.
- In the window that opens, click the General icon (if necessary)
- Enter your desired home page in the “Homepage” field, but DO NOT press return!
- At the top of the window, click any of the other icons (eg, Tabs, AutoFill, etc).
- You may see a prompt asking for confirmation for changing the home page. If so, confirm.
- Switch back to the General page and check to make sure the home page has been changed.
- Delete Safari’s preferences file to remove malicious changes
Some malicious programs are known to install managed preferences to set the homepage and search engine settings in Safari. If the above options didn’t help you remove the malicious redirects, we’ll need to delete Safari’s preferences. To do this, follow the below steps:
- Quit Safari
- Click the desktop to make sure you’re in the Finder, choose “Go” then click on “Go to Folder“.
- Type or copy/paste the following path into the window that opens, then click Go: ~/Library/Preferences/com.apple.Safari.plist
- If the file is present, do not delete it as a routine fix. Use Safari → Settings → Extensions and Privacy → Manage Website Data to remove the unwanted extension or affected site data, then reopen Safari
Remove DNS or Proxy Hijackers from Firefox for Mac
To remove malicious browser extensions, unwanted search engines, or spam browser notifications from Firefox for Mac we will reset the browser settings to their default. The reset feature fixes many issues by restoring Firefox to its factory default state while saving your essential information like bookmarks, passwords, web form auto-fill information, browsing history, and open tabs.-
Go to the “Help” menu.
Click on Firefox’s main menu button, represented by three horizontal lines. When the drop-down menu appears, select the option labeled “Help“.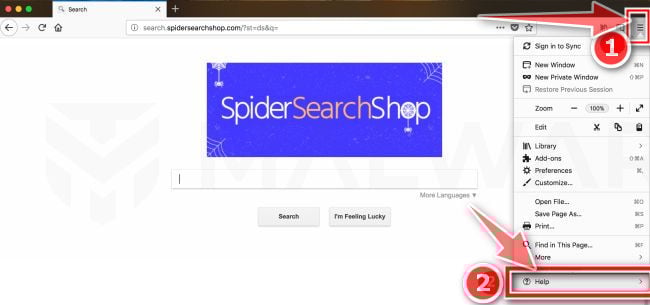
-
Click “More troubleshooting information”.
From the Help menu, click on “More troubleshooting information“.If you’re unable to access the “Help” menu, type about:support in your address bar to bring up the Troubleshooting information page. -
Click on “Refresh Firefox”
Click the “Refresh Firefox” button in the upper-right corner of the “More troubleshooting information” page.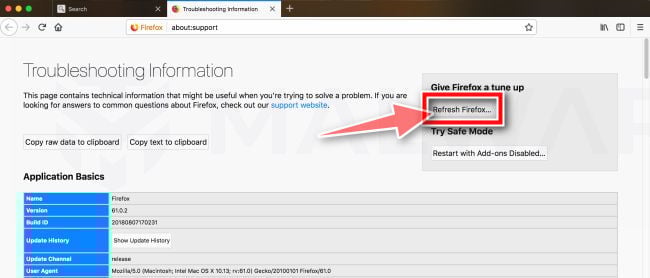
-
Confirm.
To continue, click on the “Refresh Firefox” button in the new confirmation window that opens.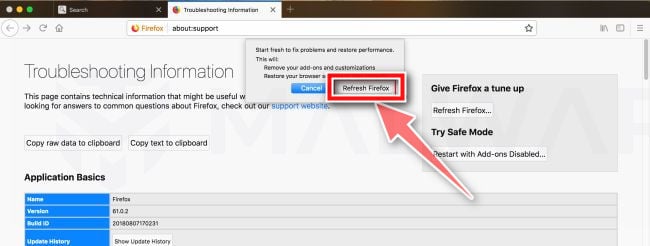
-
Click on “Finish”.
Firefox will close itself and will revert to its default settings. When it’s done, a window will list the information that was imported. Click on the “Finish“.
STEP 4: Uninstall DNS or Proxy Hijackers from your Mac
In this third step, we will try to identify and remove any malicious apps and files that might be installed on your computer.-
Quit the malicious programs
On the Apple menu bar, in the top-right corner, if you see any unknown or suspicious icon, click on it and then select Quit. -
Open “Finder”
Click the Finder application on your dock.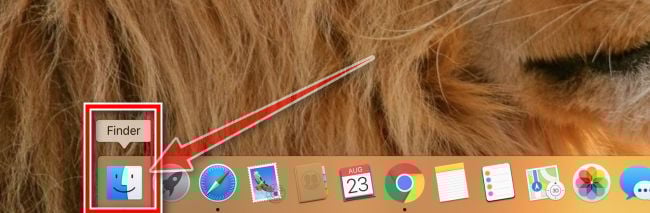
-
Click on “Applications”
In the Finder left pane, click on “Applications“.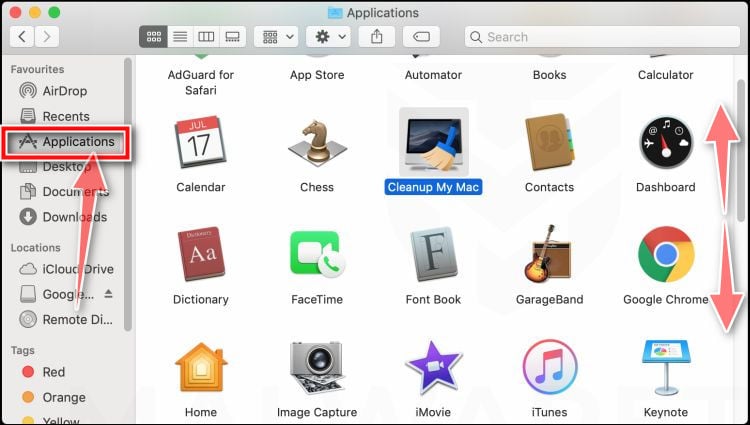
-
Find and remove the malicious app.
The “Applications” screen will be displayed with a list of all the apps installed on your device. Scroll through the list until you find the malicious app, right-click it, and then click “Move to Trash”.Look out for any suspicious program that could be behind all the drama – anything you don’t remember downloading or that doesn’t sound like a genuine program. Here are some known malicious programs: SearchMine, TakeFresh, TopResults, FeedBack, ApplicationEvents, GeneralOpen, PowerLog, MessengerNow, ImagePrime, GeneralNetSearch, Reading Cursors, GlobalTechSearch, PDFOnline-express, See Scenic Elf, MatchKnowledge, Easy Speedtest, or WebDiscover.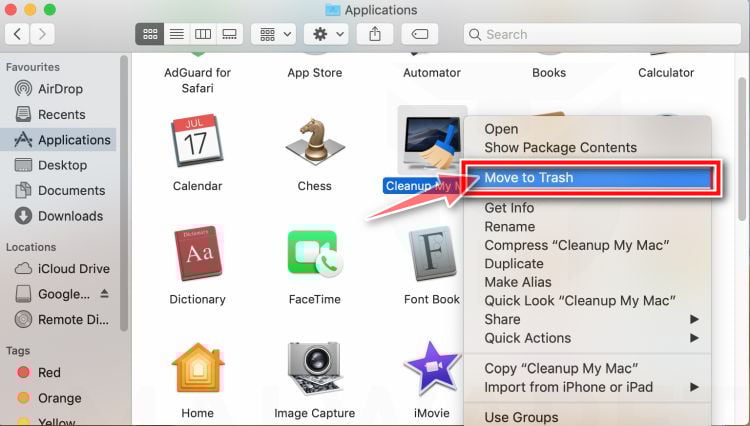
-
Click “Empty Trash”
On the dock, right-click on the trash icon and select “Empty Trash”. Doing so deletes the Trash’s contents, including the program that you just sent to the Trash.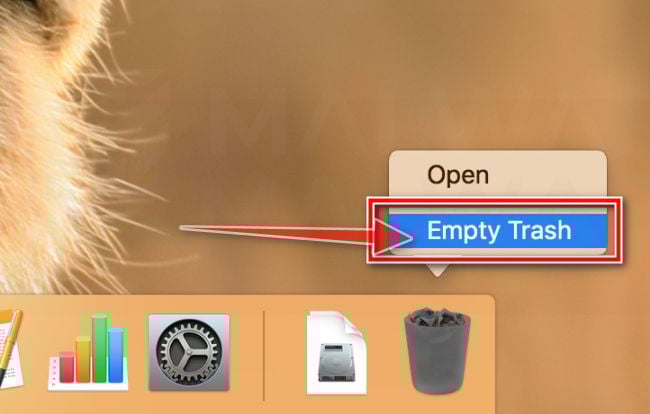
-
Find and remove the malicious files
- Click the desktop to make sure you’re in the Finder, choose “Go” then click on “Go to Folder“.
- Type or copy/paste each of the below paths into the window that opens, then click Go.
- /Library/LaunchAgents
- ~/Library/LaunchAgents
- /Library/Application Support
- /Library/LaunchDaemons
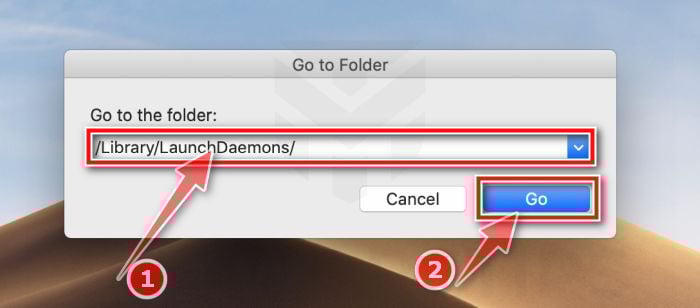
- Look out for any suspicious files that could be behind all the drama – anything you don’t remember downloading or that doesn’t sound like a genuine program. Names alone are not proof of malware. Remove only files tied to a detection or the unwanted app. Examples previously seen during investigations include: Names alone are not proof of malware. Remove only files tied to a detection or the unwanted app. Examples previously seen during investigations include: “com.adobe.fpsaud.plist” (an old Adobe updater file, not proof of malware by itself) “installmac.AppRemoval.plist”, “myppes.download.plist”, “mykotlerino.ltvbit.plist”, or “com.myppes.net-preferences.plist”. When you find a malicious file move it to the Trash.
- Click the desktop to make sure you’re in the Finder, choose “Go” then click on “Go to Folder“.
STEP 5: Use Malwarebytes for Mac to remove DNS or Proxy Hijackers
In this step, we will download, install and run a scan with Malwarebytes for Mac to find and remove DNS or Proxy Hijackers and other malware from your Mac. Malwarebytes for Mac is an on-demand scanner that can destroy many types of malware that other software tends to miss without costing you absolutely nothing. When it comes to cleaning up an infected device, Malwarebytes has always been free, and we recommend it as an essential tool in the fight against malware.-
Download Malwarebytes for Mac.
You can download Malwarebytes for Mac by clicking the link below.Download MalwarebytesOfficial installer for macOS. Your download starts right away.Want real-time protection? See Malwarebytes PremiumMalwarebytes Free for MacScans and removes malware at no cost -
Double-click on the Malwarebytes setup file.
When Malwarebytes has finished downloading, double-click on the setup file to install Malwarebytes on your computer. In most cases, downloaded files are saved to the Downloads folder.
-
Follow the on-screen prompts to install Malwarebytes.
When the Malwarebytes installation begins, you will see the Malwarebytes for Mac Installer which will guide you through the installation process. Click “Continue“, then keep following the prompts to continue with the installation process.

 When your Malwarebytes installation completes, the program opens to the Welcome to Malwarebytes screen. Click the “Get started” button.
 -
Select “Personal Computer” or “Work Computer”.
The Malwarebytes Welcome screen will first ask you what type of computer are you installing this program, click either Personal Computer or Work Computer.
-
Click on “Scan”.
If requested, open System Settings → Privacy & Security → Full Disk Access, turn on Malwarebytes, authenticate, and return to the app.
To scan your Mac with Malwarebytes, click on the “Scan” button. Malwarebytes for Mac will automatically update the antivirus database and start scanning your computer for malware.
-
Wait for the Malwarebytes scan to complete.
Malwarebytes will scan your computer for malware. This process can take a few minutes, so we suggest you do something else and periodically check on the status of the scan to see when it is finished.
-
Click on “Quarantine”.
When the scan has been completed, you will be presented with a screen showing the malware infections that Malwarebytes has detected. To remove the malware that Malwarebytes has found, click on the “Quarantine” button.
-
Restart computer.
Malwarebytes will now remove all the malicious files that it has found. To complete the malware removal process, Malwarebytes may ask you to restart your computer. When the malware removal process is complete, you can close Malwarebytes and continue with the rest of the instructions.
