Search.com is a program that offers a web search engine (t3-1.search.com) and toolbar which are being promoted via other free programs, and once installed on your computer, they will hijack your browser homepage and replace your default search engine.
![Search.com Toolbar and Homepage [Image: Search.com Toolbar and Homepage]](http://malwaretips.com/blogs/wp-content/uploads/2013/02/search-com-toolbar.jpg)
Search.com got on your computer after you have installed another free software or add-on that had bundled into their installer this browser hijacker. For example, when you install “Switch Off” from CNET, you’ll also install the Search.com, set your browser homepage to http://t3-1.search.com/ and change your default search engine to search.com.However, when you uninstall “Switch Off” from your computer, your web browser’s default settings will not be restored. This means that you’ll have to remove Search.com Toolbar from your favorite web browser manually.
![Search.com CNET download [Image: Search.com CNET download]](http://malwaretips.com/blogs/wp-content/uploads/2013/02/search-com-installation.jpg)
You should always pay attention when installing software because often, a software installer includes optional installs, such as this browser hijacker. Be very careful what you agree to install. Always opt for the custom installation and deselect anything that is not familiar, especially optional software that you never wanted to download and install in the first place. It goes without saying that you should not install software that you don’t trust.
Search.com Removal Instructions
STEP 1 : Uninstall Search.com from your computer
Search.com has installed a program (Search.com Toolbar v6.6 developed by CBS Interactive) on your computer, which we will need to uninstall.
- To uninstall Search.com program from your computer, click the Start button, then select Control Panel, and click on Uninstall a program.
If you are a Windows 8 user, you can right-click on a bottom left hot corner (formerly known as the Start button) and select Control panel from there, then select Uninstall a program. - Search and uninstall Search.com Toolbar v6.6 from your computer.
![Uninstall Search.com program [Image: Uninstall Search.com program]](//malwaretips.com/blogs/wp-content/uploads/2013/02/search-com-toolbar-uninstall.jpg)
Please note that on some computers these programs might be renamed or missing,search for any program developed by CBS Interactive, and uninstall it from your computer.
STEP 2 : Remove the Search.com residual damage from your browser
Search.com has installed a browser extension developed by CBS Interactive, has changed your homepage to t3-1.search.com, and has changed your default search engine.
Remove Search.com from Internet Explorer
- Remove Search.com add-ons from Internet Explorer.
Open Internet Explorer,then click on the gear icon![Internet Explorer gear icon [Image: Internet Explorer gear icon]](//malwaretips.com/blogs/wp-content/uploads/2013/01/icongear.jpg) (Tools for Windows XP users) at the top (far right) and then select Manage add-ons.
(Tools for Windows XP users) at the top (far right) and then select Manage add-ons.
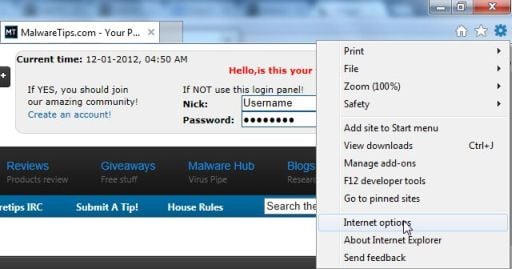
From the Toolbars and Extensions tab, select Search.com Toolbar add-on, and click on Disable.
![Search.com Internet Explorer add-ons [Image: Search.com Internet Explorer add-ons]](//malwaretips.com/blogs/wp-content/uploads/2013/02/search-com-toolbar-Internet-Explorer-addon.jpg)
- Set Internet Explorer default search engine from search.com to Bing.
To change your default search engine, click on the gear icon![Internet Explorer gear icon [Image: Internet Explorer gear icon]](//malwaretips.com/blogs/wp-content/uploads/2013/01/icongear.jpg) , select Manage Add-ons, and then, under Add-on Types, click Search Providers.
, select Manage Add-ons, and then, under Add-on Types, click Search Providers.
![Change to Bing search engine in Internet Explorer [Image: Change to default search engine in Internet Explorer]](//malwaretips.com/blogs/wp-content/uploads/2013/01/change-search-engine-internet-explorer.jpg)
- Change your Internet Explorer homepage from t3-1.search.com to its default
To change your homepage, click on the gear icon![Internet Explorer gear icon [Image: Internet Explorer gear icon]](//malwaretips.com/blogs/wp-content/uploads/2013/01/icongear.jpg) , select Internet Explore options, and in the General tab,under the Home page section, click on Use default to restore Internet Explorer default home page.
, select Internet Explore options, and in the General tab,under the Home page section, click on Use default to restore Internet Explorer default home page.
![Set Internet Explorer to its default homepage [Image: Set Internet Explorer to its default homepage]](//malwaretips.com/blogs/wp-content/uploads/2013/01/default-home-page-internet-explorer.jpg)
Remove Search.com from Mozilla Firefox
- Remove Search.com extension from Internet Explorer.
At the top of the Firefox window, click the orange Firefox button, then select Add-ons.
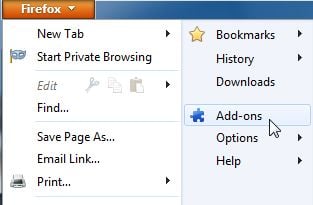
Select the Extensions tab, then remove Search.com Browser Assistant 6.6 and Search.com Toolbar extensions from Mozilla Firefox.
![Search.com Firefox extensions [Image: Search.com Firefox extensions]](//malwaretips.com/blogs/wp-content/uploads/2013/02/search-com-toolbar-Firefox-extension.jpg)
- Reset your default search engine and home page from t3-1.search.com to their default.
To reset your search engine and homepage to their default, we will use the SearchReset extension.This add-on is very simple: on installation, it backs up and then resets your search preferences and home page to their default values, and then uninstalls itself. This affects the search bar, URL bar searches, and the home page.
You can download SearchReset from the below link, and then we will just need to install it to revert Firefox to its default settings.
SEARCHRESET DOWNLOAD LINK (This link will open another web page from where you can download the SearchReset Firefox extension)
![SearchReset Extension for Firefox [Image: SearchReset Extension for Firefox]](//malwaretips.com/blogs/wp-content/uploads/2013/01/searchreset-firefox-addon.jpg)
Remove Search.com from Google Chrome
- Remove Search.com extensions from Google Chrome.
Click the Chrome menu button on the browser toolbar, select Tools and then click on Extensions.
In the Extensions tab, remove (by clicking on the Recycle Bin) the Search.com Domain Error Helper 1.3 extension from your Google Chrome.
![Remove Search.com Toolbar (Uninstall Guide) 2 [Image: Search.com Chrome extension]](//malwaretips.com/blogs/wp-content/uploads/2013/02/search-com-toolbar-Chrome-extension.jpg)
- Set Google Chrome default search engine from search.com to google.com .
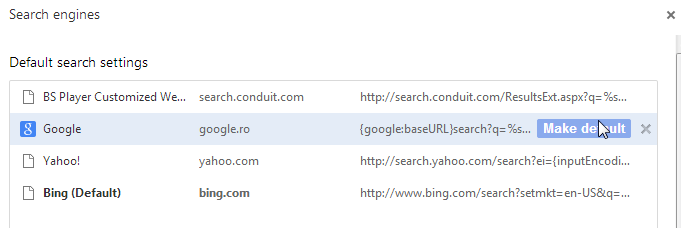
Click the Chrome menu , then select Settings and click on Manage search engines in the Search section.
Select t3-1.search.com from the list and click the X that appears at the end of the row, then select Google (Default) from the list and make it your default search engine.
- Change Google Chrome homepage from t3-1.search.com to its default.
The Search.com has modified your Google settings to open their webpage whenever you start your browser, so we will need to revert this change.
Click the Chrome menu , then select Settings and click on One the New Tab page in the On Startup section.
![Change Google Chrome homepage to its default [Image: Change Google Chrome homepage to its default]](//malwaretips.com/blogs/wp-content/uploads/2013/01/on-startup-Chrome-default.jpg)
STEP 3: Remove Search.com registry keys with AdwCleaner.
- You can download AdwCleaner from the below link.
ADWCLEANER DOWNLOAD LINK (This link will automatically download AdwCleaner on your computer) - Before starting this utility, close all open programs and internet browsers.
- Double click on adwcleaner.exe to run the tool.
- Click on Delete, then confirm each time with Ok.
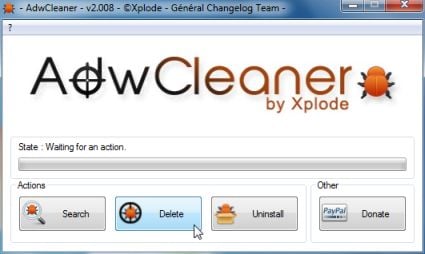
- Your computer will be rebooted automatically. A text file will open after the restart.
- NEXT, double click on adwcleaner.exe to run the tool.
- Click on Uninstall, then confirm with yes to remove this utility from your computer.
STEP 4: Run a computer scan with Malwarebytes Anti-Malware
- You can download Malwarebytes Anti-Malware Free from the below link, then double click on it to install this program.
MALWAREBYTES ANTI-MALWARE DOWNLOAD LINK (This link will open a download page in a new window from where you can download Malwarebytes Anti-Malware Free) - When the installation begins, keep following the prompts in order to continue with the setup process. DO NOT make any changes to default settings and when the program has finished installing, make sure you leave both the Update Malwarebytes’ Anti-Malware and Launch Malwarebytes’ Anti-Malware checked, then click on the Finish button.
![Malwarebytes Anti-Malware final installation screen [Image: Malwarebytes Anti-Malware final installation screen]](//malwaretips.com/blogs/wp-content/uploads/2013/01/malwarebytes-installation.jpg)
- On the Scanner tab, select Perform quick scan and then click on the Scan button to start scanning your computer.
![Run a Quick Scan with Malwarebytes Anti-Malware [Image: Malwarebytes Anti-Malware Quick Scan]](//malwaretips.com/blogs/wp-content/uploads/2013/01/malwarebytes-quick-scan.jpg)
- Malwarebytes’ Anti-Malware will now start scanning your computer as shown below.
![Malwarebytes Anti-Malware scanning for Search.com [Image: Malwarebytes Anti-Malware scanning for Search.com]](//malwaretips.com/blogs/wp-content/uploads/2013/01/malwarebytes-scan.jpg)
- When the Malwarebytes scan will be completed, click on Show Result.
![Malwarebytes when the system scan has completed [Image: Malwarebytes Anti-Malware scan results]](//malwaretips.com/blogs/wp-content/uploads/2013/01/malwarebytes-scan-results.jpg)
- You will now be presented with a screen showing you the malware infections that Malwarebytes’ Anti-Malware has detected.Please note that the infections found may be different than what is shown in the image. Make sure that everything is Checked (ticked) and click on the Remove Selected button.
![Click on Remove Selected to get rid of Search.com [Image:Malwarebytes removing malware]](//malwaretips.com/blogs/wp-content/uploads/2013/01/malwarebytes-virus-removal.jpg)
STEP 5: Run a computer scan with HitmanPro
- Download HitmanPro from the below link, then double click on it to start this program.
HITMANPRO DOWNLOAD LINK (This link will open a new web page from where you can download HitmanPro) - HitmanPro will start and you’ll need to follow the prompts (by clicking on the Next button) to start a system scan with this program.
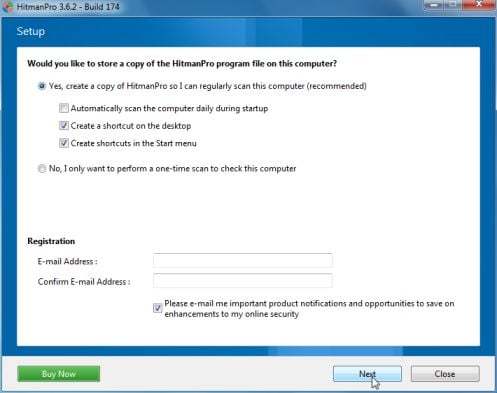
- HitmanPro will start scanning your computer for malware, as seen in the image below.
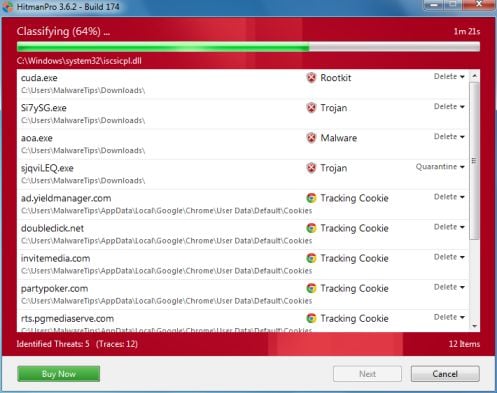
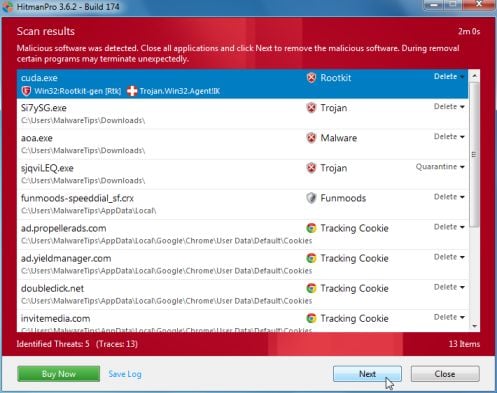
- Once the scan is complete,you’ll see a screen which will display all the infected files that this utility has detected, and you’ll need to click on Next to remove these malicious files.
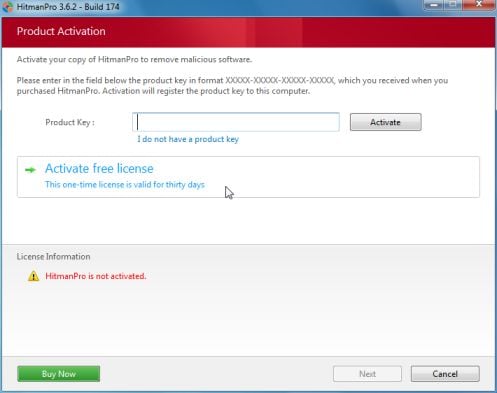
- Click Activate free license to start the free 30 days trial and remove all the malicious files from your computer.

![Remove Search.com Toolbar (Uninstall Guide) 1 [Image: Search.com Toolbar and Homepage]](https://malwaretips.com/blogs/wp-content/uploads/2013/02/search-com-toolbar.jpg)
![Uninstall Search.com program [Image: Uninstall Search.com program]](http://malwaretips.com/blogs/wp-content/uploads/2013/02/search-com-toolbar-uninstall.jpg)

![Search.com Internet Explorer add-ons [Image: Search.com Internet Explorer add-ons]](http://malwaretips.com/blogs/wp-content/uploads/2013/02/search-com-toolbar-Internet-Explorer-addon.jpg)
![Change to Bing search engine in Internet Explorer [Image: Change to default search engine in Internet Explorer]](http://malwaretips.com/blogs/wp-content/uploads/2013/01/change-search-engine-internet-explorer.jpg)
![Set Internet Explorer to its default homepage [Image: Set Internet Explorer to its default homepage]](http://malwaretips.com/blogs/wp-content/uploads/2013/01/default-home-page-internet-explorer.jpg)

![Search.com Firefox extensions [Image: Search.com Firefox extensions]](http://malwaretips.com/blogs/wp-content/uploads/2013/02/search-com-toolbar-Firefox-extension.jpg)
![SearchReset Extension for Firefox [Image: SearchReset Extension for Firefox]](http://malwaretips.com/blogs/wp-content/uploads/2013/01/searchreset-firefox-addon.jpg)
![Remove Search.com Toolbar (Uninstall Guide) 2 [Image: Search.com Chrome extension]](http://malwaretips.com/blogs/wp-content/uploads/2013/02/search-com-toolbar-Chrome-extension.jpg)

![Change Google Chrome homepage to its default [Image: Change Google Chrome homepage to its default]](http://malwaretips.com/blogs/wp-content/uploads/2013/01/on-startup-Chrome-default.jpg)

![Malwarebytes Anti-Malware final installation screen [Image: Malwarebytes Anti-Malware final installation screen]](http://malwaretips.com/blogs/wp-content/uploads/2013/01/malwarebytes-installation.jpg)
![Run a Quick Scan with Malwarebytes Anti-Malware [Image: Malwarebytes Anti-Malware Quick Scan]](http://malwaretips.com/blogs/wp-content/uploads/2013/01/malwarebytes-quick-scan.jpg)
![Malwarebytes Anti-Malware scanning for Search.com [Image: Malwarebytes Anti-Malware scanning for Search.com]](http://malwaretips.com/blogs/wp-content/uploads/2013/01/malwarebytes-scan.jpg)
![Malwarebytes when the system scan has completed [Image: Malwarebytes Anti-Malware scan results]](http://malwaretips.com/blogs/wp-content/uploads/2013/01/malwarebytes-scan-results.jpg)
![Click on Remove Selected to get rid of Search.com [Image:Malwarebytes removing malware]](http://malwaretips.com/blogs/wp-content/uploads/2013/01/malwarebytes-virus-removal.jpg)


![Remove Synylodynce.com Pop-up Ads [Virus Removal Guide] 8 McAfee scam 4](https://malwaretips.com/blogs/wp-content/uploads/2023/08/McAfee-scam-4-290x290.jpg)
