

V9 Search is a browser hijacker, which is promoted via other free downloads, and once installed it will change your browser homepage to www.v9.com/newtab and default search engine to search.v9.com. This in itself is not considered malicious as there are many legitimate programs that change these settings as well. What is considered malicious, though, is that it will also append the argument http://www.v9.com/ro/newtab?si=41460&shortcut=true&tid=293 to random Windows shortcuts on your desktop and your Windows Start Menu.
V9 Search will display advertisements and sponsored links in your search results, and may collect search terms from your search queries.
![[Image: search.v9.com virus]](https://malwaretips.com/blogs/wp-content/uploads/mwt-media/e1/e1804ce3ad9fca64f98ab01f271c5b1a5defa0d3d8627f5b741cbde3e39ae5b4/e111a548551c1198947fc736c6d9542ae5697924f6b896af796b6d3ca4d30908-948.webp "search.v9.com redirect")
![[Image: v9.com New Tab virus]](https://malwaretips.com/blogs/wp-content/uploads/mwt-media/7e/7e5b54d27bb8a94ef6d19c9fa03721f0e31949ea55b2b21a32c1d2e1cc5fd94f/ba6f0a2baa169f04fc4cdaee293359a9c483ff68743b359dae65b5f680b89bd0-948.webp "v9.com New Tab page")
V9 Search got on your computer after you have installed another free software or add-on that had bundled into their installer this browser hijacker.
For example, when you install vPlay, you will also agree to change your default browser home page to www.v9.com/newtab, and default search engine to search.v9.com.
![[Image: v9.com virus]](https://malwaretips.com/blogs/wp-content/uploads/mwt-media/0e/0e43540a257eaaa50932f64ae8579085c4f1956609fa35fc27bb76f494fa492b/b36da113c58702df27472131c8b9def044022b383dc91c4e77e79f38fb5738ff-454.webp "v9.com installation setup")
However, when you uninstall vPlay from your computer, your web browser’s default settings will not be restored. This means that you’ll have to remove V9 Search from your favorite web browser manually.
You should always pay attention when installing software because often, a software installer includes optional installs, such as this V9 Search. Be very careful what you agree to install.
Always opt for the custom installation and deselect anything that is not familiar, especially optional software that you never wanted to download and install in the first place. It goes without saying that you should not install software that you don’t trust.
How to remove search.v9.com Homepage – Virus Removal Guide
This page is a comprehensive guide, which will remove search.search.v9.com from your Internet Explorer, Firefox and Google Chrome.
Please perform all the steps in the correct order. If you have any questions or doubt at any point, STOP and ask for our assistance.
STEP 1: Remove search.v9.com browser hijacker from your computer with AdwCleaner
STEP 2:Clean up the various Windows shortcuts that have been hijacked by search.v9.com virus
STEP 3: Remove search.v9.com malicious files with Malwarebytes Anti-Malware Free
STEP 4: Double-check for the search.v9.com infection with HitmanPro
(OPTIONAL) STEP 5: Reset your browser settings to remove search.v9.com from Internet Explorer, Firefox and Google Chrome
STEP 1: Remove search.v9.com browser hijacker with AdwCleaner
The AdwCleaner utility will scan your computer for search.v9.com malicious files that may have been installed on your computer without your knowledge.
- You can download AdwCleaner utility from the below link.
Download AdwCleanerFree official download. Nothing to install. - Before starting AdwCleaner, close all open programs and internet browsers, then double-click on the AdwCleaner icon.
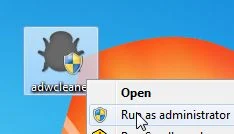
If Windows prompts you as to whether or not you wish to run AdwCleaner, please allow it to run. - When the AdwCleaner program will open, click on the Scan button as shown below.
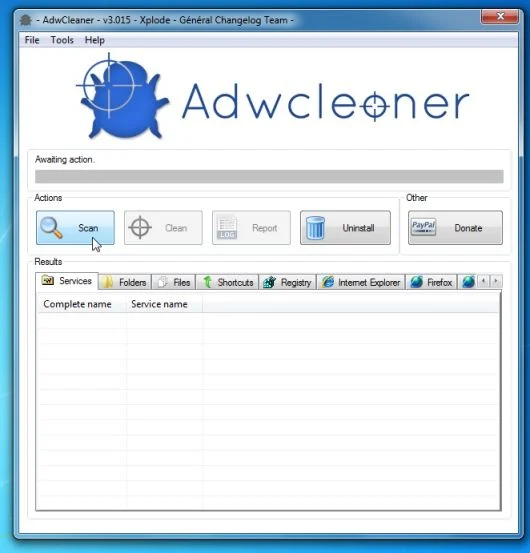
AdwCleaner will now start to search for search.v9.com malicious files that may be installed on your computer. - To remove the search.v9.com malicious files that were detected in the previous step, please click on the Clean button.
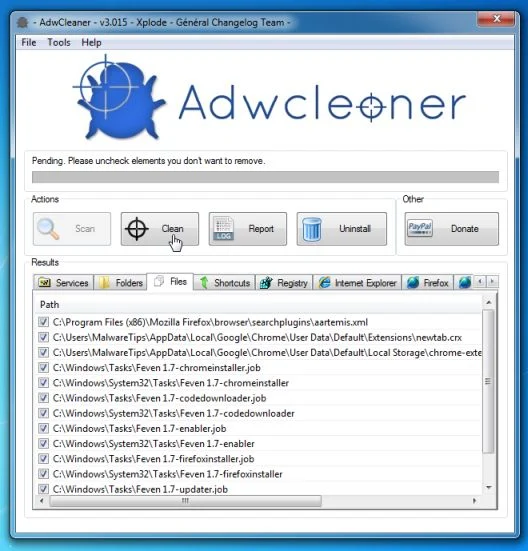
AdwCleaner will now prompt you to save any open files or data as the program will need to reboot the computer. Please do so and then click on the OK button.
STEP 2: Clean up the various Windows shortcuts that have been hijacked by search.v9.com virus
This infection has hijacked your browser shortcuts, so in this step we will need to manually clean them by removing the search.v9.com argument.
- Search for your browser shortcut (Desktop, Taskbar or Start Menu Shortcut), then right click on it and select Properties.
![[Image: Firefox Shortcut properties]](https://malwaretips.com/blogs/wp-content/uploads/mwt-media/b9/b909540514ecf1468a55cb20f0f9ee4416497951c8ef10129320b3d45ee25d23/ae75bb52a120cc2c070a4d04435ba80b72a7f08a2599017691d760a0a2a88f47-377.webp "Desktop Shortcut properties")
To view the Properties menu for the browser shortcuts pinned to your Task Bar, right-click on the browser shortcut from the Taskbar, then right-click again on the browser icon as see in the below image. Alternatively, you can just Unpin the browser shortcut from your task bar, then you can add it back after you have removed the “search.v9.com” argument from the original browser shortcut.
![[Image: taskbar shortcut hijacker]](https://malwaretips.com/blogs/wp-content/uploads/mwt-media/dd/ddcf00cc83483df320a3145361fbe21f2ae76662838bc5328d006ea67d1a4f01/5bd18818485ae58c414e02f99ff3be7a1d5f003f38ab1c314fc09b1c599cb1d9-423.webp "Right click on browser icon from Taskbar and select Properties")
- In the Shortcut tab, in the Target field, remove the http://search.v9.com argument. Basically, there should be only the path to browser executable file. Nothing more.
These are the default shortcut path that should be in your Target box, if the search.v9.com argument is there, then you should remove it.If you are using this browser: In the Target field you should have: Internet Explorer “C:\Program Files\Internet Explorer\iexplore.exe” Chrome “C:\Program Files\Google\Chrome\Application\chrome.exe” for Windows 32-bit OR “C:\Program Files (x86)\Google\Chrome\Application\chrome.exe” for Windows 64-bit Firefox “C:\Program Files\Mozilla Firefox\firefox.exe” for Windows 32-bit OR “C:\Program Files (x86)\Mozilla Firefox\firefox.exe” for Windows 64-bit ![[Image: search.v9.com hijack]](https://malwaretips.com/blogs/wp-content/uploads/mwt-media/cd/cd2388160e7b152af72e0adffecf9134429394be691ebaff4f41592fcfe18afd/c6be2ed1da98714a52e9cc793c9e8645f872a5f76330c7688efe82759b8a28c5-706.webp "search.v9.com hijack")
STEP 3: Remove search.v9.com virus from your computer with Malwarebytes Anti-Malware Free
Malwarebytes Anti-Malware Free utilizes Malwarebytes powerful technology to detect and remove all traces of malware including worms, trojans, rootkits, rogues, dialers, spyware and more.
- You can download Malwarebytes Anti-Malware Free from the below link,then double click on it to install this program.
Download MalwarebytesFree official installer. Your download starts right away. - When the installation begins, keep following the prompts in order to continue with the setup process.
Do not make any changes to default settings and when the program has finished installing, click on the Finish button.
![[Image: Malwarebytes Anti-Malware final installation screen]](https://malwaretips.com/blogs/wp-content/uploads/mwt-media/47/471448d4dd5aa1d55ea545effccf0ac9c8ccb5a29622da4e38ac677b5d8c37b5/9f473303c15a00262451cc5a56b904de929157b59e19e3cfb2c03ec88f643390-402.webp "Malwarebytes Anti-Malware final installation screen")
- On the Scanner tab, select Perform quick scan and then click on the Scan button to start scanning your computer.
![[Image: Malwarebytes Anti-Malware Quick Scan]](https://malwaretips.com/blogs/wp-content/uploads/mwt-media/1e/1eb209597ca2f06e596fd060345ac7e3100355f1ec8fc8ea2d9dec7abbb05ea0/3afba9b0b97b56945ffc33817ac48f7433c799241a22e422966180b76473a906-521.webp "Run a Quick Scan with Malwarebytes Anti-Malware")
- Malwarebytes’ Anti-Malware will now start scanning your computer as shown below.
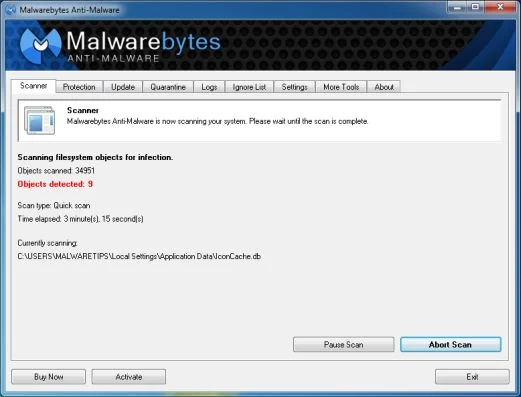
- When the Malwarebytes scan will be completed,click on Show Result.
![[Image: Malwarebytes Anti-Malware scan results]](https://malwaretips.com/blogs/wp-content/uploads/mwt-media/84/84c62dd46289424dbc686abc53672cb0810111920c8c0bbd69e973844d0a9ab0/a4c04aa700e641f47afec9965f79ff346740668e5952955ccbe5b4c3658b5897-521.webp "Malwarebytes when the system scan has completed")
- You will now be presented with a screen showing you the malware infections that Malwarebytes’ Anti-Malware has detected.Please note that the infections found may be different than what is shown in the image.Make sure that everything is Checked (ticked) and click on the Remove Selected button.
![[Image:Malwarebytes removing malware]](https://malwaretips.com/blogs/wp-content/uploads/mwt-media/d8/d86b6a8bac0e4ece9fd2d259a83db71487943f6b04b567edb0e9adcc3200f492/4eb94651b0e34cc99689c56dc71cd0a49444498ed05c5803ea55fda1cfee1b1f-521.webp "Click on Remove Selected to get rid of malware")
STEP 4: Double check for the search.v9.com infection with HitmanPro
HitmanPro is a second opinion scanner, designed to rescue your computer from malware (viruses, trojans, rootkits, etc.) that have infected your computer despite all the security measures you have taken (such as anti virus software, firewalls, etc.).
- You can download HitmanPro from the below link, then double click on it to start this program.
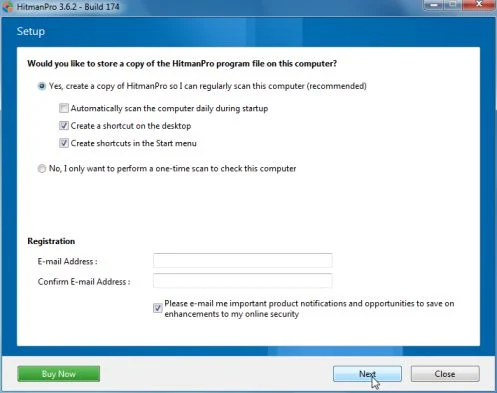
Download HitmanProOfficial Sophos download. Free scan, free 30-day trial to remove threats. - HitmanPro will start and you’ll need to follow the prompts (by clicking on the Next button) to start a system scan with this program.
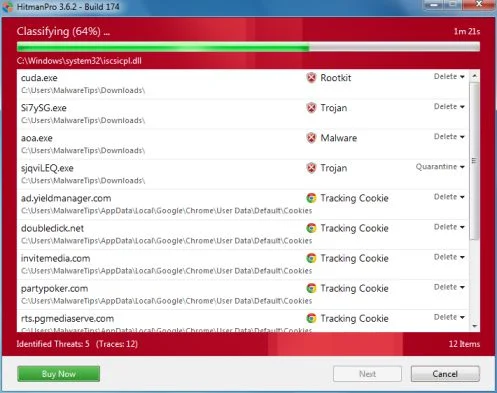
- HitmanPro will start scanning your computer for malware, as seen in the image below.
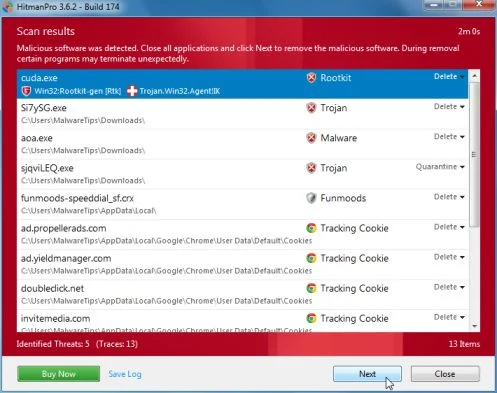
- Once the scan is complete,you’ll see a screen which will display all the infected files that this utility has detected, and you’ll need to click on Next to remove these malicious files.
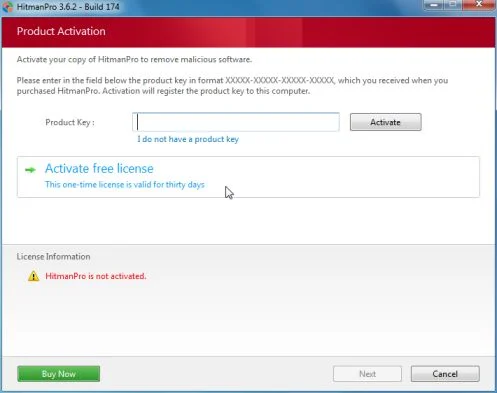
- Click Activate free licenseto start the free 30 days trial and remove all the malicious files from your computer.
(OPTIONAL)STEP 5: Reset your browser settings to remove search.v9.com from Internet Explorer, Firefox and Google Chrome
If you are still experiencing issues with the search.v9.com redirect in Internet Explorer, Firefox or Chrome, we will need to reset your browser to its default settings. Before resetting your browser to its default settings, we recommend that you check again your browser shortcuts for the search.v9.com hijack, as seen in Step 2.
Remove search.v9.comfrom Internet Explorer
- Open Internet Explorer, click on the gear icon
![[Image: icongear.jpg]](//malwaretips.com/images/removalguide/icongear.jpg "Remove V9.com search redirect (Removal Guide) 1") (Tools for Windows XP users) at the top (far right), then click again on Internet Options.
(Tools for Windows XP users) at the top (far right), then click again on Internet Options.
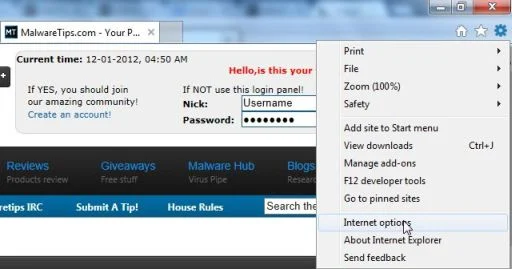
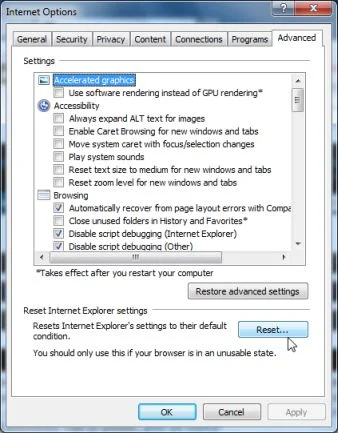
- In the Internet Options dialog box, click on the Advanced tab, then click on the Reset button.
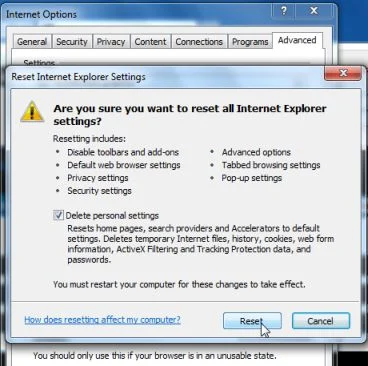
- In the Reset Internet Explorer settings section, check the Delete personal settings box, then click on Reset.
- When Internet Explorer finishes resetting, click Close in the confirmation dialogue box and then click OK.
- Close and open Internet Explorer.
![[Image: icongear.jpg]](http://malwaretips.com/images/removalguide/icongear.jpg "Remove V9.com search redirect (Removal Guide) 1") (Tools for Windows XP users) at the top (far right), then click again on Internet Options.
(Tools for Windows XP users) at the top (far right), then click again on Internet Options.Remove search.v9.com from Mozilla Firefox
- At the top of the Firefox window, click the Firefox button, go over to the Help sub-menu (on Windows XP, click the Help menu at the top of the Firefox window), and select Troubleshooting Information.
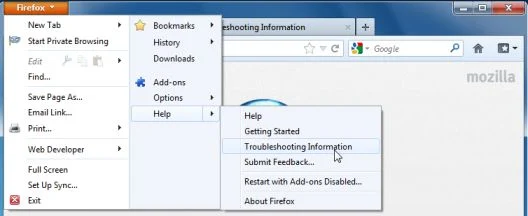
- Click the Reset Firefox button in the upper-right corner of the Troubleshooting Information page.
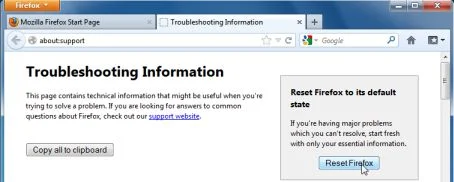
- To continue, click Reset Firefox in the confirmation window that opens.
- Firefox will close and be reset. When it’s done, a window will list the information that was imported. Click Finish
Remove search.v9.com from Google Chrome
- Click on Chrome’s main menu button, represented by three horizontal lines (
![[Image: Chrome's main menu button]](https://malwaretips.com/blogs/wp-content/uploads/mwt-media/c9/c964c619bc5156a269efadd7f08e8f02f7238a9b5062d5d27881889bd94b5755/889f99da68d5e9ef76c7db38ab873d8a2cf3843d646d3f5254663ded586b8dbc-29.webp "Google Chrome's main menu button") ) .When the drop-down menu appears, select the option labeled Settings.
) .When the drop-down menu appears, select the option labeled Settings.
![[Image: Click on Settings button]](https://malwaretips.com/blogs/wp-content/uploads/mwt-media/2a/2a7d2054ad39934fa3bae020d86c92c3468bc20e86c3a20399190f326e956f9d/11e031ab25c04e089a186af35fa4df3cff0e158c5f08513c2aed35cd96960638-301.webp "Click on Settings button")
- Chrome’s Settings should now be displayed in a new tab or window, depending on your configuration. Next, scroll to the bottom of the page and click on the Show advanced settings link (as seen in the below example).
![[Image: Click on Show advanced settings link]](https://malwaretips.com/blogs/wp-content/uploads/mwt-media/31/3104b6ba4d83bc34265ecc970277a392296f9205ddc6d9d60376accd6416d9b7/82e70728a139e02a9d78148f13d2c1ba1f45a97fc453839fccdac30ff93aaead-666.webp "Click on Show advanced settings link")
- Chrome’s advanced Settings should now be displayed. Scroll down until the Reset browser settings section is visible, as shown in the example below. Next, click on the Reset browser settings button.
![[Image: Click on Reset browser button]](https://malwaretips.com/blogs/wp-content/uploads/mwt-media/89/89226e9995a522db2aa1df849b81d1fb9c2a9fd4a567cfe0b51ed590ed3dccb2/3e925bbdab38d43a5d3d480776a8c52293448a9c524b7e2d3b79e9bc19217a4a-651.webp "Click on Reset browser button")
- A confirmation dialog should now be displayed, detailing the components that will be restored to their default state should you continue on with the reset process. To complete the restoration process, click on the Reset button.
![[Image: Click on Reset button to restore Chrome to default settings]](https://malwaretips.com/blogs/wp-content/uploads/mwt-media/0b/0b6d5f21d16fbf5a8f53f9e862adc562783558809083b148adacdb2b0ae013b5/cb2d417e863eb82ccd92104de31427cea3357277e3cb724fb0acd15f5d767269-651.webp "Click on Reset button to restore Chrome to default settings")
Your computer should now be free of the search.v9.com infection. If your current anti-virus solution let this infection through, you may want to consider purchasing the PRO version of Malwarebytes Anti-Malware to protect against these types of threats in the future.
If you are still experiencing problems while trying to remove search.v9.com hijacker from your machine, please start a new thread in our Malware Removal Assistance forum.

Join the discussion
4 commentsShare your experience or ask a question about this article.
Discussion
This program worked for me. I tried different programs and also removed some virus’s myself but could not get v9 out of internet explorer. I followed the steps and no v9 virus has been detected since running the programs.Thanks a lot.
The fix worked for IE8 but not for mozilla.
In reply to Pierre
Lets try to remove this program:
STEP 1: Run a scan with AdwCleaner
Please run AdwCleaner (as seen on STEP 3) to remove this infection!
STEP 2: Run a scan with Junkware Removal Tool
1.Download Junkware Removal Tool to your desktop from the below link:
JUNKWARE REMOVAL TOOL : http://thisisudax.org/download…
2. Double-click on the JRT.exe icon to start this utility.
3. The tool will open and start scanning your system. Please be patient as this can take a while to complete depending on your system’s specifications
STEP 3: Cleanup your shortcuts:
Please download and run Shortcut Cleaner: http://www.bleepingcomputer.com/download/shortcut-cleaner/
Waiting for your reply to see how everything is running…
it worked…thanks for the info……didn’t know it had saved itself in the shortcut som could have taken me somtime before figuring that out ;-)