


If you are unable to access your Android phone or tablet and are seeing a lock screen message stating that your device has been blocked, it is likely that your device has been infected with a malicious app.
These types of apps can be downloaded from malicious websites or legitimate websites that have been hacked and offer a “video player” or other seemingly useful app for download. The infection may also be downloaded manually if the user is tricked into believing they are installing a genuine update for software such as Adobe Flash Player.
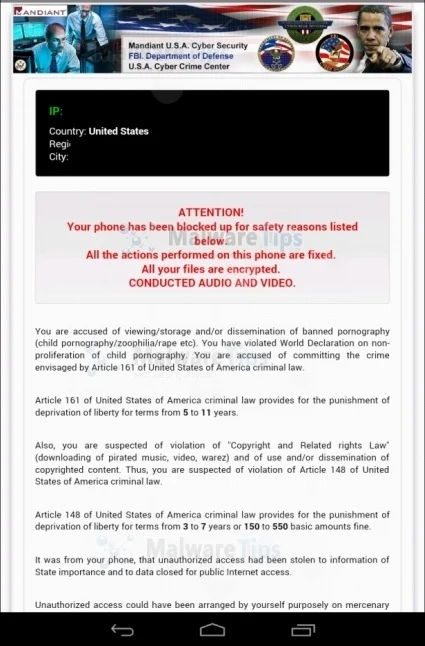
What is the Android lock screen Ransomware?
Ransomware has evolved in recent years and the Windows operating system is not the only one who can get infected with this type of malware. With Android overwhelmingly the most common operating system for mobile devices, ransomware specially made for phones, tablets, and more is also on the rise.
The malicious ransomware apps will lock you out of your Android device and applications, so whenever you try to unlock or use your smartphone, it will display instead a lock screen asking you to pay a ransom in vouchers or cryptocurrency (Bitcoin, Monero, Dash). The malware’s authors prefer these payment services because transactions made through them cannot be reversed and are hard to trace.
Unlike Windows devices, the good news is that the infection doesn’t encrypt any of your data on your Android, and it merely locks your device with a popover browser window that quickly reappears if you try to get clear of it. The bad news is that the continually reappearing pop-over window makes it as good as impossible to get into the Settings menu to remove the malware.
Even rebooting won’t help as the malware kicks back in early in the process of restarting. A factory reset will get rid of it, but that also removes all your other installed apps and stored data.
The messages on this Android lock screen Ransomware are for the most part a scam, and you should ignore any alerts that this malicious app might generate.
Under no circumstance should you send any vouchers or cryptocurrency to these cyber criminals, and if you have, you can request a refund, stating that you are the victim of the malware.
Remove Android Lock Screen Ransomware
This page is a comprehensive guide that will remove the malicious app from your Android phone. Please perform all the steps in the correct order. If you have any questions or doubt at any point, STOP and ask for our assistance.
- STEP 1: Start Android in Safe Mode
- STEP 2: Remove malicious device admin apps
- STEP 3: Uninstall malicious apps
- STEP 4: Reset browsers back to default settings
- STEP 5: Use Malwarebytes for Android to remove malicious apps
STEP 1: Start Android in Safe Mode
In this first step, we will start your phone in Safe Mode to prevent malicious apps from interfering with the next steps. We’re using Safe mode because it starts Android in a basic state, with only the factory apps and settings.
-
Long press the power button.
Long press the hardware power button (located on the side of your phone) until the power off menu appears.
-
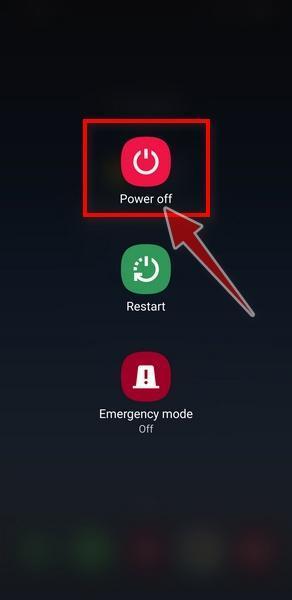
Tap and hold on “Power off”.
When the power off menu appears, tap and hold on the “Power off” button on your screen until you get the “Safe mode” option.
-
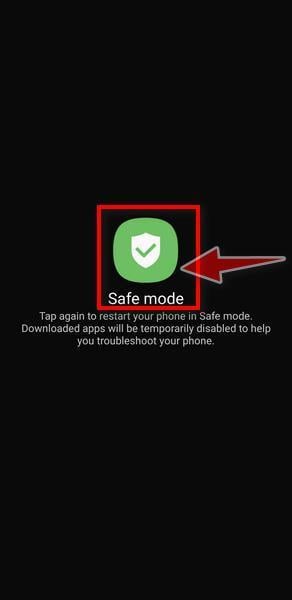
Tap on “Safe Mode”.
When the “Safe mode” option appears on your screen, tap on it to enter safe mode.
-
Your phone is in Safe Mode.
Your Android phone will now restart and enter into safe mode. When your phone is in safe mode, you’ll see the “Safe Mode” text at the bottom left corner of your phone. You can now continue with the next step.
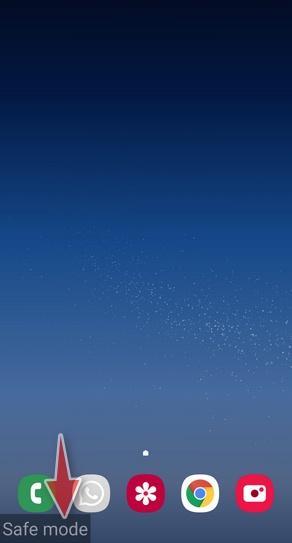
If you can’t find a safe mode on your phone, activate Airplane mode instead, to cut your device off from any networks.
STEP 2: Remove malicious device admin
In this second step, we will check the phone to see if there are any malicious apps with administrator privileges installed on your phone.
The administrator privileges are used by apps to perform legitimate tasks such as device management or for antivirus apps to do a remote wipe. Unfortunately, these elevated privileges are also being used by malicious apps to prevent victims from removing the malicious app from their phone.
-
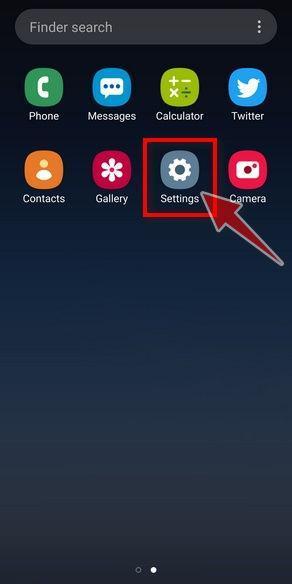
Open the “Settings” menu.
Tap on the “Settings” app from your phone menu or home screen.
-
Go to “Device admin apps”.
When the “Settings” menu opens, if you’re using a newer version of Android or a Samsung phone, tap on “Biometrics and Security“, then tap on “Other Security Settings” and then on “Device admin apps“.
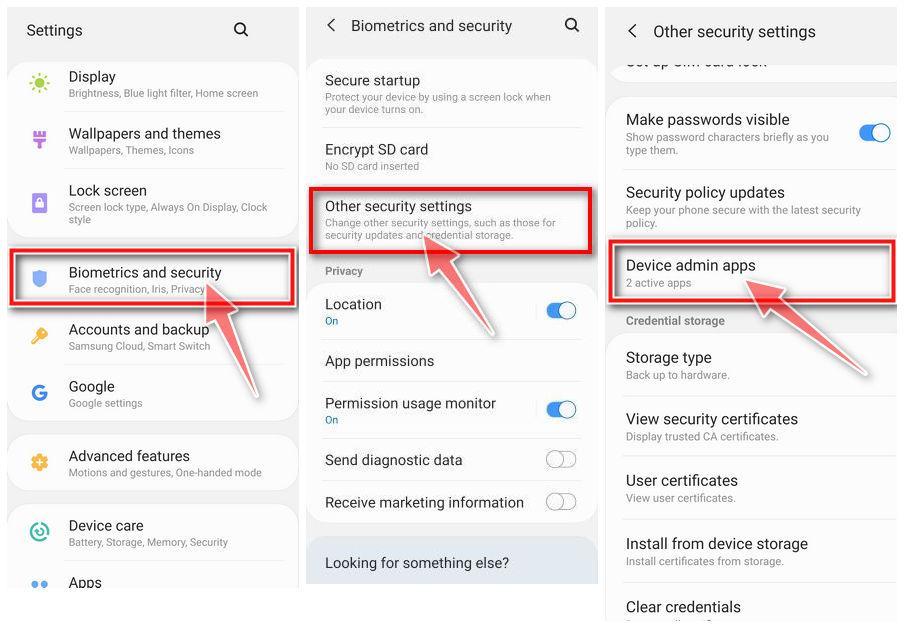
However, because there are phones with different versions of Android the “Device admins apps” settings may be in a different menu, so below we’ve listed other common ways to reach the “Device admin apps” options:
- Security > Device admin apps
- Security & privacy > Device admin apps
- Security > Device Administrators
- Lock Screen and Security > Other Security Settings > Phone Administrators.
If you’re having trouble finding the “Device admin apps” settings, you can use your phone’s built-in search function to search through the Settings.
-
Disable administrator privileges for the malicious app.
Once you’ve accessed the list of device admin apps, disable admin rights by tapping the option to the right of the app. This will remove the checkmark or toggle the button to the off position. Now you can delete the app normally as seen in the below step. On some phones, you can tap the app right there in the admin apps list and then use the Uninstall app link to remove it immediately.
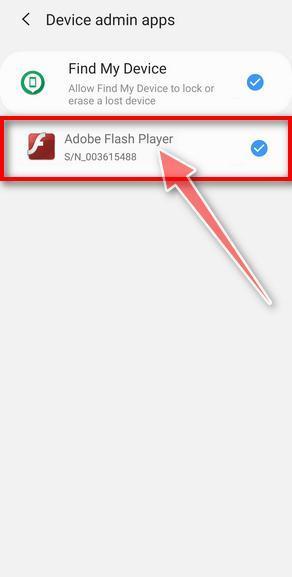
If there is no malicious app with administrator privileges on your phone, then you can continue with the next step from this guide.
STEP 3: Uninstall the malicious apps
In this third step, while the phone is still in Safe Mode, we will check if any malicious apps are installed on your device. Sometimes browser hijackers or adware apps can have usable Uninstall entries that can be used to remove these apps.
-
Open the “Settings” menu.
Tap on the “Settings” app from your phone menu or home screen.
-
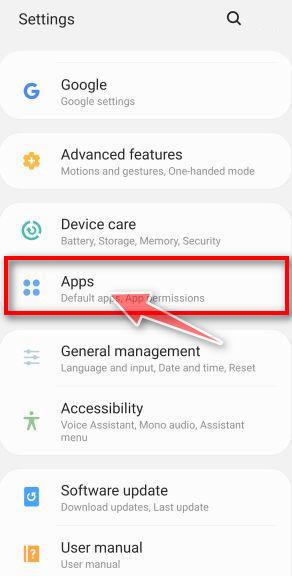
Tap on “Apps”.
When the “Settings” menu opens, tap on “Apps” (or “App Manager”) to see all the installed applications on your phone.
-
Find the malicious app.
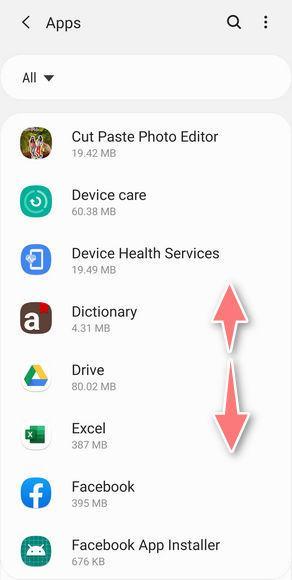
The “Apps” screen will be displayed with a list of all the applications that are installed on your phone. Scroll through the list until you find the malicious app.
Look out for any suspicious app that could be behind all the drama – anything you don’t remember downloading or that doesn’t sound like a genuine program. Most often, cyber criminals hide malware inside video or photo editing apps, weather apps, and camera apps.Here are some known malicious apps: ES File Explorer, Xender, Amber Weather Widget, GO Weather Forecast & Widgets, Kitty Play, Touchpal, Z Camera.
The malicious program will most likely have a different name on your phone. If you cannot find any malicious app on your device, you can exit “Safe mode” (as seen below) and continue with the next step from this guide.
-
Uninstall the malicious app
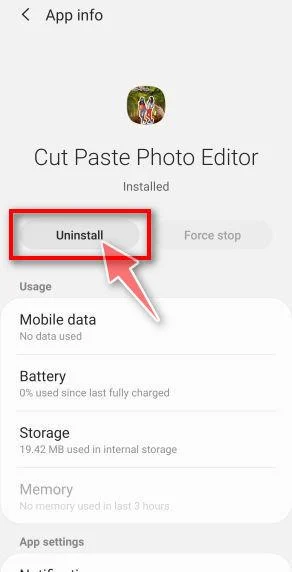
When you find a suspicious or malicious app, tap on it to uninstall it. This won’t start the app but will open up the app details screen. If the app is currently running press the “Force stop” button, then tap on “Uninstall”.
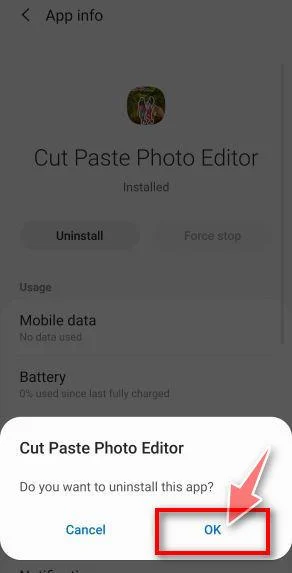
A confirmation dialog should be displayed to confirm you want to uninstall the app, tap on “OK” to remove the malicious app from your phone.
-
Exit “Safe mode”.
Now that we’ve removed the malicious apps from your phone, we can exit “Safe mode”. To do this, hold the power button on your device until you get the power off menu, then select the restart option from the menu.
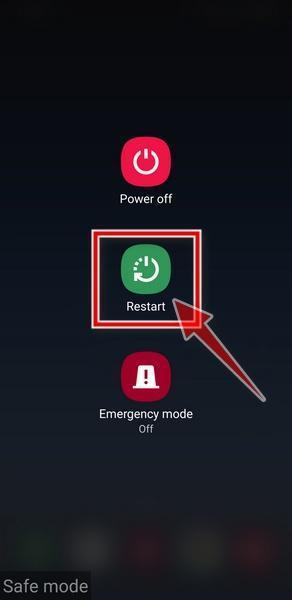
Your phone will now be rebooted and exit from the safe mode and boot into the normal mode.
STEP 4: Reset browsers back to default settings
In this next step, we will remove spam notifications, redirects, and change to default any settings that might have been changed by malware.
Android browsers don’t have a single “reset settings” button like browsers on a computer, but they do let you control what each website is allowed to do. Start with the least disruptive fix: block the spam site’s notifications in the browser’s settings. In Chrome, you can also delete cookies and site data: tap More (three dots) > Delete browsing data.
Clear the browser’s app storage only if unwanted pages or redirects keep coming back. It works like a full reset, but it also deletes data that isn’t synced, so treat it as a last resort.
Remove malware from Chrome for Android
First, block the spam site’s notifications:
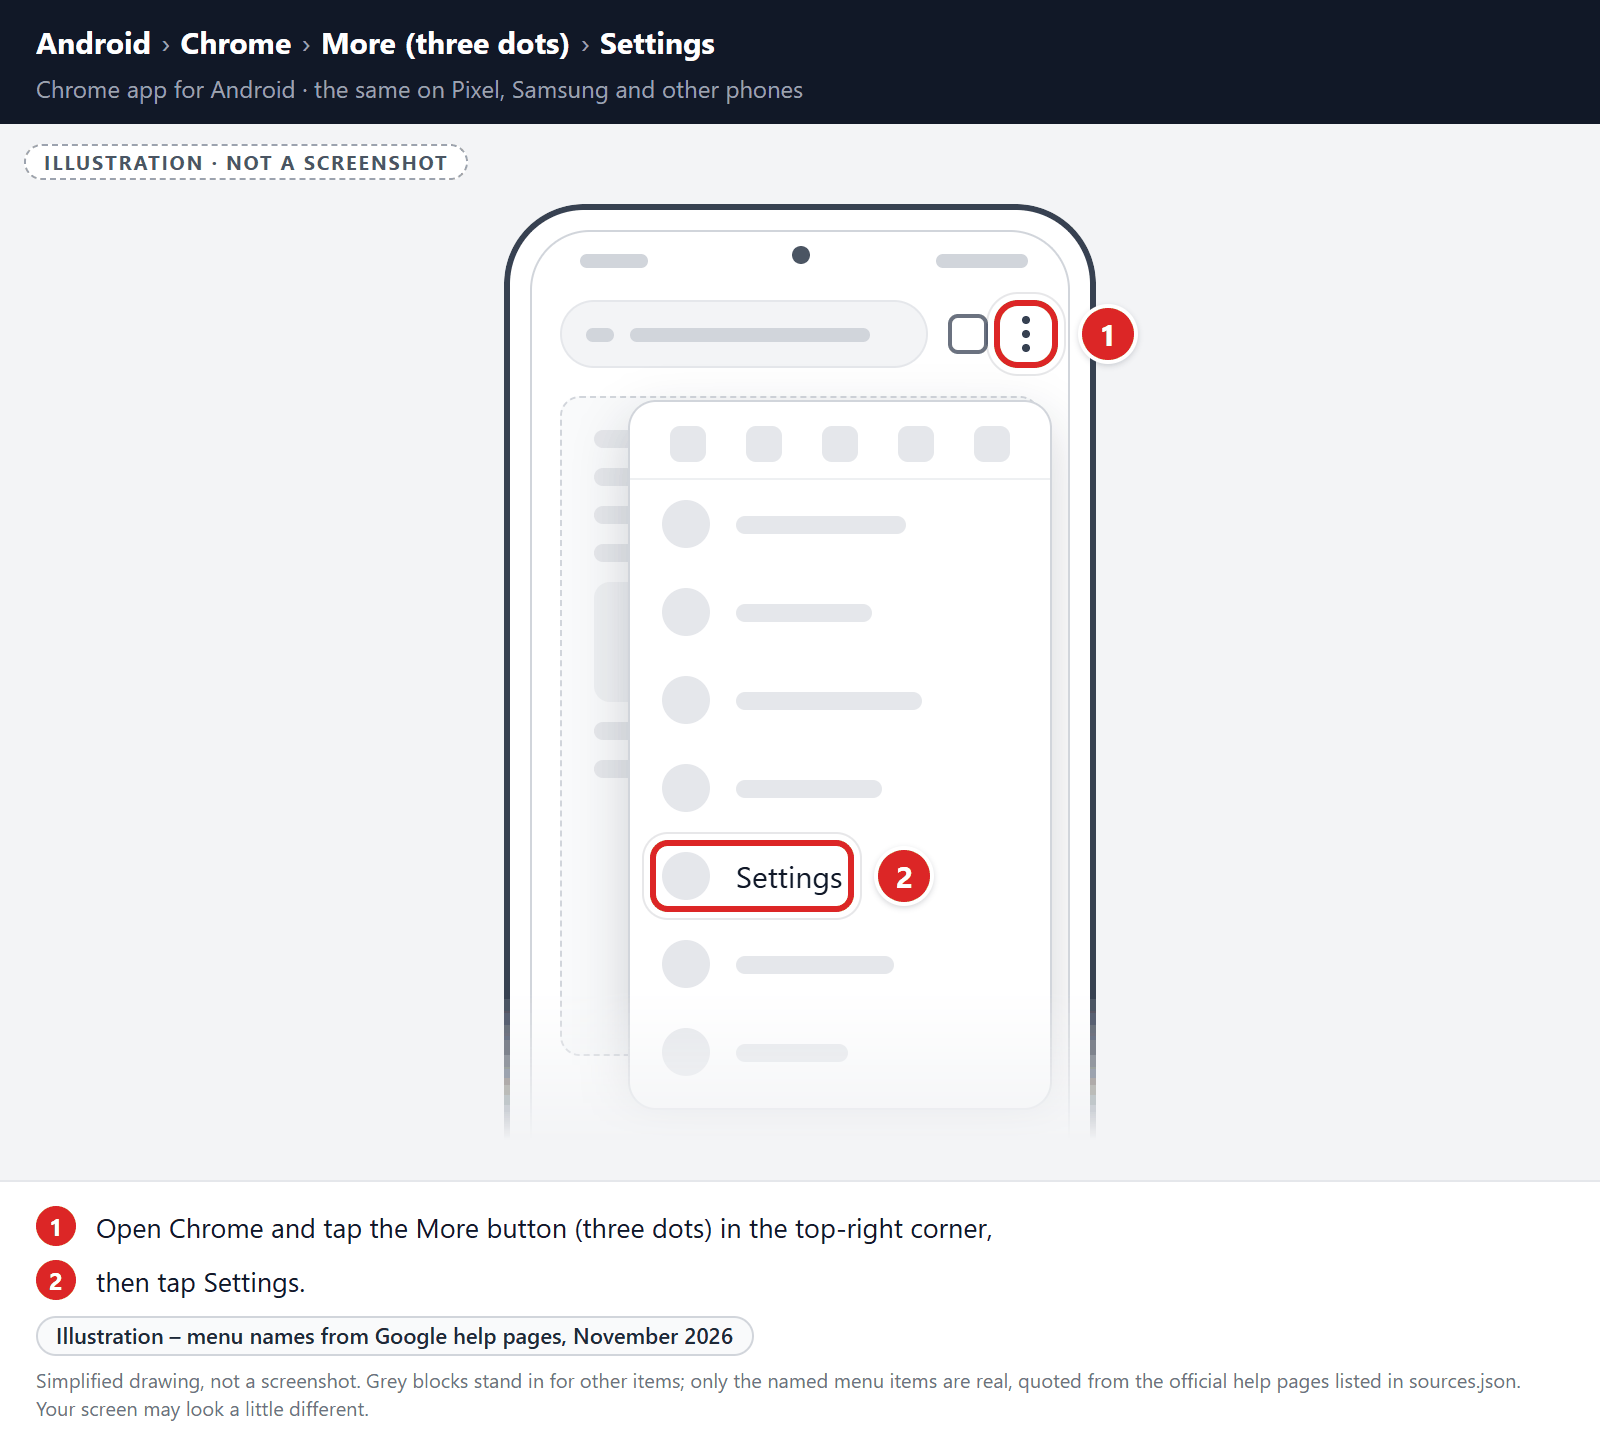
- Open Chrome, tap the More button (three dots) in the top-right corner, and tap Settings.
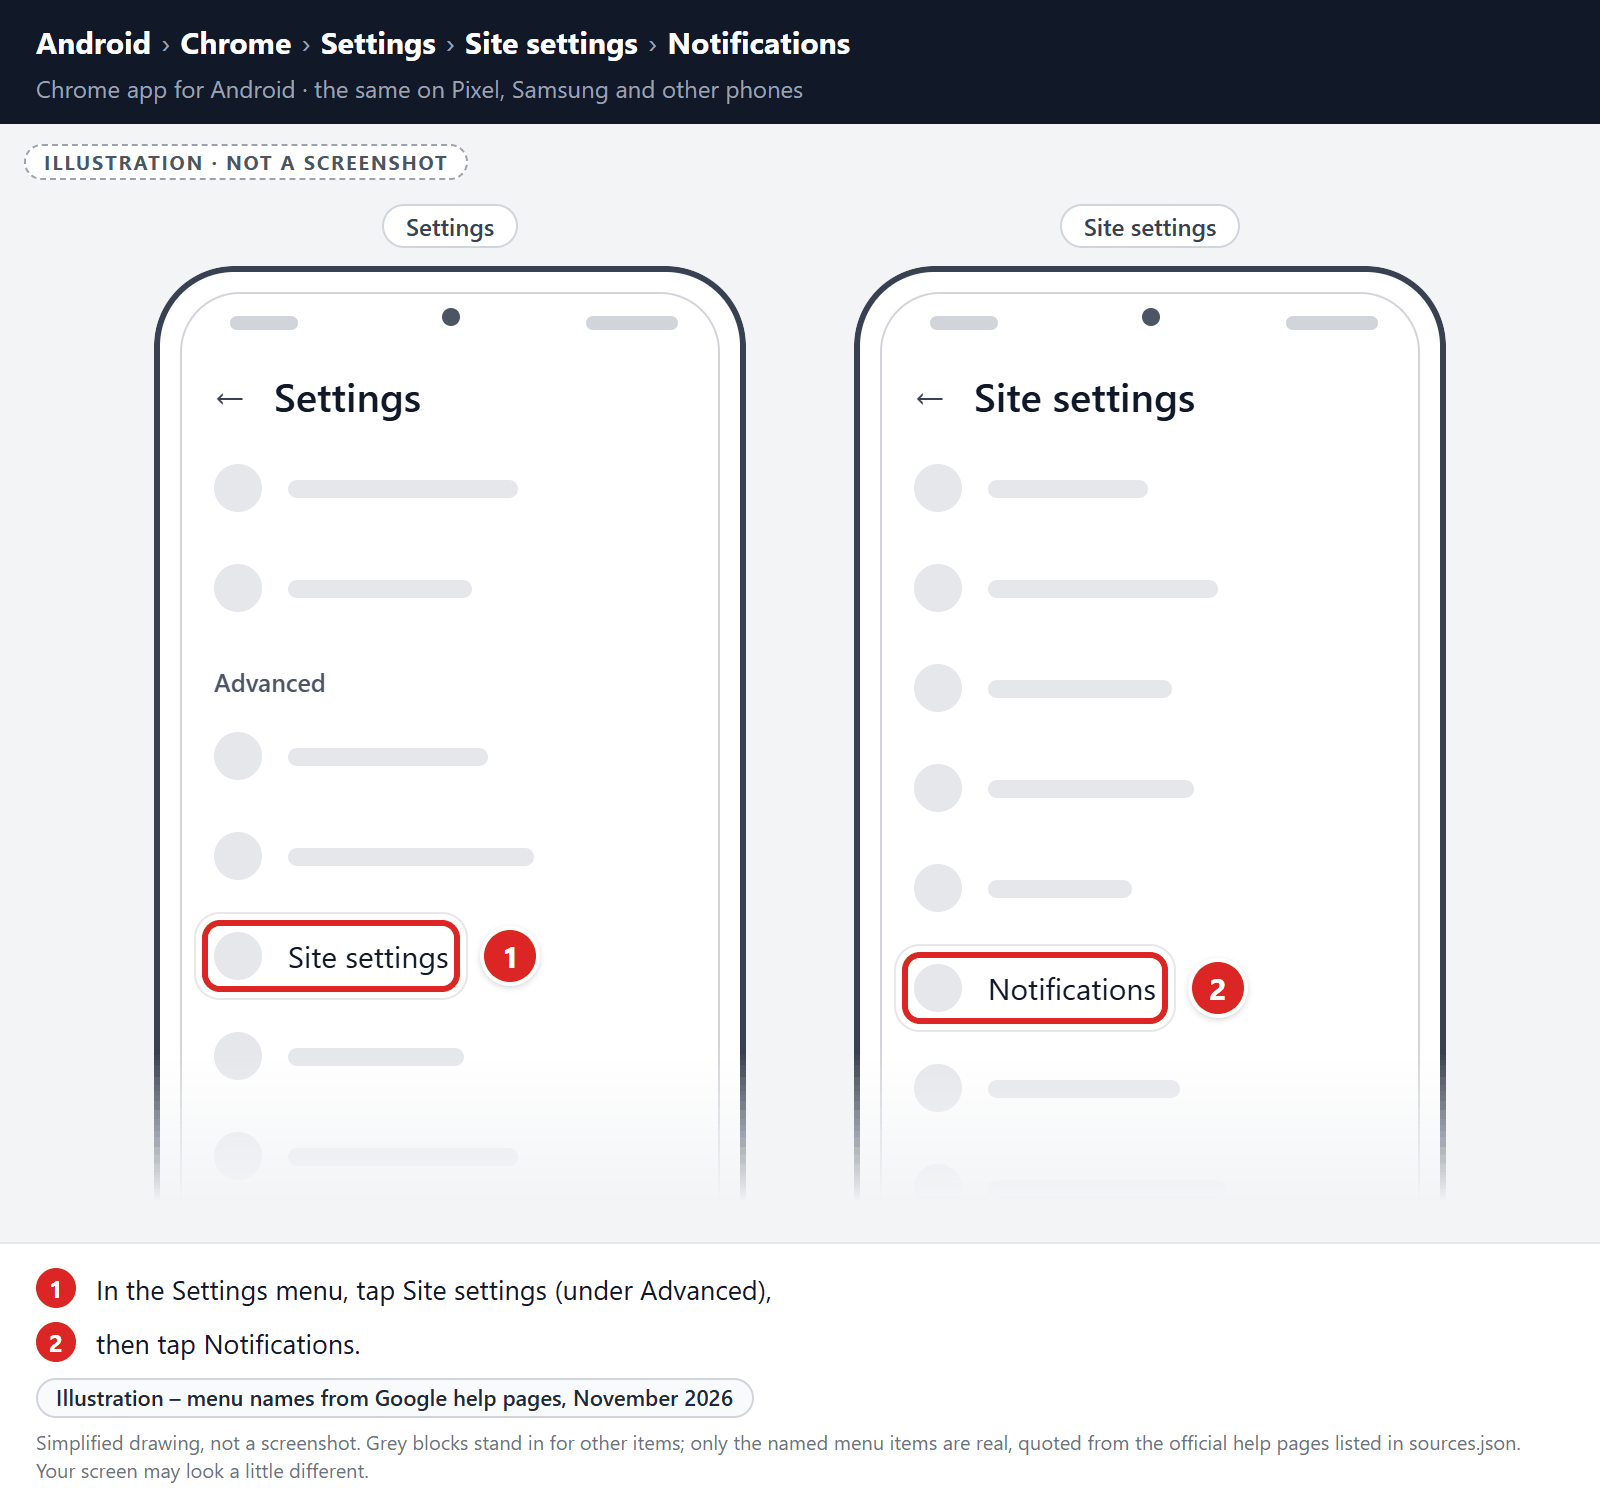
- Tap Site settings, then tap Notifications.
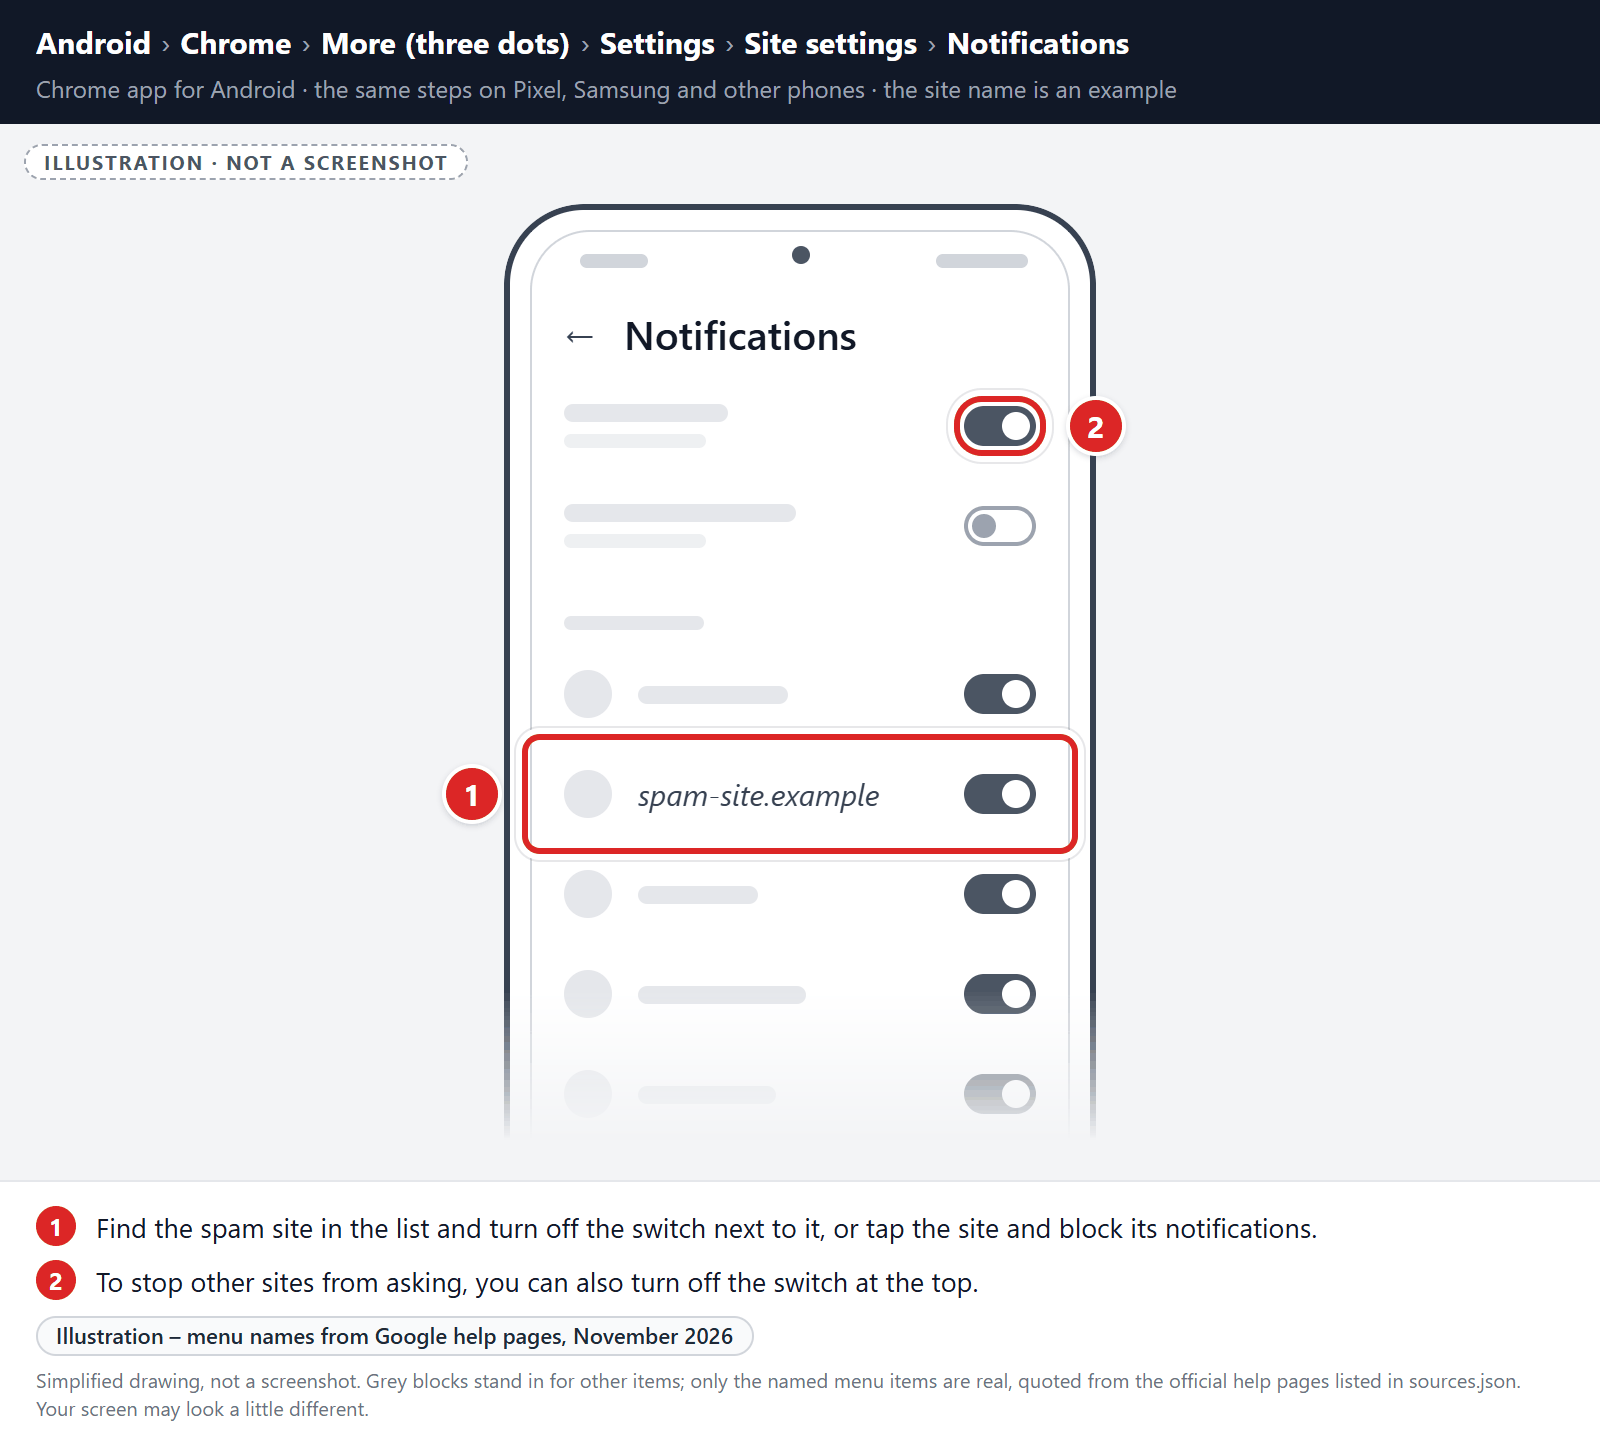
- Find the spam site in the list and turn off the switch next to it, or tap the site and block its notifications. To stop other sites from asking, you can also turn off the switch at the top.
If unwanted pages or redirects keep appearing, clear Chrome’s storage (last resort):
-
Open the “Settings” menu.
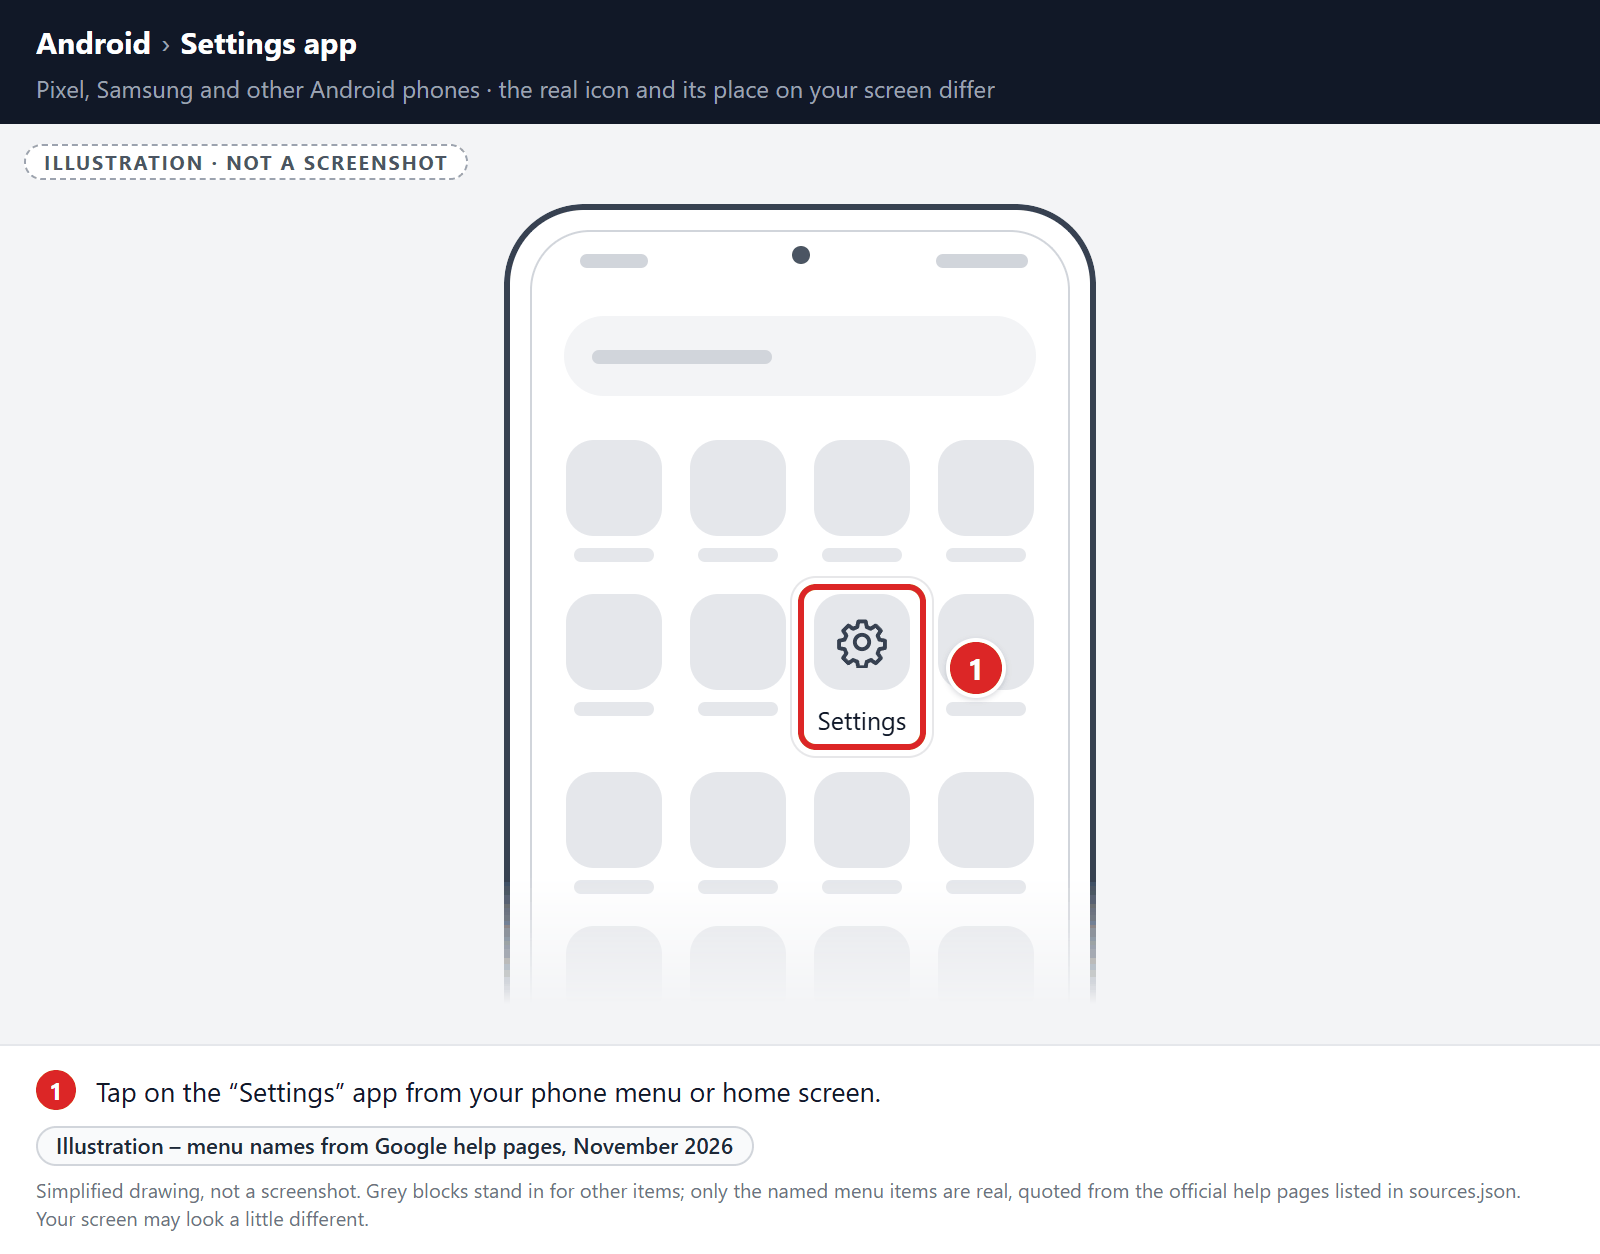
Tap on the “Settings” app from your phone menu or home screen.
-
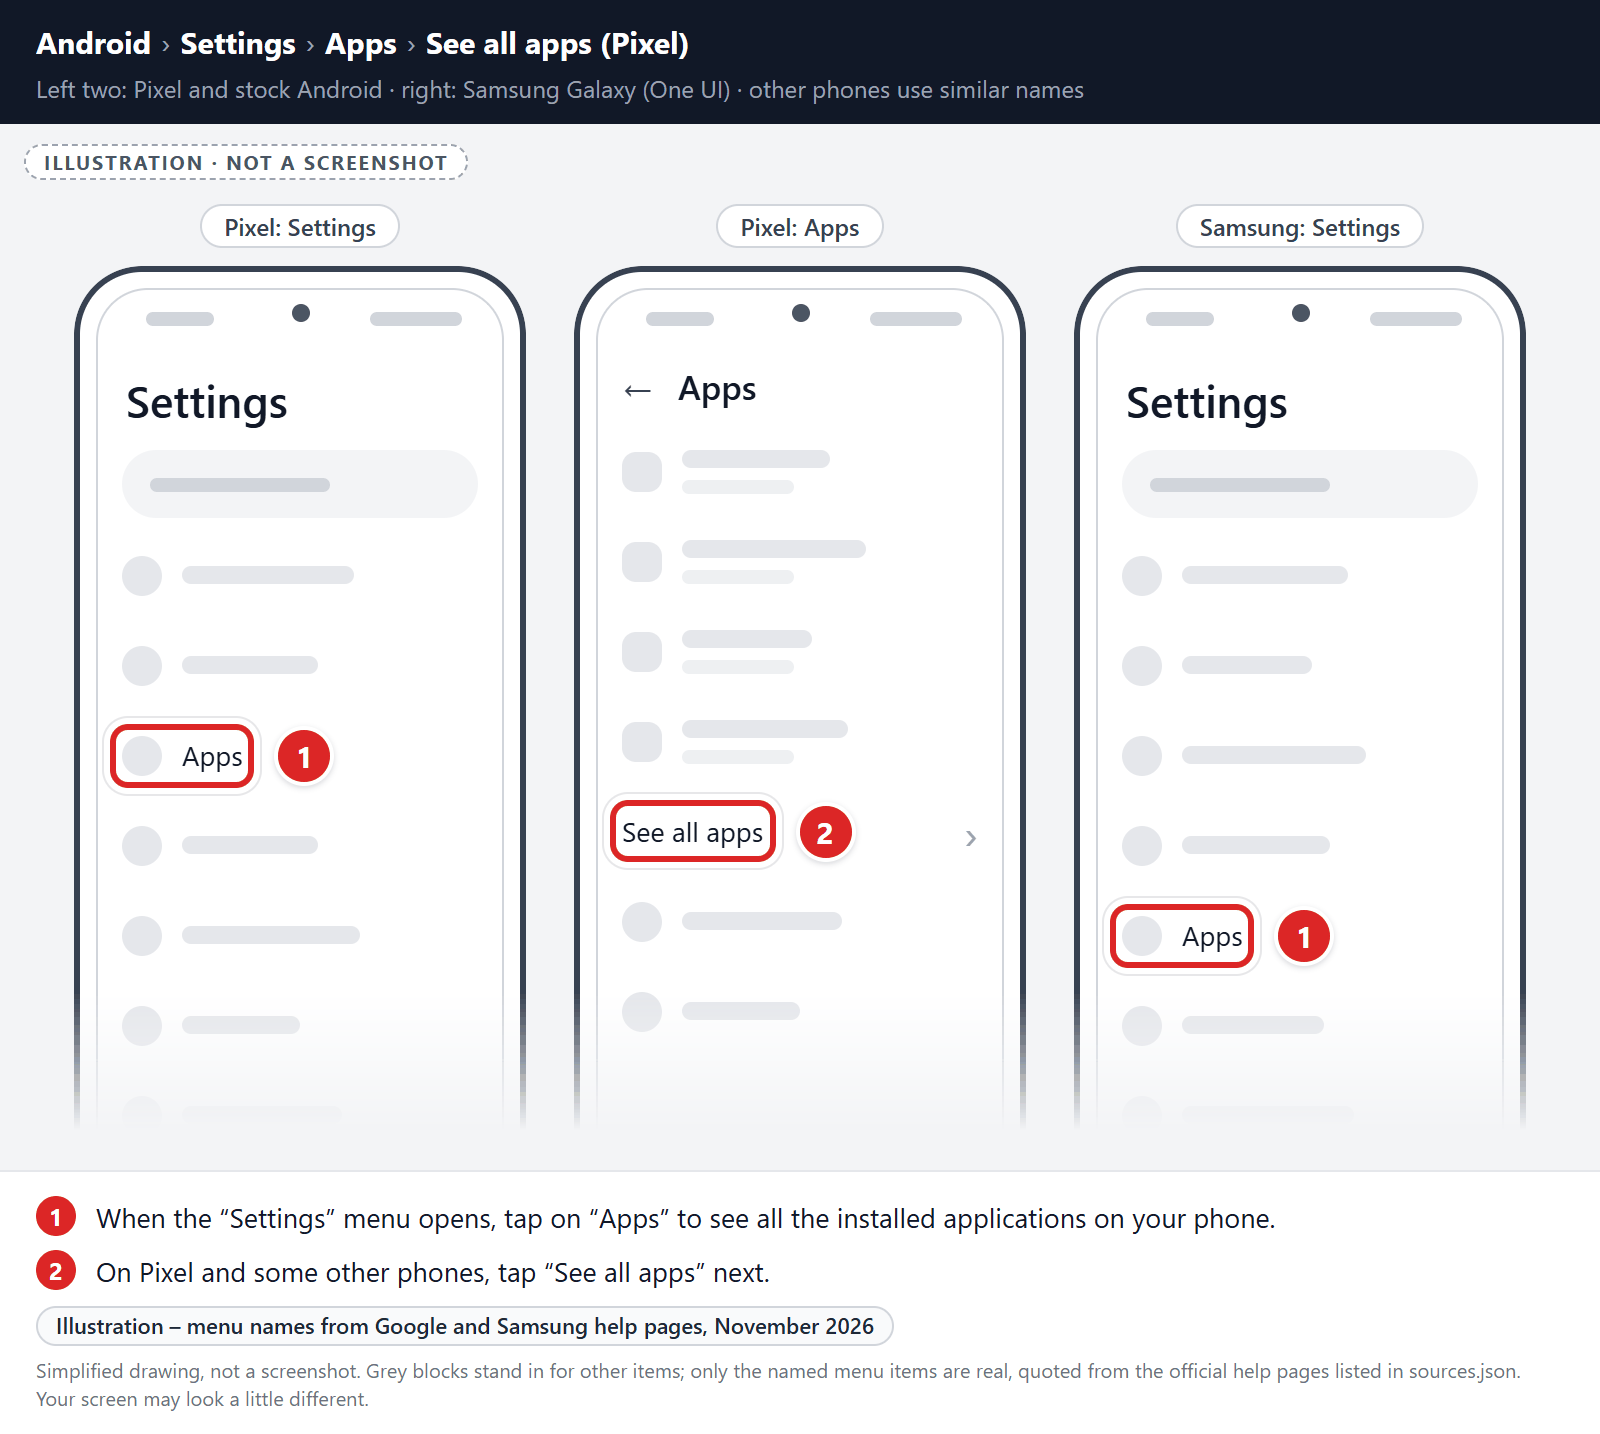
Tap on “Apps”.
When the “Settings” menu opens, tap on “Apps” to see all the installed applications on your phone.
-
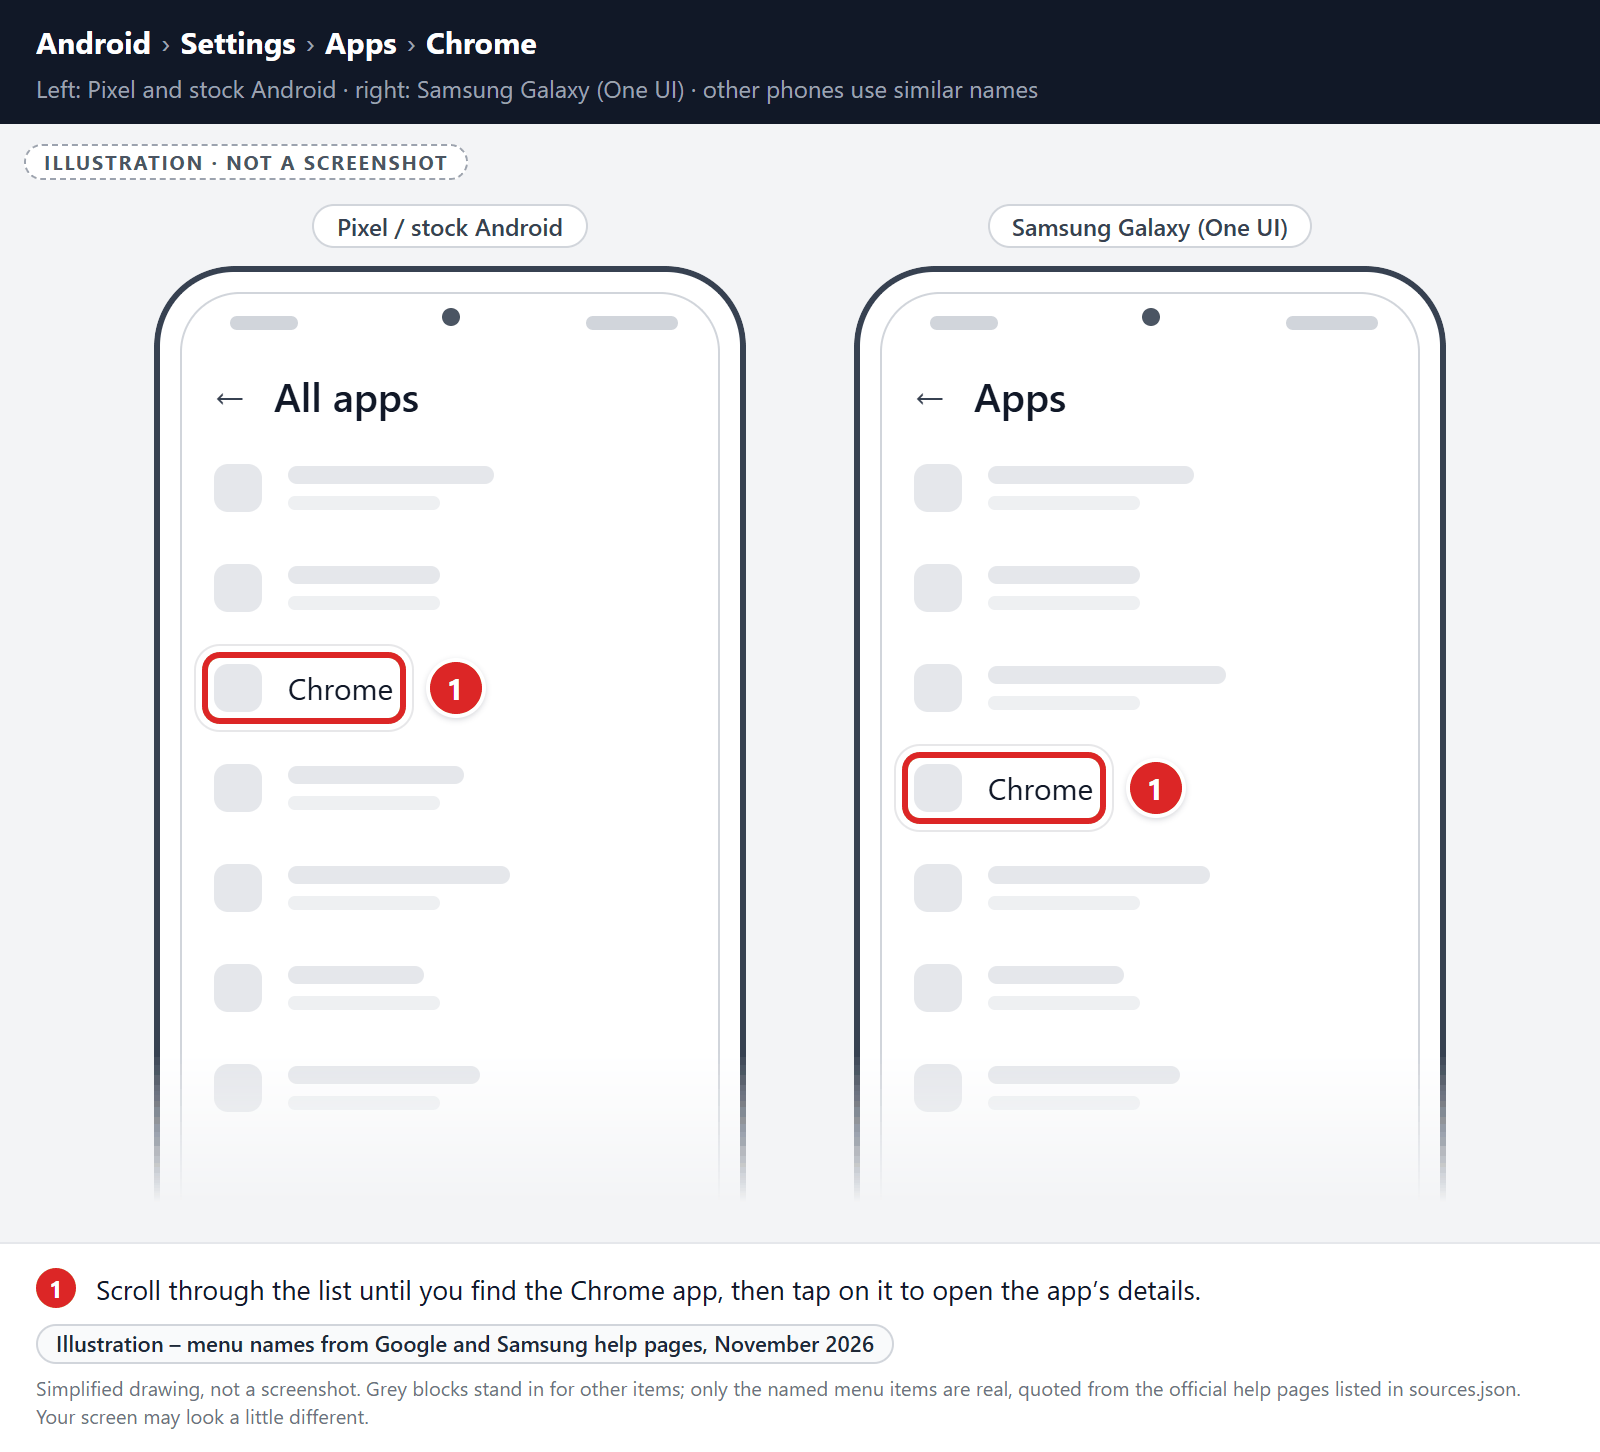
Find and tap on Chrome.
The “Apps” screen will be displayed with a list of all the apps installed on your phone. Scroll through the list until you find the Chrome app, then tap on it to open the app’s details.
-
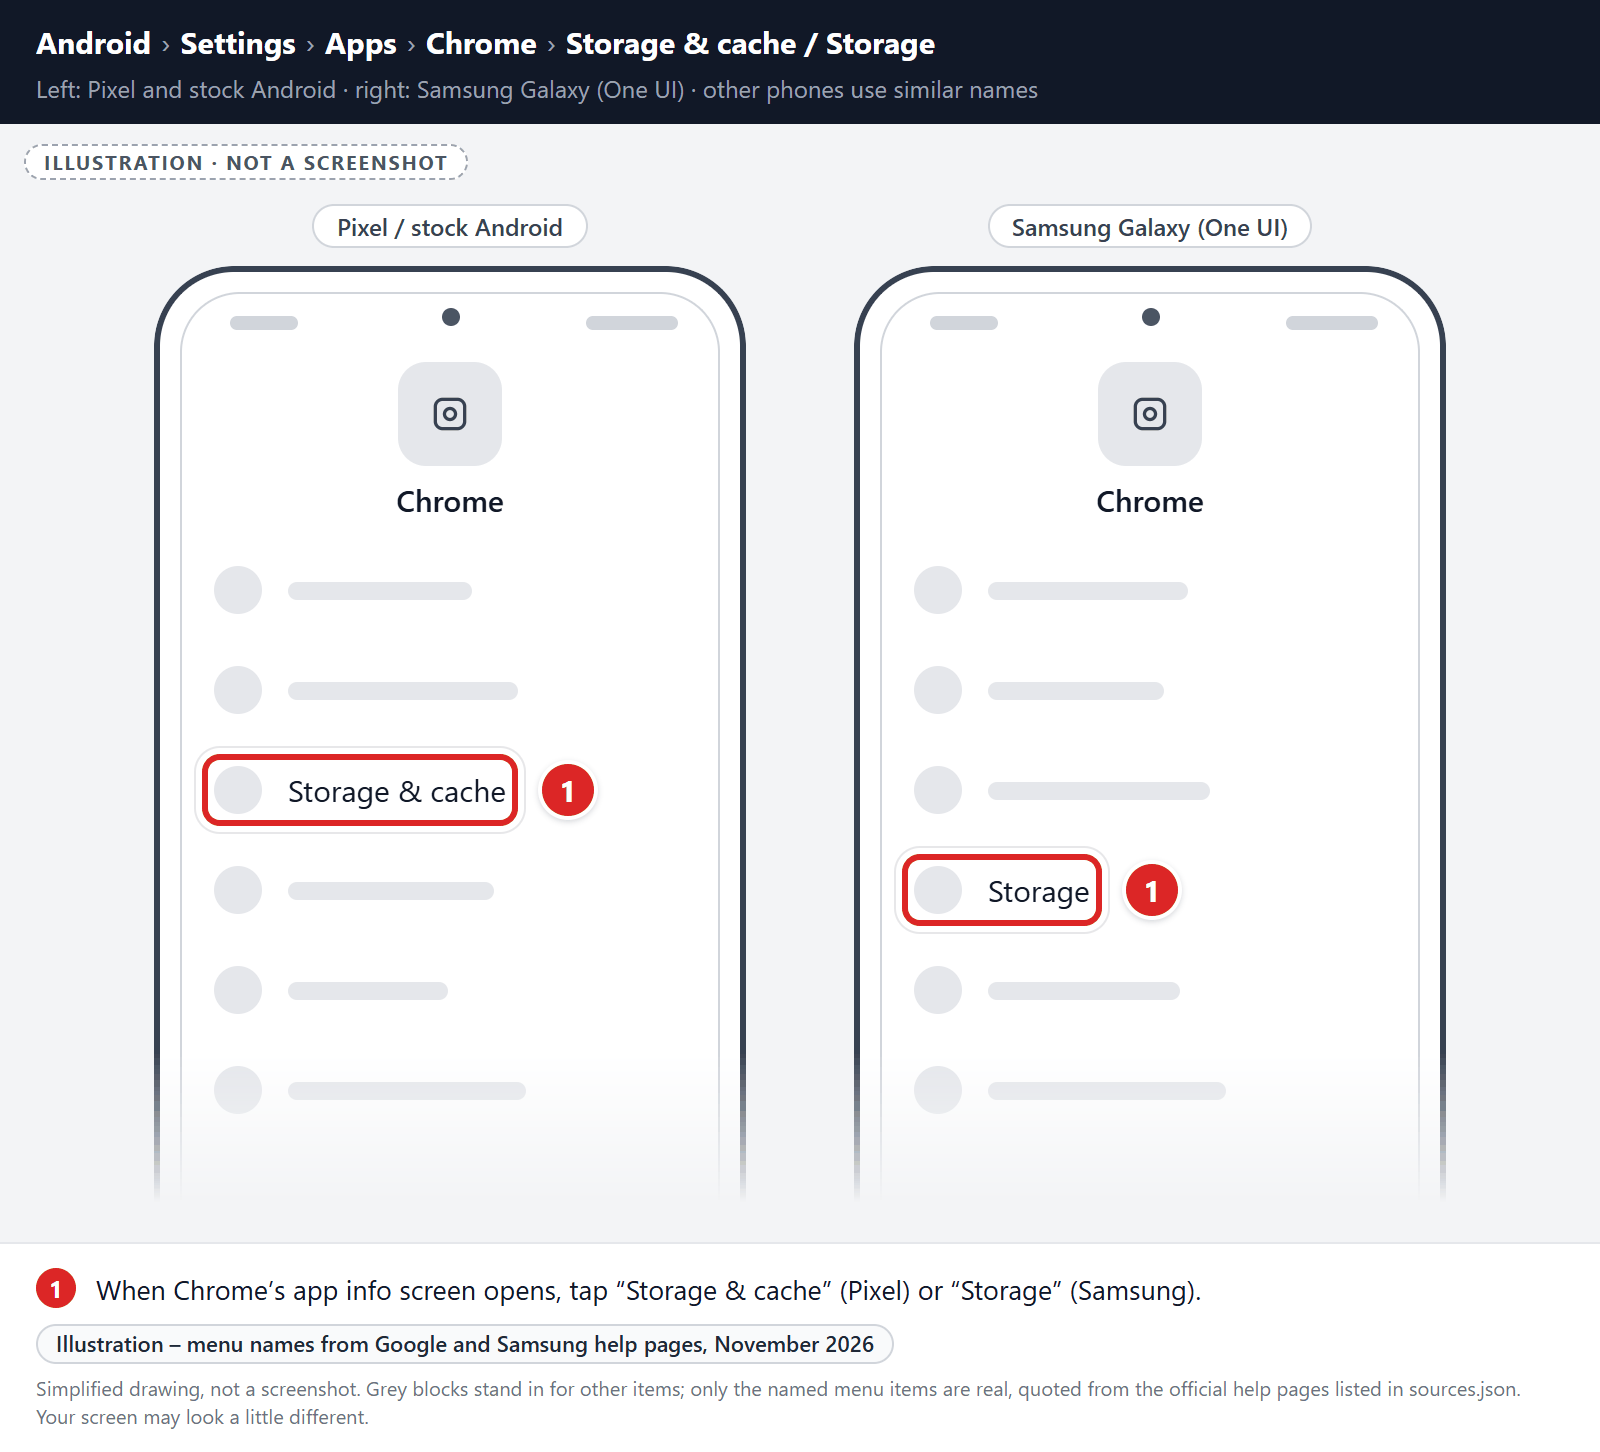
Tap “Storage”.
When Chrome’s app info menu is displayed, tap on “Storage” (on Pixel phones, “Storage & cache“).
-
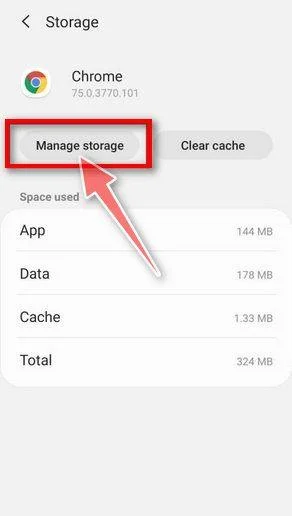
Tap “Manage Space”.
Under the storage settings, tap “Manage space” (called “Manage storage” on some phones). Don’t tap “Clear cache”, because it doesn’t reset Chrome.
-
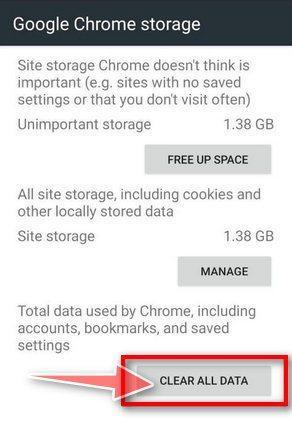
Tap “Clear all data”.
Tap “Clear all data” to delete all Chrome’s data including accounts, bookmarks, and your settings to reset the default settings.
-
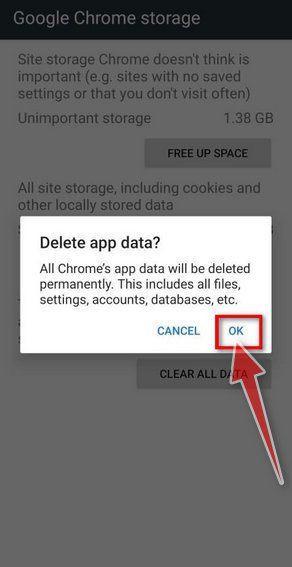
Confirm by tapping “Ok”.
A confirmation dialog should now be displayed, detailing the components that will be restored to their default state should you continue with the reset process. To complete the restoration process, tap “Ok“.
Remove malware from Firefox for Android
First, block the spam site’s notifications:
- Open Firefox, tap the menu button (three dots), and tap Settings.
- Tap Site permissions, then tap Exceptions.
- Tap the spam site, then set Notification to Blocked.
- Optional: to stop other sites from asking, go back to Site permissions, tap Notification, and choose Blocked.
If unwanted pages or redirects keep appearing, clear Firefox’s storage (last resort):
-
Open the “Settings” menu.
Tap on the “Settings” app from your phone menu or home screen.
-
Tap on “Apps”.
When the “Settings” menu opens, tap on “Apps” to see all the installed applications on your phone.
-
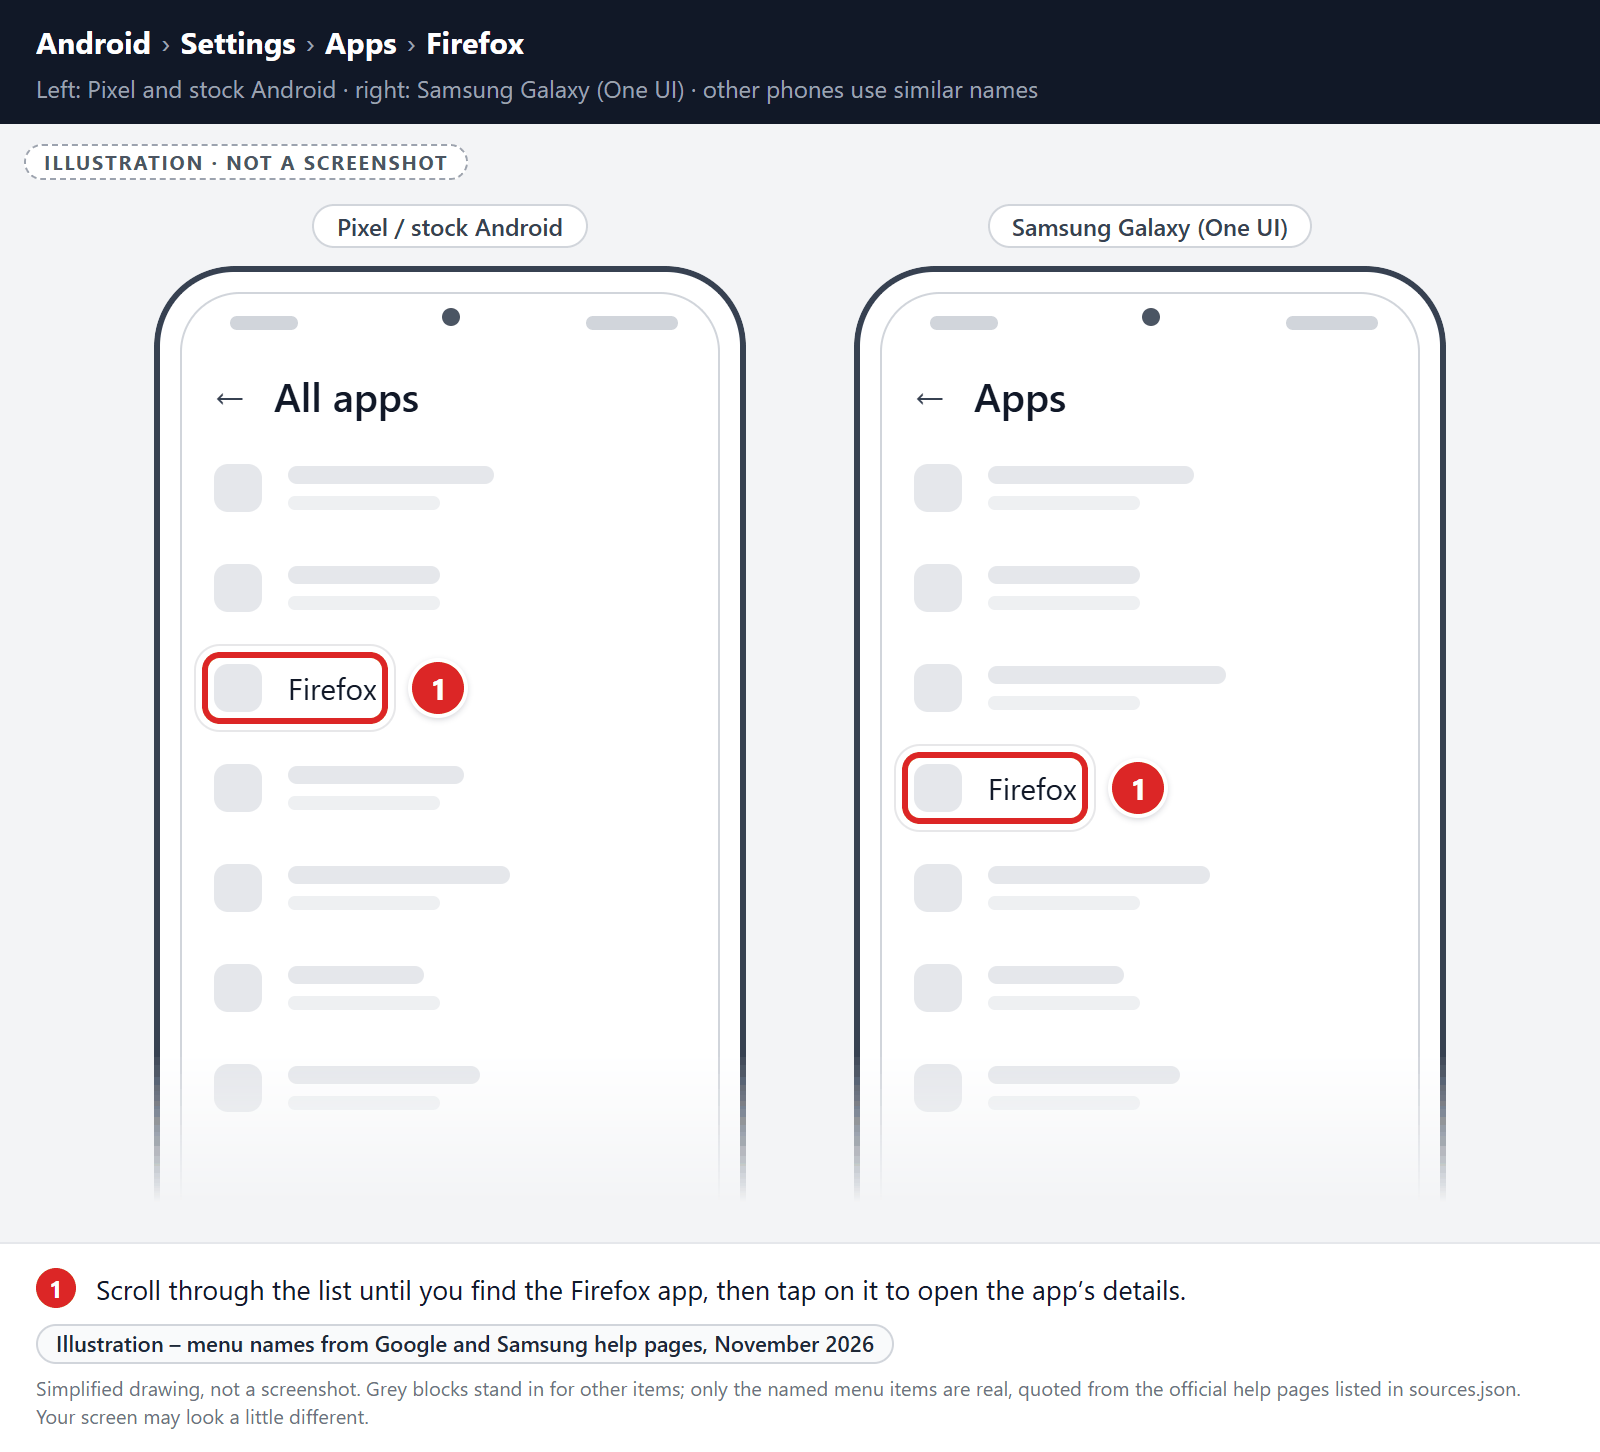
Find and tap on Firefox.
The “Apps” screen will be displayed with a list of all the apps installed on your phone. Scroll through the list until you find the Firefox app, then tap on it to open the app’s details.
-
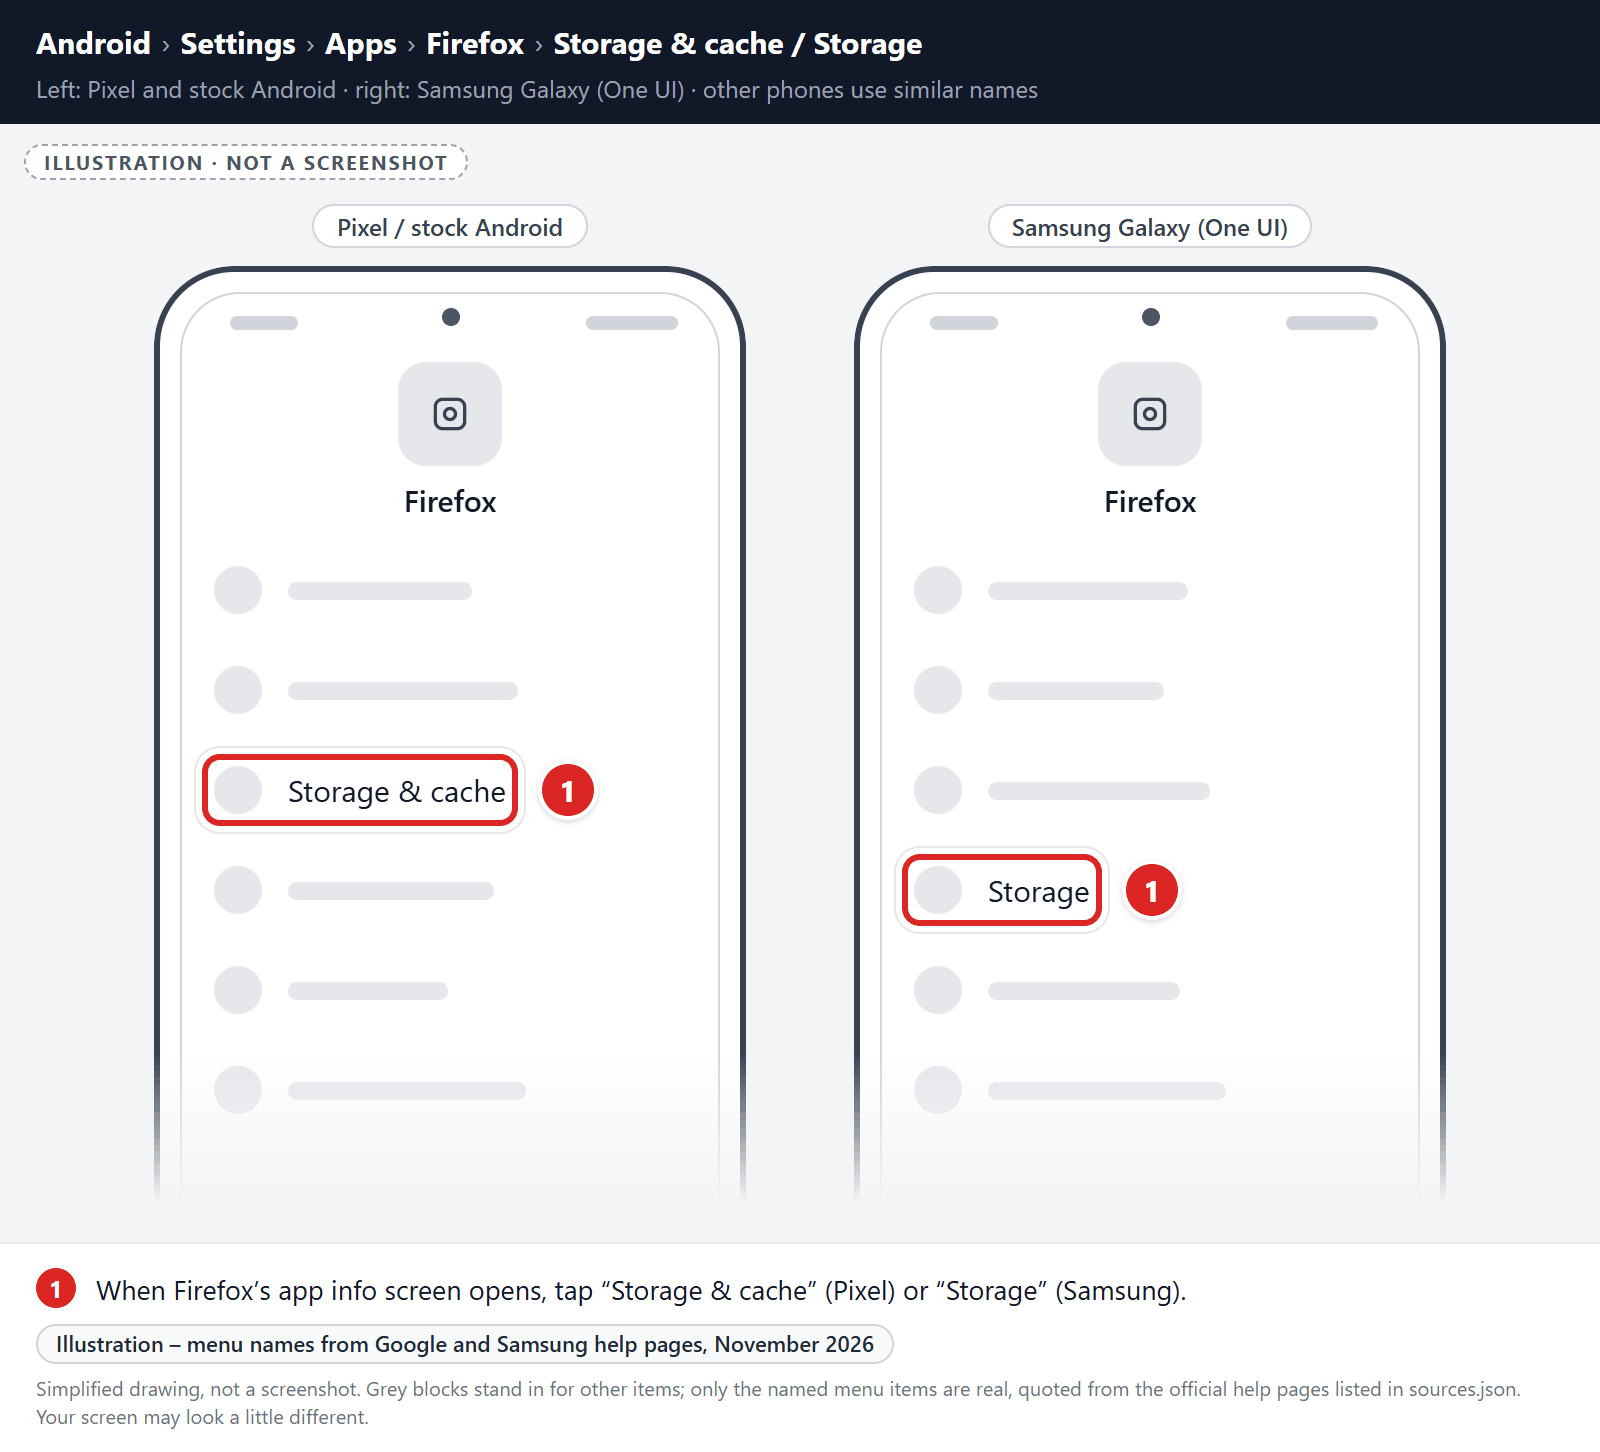
Tap “Storage”.
When Firefox’s app info menu is displayed, tap on “Storage” (on Pixel phones, “Storage & cache“).
-
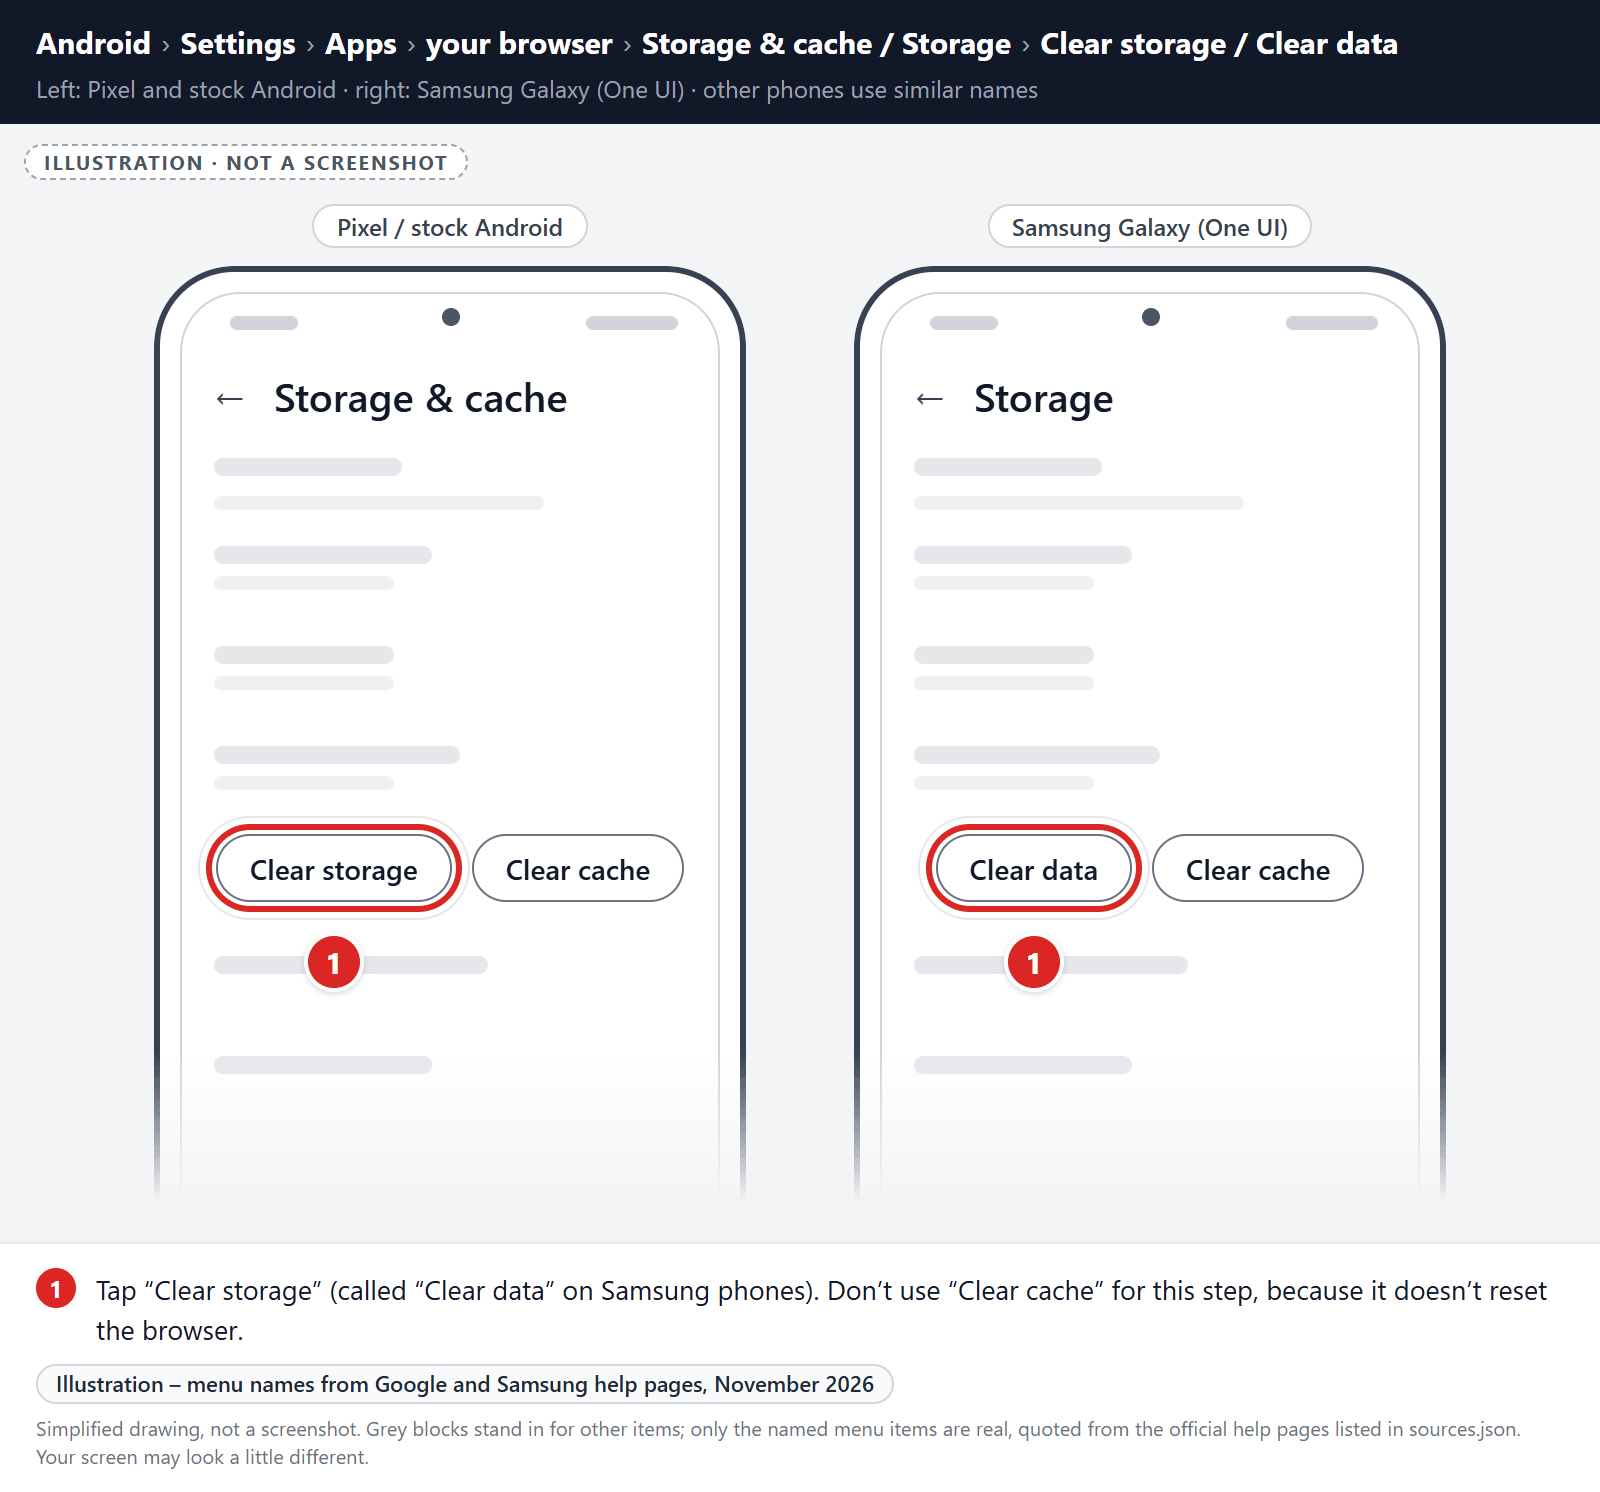
Tap “Clear storage” or “Clear data”.
Tap “Clear storage” (called “Clear data” on Samsung phones). If you see “Manage space” or “Manage storage” instead, tap it, then tap “Clear all data“. Don’t use “Clear cache” for this step, because it doesn’t reset the browser.
-
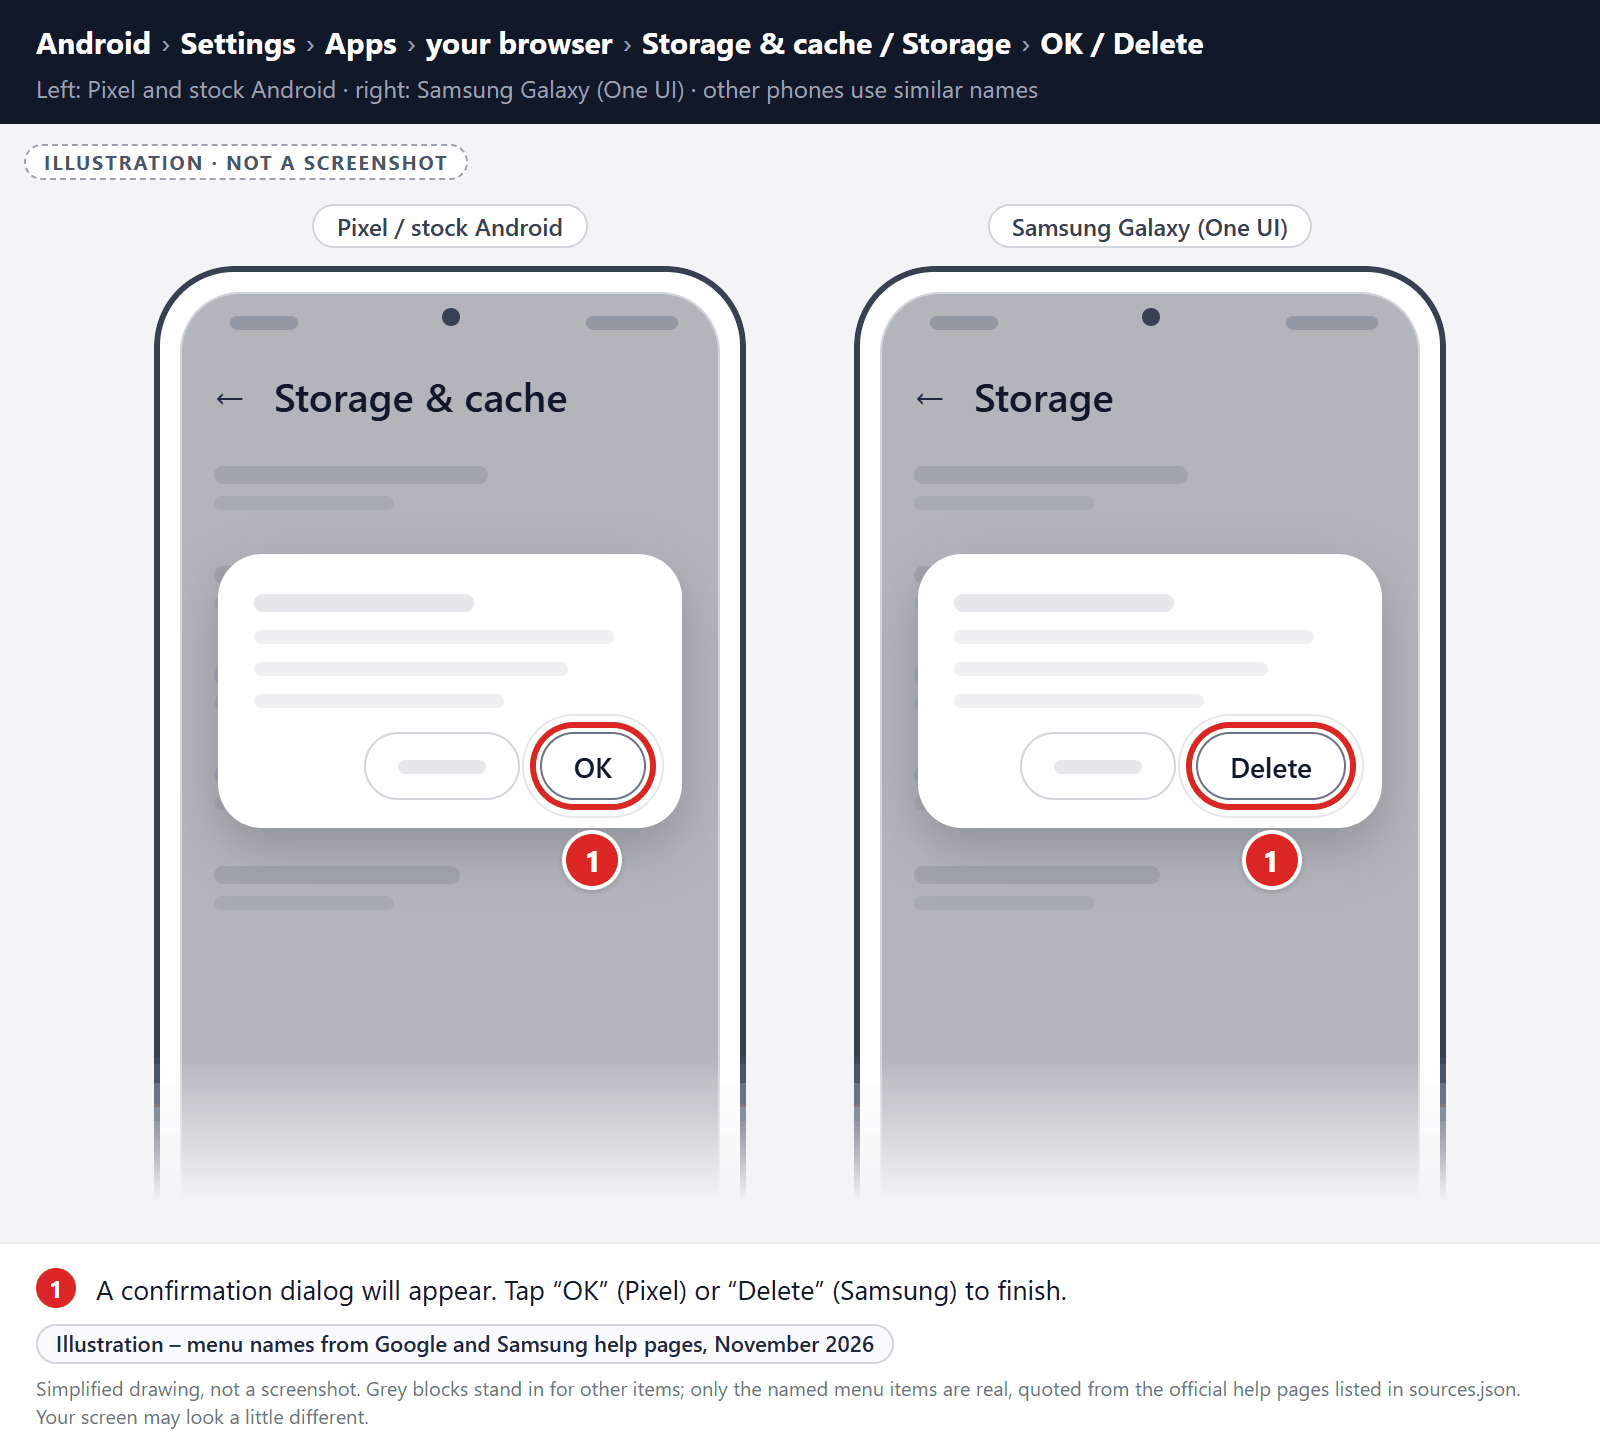
Confirm by tapping “OK”.
A confirmation dialog will appear. Tap “OK” or “Delete” to finish. When you open Firefox again, sign back in and turn sync back on if you use it.
Remove malware from the Opera browser
First, block the spam site’s notifications:
- Open Opera, open the Opera menu, and tap Settings.
- Tap Site settings, then tap Notifications.
- Find the spam site and block it. Don’t just remove it from the list, because a removed site can ask again.
If unwanted pages or redirects keep appearing, clear Opera’s storage (last resort):
-
Open the “Settings” menu.
Tap on the “Settings” app from your phone menu or home screen.
-
Tap on “Apps”.
When the “Settings” menu opens, tap on “Apps” to see all the installed applications on your phone.
-
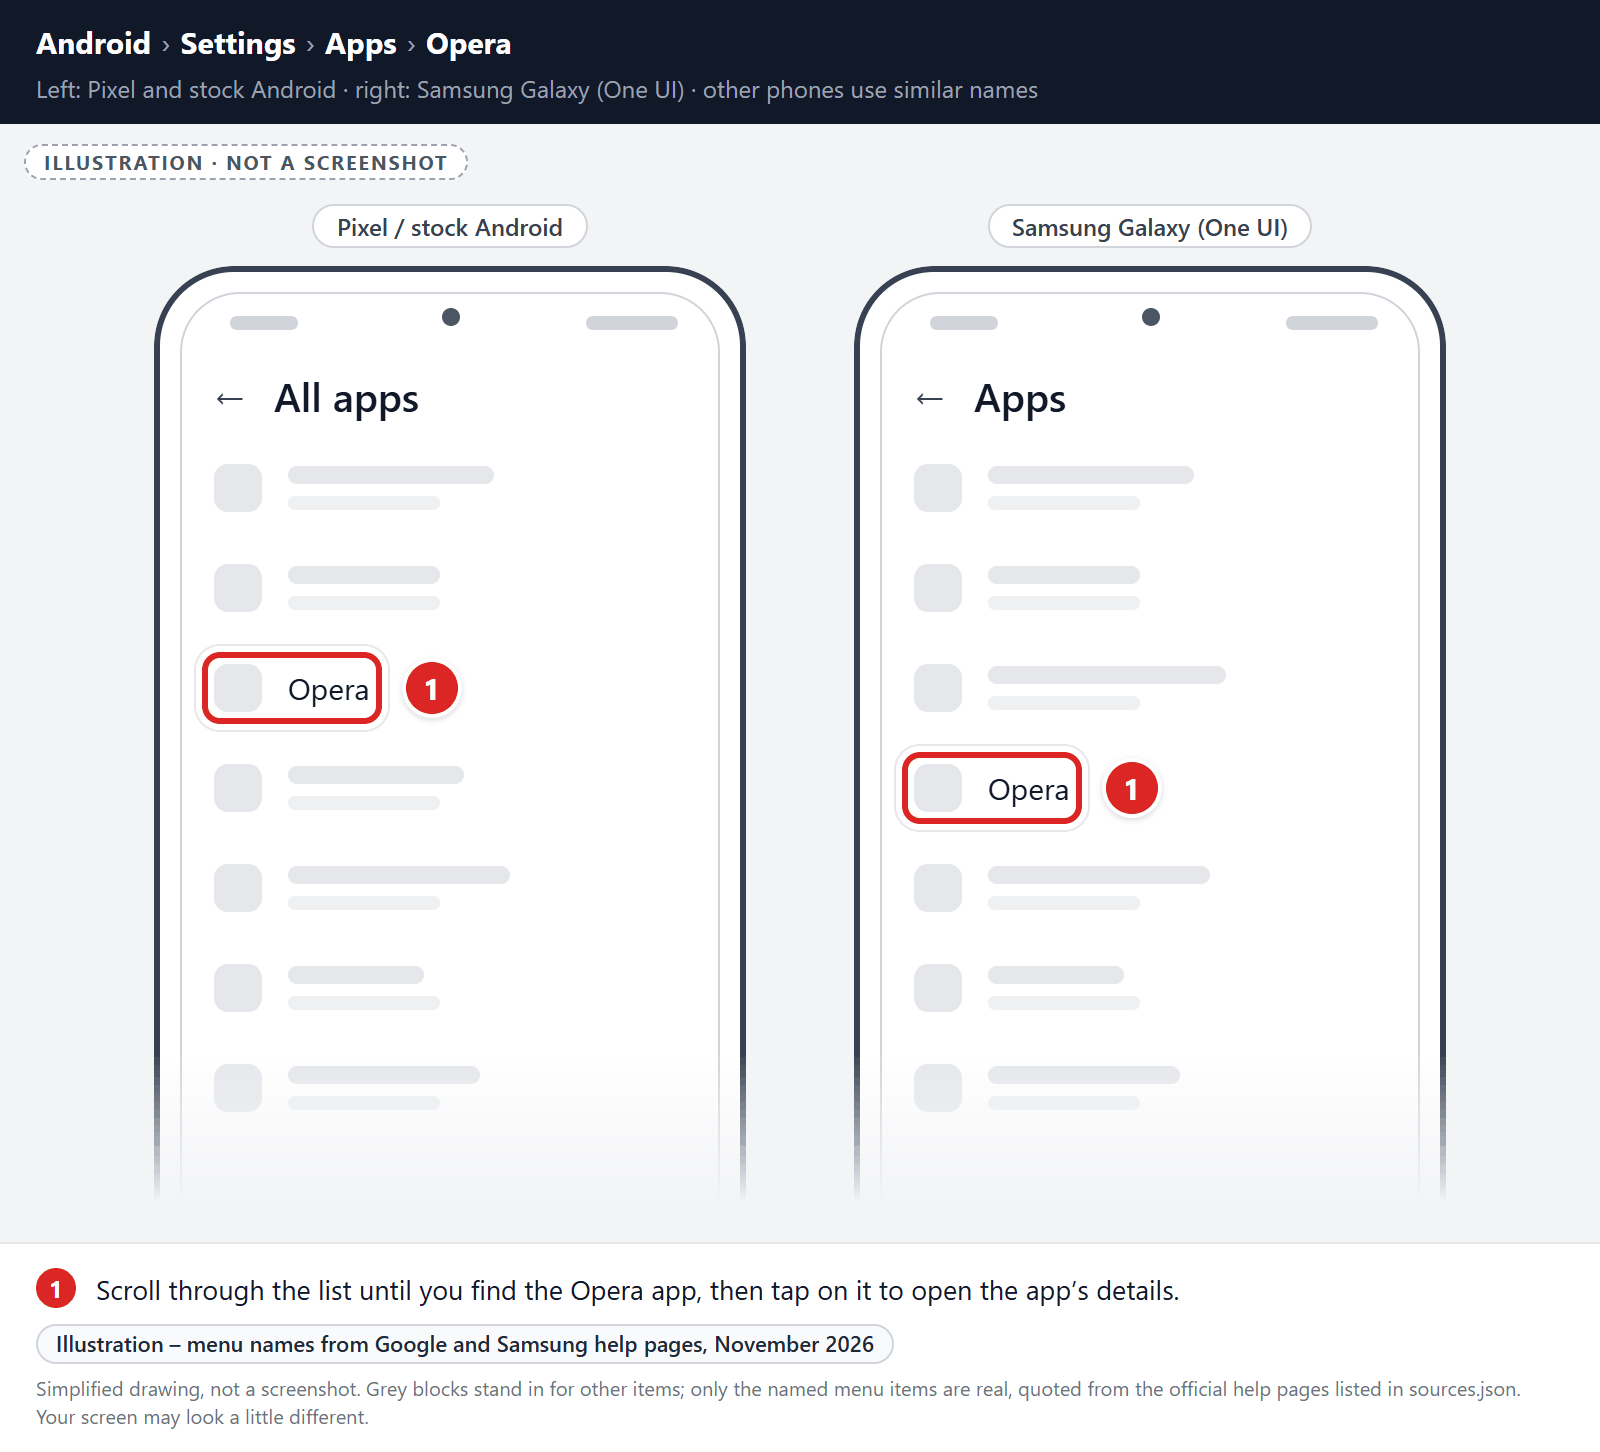
Find and tap on Opera.
The “Apps” screen will be displayed with a list of all the apps installed on your phone. Scroll through the list until you find the Opera app, then tap on it to open the app’s details.
-
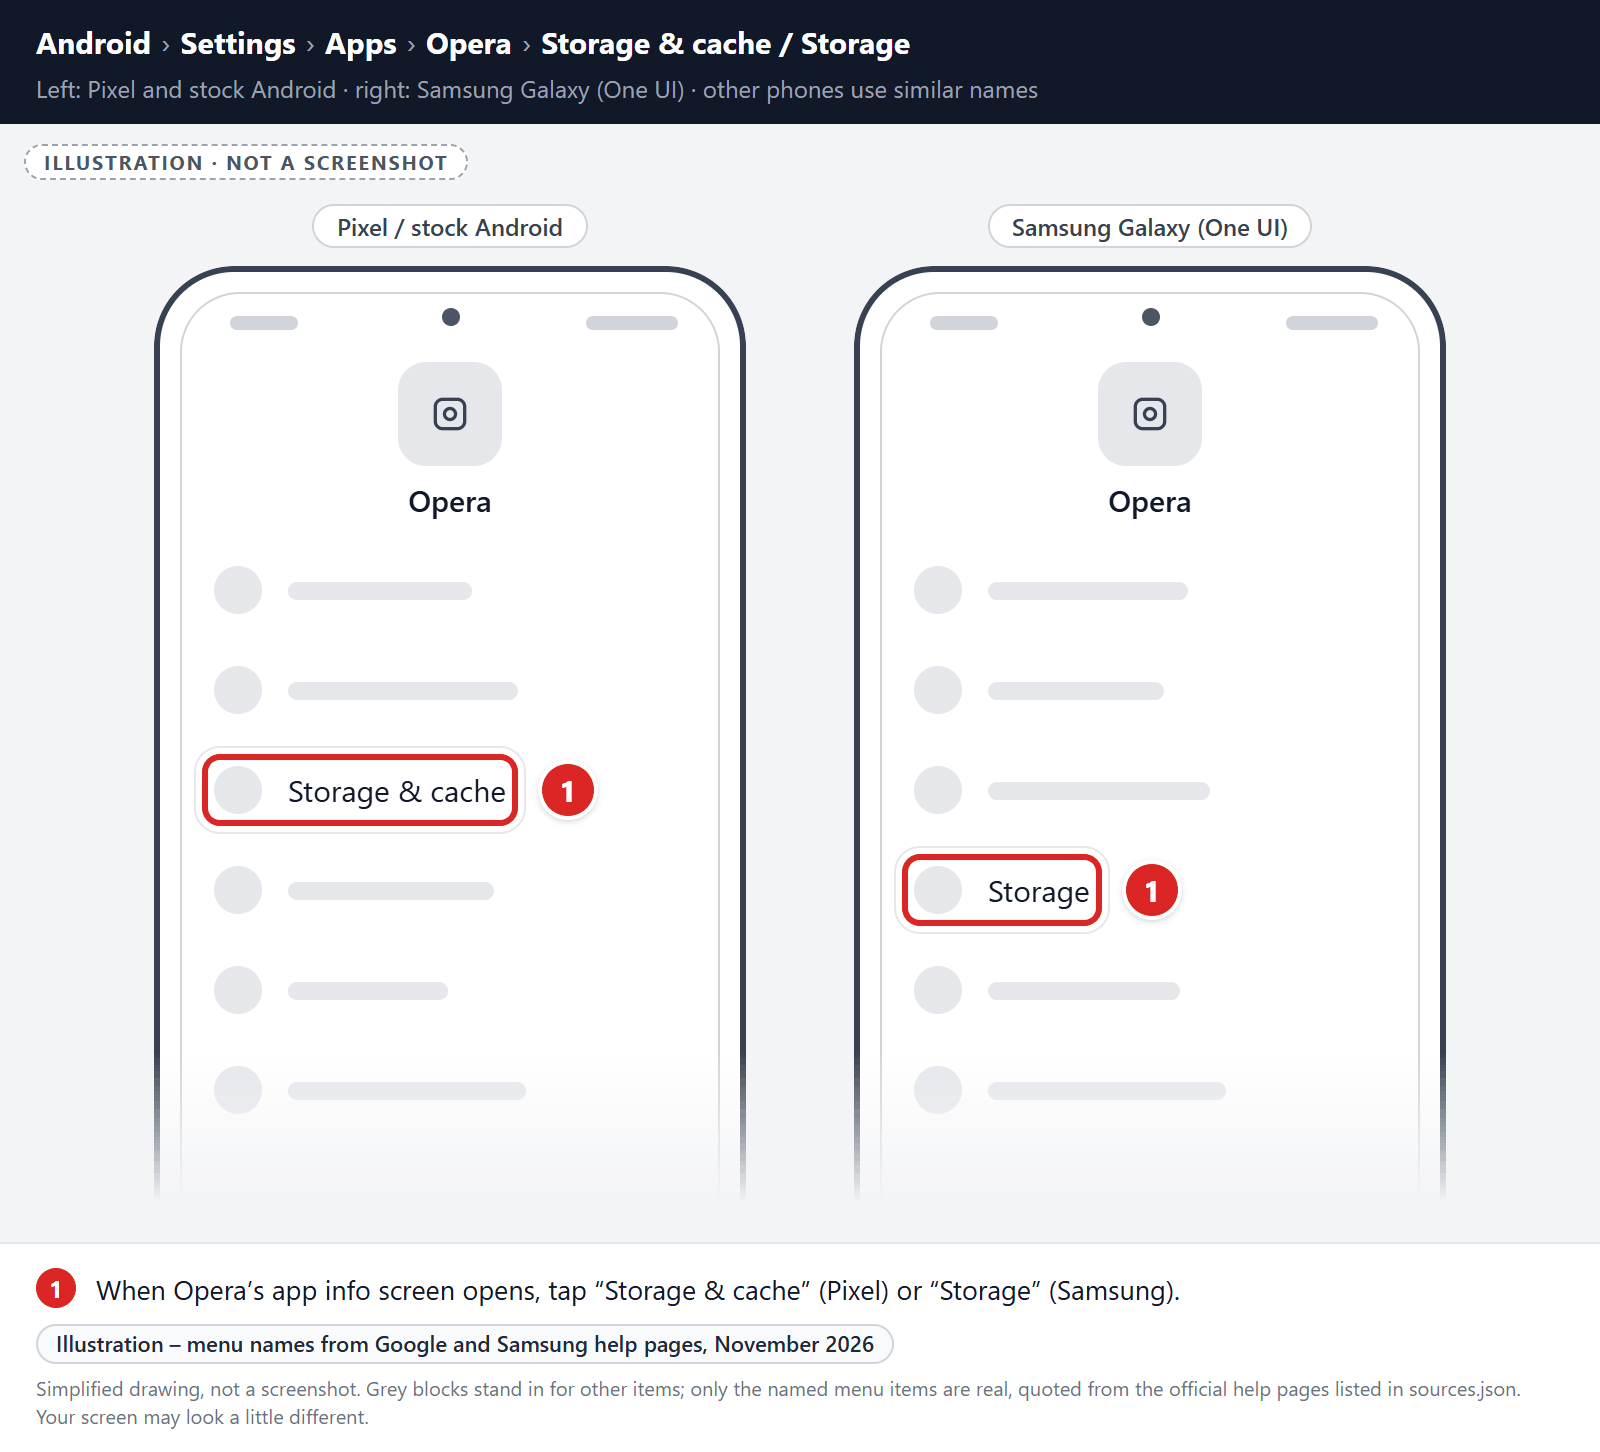
Tap “Storage”.
When Opera’s app info menu is displayed, tap on “Storage” (on Pixel phones, “Storage & cache“).
-
Tap “Clear storage” or “Clear data”.
Tap “Clear storage” (called “Clear data” on Samsung phones). If you see “Manage space” or “Manage storage” instead, tap it, then tap “Clear all data“. Don’t use “Clear cache” for this step, because it doesn’t reset the browser.
-
Confirm by tapping “OK”.
A confirmation dialog will appear. Tap “OK” or “Delete” to finish. When you open Opera again, sign back in and turn sync back on if you use it.
Remove malware from Samsung Internet
First, block the spam site’s notifications:
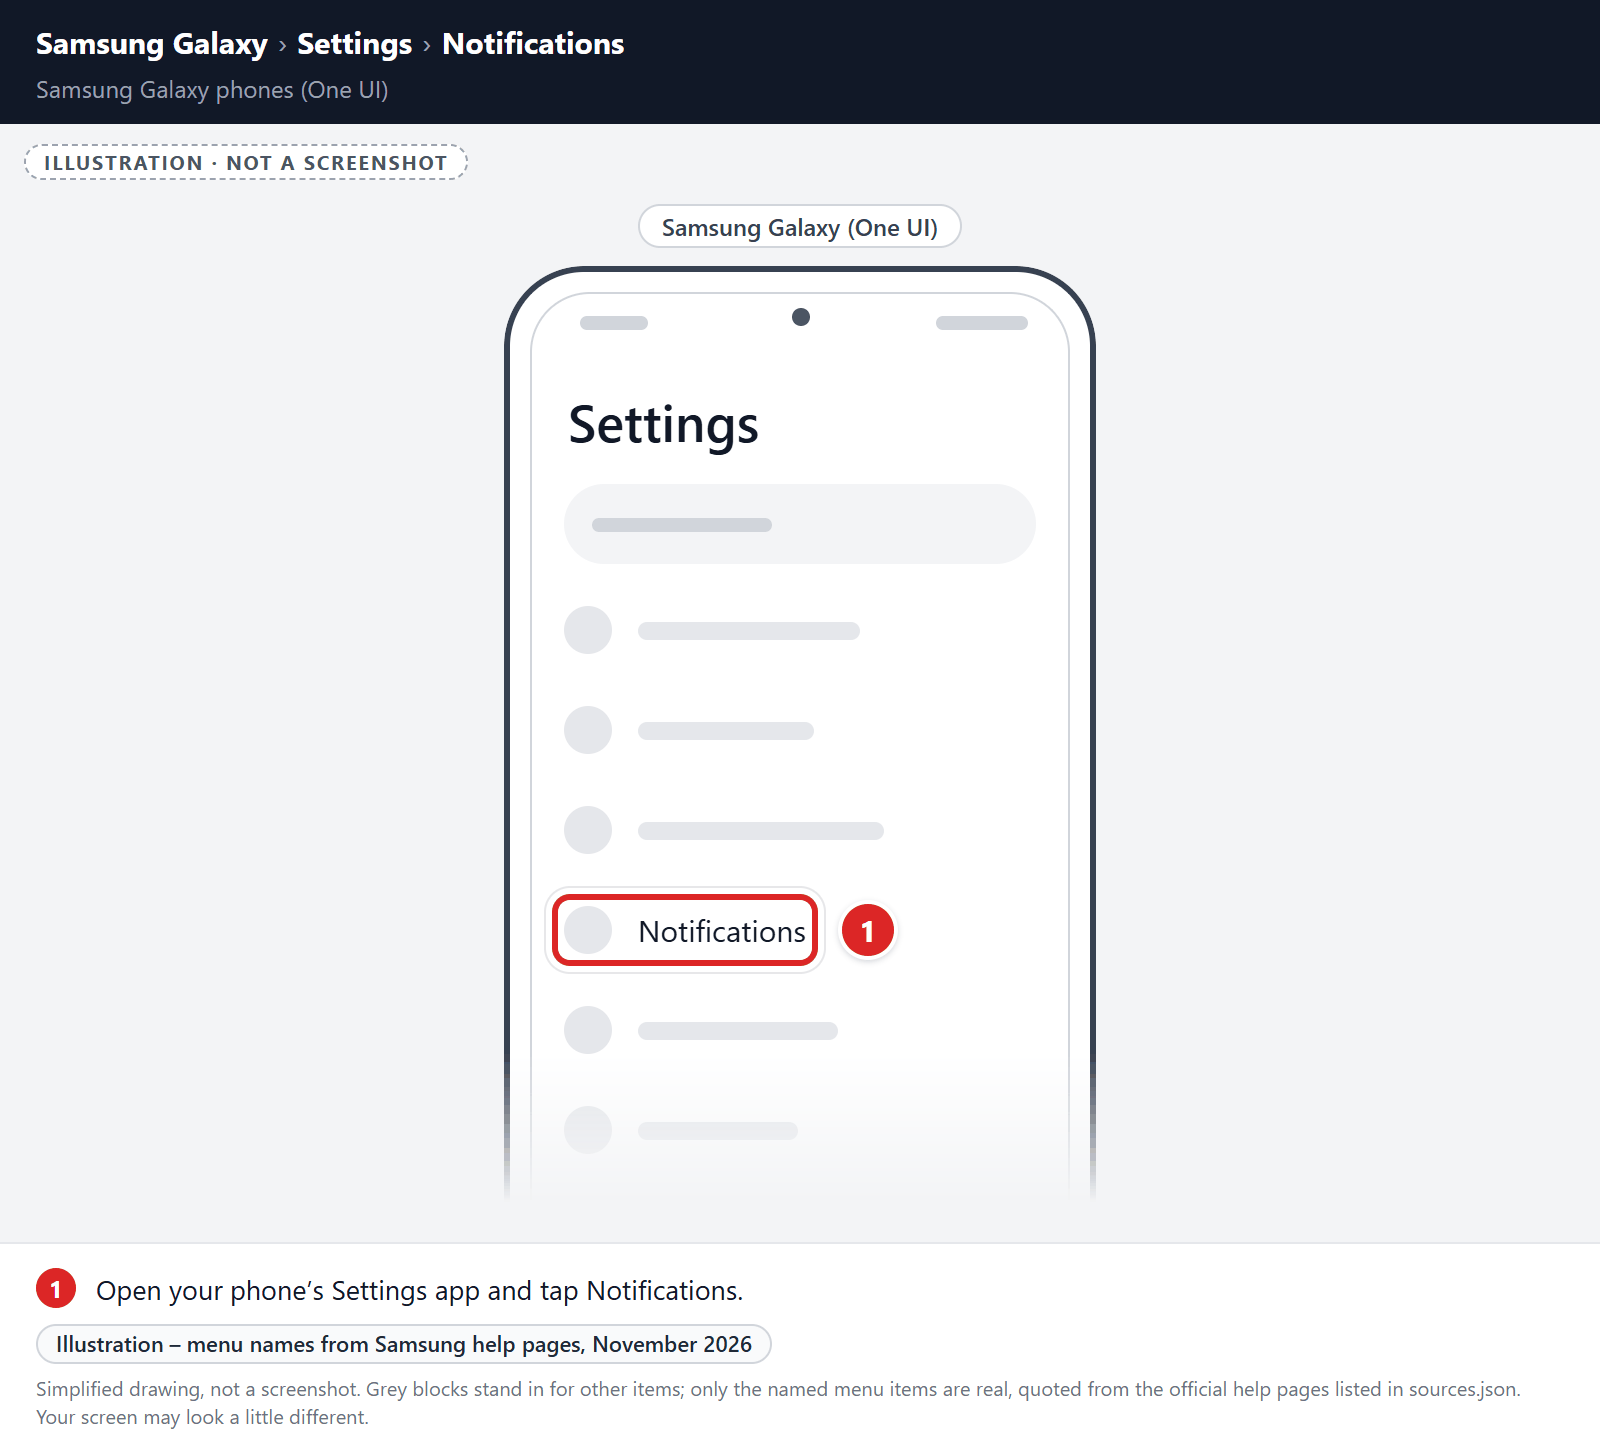
- Open your phone’s Settings app and tap Notifications.
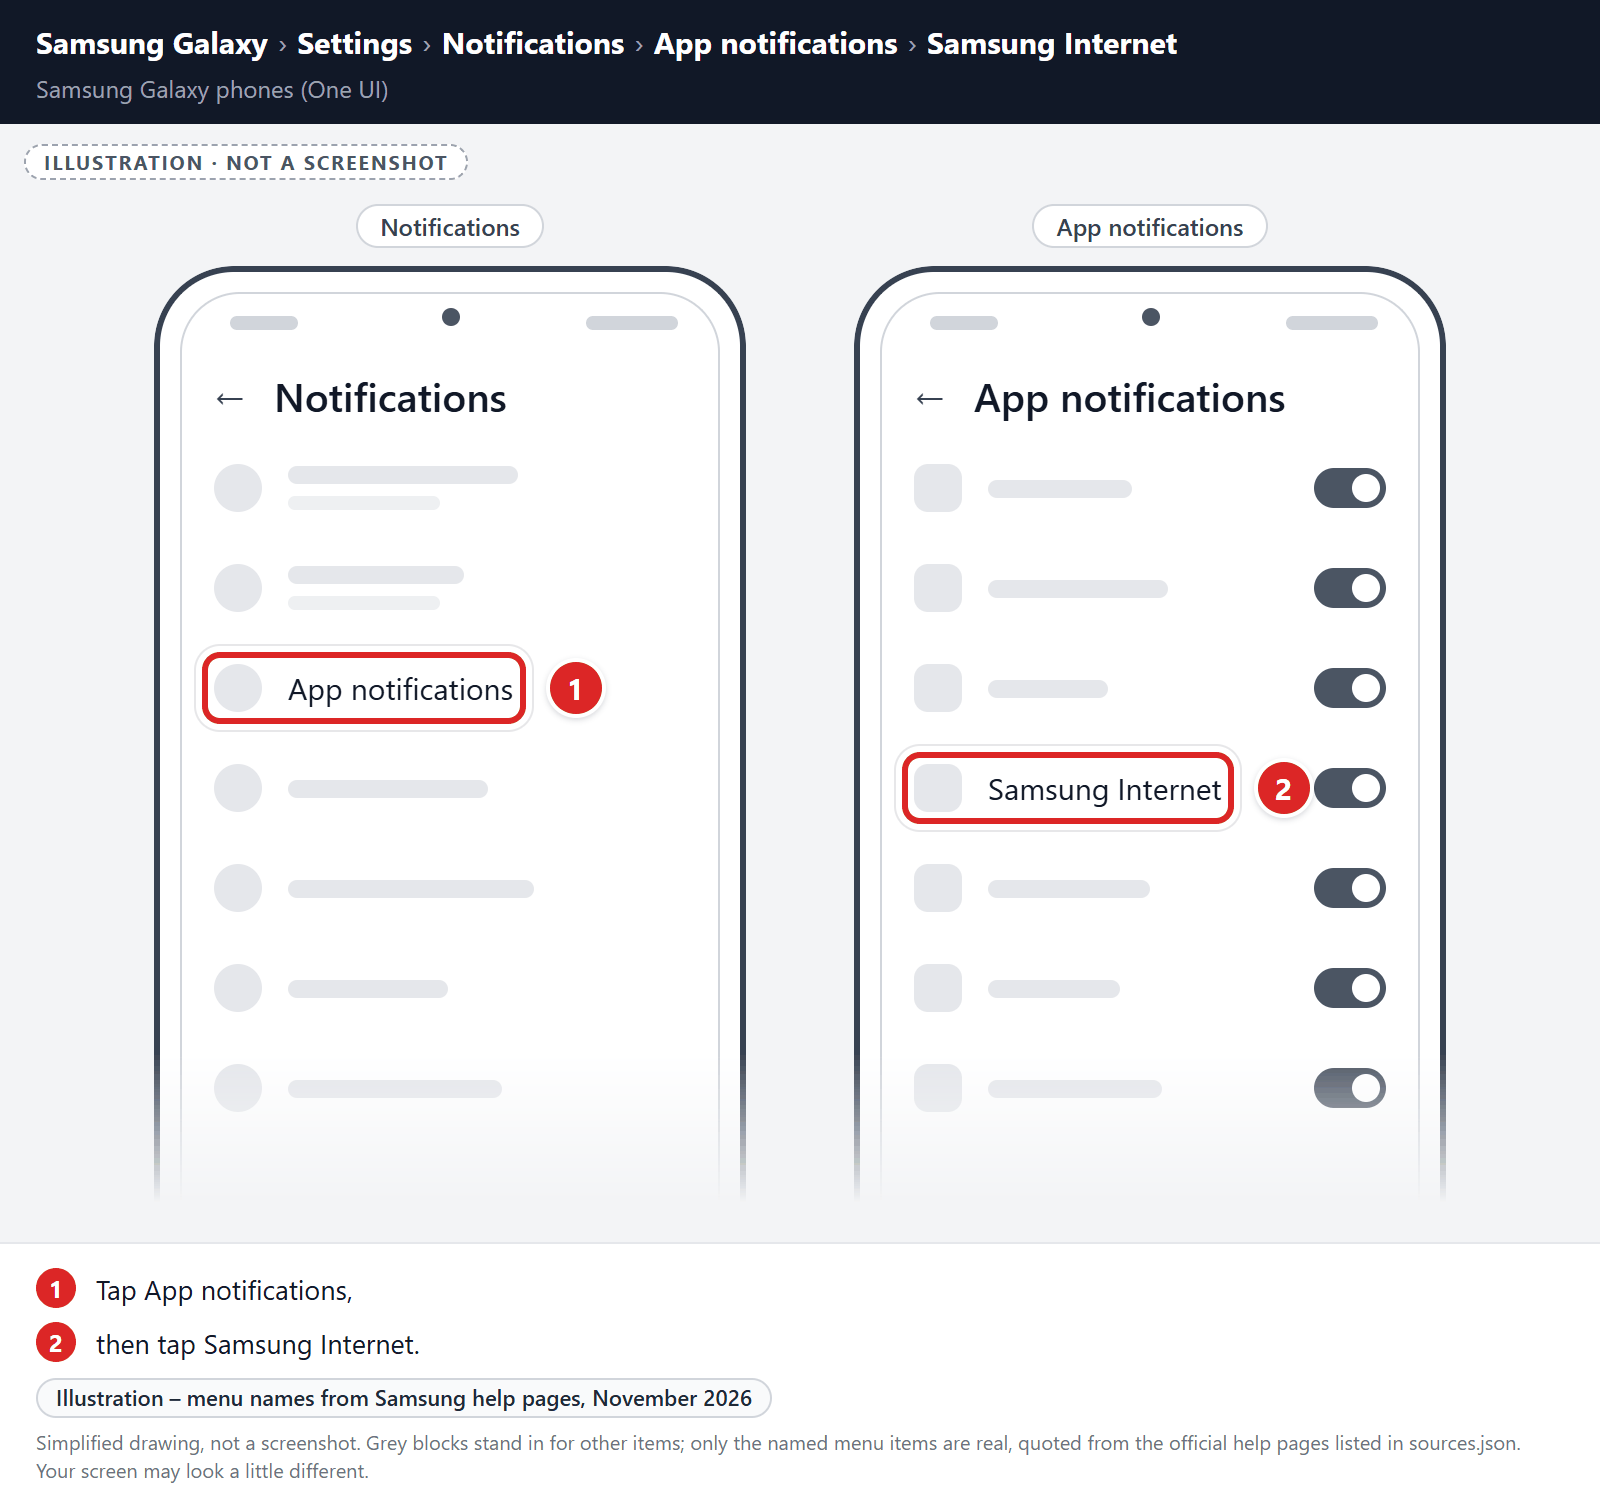
- Tap App notifications, then tap Samsung Internet.
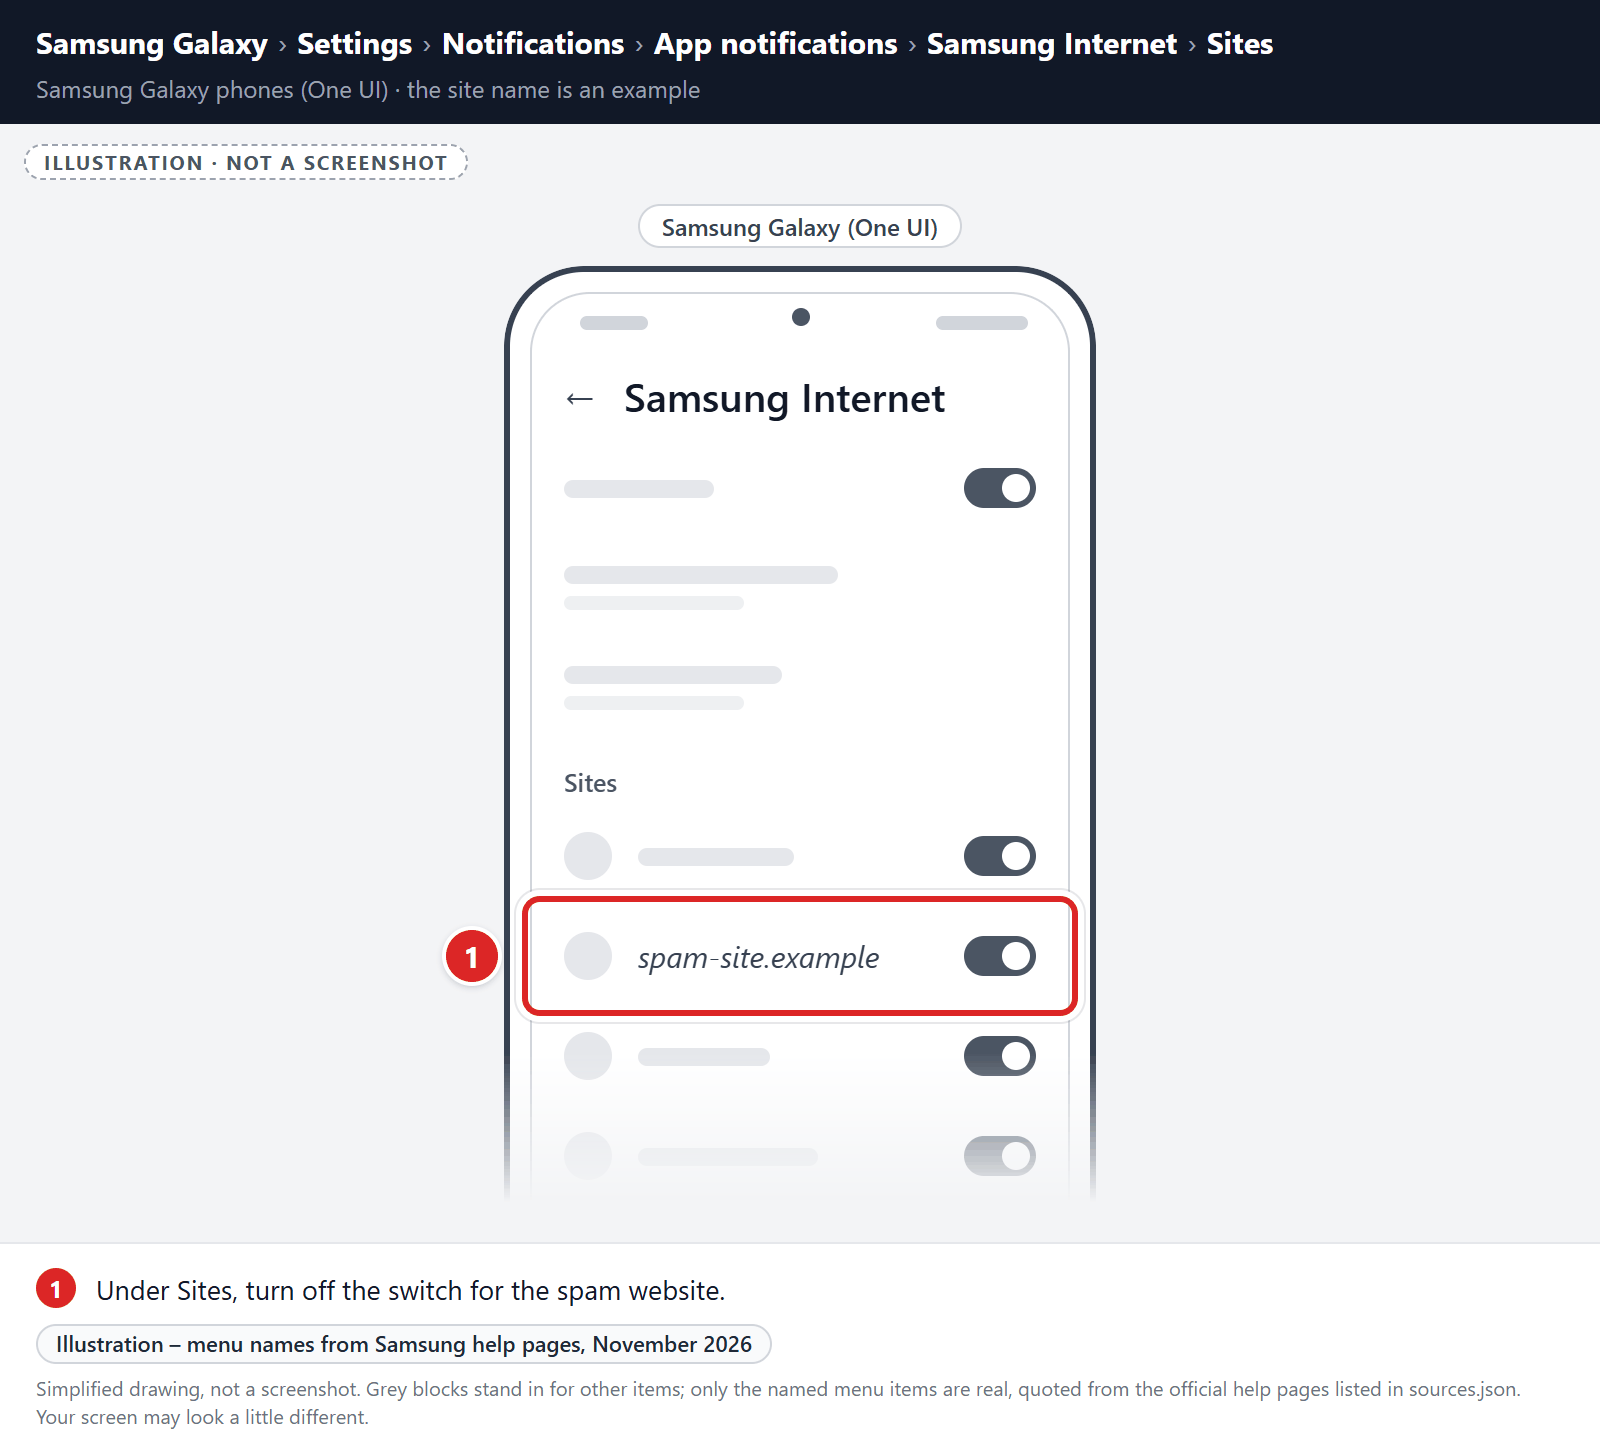
- Under Sites, turn off the switch for the spam website.
If unwanted pages or redirects keep appearing, clear Samsung Internet’s storage (last resort):
-
Open the “Settings” menu.
Tap on the “Settings” app from your phone menu or home screen.
-
Tap on “Apps”.
When the “Settings” menu opens, tap on “Apps” to see all the installed applications on your phone.
-
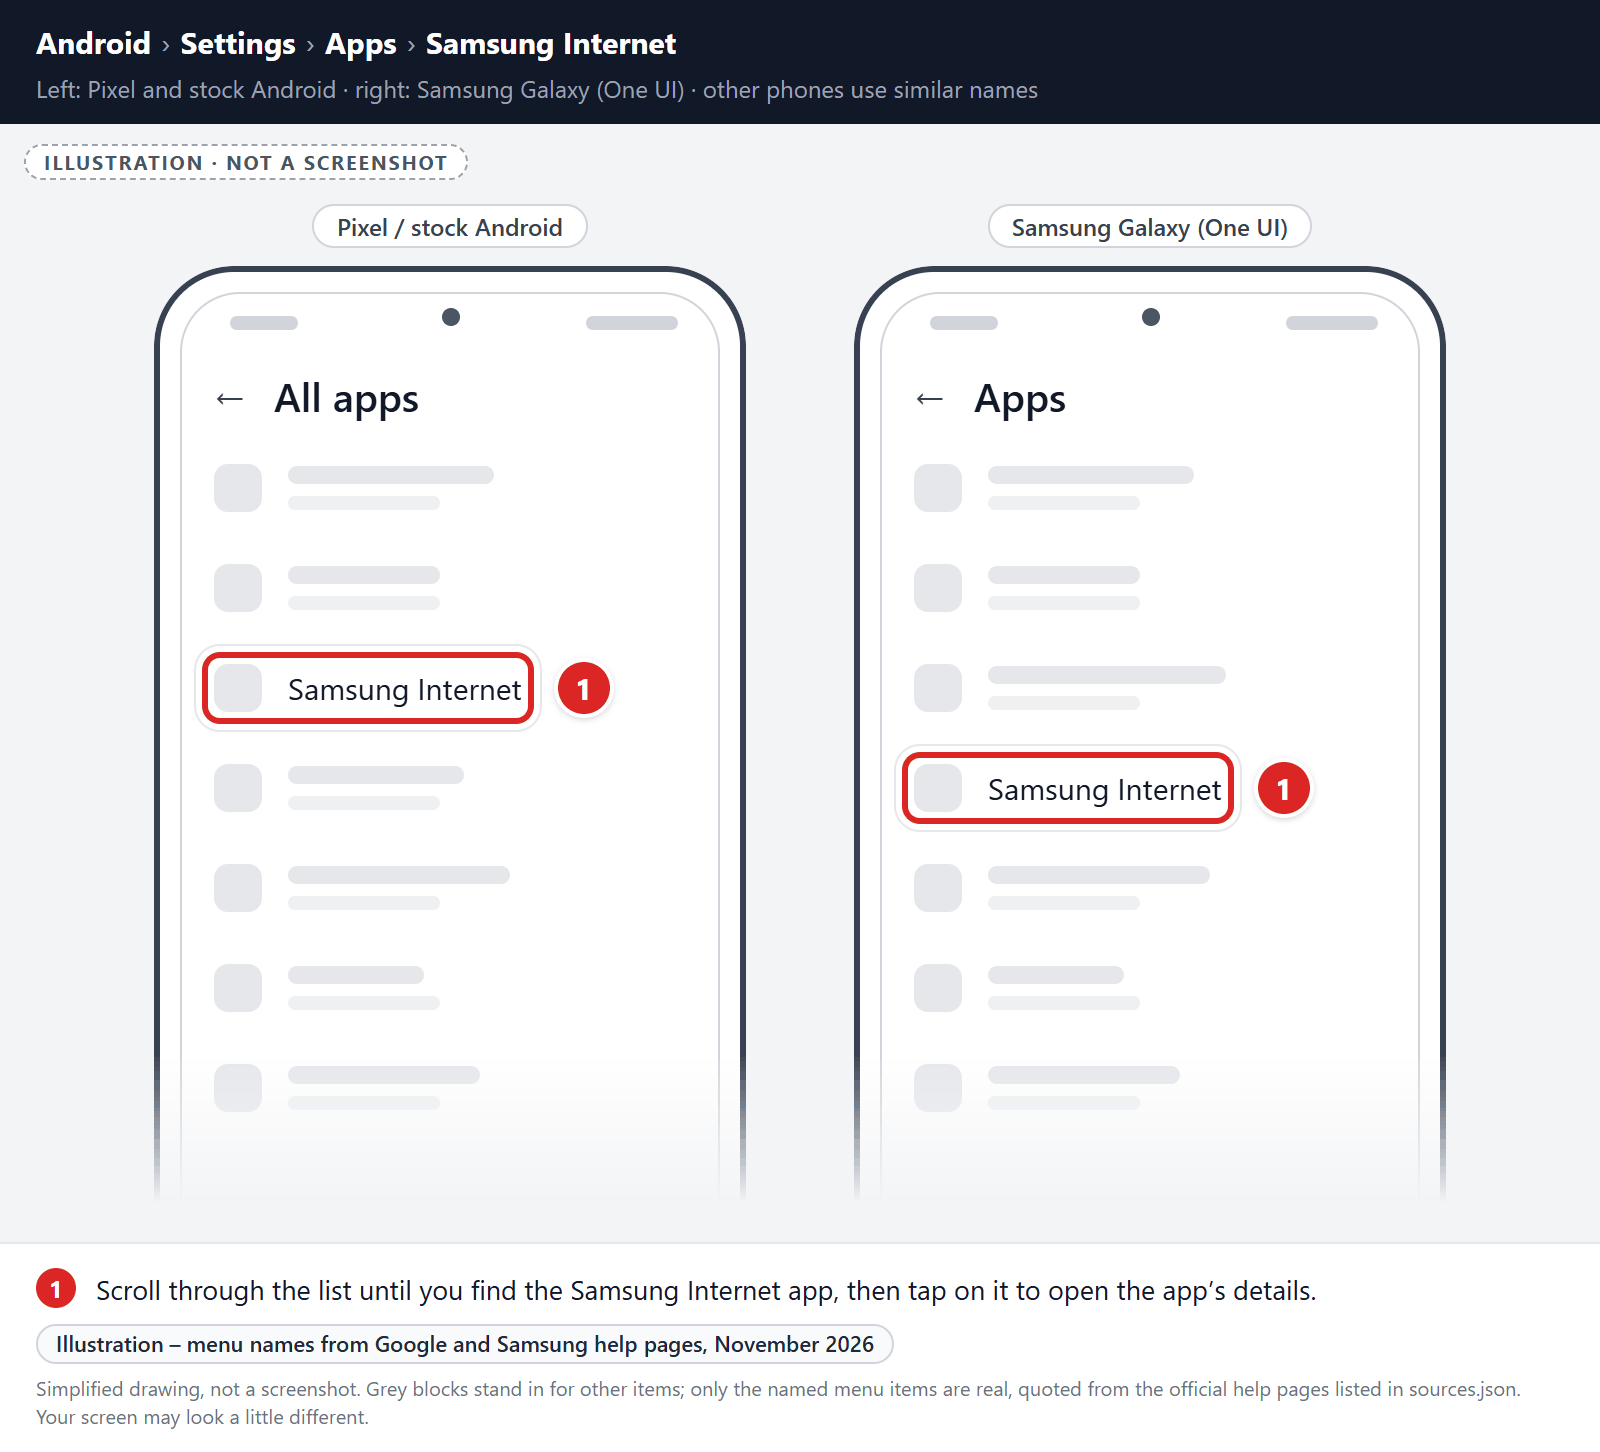
Find and tap on Samsung Internet.
The “Apps” screen will be displayed with a list of all the apps installed on your phone. Scroll through the list until you find the Samsung Internet app, then tap on it to open the app’s details.
-
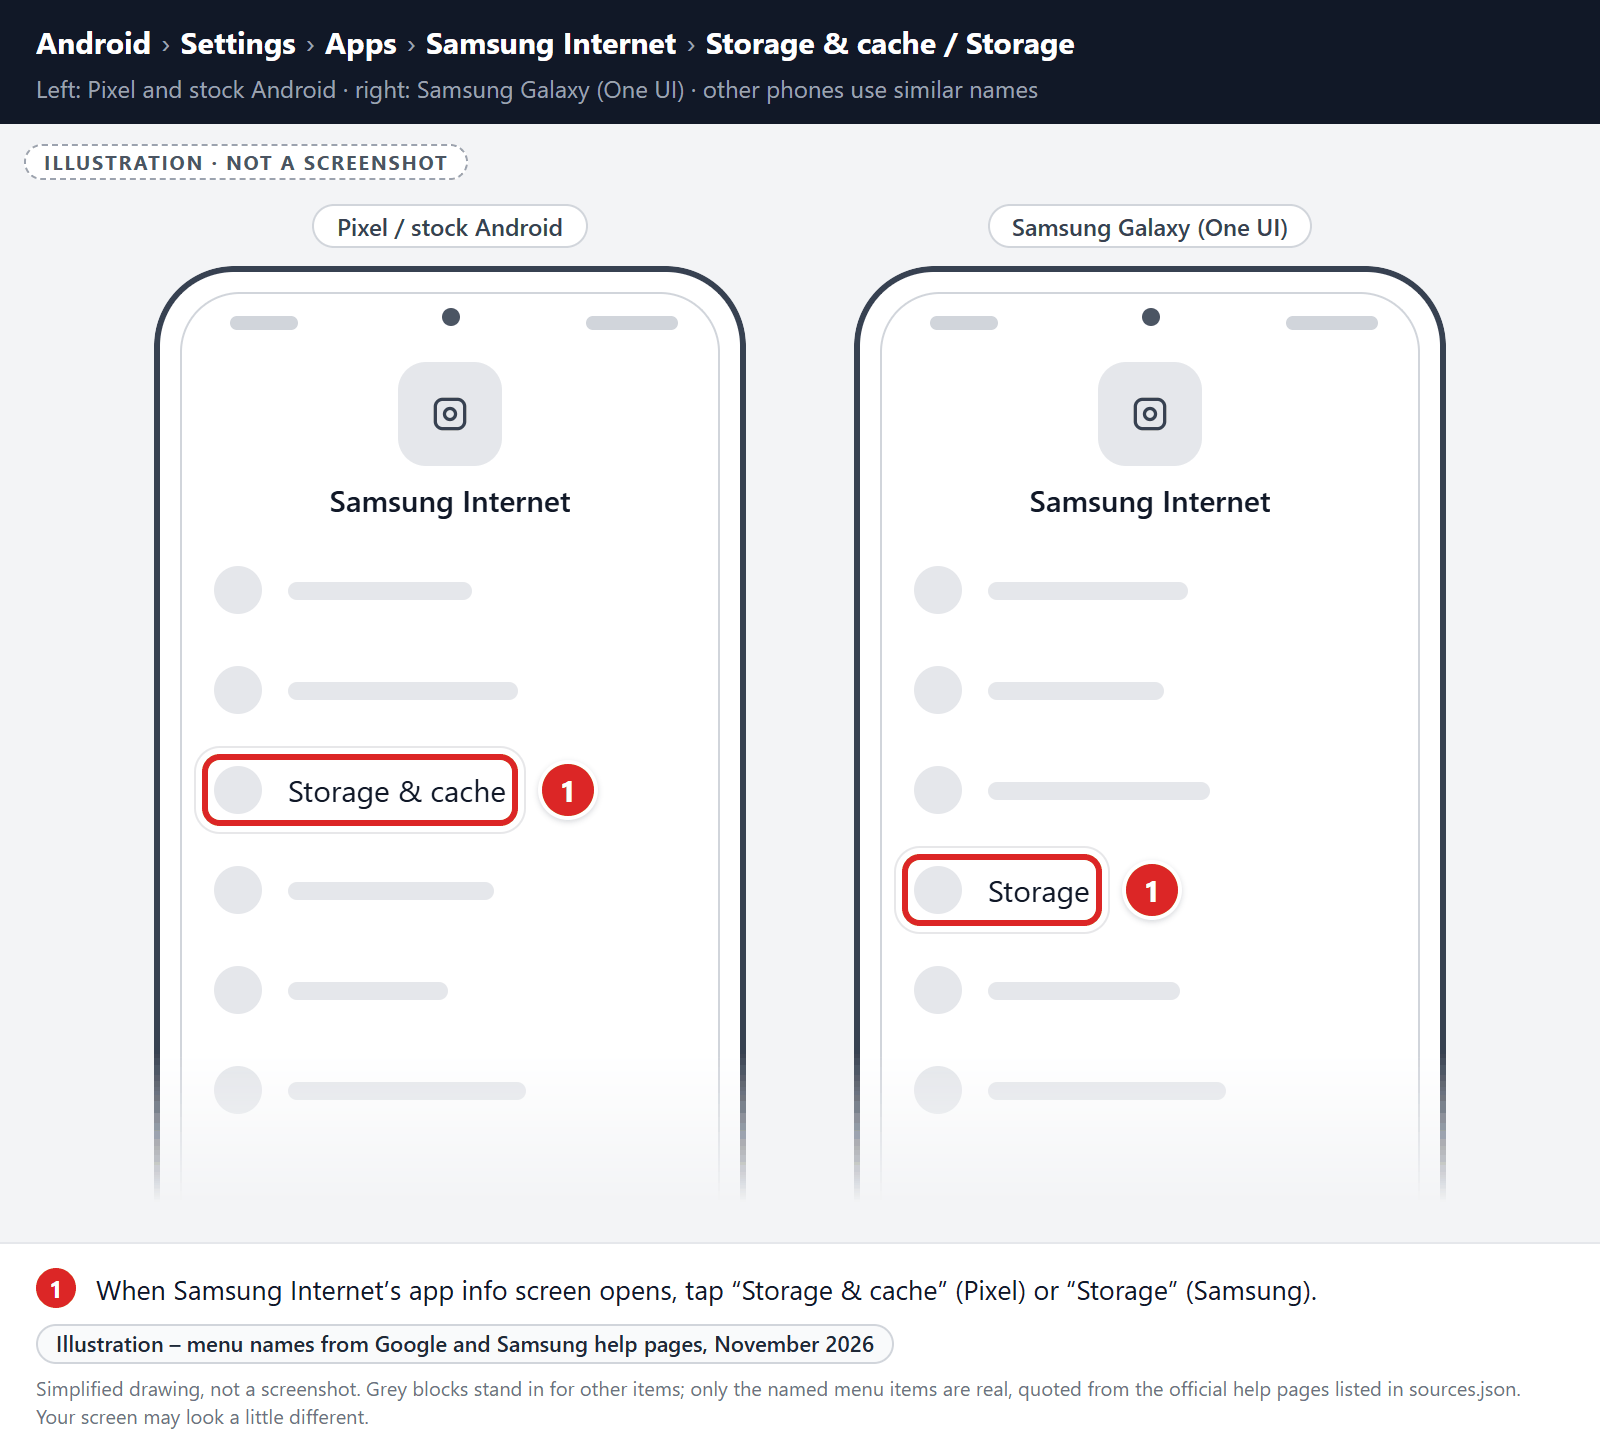
Tap “Storage”.
When Samsung Internet’s app info menu is displayed, tap on “Storage” (on Pixel phones, “Storage & cache“).
-
Tap “Clear storage” or “Clear data”.
Tap “Clear storage” (called “Clear data” on Samsung phones). If you see “Manage space” or “Manage storage” instead, tap it, then tap “Clear all data“. Don’t use “Clear cache” for this step, because it doesn’t reset the browser.
-
Confirm by tapping “OK”.
A confirmation dialog will appear. Tap “OK” or “Delete” to finish. When you open Samsung Internet again, sign back in and turn sync back on if you use it.
Remove malware from Microsoft Edge for Android
First, block the spam site’s notifications:
- Open Microsoft Edge, tap the menu button (three dots) at the bottom of the screen, and tap Settings.
- Tap Site permissions, then tap Notifications. In some versions, Site permissions is inside Privacy and security.
- Find the spam site in the list of allowed sites and switch it to Block.
If unwanted pages or redirects keep appearing, clear Microsoft Edge’s storage (last resort):
-
Open the “Settings” menu.
Tap on the “Settings” app from your phone menu or home screen.
-
Tap on “Apps”.
When the “Settings” menu opens, tap on “Apps” to see all the installed applications on your phone.
-
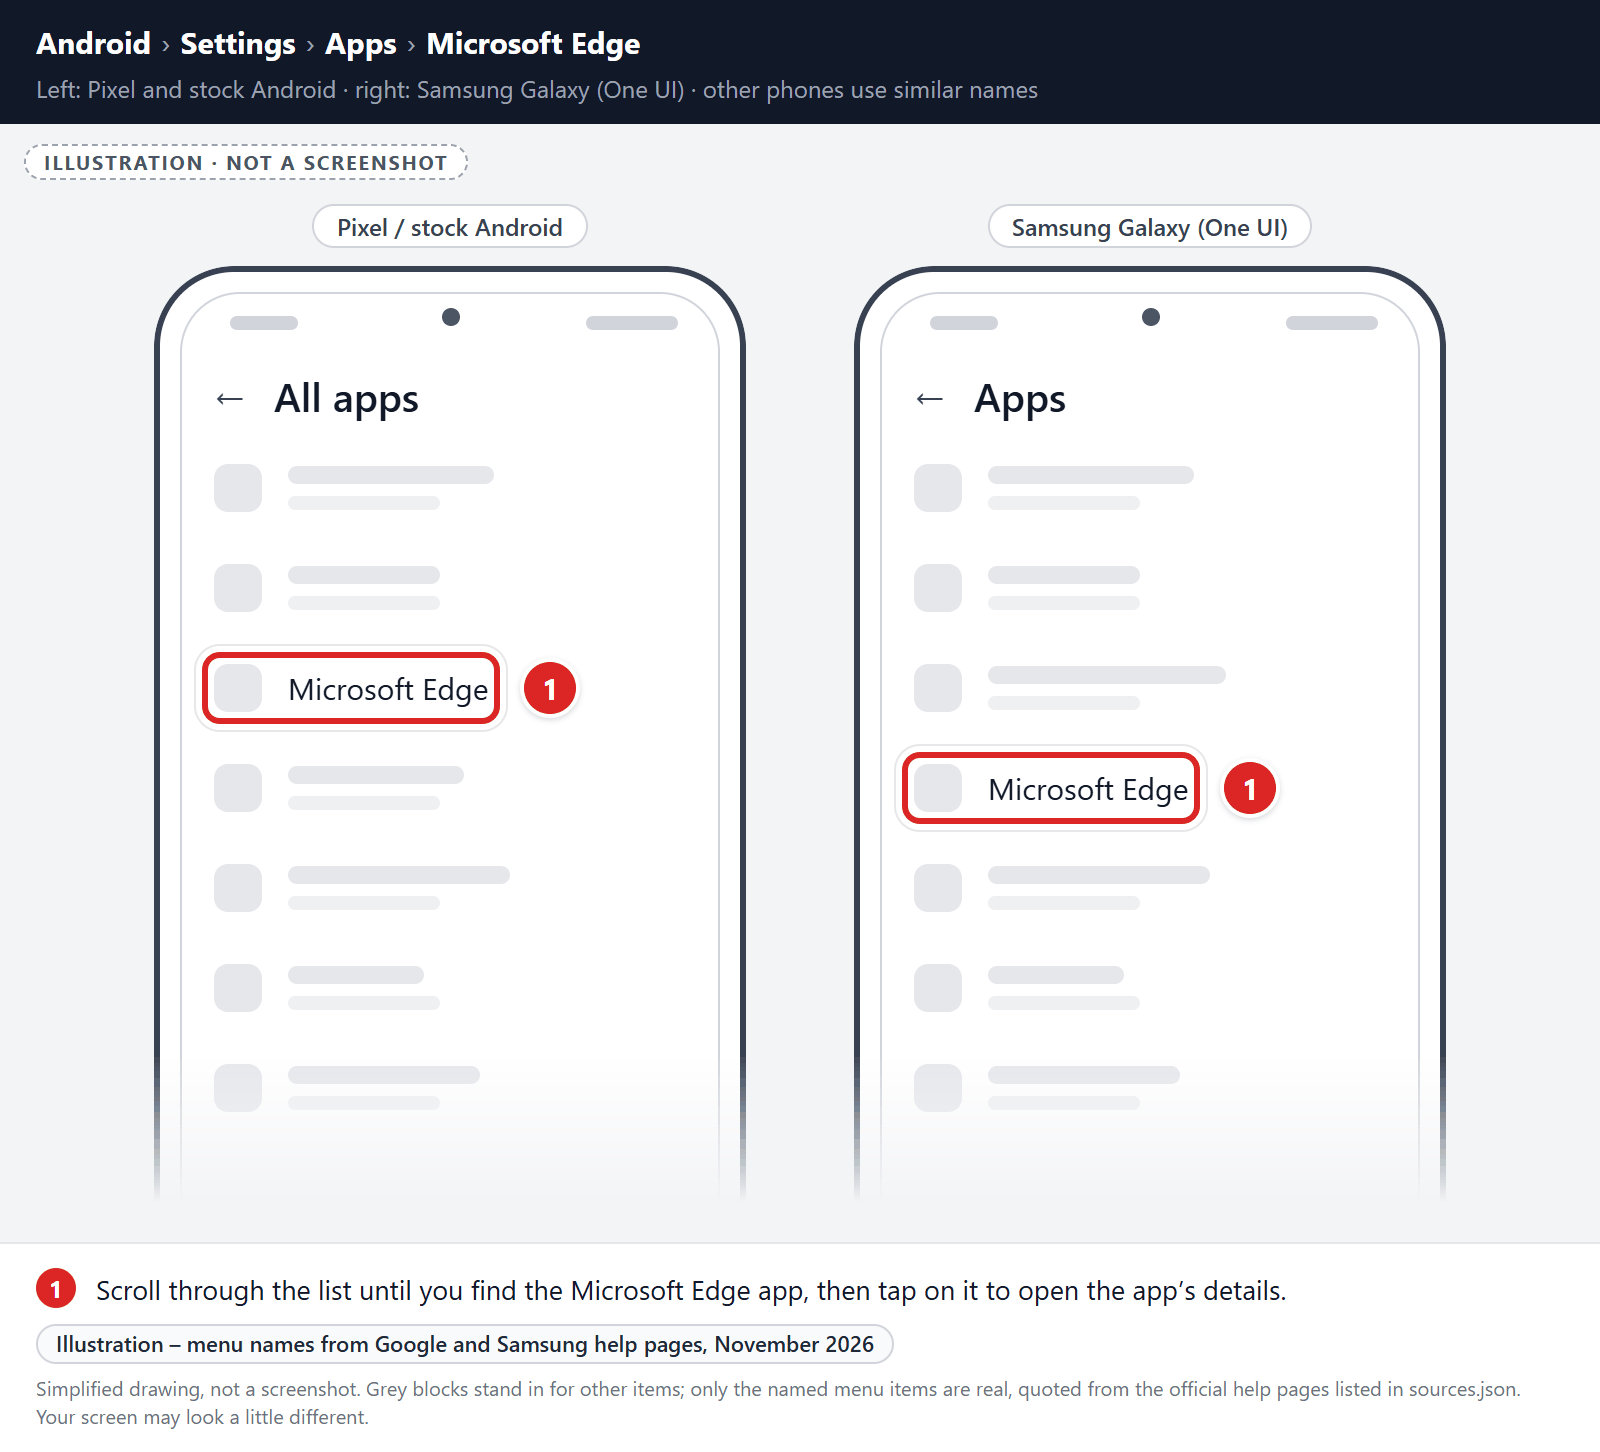
Find and tap on Microsoft Edge.
The “Apps” screen will be displayed with a list of all the apps installed on your phone. Scroll through the list until you find the Microsoft Edge app, then tap on it to open the app’s details.
-
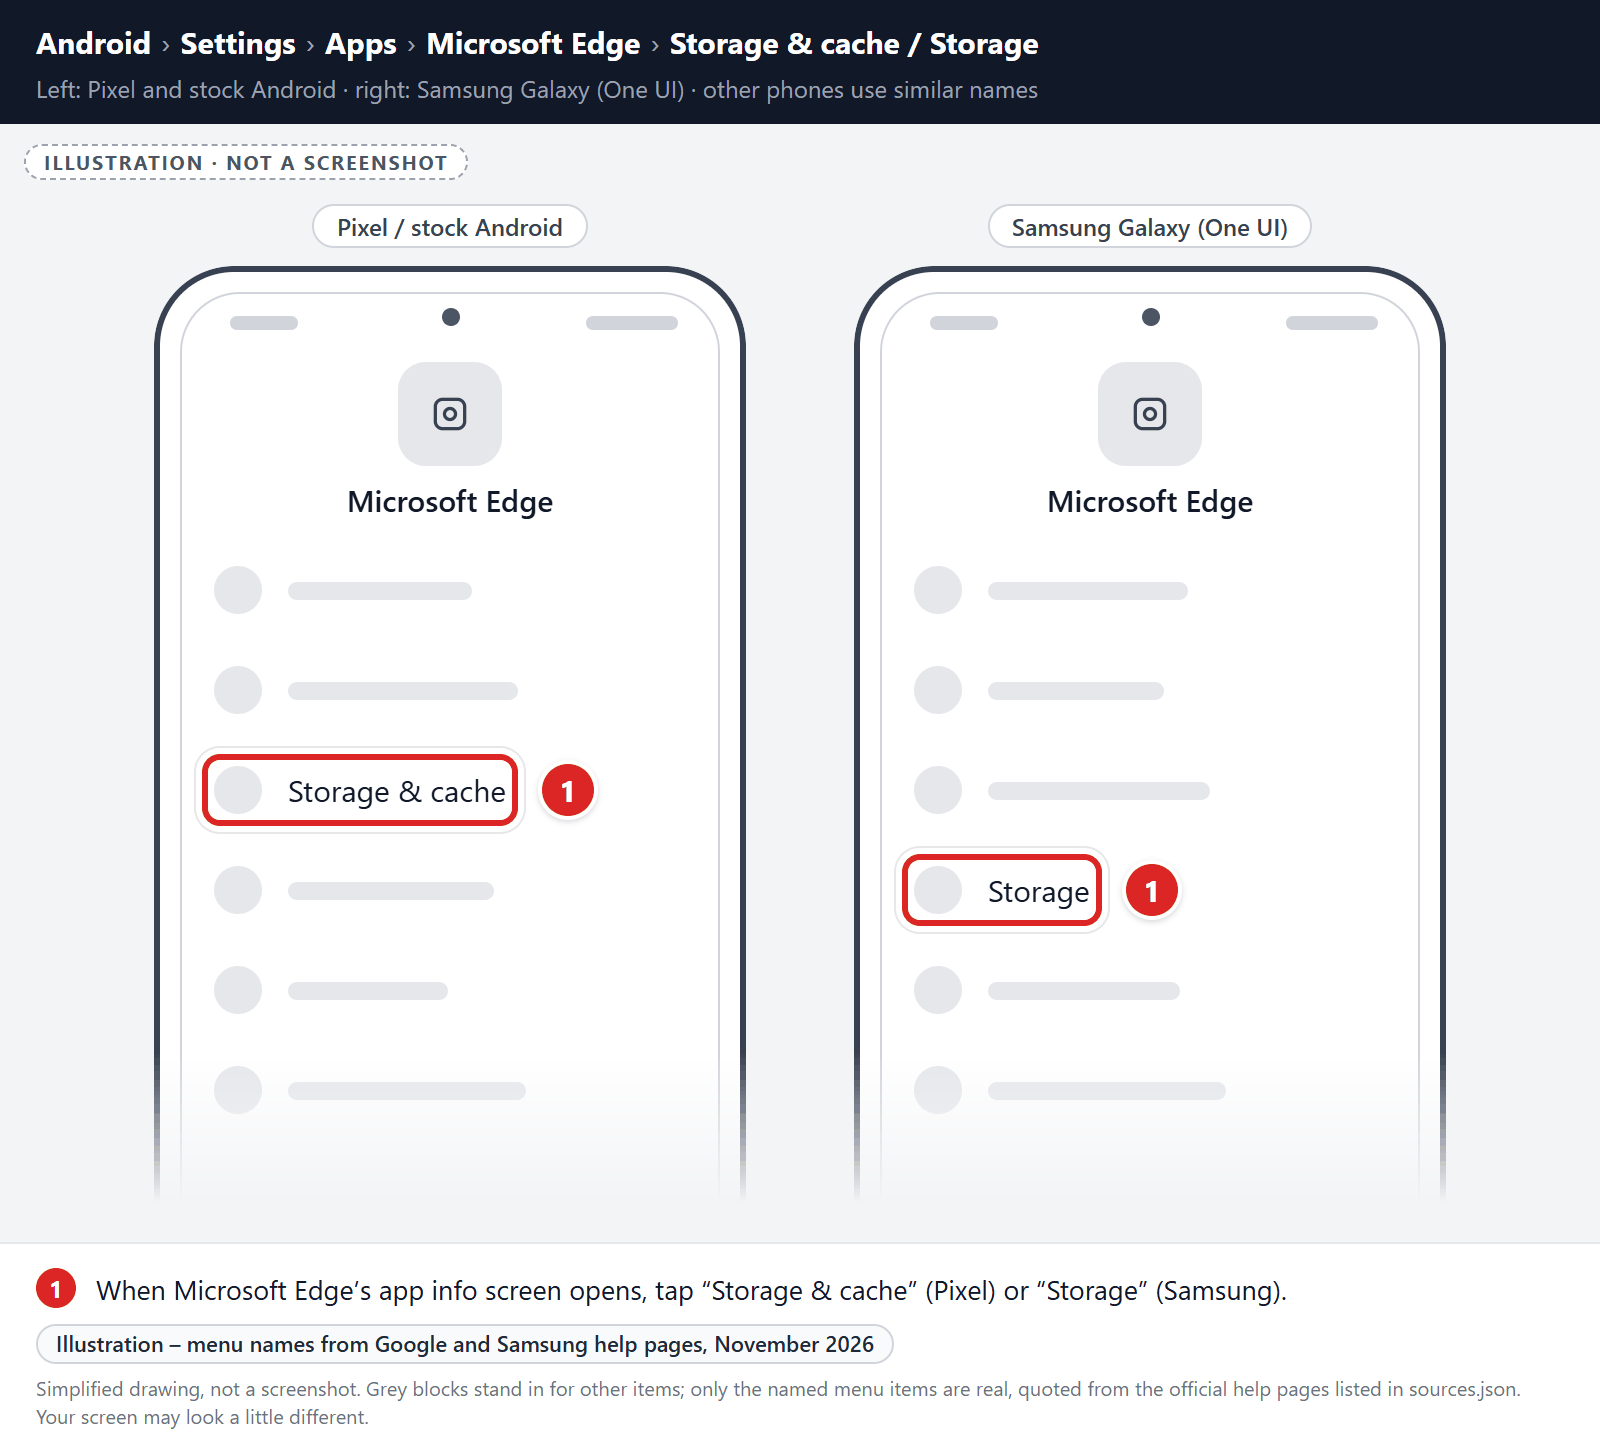
Tap “Storage”.
When the Microsoft Edge’s app info menu is displayed, tap on “Storage” (on Pixel phones, “Storage & cache“).
-
Tap “Clear storage” or “Clear data”.
Tap “Clear storage” (called “Clear data” on Samsung phones). If you see “Manage space” or “Manage storage” instead, tap it, then tap “Clear all data“. Don’t use “Clear cache” for this step, because it doesn’t reset the browser.
-
Confirm by tapping “OK”.
A confirmation dialog will appear. Tap “OK” or “Delete” to finish. When you open Microsoft Edge again, sign back in and turn sync back on if you use it.
STEP 5: Use Malwarebytes for Android to remove malicious apps
In this final step, we will download, install and run a scan with Malwarebytes for Android to remove adware, browser hijackers, and other malware from your phone.
Malwarebytes for Android scans your phone or tablet for malware, adware, and potentially unwanted apps. The free version scans only when you start a scan. Real-time protection, which checks apps automatically, is part of the paid Premium version.
-
Download Malwarebytes for Android.
You can download Malwarebytes for Android by clicking the link below.
Get Malwarebytes for AndroidOpens Google Play in a new tab.Want real-time protection? See Malwarebytes Premium for Android Malwarebytes for AndroidScans your phone and removes malware at no cost
-
Install Malwarebytes for Android on your phone.
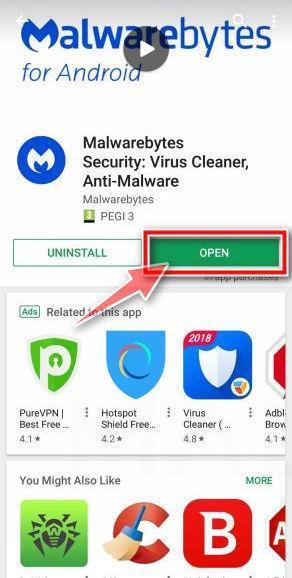
In the Google Play Store, tap “Install” to install Malwarebytes for Android on your device.
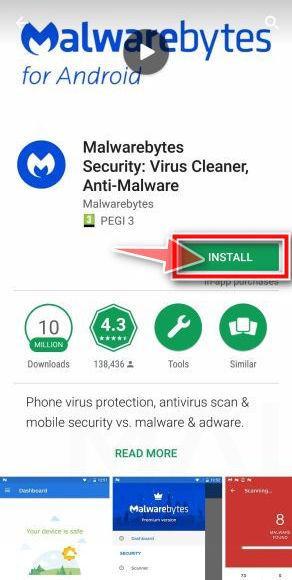
When the installation process has finished, tap “Open” to begin using Malwarebytes for Android. You can also open Malwarebytes by tapping on its icon in your phone menu or home screen.
-
Follow the on-screen prompts to complete the setup process
When Malwarebytes opens, it walks you through a short setup. Tap Get started and follow the prompts. If you see an offer for a trial or a paid plan, read it before you accept. You can skip it and keep using the free scanner.
Malwarebytes will ask for permission to access the files on your phone so it can scan them. Tap Allow, or turn on the permission in the Android screen that opens, then return to Malwarebytes.
-
Run a scan with Malwarebytes for Android
On the main screen, tap Scan now. In some versions, you open the menu, tap Scanner, and then tap Run a scan.
-
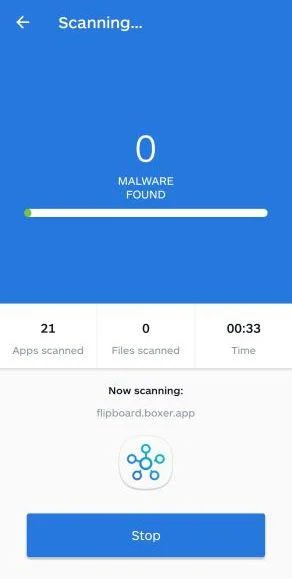
Wait for the Malwarebytes scan to complete.
Malwarebytes will now start scanning your phone for adware and other malicious apps. This process can take a few minutes, so we suggest you do something else and periodically check on the status of the scan to see when it is finished.
-
Remove the detected apps.
When the scan has been completed, you will see a list of the threats that Malwarebytes for Android has detected. Next to each detected item, tap the menu icon (three dots), then choose to uninstall the app or delete the file. Android then asks you to confirm. Tap OK or Uninstall to remove the app.
-
Restart your phone.
When the detected apps are removed, restart your phone if Malwarebytes asks you to. Then check whether the problems you noticed have stopped.
Your phone should now be free of browser hijackers, adware, and other malicious apps.
If you are still having problems with your phone after completing these instructions, then please follow one of the steps:
- Ask for help in our Mobile Malware Removal Help & Support forum.
- Only as a last resort, reset your phone to factory settings. Read the warning below first.
- Back up your photos, videos, files, and messages, for example to your Google account or a computer.
- Make sure you know your Google account email and password. The phone asks for them after the reset. If you changed the password recently, Google recommends waiting 24 hours before you reset.
- On a Samsung phone, also make sure you know your Samsung account password.
- If you use an authenticator app for two-step verification, move your accounts to another device or save your backup codes first.

Join the discussion
310 commentsShare your experience or ask a question about this article.
Your progress
Did these steps help?
Let us know how the guide worked for you.
Describe what you see and the step you reached. Keep passwords and other private information out.
Discussion
This was incredibly helpful, thank you
In reply to SafeModeSavior
Thank you – good to know it did the job. If anything comes back, or a step behaves differently on your version of Windows, say so here and I will take a look.
Phone was locked showing the same $500 penalty fee screen. Followed the steps and got it fix. Thanks!
In reply to Linz
You are very welcome, Linz. I am glad the steps removed the fake police lock screen without paying the demand. Gift cards and “penalty” payments are never how a legitimate authority resolves an issue on a phone.
i have a s7 active and i cant get it to shut off
In reply to taylor
If the normal power menu is blocked, use the phone maker’s forced-restart button combination, then start the device in Safe Mode and uninstall the suspicious app. Do not pay or call any number shown by the lock screen. If the device still cannot start normally, use another device to review the Google account for unfamiliar activity and seek hands-on help before considering a factory reset, because a reset erases local data.
phone froze saying I had to pay $500 with a pre paid card, followed these steps on this website, phones all better now, thank you so much for the help.
In reply to Andrew
Excellent news, Andrew. You did the right thing by treating the payment demand as a scam and following the removal steps instead of paying. Thank you for confirming that the phone is working normally again.
Just used this website to help remove one of these from my stepdad’s S3. The app in our case was called Porn Player or Porn Viewer. Something along the lines of those.
In reply to Andrew Bent
Thank you for adding the app name you encountered, Andrew. Names such as “Porn Player” or “Porn Viewer” are useful indicators, but these apps frequently change names, so readers should also check the installation date, device-administrator access, and apps installed from outside the official store.
Thanks for nice information
In reply to Adrian Smith
You are welcome, Adrian. I am glad the information was useful.
I had the virus in System Updates, but the Uninstall button was greyed out. In this case, you need to go to Settings->Security->Device (or Phone) Administators, then turn off any apps with a tick. This should restroe the Uninstall button. After Uninstalling, Galaxy worked OK.
If you can uninstall it, it’s fake. If you can only “uninstall updates” it’s the real thing in most cases
thanks a lot.
hello everyone. the virus app in my case was “system update”.
How do you know which app is the bad one?
They all seem to look ok with typical goofy Android names
Great and thorough information for getting rid of this virus. Thanks!
This helped so much, thank you!
mine has the pornplayer and it wont let me uninstall how do I do it
they will not call anyone I have the same thing go into the safemode I did and it worked then delete they virus
I cannot shake this. I can’t find anything for “System Update” in apps. Tried all the malware removers, no avail. If anyone else has tips I’d appreciate it
Ok so I just had this happen to me and I took my battery out and also removed a micro SD I had in my phone. Then I started my phone back up looked through my apps and couldn’t find it in my apps, any help would be appreciated because I’m not sure if its really gone.
This is so helpful, thank you so much.
I just wanna ask if I can safely copy all my blocked phone files, into an other phone or tab
Thanks
I dunno if your setting thing works like mine does, but under applications there were 3 options, downloaded, running, and all. I found “Sytem Update” with an android logo, in “all”, and it was the virus.
Had this on my samsung galaxy tab 2, it was under a name like update manager or something along those lines, if theres any app in yiur downloadw that you cant remember downloading just delete it as it may be this