

Trojan:Win32/Raccoon.RPQ!MTB is a heuristic detection designed to generically detect a Trojan Horse. Due to the generic nature of this threat, we are unable to provide specific information on what it does.
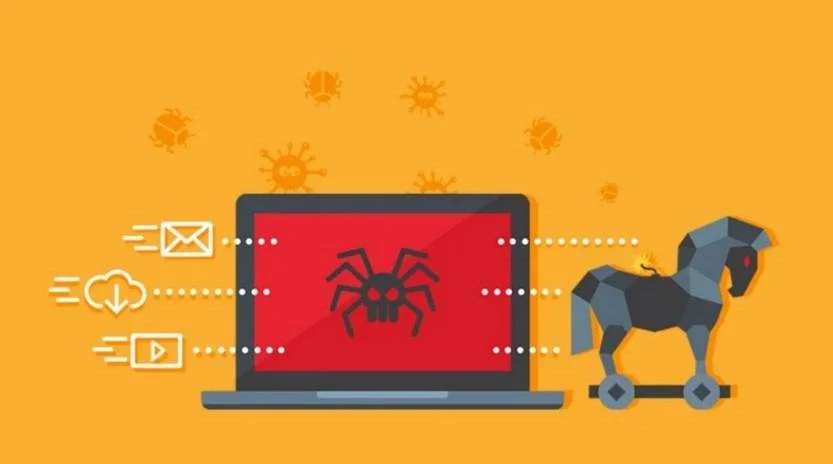
Typical behavior for Trojans like Trojan:Win32/Raccoon.RPQ!MTB is one or more of the following:
- Download and install other malware.
- Use your computer for click fraud.
- Record your keystrokes and the sites you visit.
- Send information about your PC, including usernames and browsing history, to a remote malicious hacker.
- Give remote access to your PC.
- Advertising banners are injected with the web pages that you are visiting.
- Random web page text is turned into hyperlinks.
- Browser popups appear which recommend fake updates or other software.
To check your computer for malware and remove it for free, please use the guide below.
Removal Instructions for Trojan:Win32/Raccoon.RPQ!MTB
Please perform all the steps in the correct order. If you have any questions or doubt at any point, stop and ask for our assistance.
- STEP 1: Start your computer in Safe Mode with Networking
- STEP 2: Use Malwarebytes to remove the Trojan:Win32/Raccoon.RPQ!MTB
- STEP 3: Scan and clean your computer with HitmanPro
- STEP 4: Double-check for Trojan:Win32/Raccoon.RPQ!MTB malware with ESET Online Scanner
- STEP 5: Use AdwCleaner to remove malicious browser policies
STEP 1: Start your computer in Safe Mode with Networking
In this first step, we will start your computer in Safe Mode with Networking to prevent Trojan:Win32/Raccoon.RPQ!MTB malicious drivers and services from loading at Windows start-up. We’re using Safe mode because it starts Windows in a basic state, using a limited set of files and drivers.
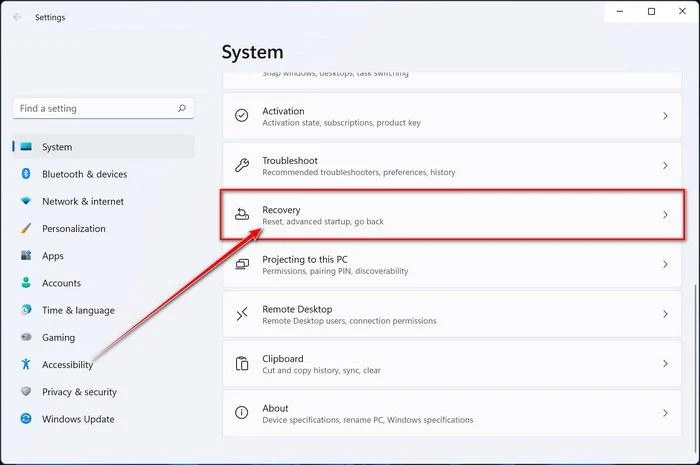
- Press Windows key + I to open Settings. If that doesn’t work, right-click the Start button and select Settings. Then, in the right-hand pane, click Recovery.
- Under Advanced startup, click Restart now. Save any open work first — your PC will restart immediately.
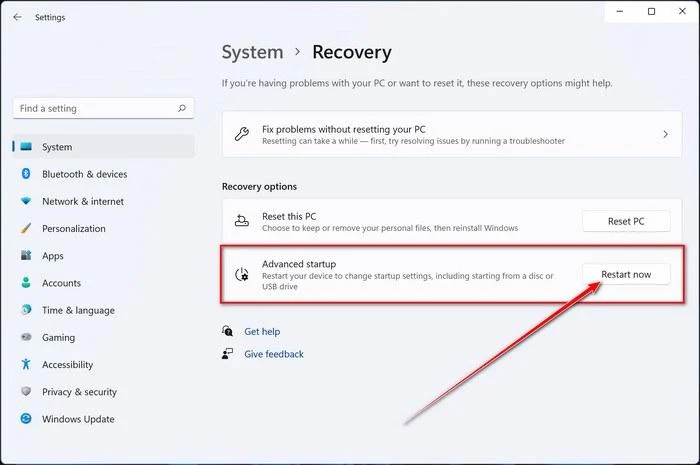
Your PC will restart into the Windows Recovery Environment. From there, follow these steps to reach Safe Mode:
- On the Choose an option screen, select Troubleshoot.
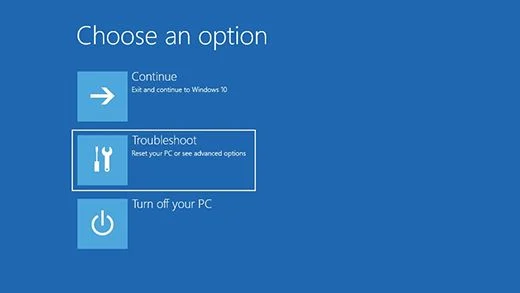
- On the Troubleshoot screen, click Advanced Options.
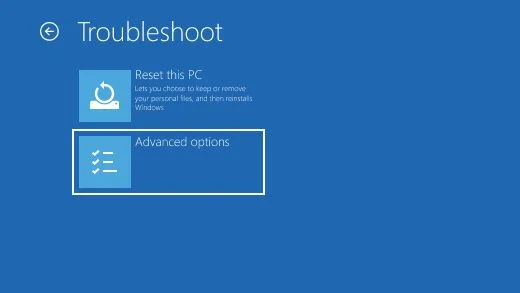
- On the Advanced Options page, click Startup Settings.
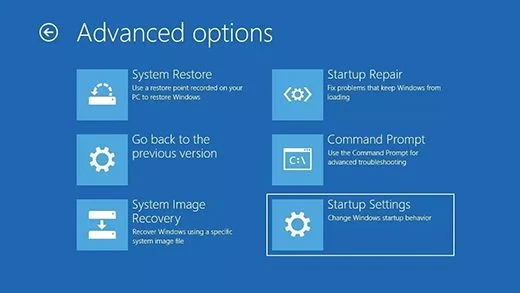
- On the Startup Settings page, click Restart.
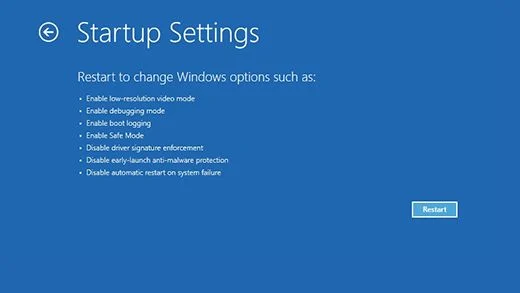
- After your PC restarts, you’ll see a list of startup options. Press 5 or F5 to start Safe Mode with Networking.
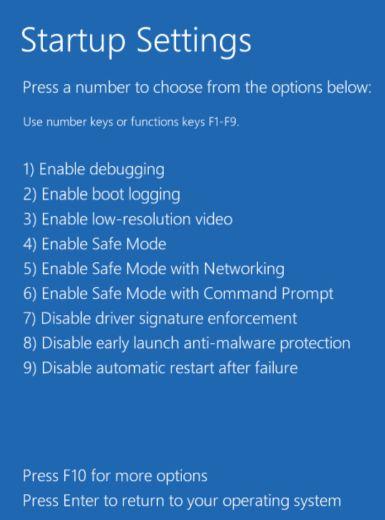
- You’ll know you’re in Safe Mode when “Safe Mode” appears in the corners of the screen. Now continue with the next step of this guide — downloading and running Malwarebytes (explained in Step 2).
- Press Windows key + I to open Settings. If that doesn’t work, click the Start button and select Settings (the gear icon).
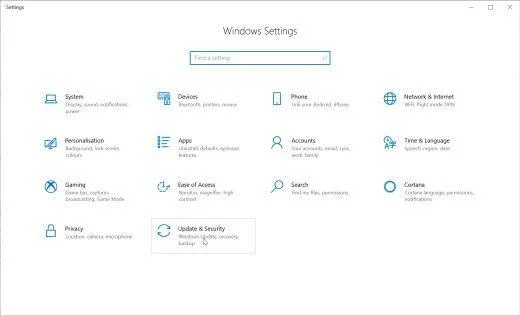
- In the Windows Settings window, select Update & Security, then click Recovery.
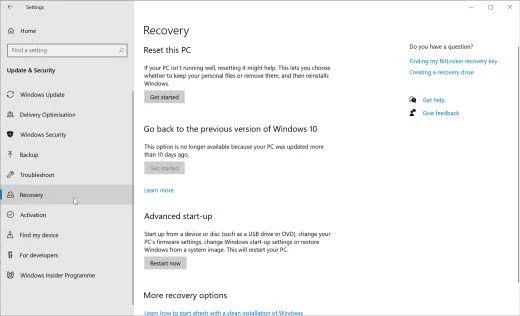
- Under Advanced startup, click Restart now. Save any open work first — your PC will restart immediately.
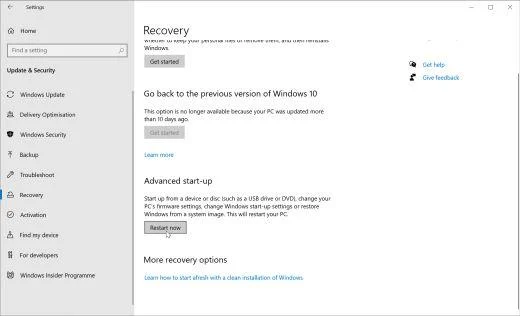
Your PC will restart into the Windows Recovery Environment. From there, follow these steps to reach Safe Mode:
- On the Choose an option screen, select Troubleshoot.
- On the Troubleshoot screen, click Advanced Options.
- On the Advanced Options page, click Startup Settings. (On Windows 8, this option is labeled Windows Startup Settings.)
- On the Startup Settings page, click Restart.
- After your PC restarts, you’ll see a list of startup options. Press 5 or F5 to start Safe Mode with Networking.
- You’ll know you’re in Safe Mode when “Safe Mode” appears in the corners of the screen. Now continue with the next step of this guide — downloading and running Malwarebytes (explained in Step 2).
- Remove any CDs, DVDs, or USB drives from your computer, then restart it.
- As soon as the computer starts (when the hardware information appears on screen), press the F8 key repeatedly until the Advanced Boot Options menu appears. If Windows starts normally instead, you pressed F8 too late — restart and try again.
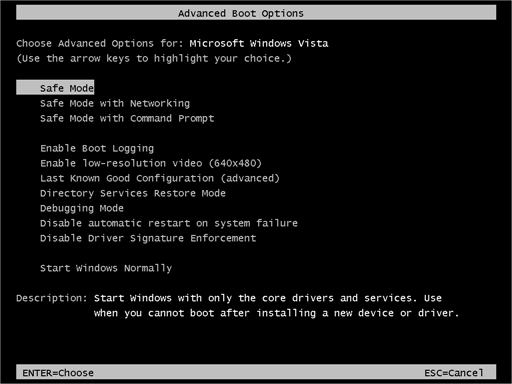
- On the Advanced Boot Options screen, use the arrow keys to highlight Safe Mode with Networking, then press Enter.
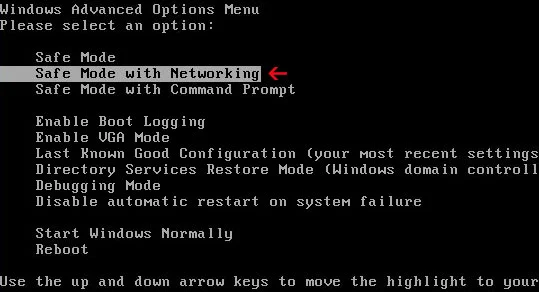
- Once you’re in Safe Mode with Networking, continue with the next step of this guide — downloading and running Malwarebytes (explained in Step 2).
Can’t get into Safe Mode with Networking? No problem — you can run the Malwarebytes scan in normal mode instead and continue the guide from there.
STEP 2: Use Malwarebytes to remove Trojan:Win32/Raccoon.RPQ!MTB
Malwarebytes is one of the most popular and trusted anti-malware tools for Windows — and it’s completely free for removing infections. It catches threats that many antivirus programs miss, including adware, browser hijackers, and trojans. Follow the steps below to scan and clean your PC in just a few minutes.
Download Malwarebytes
Click the button below to download the latest version of Malwarebytes for Windows from the official source. The free version is all you need — it will scan your computer and remove adware, browser hijackers, and other malicious software at no cost.
Download MalwarebytesOfficial installer for Windows 11 and 10. Your download starts right away.Want real-time protection? See Malwarebytes Premium Malwarebytes Free for WindowsScans and removes malware at no cost
-
Install Malwarebytes
When the download finishes, open your Downloads folder and double-click the MBSetup file. If Windows shows a User Account Control pop-up, click “Yes” to allow the installation.

Follow the On-Screen Prompts to Install Malwarebytes
The setup wizard will walk you through a few quick screens:
-
Choose where you’re installing the program — “Personal Computer” or “Work Computer” — then click Next.

-
Malwarebytes will now install on your device. This usually takes under a minute.

-
When installation is complete, the “Welcome to Malwarebytes” screen will open automatically.

-
On the final screen, click Open Malwarebytes to launch the program.

-
Enable “Scan for Rootkits”
Before scanning, turn on rootkit detection so Malwarebytes can find even the most hidden threats. Click the Settings gear icon on the left side of the screen.

In the settings menu, find “Scan for rootkits” and click the toggle so it turns blue.

Done? Click “Dashboard” in the left pane to return to the main screen.
Start the Scan
Click the blue Scan button. Malwarebytes will automatically update its virus database and start checking your computer for malware.

-
Wait for the Scan to Finish
The scan checks your entire system for browser hijackers and other malicious programs, so it can take 5 to 20 minutes depending on your computer. Feel free to do something else — just check back occasionally to see the progress.

-
Quarantine the Detected Threats
When the scan is done, you’ll see a list of everything Malwarebytes found — malware, adware, and potentially unwanted programs. Click the “Quarantine” button to remove all of them at once.

Malwarebytes will now remove the malicious files and registry entries and move them safely into quarantine.

-
Restart Your Computer
Some threats can only be fully removed after a reboot. If Malwarebytes asks you to restart, click Yes. Once you’re logged back in, Malwarebytes has finished removing the threats it found.

STEP 3: Scan and clean your computer with HitmanPro
In this third step, while the computer is in normal back, we will download and run a scan with HitmanPro to remove the Trojan:Win32/Raccoon.RPQ!MTB and other malicious programs.
HitmanPro is a second-opinion scanner — it’s designed to catch what your main antivirus might have missed. Instead of relying on a single detection engine, it checks the behavior of files in the locations where malware usually hides. Anything suspicious gets sent to the cloud, where it’s analyzed by two of the best antivirus engines available: Bitdefender and Kaspersky.
Good news: scanning is completely free, with no limits. You only need a license when it’s time to remove what was found — and even then, you can activate a free one-time 30-day trial to clean your PC at no cost. (A full license is $24.95 per year for 1 PC.)
-
Download HitmanPro
Click the button below to download HitmanPro. Remember — the scan is free, so you have nothing to lose by checking your PC.
Download HitmanProFree scan. Removing threats needs the free 30-day trial. Opens the official HitmanPro page in a new tab. HitmanProSecond-opinion malware scanner from Sophos
 -
Install HitmanPro
When the download finishes, open your Downloads folder and double-click the file: “hitmanpro.exe” on 32-bit Windows, or “hitmanpro_x64.exe” on 64-bit Windows.
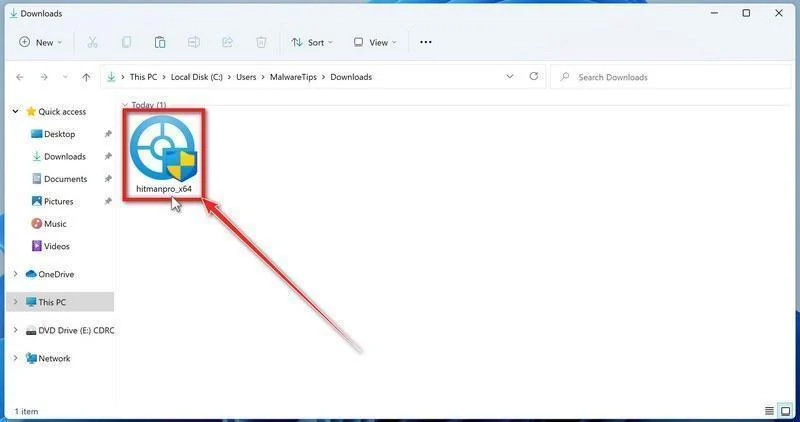
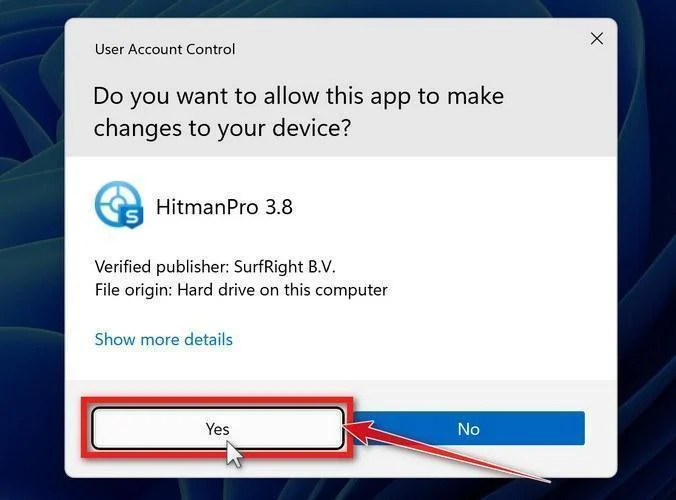
If a User Account Control pop-up asks whether HitmanPro can make changes to your device, click “Yes” to continue.
-
Follow the On-Screen Prompts
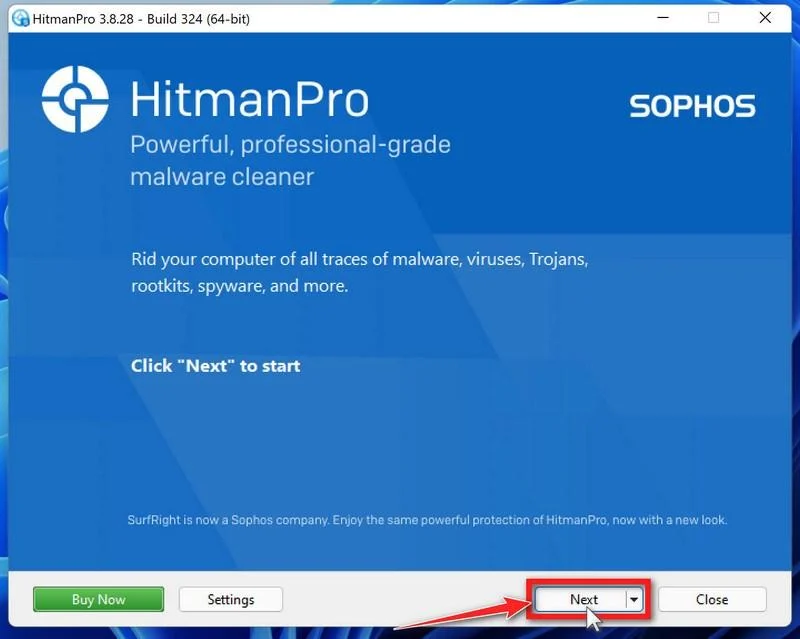
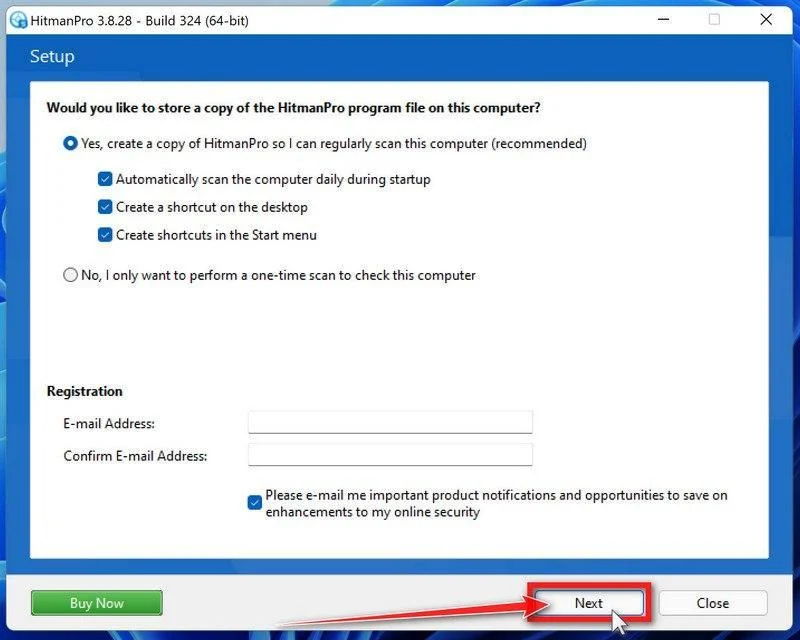
On the HitmanPro start screen, click “Next” to begin the system scan. No lengthy setup required — it goes straight to work.
-
Wait for the Scan to Finish
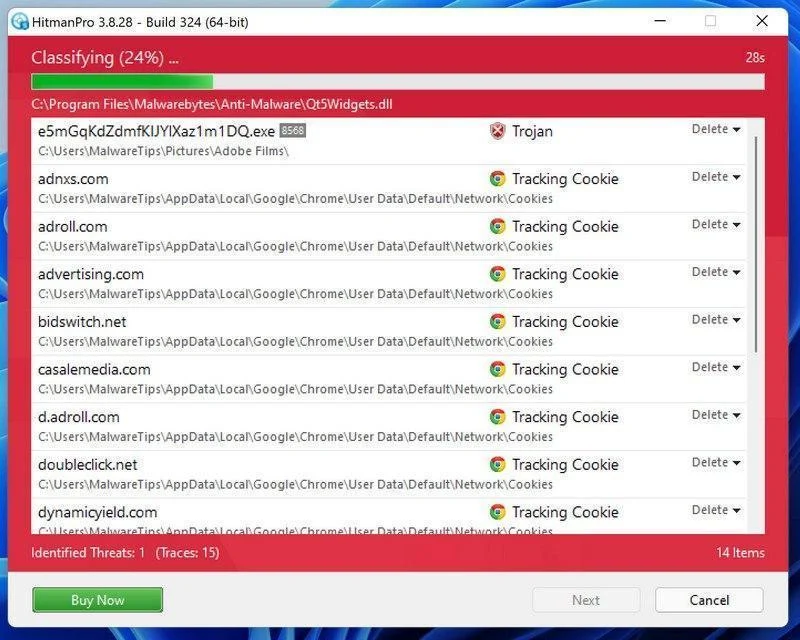
HitmanPro will now check your computer for malicious programs. This usually takes just a few minutes thanks to its cloud-based scanning.
-
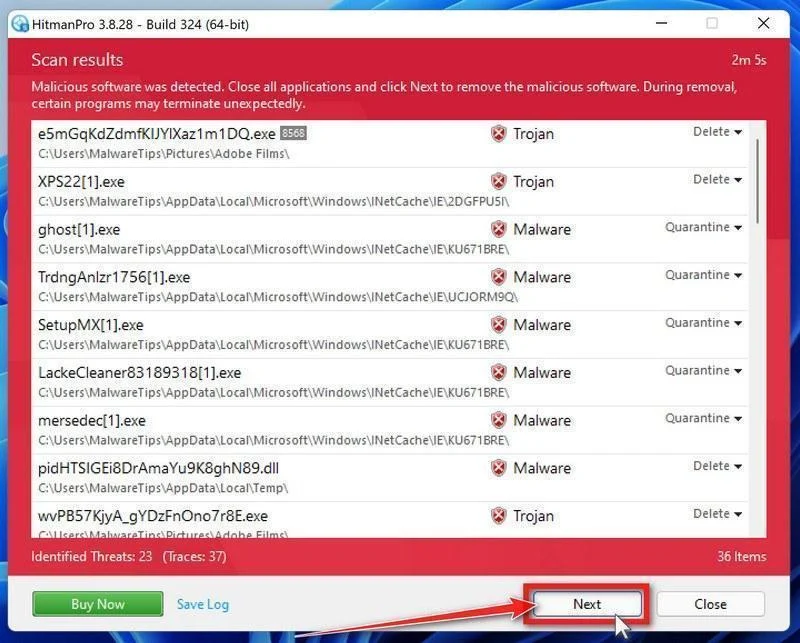
Review the Results and Click “Next”
When the scan is done, HitmanPro will show you everything it found. Click “Next” to remove the detected threats.
-
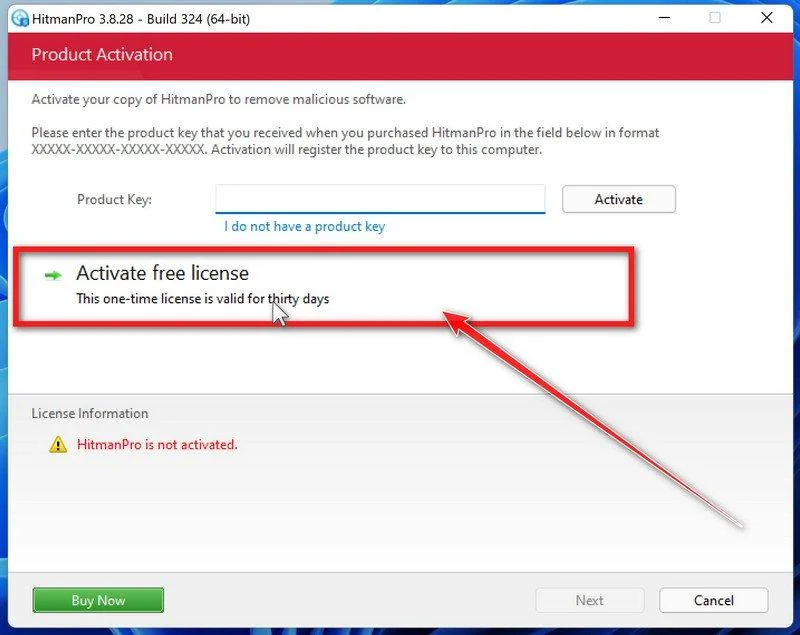
Click “Activate Free License”
To remove the malicious files, click the “Activate free license” button. This starts your free 30-day trial — no payment details needed — and unlocks the full cleanup.
When the removal is complete, HitmanPro will show a summary of everything it cleaned. Click Next, then click Reboot if prompted. If there’s no reboot prompt, just click Close — your PC is clean.
STEP 4: Double-check for Trojan:Win32/Raccoon.RPQ!MTB malware with ESET Online Scanner
In this fourth step, we will scan the computer with ESET Online Scanner to remove any leftover files from the Trojan:Win32/Raccoon.RPQ!MTB and other malicious programs.
ESET Online Scanner is a free second-opinion scanner that performs a deep, full-system check for viruses, trojans, rootkits, and other malware. We use it as the final step because it’s thorough — if anything slipped past the previous scans, ESET will find it. A clean result here means your computer is malware-free.
-
Download ESET Online Scanner
Click the button below to download ESET Online Scanner.
Download ESET Online ScannerOpens the official download page in a new tab. ESET Online ScannerFree one-time malware scan from ESET
 -
Run the Installer
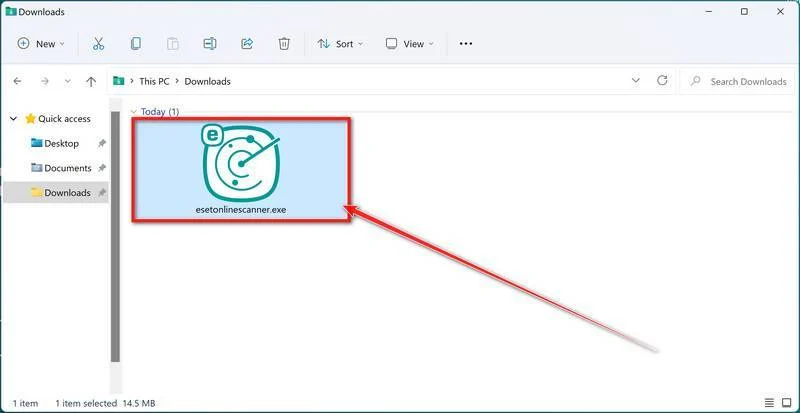
When the download finishes, open your Downloads folder and double-click “esetonlinescanner.exe“.
-
Install ESET Online Scanner
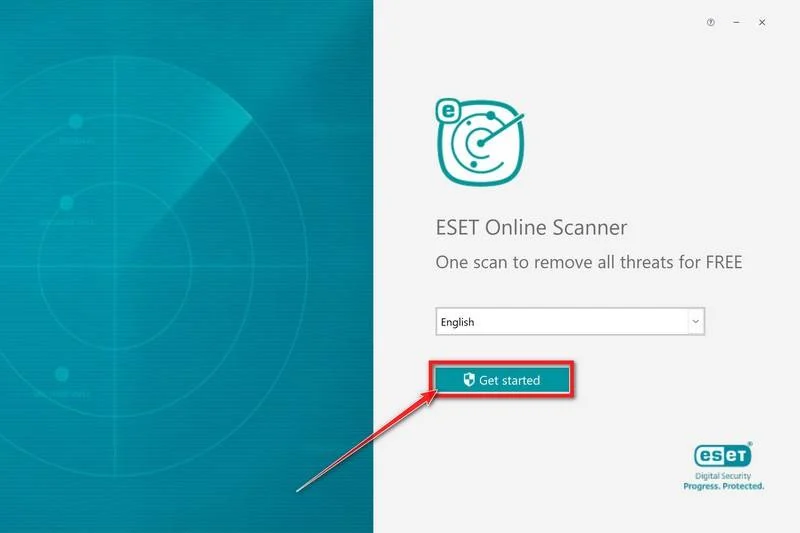
On the start screen, select your language from the drop-down menu and click Get started.
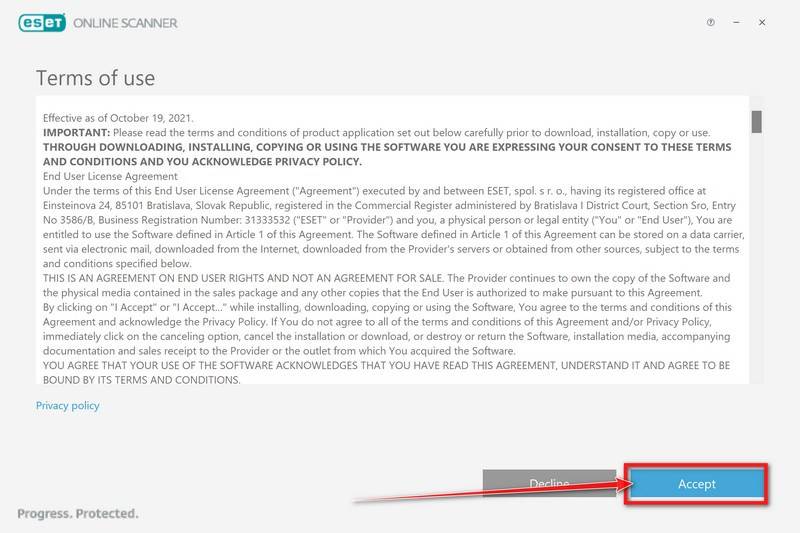
On the Terms of use screen, click Accept.
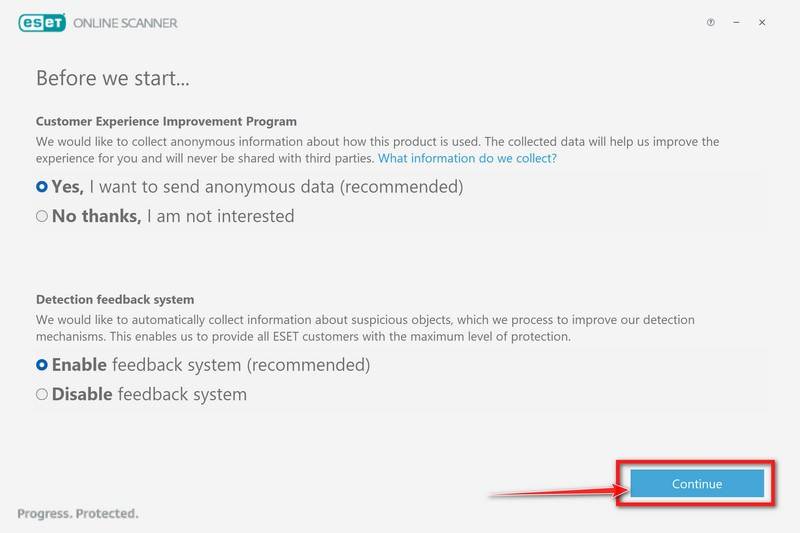
Choose your preferences for the Customer Experience Improvement Program and the Detection feedback system (either choice is fine), then click Continue.
-
Start a Full Scan
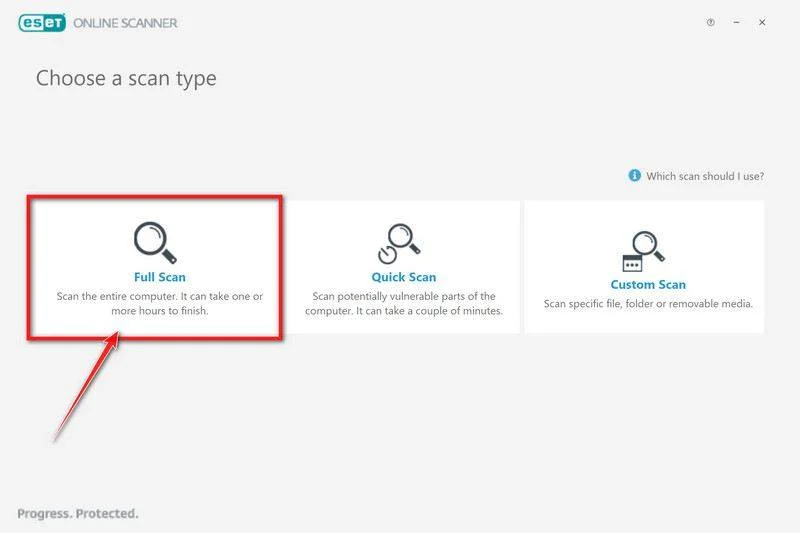
Click Full Scan — this checks your entire computer, not just the common hiding spots.
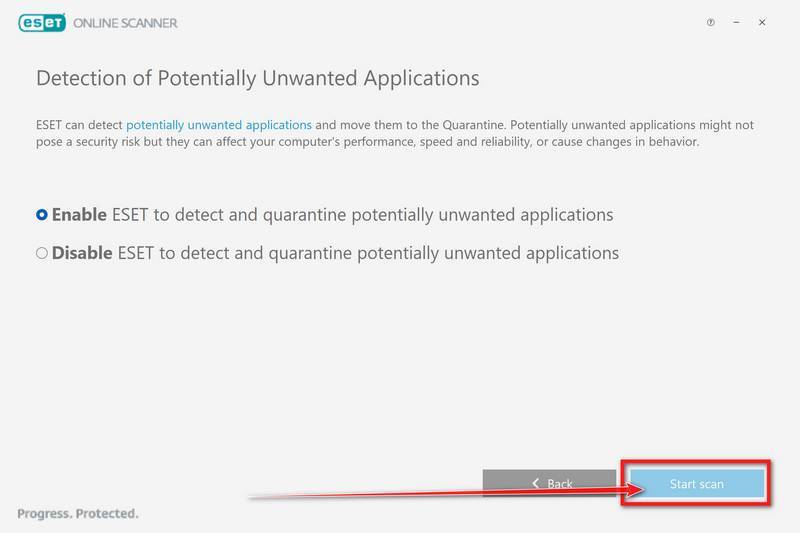
Select Enable for Detection of Potentially Unwanted Applications — this lets ESET catch adware and bundled junk programs, not just viruses. Then click Start scan.
-
Wait for the Scan to Finish
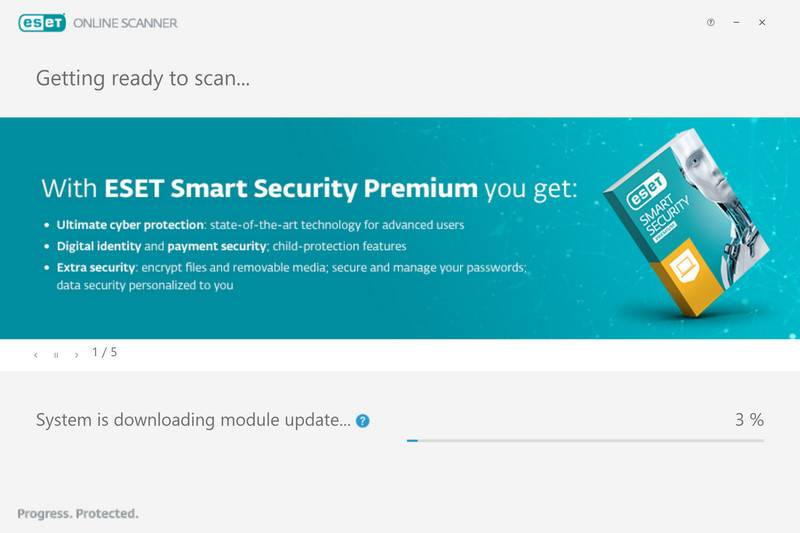
ESET will now check every file on your computer. Because it’s a full scan, this can take a while — often an hour or more, depending on how much data you have. Leave it running in the background and check on it from time to time.
-
Review the Results
When the scan completes, the Found and resolved detections screen appears. Any threats found were automatically cleaned and quarantined — there’s nothing extra you need to do. Click View detailed results if you want to see exactly what was removed.
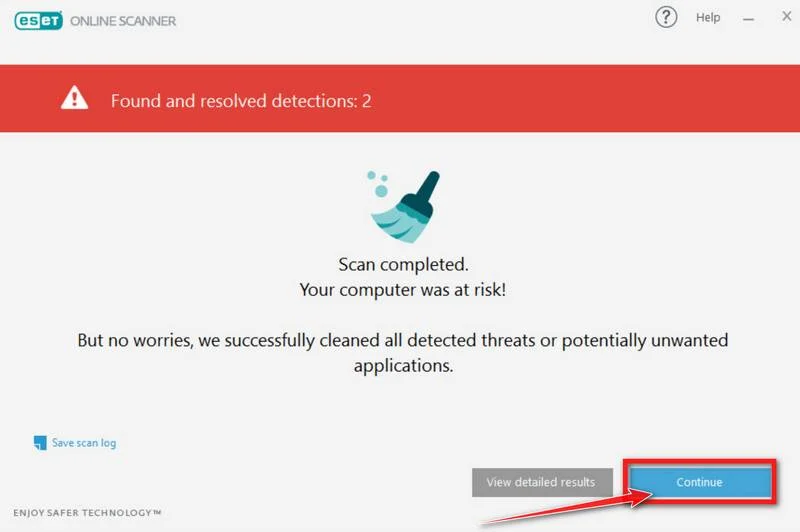
If ESET found nothing — congratulations, your computer has passed the final check and is malware-free.
STEP 5: Use AdwCleaner to remove malicious browser policies
In this final step, we will use AdwCleaner to remove malicious browser policies and unwanted browser extensions from your computer.
AdwCleaner is a free on-demand scanner that specializes in adware, browser hijackers, and unwanted toolbars — the exact threats that mainstream antivirus programs often miss. It also includes tools that repair the damage malware leaves behind, like hijacked browser settings and malicious policies. It’s a quick scan that’s well worth running.
-
Download AdwCleaner
Click the button below to download AdwCleaner — it’s free, portable, and requires no installation.
Download AdwCleanerOpens the official download page in a new tab. Malwarebytes AdwCleanerRemoves adware and unwanted programs at no cost
 -
Run AdwCleaner
Open your Downloads folder and double-click the file named “adwcleaner.exe“. There’s no installation — the program starts right away.
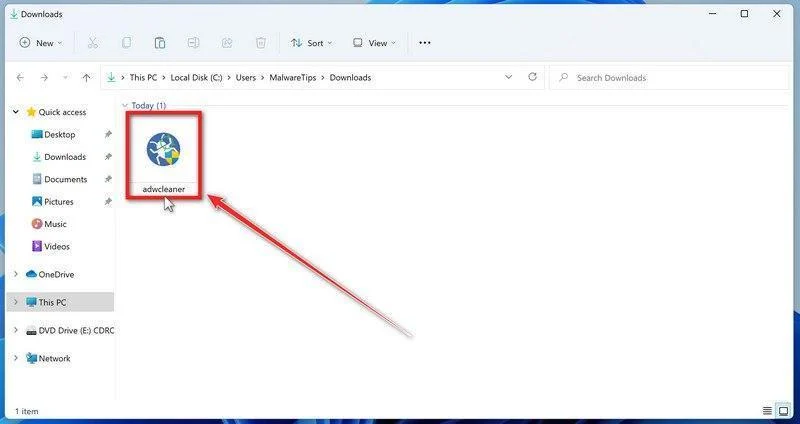
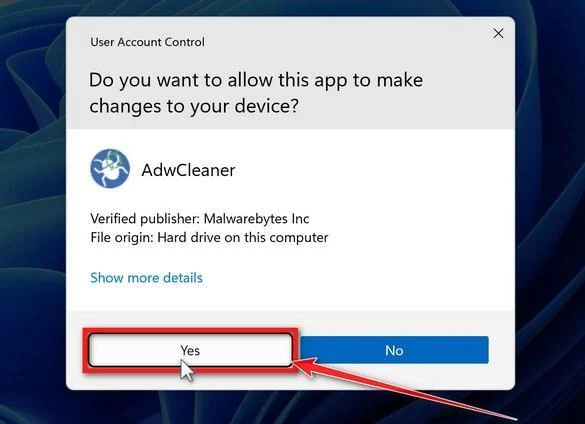
If Windows asks whether you want to allow AdwCleaner to run, click “Yes“. When the license agreement appears, click I agree to continue.
-
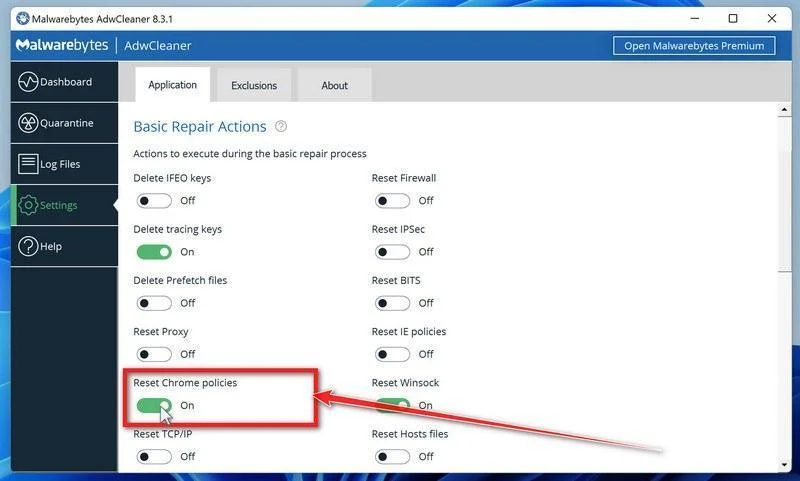
Enable “Reset Chrome policies”
This setting removes malicious browser policies — a trick malware uses to lock your browser settings so you can’t change them back. Click “Settings” on the left side of the window, then turn on “Reset Chrome policies“.
-
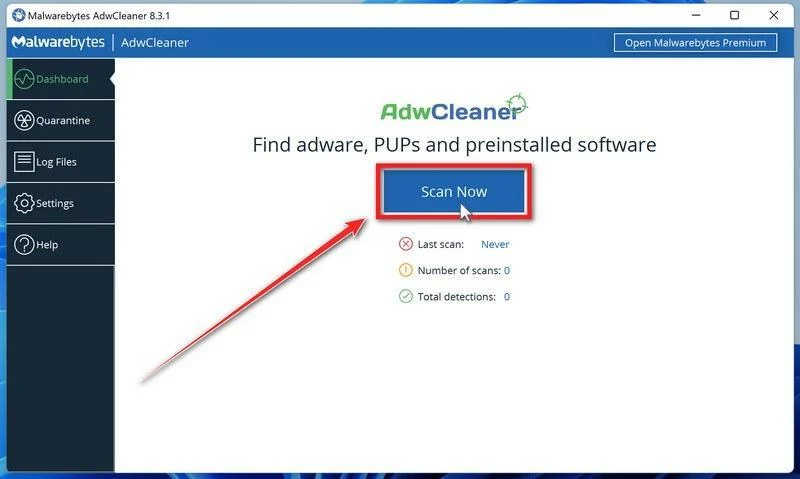
Start the Scan
Click “Dashboard” on the left side of the window, then click the “Scan” button.
-
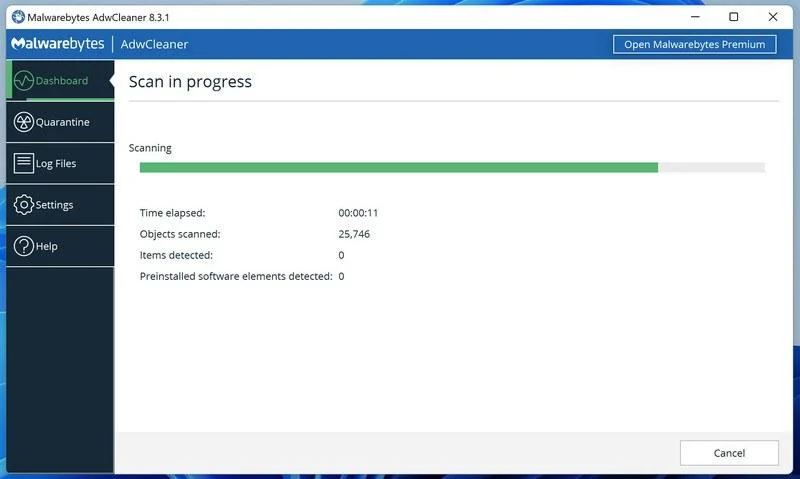
Wait for the Scan to Finish
AdwCleaner will now check your computer for adware and other malware. This usually takes only a few minutes — it’s one of the fastest scanners around.
-
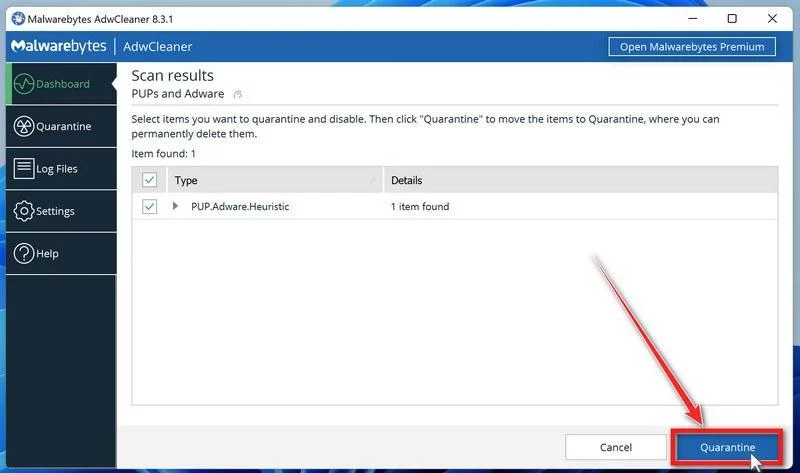
Quarantine the Detected Threats
When the scan finishes, AdwCleaner will list everything it found. Click the “Quarantine” button to remove all the malicious items at once.
-
Click “Continue” to Finish the Cleanup
Save any open work first — AdwCleaner needs to close your open programs before it can clean. When you’re ready, click the “Continue” button.
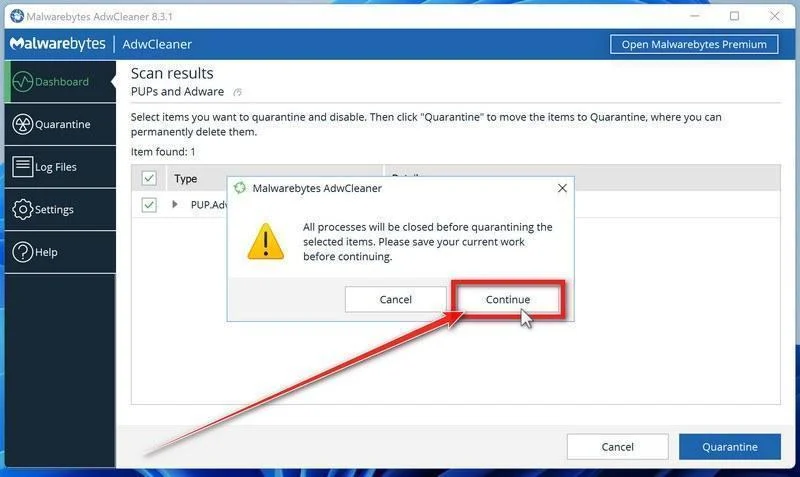
AdwCleaner will now delete all detected malware from your computer. If it asks you to restart your PC, allow it — your computer will be clean when you log back in.
Your computer should now be free of the Trojan:Win32/Raccoon.RPQ!MTB and other malicious programs.
If you are still having problems with your computer after completing these instructions, then please follow one of the steps:
- Run a computer scan with Emsisoft Emergency Kit
- Ask for help in our Malware Removal Assistance for Windows forum.

Join the discussion
0 commentsShare your experience or ask a question about this article.
Discussion
Start the conversation
Have a question or something useful to share? Add the first comment.