

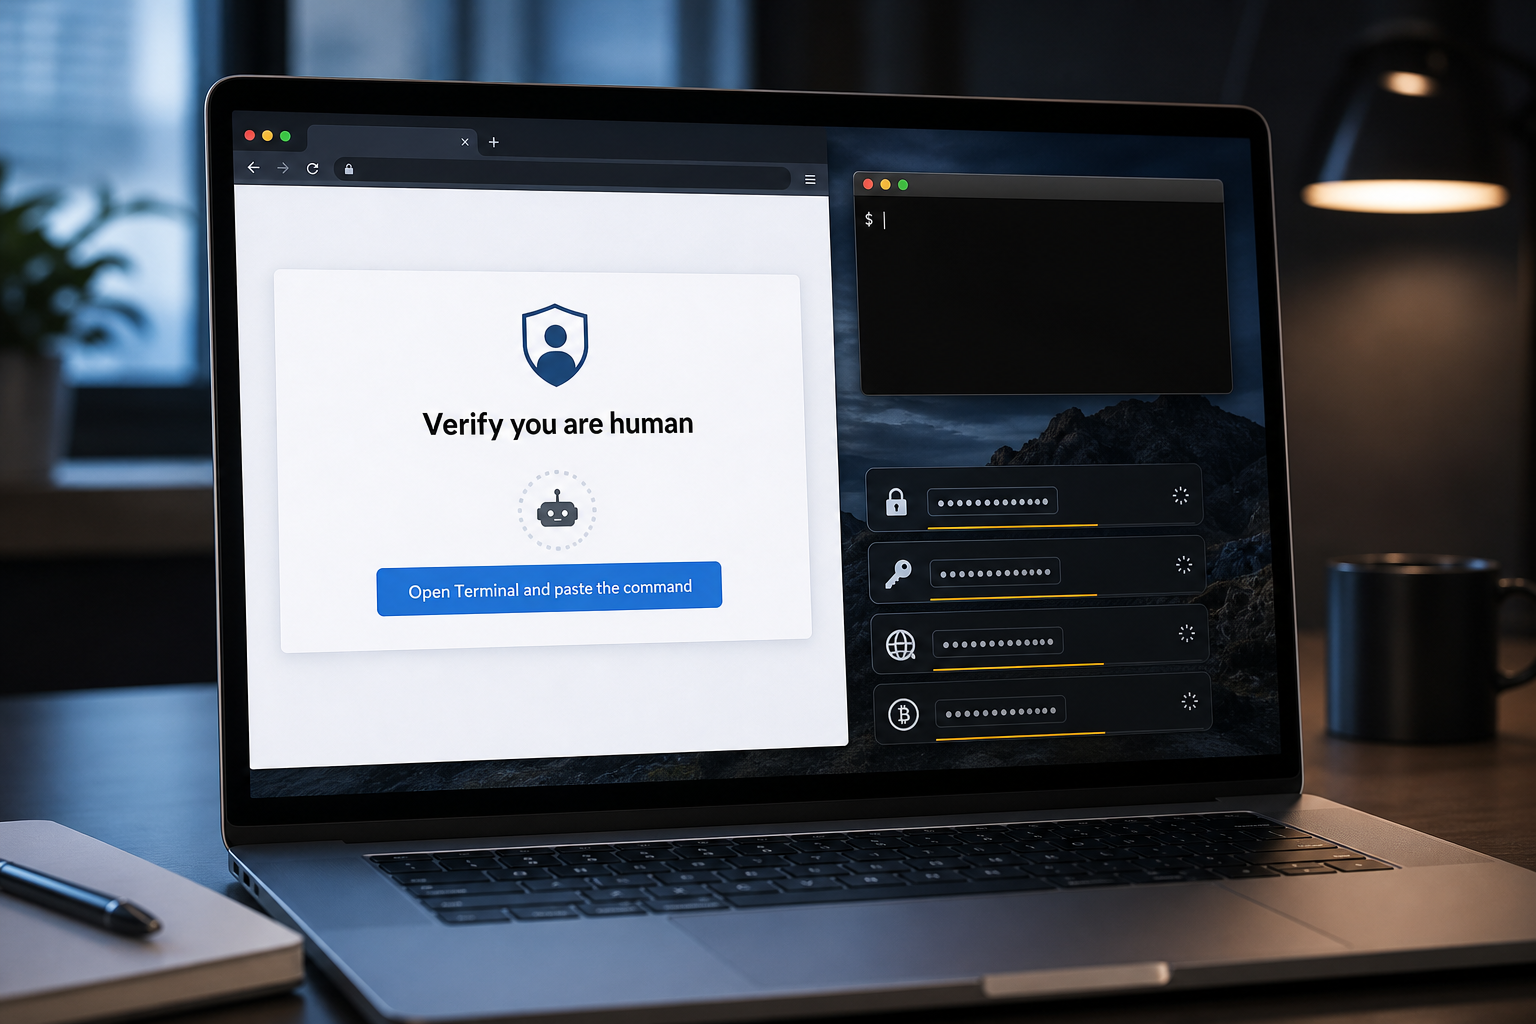
A website says you must open Terminal and paste a command to prove you are human. On a Mac, that is not a security check. It is a warning that the page may be trying to make you install malware yourself.
ClickLock Stealer turns that single moment of trust into a full compromise, stealing passwords, browser data, crypto wallets, and Keychain secrets while leaving a persistent backdoor behind.
ClickLock Stealer Overview
ClickLock Stealer is modular information-stealing malware built for macOS. It is associated with a ClickFix-style delivery method: a deceptive page pretends that the visitor must complete a browser verification, fix a Mac problem, or follow a technical instruction. Instead of exploiting the computer automatically, the page persuades the victim to open Terminal and run the attacker’s command.
Once that command is executed, an orchestrator script downloads several specialized components. One targets ordinary credentials, another extracts Keychain-related data, another hunts for cryptocurrency wallets and browser profiles, and a fourth installs a persistent backdoor based on GSocket. The modules can operate together in seconds, giving the attacker both an immediate archive of valuable data and a way to return later.
The theft is unusually broad. ClickLock has targeted data from Chrome, Brave, Edge, Opera, Vivaldi, Arc, Chromium, and Firefox, along with more than 30 crypto wallet extensions, desktop wallet applications, password-manager extensions, FTP credentials, shell history, and SSH keys. It can also seek Chrome’s Safe Storage key from the macOS Keychain, which helps decrypt passwords stored by the browser.
The malware is aggressive when a victim hesitates. Scripts can suppress notifications, hide the Terminal cursor, and repeatedly close visible applications while presenting password or Keychain prompts. Even after the short-lived stealing components remove themselves, the backdoor can remain in the user’s Library folder and reconnect after a restart. More than 100 victims across 33 countries were identified early in the campaign, showing that this is an active financial threat rather than a theoretical proof of concept.
ClickLock does not need to break macOS with a hidden vulnerability. It borrows the victim’s own permissions and uses believable system dialogs as part of the coercion. That distinction is important: fully updated Macs are still exposed when a user runs an untrusted shell command and approves access. Security updates remain essential, but the decisive defense here is refusing to treat copied Terminal instructions as a normal part of browsing.
How the ClickLock Stealer Attack Works
Step 1: A fake verification or Mac-help page sets the trap
The victim lands on a page that resembles a human-verification screen, software guide, community answer, or Mac cleanup instruction. It may borrow the visual language of a familiar security check without being operated by that service.
The key red flag is the instruction to open Terminal. Real CAPTCHA systems verify activity inside the browser; they do not require pasted shell commands, administrator passwords, or Full Disk Access.
Step 2: The victim pastes a command into Terminal
The copied command may look like a long certificate string or harmless maintenance script. In reality, it contacts attacker-controlled or compromised websites and launches a shell script. Some payloads are piped directly into bash, reducing the number of obvious files left in Downloads.
At this point the victim has crossed the security boundary for the attacker. macOS is executing a command explicitly approved by the user, so ordinary browser protections cannot stop the next stage.
Step 3: Four specialized components are downloaded
The orchestrator retrieves modules for credential theft, Keychain access, crypto-wallet collection, and remote access. Different components can be updated independently, making the operation flexible and harder to summarize as one suspicious app.
Some files are stored under hidden folders such as ~/.cacheb/. Others can run directly through the shell and remove themselves after completing their task.
Step 4: Password and Keychain prompts are weaponized
ClickLock may show a convincing macOS password dialog and test the password immediately. If the victim cancels, persistence components can activate later and repeatedly close open applications until another prompt is answered.
A similar loop can pressure the user to approve a genuine Keychain request. The dialog may look legitimate because it is a real system prompt, but the process requesting the secret is malicious.
Step 5: Browser, wallet, and account data is archived
The stealer searches browser profiles, wallet extensions, password managers, desktop wallet folders, shell history, FileZilla data, SSH material, and basic system information. The collected files are bundled and sent out, giving the attacker enough information to hijack accounts or drain cryptocurrency.
Stolen cookies are especially dangerous because they may allow access to an account without immediately asking for the password or multi-factor code.
Step 6: A persistent backdoor keeps the Mac exposed
A modified GSocket component can install under the name iCloud in the user’s Library directory and establish a reverse shell. LaunchAgents, crontab entries, and shell configuration changes can restart malicious components after login.
The Mac may appear normal when the theft finishes. That calm screen does not mean the threat is gone; the operator may still have remote access.
What ClickLock Stealer Targets
- Saved browser passwords, cookies, history, bookmarks, and autofill data.
- macOS login credentials and Chrome’s Safe Storage encryption key.
- Browser wallet extensions such as Ethereum, Solana, and multi-chain wallets.
- Desktop cryptocurrency wallets and stored blockchain addresses.
- Password-manager extension data and locally accessible vault information.
- SSH keys, shell history, FTP credentials, and system details.
- Ongoing remote access through the installed backdoor.
Red Flags of a ClickLock Page
- It says a CAPTCHA or browser check requires Terminal.
- It copies a command to the clipboard and tells you to paste it without explaining each part.
- It asks for Full Disk Access, an administrator password, or Keychain approval immediately.
- It claims the verification cannot finish unless every visible app is closed.
- The page appears on a compromised blog, unfamiliar domain, or ad-driven redirect.
- The Terminal shows a fake progress animation while unrelated downloads occur.
What to Do If You Ran the ClickLock Command
- Disconnect the Mac from the internet. This can interrupt further exfiltration and the backdoor’s remote connection.
- Do not enter more passwords into prompts. Close the lid or power the Mac down if applications are being killed and prompts keep returning.
- Use another trusted device to secure critical accounts. Change your primary email, Apple Account, password manager, financial accounts, and crypto-related credentials.
- Move cryptocurrency immediately. Create clean wallets on a trusted device and transfer remaining assets. Treat every seed phrase or private key stored on the Mac as exposed.
- Revoke sessions and rotate SSH keys. Sign out browser sessions, invalidate application passwords, replace SSH keys, and remove unknown account recovery methods.
- Follow the complete Mac cleanup guide below. Check profiles, suspicious apps, LaunchAgents, browser settings, and hidden persistence rather than deleting only Terminal history.
- Consider a clean reinstall for high-value systems. If the Mac held business credentials, development keys, or large crypto assets, professional incident response or a verified clean macOS reinstall is the safer choice.
Frequently Asked Questions
Can ClickLock Stealer infect a Mac just by opening a page?
The documented chain depends on user action. The page persuades the visitor to paste and run a Terminal command, then requests passwords or access. Simply closing the page without running anything is very different from executing its instructions.
Is deleting the downloaded script enough?
No. Some components can run without remaining as obvious downloads, while LaunchAgents, shell changes, hidden folders, and the GSocket backdoor may survive. A proper response checks the entire persistence chain and secures every credential that the Mac could access.
Does FileVault protect the stolen data?
FileVault protects data when the Mac is powered off and the disk is locked. It does not stop malware running inside an unlocked user session from reading files and browser profiles that the user can already access. Disk encryption remains valuable, but it is not a substitute for removing an active stealer.
The Bottom Line
ClickLock Stealer proves that a Mac does not need a software exploit to suffer a devastating compromise. One pasted Terminal command can hand over passwords, wallet data, Keychain secrets, and long-term remote access.
No legitimate CAPTCHA or browser check requires Terminal. If you ran such a command, disconnect the Mac, protect your accounts and wallets from another device, and complete the full cleanup rather than assuming the danger ended when the browser page closed.
- STEP 1: Remove malicious profiles
- STEP 2: Delete malicious apps
- STEP 3: Reset browsers back to default settings
- STEP 4: Run a scan with Malwarebytes for Mac to remove malware
STEP 1: Remove malicious profiles
Profiles are used by IT admins in businesses to control the behavior of their Macs. These profiles can configure a Mac to do many different things, some of which are not otherwise possible.
When it comes to home users, adware and browser hijackers are using the configuration profile to prevent users from removing malicious programs from the computer. This also prevents the user from changing that behavior in the browser’s settings.
In this first step, we will check your computer to see if any configuration profiles are installed. To do this, follow the below steps:
-
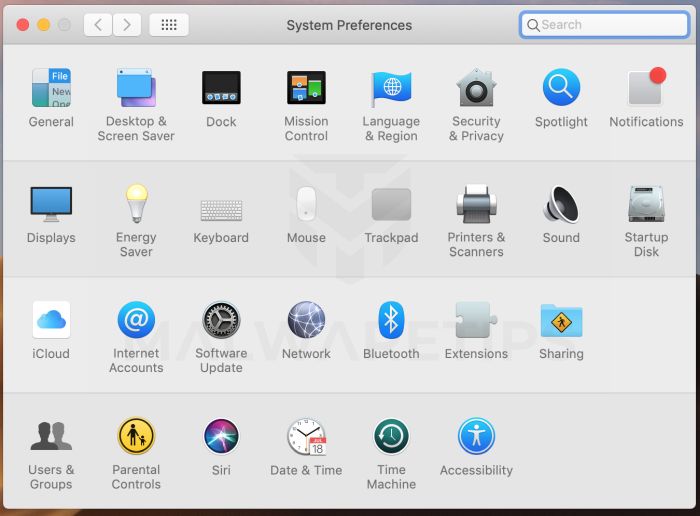
Open “System Settings”
From the Apple menu () in the top-left corner of the screen, select System Settings. (On macOS Monterey and earlier, this is called System Preferences.)
-
Look for “Profiles”
In the System Settings window, search for Profiles — on newer macOS versions you’ll find it under Privacy & Security, or you can type “Profiles” in the search box.
 No Profiles section? Good news — that means no profiles are installed on your Mac, which is completely normal. Skip ahead to the next step of this guide.
 -
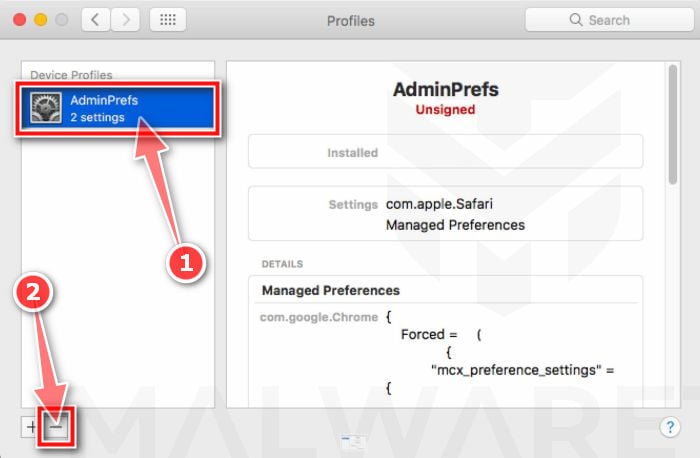
Remove the malicious profiles
Malware uses configuration profiles to lock your browser settings — forcing a fake search engine or homepage on you and preventing you from changing it back. If you see a profile you don’t recognize (and your Mac isn’t managed by your workplace or school), select it, press the − (minus) button, and click Remove to confirm.
STEP 2: Delete malicious apps
In this second step, we will try to identify and remove any malicious apps and files that might be installed on your computer. Sometimes redirects or adware programs can have usable Uninstall entries that can be used to remove these programs.
-
Quit the malicious programs
Check the Apple menu bar in the top-right corner of your screen. If you see an icon you don’t recognize, click it and select Quit. This stops the malware from running so it can’t interfere while we remove it.
-
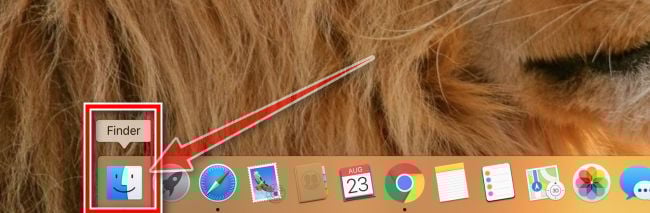
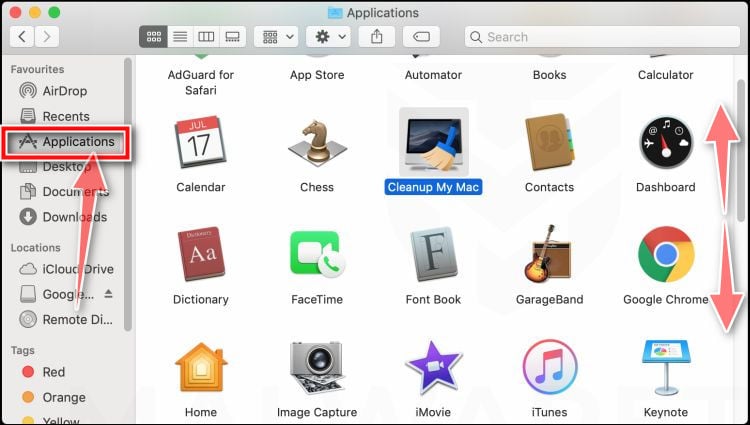
Open “Finder”
Click the Finder icon in your dock.
-
Click on “Applications”
In the Finder sidebar, click “Applications“.
-
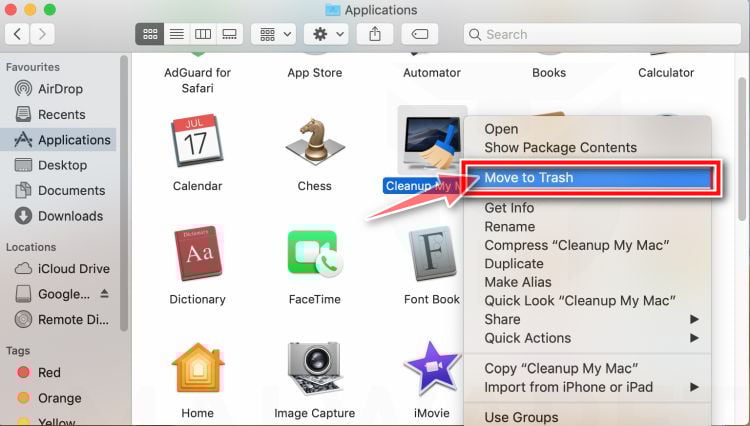
Find and remove the malicious app
Scroll through the list of installed apps and look for anything suspicious — an app you don’t remember installing, or one with a strange or generic name. When you find it, right-click it and select “Move to Trash“.
Some known malicious programs to look for: SearchMine, TakeFresh, TopResults, FeedBack, ApplicationEvents, GeneralOpen, PowerLog, MessengerNow, ImagePrime, GeneralNetSearch, Reading Cursors, GlobalTechSearch, PDFOnline-express, See Scenic Elf, MatchKnowledge, Easy Speedtest, and WebDiscover. The names change constantly, though — so treat any app you can’t account for as suspect.
-
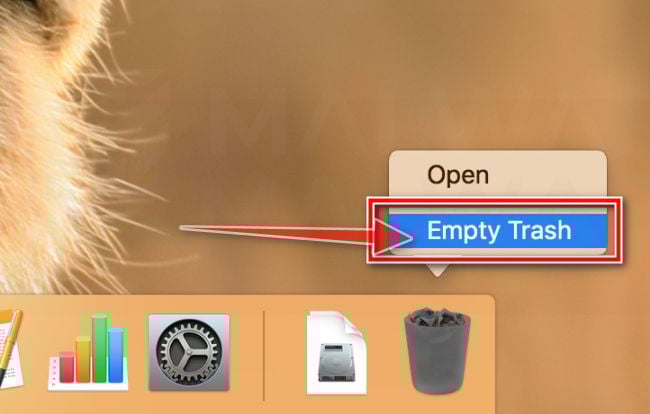
Empty the Trash
Right-click the Trash icon in your dock and select “Empty Trash“. This permanently deletes the malicious app you just removed — until you do this, the malware is still on your Mac.
Find and remove the malicious files
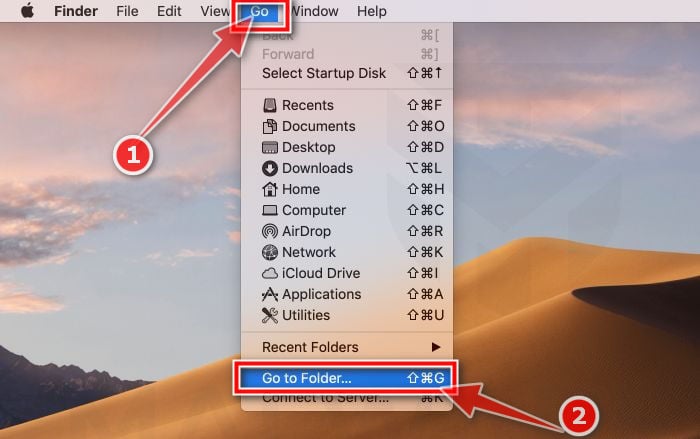
Malware on Mac uses launch agents and launch daemons — small files that automatically restart the malware every time you boot your Mac. We’ll check the four folders where they hide:
- Click the desktop to make sure you’re in Finder, then open the “Go” menu and click “Go to Folder“.
- Copy and paste each of the paths below into the window, one at a time, and click Go after each:
- /Library/LaunchAgents
- ~/Library/LaunchAgents
- /Library/Application Support
- /Library/LaunchDaemons
- In each folder, look for suspicious .plist files — typically named after the malware or with odd, random-looking names. Some known examples: “com.adobe.fpsaud.plist”, “installmac.AppRemoval.plist”, “myppes.download.plist”, “mykotlerino.ltvbit.plist”, and “com.myppes.net-preferences.plist”. When you find a malicious file, move it to the Trash — then empty the Trash again when you’re done.
Be careful: these folders also contain files belonging to legitimate apps — especially /Library/Application Support, where programs like Adobe, Google, and Microsoft store their data. Only delete files you’re confident are malicious. If you’re unsure about a file, search its exact name online first — or skip it; the Malwarebytes scan in the next step will catch what you miss.
- Click the desktop to make sure you’re in Finder, then open the “Go” menu and click “Go to Folder“.
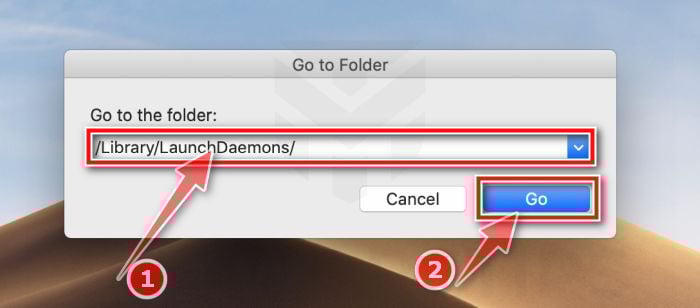
STEP 3: Reset browsers back to default settings
In this third step, we will remove spam push notifications and malicious extensions, and change to default any settings that might have been changed by malware.
For each browser that you have installed on your computer, please click on the tab below and follow the displayed steps to reset that browser.
Remove malicious extensions and settings from Safari
To remove malware from Safari we will check if there are any malicious extensions installed on your browser and what settings have been changed by this malicious program.
-
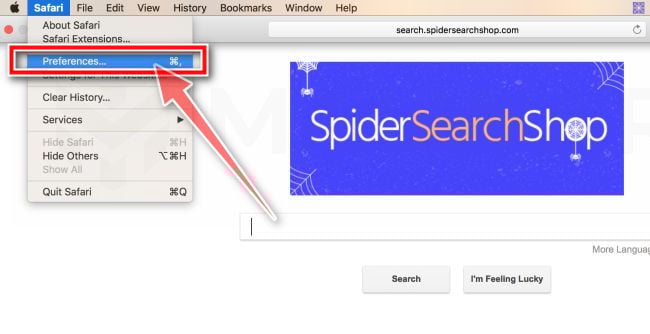
Go to Safari’s “Preferences”.
On the menu bar, click the “Safari” menu and select “Preferences”.
-
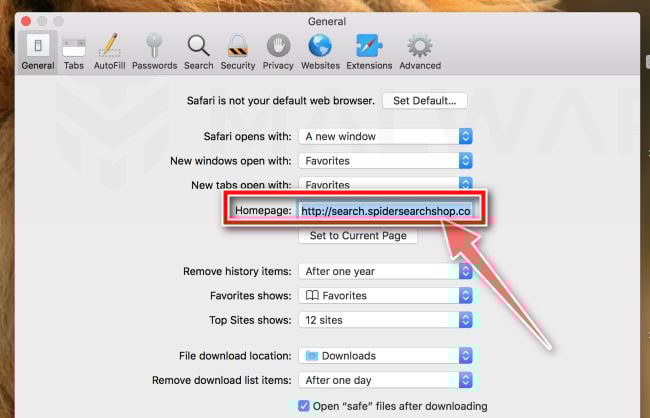
Check Homepage.
This will open a new window with your Safari preferences, opened to the “General” tab. Some browser hijackers may change your default homepage, so in the Homepage field make sure it’s a web page you want to use as your start-up page.
-
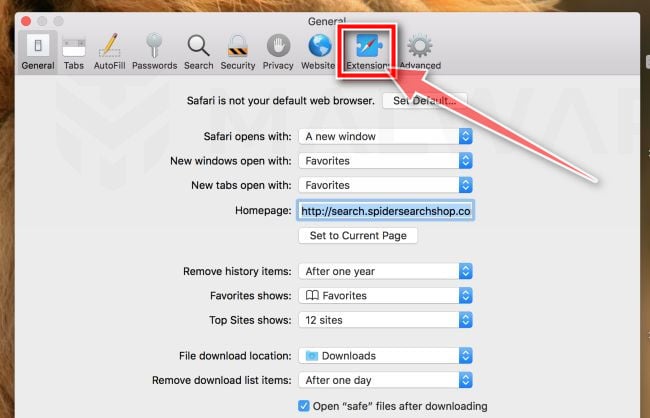
Click “Extensions”
Next, click on the “Extensions” tab.
-
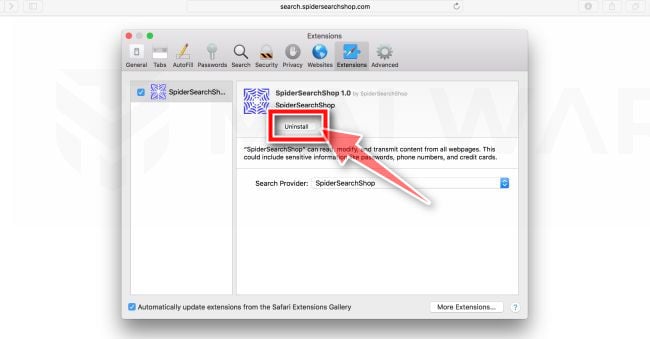
Find and uninstall malicious extensions.
The “Extensions” screen will be displayed with a list of all the extensions installed on Safari. Look out for any suspicious browser extension that could be behind all the drama – anything you don’t remember downloading or that doesn’t sound like a genuine extension. By default, there are no extensions installed on Safari so it’s safe to remove an extension
-
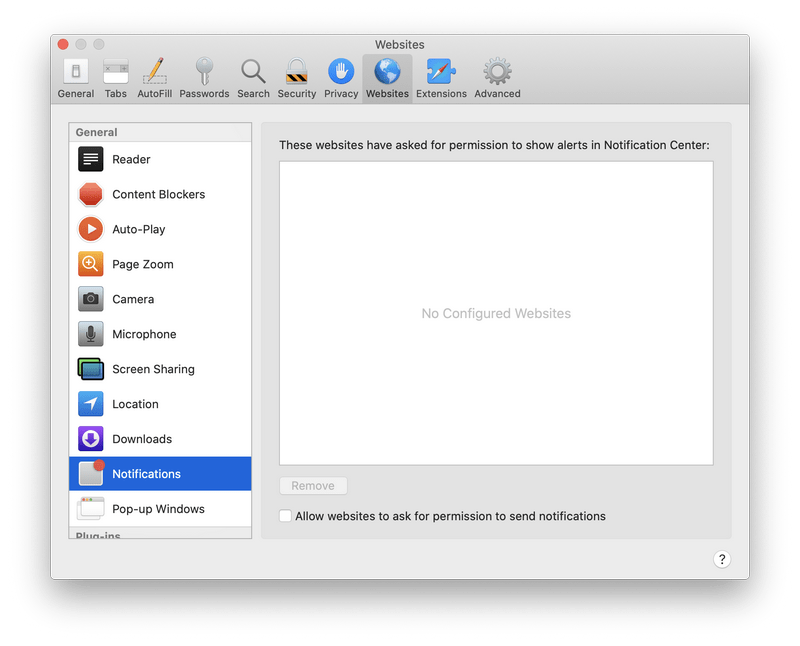
Remove spam notifications ads
Click Preferences, click Websites, then click Notifications. Deselect “Allow websites to ask for permission to send push notifications”.
-
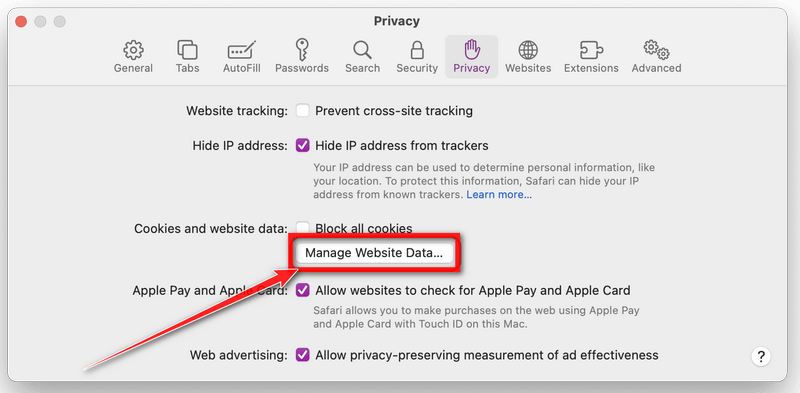
Remove all data stored by websites on your computer.
In the Safari menu, choose “Preferences…”, select “Privacy” at the top of the new window that appears, and then click the “Manage Website Data” button.
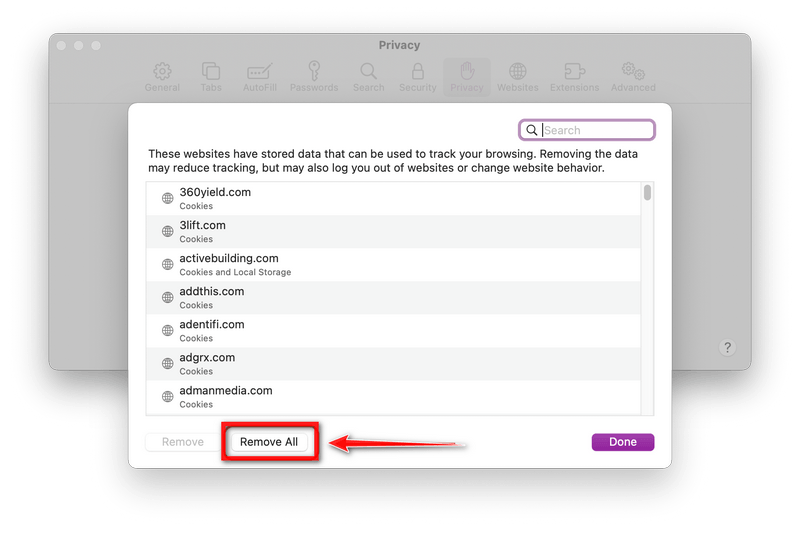
In the next dialog box, click “Remove All“. It will ask you if you are sure you want to remove all data stored by websites on your computer. Select “Remove Now” to clear data that could be used to track your browsing.
-
Empty Safari Caches.
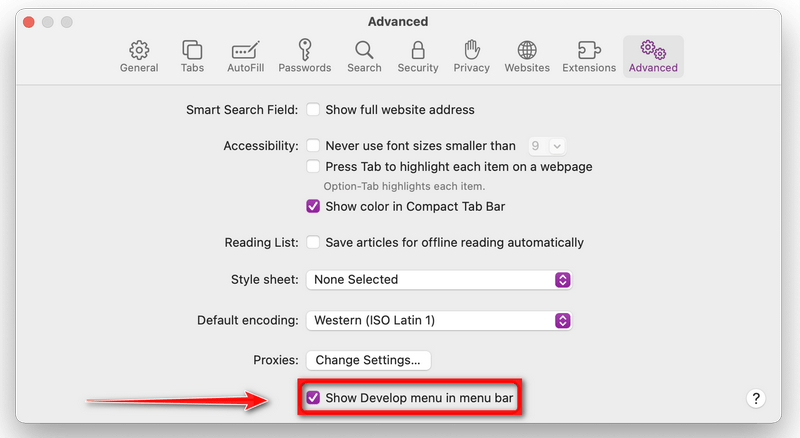
From your Safari menu bar, click Safari and select Preferences, then select the Advanced tab. Enable the checkbox to “Show Develop menu in menu bar“.
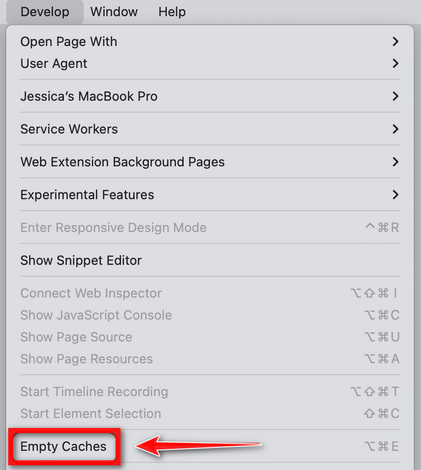
From the menu bar select Develop, then click on Empty Caches as seen in the image below.
Remove malware from Chrome for Mac
To remove malware from Chrome for Mac we will reset the browser settings to their default. Doing these steps will erase all configuration information from Chrome such as your home page, tab settings, saved form information, browsing history, and cookies. This process will also disable any installed extensions. All of your bookmarks, though, will be preserved.
-
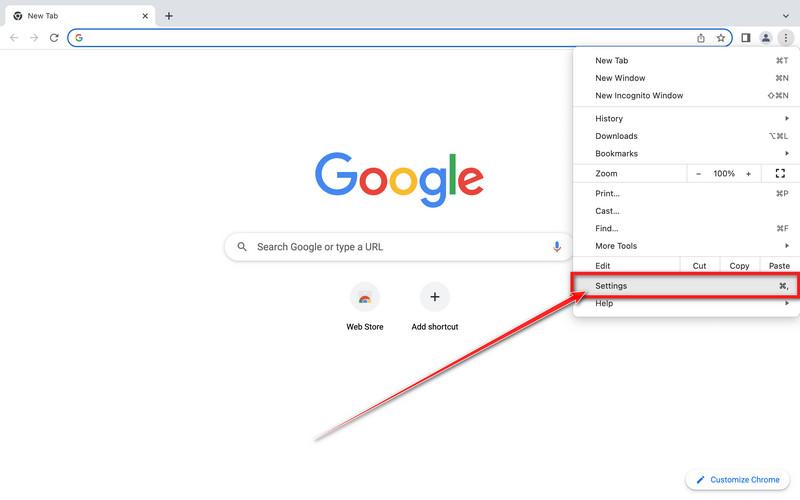
Click on the three dots at the top right and go to Settings.
Click on Chrome’s main menu button, represented by three dots at the top right corner. Now click on the menu option labeled Settings as shown by the arrow in the picture below, which will open the basic settings screen. -
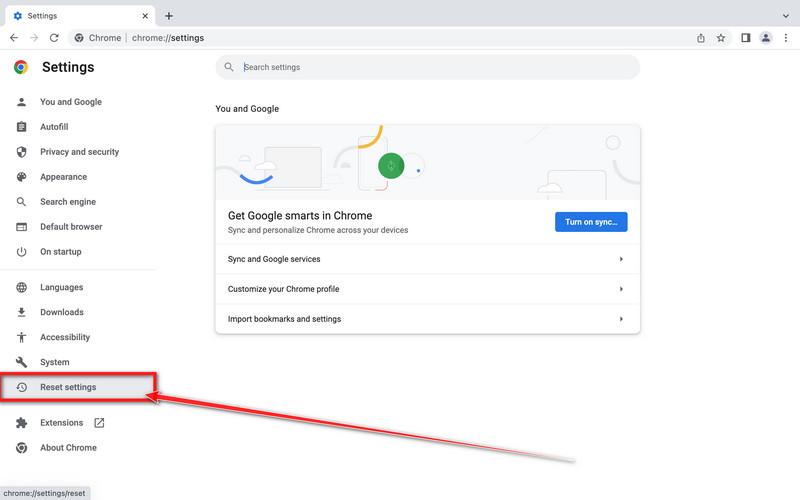
In the left sidebar, click on the “Reset and Cleanup” option.
In the left sidebar, click on “Reset and clean up“. -
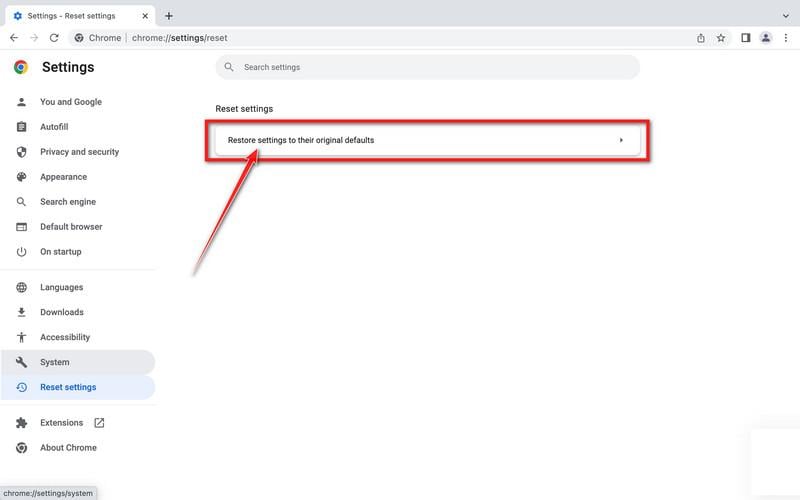
Click “Reset settings to their original defaults”.
Now click on the “Reset settings to their original defaults”. link as shown in the image below. -
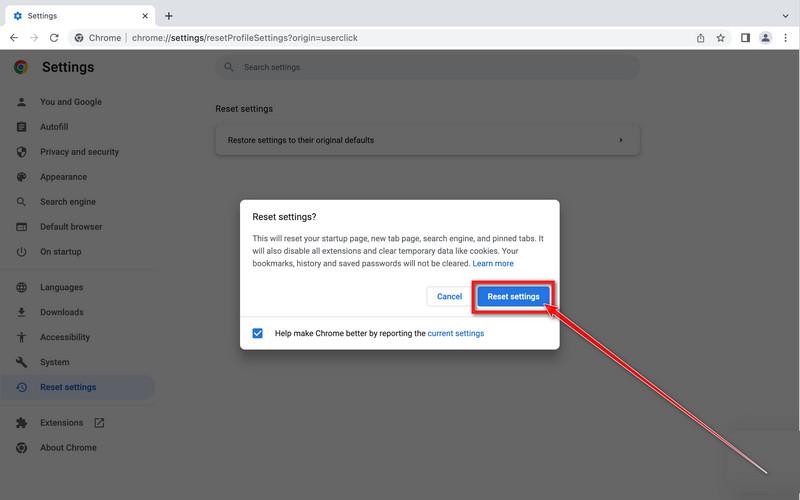
Click “Reset Settings” button.
A confirmation dialog should now be displayed, detailing the components that will be restored to their default state should you continue with the reset process. To complete the restoration process, click on the “Reset Settings” button. -
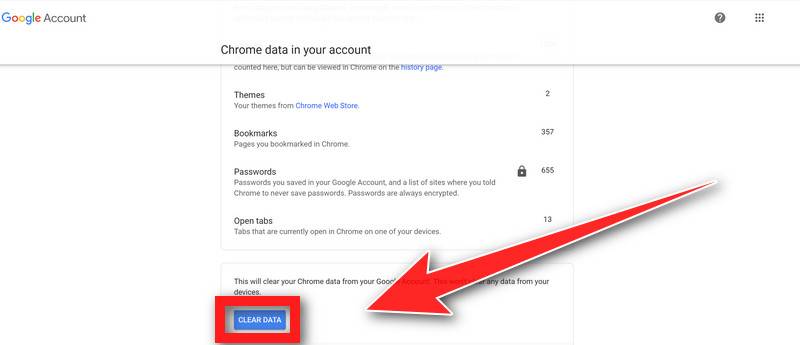
(Optional) Reset Chrome Data Sync.
In case a malicious extension reinstalls itself even after performing a browser reset, you have an additional option to reset the data sync for your browser. To do this, navigate to chrome.google.com/sync and click on the Clear Data button.
Remove malware from Firefox for Mac
To remove malware from Firefox for Mac we will reset the browser settings to its default. The reset feature fixes many issues by restoring Firefox to its factory default state while saving your essential information like bookmarks, passwords, web form auto-fill information, browsing history, and open tabs.
-
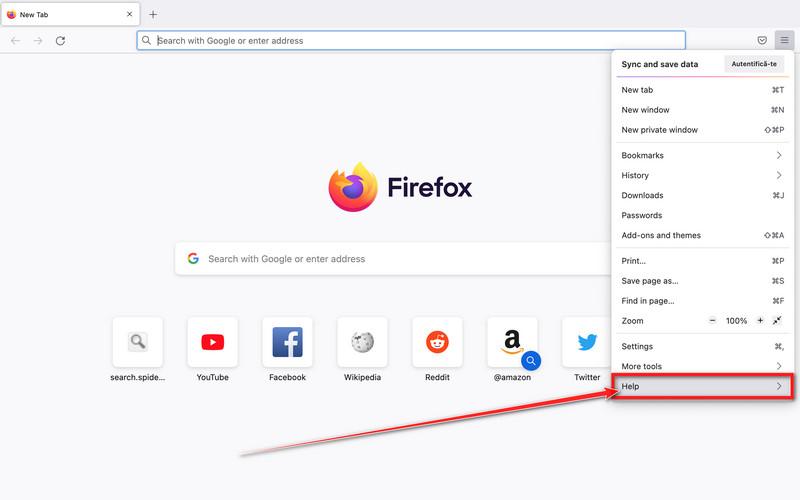
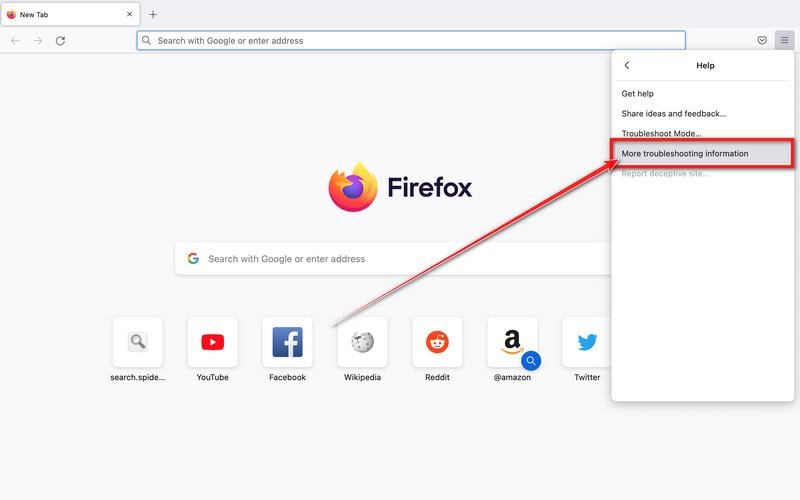
Go to the “Help” menu.
Click on Firefox’s main menu button, represented by three horizontal lines. When the drop-down menu appears, select the option labeled “Help“.
-
Click “Troubleshooting Information”.
Next click on the “Troubleshooting Information” option as indicated by the arrow in the image below. This will bring you to a Troubleshooting page.
-
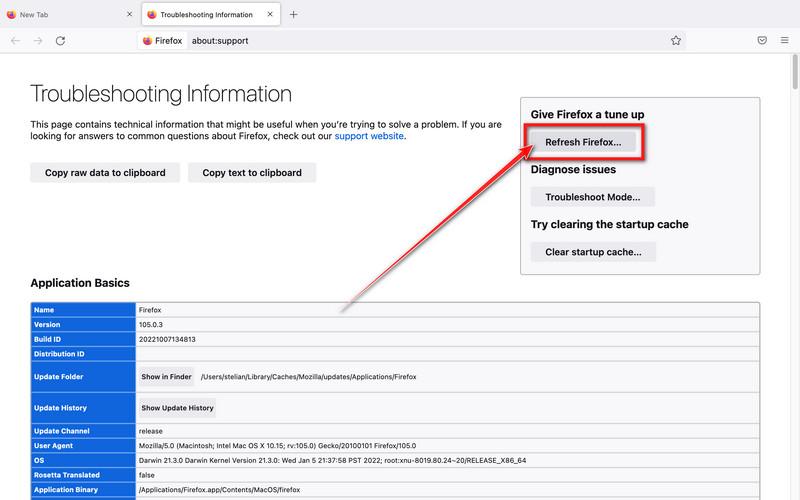
Click on “Refresh Firefox”
Click the “Refresh Firefox” button in the upper-right corner of the “Troubleshooting Information” page.
-
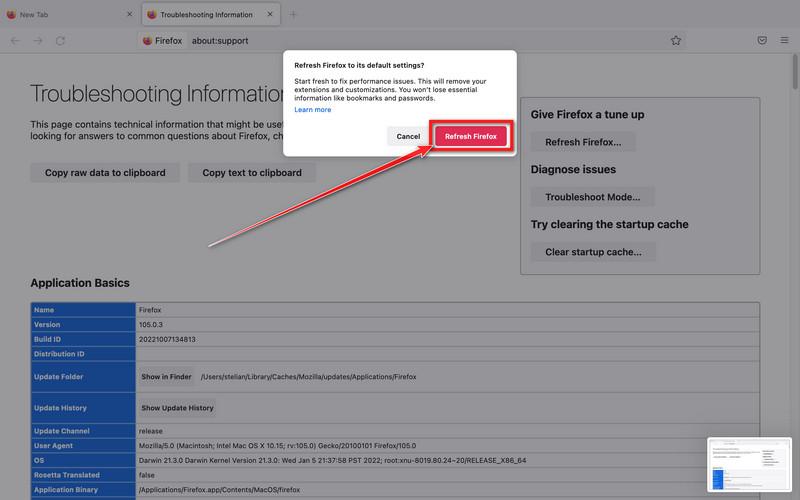
Confirm.
To continue, click on the “Refresh Firefox” button in the new confirmation window that opens.
-
Click on “Finish”.
Firefox will close itself and will revert to its default settings. When it’s done, a window will list the information that was imported. Click on the “Finish“.
STEP 4: Run a scan with Malwarebytes for Mac to remove malware
In this final step, we will scan the computer with Malwarebytes for Mac to find and remove any malicious programs that might be installed on your Mac.
Malwarebytes for Mac is a free on-demand scanner that removes the malware other security software tends to miss — adware, browser hijackers, and unwanted programs included. Cleaning an infected Mac with Malwarebytes has always been completely free, and it’s our go-to recommendation. Follow the steps below to scan and clean your Mac in just a few minutes.
-
Download Malwarebytes for Mac
Click the button below to download the latest version of Malwarebytes for Mac.
-
Open the Malwarebytes setup file
When the download finishes, open your Downloads folder and double-click the setup file to begin the installation.
-
Follow the On-Screen Prompts to Install Malwarebytes
The Malwarebytes for Mac Installer will guide you through a few quick screens. Click “Continue” and keep following the prompts until the installation completes.
When the installation is complete, Malwarebytes opens to the Welcome to Malwarebytes screen. Click “Get started“.
-
Select “Personal Computer” or “Work Computer”
Malwarebytes will ask what type of computer you’re installing it on. Click either Personal Computer or Work Computer, whichever applies.
-
Start the Scan
Click the “Scan” button. Malwarebytes will automatically update its detection database and begin checking your Mac for malware.
-
Wait for the Scan to Finish
Malwarebytes will scan your Mac for adware, browser hijackers, and other malicious programs. This can take a few minutes, so feel free to do something else — just check back occasionally to see the progress.
-
Quarantine the Detected Threats
When the scan is done, you’ll see a list of everything Malwarebytes found. Click the “Quarantine” button to remove all the threats at once.
-
Restart Your Mac
Malwarebytes will now remove all the malicious files it found. Some threats can only be fully removed after a reboot — if Malwarebytes asks you to restart, allow it. Once you’re logged back in, your Mac is clean.


















