

A mailbox warning that combines an expiration date with a nearly full storage limit sounds technical enough to be believable. It also creates a practical fear: if you wait, customers, coworkers, or family members may no longer be able to reach you.
The Email Account Details Will Expire scam uses that invented problem to steal login credentials. The customer portal is fake, the storage deadline is not real, and signing in gives the password to criminals.
Overview
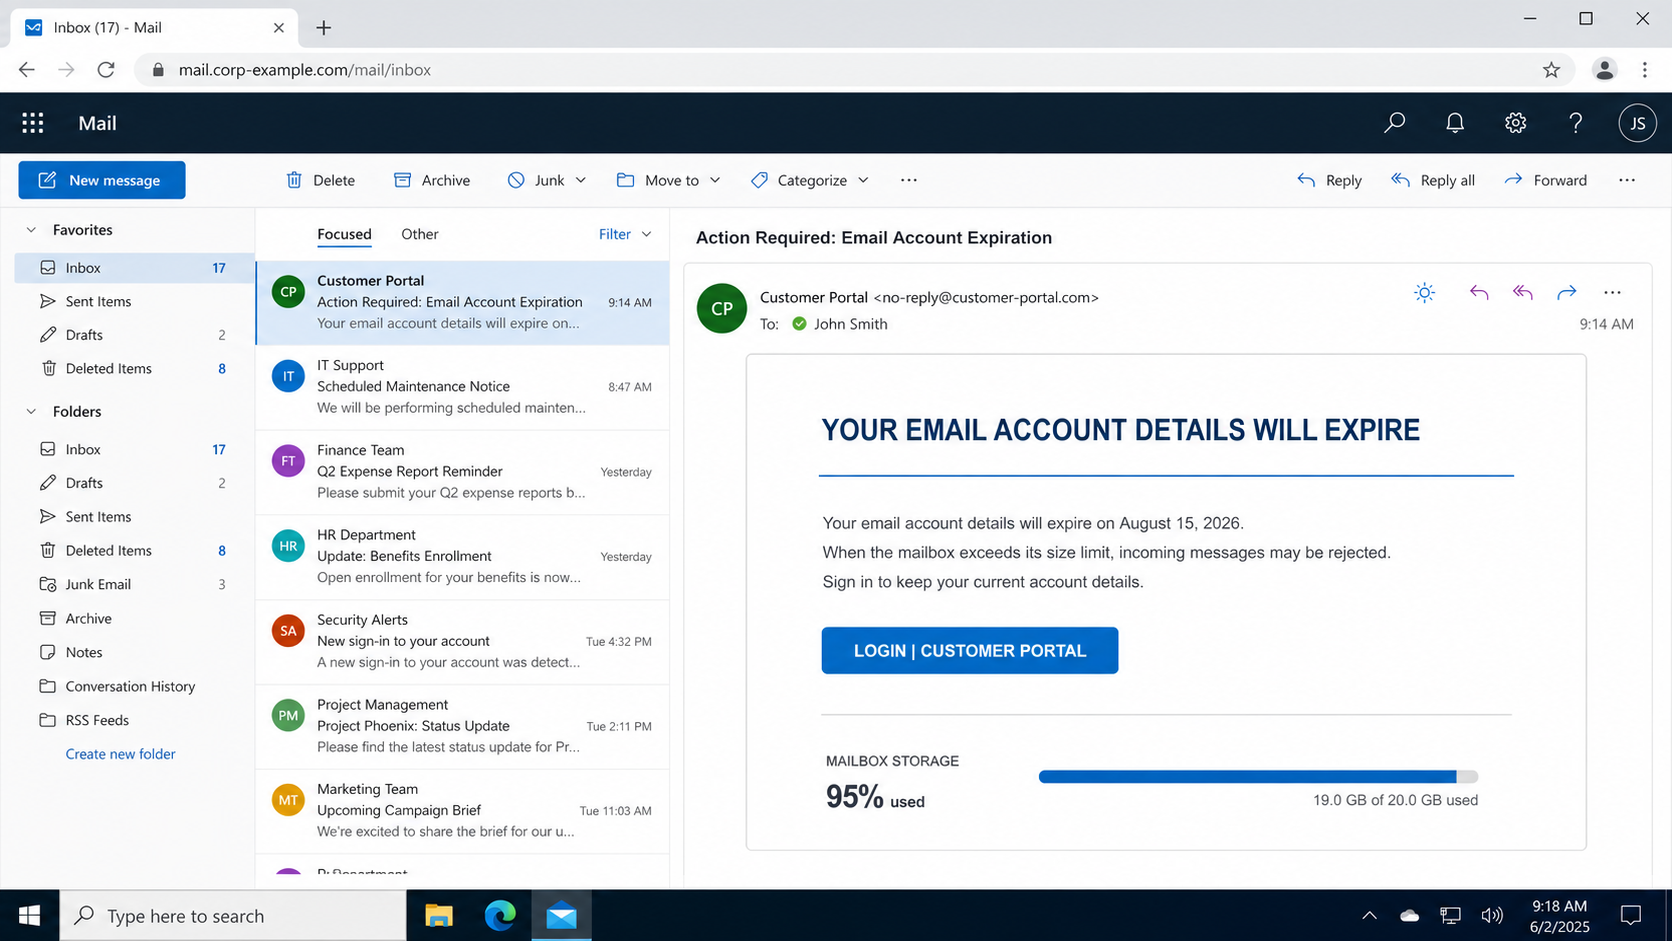
This phishing email pretends to be a service notice from an email provider. It says the recipient’s “account details” will expire on a specific date and claims the mailbox will exceed its storage limit at the same time.
According to the message, all incoming mail will then be rejected. A button labeled “Login | Customer Portal” supposedly lets the recipient keep the current details and avoid disruption.
Two unrelated problems are blended together
Login details and mailbox storage are separate issues. A password does not normally expire because the inbox reaches its capacity, and a full mailbox does not cause the account identity itself to expire.
The scam joins them because each creates urgency. The deadline threatens access, while the storage warning threatens missed messages.
The exact date creates false precision
An observed version included a full date and time. Precise timestamps can make an automated message feel authoritative, even when the sender has no connection to the recipient’s service.
The date is simply content written by the attacker. It is not proof that the provider has scheduled any account change.
The “Customer Portal” is a credential collector
- The button hides an unrelated web address.
- The landing page imitates a familiar webmail login.
- The address may be prefilled to make the page feel personal.
- The password is sent to the phishing operator.
- The victim may see a fake error or harmless redirect afterward.
The linked site reviewed in this campaign was no longer active, but the purpose is clear from the workflow. The message sends the recipient away from the real provider and into an attacker-controlled sign-in process.
Why Storage and Expiration Lures Are Effective
Missed email can have immediate consequences
For a business, rejected mail can mean lost orders, delayed invoices, or unhappy customers. For an individual, it can mean missing a password reset, travel update, medical notice, or family message.
The scam exploits that reasonable concern by suggesting the safest action is also the fastest one.
Storage warnings are familiar
Real providers may warn when storage is nearly full. That makes a fraudulent gauge, percentage, or quota figure seem routine rather than suspicious.
The correct response is still to check storage inside the provider’s official app or website. A real quota will appear there without requiring an email link.
“Keep current details” sounds harmless
The email does not ask the recipient to invent new information. It asks them to preserve what they already have, which feels like a low-risk administrative task.
In reality, preserving the details means typing the current password into a page owned by the attacker.
How the Email Account Details Will Expire Scam Works
Step 1: A fake quota notice is delivered
The email appears to come from a customer portal, webmail administrator, or hosting service. It may use the recipient’s address in the subject or body to look account-specific.
These messages are commonly sent in bulk. The attacker does not need to know the recipient’s real provider, quota, or account status.
Step 2: The message announces an expiration date
A date and time are displayed as if generated by an account-management system. The recipient is told that account details will stop working “on or before” that deadline.
Vague wording allows the attacker to avoid explaining which details expire or why. The deadline does the persuasive work.
Step 3: Storage is used to threaten incoming mail
The notice claims the mailbox will exceed its allowed size and reject all new messages. Some variants display a progress bar or a percentage such as 95% used.
A graphic is not a live measurement. Email HTML can display any number the sender chooses.
Step 4: The customer portal button redirects off-site
The call-to-action hides the true destination. It may pass the email address in the URL, allowing the landing page to display it automatically.
Cloud hosts, compromised sites, and newly registered domains are common destinations. Encryption and a padlock do not establish who owns the page.
Step 5: A counterfeit login captures the password
The page may mimic Microsoft 365, Google, Roundcube, cPanel webmail, or a generic hosting portal. The design can change based on the address or domain in the link.
After the user submits credentials, the attacker stores them. The page may ask twice, report a session error, or redirect to the real provider to reduce suspicion.
Step 6: Criminals test the credentials and request codes
The attacker tries to enter the real mailbox. If multi-factor authentication is present, the victim may receive a prompt that seems connected to the supposed portal session.
Deny the request. An activation or quota page never needs you to approve a sign-in you did not start through the official provider.
Step 7: The mailbox is turned into a surveillance point
Attackers may quietly search for financial conversations, invoices, contracts, identity documents, and password resets. They can add a forwarding rule to receive future messages without repeatedly signing in.
They may also suppress security alerts by sending them to trash or marking them as read.
Step 8: Other accounts and contacts are targeted
Email access can unlock services that use the address for recovery. A criminal may reset shopping, social, payment, cloud, or workplace accounts.
The real mailbox can then send additional phishing. Contacts may trust the familiar sender, especially when the new message continues an existing conversation.
How to Check Storage Without Using the Email
- Open the official app or provider website. Use your normal bookmark or an address supplied by your organization.
- Find the storage or quota page. Compare actual usage with the number claimed in the message.
- Review provider notifications. A real issue should appear inside the authenticated account.
- Check billing separately. If storage depends on a paid plan, inspect billing from the official dashboard.
- Ask the administrator. Workplace and hosted mail users should verify limits with their IT team or hosting provider.
Do not reply to the suspicious sender to ask whether the warning is real. That confirms the address is monitored and keeps the conversation inside the attacker’s channel.
Important Warning Signs
The terminology is internally inconsistent
“Account details will expire” is vague. Combining that phrase with a storage limit suggests the sender is blending familiar technical words rather than describing a real policy.
The greeting and provider identity are generic
A legitimate provider should be identifiable. A message signed only by “Customer Portal,” “Webmail Team,” or “Administrator” can be sent to users of any service.
The button requests a fresh login
Unexpected credential prompts deserve caution, especially when the browser address does not match the provider. Close the page and use the official sign-in route.
The deadline discourages normal verification
A provider may enforce real storage limits, but a legitimate support process should remain accessible through the account. You do not need to gamble on an email link to prevent immediate loss.
How Phishing Operators Avoid Immediate Detection
The page can display a normal error
After the password is submitted, the site may report that the session expired or the credentials were incorrect. This encourages another attempt and makes the victim think no successful action occurred.
The information can be captured before the error appears. Treat every password entered on an unrelated domain as exposed.
The victim may be redirected to real webmail
A redirect to the provider’s genuine sign-in page creates a plausible ending. The victim may enter the password again, this time successfully, and assume the first screen was simply part of the process.
Check which domain received the first entry. A real destination afterward cannot retroactively make the phishing page safe.
The attacker can wait before using the account
Not every stolen password is used immediately. Credentials may be collected in batches, sold, or tested later to avoid connecting suspicious activity with the original email.
Change the password even if several hours or days have passed without an unfamiliar login. Lack of visible activity is not evidence that the password was discarded.
Mailbox rules can hide security evidence
Once inside, criminals can move sign-in alerts and password reset messages to trash or another folder. They may mark messages as read or create keywords that target bank and security mail.
Review rules, forwarding, deleted mail, and recent configuration changes. Business administrators should preserve audit logs before removing suspicious settings.
Managing a Genuinely Full Mailbox Safely
If the official account confirms that storage is nearly full, use the provider’s own cleanup tools. Review large attachments, empty deleted items, and remove mail only after deciding what must be retained.
Businesses should follow retention rules and backup requirements rather than deleting records in a panic. An administrator can increase a quota or archive mail through approved systems when appropriate.
If a paid storage upgrade is needed, reach billing from the authenticated dashboard. Do not enter card details on a page opened from the warning email.
How to Protect Other Accounts Linked to the Mailbox
Search the inbox for recent password reset messages and security alerts. Those records can reveal which services an attacker may have targeted after entering the mailbox.
Prioritize services that hold money, identity documents, private files, or business authority. Change their passwords, review sessions, and confirm their recovery details.
Where possible, replace email-only recovery with stronger methods such as passkeys, security keys, or authenticator-based verification.
Check whether the compromised mailbox was used as a username elsewhere, even when those services have different passwords. Criminals can use the address to launch password-reset attempts and discover which accounts exist.
Watch for unexpected codes, welcome messages, and account-change confirmations during the following weeks. Do not follow links in those alerts. Open each service independently and review its real activity.
What to Do if You Have Fallen Victim to This Scam
- Close the fraudulent portal. Do not enter another password or approve any authentication requests.
- Change the mailbox password through the official service. Use a clean device and create a unique password that has never been used elsewhere.
- Update every account using the same password. Begin with financial services, cloud storage, work systems, and accounts that can spend money.
- Revoke all sessions. Sign out other browsers and devices, remove unknown application passwords, and disconnect suspicious third-party access.
- Check recovery details. Restore your phone number, alternate email, passkeys, security keys, and authenticator methods if anything changed.
- Review forwarding and inbox rules. Delete unfamiliar rules, delegates, aliases, automatic replies, and hidden forwarding addresses.
- Inspect sent, deleted, and archived mail. Look for phishing sent to contacts, reset messages, or conversations the attacker may have opened.
- Turn on strong multi-factor authentication. Prefer phishing-resistant passkeys or security keys where available.
- Contact IT for a work or hosted account. Administrators can review logs, revoke tokens, check other users, and confirm the real quota status.
- Run a malware scan if anything downloaded. Malwarebytes can check for credential stealers and unwanted software that a more aggressive version might deliver.
- Use safer browsing protection. AdGuard can block many known phishing destinations and dangerous redirect chains, though it cannot undo submitted credentials.
- Report the phishing message. Use the mail provider’s report feature, notify your organization, and file a fraud report when losses or identity misuse occurred.
Is Your Device Infected? Run a Free Malware Scan
Slow performance, constant pop-ups, or strange behavior? These are classic signs of a malware infection. The fastest way to find out is to scan your device with Malwarebytes Free — one of the most trusted malware removal tools available.
The free version detects and removes the most common threats, including:
- Adware — the cause of those annoying pop-ups
- Browser hijackers — unwanted redirects and changed homepages
- Trojans and spyware — hidden programs stealing your data
- Potentially unwanted programs (PUPs) — software you never asked for
👉 Select your device below — Windows, Mac, or Android — then follow the simple steps to download Malwarebytes, scan your system, and remove any threats it finds. The scan usually takes 5 to 20 minutes.
Run a Malware Scan with Malwarebytes for Windows
Malwarebytes is one of the most popular and trusted anti-malware tools for Windows — and it’s completely free for removing infections. It catches threats that many antivirus programs miss, including adware, browser hijackers, and trojans. Follow the steps below to scan and clean your PC in just a few minutes.
Download Malwarebytes
Click the button below to download the latest version of Malwarebytes for Windows from the official source. The free version is all you need — it will scan your computer and remove adware, browser hijackers, and other malicious software at no cost.
Download MalwarebytesOfficial installer for Windows 11 and 10. Your download starts right away.Want real-time protection? See Malwarebytes Premium Malwarebytes Free for WindowsScans and removes malware at no cost
-
Install Malwarebytes
When the download finishes, open your Downloads folder and double-click the MBSetup file. If Windows shows a User Account Control pop-up, click “Yes” to allow the installation.

Follow the On-Screen Prompts to Install Malwarebytes
The setup wizard will walk you through a few quick screens:
-
Choose where you’re installing the program — “Personal Computer” or “Work Computer” — then click Next.

-
Malwarebytes will now install on your device. This usually takes under a minute.

-
When installation is complete, the “Welcome to Malwarebytes” screen will open automatically.

-
On the final screen, click Open Malwarebytes to launch the program.

-
Enable “Scan for Rootkits”
Before scanning, turn on rootkit detection so Malwarebytes can find even the most hidden threats. Click the Settings gear icon on the left side of the screen.

In the settings menu, find “Scan for rootkits” and click the toggle so it turns blue.

Done? Click “Dashboard” in the left pane to return to the main screen.
Start the Scan
Click the blue Scan button. Malwarebytes will automatically update its virus database and start checking your computer for malware.

-
Wait for the Scan to Finish
The scan checks your entire system for browser hijackers and other malicious programs, so it can take 5 to 20 minutes depending on your computer. Feel free to do something else — just check back occasionally to see the progress.

-
Quarantine the Detected Threats
When the scan is done, you’ll see a list of everything Malwarebytes found — malware, adware, and potentially unwanted programs. Click the “Quarantine” button to remove all of them at once.

Malwarebytes will now remove the malicious files and registry entries and move them safely into quarantine.

-
Restart Your Computer
Some threats can only be fully removed after a reboot. If Malwarebytes asks you to restart, click Yes. Once you’re logged back in, Malwarebytes has finished removing the threats it found.

That’s it — your Windows PC is now clean of trojans, adware, and other malware, and should be back to running smoothly.
If you are still having problems with your computer after completing these instructions, then please follow one of the steps:
- Run a computer scan with ESET Online Scanner
- Ask for help in our Windows Malware Removal Help & Support forum.
Run a Malware Scan with Malwarebytes for Mac
Malwarebytes for Mac is a free on-demand scanner that removes the malware other security software tends to miss — adware, browser hijackers, and unwanted programs included. Cleaning an infected Mac with Malwarebytes has always been completely free, and it’s our go-to recommendation. Follow the steps below to scan and clean your Mac in just a few minutes.
-
Download Malwarebytes for Mac
Click the button below to download the latest version of Malwarebytes for Mac.
Download MalwarebytesOfficial installer for macOS. Your download starts right away.Want real-time protection? See Malwarebytes PremiumMalwarebytes Free for MacScans and removes malware at no cost -
Open the Malwarebytes setup file
When the download finishes, open your Downloads folder and double-click the setup file to begin the installation.

-
Follow the On-Screen Prompts to Install Malwarebytes
The Malwarebytes for Mac Installer will guide you through a few quick screens. Click “Continue” and keep following the prompts until the installation completes.



When the installation is complete, Malwarebytes opens to the Welcome to Malwarebytes screen. Click “Get started“.
-
Select “Personal Computer” or “Work Computer”
Malwarebytes will ask what type of computer you’re installing it on. Click either Personal Computer or Work Computer, whichever applies.

-
Start the Scan
Click the “Scan” button. Malwarebytes will automatically update its detection database and begin checking your Mac for malware.

-
Wait for the Scan to Finish
Malwarebytes will scan your Mac for adware, browser hijackers, and other malicious programs. This can take a few minutes, so feel free to do something else — just check back occasionally to see the progress.

-
Quarantine the Detected Threats
When the scan is done, you’ll see a list of everything Malwarebytes found. Click the “Quarantine” button to remove all the threats at once.

-
Restart Your Mac
Malwarebytes will now remove all the malicious files it found. Some threats can only be fully removed after a reboot — if Malwarebytes asks you to restart, allow it. Once you’re logged back in, your Mac is clean.

That’s it — your Mac is now free of adware, rogue browser extensions, and other potentially harmful software.
If you are still experiencing problems while trying to remove a malicious program from your computer, please ask for help in our Mac Malware Removal Help & Support forum.
Run a Malware Scan with Malwarebytes for Android
Malwarebytes for Android automatically detects and removes dangerous threats like malware and ransomware so you don’t have to worry about your most-used device being compromised. Aggressive detection of adware and potentially unwanted programs keeps your Android phone or tablet running smooth.
-
Download Malwarebytes for Android.
You can download Malwarebytes for Android by clicking the link below.
Get Malwarebytes for AndroidOpens Google Play in a new tab.Want real-time protection? See Malwarebytes Premium for AndroidMalwarebytes for AndroidScans your phone and removes malware at no cost -
Install Malwarebytes for Android on your phone.
In the Google Play Store, tap “Install” to install Malwarebytes for Android on your device.

When the installation process has finished, tap “Open” to begin using Malwarebytes for Android. You can also open Malwarebytes by tapping on its icon in your phone menu or home screen.

-
Follow the on-screen prompts to complete the setup process
When Malwarebytes will open, you will see the Malwarebytes Setup Wizard which will guide you through a series of permissions and other setup options.
This is the first of two screens that explain the difference between the Premium and Free versions. Swipe this screen to continue.
Tap on “Got it” to proceed to the next step.
Malwarebytes for Android will now ask for a set of permissions that are required to scan your device and protect it from malware. Tap on “Give permission” to continue.
Tap on “Allow” to permit Malwarebytes to access the files on your phone.
-
Update database and run a scan with Malwarebytes for Android
You will now be prompted to update the Malwarebytes database and run a full system scan.

Click on “Update database” to update the Malwarebytes for Android definitions to the latest version, then click on “Run full scan” to perform a system scan.

-
Wait for the Malwarebytes scan to complete.
Malwarebytes will now start scanning your phone for adware and other malicious apps. This process can take a few minutes, so we suggest you do something else and periodically check on the status of the scan to see when it is finished.

-
Click on “Remove Selected”.
When the scan has been completed, you will be presented with a screen showing the malware infections that Malwarebytes for Android has detected. To remove the malicious apps that Malwarebytes has found, tap on the “Remove Selected” button.

-
Restart your phone.
Malwarebytes for Android will now remove all the malicious apps that it has found. To complete the malware removal process, Malwarebytes may ask you to restart your device.
That’s it — your Android phone is now clean — no more malicious apps, adware, or browser redirects.
If you are still having problems with your phone after completing these instructions, then please follow one of the steps:
- Restore your phone to factory settings by going to Settings > General management > Reset > Factory data reset.
- Ask for help in our Mobile Malware Removal Help & Support forum.
Stay Protected: Block Ads and Malicious Sites
Now that your device is clean, keep it that way. Most infections start with a malicious ad or a fake download button — so blocking them at the source is your best defense.
We recommend AdGuard, which blocks malicious ads, phishing pages, and dangerous redirects before they can reach you.
👉 Download AdGuard and browse safely
Frequently Asked Questions
Can a full mailbox reject incoming messages?
Yes, depending on the provider and plan. Check actual storage from the official account. That real possibility is exactly what makes this false warning persuasive.
Do email account details normally expire?
Providers may enforce password, subscription, or inactivity policies, but “account details” is unusually vague. Any required action should be verifiable inside the official service.
Why did the page know my email address?
The address can be embedded in the phishing link and displayed automatically. This simple technique does not require access to the real account.
What if I clicked but did not sign in?
Close the page. If no information was submitted and nothing downloaded, account theft is less likely. Review activity and scan the device if a file appeared.
Could the first password error have been real?
Assume the password was captured. Phishing pages often reject the first entry to collect another credential or imitate a normal login failure.
Should I delete messages to solve the warning?
Only after checking the real storage page. Deleting mail may free space in a genuinely full account, but it has no effect on the fabricated deadline in this phishing message.
The Bottom Line
The Email Account Details Will Expire scam combines a fake expiration date with a fake storage crisis, then funnels the recipient into a counterfeit customer portal.
Check quotas and account notices directly with the provider. If a password was submitted, treat the mailbox as compromised, change credentials, revoke sessions, inspect rules and recovery settings, and warn affected contacts.

Join the discussion
0 commentsShare your experience or ask a question about this article.
Discussion
Start the conversation
Have a question or something useful to share? Add the first comment.