

A message says your email provider is clearing unused accounts because its servers are congested. Your address is supposedly on the deletion list, and one button promises to save it. That warning can feel urgent even when you use the mailbox every day.
The Deleting All E-mails No Longer in Use scam is a credential-phishing campaign. The provider is not deleting your account, and the verification button is designed to lead you away from the real service and into a counterfeit login page.
Overview
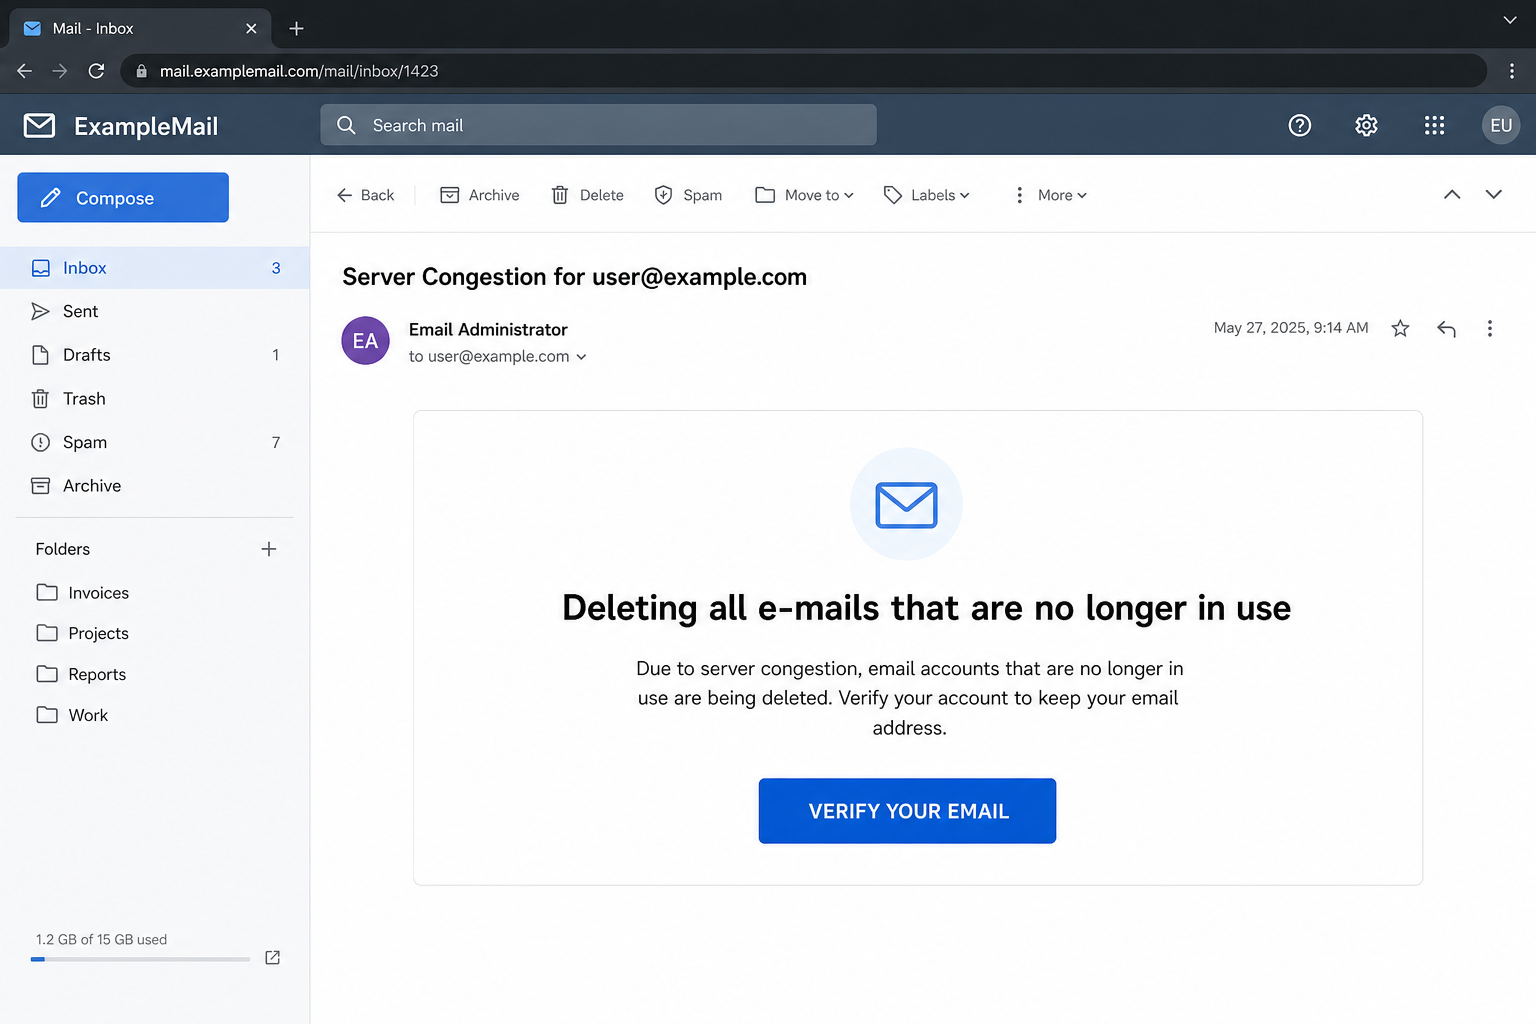
This email poses as an automated maintenance notice from the recipient’s mail provider. An observed version uses a subject such as “Server Congestion for [email address]” and claims inactive accounts are being removed to free storage capacity.
The recipient is told to click “VERIFY YOUR EMAIL” to keep the address. The message may not name a specific provider because its generic wording allows the same campaign to target Gmail, Outlook, Yahoo, workplace webmail, and privately hosted domains.
Server congestion is used as a technical-sounding excuse
Deleting customer accounts is not a normal response to temporary server congestion. Providers manage capacity through infrastructure, storage quotas, published inactivity policies, and authenticated notices inside the account.
The claim is intentionally vague. It sounds like an urgent back-end problem, yet it supplies no real incident number, policy link, storage reading, or notice that can be confirmed through the official service.
The verification button is the real danger
The email is built around one action. The visible label suggests a harmless confirmation, while the hidden destination can be a newly registered domain, compromised website, or cloud-hosted phishing page.
That page may identify the domain in the recipient’s address and imitate the matching provider. A Gmail address can receive a Google-style form, while a company address may see a generic corporate webmail screen.
The goal is control of the mailbox
- The current email address and password
- One-time codes or approval prompts
- Recovery phone numbers and alternate addresses
- Private messages, attachments, and contacts
- Password-reset access for connected online accounts
Reading the email alone does not verify, delete, or compromise the mailbox. Risk begins when the recipient follows the link, enters information, approves an unexpected sign-in, or downloads content supplied by the sender.
Why the Inactive Account Warning Feels Believable
Real services do have inactivity policies
Some providers publish rules for accounts that remain unused for long periods. Scammers borrow that familiar idea but remove the details that make a policy legitimate, such as the definition of inactivity, the relevant dates, and a notice visible after an official sign-in.
An account used regularly should not become “inactive” simply because an unsolicited message says so. Even if you have an older mailbox, verify its status by visiting the provider directly.
Email loss sounds permanent
A mailbox can contain years of family conversations, receipts, tax records, travel plans, photographs, and business documents. The possibility of losing that history encourages quick action.
The message usually gives the recipient only one apparent escape: click now. That narrow choice is a social-engineering device, not evidence of a real maintenance process.
The warning arrives where the fear is strongest
Receiving a deletion notice inside the mailbox can feel self-validating. In reality, anyone can send a message to an address. Delivery proves only that the sender knew the address, not that the sender manages the account.
The address may have come from a marketing list, public website, data breach, or previous phishing campaign. Including it in the subject line is easy personalization.
How the Deleting All E-mails That Are No Longer in Use Scam Works
Step 1: A bulk phishing email reaches active addresses
Attackers distribute the notice to large lists of consumer and business addresses. The message is intentionally provider-neutral so one template can work across many mail systems.
A display name such as “Email Administrator,” “Server Team,” or “Webmail Support” creates authority. The actual sender domain often has no relationship to the recipient’s provider.
Step 2: The message invents a congestion problem
The recipient is told that storage or server resources are under pressure. Accounts “no longer in use” will supposedly be removed as part of an urgent cleanup.
No explanation is given for why the active recipient was selected. The technical language is decorative and exists to make the decision sound automated and unavoidable.
Step 3: The email places the address on a deletion list
The warning may repeat the recipient’s full address and imply that failure to respond confirms abandonment. This reverses the burden of proof: silence is presented as consent to deletion.
Legitimate providers do not determine ownership through a password form opened from an unsolicited message. They already know which account received the notice.
Step 4: A verification button conceals an unrelated URL
The call-to-action uses reassuring language such as “Keep My Account” or “VERIFY YOUR EMAIL.” The underlying address may have no recognizable connection to the provider.
Shortened URLs and redirects can hide the final destination. HTTPS and a padlock only indicate an encrypted connection to that domain; they do not prove the domain belongs to the mail service.
Step 5: The landing page copies a familiar sign-in
The phishing site asks the victim to confirm the account with a username and password. Logos, colors, background images, and a prefilled address make the page feel familiar.
A password manager may refuse to autofill because the domain is wrong. That is an important warning, not a reason to type the password manually.
Step 6: Submitted information goes to the attacker
When the form is submitted, the data can be transmitted to a remote collection panel or messaging bot. A fake “incorrect password” response may appear even though the first entry was already recorded.
Some pages ask for another password, an authentication code, or approval of a sign-in notification. Each additional request is intended to overcome a different security layer.
Step 7: Criminals test the credentials quickly
Attackers may attempt the real mailbox while the victim is still viewing the fake page. If multi-factor authentication is enabled, the victim can receive a genuine code or approval request seconds later.
Never approve an authentication event you did not initiate through the official app. A real code appearing after a phishing submission is evidence that someone may be testing the stolen password.
Step 8: The mailbox is exploited and the scam spreads
After gaining access, an intruder can search for financial records, reset other passwords, add forwarding rules, and impersonate the owner in existing conversations.
A compromised business address is especially valuable. It can be used for invoice redirection, payroll fraud, document phishing, and convincing messages to coworkers or customers.
How to Verify a Real Account or Storage Notice
Open the provider independently
Use the app you normally use, a saved bookmark, or an address you type yourself. For workplace email, use the organization’s known sign-in portal or contact its help desk.
If maintenance is real, the authenticated account should show a matching notice, storage reading, or policy message. Do not use the email’s button to perform this check.
Check the provider’s published policy
Look for official information explaining inactivity, retention, and deletion. A genuine policy states what counts as activity and usually describes the notification process.
Compare the policy with your actual use. Regular sign-ins and recent sent mail directly contradict a claim that the mailbox has been abandoned.
Inspect the full sender and link domains
A familiar display name can be typed by anyone. Expand the sender details and compare the domain character by character with the provider’s official domain.
On desktop, hovering can reveal a link without opening it. On mobile, the safest option is to avoid interacting with the link and reach the service through its official app.
Ask support through a trusted channel
Use a phone number or help page obtained independently. A real representative should be able to confirm account status without asking you to reveal your password, authentication code, or recovery secret.
Warning Signs in the Deletion Email
- The account is described as inactive even though you use it.
- “Server congestion” is offered as the reason for deleting users.
- The provider is not clearly identified.
- The message creates an immediate deadline without citing a policy.
- The full sender domain does not belong to the provider.
- The verification button points to an unrelated site.
- The page asks for a current password to prevent deletion.
- A failed login encourages you to submit another password.
Perfect grammar and polished branding do not make a message genuine. Modern phishing kits can reproduce professional templates, while compromised accounts can send mail that passes some technical checks.
What an Attacker Can Change After Taking the Account
Forwarding and filtering rules
A hidden rule can copy incoming messages to an attacker or move security alerts out of sight. Criminals often search for conversations involving payments, contracts, password resets, and identity documents.
Review rules, delegates, forwarding addresses, blocked senders, automatic replies, and mail-client connections. Removing only the attacker’s device may leave a persistent rule behind.
Recovery and authentication settings
An intruder may add a phone number, alternate email, passkey, security key, app password, or connected application. These additions can preserve access after the victim changes the main password.
Use the provider’s “sign out everywhere” option and examine every recovery method. Revoke anything you do not recognize.
Messages and account relationships
Email often reveals which banks, stores, cloud services, and social networks a person uses. The attacker can request resets and delete the resulting notices.
Contacts may receive convincing messages from the real address. Warn them if the account sent unexpected links, documents, or payment requests.
Why the Page May Look Real Even When It Is Not
Website content is easy to copy. A logo, font, sign-in form, and help links can be reproduced without permission, and the attacker may send some buttons to the genuine provider to make the page appear complete.
The phishing site can also redirect to the real inbox after stealing the password. Ending on a legitimate page does not validate the earlier form. Check the domain where the password was actually entered.
Cloud hosting and a valid certificate provide reliable delivery and encryption, but neither certifies the business identity behind a page. Ownership of the displayed domain remains the key check.
How to Protect Important Email Accounts
Use a unique password or passkey for the mailbox. Reusing a password allows one stolen credential to unlock several accounts through automated credential-stuffing attempts.
Enable multi-factor authentication and prefer a passkey, hardware security key, or authenticator app. Still reject any prompt you did not initiate, because attackers may try to persuade you to approve their login.
Keep recovery information current and save recovery codes securely. Review recent security events periodically so you know what the provider’s real alerts and controls look like.
For organizations, require phishing-resistant authentication on administrator and finance accounts. Train employees to report suspicious messages promptly, even when they did not click.
What to Do if You Have Fallen Victim to This Scam
- Close the phishing page. Do not retry the password, enter a one-time code, or follow instructions to use another browser.
- Change the email password through the official service. Use a clean device if you downloaded anything or installed software during the interaction.
- Replace every reused password. Start with financial, workplace, cloud, shopping, and social accounts that use the same address.
- Sign out unknown sessions. Use the provider’s security controls to revoke active devices, tokens, app passwords, and connected applications.
- Restore recovery settings. Verify phone numbers, alternate addresses, passkeys, security keys, and authentication methods.
- Inspect mailbox configuration. Remove unfamiliar forwarding rules, filters, delegates, automatic replies, and POP or IMAP connections.
- Review recent activity. Look for sent messages, deleted alerts, password-reset requests, and sign-ins from devices or locations you do not recognize.
- Enable stronger authentication. A passkey or hardware security key offers better protection against many fake login pages.
- Notify your administrator. For a work or school mailbox, report the time, link, device, and information entered so logs can be reviewed.
- Warn affected contacts. Tell recipients to disregard unexpected messages sent from your address and verify payment requests by another channel.
- Check the device for malware. Run a Malwarebytes scan if a file downloaded, an extension appeared, or software was installed.
- Report and reduce future exposure. Use the provider’s phishing control, submit an FTC report when appropriate, and consider AdGuard to block known phishing and redirect domains.
Is Your Device Infected? Run a Free Malware Scan
Slow performance, constant pop-ups, or strange behavior? These are classic signs of a malware infection. The fastest way to find out is to scan your device with Malwarebytes Free — one of the most trusted malware removal tools available.
The free version detects and removes the most common threats, including:
- Adware — the cause of those annoying pop-ups
- Browser hijackers — unwanted redirects and changed homepages
- Trojans and spyware — hidden programs stealing your data
- Potentially unwanted programs (PUPs) — software you never asked for
👉 Select your device below — Windows, Mac, or Android — then follow the simple steps to download Malwarebytes, scan your system, and remove any threats it finds. The scan usually takes 5 to 20 minutes.
Run a Malware Scan with Malwarebytes for Windows
Malwarebytes is one of the most popular and trusted anti-malware tools for Windows — and it’s completely free for removing infections. It catches threats that many antivirus programs miss, including adware, browser hijackers, and trojans. Follow the steps below to scan and clean your PC in just a few minutes.
Download Malwarebytes
Click the button below to download the latest version of Malwarebytes for Windows from the official source. The free version is all you need — it will scan your computer and remove adware, browser hijackers, and other malicious software at no cost.
Download MalwarebytesOfficial installer for Windows 11 and 10. Your download starts right away.Want real-time protection? See Malwarebytes Premium Malwarebytes Free for WindowsScans and removes malware at no cost
-
Install Malwarebytes
When the download finishes, open your Downloads folder and double-click the MBSetup file. If Windows shows a User Account Control pop-up, click “Yes” to allow the installation.

Follow the On-Screen Prompts to Install Malwarebytes
The setup wizard will walk you through a few quick screens:
-
Choose where you’re installing the program — “Personal Computer” or “Work Computer” — then click Next.

-
Malwarebytes will now install on your device. This usually takes under a minute.

-
When installation is complete, the “Welcome to Malwarebytes” screen will open automatically.

-
On the final screen, click Open Malwarebytes to launch the program.

-
Enable “Scan for Rootkits”
Before scanning, turn on rootkit detection so Malwarebytes can find even the most hidden threats. Click the Settings gear icon on the left side of the screen.

In the settings menu, find “Scan for rootkits” and click the toggle so it turns blue.

Done? Click “Dashboard” in the left pane to return to the main screen.
Start the Scan
Click the blue Scan button. Malwarebytes will automatically update its virus database and start checking your computer for malware.

-
Wait for the Scan to Finish
The scan checks your entire system for browser hijackers and other malicious programs, so it can take 5 to 20 minutes depending on your computer. Feel free to do something else — just check back occasionally to see the progress.

-
Quarantine the Detected Threats
When the scan is done, you’ll see a list of everything Malwarebytes found — malware, adware, and potentially unwanted programs. Click the “Quarantine” button to remove all of them at once.

Malwarebytes will now remove the malicious files and registry entries and move them safely into quarantine.

-
Restart Your Computer
Some threats can only be fully removed after a reboot. If Malwarebytes asks you to restart, click Yes. Once you’re logged back in, Malwarebytes has finished removing the threats it found.

That’s it — your Windows PC is now clean of trojans, adware, and other malware, and should be back to running smoothly.
If you are still having problems with your computer after completing these instructions, then please follow one of the steps:
- Run a computer scan with ESET Online Scanner
- Ask for help in our Windows Malware Removal Help & Support forum.
Run a Malware Scan with Malwarebytes for Mac
Malwarebytes for Mac is a free on-demand scanner that removes the malware other security software tends to miss — adware, browser hijackers, and unwanted programs included. Cleaning an infected Mac with Malwarebytes has always been completely free, and it’s our go-to recommendation. Follow the steps below to scan and clean your Mac in just a few minutes.
-
Download Malwarebytes for Mac
Click the button below to download the latest version of Malwarebytes for Mac.
Download MalwarebytesOfficial installer for macOS. Your download starts right away.Want real-time protection? See Malwarebytes PremiumMalwarebytes Free for MacScans and removes malware at no cost -
Open the Malwarebytes setup file
When the download finishes, open your Downloads folder and double-click the setup file to begin the installation.

-
Follow the On-Screen Prompts to Install Malwarebytes
The Malwarebytes for Mac Installer will guide you through a few quick screens. Click “Continue” and keep following the prompts until the installation completes.



When the installation is complete, Malwarebytes opens to the Welcome to Malwarebytes screen. Click “Get started“.
-
Select “Personal Computer” or “Work Computer”
Malwarebytes will ask what type of computer you’re installing it on. Click either Personal Computer or Work Computer, whichever applies.

-
Start the Scan
Click the “Scan” button. Malwarebytes will automatically update its detection database and begin checking your Mac for malware.

-
Wait for the Scan to Finish
Malwarebytes will scan your Mac for adware, browser hijackers, and other malicious programs. This can take a few minutes, so feel free to do something else — just check back occasionally to see the progress.

-
Quarantine the Detected Threats
When the scan is done, you’ll see a list of everything Malwarebytes found. Click the “Quarantine” button to remove all the threats at once.

-
Restart Your Mac
Malwarebytes will now remove all the malicious files it found. Some threats can only be fully removed after a reboot — if Malwarebytes asks you to restart, allow it. Once you’re logged back in, your Mac is clean.

That’s it — your Mac is now free of adware, rogue browser extensions, and other potentially harmful software.
If you are still experiencing problems while trying to remove a malicious program from your computer, please ask for help in our Mac Malware Removal Help & Support forum.
Run a Malware Scan with Malwarebytes for Android
Malwarebytes for Android automatically detects and removes dangerous threats like malware and ransomware so you don’t have to worry about your most-used device being compromised. Aggressive detection of adware and potentially unwanted programs keeps your Android phone or tablet running smooth.
-
Download Malwarebytes for Android.
You can download Malwarebytes for Android by clicking the link below.
Get Malwarebytes for AndroidOpens Google Play in a new tab.Want real-time protection? See Malwarebytes Premium for AndroidMalwarebytes for AndroidScans your phone and removes malware at no cost -
Install Malwarebytes for Android on your phone.
In the Google Play Store, tap “Install” to install Malwarebytes for Android on your device.

When the installation process has finished, tap “Open” to begin using Malwarebytes for Android. You can also open Malwarebytes by tapping on its icon in your phone menu or home screen.

-
Follow the on-screen prompts to complete the setup process
When Malwarebytes will open, you will see the Malwarebytes Setup Wizard which will guide you through a series of permissions and other setup options.
This is the first of two screens that explain the difference between the Premium and Free versions. Swipe this screen to continue.
Tap on “Got it” to proceed to the next step.
Malwarebytes for Android will now ask for a set of permissions that are required to scan your device and protect it from malware. Tap on “Give permission” to continue.
Tap on “Allow” to permit Malwarebytes to access the files on your phone.
-
Update database and run a scan with Malwarebytes for Android
You will now be prompted to update the Malwarebytes database and run a full system scan.

Click on “Update database” to update the Malwarebytes for Android definitions to the latest version, then click on “Run full scan” to perform a system scan.

-
Wait for the Malwarebytes scan to complete.
Malwarebytes will now start scanning your phone for adware and other malicious apps. This process can take a few minutes, so we suggest you do something else and periodically check on the status of the scan to see when it is finished.

-
Click on “Remove Selected”.
When the scan has been completed, you will be presented with a screen showing the malware infections that Malwarebytes for Android has detected. To remove the malicious apps that Malwarebytes has found, tap on the “Remove Selected” button.

-
Restart your phone.
Malwarebytes for Android will now remove all the malicious apps that it has found. To complete the malware removal process, Malwarebytes may ask you to restart your device.
That’s it — your Android phone is now clean — no more malicious apps, adware, or browser redirects.
If you are still having problems with your phone after completing these instructions, then please follow one of the steps:
- Restore your phone to factory settings by going to Settings > General management > Reset > Factory data reset.
- Ask for help in our Mobile Malware Removal Help & Support forum.
Stay Protected: Block Ads and Malicious Sites
Now that your device is clean, keep it that way. Most infections start with a malicious ad or a fake download button — so blocking them at the source is your best defense.
We recommend AdGuard, which blocks malicious ads, phishing pages, and dangerous redirects before they can reach you.
👉 Download AdGuard and browse safely
Frequently Asked Questions
Do email providers ever delete inactive accounts?
Some do under published inactivity policies, but the status should be verifiable through the official account. A surprise password form reached through an email is not a safe verification process.
Why did the message know my email address?
The sender needed the address to deliver the email. Addresses also circulate through public pages, mailing lists, breaches, and prior correspondence. Repeating it is not proof of provider access.
Can server congestion really cause account deletion?
Providers manage temporary capacity problems without asking random users to surrender passwords. The vague congestion story is designed to make an invented cleanup sound technical.
What if the phishing link no longer opens?
Do not assume the campaign was harmless. The page may have been removed, blocked, or replaced. If you entered information while it worked, secure the account immediately.
Is the account safe if multi-factor authentication is enabled?
It is safer, but you must reject unexpected approvals and never enter codes on a page reached from the email. Review active sessions and authentication methods after any credential exposure.
Did opening the email infect my device?
Simply reading ordinary message text usually does not compromise an account. Risk increases if you opened an attachment, downloaded a file, installed software, or entered credentials on the linked site.
The Bottom Line
The Deleting All E-mails That Are No Longer in Use scam invents a server cleanup and places the recipient’s active address on a fake deletion list. Its verification button leads toward credential theft, not account protection.
Ignore the button and check the mailbox through the provider’s official app or website. If you entered a password, change it promptly, revoke sessions, inspect forwarding and recovery settings, and secure every account where the same credential was used.

Join the discussion
0 commentsShare your experience or ask a question about this article.
Discussion
Start the conversation
Have a question or something useful to share? Add the first comment.