

An electronic-signature notice says a revised contract from Binghatti is waiting for your approval. It warns that the file will be deleted in 24 hours, making a quick review feel responsible rather than risky.
The DocuSign Document Approval email scam uses that professional reflex against the recipient. The review button does not open a legitimate envelope; it leads to a fake sign-in page built to steal credentials.
Overview
The email borrows a familiar business workflow
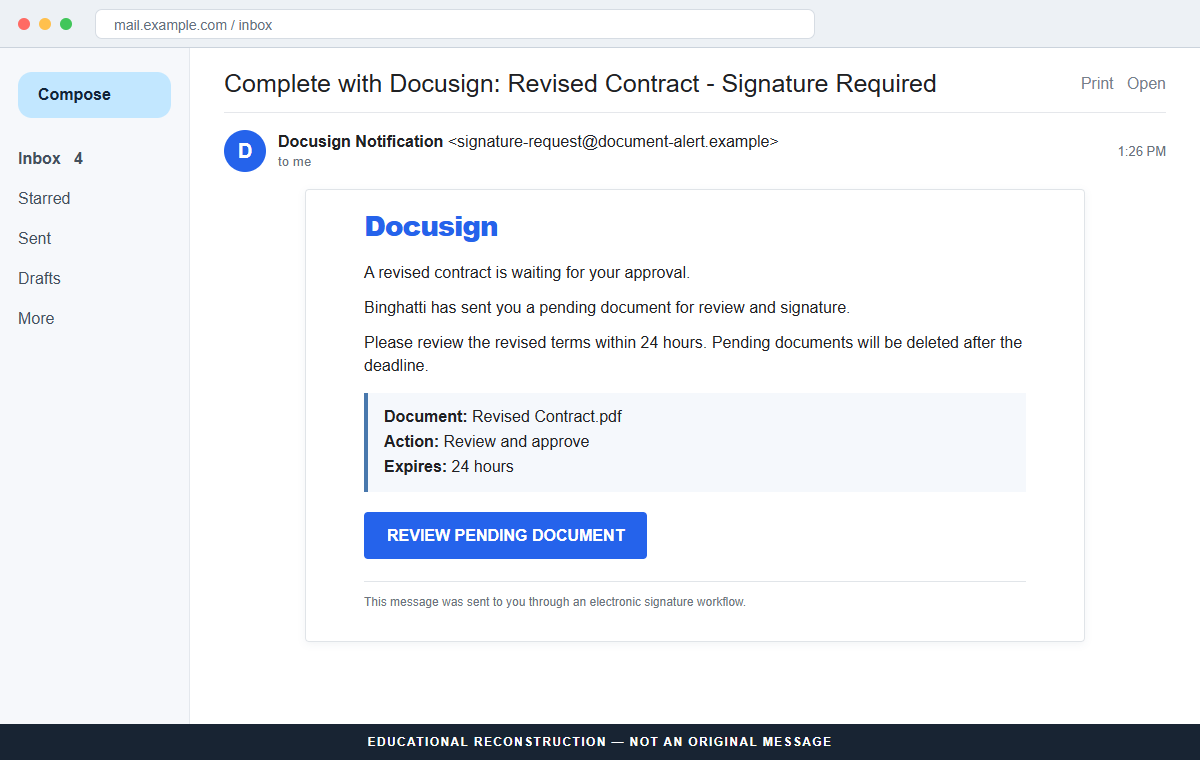
The subject can read “Complete with Docusign: Revised Contract – Signature Required.” Inside, the recipient is told that a revised agreement has been sent on behalf of Binghatti and now needs review, signature, or approval.
Contract revisions happen in property, procurement, employment, and vendor work, so the wording can fit many inboxes. The attacker does not need to know the recipient's exact role if curiosity and deadline pressure produce a click.
A 24-hour deletion warning suppresses verification
The message says pending documents will be deleted after 24 hours. That is a manufactured consequence intended to keep the recipient from calling the supposed sender or asking a legal, purchasing, or IT colleague about the envelope.
Legitimate signature requests can be urgent, but urgency does not remove the need to confirm the sender and document. A real business contact should be reachable through a known number or established email thread.
The review page harvests the recipient's login
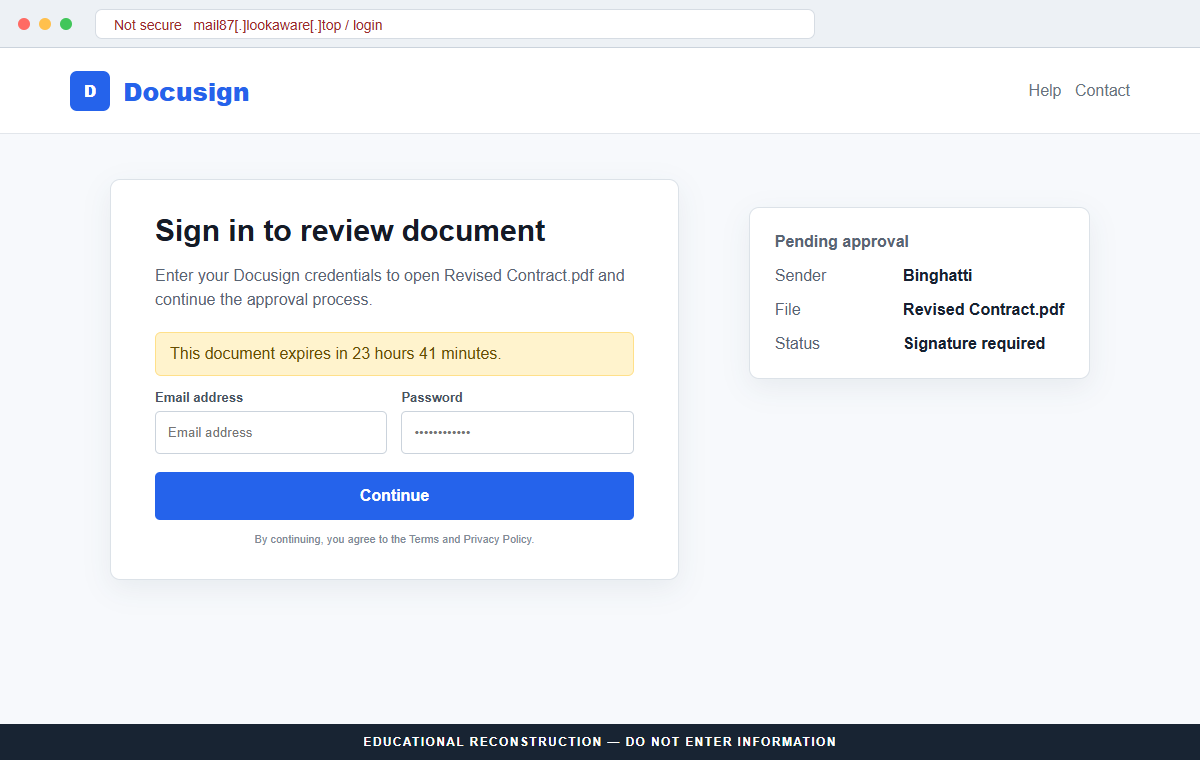
The button opens mail87[.]lookaware[.]top, an unrelated domain that imitates a Docusign login. Analysis of the page found that it requested an email address and password and was designed to capture those credentials.
The stolen password may belong to Docusign, the mailbox, or another reused account. In a company, one set of credentials can expose contracts, client names, payment instructions, and conversations useful for business email compromise.
- An unexpected revised contract supposedly comes from Binghatti.
- The subject says a Docusign signature or approval is required.
- The email threatens deletion after a 24-hour deadline.
- A REVIEW PENDING DOCUMENT button controls the next step.
- The link opens mail87[.]lookaware[.]top rather than Docusign.
- The fake page asks for an email address and password.
- Captured credentials can support mailbox and business-account takeover.
Why Unexpected Contract Notices Are Powerful Phishing Bait
Electronic-signature messages cross departmental boundaries. Executives, contractors, tenants, job candidates, customers, and vendors all receive them, which gives a broad phishing campaign a plausible reason to reach almost any professional inbox.
A document is also naturally confidential. Recipients may hesitate to ask coworkers about it and may accept a login requirement because they assume the sender is protecting sensitive material.
The word revised suggests an earlier conversation the recipient might have forgotten or that another colleague handled. That uncertainty can be enough to open a file supposedly sent by a recognized development or business name.
Attackers exploit workflow muscle memory. People are trained to click Review, Continue, or Sign inside genuine electronic-signature notifications. A copied button can trigger that practiced behavior before the address bar receives attention.
The safe response preserves the workflow but changes the route. Contact the named sender independently, open Docusign from a saved address, and use official document-access tools rather than the unexpected button.
What Docusign's Safety Guidance Says to Check
Analysis of this email classified it as phishing with no connection to Docusign. The fake page's purpose was to steal credentials under the cover of an approval request.
Docusign's Safety Center says official notifications come from @docusign.com or @docusign.net, while also warning that unexpected content deserves scrutiny even when a message appears authentic.
Docusign recommends opening docusign.com independently and using the Access Documents feature with the unique security code from a legitimate email. This avoids following an embedded link to an external login page.
For off-platform impersonation, Docusign's reporting guide says to forward the entire email as an attachment to verify@docusign.com and delete the original. Suspicious URLs can also be sent there for investigation.
The company has published broader warnings about credential-harvesting campaigns that use fake notifications, external pages, strict deadlines, and stolen branding. The exact sender, company name, document title, and host can change while the technique remains the same.
How the DocuSign Document Approval Email Scam Works
Step 1: An unexpected contract enters a real-looking workflow
The attacker sends a notification styled like an electronic-signature service. A subject about a revised contract or required signature is meant to look like an ordinary automated message rather than a personal sales pitch.
The sender can choose a company name associated with construction, real estate, procurement, finance, or another document-heavy field. Familiarity with the name may replace actual knowledge of the transaction.
Step 2: A named organization supplies borrowed context
The body says the envelope was sent on behalf of Binghatti or another business. The recipient may wonder whether a colleague, customer, recruiter, landlord, or supplier initiated it.
That ambiguity is deliberate. Instead of asking why the stranger contacted them, recipients search their memory for a possible relationship and may click to resolve the uncertainty.
Step 3: A 24-hour deadline turns review into an emergency
The message says the pending document will be deleted if it is not reviewed soon. A countdown may continue on the landing page to make the deadline appear connected with a live envelope.
Legitimate parties can resend an envelope and explain a deadline. The threat of immediate deletion should trigger independent confirmation, not faster credential entry.
Step 4: The review button leaves Docusign
The visible button says REVIEW PENDING DOCUMENT, but the destination belongs to lookaware[.]top in this campaign. The path may include words such as mail, secure, document, or login to distract from the real domain.
A redirect can briefly pass through another service. The final address where credentials are requested must still belong to the organization it claims to represent.
Step 5: A copied sign-in page captures credentials
The page repeats the sender, document name, expiration notice, and Docusign styling. These details preserve continuity from the email and make the login feel like the expected next step.
When the recipient submits an email and password, the page can transmit them immediately. It may then show an error, a blank document, or a redirect to the real Docusign site to reduce suspicion.
Step 6: The attacker tests the mailbox and business services
Criminals can try the password against the email provider, Docusign, Microsoft 365, Google Workspace, and other services. Reused credentials make one fake form a key to several accounts.
A successful mailbox login can expose real contracts and payment threads. The attacker may add forwarding rules, study writing patterns, and wait for a high-value invoice or bank-detail change.
Step 7: A compromised account creates convincing internal fraud
Messages sent from a real employee mailbox can ask colleagues to review another document, approve a payment, or change supplier banking information. The original victim becomes the trusted sender in the next stage.
That is why business users must report the incident to IT quickly. Resetting one password without checking sessions, rules, applications, and connected accounts can leave the attacker in place.
Company and Checkout Checks
Verify the person or business that supposedly sent the envelope
Use a known telephone number, previous thread, official company directory, or established account manager. Ask for the document title and security code without replying to the suspicious message.
A company name in the email is not proof that the company initiated it. Attackers choose names that create curiosity or fit the recipient's industry.
Check the sender and notification domains
Expand the full From and Reply-To fields. Docusign says official notifications use its recognized domains, but a legitimate-looking sender does not excuse an external login destination or unexpected content.
Email forwarding and compromised platforms can complicate sender checks. Combine the domain check with independent confirmation and official document access.
Use the security code on Docusign's own site
A legitimate envelope notification includes a security code that can be entered through the Access Documents route reached directly from docusign.com. This lets the recipient avoid the email's button.
If there is no code, no matching account activity, or no confirmation from the sender, do not create credentials on an outside page to discover what the document contains.
Treat an unrelated login domain as a failed checkout
The domain mail87[.]lookaware[.]top does not become a Docusign property because it displays a logo and password form. The registrable domain tells you which site receives the information.
Do not enter sample credentials or continue after an error. Close the page, record the defanged address, and report it through Docusign and your organization's security team.
Warning Signs to Check Before You Act
- You did not expect a revised contract from the named organization.
- The email supplies little context beyond a generic document title.
- A 24-hour deletion threat discourages checking with colleagues.
- The sender or Reply-To domain is outside recognized Docusign domains.
- The review link opens lookaware[.]top or another unrelated site.
- The fake page asks for an email or workplace password.
- There is no independently confirmed security code or envelope.
- The message cannot be found in the official Docusign account.
- A login error appears before any document is displayed.
- The supposed sender cannot confirm the contract through a known channel.
An authentic contract can survive a verification call. When the sender, envelope, and final domain cannot be confirmed without using the email's own route, do not sign in. The 24-hour warning is a reason to slow down, not speed up.
What to Do if You Have Fallen Victim to This Scam
- Change the submitted password from a clean device. Go directly to the genuine email, Docusign, Microsoft, Google, or other affected account. Set a unique password and update every service where the same or a similar password was used.
- Enable phishing-resistant multi-factor authentication. Use a security key or passkey where available, followed by an authenticator app. Review registered methods and remove unknown telephone numbers, devices, app passwords, and recovery addresses.
- Revoke sessions and connected applications. Sign out everywhere and inspect active sessions, OAuth grants, browser sessions, and enterprise applications. A password change may not terminate every token the attacker already obtained.
- Audit mailbox rules and delegated access. Check forwarding, inbox rules, delegates, automatic replies, sent items, deleted messages, and hidden filters. Remove anything unfamiliar and preserve screenshots for the incident record.
- Notify IT, legal, and finance quickly. Business accounts may expose confidential documents and payment threads. Ask the security team to review logs and tell finance to verify bank-detail changes, urgent approvals, and invoices through a second channel.
- Scan any device that received downloads. Run Malwarebytes or another trusted security scanner if the page delivered an attachment, browser extension, or remote-access tool. Remove unknown software and apply operating-system and browser updates.
- Add blocking without relying on it alone. AdGuard or another reputable DNS and content blocker may stop known phishing destinations. New domains can appear quickly, so account recovery and human verification remain necessary.
- Contact the real document sender independently. Tell the organization that its name was used and ask whether any genuine envelope exists. Do not reply to the original email or use a telephone number listed inside the suspected document.
- Report the email to Docusign. Forward the entire message as an attachment to verify@docusign.com according to Docusign's official guidance. Use the Report Abuse feature for a suspicious on-platform envelope.
- Watch for business email compromise follow-ups. Warn colleagues that recent messages from the account may be fraudulent. Require voice or in-person confirmation for payment changes, sensitive files, password resets, and new signature requests.
Is Your Device Infected? Run a Free Malware Scan
Slow performance, constant pop-ups, or strange behavior? These are classic signs of a malware infection. The fastest way to find out is to scan your device with Malwarebytes Free — one of the most trusted malware removal tools available.
The free version detects and removes the most common threats, including:
- Adware — the cause of those annoying pop-ups
- Browser hijackers — unwanted redirects and changed homepages
- Trojans and spyware — hidden programs stealing your data
- Potentially unwanted programs (PUPs) — software you never asked for
👉 Select your device below — Windows, Mac, or Android — then follow the simple steps to download Malwarebytes, scan your system, and remove any threats it finds. The scan usually takes 5 to 20 minutes.
Run a Malware Scan with Malwarebytes for Windows
Malwarebytes is one of the most popular and trusted anti-malware tools for Windows — and it’s completely free for removing infections. It catches threats that many antivirus programs miss, including adware, browser hijackers, and trojans. Follow the steps below to scan and clean your PC in just a few minutes.
Download Malwarebytes
Click the button below to download the latest version of Malwarebytes for Windows from the official source. The free version is all you need — it will scan your computer and remove adware, browser hijackers, and other malicious software at no cost.
Download MalwarebytesOfficial installer for Windows 11 and 10. Your download starts right away.Want real-time protection? See Malwarebytes Premium Malwarebytes Free for WindowsScans and removes malware at no cost
-
Install Malwarebytes
When the download finishes, open your Downloads folder and double-click the MBSetup file. If Windows shows a User Account Control pop-up, click “Yes” to allow the installation.

Follow the On-Screen Prompts to Install Malwarebytes
The setup wizard will walk you through a few quick screens:
-
Choose where you’re installing the program — “Personal Computer” or “Work Computer” — then click Next.

-
Malwarebytes will now install on your device. This usually takes under a minute.

-
When installation is complete, the “Welcome to Malwarebytes” screen will open automatically.

-
On the final screen, click Open Malwarebytes to launch the program.

-
Enable “Scan for Rootkits”
Before scanning, turn on rootkit detection so Malwarebytes can find even the most hidden threats. Click the Settings gear icon on the left side of the screen.

In the settings menu, find “Scan for rootkits” and click the toggle so it turns blue.

Done? Click “Dashboard” in the left pane to return to the main screen.
Start the Scan
Click the blue Scan button. Malwarebytes will automatically update its virus database and start checking your computer for malware.

-
Wait for the Scan to Finish
The scan checks your entire system for browser hijackers and other malicious programs, so it can take 5 to 20 minutes depending on your computer. Feel free to do something else — just check back occasionally to see the progress.

-
Quarantine the Detected Threats
When the scan is done, you’ll see a list of everything Malwarebytes found — malware, adware, and potentially unwanted programs. Click the “Quarantine” button to remove all of them at once.

Malwarebytes will now remove the malicious files and registry entries and move them safely into quarantine.

-
Restart Your Computer
Some threats can only be fully removed after a reboot. If Malwarebytes asks you to restart, click Yes. Once you’re logged back in, Malwarebytes has finished removing the threats it found.

That’s it — your Windows PC is now clean of trojans, adware, and other malware, and should be back to running smoothly.
If you are still having problems with your computer after completing these instructions, then please follow one of the steps:
- Run a computer scan with ESET Online Scanner
- Ask for help in our Windows Malware Removal Help & Support forum.
Run a Malware Scan with Malwarebytes for Mac
Malwarebytes for Mac is a free on-demand scanner that removes the malware other security software tends to miss — adware, browser hijackers, and unwanted programs included. Cleaning an infected Mac with Malwarebytes has always been completely free, and it’s our go-to recommendation. Follow the steps below to scan and clean your Mac in just a few minutes.
-
Download Malwarebytes for Mac
Click the button below to download the latest version of Malwarebytes for Mac.
Download MalwarebytesOfficial installer for macOS. Your download starts right away.Want real-time protection? See Malwarebytes PremiumMalwarebytes Free for MacScans and removes malware at no cost -
Open the Malwarebytes setup file
When the download finishes, open your Downloads folder and double-click the setup file to begin the installation.

-
Follow the On-Screen Prompts to Install Malwarebytes
The Malwarebytes for Mac Installer will guide you through a few quick screens. Click “Continue” and keep following the prompts until the installation completes.



When the installation is complete, Malwarebytes opens to the Welcome to Malwarebytes screen. Click “Get started“.
-
Select “Personal Computer” or “Work Computer”
Malwarebytes will ask what type of computer you’re installing it on. Click either Personal Computer or Work Computer, whichever applies.

-
Start the Scan
Click the “Scan” button. Malwarebytes will automatically update its detection database and begin checking your Mac for malware.

-
Wait for the Scan to Finish
Malwarebytes will scan your Mac for adware, browser hijackers, and other malicious programs. This can take a few minutes, so feel free to do something else — just check back occasionally to see the progress.

-
Quarantine the Detected Threats
When the scan is done, you’ll see a list of everything Malwarebytes found. Click the “Quarantine” button to remove all the threats at once.

-
Restart Your Mac
Malwarebytes will now remove all the malicious files it found. Some threats can only be fully removed after a reboot — if Malwarebytes asks you to restart, allow it. Once you’re logged back in, your Mac is clean.

That’s it — your Mac is now free of adware, rogue browser extensions, and other potentially harmful software.
If you are still experiencing problems while trying to remove a malicious program from your computer, please ask for help in our Mac Malware Removal Help & Support forum.
Run a Malware Scan with Malwarebytes for Android
Malwarebytes for Android automatically detects and removes dangerous threats like malware and ransomware so you don’t have to worry about your most-used device being compromised. Aggressive detection of adware and potentially unwanted programs keeps your Android phone or tablet running smooth.
-
Download Malwarebytes for Android.
You can download Malwarebytes for Android by clicking the link below.
Get Malwarebytes for AndroidOpens Google Play in a new tab.Want real-time protection? See Malwarebytes Premium for AndroidMalwarebytes for AndroidScans your phone and removes malware at no cost -
Install Malwarebytes for Android on your phone.
In the Google Play Store, tap “Install” to install Malwarebytes for Android on your device.

When the installation process has finished, tap “Open” to begin using Malwarebytes for Android. You can also open Malwarebytes by tapping on its icon in your phone menu or home screen.

-
Follow the on-screen prompts to complete the setup process
When Malwarebytes will open, you will see the Malwarebytes Setup Wizard which will guide you through a series of permissions and other setup options.
This is the first of two screens that explain the difference between the Premium and Free versions. Swipe this screen to continue.
Tap on “Got it” to proceed to the next step.
Malwarebytes for Android will now ask for a set of permissions that are required to scan your device and protect it from malware. Tap on “Give permission” to continue.
Tap on “Allow” to permit Malwarebytes to access the files on your phone.
-
Update database and run a scan with Malwarebytes for Android
You will now be prompted to update the Malwarebytes database and run a full system scan.

Click on “Update database” to update the Malwarebytes for Android definitions to the latest version, then click on “Run full scan” to perform a system scan.

-
Wait for the Malwarebytes scan to complete.
Malwarebytes will now start scanning your phone for adware and other malicious apps. This process can take a few minutes, so we suggest you do something else and periodically check on the status of the scan to see when it is finished.

-
Click on “Remove Selected”.
When the scan has been completed, you will be presented with a screen showing the malware infections that Malwarebytes for Android has detected. To remove the malicious apps that Malwarebytes has found, tap on the “Remove Selected” button.

-
Restart your phone.
Malwarebytes for Android will now remove all the malicious apps that it has found. To complete the malware removal process, Malwarebytes may ask you to restart your device.
That’s it — your Android phone is now clean — no more malicious apps, adware, or browser redirects.
If you are still having problems with your phone after completing these instructions, then please follow one of the steps:
- Restore your phone to factory settings by going to Settings > General management > Reset > Factory data reset.
- Ask for help in our Mobile Malware Removal Help & Support forum.
Stay Protected: Block Ads and Malicious Sites
Now that your device is clean, keep it that way. Most infections start with a malicious ad or a fake download button — so blocking them at the source is your best defense.
We recommend AdGuard, which blocks malicious ads, phishing pages, and dangerous redirects before they can reach you.
👉 Download AdGuard and browse safely
Frequently Asked Questions
Is the revised Binghatti contract email genuine?
The documented campaign is not. It used an unrelated login page to capture credentials and had no connection with Docusign.
Does Docusign delete pending documents after 24 hours?
Envelope settings can vary, but a short deadline in an unexpected email is not proof. Confirm the request with the sender and use Docusign's official access method.
How can I open a Docusign document without clicking the email button?
Go directly to docusign.com and use Access Documents with the unique security code from a legitimate notification. Confirm the sender separately if the request is unexpected.
Which domains send official Docusign notifications?
Docusign's safety guidance identifies @docusign.com and @docusign.net. Still inspect unexpected content and final links because legitimate platforms and addresses can be abused.
Where should I send a fake Docusign email?
Docusign advises forwarding an off-platform impersonation email as an attachment to verify@docusign.com. On-platform envelopes can be reported with the built-in Report Abuse feature.
What if I entered a work password on the fake page?
Change it immediately, contact IT, revoke sessions, inspect mailbox rules, and review connected applications. Business credentials can support payment fraud and attacks on colleagues.
The Bottom Line
The DocuSign Document Approval email scam hides credential theft inside an ordinary business task. A revised contract, known company name, and 24-hour deadline are there to make the recipient follow the button instead of verifying the envelope.
Contact the sender through a known channel and access documents from docusign.com. Never enter email or workplace credentials on an unrelated domain simply to learn what an unexpected file contains.
If information was submitted, treat the mailbox and connected business services as exposed. Reset credentials, revoke access, involve IT, report the message to Docusign, and warn colleagues about follow-up approval or payment requests.

Join the discussion
0 commentsShare your experience or ask a question about this article.
Discussion
Start the conversation
Have a question or something useful to share? Add the first comment.