A blocked sign-in alert usually feels helpful. It suggests the security system noticed trouble and stopped an intruder before access occurred.
The cPanel Webmail message examined here uses that relief carefully, then asks the recipient to make one urgent decision.
Overview
The warning delivered by the supposed security team
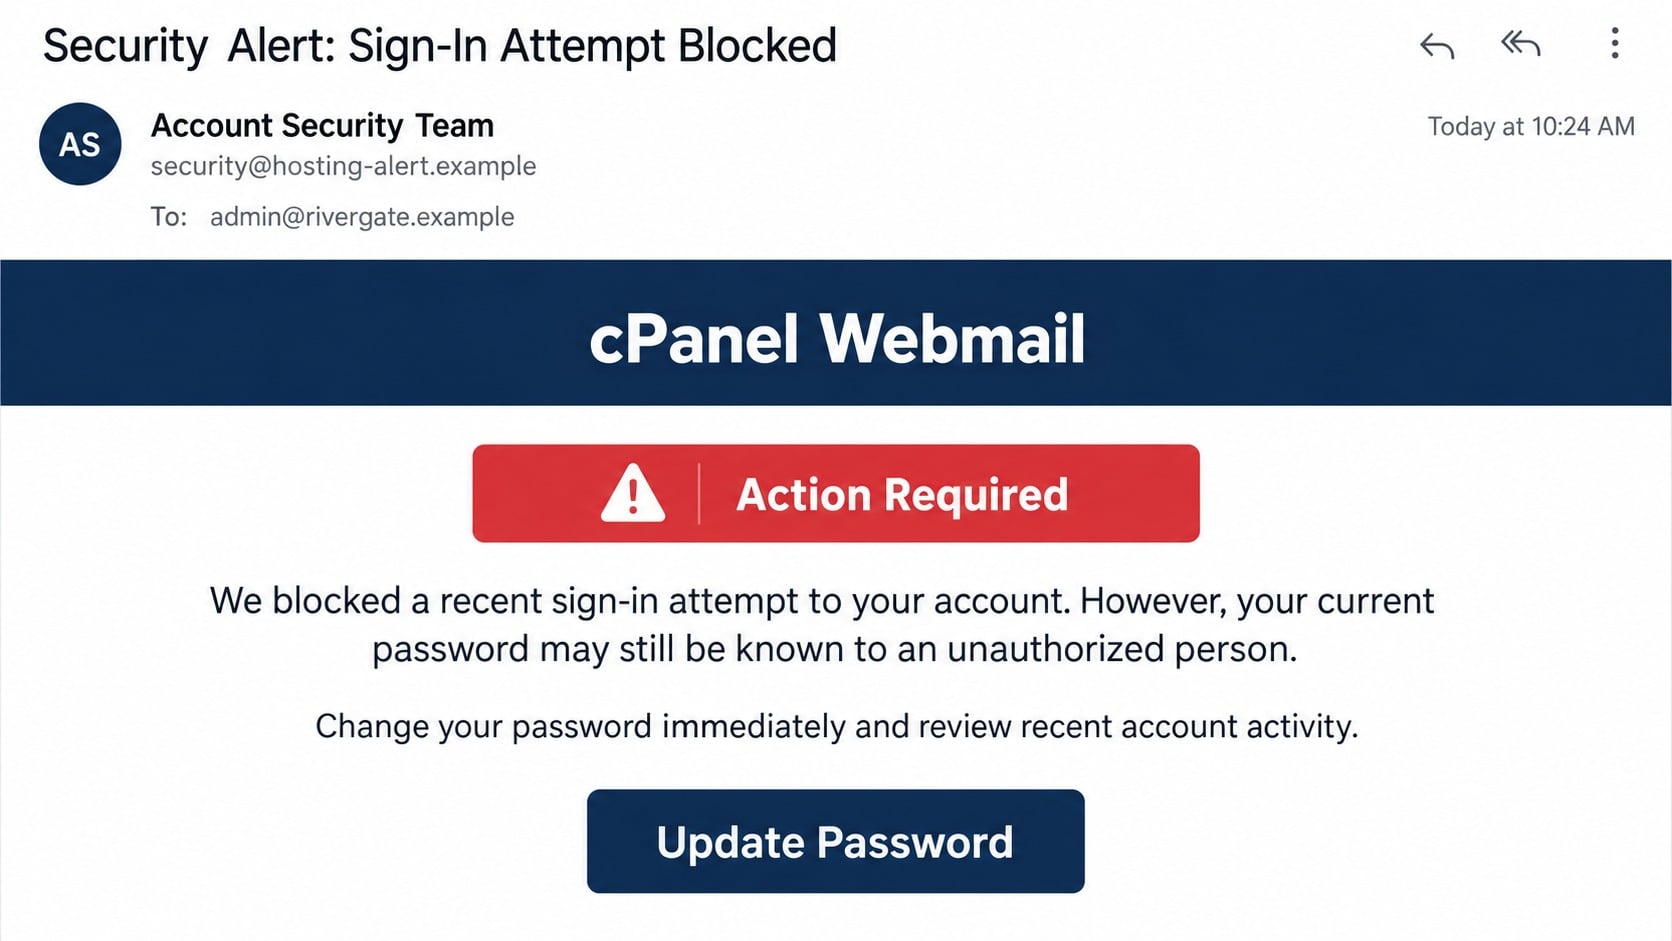
The email arrives with the subject “Security Alert: Sign-In Attempt Blocked.”
It claims to come from an “Account Security Team” and presents a cPanel Webmail heading.
The message says a recent attempt to enter the recipient’s account was blocked.
It then introduces a second concern: the unauthorized person may still know the current password and could try again.
An “Update Password” button promises a quick way to secure the account and review unfamiliar activity.
The deceptive characters hidden inside the button
In the observed email, letters inside the word “Password” were replaced with lookalike characters from the Cyrillic alphabet.
The result appears normal during a quick read, yet the underlying text differs from the expected English spelling.
This homoglyph technique can interfere with simple filters that scan for phrases commonly used in phishing.
It also reveals deliberate construction. A genuine security team has no reason to disguise the label of its password button.
The credential theft route behind the alert
The campaign’s destination was no longer available during later inspection.
Evidence from the message indicates that it led toward a fake cPanel Webmail login or an adaptive page imitating the recipient’s provider.
The complete warning pattern includes:
An alarming security subject sent without recognizable hosting context.
A claim that protection succeeded, followed by urgent pressure.
No IP address, time, device, server, or account identifier in the email.
A button containing disguised lookalike characters.
A destination outside the known hosting or webmail domain.
A request to submit the same password supposedly known by an attacker.
cPanel is not responsible for this campaign. Criminals are borrowing its name to make an ordinary credential request sound like verified security advice.
How the cPanel Blocked Sign-In Attempt Email Scam Works
Step 1: A defensive-sounding alert interrupts the inbox
Many phishing messages threaten that an account will be closed or compromised.
This campaign begins differently by saying a security control already protected the user.
That opening creates relief and gives the supposed sender credibility before the urgent request appears.
The recipient may think the system must be genuine because it claims to have blocked something.
No attacker actually needed to attempt a login.
The sender can make the same claim to every address on a mailing list without knowing whether the recipient uses cPanel.
Step 2: The message turns a blocked event into an active emergency
If the attempt was stopped, a cautious reader might decide no further action is necessary.
The email prevents that conclusion by claiming the intruder may possess the password.
That possibility sounds serious and cannot be disproved from the inbox alone.
The victim is told to change the password immediately and review recent account activity.
Both recommendations are sensible in a genuine incident.
The deception lies in directing those actions through the attacker’s link rather than the real account.
Step 3: Homoglyphs help the call to action avoid inspection
Cyrillic and Latin alphabets contain characters that can look nearly identical in common fonts.
Attackers substitute one alphabet for another while preserving a readable visual word.
A person sees “Update Password,” but a filter may see a different sequence of Unicode characters.
Homoglyphs can also appear in sender names, domains, and filenames.
The technique is not accidental decoration.
It shows that the author considered how automated defenses interpret the message and tried to create a mismatch.
Step 4: The button opens a fraudulent verification page
Clicking the update button moves the recipient to a website controlled or selected by the campaign operator.
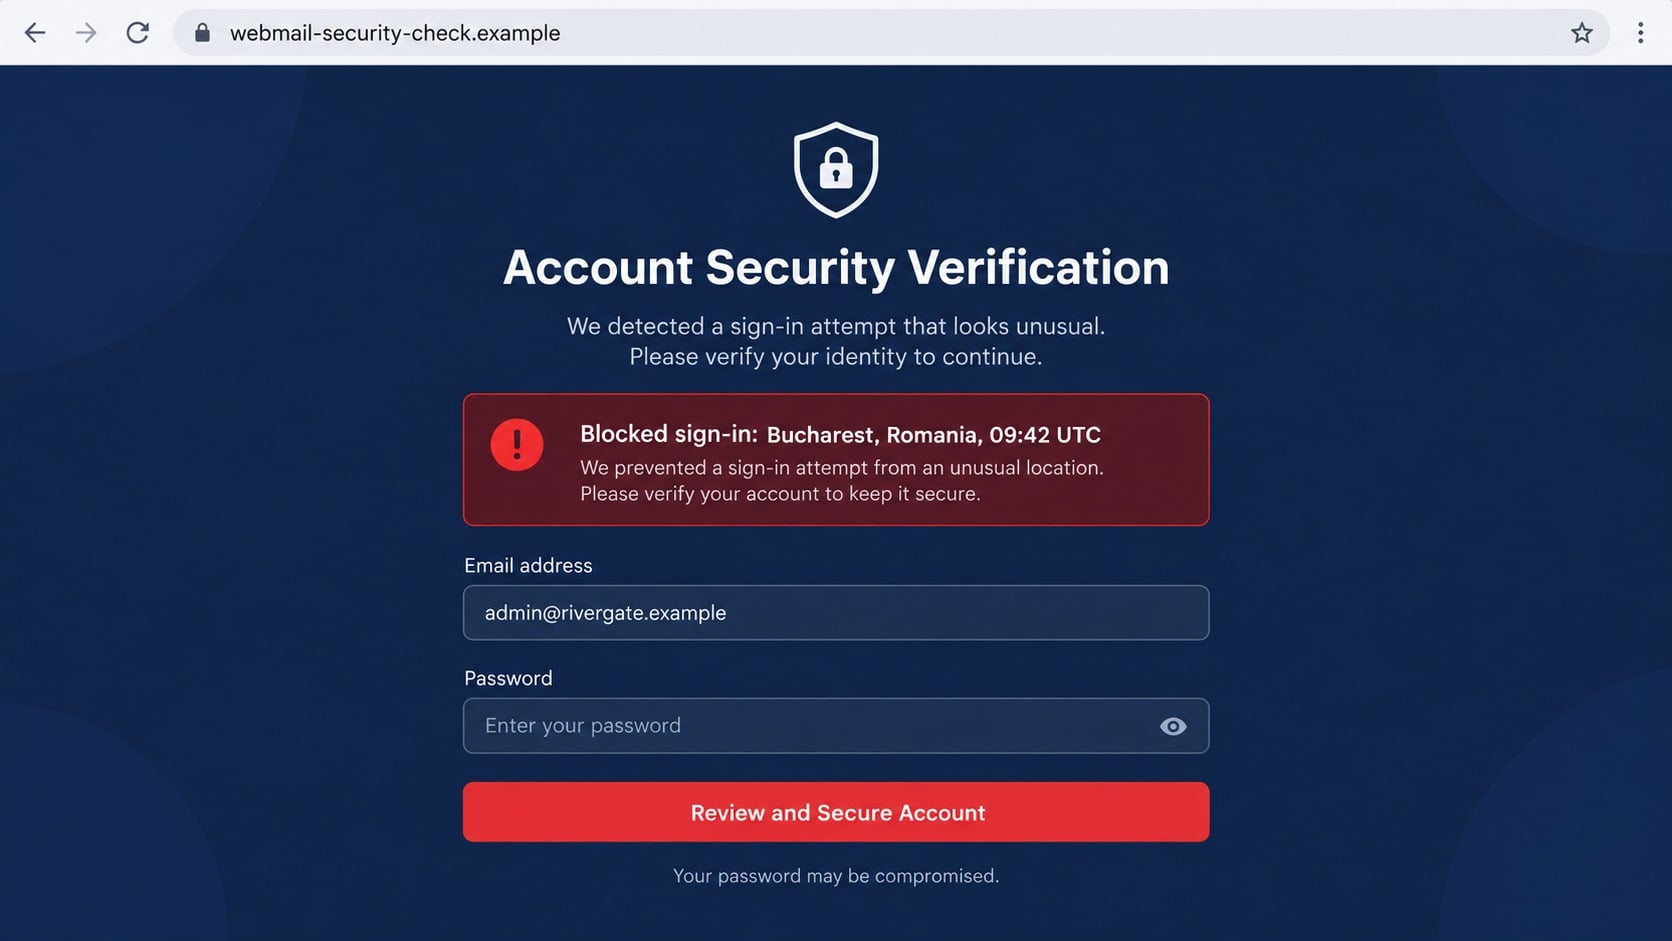
The page may reproduce a webmail login, cPanel-inspired design, or the branding associated with the victim’s email address.
A location and timestamp can be added to make the fictional sign-in event feel specific.
Those details are page content, not evidence from the real account.
The registered domain remains outside the hosting provider’s normal environment.
A valid encryption certificate protects the connection but does not verify the story or page owner.
Step 5: The security form captures the current password
The page asks the victim to enter credentials before reviewing activity or securing the account.
Submitting the form sends the password to the phishing operator.
It does not change the password inside cPanel because the fraudulent site lacks authorized account access.
The page may reject the first attempt and request another entry.
That response can collect a corrected password or an alternative used on another service.
A final redirect may conceal the theft by making the experience look like an expired session.
Step 6: The captured account supports persistent access and impersonation
The operator can test the credentials against webmail, hosting portals, and common identity providers.
If successful, they may read messages, create forwarding rules, or connect applications that retain access.
A hosting account can expose websites, files, databases, backups, domains, and additional mailboxes, depending on assigned permissions.
The attacker may send new security alerts from the compromised domain.
They can also study invoices, contacts, and projects before launching business email compromise.
Password reuse extends the danger to unrelated accounts that never used cPanel.
Why a Blocked Sign-In Story Is So Effective
It combines reassurance with fear
The first sentence says the defense worked. The next says the danger remains.
This emotional shift creates trust and urgency in a compact space.
Recipients feel grateful to the supposed security system and are more willing to follow its instructions.
A calm independent login interrupts that sequence and allows evidence to replace emotion.
The recommended action sounds responsible
Changing an exposed password is genuinely good advice.
Scammers exploit that truth by controlling where the recipient performs the action.
The safest response is to close the email and open the known hosting account separately.
Correct advice delivered through an unverified link can still be the mechanism of theft.
Most users cannot instantly identify their hosting stack
Small-business owners may recognize cPanel without remembering which provider operates it or what the exact login domain is.
Employees may use webmail without knowing the underlying control panel.
That ambiguity lets a mass email appear relevant to many recipients.
Keeping the approved access address documented removes the need to guess during an alert.
The Risks of Giving Away Webmail or Hosting Credentials
Silent mailbox monitoring
An intruder may avoid visible changes after the first login.
They can read conversations, search attachments, and identify high-value relationships.
Forwarding rules may copy messages externally, while filters hide alerts from the owner.
This quiet phase helps criminals prepare fraud that uses authentic names, timing, and context.
Website and domain compromise
Broader cPanel access can allow changes to website files, databases, DNS settings, redirects, and scheduled jobs.
Attackers may inject spam pages, malicious scripts, or hidden administrators.
Visitors and customers can be exposed even when the mailbox owner notices nothing unusual.
Recovery requires reviewing hosted assets, not merely restoring one email password.
Account recovery abuse
Email often receives reset links for financial, cloud, shopping, and workplace accounts.
Mailbox access allows an attacker to request those resets and delete the evidence.
Recovery addresses and multifactor methods may also be changed.
Fast session revocation and settings review can prevent the initial compromise from spreading further.
Sender, Alert, Domain, and Account Activity Verification Checks
Identify the real account security authority
Determine which hosting provider or administrator manages the mailbox.
Use an old invoice, welcome message, saved bookmark, or internal support directory.
Compare the full sender address with prior verified notices.
A display name such as “Account Security Team” carries no technical authority.
Contact the provider through independently found support details when ownership remains uncertain.
Look for evidence of the claimed sign-in
Real security notices often identify a time, location, IP address, browser, device, or authentication result.
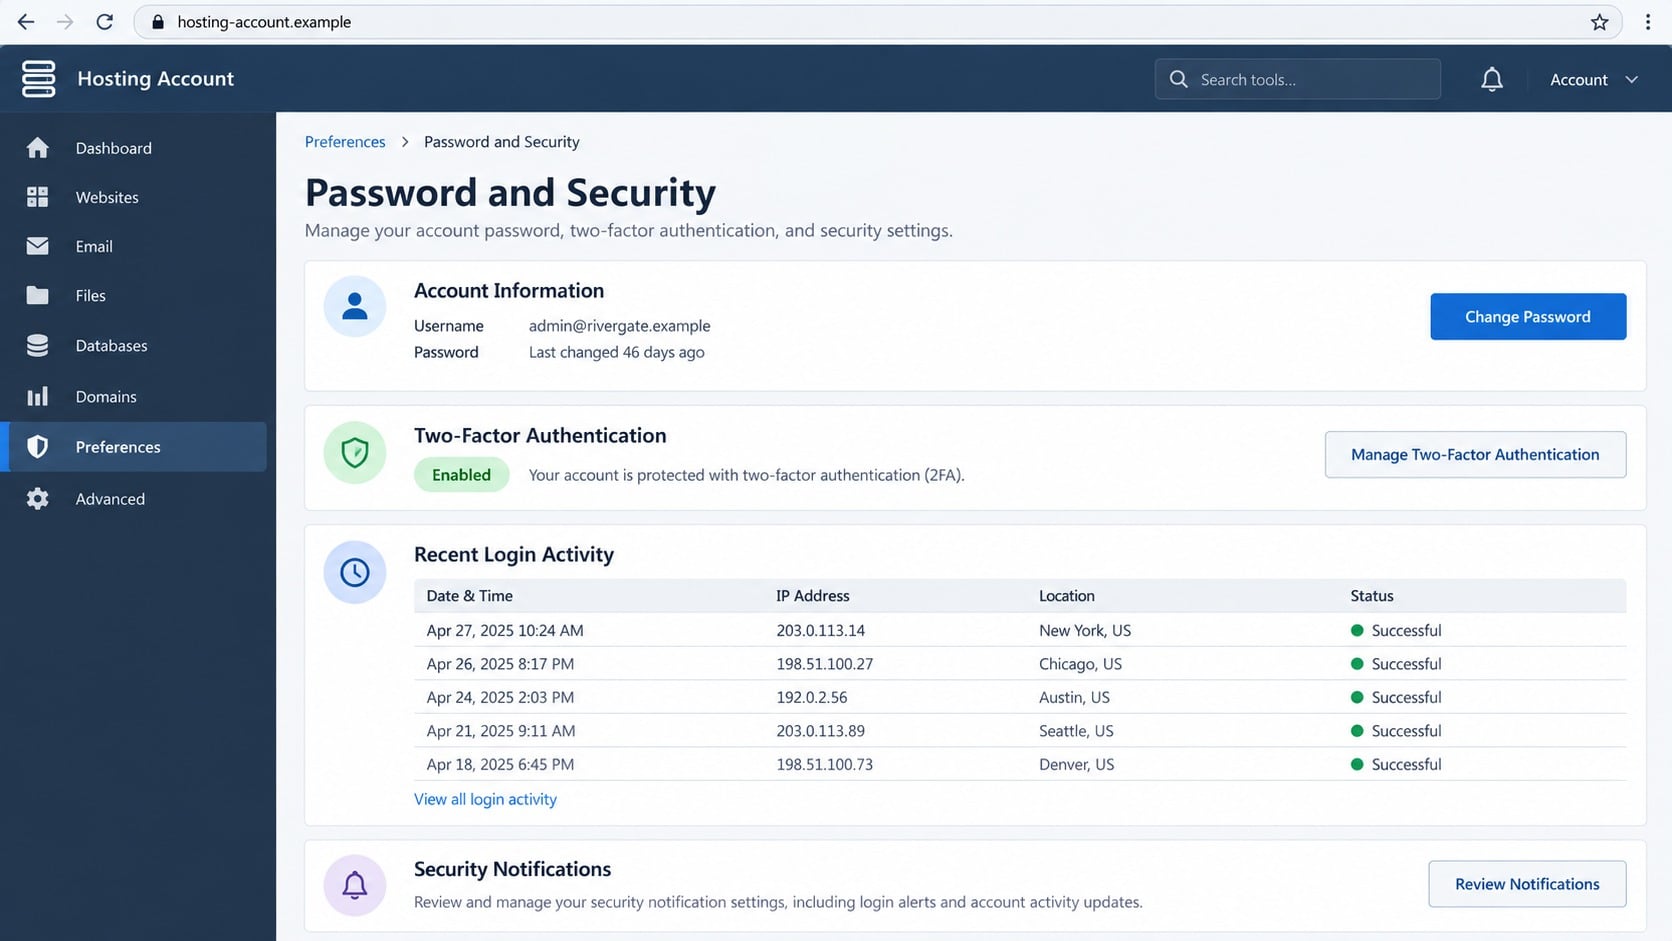
Open the genuine account and compare its login history.
Do not trust incident details shown only on the linked page.
If no event appears, preserve the email as a probable phishing attempt.
If an unfamiliar event does appear, secure the account through the genuine interface.
Inspect the button text and destination
Unusual characters, spacing, or fonts can indicate filter evasion.
Hover over the button on a desktop browser without clicking.
Compare the destination with the provider’s approved registered domain.
Do not assume a lock icon or “security” label proves ownership.
Report the message so specialists can inspect redirects without exposing other users.
Review security settings independently
Navigate to cPanel or webmail through a known address.
Check recent logins, active sessions, two-factor methods, contact details, connected applications, forwarders, and filters.
Change the password from the account’s Password and Security area when evidence warrants it.
Ask the hosting provider to review server logs if the account lacks visible activity history.
Independent access makes every decision verifiable.
Building a Safer Response to Genuine Login Alerts
Treat the email as a notification, never as the only route to the account.
Open the hosting panel from a saved bookmark and inspect activity there.
Use a password manager because it will normally refuse to fill credentials on an unfamiliar domain.
Enable two-factor authentication and login notices through the genuine settings.
Administrators should document approved domains and provide a clear reporting channel for suspicious security messages.
They can also restrict hosting permissions so routine mailbox users cannot modify websites or databases.
Regularly review forwarding rules and connected applications, especially after any unexplained authentication alert.
Configure alerts for successful logins, contact-detail changes, and newly linked authentication providers when those features are available.
Keep emergency provider contacts outside the affected mailbox so they remain accessible during an account takeover.
Require a second administrator to approve high-risk hosting changes, including DNS edits, new users, and restoration of remote backups.
Log reviews should compare the suspicious time with real administrator activity, maintenance windows, and known automated services.
Teams should practice account containment before an incident, including who can revoke sessions and rotate application secrets.
That preparation prevents a convincing email from forcing hurried decisions about an unfamiliar control panel.
A real warning deserves action, but the action should begin from a trusted location chosen by the user.
What to Do If You Fell for the cPanel Blocked Sign-In Attempt Scam
Change the exposed password immediately. Open the genuine hosting or webmail address manually and create a unique replacement from a trusted device.
Contact the hosting provider. Give support the submission time and affected username. Ask them to revoke sessions and inspect access logs.
Remove persistence. Check forwarders, filters, delegates, connected applications, recovery contacts, app passwords, two-factor methods, and newly created users.
Inspect hosted resources. If cPanel access was exposed, review website files, databases, DNS, scheduled jobs, backups, redirects, and email accounts.
Replace connected secrets. Rotate database passwords, file-transfer credentials, API tokens, mailbox logins, and every account reusing the stolen password.
Warn trusted contacts. Tell coworkers, customers, and vendors to question recent messages from the affected domain, especially payment or password requests.
Check the device. Run Malwarebytes for malware. Use AdGuard to reduce exposure to known phishing destinations and malicious advertising during future browsing.
Preserve and report evidence. Save the message, headers, link, screenshots, authentication alerts, provider case number, and any discovered account changes.
Is Your Device Infected? Run a Free Malware Scan
Slow performance, constant pop-ups, or strange behavior? These are classic signs of a malware infection. The fastest way to find out is to scan your device with Malwarebytes Anti-Malware Free — one of the most trusted malware removal tools available.
The free version detects and removes the most common threats, including:
Adware — the cause of those annoying pop-ups
Browser hijackers — unwanted redirects and changed homepages
Trojans and spyware — hidden programs stealing your data
Potentially unwanted programs (PUPs) — software you never asked for
👉 Select your device below — Windows, Mac, or Android — then follow the simple steps to download Malwarebytes, scan your system, and remove any threats it finds. The whole process takes about 5 minutes.
Malwarebytes for WindowsMalwarebytes for MacMalwarebytes for Android
Run a Malware Scan with Malwarebytes for Windows
Malwarebytes is one of the most popular and trusted anti-malware tools for Windows — and it’s completely free for removing infections. It catches threats that many antivirus programs miss, including adware, browser hijackers, and trojans. Follow the steps below to scan and clean your PC in just a few minutes.
Download Malwarebytes
Click the button below to download the latest version of Malwarebytes for Windows from the official source. The free version is all you need — it will scan your computer and remove adware, browser hijackers, and other malicious software at no cost.
(The link opens in a new page where your download will start)
Install Malwarebytes
When the download finishes, open your Downloads folder and double-click the MBSetup file. If Windows shows a User Account Control pop-up, click “Yes” to allow the installation.
Follow the On-Screen Prompts to Install Malwarebytes
The setup wizard will walk you through a few quick screens:
Choose where you’re installing the program — “Personal Computer” or “Work Computer” — then click Next.
Malwarebytes will now install on your device. This usually takes under a minute.
When installation is complete, the “Welcome to Malwarebytes” screen will open automatically.
On the final screen, click Open Malwarebytes to launch the program.
Enable “Scan for Rootkits”
Before scanning, turn on rootkit detection so Malwarebytes can find even the most hidden threats. Click the Settings gear icon on the left side of the screen.
In the settings menu, find “Scan for rootkits” and click the toggle so it turns blue.
Done? Click “Dashboard” in the left pane to return to the main screen.
Start the Scan
Click the blue Scan button. Malwarebytes will automatically update its virus database and start checking your computer for malware.
Wait for the Scan to Finish
The scan checks your entire system for browser hijackers and other malicious programs, so it can take several minutes. Feel free to do something else — just check back occasionally to see the progress.
Quarantine the Detected Threats
When the scan is done, you’ll see a list of everything Malwarebytes found — malware, adware, and potentially unwanted programs. Click the “Quarantine” button to remove all of them at once.
Malwarebytes will now remove the malicious files and registry entries and move them safely into quarantine.
Restart Your Computer
Some threats can only be fully removed after a reboot. If Malwarebytes asks you to restart, click Yes. Once you’re logged back in, your PC is clean and you can continue with the next steps in this guide.
When the scan finishes, click Quarantine to remove everything Malwarebytes found. That’s it — your Windows PC is now clean of trojans, adware, and other malware, and should be back to running smoothly.
If your current antivirus allowed this malicious program on your computer, you may want to consider purchasing Malwarebytes Premium to protect against these types of threats in the future. If you are still having problems with your computer after completing these instructions, then please follow one of the steps:
Malwarebytes for Mac is a free on-demand scanner that removes the malware other security software tends to miss — adware, browser hijackers, and unwanted programs included. Cleaning an infected Mac with Malwarebytes has always been completely free, and it’s our go-to recommendation. Follow the steps below to scan and clean your Mac in just a few minutes.
Download Malwarebytes for Mac
Click the button below to download the latest version of Malwarebytes for Mac.
When the download finishes, open your Downloads folder and double-click the setup file to begin the installation.
Follow the On-Screen Prompts to Install Malwarebytes
The Malwarebytes for Mac Installer will guide you through a few quick screens. Click “Continue” and keep following the prompts until the installation completes.
When the installation is complete, Malwarebytes opens to the Welcome to Malwarebytes screen. Click “Get started“.
Select “Personal Computer” or “Work Computer”
Malwarebytes will ask what type of computer you’re installing it on. Click either Personal Computer or Work Computer, whichever applies.
Start the Scan
Click the “Scan” button. Malwarebytes will automatically update its detection database and begin checking your Mac for malware.
Wait for the Scan to Finish
Malwarebytes will scan your Mac for adware, browser hijackers, and other malicious programs. This can take a few minutes, so feel free to do something else — just check back occasionally to see the progress.
Quarantine the Detected Threats
When the scan is done, you’ll see a list of everything Malwarebytes found. Click the “Quarantine” button to remove all the threats at once.
Restart Your Mac
Malwarebytes will now remove all the malicious files it found. Some threats can only be fully removed after a reboot — if Malwarebytes asks you to restart, allow it. Once you’re logged back in, your Mac is clean.
Once the scan is done, remove every threat it detected. Your Mac is now free of adware, rogue browser extensions, and other potentially harmful software.
If your current antivirus allowed a malicious program on your computer, you might want to consider purchasing the full-featured version of Malwarebytes Anti-Malware to protect against these types of threats in the future. If you are still experiencing problems while trying to remove a malicious program from your computer, please ask for help in our Mac Malware Removal Help & Support forum.
Run a Malware Scan with Malwarebytes for Android
Malwarebytes for Android automatically detects and removes dangerous threats like malware and ransomware so you don’t have to worry about your most-used device being compromised. Aggressive detection of adware and potentially unwanted programs keeps your Android phone or tablet running smooth.
Download Malwarebytes for Android.
You can download Malwarebytes for Android by clicking the link below.
In the Google Play Store, tap “Install” to install Malwarebytes for Android on your device.
When the installation process has finished, tap “Open” to begin using Malwarebytes for Android. You can also open Malwarebytes by tapping on its icon in your phone menu or home screen.
Follow the on-screen prompts to complete the setup process
When Malwarebytes will open, you will see the Malwarebytes Setup Wizard which will guide you through a series of permissions and other setup options. This is the first of two screens that explain the difference between the Premium and Free versions. Swipe this screen to continue. Tap on “Got it” to proceed to the next step. Malwarebytes for Android will now ask for a set of permissions that are required to scan your device and protect it from malware. Tap on “Give permission” to continue. Tap on “Allow” to permit Malwarebytes to access the files on your phone.
Update database and run a scan with Malwarebytes for Android
You will now be prompted to update the Malwarebytes database and run a full system scan.
Click on “Update database” to update the Malwarebytes for Android definitions to the latest version, then click on “Run full scan” to perform a system scan.
Wait for the Malwarebytes scan to complete.
Malwarebytes will now start scanning your phone for adware and other malicious apps. This process can take a few minutes, so we suggest you do something else and periodically check on the status of the scan to see when it is finished.
Click on “Remove Selected”.
When the scan has been completed, you will be presented with a screen showing the malware infections that Malwarebytes for Android has detected. To remove the malicious apps that Malwarebytes has found, tap on the “Remove Selected” button.
Restart your phone.
Malwarebytes for Android will now remove all the malicious apps that it has found. To complete the malware removal process, Malwarebytes may ask you to restart your device.
After the scan, tap Remove Selected to delete all detected threats. Your Android phone is now clean — no more malicious apps, adware, or browser redirects.
If your current antivirus allowed a malicious app on your phone, you may want to consider purchasing the full-featured version of Malwarebytes to protect against these types of threats in the future. If you are still having problems with your phone after completing these instructions, then please follow one of the steps:
Restore your phone to factory settings by going to Settings > General management > Reset > Factory data reset.
Now that your device is clean, keep it that way. Most infections start with a malicious ad or a fake download button — so blocking them at the source is your best defense.
We recommend AdGuard, which blocks malicious ads, phishing pages, and dangerous redirects before they can reach you.
The email alone does not prove that any attempt occurred.
Check the genuine account’s activity history or ask the hosting provider to review logs.
Do not use the email button to investigate the claim.
What are the strange letters in “Update Password”?
They are lookalike characters, often called homoglyphs, taken from another alphabet.
They resemble Latin letters to readers but differ technically.
Scammers can use them to evade filters that search for familiar phishing phrases.
Is cPanel Webmail sending this security alert?
No. The campaign impersonates cPanel Webmail and an unnamed security team.
Brand text inside an email is easy to copy.
Verify authentic notifications through the hosting provider and known account portal.
What if I clicked but did not enter a password?
Close the page and do not return.
Your credential risk is lower, but report the link and inspect any downloaded files.
Run Malwarebytes if a download opened or the browser behaved unexpectedly.
Should I change my password after every blocked-login email?
First verify the event through the genuine account.
If the login is real or the password may be exposed, change it from the trusted settings page.
Never perform the change through an unsolicited message.
Can two-factor authentication stop this scam?
It can block many password-only login attempts, but it does not make the phishing page safe.
Attackers may trigger approval prompts or steal session tokens.
Never approve an unexpected request, and review enrolled methods after exposure.
The Bottom Line
The cPanel blocked sign-in email invents a security event, disguises its button text, and directs recipients toward a fraudulent password verification process.
Check alerts inside the known hosting account, not through email links. After any submission, revoke access, review hosted resources, and involve the provider immediately.
10 Rules to Avoid Online Scams
Here are 10 practical safety rules to help you avoid malware, online shopping scams, crypto scams, and other online fraud. Each tip includes a quick “if you already got hit” action.
Stop and verify before you click, log in, download, or pay.
Most scams win by creating urgency. Verify using a trusted method: type the website address yourself, use the official app, or call a known number (not the one in the message).
If you already clicked: close the page, do not enter passwords, and run a malware scan.
Keep your operating system, browser, and apps updated.
Updates patch security holes used by malware and malicious ads. Turn on automatic updates where possible.
If you saw a scary “update now” pop-up: close it and update only through your device settings or the official app store.
Use layered protection: antivirus plus an ad blocker.
Antivirus helps block malware. An ad blocker reduces scam redirects, phishing pages, and malvertising.
If your browser is acting weird: remove unknown extensions, reset the browser, then run a full scan.
Install apps, software, and extensions only from official sources.
Avoid cracked software, “keygens,” and random downloads. During installs, choose Custom/Advanced and decline bundled offers you do not recognize.
If you already installed something suspicious: uninstall it, restart, and scan again.
Treat links and attachments as untrusted by default.
Phishing often impersonates delivery services, banks, and popular brands. If it is unexpected, do not open attachments or log in through the message.
If you entered credentials: change the password immediately and enable 2FA.
Shop safely: research the store, then pay with protection.
Be cautious with brand-new stores, “closing sale” stories, and prices that make no sense. Prefer credit cards or PayPal for dispute options. Avoid wire transfers, gift cards, and crypto payments.
If you already paid: contact your card issuer or PayPal quickly to dispute the transaction.
Crypto rule: never pay a “fee” to withdraw or recover money.
Common patterns include fake profits, then “tax,” “gas,” or “verification” fees. Another is a “recovery agent” who demands upfront crypto.
If you already sent crypto: stop paying, save evidence (wallet addresses, TXIDs, chats), and report the scam to the platform used.
Secure your accounts with unique passwords and 2FA (start with email).
Use a password manager and unique passwords for every account. Enable 2FA using an authenticator app when possible.
If you suspect an account takeover: change passwords, sign out of all devices, and review recent logins and recovery settings.
Back up important files and keep one backup offline.
Backups protect you from ransomware and device failure. Keep at least one backup on an external drive that is not always connected.
If you suspect infection: do not connect backup drives until the system is clean.
If you think you are a victim: stop losses, document evidence, and escalate fast.
Move quickly. Speed matters for disputes, account recovery, and limiting damage.
Stop payments and contact: do not send more money or respond to the scammer.
Call your bank or card issuer: block transactions, replace the card if needed, and start a dispute or chargeback.
Secure your email first: change the email password, enable 2FA, and remove unfamiliar recovery options.
Secure other accounts: change passwords, enable 2FA, and log out of all sessions.
Scan your device: remove suspicious apps or extensions, then run a full malware scan.
Save evidence: screenshots, emails, order pages, tracking pages, wallet addresses, TXIDs, and chat logs.
Report it: to the payment provider, marketplace, social platform, exchange, or wallet service involved.
These rules are intentionally simple. Most online losses happen when decisions are rushed. Slow down, verify independently, and use payment methods and account controls that give you recourse.
Hello! I'm Lapain Epuran, your go-to source for detailed and honest product reviews. From tech gadgets to miracle cures, I provide insights to help you make informed choices. Join me as we discover what's truly worth your time and money.