


An invoice asking for payment confirmation may land among genuine purchasing messages, where speed is valued and attachments are opened constantly.
This particular request contains enough business language to look familiar, yet its unusual details reveal why routine verification matters.
Overview
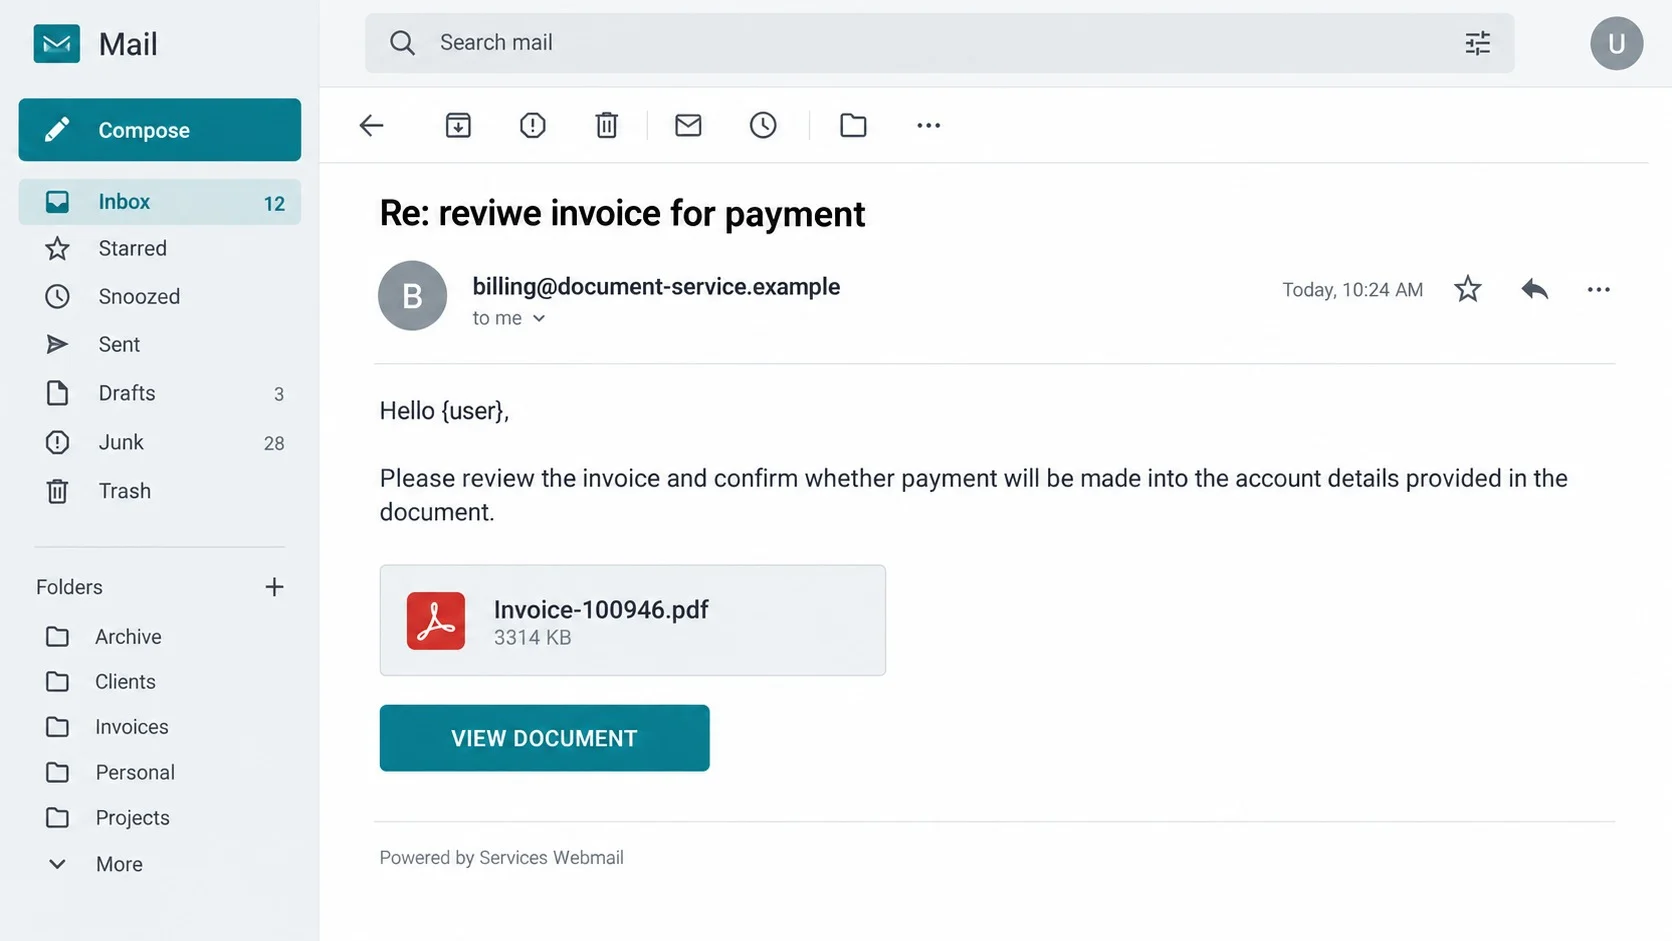
The payment request presented in the email
The message arrives with a subject resembling “Re: reviwe invoice for payment.”
It asks the recipient to review an invoice and confirm payment using the bank information inside the attached document.
The greeting may literally display “Hello {user},” showing that a template placeholder was never replaced.
A document panel advertises “Invoice-100946.pdf,” lists a file size, and offers a “View Document” button.
The reply-style subject creates the illusion that the email belongs to an existing conversation, even when no earlier message exists.
The fake webmail page behind the document
The invoice button does not simply display a PDF.
It directs the recipient to a page imitating a cPanel webmail login.
The observed page was hosted through public cloud storage, not the recipient’s organization or known email provider.
It asks for an email address and password before supposedly releasing the invoice.
Those credentials can be captured and used to enter the mailbox, investigate real vendors, or prepare payment diversion.
The key risks at a glance
This campaign targets both account access and the financial processes surrounding invoices.
Employees should watch for:
- A reply prefix without a matching conversation in the mailbox.
- A misspelled subject and unresolved “{user}” placeholder.
- No recognizable vendor, purchase order, amount, or service description.
- A PDF-style button that opens a webmail login instead of a document.
- A login page hosted outside the organization’s normal mail domain.
- Pressure to confirm bank details without an independent vendor check.
cPanel and the cloud-hosting provider did not create the payment request. Their services or appearance are being misused to support the deception.
How the Review Invoice and Confirm Payment Email Scam Works
Step 1: The sender disguises a cold message as a reply
Starting the subject with “Re:” suggests that the recipient or a colleague already discussed the invoice.
Busy workers often scan subject lines quickly and prioritize threads that appear active.
The tactic also encourages the reader to blame a missing memory or crowded inbox rather than question the sender.
Opening the conversation history should expose the trick because the message lacks genuine earlier replies.
Some mail clients group unrelated messages with similar subjects, making a forged reply prefix even more effective.
The misspelled word “reviwe” adds suspicion, although the deeper problem is the absent business context.
Step 2: The invoice language targets an established office routine
Accounts-payable teams receive requests to review, approve, dispute, and schedule invoices every day.
The attacker does not need a dramatic story. A plain request can blend into ordinary workload.
Mentioning bank details implies the document contains everything needed to proceed.
However, the email supplies no amount, currency, purchase order, contract, billing period, vendor representative, or receiving record.
Real invoices can still contain errors, but approvers should be able to connect them with purchases recorded elsewhere.
A message that exists only inside its own story should not enter the payment queue.
Step 3: A PDF card makes the link resemble an attachment
The document panel shows a filename and size, creating the impression that a file is already attached.
In many phishing messages, the visible card is merely an image or link.
Clicking “View Document” opens a website rather than a locally attached PDF.
This distinction can be easy to miss because cloud documents and secure invoice portals also use browser-based viewing.
The correct test is destination ownership, not whether opening a browser is technically possible.
A legitimate vendor portal should match contracts, onboarding records, and previously confirmed contact information.
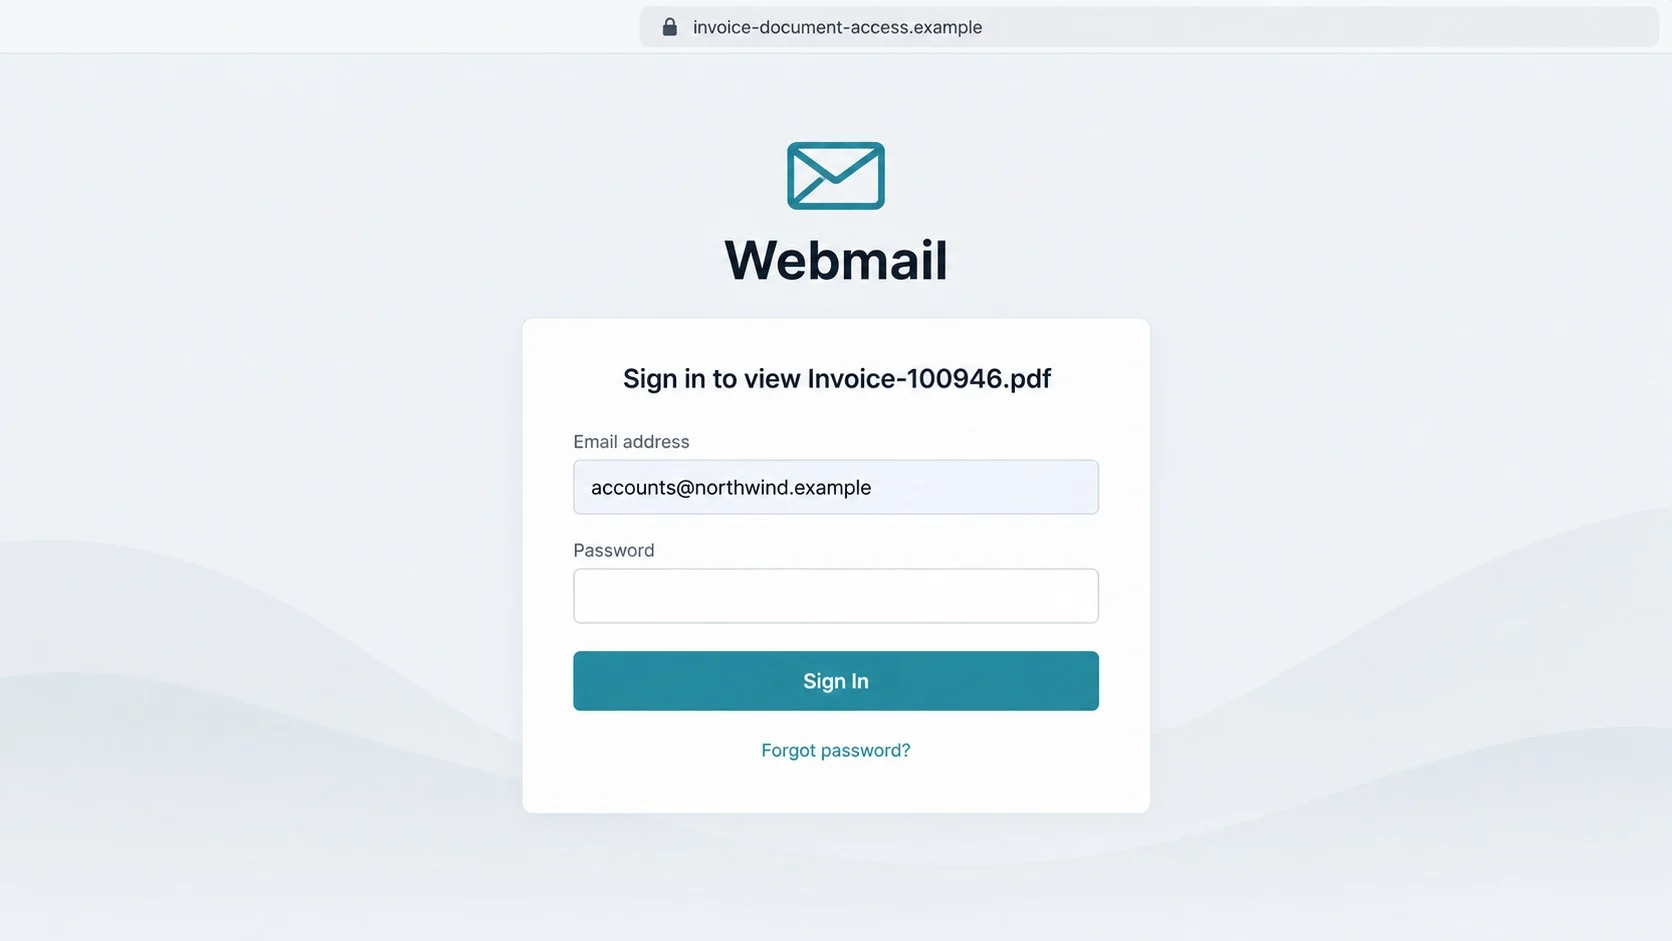
Step 4: The page switches from invoice review to mailbox authentication
The destination shows a generic webmail login and claims authentication is required to see the invoice.
That change gives the attacker a reason to request credentials unrelated to the purported vendor.
A PDF sender does not need the recipient’s email password to share billing information.
If organizational single sign-on is genuinely required, authentication occurs on the company’s known identity domain.
The observed form instead appeared on public hosting controlled by someone outside the victim’s organization.
Public cloud infrastructure can host legitimate content, but its reputation does not transfer to every page stored there.
Step 5: The form records credentials and hides the result
When the recipient submits an address and password, the page can send both to the phishing operator.
It may display an error, request another attempt, or redirect to a generic PDF.
A second request can capture alternative passwords from users who think they mistyped.
Redirecting afterward reduces suspicion because the victim sees a familiar website or concludes that the invoice link expired.
The stolen password may be tested within minutes.
Delayed testing is also possible, especially when criminals want to avoid triggering immediate location-based alerts.
Step 6: Mailbox access prepares a convincing payment attack
Inside the mailbox, criminals can locate real invoices, vendor contacts, approval chains, and payment dates.
They may create rules that hide messages containing words like fraud, password, invoice, or security.
After learning the organization’s process, the attacker can impersonate a vendor and provide replacement bank details.
Another option is modifying a legitimate attachment while preserving the surrounding conversation.
The original phishing email looks crude, but the follow-up fraud can use accurate names, amounts, signatures, and timing.
That escalation is why one submitted password deserves an immediate financial response, not only an email reset.
The Difference Between an Invoice Lure and Ordinary Billing Confusion
A legitimate invoice has a traceable business origin
Normal billing documents connect to a purchase, contract, delivery, subscription, or professional service.
The recipient can compare them with purchase orders, goods receipts, statements, and prior vendor communications.
Even an incorrect invoice usually identifies a real entity and a specific claimed transaction.
This lure remains deliberately empty because its goal is opening the login page, not resolving a billing disagreement.
Real vendors do not authenticate through random webmail forms
A vendor may use a portal, but that portal should have known ownership and established enrollment procedures.
The vendor does not need direct access to the recipient’s mailbox password.
If an invoice link suddenly introduces cPanel, generic webmail, or another unrelated service, stop.
Contact the vendor using onboarding records rather than any number or address contained in the suspicious message.
Banking changes require stronger proof than email
Email alone is not a safe channel for accepting new payment instructions.
Mailbox compromise can make a fraudulent change appear inside a legitimate thread.
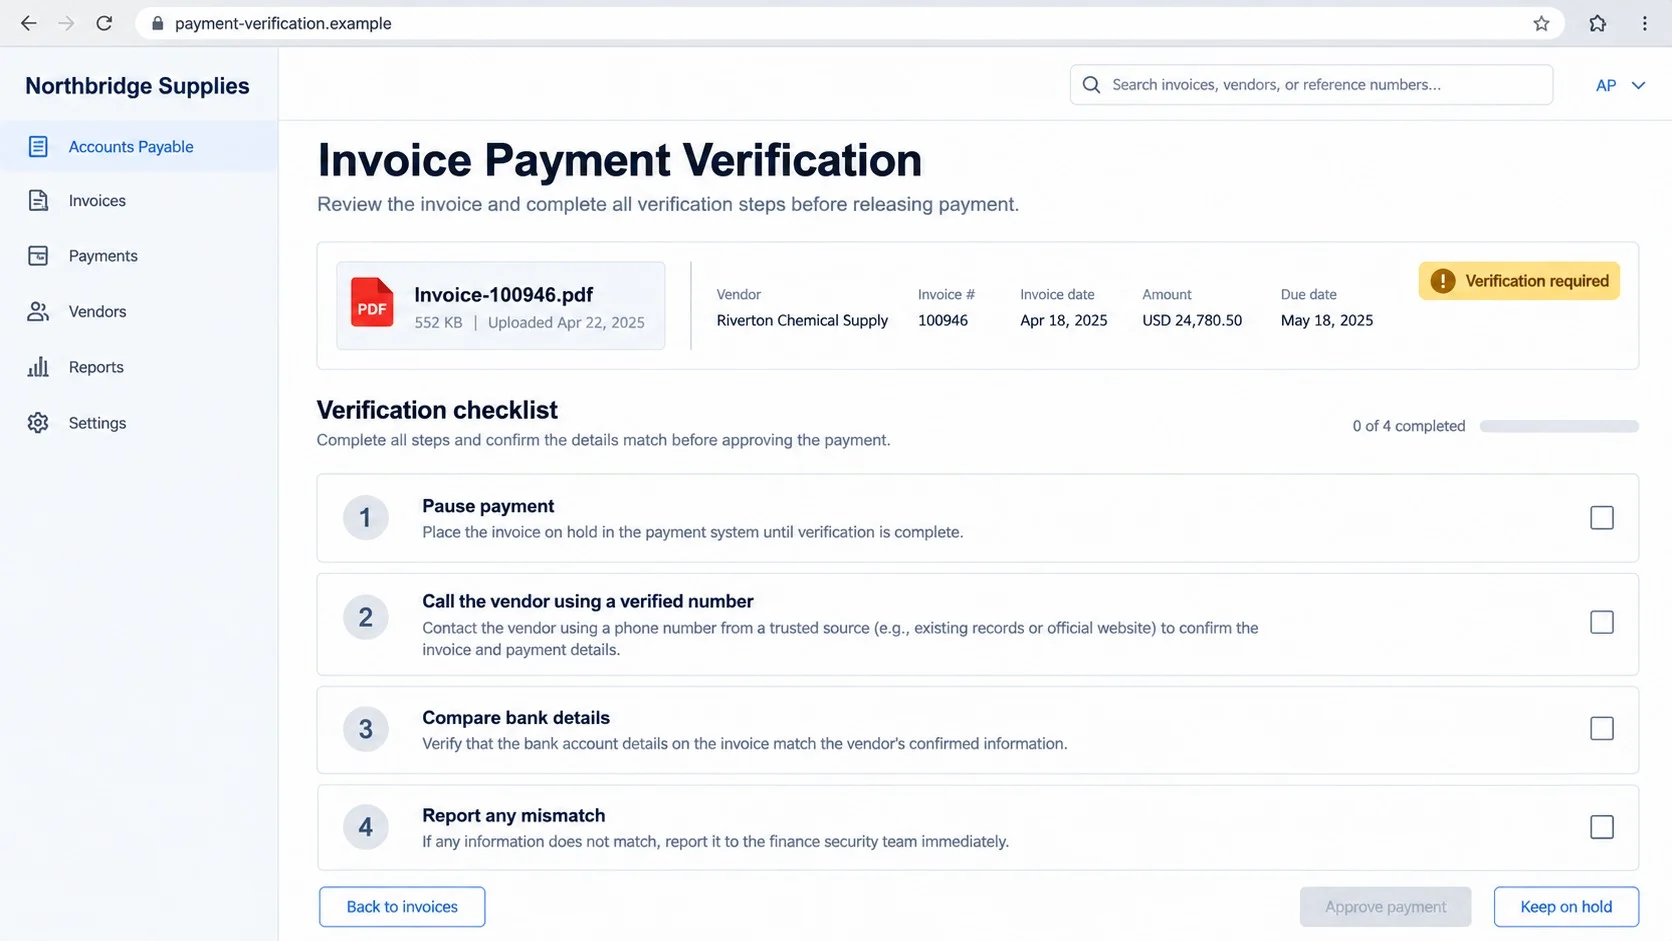
Use a known telephone number and a second authorized employee to verify new account details.
Document the confirmation, including who supplied the number and who approved the change.
Why Public Cloud Hosting Does Not Make a Login Page Trustworthy
Attackers can place pages on legitimate infrastructure
Cloud storage and application platforms are designed to let customers publish files and web content quickly.
Criminals can abuse that convenience, sometimes using free tiers or compromised accounts.
The browser may display a recognizable hosting domain and valid encryption.
Neither proves that the page is authorized to collect your organization’s credentials.
The page owner matters more than the hosting provider
A shopping mall can contain many independent stores. Cloud infrastructure works similarly at a technical level.
The platform supplies space, while the customer controls the uploaded page.
Ask whether your employer intentionally uses that exact application and path for authentication.
If the answer is unknown, open the normal company login separately or contact support.
Branding can be copied into any hosted page
Webmail logos, sign-in boxes, colors, and icons are not identity certificates.
A basic phishing kit can reproduce them within minutes.
The registered domain, approved login flow, and internal confirmation provide stronger evidence.
Password managers can help because they normally refuse to autofill credentials on an unrecognized domain.
Vendor, Invoice, Bank Details, and Login Verification Checks
Verify the vendor outside the message
Locate the vendor in approved purchasing records and compare the legal name, address, tax details, and usual contact.
Call a number already stored in the vendor master record.
Do not use contact information from the unexpected invoice because an attacker controls every element inside it.
Ask the vendor to confirm the invoice number, amount, purchase order, and delivery.
If no relationship exists, quarantine the email rather than asking the sender for more convincing paperwork.
Match the invoice against internal records
Check the purchase order, contract, goods receipt, service acceptance, and prior billing sequence.
Invoice numbers and file sizes are not meaningful without that match.
Look for duplicate billing, unusual urgency, changed remittance instructions, or a sender domain differing by one character.
Require another approver when the invoice arrives outside the usual channel.
A controlled exception process is safer than improvising through email.
Confirm bank details by a separate method
Compare the account name and routing information with previously verified records.
Call the vendor through an established number when anything changes.
Ask a known representative to repeat the details rather than answering yes to information you provide.
Apply a temporary payment hold until discrepancies are resolved.
Criminals depend on organizations treating a banking change as clerical rather than security-sensitive.
Validate the login route with internal support
Employees should know the one approved address for webmail and single sign-on.
Open that address from a bookmark, not through the invoice.
Report any page asking for credentials on a different domain, even when its design is accurate.
Security staff can review message headers, redirect chains, and cloud abuse indicators without exposing more users.
Blocking the destination quickly may prevent colleagues from submitting their passwords.
A Safer Payment Approval Routine
Separate invoice review from bank-detail approval.
One person can validate the purchase, while another confirms payment information through a trusted channel.
Lock vendor master changes behind multifactor authentication and maintain an audit history.
Require callbacks for first payments, dormant vendors, and any account change.
Teach staff that a document button can be a web link disguised as an attachment.
Use a password manager on approved sign-in pages because an unexpected domain will not receive stored credentials automatically.
These measures slow unusual payments by minutes, while potentially preventing losses that are difficult to reverse.
What to Do If You Fell for the Review Invoice and Confirm Payment Scam
- Change the mailbox password now. Use the organization’s known login address on a trusted device. Choose a unique replacement.
- Contact workplace security. Report the submission time, account, message, and destination. Administrators can review logs and contain access faster.
- End sessions and remove persistence. Revoke unfamiliar devices, applications, forwarding rules, filters, delegates, recovery changes, and app passwords.
- Freeze related payments. Tell accounts payable and treasury to pause the invoice, vendor changes, and unusual transfers connected with the mailbox.
- Call the real vendor. Use a previously verified number to confirm whether any invoice or banking request was genuine.
- Notify the bank immediately. If funds moved, request a recall or fraud hold. Speed can affect whether the transfer remains recoverable.
- Check the device. Scan with Malwarebytes, especially if anything downloaded. Use AdGuard to reduce exposure to malicious advertisements and phishing destinations.
- Preserve the evidence. Retain headers, screenshots, filenames, payment records, call notes, and security alerts for investigators and insurers.
Is Your Device Infected? Run a Free Malware Scan
Slow performance, constant pop-ups, or strange behavior? These are classic signs of a malware infection. A quick way to check is to scan your device with Malwarebytes Free, one of the most trusted malware removal tools available. If you only visited a scam page and didn’t download or install anything, this scan is optional.
The free version detects and removes the most common threats, including:
- Adware — the cause of those annoying pop-ups
- Browser hijackers — unwanted redirects and changed homepages
- Trojans and spyware — hidden programs stealing your data
- Potentially unwanted programs (PUPs) — software you never asked for
👉 Select your device below — Windows, Mac, or Android — then follow the simple steps to download Malwarebytes, scan your system, and remove any threats it finds. The scan usually takes 5 to 20 minutes.
Run a Malware Scan with Malwarebytes for Windows
Malwarebytes is one of the most popular and trusted anti-malware tools for Windows — and it’s completely free for removing infections. It catches threats that many antivirus programs miss, including adware, browser hijackers, and trojans. Follow the steps below to scan your PC and remove what Malwarebytes finds.
Download Malwarebytes
Click the button below to download the latest version of Malwarebytes for Windows from the official source. The free version is all you need — it will scan your computer and remove adware, browser hijackers, and other malicious software at no cost.
Download MalwarebytesOfficial installer for Windows 11 and 10. Your download starts right away.Want real-time protection? See Malwarebytes Premium Malwarebytes Free for WindowsScans and removes malware at no cost
-
Install Malwarebytes
When the download finishes, open your Downloads folder and double-click the MBSetup file. If Windows shows a User Account Control pop-up, click “Yes” to allow the installation.
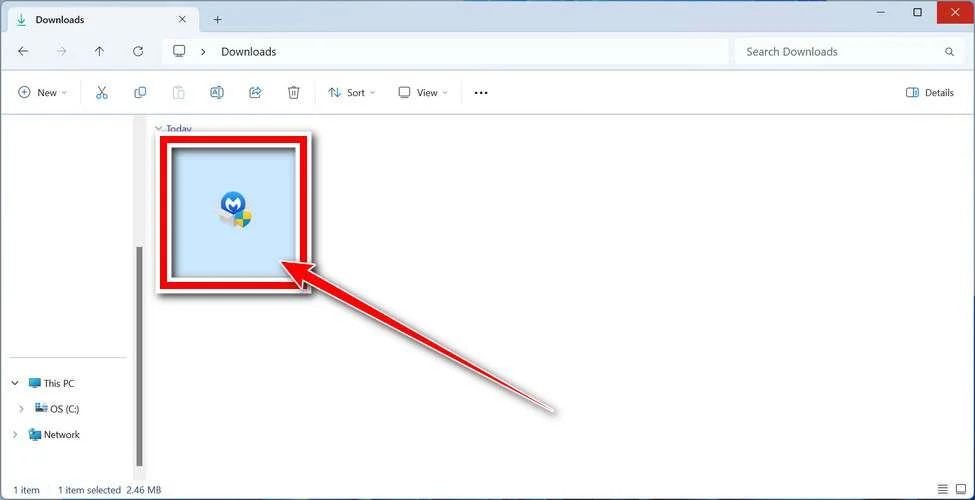
Follow the On-Screen Prompts to Install Malwarebytes
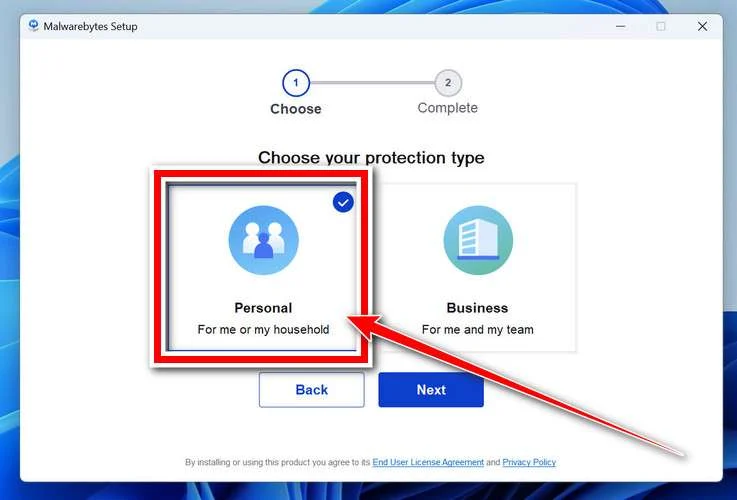
The setup wizard will walk you through a few quick screens:
-
Choose where you’re installing the program — “Personal Computer” or “Work Computer” — then click Next.
-
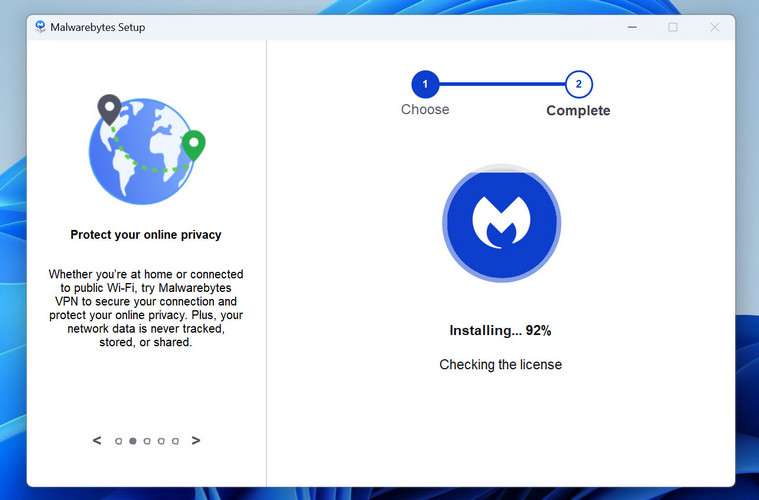
Malwarebytes will now install on your device. This usually takes under a minute.
-
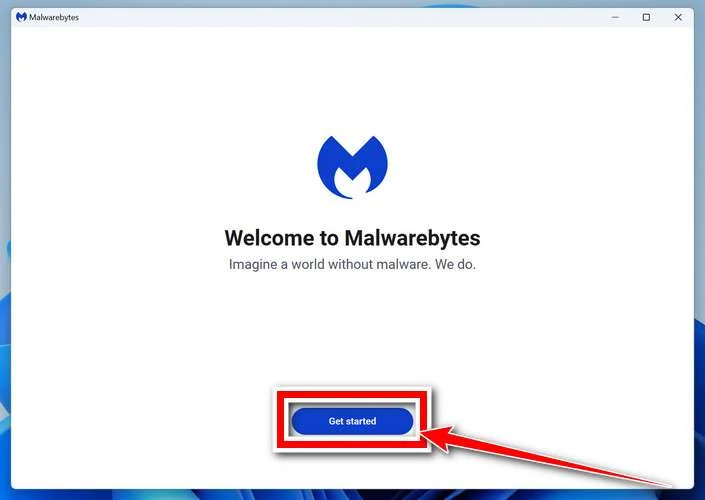
When installation is complete, the “Welcome to Malwarebytes” screen will open automatically.
-
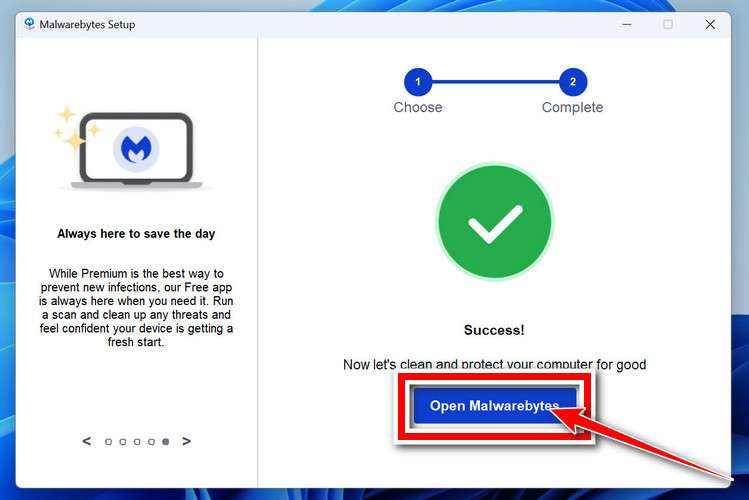
On the final screen, click Open Malwarebytes to launch the program.
-
Optional: Check for rootkits with a Custom Scan
You don’t need to change any settings for a normal scan. The standard Threat Scan in the next step is enough for most problems, so you can go straight to it.
If you also want to check for rootkits, use a Custom Scan. In current versions of Malwarebytes, rootkit scanning is only available there:
- On the Scanner tile, click the three-dot menu and select Advanced Scan.
- Choose Custom Scan. In its options, check Scan for rootkits.
- Select your system drive (usually C:\) as the location to scan, then start the scan. It takes longer than a Threat Scan.
- When it finishes, review and quarantine the results as described in the steps below.
Rootkit scanning isn’t available on Windows devices with ARM processors.
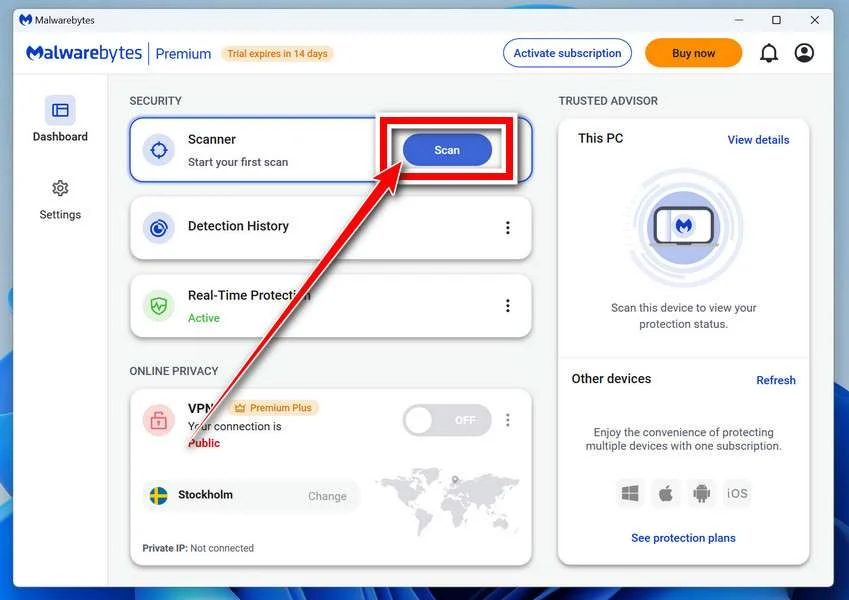
Start the Scan
Click the blue Scan button. Malwarebytes will automatically update its virus database and start checking your computer for malware.
-
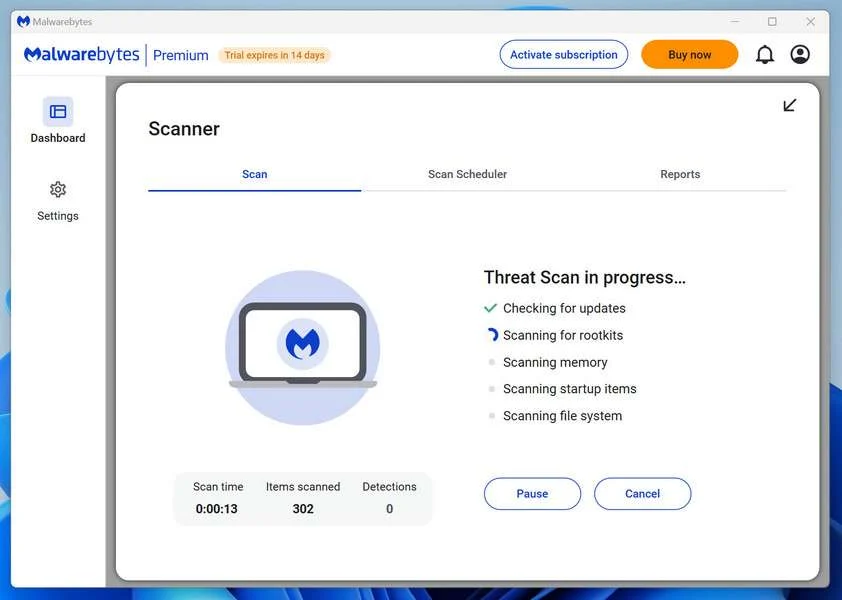
Wait for the Scan to Finish
The scan checks your entire system for browser hijackers and other malicious programs, so it can take 5 to 20 minutes depending on your computer. Feel free to do something else — just check back occasionally to see the progress.
-
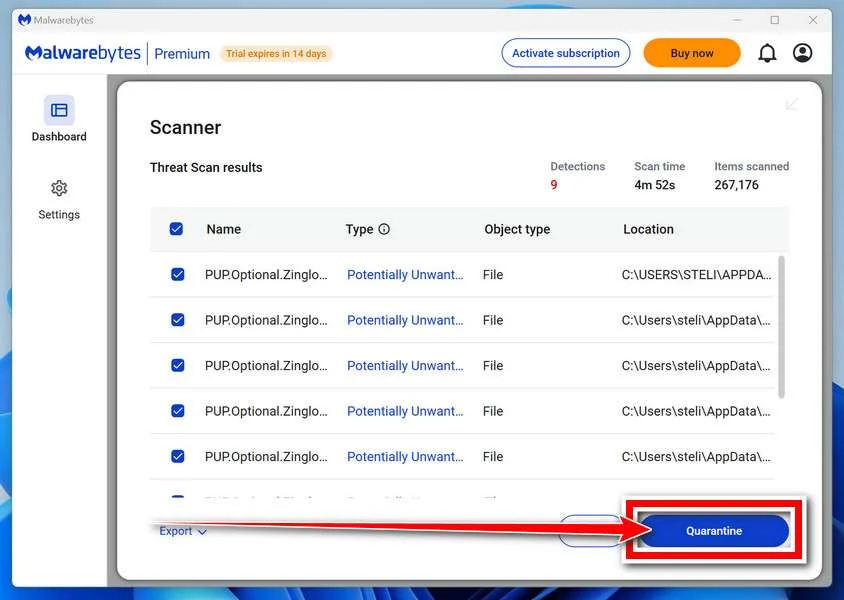
Quarantine the Detected Threats
When the scan is done, you’ll see a list of everything Malwarebytes found — malware, adware, and potentially unwanted programs. Click the “Quarantine” button to remove all of them at once.
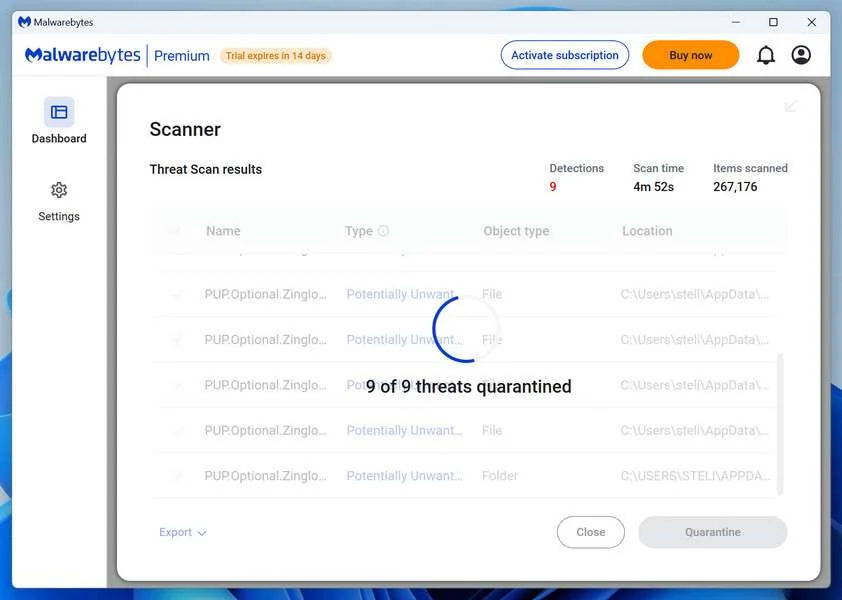
Malwarebytes will now remove the malicious files and registry entries and move them safely into quarantine.
-
Restart Your Computer
Some threats can only be fully removed after a reboot. If Malwarebytes asks you to restart, click Yes. Once you’re logged back in, Malwarebytes has finished removing the threats it found.
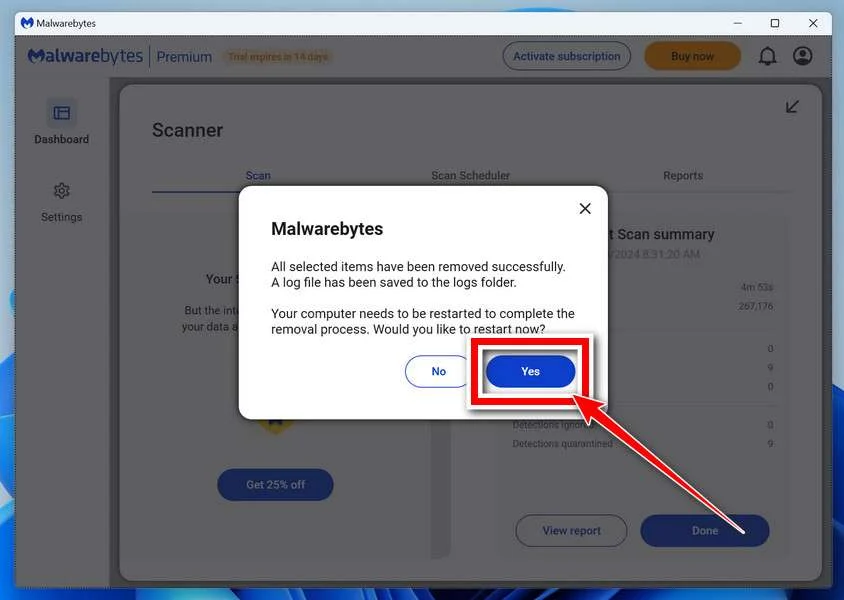
When the scan is done, check whether the problems you noticed have stopped. If they continue, see the options below.
If you are still having problems with your computer after completing these instructions, then please follow one of the steps:
- Run a computer scan with ESET Online Scanner
- Ask for help in our Windows Malware Removal Help & Support forum.
Run a Malware Scan with Malwarebytes for Mac
Malwarebytes for Mac is a free on-demand scanner that removes the malware other security software tends to miss — adware, browser hijackers, and unwanted programs included. Cleaning an infected Mac with Malwarebytes has always been completely free, and it’s our go-to recommendation. Follow the steps below to scan your Mac and remove what Malwarebytes finds.
-
Download Malwarebytes for Mac
Click the button below to download the latest version of Malwarebytes for Mac.
Download MalwarebytesOfficial installer for macOS. Your download starts right away.Want real-time protection? See Malwarebytes PremiumMalwarebytes Free for MacScans and removes malware at no cost -
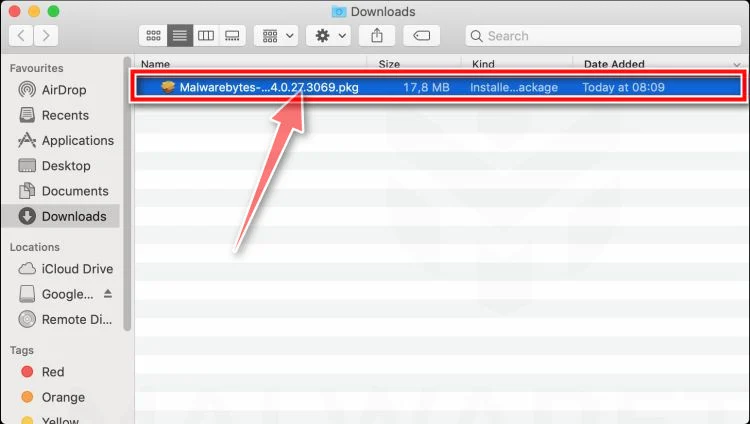
Open the Malwarebytes setup file
When the download finishes, open your Downloads folder and double-click the setup file to begin the installation.
-
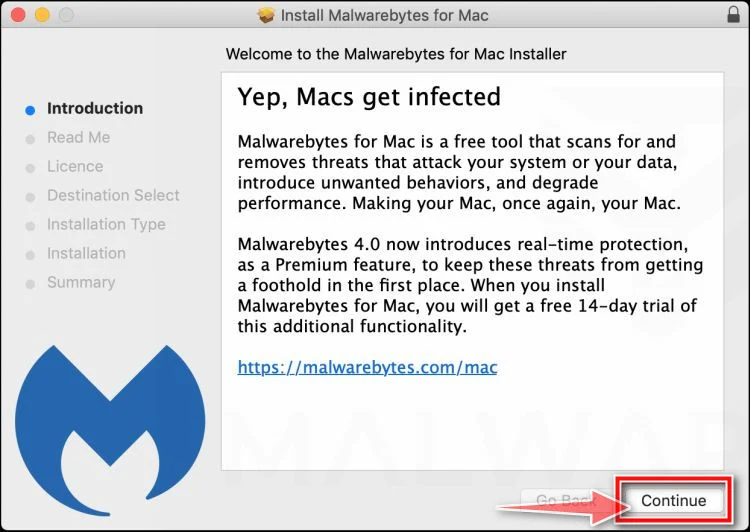
Follow the On-Screen Prompts to Install Malwarebytes
The Malwarebytes for Mac Installer will guide you through a few quick screens. Click “Continue” and keep following the prompts until the installation completes.
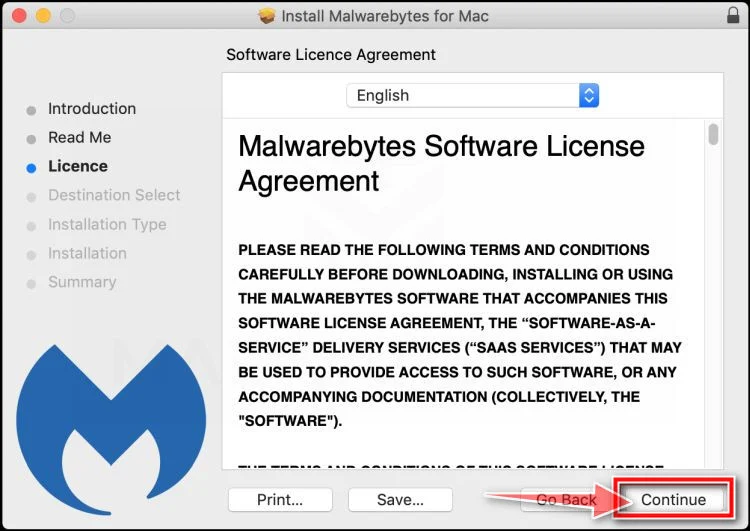
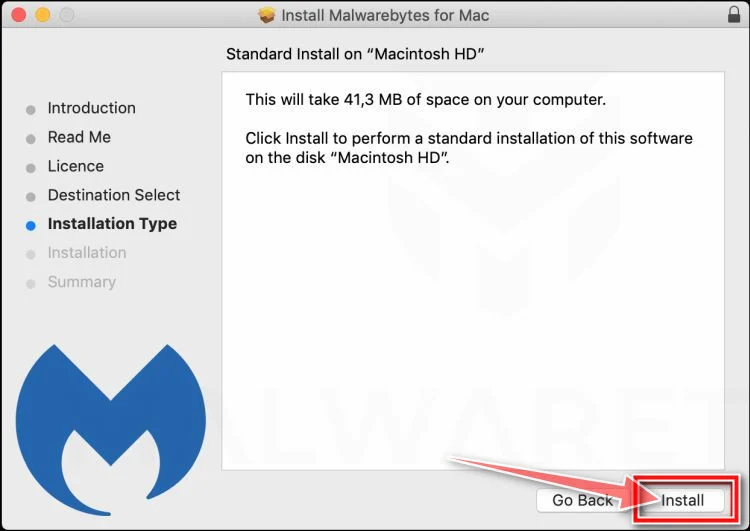
When the installation is complete, Malwarebytes opens to the Welcome to Malwarebytes screen. Click “Get started“.
Malwarebytes needs Full Disk Access to check your whole Mac. When it asks, open System Settings > Privacy & Security > Full Disk Access, turn on Malwarebytes (it may be listed as Malwarebytes Protection), and confirm with your password or Touch ID. Then return to Malwarebytes. On macOS Monterey and earlier, this setting is in System Preferences > Security & Privacy > Privacy.
-
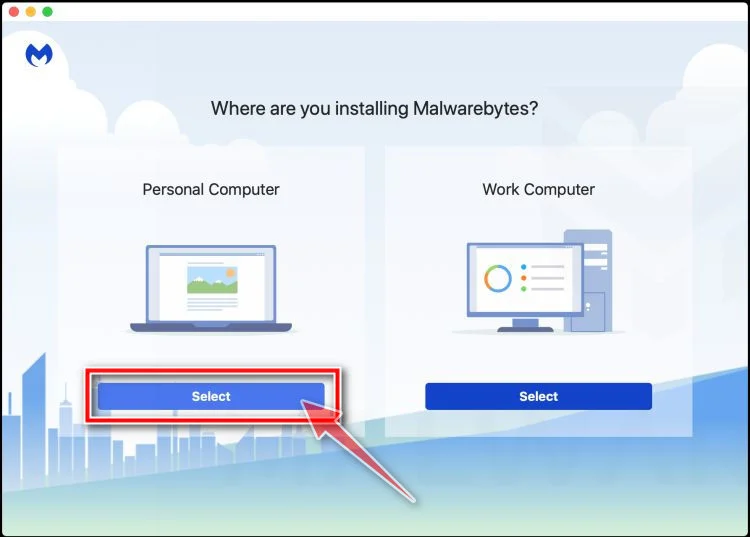
Select “Personal Computer” or “Work Computer”
Malwarebytes will ask what type of computer you’re installing it on. Click either Personal Computer or Work Computer, whichever applies.
-
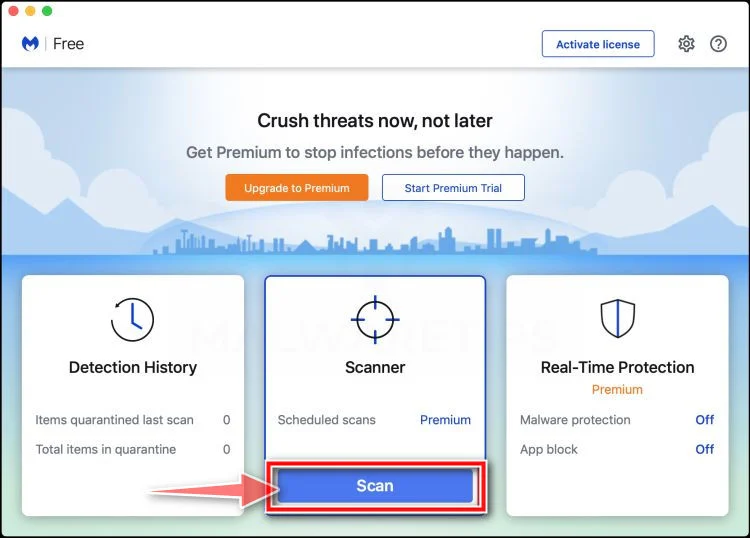
Start the Scan
Click the “Scan” button. Malwarebytes will automatically update its detection database and begin checking your Mac for malware.
-
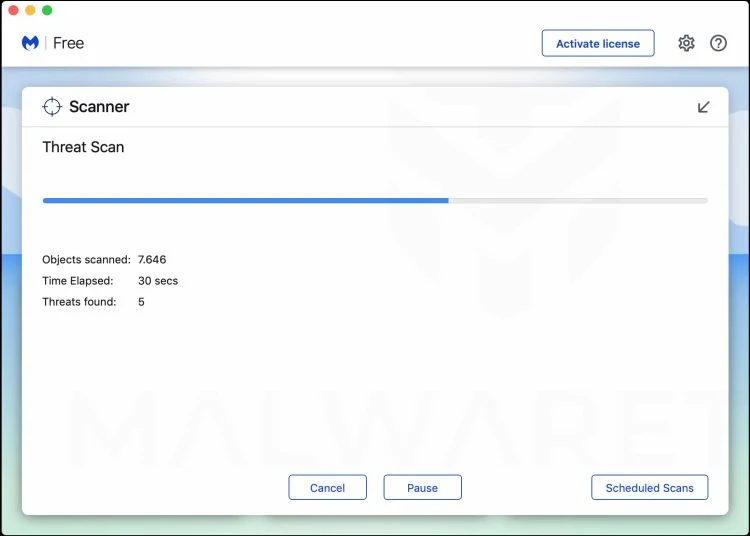
Wait for the Scan to Finish
Malwarebytes will scan your Mac for adware, browser hijackers, and other malicious programs. This can take a few minutes, so feel free to do something else — just check back occasionally to see the progress.
-
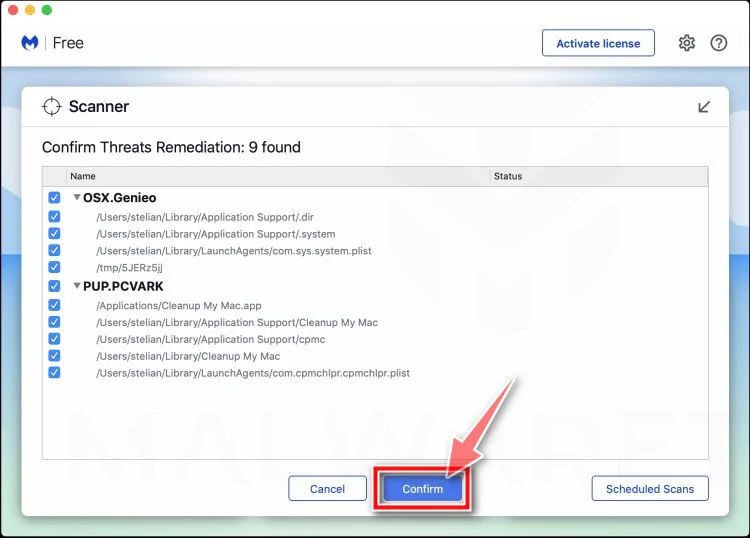
Quarantine the Detected Threats
When the scan is done, you’ll see a list of everything Malwarebytes found. Click the “Quarantine” button to remove all the threats at once.
-
Restart Your Mac
Malwarebytes will now remove all the malicious files it found. Some threats can only be fully removed after a reboot — if Malwarebytes asks you to restart, allow it. Once you’re logged back in, check whether the problems you noticed have stopped. If they come back, save the scan report and ask for help in our forum.
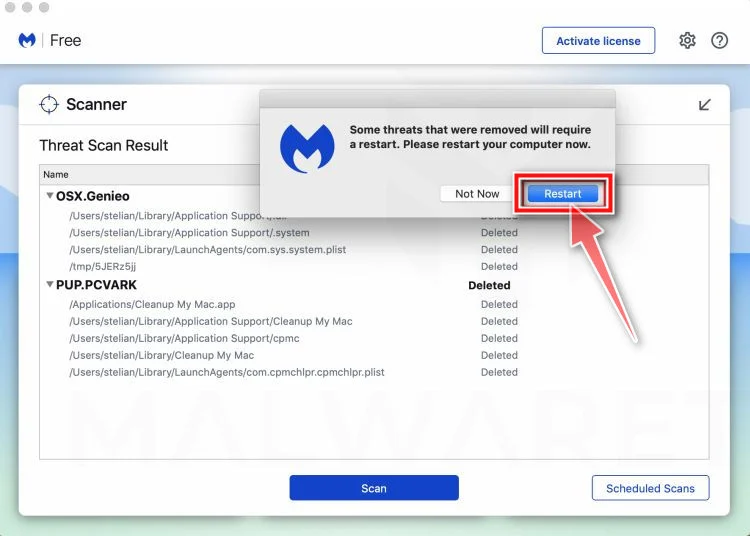
If the problems you noticed continue after the scan, see the options below.
If you are still experiencing problems while trying to remove a malicious program from your computer, please ask for help in our Mac Malware Removal Help & Support forum.
Run a Malware Scan with Malwarebytes for Android
Malwarebytes for Android scans your phone or tablet for malware, adware, and potentially unwanted apps. The free version scans only when you start a scan. Real-time protection, which checks apps automatically, is part of the paid Premium version.
-
Download Malwarebytes for Android.
You can download Malwarebytes for Android by clicking the link below.
Get Malwarebytes for AndroidOpens Google Play in a new tab.Want real-time protection? See Malwarebytes Premium for AndroidMalwarebytes for AndroidScans your phone and removes malware at no cost -
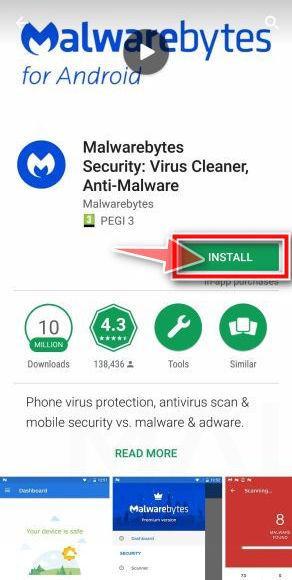
Install Malwarebytes for Android on your phone.
In the Google Play Store, tap “Install” to install Malwarebytes for Android on your device.
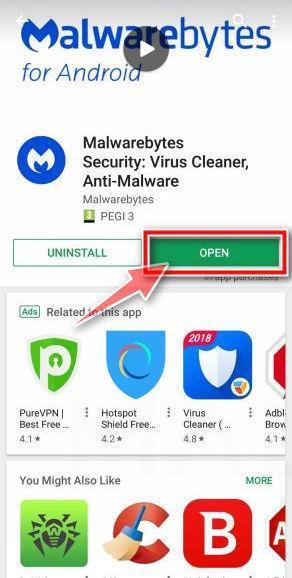
When the installation process has finished, tap “Open” to begin using Malwarebytes for Android. You can also open Malwarebytes by tapping on its icon in your phone menu or home screen.
-
Follow the on-screen prompts to complete the setup process
When Malwarebytes opens, it walks you through a short setup. Tap Get started and follow the prompts. If you see an offer for a trial or a paid plan, read it before you accept. You can skip it and keep using the free scanner.
Malwarebytes will ask for permission to access the files on your phone so it can scan them. Tap Allow, or turn on the permission in the Android screen that opens, then return to Malwarebytes.
-
Run a scan with Malwarebytes for Android
On the main screen, tap Scan now. In some versions, you open the menu, tap Scanner, and then tap Run a scan.
-
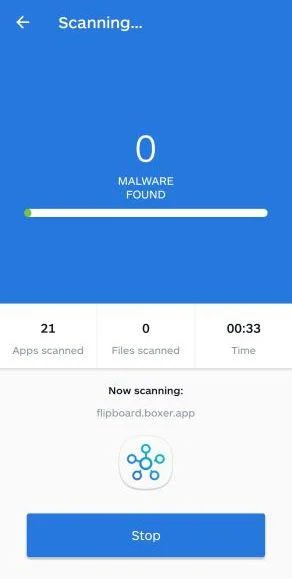
Wait for the Malwarebytes scan to complete.
Malwarebytes will now start scanning your phone for adware and other malicious apps. This process can take a few minutes, so we suggest you do something else and periodically check on the status of the scan to see when it is finished.
-
Remove the detected apps.
When the scan has been completed, you will see a list of the threats that Malwarebytes for Android has detected. Next to each detected item, tap the menu icon (three dots), then choose to uninstall the app or delete the file. Android then asks you to confirm. Tap OK or Uninstall to remove the app.
-
Restart your phone.
When the detected apps are removed, restart your phone if Malwarebytes asks you to. Then check whether the problems you noticed have stopped.
If the problems you noticed continue after the scan, see the options below.
If you are still having problems with your phone after completing these instructions, then please follow one of the steps:
- Ask for help in our Mobile Malware Removal Help & Support forum.
- Only as a last resort, reset your phone to factory settings. Read the warning below first.
- Back up your photos, videos, files, and messages, for example to your Google account or a computer.
- Make sure you know your Google account email and password. The phone asks for them after the reset. If you changed the password recently, Google recommends waiting 24 hours before you reset.
- On a Samsung phone, also make sure you know your Samsung account password.
- If you use an authenticator app for two-step verification, move your accounts to another device or save your backup codes first.
Stay Protected: Block Ads and Malicious Sites
No scan can prove a device is completely clean, so it helps to block threats before they reach you. Most infections start with a malicious ad or a fake download button — so blocking them at the source is your best defense.
We recommend AdGuard, which blocks malicious ads, phishing pages, and dangerous redirects before they can reach you.
👉 Download AdGuard and browse safely
Frequently Asked Questions
Is Invoice-100946.pdf a legitimate bill?
In this campaign, the filename is part of the lure.
The button leads to a credential page rather than a verifiable invoice tied to a known purchase.
Always match billing documents with internal records and confirm unexpected requests with the vendor.
Why does the subject begin with Re:?
The reply prefix is intended to simulate an ongoing conversation.
It can make a cold message receive faster attention.
Expand the thread and inspect the mailbox history. A genuine reply should have recognizable prior messages and participants.
Can a cPanel webmail page be legitimate?
Yes. Many hosting accounts use genuine cPanel webmail.
The issue is whether your organization expects it at that exact controlled address.
An invoice link opening an unrelated imitation is not a valid reason to enter mailbox credentials.
What if no money was sent?
Credential theft still requires immediate action.
An intruder can wait, study genuine invoices, and attempt fraud later.
Reset the account, review persistence, notify finance staff, and monitor vendor-change requests connected with the mailbox.
What if a payment already left the account?
Contact the bank’s fraud department immediately and request a recall or beneficiary freeze.
Notify law enforcement and organizational leadership according to local procedures.
Do not negotiate with the email sender or delay while seeking more proof.
How should companies verify new bank instructions?
Use a known telephone number from vendor records, require dual approval, and document the callback.
Never rely solely on the email containing the change.
Send independent confirmation to the previously established vendor contact before releasing payment.
The Bottom Line
The review-and-confirm-payment email is a credential phishing attack disguised as ordinary invoice work. Its document button opens a fake webmail login on unrelated infrastructure.
Verify purchases, vendors, banking changes, and login domains separately. If credentials were entered, secure the mailbox and pause financial activity before the attacker can escalate.

Join the discussion
0 commentsShare your experience or ask a question about this article.
Community experiences
Did this happen to you?
Your experience could help someone recognize the same scam. Submit a private report for our team to review.
I experienced this tooReports are reviewed before publication. Sharing publicly is always your choice.
Discussion
Start the conversation
Have a question or something useful to share? Add the first comment.