

A storage warning arrives just when you need your inbox. The subject says your account has expired, and a deletion date makes the message hard to ignore.
Before choosing a plan or cleaning out files, take a closer look at who sent the notice and what the button actually asks you to do.
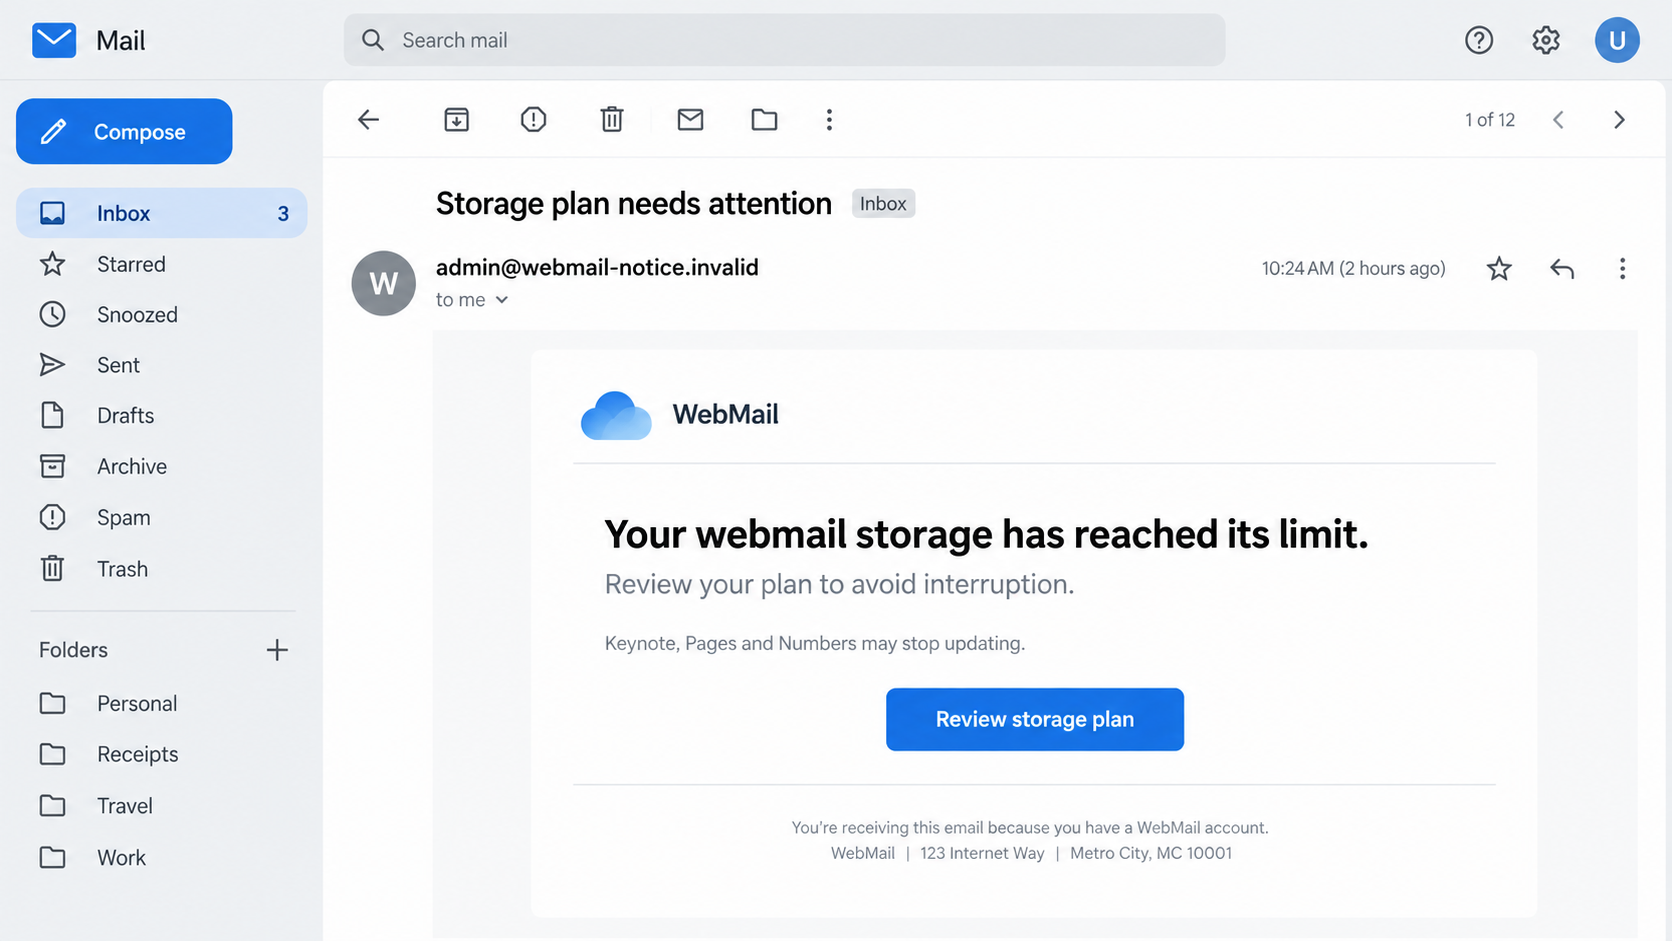
Overview
A supposed storage limit becomes an account emergency
The “Upgrade Your Webmail Storage Plan” email claims that the recipient’s storage is exhausted and their account will be deleted unless they act.
One reported subject warns that the account has expired and will be permanently deleted on November 9, 2026. A signature calls itself “The Webmail Team.”
Those details come from a reported specimen, not from an authenticated notice sent by the reader’s own provider. The sender does not establish an actual quota problem.
The danger is a link dressed up as an upgrade route. In the reported campaign, that route opens a counterfeit Google sign-in page seeking email credentials.
The message borrows pieces from incompatible services
The body talks about webmail storage, then mentions Keynote, Pages, and Numbers. Those are Apple applications associated with iCloud, not a generic webmail product.
Its destination then presents Google branding. A warning that cannot name one consistent provider should not be allowed to choose where you sign in.
Apple’s description of iCloud Drive data includes Pages, Keynote, and Numbers documents. That authentic connection explains why the borrowed wording can sound familiar.
It does not make the webmail notice an Apple message. Nor does a Google-style login prove that Google sent the email or owns the linked page.
The practical decision is simpler than the email suggests
- Do not use the upgrade button to measure your mailbox storage.
- Open your real email service from a saved app or address you already know.
- Check its storage meter, billing history, and security alerts there.
- Keep your password out of a page reached through this unsolicited notice.
If no matching warning appears in the authenticated account, report the message. If storage is genuinely low, resolve it inside the actual provider’s settings.
Why This Particular Storage Warning Is So Convincing
Email storage is a real problem for real people
Mailboxes can fill. Attachments, photos, and backups can consume space, and some providers limit sending or receiving when a quota is exceeded.
That truth gives the fraudulent message room to work. The scammer does not need to invent an impossible technology problem, only an unverified diagnosis.
A reader expecting a job reply or customer order may worry that a full inbox could make them miss something important. The message exploits that concern.
The same reader may know that storage upgrades exist but not remember where the control lives. A convenient button seems like a shortcut to the right page.
It is not. The button is controlled by the sender, while the actual storage meter belongs to the service where the account is maintained.
The deletion date changes a routine task into a deadline
Freeing storage is normally a planned maintenance task. The email presents it as an account-survival decision that must be made before a printed date.
That date may look administrative because it is exact. But anyone can type a date into a bulk message, including one that has no account record.
Notice how the warning moves from “storage is full” to “account will be deleted.” Those are different claims, each requiring proof from the provider.
A real service may send advance notices about quotas or policy changes. The existence of such notices does not authenticate this particular message.
Pause and ask whether the account dashboard shows the same deadline. If it does not, the email’s urgency should not override the account’s own information.
Familiar product names supply borrowed authority
Keynote, Pages, and Numbers sound like details only a technology company would mention. They are recognizable, specific, and easy to skim past.
In this context, they expose a mismatch. The notice calls itself webmail administration while borrowing a description of Apple’s cloud-storage ecosystem.
The fake Google login adds a second mismatch. A generic webmail team has not explained why its storage problem requires a Google password.
Scammers often copy legitimate wording without preserving the original context. The result can look polished at a glance but fall apart when its services are compared.
Do not rely solely on the presence of a typo. A well-written version could ask for the same password through the same untrusted route.
How the Upgrade Your Webmail Storage Plan Scam Works
Step 1: The email announces an unexplained account expiry
The subject places “expired” beside a future deletion date. That combination makes the problem feel both already real and still fixable.
The recipient may be addressed only by an email address or a generic greeting. The notice does not need an accurate storage reading to reach many inboxes.
It presents “System Administrator” as a sender identity. That phrase describes a role, not the organization that actually operates your account.
Even if the displayed address resembles a provider, the visible name can be forged. Compare the full address and authentication details with established notices.
Do not use the message to learn which company manages your mail. You should be able to identify that relationship from your account, bill, or workplace administrator.
Step 2: A storage story makes the upgrade seem necessary
The body says mail, documents, contacts, and device backups could stop working. It offers two choices: increase storage or reduce what you use.
Those alternatives resemble genuine quota advice, which softens the suspicious request. A reader may think the email is helpful rather than threatening.
But the text never shows a trustworthy usage figure, plan name, billing account, or verified storage screen. It asks the reader to accept an unsupported diagnosis.
If a provider actually measured your usage, you can inspect that measurement by opening its app or website yourself. An email button is unnecessary.
Step 3: The upgrade link leaves the claimed service
The reported link points to a domain unrelated to the account’s supposed provider. The domain may be replaced in later copies of the campaign.
What matters is the handoff. The sender moves the reader from an email about storage to a website the sender selected.
On a computer, you may be able to preview the link without opening it. On a phone, do not long-press if your application automatically opens links.
A tidy address or HTTPS padlock does not prove the site is authorized. Encryption can protect a connection to the wrong recipient just as effectively.
The safest route is to ignore the link and enter the known provider address independently. That removes the sender’s control over navigation.
Step 4: A Google-style sign-in page requests credentials
The reported destination displays Google’s logo and asks for an email address and password. It is a counterfeit page, not the real account workflow.
This is where the alleged storage purchase becomes password theft. The form does not display a genuine account’s storage usage or the plan being purchased.
A prefilled address would not make it legitimate. The sender already knows the address to which the message was delivered and can insert it into a page.
A copied logo also proves nothing. Google did not send this campaign simply because its branding appears at the destination.
Do not type a one-time code if the site asks for one afterward. A phisher can use a code to finish a login attempt in real time.
Step 5: A stolen mailbox can support further abuse
With a valid password, an attacker may try to read messages, change account recovery options, or request password resets for connected services.
They may add a forwarding rule so future mail continues reaching them. That route can remain even after the original password is changed.
A work mailbox can expose customer conversations, invoices, or internal documents. Personal mail may contain identity records and access links for other accounts.
These are possible consequences, not proof that every reader of the email was compromised. The exposure depends on whether credentials were submitted and accepted.
There is no evidence that merely receiving this message deletes an account, charges a card, or installs software. Do not let fear invent a larger incident.
How to Check Whether Your Storage Is Actually Full
Look at the provider’s own meter
Open the mail service from its usual app, bookmark, or address you type yourself. Find storage usage in account settings, not through the email.
Some providers combine mail, cloud files, and photos in one quota. Others sell separate hosting and mailbox limits. The genuine interface should explain which applies.
Compare the measured usage with the plan you currently pay for. An unexplained “expired” subject cannot replace these account facts.
If the mailbox belongs to a workplace, ask its administrator. Employees should not guess which subscription, domain, or storage pool a bulk notice refers to.
Check billing without buying through the warning
Open your existing billing history and review recent renewal notices. A genuine plan change should identify the provider, amount, terms, and payment method.
The reported campaign’s immediate destination seeks a password, not a transparent plan comparison. That mismatch matters more than the word “upgrade.”
Do not enter card information because another page appears after login. A phisher can change the sequence once a visitor follows the first instruction.
If you already paid for more storage through an unfamiliar site, contact the card issuer and the real provider separately. Treat both the payment and login as exposures.
Resolve a real quota issue in the right place
Once your provider confirms that storage is nearly full, archive or delete unnecessary items using its authenticated tools. Check trash retention before removing important records.
If an upgrade is appropriate, review the recurring price and cancellation policy inside the provider’s normal checkout. Save the confirmation for your records.
Mail may still fail for unrelated reasons, including a wrong address or server issue. A fake quota email should not become your universal explanation.
Ask support about a specific error rather than telling them the scam email’s diagnosis. That keeps the investigation anchored to actual account behavior.
What to Do if You Have Fallen Victim to This Scam
Stop using the linked page and record what happened. Note whether you only clicked, entered a password, approved a sign-in, submitted a code, or paid.
Keep the original email and screenshot for reporting. Do not reopen the suspicious link to collect more evidence.
Change the exposed password through the real provider. Open the known account address from a clean browser session and replace the password with a unique one.
If that password was reused elsewhere, change it on each affected service. A password manager helps avoid repeating the same secret.
End unauthorized access, not just the old password. Review signed-in devices, active sessions, application permissions, recovery email, and phone number.
Remove anything unfamiliar and enable strong multifactor authentication. Ask workplace IT to inspect access logs for a managed account.
Inspect mail settings and recent activity. Check forwarding rules, filters, delegated users, sent mail, deleted messages, and password-reset notices.
A quiet inbox does not mean the account is secure. An attacker may prefer hidden forwarding over visible disruption.
Address any payment or document exposure. If you entered a card, call its issuer using the number on the card and ask about replacement or dispute options.
If sensitive files or business correspondence were accessed, notify the relevant organization. Keep a timeline of affected accounts and dates.
Scan only when the exposure warrants it. Merely receiving or reading the message does not establish malware. Scan with Malwarebytes if a file downloaded or ran.
AdGuard can reduce future malicious-page exposure, but neither tool can undo a submitted password. Account recovery remains the priority.
Report the message and warn contacts if necessary. Use your mail provider’s phishing-report function and follow organizational incident rules.
If suspicious messages went out from your account, tell contacts through another trusted channel without forwarding the dangerous link.
Is Your Device Infected? Run a Free Malware Scan
Slow performance, constant pop-ups, or strange behavior? These are classic signs of a malware infection. The fastest way to find out is to scan your device with Malwarebytes Free — one of the most trusted malware removal tools available.
The free version detects and removes the most common threats, including:
- Adware — the cause of those annoying pop-ups
- Browser hijackers — unwanted redirects and changed homepages
- Trojans and spyware — hidden programs stealing your data
- Potentially unwanted programs (PUPs) — software you never asked for
👉 Select your device below — Windows, Mac, or Android — then follow the simple steps to download Malwarebytes, scan your system, and remove any threats it finds. The scan usually takes 5 to 20 minutes.
Run a Malware Scan with Malwarebytes for Windows
Malwarebytes is one of the most popular and trusted anti-malware tools for Windows — and it’s completely free for removing infections. It catches threats that many antivirus programs miss, including adware, browser hijackers, and trojans. Follow the steps below to scan and clean your PC in just a few minutes.
Download Malwarebytes
Click the button below to download the latest version of Malwarebytes for Windows from the official source. The free version is all you need — it will scan your computer and remove adware, browser hijackers, and other malicious software at no cost.
Download MalwarebytesOfficial installer for Windows 11 and 10. Your download starts right away.Want real-time protection? See Malwarebytes Premium Malwarebytes Free for WindowsScans and removes malware at no cost
-
Install Malwarebytes
When the download finishes, open your Downloads folder and double-click the MBSetup file. If Windows shows a User Account Control pop-up, click “Yes” to allow the installation.

Follow the On-Screen Prompts to Install Malwarebytes
The setup wizard will walk you through a few quick screens:
-
Choose where you’re installing the program — “Personal Computer” or “Work Computer” — then click Next.

-
Malwarebytes will now install on your device. This usually takes under a minute.

-
When installation is complete, the “Welcome to Malwarebytes” screen will open automatically.

-
On the final screen, click Open Malwarebytes to launch the program.

-
Enable “Scan for Rootkits”
Before scanning, turn on rootkit detection so Malwarebytes can find even the most hidden threats. Click the Settings gear icon on the left side of the screen.

In the settings menu, find “Scan for rootkits” and click the toggle so it turns blue.

Done? Click “Dashboard” in the left pane to return to the main screen.
Start the Scan
Click the blue Scan button. Malwarebytes will automatically update its virus database and start checking your computer for malware.

-
Wait for the Scan to Finish
The scan checks your entire system for browser hijackers and other malicious programs, so it can take 5 to 20 minutes depending on your computer. Feel free to do something else — just check back occasionally to see the progress.

-
Quarantine the Detected Threats
When the scan is done, you’ll see a list of everything Malwarebytes found — malware, adware, and potentially unwanted programs. Click the “Quarantine” button to remove all of them at once.

Malwarebytes will now remove the malicious files and registry entries and move them safely into quarantine.

-
Restart Your Computer
Some threats can only be fully removed after a reboot. If Malwarebytes asks you to restart, click Yes. Once you’re logged back in, Malwarebytes has finished removing the threats it found.

That’s it — your Windows PC is now clean of trojans, adware, and other malware, and should be back to running smoothly.
If you are still having problems with your computer after completing these instructions, then please follow one of the steps:
- Run a computer scan with ESET Online Scanner
- Ask for help in our Windows Malware Removal Help & Support forum.
Run a Malware Scan with Malwarebytes for Mac
Malwarebytes for Mac is a free on-demand scanner that removes the malware other security software tends to miss — adware, browser hijackers, and unwanted programs included. Cleaning an infected Mac with Malwarebytes has always been completely free, and it’s our go-to recommendation. Follow the steps below to scan and clean your Mac in just a few minutes.
-
Download Malwarebytes for Mac
Click the button below to download the latest version of Malwarebytes for Mac.
Download MalwarebytesOfficial installer for macOS. Your download starts right away.Want real-time protection? See Malwarebytes PremiumMalwarebytes Free for MacScans and removes malware at no cost -
Open the Malwarebytes setup file
When the download finishes, open your Downloads folder and double-click the setup file to begin the installation.

-
Follow the On-Screen Prompts to Install Malwarebytes
The Malwarebytes for Mac Installer will guide you through a few quick screens. Click “Continue” and keep following the prompts until the installation completes.



When the installation is complete, Malwarebytes opens to the Welcome to Malwarebytes screen. Click “Get started“.
-
Select “Personal Computer” or “Work Computer”
Malwarebytes will ask what type of computer you’re installing it on. Click either Personal Computer or Work Computer, whichever applies.

-
Start the Scan
Click the “Scan” button. Malwarebytes will automatically update its detection database and begin checking your Mac for malware.

-
Wait for the Scan to Finish
Malwarebytes will scan your Mac for adware, browser hijackers, and other malicious programs. This can take a few minutes, so feel free to do something else — just check back occasionally to see the progress.

-
Quarantine the Detected Threats
When the scan is done, you’ll see a list of everything Malwarebytes found. Click the “Quarantine” button to remove all the threats at once.

-
Restart Your Mac
Malwarebytes will now remove all the malicious files it found. Some threats can only be fully removed after a reboot — if Malwarebytes asks you to restart, allow it. Once you’re logged back in, your Mac is clean.

That’s it — your Mac is now free of adware, rogue browser extensions, and other potentially harmful software.
If you are still experiencing problems while trying to remove a malicious program from your computer, please ask for help in our Mac Malware Removal Help & Support forum.
Run a Malware Scan with Malwarebytes for Android
Malwarebytes for Android automatically detects and removes dangerous threats like malware and ransomware so you don’t have to worry about your most-used device being compromised. Aggressive detection of adware and potentially unwanted programs keeps your Android phone or tablet running smooth.
-
Download Malwarebytes for Android.
You can download Malwarebytes for Android by clicking the link below.
Get Malwarebytes for AndroidOpens Google Play in a new tab.Want real-time protection? See Malwarebytes Premium for AndroidMalwarebytes for AndroidScans your phone and removes malware at no cost -
Install Malwarebytes for Android on your phone.
In the Google Play Store, tap “Install” to install Malwarebytes for Android on your device.

When the installation process has finished, tap “Open” to begin using Malwarebytes for Android. You can also open Malwarebytes by tapping on its icon in your phone menu or home screen.

-
Follow the on-screen prompts to complete the setup process
When Malwarebytes will open, you will see the Malwarebytes Setup Wizard which will guide you through a series of permissions and other setup options.
This is the first of two screens that explain the difference between the Premium and Free versions. Swipe this screen to continue.
Tap on “Got it” to proceed to the next step.
Malwarebytes for Android will now ask for a set of permissions that are required to scan your device and protect it from malware. Tap on “Give permission” to continue.
Tap on “Allow” to permit Malwarebytes to access the files on your phone.
-
Update database and run a scan with Malwarebytes for Android
You will now be prompted to update the Malwarebytes database and run a full system scan.

Click on “Update database” to update the Malwarebytes for Android definitions to the latest version, then click on “Run full scan” to perform a system scan.

-
Wait for the Malwarebytes scan to complete.
Malwarebytes will now start scanning your phone for adware and other malicious apps. This process can take a few minutes, so we suggest you do something else and periodically check on the status of the scan to see when it is finished.

-
Click on “Remove Selected”.
When the scan has been completed, you will be presented with a screen showing the malware infections that Malwarebytes for Android has detected. To remove the malicious apps that Malwarebytes has found, tap on the “Remove Selected” button.

-
Restart your phone.
Malwarebytes for Android will now remove all the malicious apps that it has found. To complete the malware removal process, Malwarebytes may ask you to restart your device.
That’s it — your Android phone is now clean — no more malicious apps, adware, or browser redirects.
If you are still having problems with your phone after completing these instructions, then please follow one of the steps:
- Restore your phone to factory settings by going to Settings > General management > Reset > Factory data reset.
- Ask for help in our Mobile Malware Removal Help & Support forum.
Stay Protected: Block Ads and Malicious Sites
Now that your device is clean, keep it that way. Most infections start with a malicious ad or a fake download button — so blocking them at the source is your best defense.
We recommend AdGuard, which blocks malicious ads, phishing pages, and dangerous redirects before they can reach you.
👉 Download AdGuard and browse safely
What the Evidence Does Not Show
The reported sample documents a deceptive storage email and a counterfeit Google-style login. It does not prove every recipient clicked or lost account access.
It also does not establish a real storage invoice, a successful card charge, or a malware download from this exact lure.
A later version may use another domain, deadline, or provider logo. The useful test is whether the email can be verified inside your authentic account.
Our lead image is an original fictional interface showing the storage-upgrade pretext. Its sender and button are nonfunctional, not a captured victim email.
Frequently Asked Questions
Is the “Upgrade Your Webmail Storage Plan” email legitimate?
The reported specimen is phishing. Check any genuine storage concern by opening your actual provider account independently.
Why does a webmail notice mention Keynote, Pages, and Numbers?
Those Apple applications are associated with iCloud storage. Their presence in a generic webmail warning is a copied-content mismatch, not proof of Apple involvement.
Does the Google logo mean I should use my Google password?
No. A counterfeit page can display Google’s branding. Never sign in through a page reached from an unverified storage warning.
Will my email account be deleted on the date in the subject?
The suspicious email provides no independent evidence of that deadline. Check the provider’s authenticated dashboard and contact its real support if needed.
What if I clicked but did not enter information?
Close the page and inspect downloads or permissions you accepted. A click alone does not prove a password was stolen.
Should I buy a larger plan if my mailbox is really full?
Possibly, but make that decision inside your provider’s own account. Review actual usage, alternatives, renewal price, and cancellation terms first.
The Bottom Line
The fake webmail storage warning uses a real concern to route readers toward a counterfeit Google login. Its borrowed Apple wording is an important clue.
Check storage and billing inside the service you already use. If you entered a password, secure the mailbox and review existing access immediately.








