

You open a new tab and start a familiar search, but an unfamiliar address appears along the way. The results may still look perfectly ordinary.
That makes the change easy to ignore. Before accepting it as your browser’s new normal, check which extension is choosing the route.
Overview
Quick Search changes where your searches begin
The find.flashysearches.com redirect is associated with a browser extension identified as Quick Search. It is reported to change search and new-tab settings.
That means an ordinary address-bar query can pass through an intermediary you didn’t choose. Seeing recognizable results afterward doesn’t explain why that intermediary is present.
If the change was unwanted, remove the responsible extension and restore your preferred settings. You don’t need to keep using it because searches still finish.
The promotion promises convenience, not a necessary browser repair
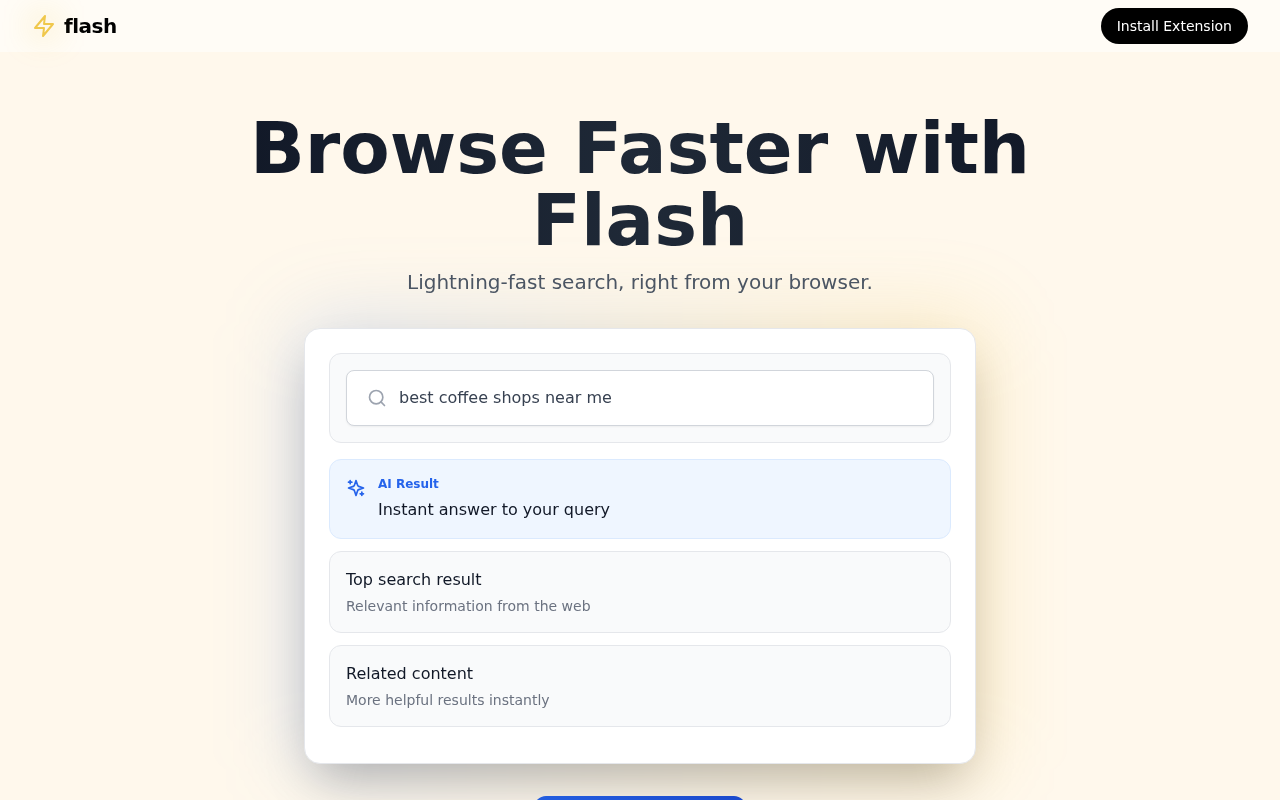
The captured Flash page promotes faster browsing and an extension installation. Its interface includes a sample search, an AI-result card, and related-result examples.
Those are marketing elements on a landing page, not a demonstration that the extension improves your particular browser or needs to remain installed.
The original screenshot above shows the promotion itself. It does not show an installation test or prove what information a browser extension collected.
What the unwanted change does and doesn’t tell you
- A search route you didn’t approve deserves investigation.
- Bing appearing at the end does not make Bing the unwanted extension.
- Deleting history alone doesn’t restore an extension-controlled setting.
- A redirect isn’t automatic proof that every saved password was stolen.
The reported destination can vary. Focus on the extension and settings controlling your browser, not on a single final search-results address.
Why Normal-Looking Results Can Hide an Unwanted Detour
People usually judge a search by whether it finds something useful. An extra domain can be difficult to notice if it appears only briefly.
That brief appearance still matters. A browser setting determines where a query goes before any results arrive.
You may be comfortable sending a query to your chosen engine without wanting an unrelated service in between. Those are separate choices.
Don’t treat a familiar final logo as approval of the whole route. A redirect can lead to a legitimate service after changing how you reached it.
Similarly, a browser extension can have a polished description and still be unwanted on your computer. Its advertised benefit isn’t an obligation to keep it.
Some settings changes are clearly requested during installation. Others may be accepted without the person understanding what the choice affects.
The practical cleanup question is whether the installed extension is controlling behavior you no longer want. You can remove that control without proving every possible allegation.
A privacy assessment should stay specific. The existence of a detour doesn’t establish theft of payment details or documents from elsewhere on the device.
If you disclosed sensitive information to a page reached through the route, investigate that event separately. Browser cleanup cannot undo information already submitted.
How the Quick Search Redirect Takes Over the Search Route
Step 1: A browsing feature is offered as an upgrade
A promotional page presents the extension as a way to browse or search more conveniently. The installation button makes adding it the obvious next task.
Before accepting an extension, consider which problem it solves. You don’t need an unfamiliar add-on merely to use an established search engine.
Read the browser’s permission prompt as part of the decision. A convenient description and a request for broad access are not the same thing.
If the route began with an unrelated download or advertisement, don’t assume the extension was required for the content you originally wanted.
An installer offering several extras can create confusion about what you accepted. Record recently added software as well as recently added browser extensions.
Step 2: The extension changes browser-controlled preferences
The reported behavior involves the default search engine and new-tab route. These settings affect actions you repeat throughout a normal browsing session.
A new tab, homepage, startup page, and address-bar search aren’t interchangeable. Restoring one does not necessarily restore the others.
A browser may indicate when an extension controls a preference. That message can explain why a setting seems unavailable or changes back.
Don’t keep editing the visible address while leaving the controller active. Find the extension responsible for the preference first.
If the browser is managed by work or school, ask the administrator before changing policy. Legitimate organizational management should not be removed indiscriminately.
Step 3: Everyday searches keep using the intermediary
Once configured, the route can become part of normal browsing. You may see the unfamiliar hostname only while a search is loading.
Take note of that hostname and which action triggered it. Searching from the address bar and clicking a website’s own search button can follow different paths.
That distinction helps identify what needs repair. A website-specific link problem isn’t necessarily a browser-wide search setting.
After cleanup, test the same everyday actions again. A successful search through your selected engine is more informative than simply closing the offending tab.
If the route returns after a restart or synchronization, investigate the source of that recurrence rather than assuming the reset never worked.
Check the Extension, Browser Profile, and Installation History
The name alone may not identify the right add-on
Quick Search is a generic name. Don’t remove an unrelated tool solely because its display name contains those words.
Compare the extension’s details with the changed search route and installation timing. Keep its identifier or details page available for a support request.
A screenshot of the extension list can help document what was installed. Hide account details before posting that image publicly.
Check the profile that actually has the problem
Browsers can contain separate personal and work profiles. A change in one profile doesn’t establish that every profile or device has the same configuration.
Run the same test in the affected profile after repair. Otherwise, a clean profile can give a reassuring result while the original route remains unchanged.
When synchronization is involved, review which settings and extensions are shared. Coordinate cleanup across affected devices instead of repeatedly restoring an unwanted configuration.
Don’t invent a legal company from a landing page
The Flash branding describes the promotion. It doesn’t independently identify every party involved in an extension, distribution campaign, or redirected search.
Likewise, the two matching promotion pages don’t establish the identity of an operator. Shared presentation is a connection to record, not a complete ownership investigation.
The warning here is grounded in unwanted browser control. It doesn’t require unsupported claims about a company’s country, staff, or payment practices.
Separate a Search Change From Other Browser Interruptions
A startup page and a new tab are different settings
Close and reopen the browser, then open an additional tab. Note whether the unfamiliar route appears in both situations or only one.
A page configured to open at startup can persist after the address-bar search engine is restored. Check startup entries rather than repeatedly changing the search preference.
The Home button can have another destination again. Its behavior doesn’t necessarily tell you which service handles ordinary searches.
These distinctions let you describe a precise symptom when asking for help. Saying the browser is broken provides much less useful information.
A site notification is not an installed search extension
If unwanted alerts appear outside the original page, inspect notification permissions. A website permission and an extension installation are separate browser features.
Removing an add-on may leave an unrelated site’s notification permission untouched. Revoke unwanted site access through browser settings if that symptom is also present.
Don’t use a button inside a frightening notification to find the settings. It may open another website rather than the browser’s own controls.
Keep the diagnosis narrow. A notification problem doesn’t establish that Quick Search caused it, even when both appeared during the same period.
A selected engine can coexist with other search shortcuts
Some browsers support site-search shortcuts alongside the default provider. An unwanted entry can affect a particular action without replacing every search.
Check which action you performed before the detour. A keyword shortcut, a new-tab search box, and the address bar may not share one configuration.
Use settings you understand and record changes one at a time. If a field is managed or unclear, seek browser-specific guidance before editing it.
After restoration, repeat the original action with an ordinary nonsensitive query. Don’t test by entering account details or visiting risky advertisements.
A clean result should remain consistent after a normal restart. If it doesn’t, the timing of the return is valuable evidence for identifying the controller.
What to Do If Find.flashysearches.com Keeps Appearing
Record the affected action. Note whether the address appears after opening a tab, starting the browser, or submitting an address-bar search.
Keep the hostname and affected profile name in a private note. Don’t visit suspicious pages repeatedly merely to capture a better example.
Remove the unwanted extension. In Chrome, open the menu, choose Extensions, then Manage Extensions. Inspect the relevant add-on and remove it if unwanted.
For a managed browser, contact IT if removal is blocked. Don’t run a policy-deletion script that could dismantle legitimate controls.
Other Chromium-based browsers have their own extension controls. Use the installed browser’s settings rather than assuming every menu label matches Chrome.
Restore your chosen search engine. Open browser settings and review the search-engine configuration after removing the controller.
Google’s search-engine instructions explain Chrome’s controls. Choose the engine you intended, and inspect unfamiliar shortcuts or site-search entries.
Check the new-tab and startup behavior separately. A correct default search engine doesn’t necessarily undo every related extension change.
Inspect recent installed programs. If the extension arrived alongside a download, review that software’s origin and whether any other unwanted components were added.
Remove programs you can identify as unwanted through normal system controls. Don’t delete arbitrary folders simply because their creation date looks recent.
Scan for additional unwanted software. Run Malwarebytes on the affected operating system and review findings, rather than treating the browser reset as a system scan.
The guide below provides the applicable device sections. AdGuard can reduce some intrusive advertising and risky redirects, but it doesn’t remove an installed extension by itself.
Use a browser reset if unwanted behavior remains. Consult Chrome’s unwanted-software guidance and understand what settings will change.
Re-enable only extensions you trust afterward. Don’t restore the same unknown add-on merely because a familiar feature is temporarily missing.
Test after restarting. Open a fresh tab, search normally, and check startup behavior in the original affected profile.
If the detour reappears, document when it returned. Synchronization, another installed component, or an authorized policy may require a more specific explanation.
Address any separate disclosure. If you entered a password or paid on a questionable destination, recover that account or payment through the genuine provider.
A scan won’t reverse a transaction. Conversely, a search redirect alone isn’t grounds to claim all your accounts have already been compromised.
Is Your Device Infected? Run a Free Malware Scan
Slow performance, constant pop-ups, or strange behavior? These are classic signs of a malware infection. The fastest way to find out is to scan your device with Malwarebytes Free — one of the most trusted malware removal tools available.
The free version detects and removes the most common threats, including:
- Adware — the cause of those annoying pop-ups
- Browser hijackers — unwanted redirects and changed homepages
- Trojans and spyware — hidden programs stealing your data
- Potentially unwanted programs (PUPs) — software you never asked for
👉 Select your device below — Windows, Mac, or Android — then follow the simple steps to download Malwarebytes, scan your system, and remove any threats it finds. The scan usually takes 5 to 20 minutes.
Run a Malware Scan with Malwarebytes for Windows
Malwarebytes is one of the most popular and trusted anti-malware tools for Windows — and it’s completely free for removing infections. It catches threats that many antivirus programs miss, including adware, browser hijackers, and trojans. Follow the steps below to scan and clean your PC in just a few minutes.
Download Malwarebytes
Click the button below to download the latest version of Malwarebytes for Windows from the official source. The free version is all you need — it will scan your computer and remove adware, browser hijackers, and other malicious software at no cost.
Download MalwarebytesOfficial installer for Windows 11 and 10. Your download starts right away.Want real-time protection? See Malwarebytes Premium Malwarebytes Free for WindowsScans and removes malware at no cost
-
Install Malwarebytes
When the download finishes, open your Downloads folder and double-click the MBSetup file. If Windows shows a User Account Control pop-up, click “Yes” to allow the installation.

Follow the On-Screen Prompts to Install Malwarebytes
The setup wizard will walk you through a few quick screens:
-
Choose where you’re installing the program — “Personal Computer” or “Work Computer” — then click Next.

-
Malwarebytes will now install on your device. This usually takes under a minute.

-
When installation is complete, the “Welcome to Malwarebytes” screen will open automatically.

-
On the final screen, click Open Malwarebytes to launch the program.

-
Enable “Scan for Rootkits”
Before scanning, turn on rootkit detection so Malwarebytes can find even the most hidden threats. Click the Settings gear icon on the left side of the screen.

In the settings menu, find “Scan for rootkits” and click the toggle so it turns blue.

Done? Click “Dashboard” in the left pane to return to the main screen.
Start the Scan
Click the blue Scan button. Malwarebytes will automatically update its virus database and start checking your computer for malware.

-
Wait for the Scan to Finish
The scan checks your entire system for browser hijackers and other malicious programs, so it can take 5 to 20 minutes depending on your computer. Feel free to do something else — just check back occasionally to see the progress.

-
Quarantine the Detected Threats
When the scan is done, you’ll see a list of everything Malwarebytes found — malware, adware, and potentially unwanted programs. Click the “Quarantine” button to remove all of them at once.

Malwarebytes will now remove the malicious files and registry entries and move them safely into quarantine.

-
Restart Your Computer
Some threats can only be fully removed after a reboot. If Malwarebytes asks you to restart, click Yes. Once you’re logged back in, Malwarebytes has finished removing the threats it found.

That’s it — your Windows PC is now clean of trojans, adware, and other malware, and should be back to running smoothly.
If you are still having problems with your computer after completing these instructions, then please follow one of the steps:
- Run a computer scan with ESET Online Scanner
- Ask for help in our Windows Malware Removal Help & Support forum.
Run a Malware Scan with Malwarebytes for Mac
Malwarebytes for Mac is a free on-demand scanner that removes the malware other security software tends to miss — adware, browser hijackers, and unwanted programs included. Cleaning an infected Mac with Malwarebytes has always been completely free, and it’s our go-to recommendation. Follow the steps below to scan and clean your Mac in just a few minutes.
-
Download Malwarebytes for Mac
Click the button below to download the latest version of Malwarebytes for Mac.
Download MalwarebytesOfficial installer for macOS. Your download starts right away.Want real-time protection? See Malwarebytes PremiumMalwarebytes Free for MacScans and removes malware at no cost -
Open the Malwarebytes setup file
When the download finishes, open your Downloads folder and double-click the setup file to begin the installation.

-
Follow the On-Screen Prompts to Install Malwarebytes
The Malwarebytes for Mac Installer will guide you through a few quick screens. Click “Continue” and keep following the prompts until the installation completes.



When the installation is complete, Malwarebytes opens to the Welcome to Malwarebytes screen. Click “Get started“.
-
Select “Personal Computer” or “Work Computer”
Malwarebytes will ask what type of computer you’re installing it on. Click either Personal Computer or Work Computer, whichever applies.

-
Start the Scan
Click the “Scan” button. Malwarebytes will automatically update its detection database and begin checking your Mac for malware.

-
Wait for the Scan to Finish
Malwarebytes will scan your Mac for adware, browser hijackers, and other malicious programs. This can take a few minutes, so feel free to do something else — just check back occasionally to see the progress.

-
Quarantine the Detected Threats
When the scan is done, you’ll see a list of everything Malwarebytes found. Click the “Quarantine” button to remove all the threats at once.

-
Restart Your Mac
Malwarebytes will now remove all the malicious files it found. Some threats can only be fully removed after a reboot — if Malwarebytes asks you to restart, allow it. Once you’re logged back in, your Mac is clean.

That’s it — your Mac is now free of adware, rogue browser extensions, and other potentially harmful software.
If you are still experiencing problems while trying to remove a malicious program from your computer, please ask for help in our Mac Malware Removal Help & Support forum.
Run a Malware Scan with Malwarebytes for Android
Malwarebytes for Android automatically detects and removes dangerous threats like malware and ransomware so you don’t have to worry about your most-used device being compromised. Aggressive detection of adware and potentially unwanted programs keeps your Android phone or tablet running smooth.
-
Download Malwarebytes for Android.
You can download Malwarebytes for Android by clicking the link below.
Get Malwarebytes for AndroidOpens Google Play in a new tab.Want real-time protection? See Malwarebytes Premium for AndroidMalwarebytes for AndroidScans your phone and removes malware at no cost -
Install Malwarebytes for Android on your phone.
In the Google Play Store, tap “Install” to install Malwarebytes for Android on your device.

When the installation process has finished, tap “Open” to begin using Malwarebytes for Android. You can also open Malwarebytes by tapping on its icon in your phone menu or home screen.

-
Follow the on-screen prompts to complete the setup process
When Malwarebytes will open, you will see the Malwarebytes Setup Wizard which will guide you through a series of permissions and other setup options.
This is the first of two screens that explain the difference between the Premium and Free versions. Swipe this screen to continue.
Tap on “Got it” to proceed to the next step.
Malwarebytes for Android will now ask for a set of permissions that are required to scan your device and protect it from malware. Tap on “Give permission” to continue.
Tap on “Allow” to permit Malwarebytes to access the files on your phone.
-
Update database and run a scan with Malwarebytes for Android
You will now be prompted to update the Malwarebytes database and run a full system scan.

Click on “Update database” to update the Malwarebytes for Android definitions to the latest version, then click on “Run full scan” to perform a system scan.

-
Wait for the Malwarebytes scan to complete.
Malwarebytes will now start scanning your phone for adware and other malicious apps. This process can take a few minutes, so we suggest you do something else and periodically check on the status of the scan to see when it is finished.

-
Click on “Remove Selected”.
When the scan has been completed, you will be presented with a screen showing the malware infections that Malwarebytes for Android has detected. To remove the malicious apps that Malwarebytes has found, tap on the “Remove Selected” button.

-
Restart your phone.
Malwarebytes for Android will now remove all the malicious apps that it has found. To complete the malware removal process, Malwarebytes may ask you to restart your device.
That’s it — your Android phone is now clean — no more malicious apps, adware, or browser redirects.
If you are still having problems with your phone after completing these instructions, then please follow one of the steps:
- Restore your phone to factory settings by going to Settings > General management > Reset > Factory data reset.
- Ask for help in our Mobile Malware Removal Help & Support forum.
Stay Protected: Block Ads and Malicious Sites
Now that your device is clean, keep it that way. Most infections start with a malicious ad or a fake download button — so blocking them at the source is your best defense.
We recommend AdGuard, which blocks malicious ads, phishing pages, and dangerous redirects before they can reach you.
👉 Download AdGuard and browse safely
When Cleanup Seems to Work Only Temporarily
Pay attention to the moment the unwanted setting returns. Does it happen at browser launch, after another program opens, or after profile synchronization?
That timing can point toward the source. Changing several unrelated settings at once can make it harder to see which action mattered.
Keep a short record of what you removed and what you restored. A support volunteer can give better guidance when the sequence is clear.
If an extension reappears, don’t assume reinstalling the entire operating system is the only option. First identify what is reinstalling or enforcing it.
For a work computer, share the evidence with the administrator. A policy label needs interpretation, not an automatic decision that the organization itself is malicious.
On a shared household computer, check whether another person deliberately re-added the extension. Coordinating preferences can prevent repeated changes that look like persistence.
Avoid downloading a special remover from the same promotional route. That merely asks an unverified source to repair behavior associated with its own offer.
Also ignore support callers who demand payment to fix a search engine. Obtain help through a provider or community you independently identify.
The desired endpoint is simple: your chosen browser settings stay in place, and routine searches follow the route you intended.
Frequently Asked Questions
What is find.flashysearches.com?
It is a reported search intermediary promoted through Quick Search. The concern is unwanted control over searches and new tabs.
Is Bing the malware behind the redirect?
No. An unwanted route can end at a genuine search engine. Investigate the extension and intermediary rather than accusing the final results provider.
Will clearing browsing history remove Quick Search?
No. History cleanup doesn’t uninstall an extension or necessarily change its permissions. Remove unwanted control and restore the relevant browser preferences.
Why does changing the search engine not always help?
An active extension or policy may control the setting. Identify that controller before repeatedly editing a preference it can override.
Does the redirect prove my passwords were stolen?
Not by itself. Assess the extension’s actual access and any separate disclosure instead of assuming every possible privacy risk occurred.
Should I install an extension to search with Bing?
You can select an established engine through normal browser settings. Don’t accept an unfamiliar add-on solely because a promotion presents it as necessary.
The Bottom Line
Remove unwanted Quick Search control if the find.flashysearches.com redirect has replaced your chosen browsing route. Don’t mistake familiar results for permission to change your settings.
Restore the affected preferences, check for additional unwanted software, and test again after restarting. Investigate any actual account or payment exposure separately.

Join the discussion
0 commentsShare your experience or ask a question about this article.
Discussion
Start the conversation
Have a question or something useful to share? Add the first comment.