

A verification page interrupts what you were doing and asks for an extra step. It’s easy to treat the instruction as another annoying browser formality.
Sometimes that small interruption deserves your full attention. What you do next can matter far more than the page you originally wanted to open.
Overview
A Windows information stealer with more than one foothold
Lunex Stealer is malicious Windows software associated with theft of browser account data and cryptocurrency wallet information. Removing it requires attention to access already exposed.
Ontinue’s technical analysis describes a fake CAPTCHA delivery chain involving an installer, a loader, interference with security monitoring, and a final information-stealing component.
The important distinction is between stopping the software and recovering from its activity. Cleanup can’t recall a password or session that has already left the computer.
A verification task should not become a system instruction
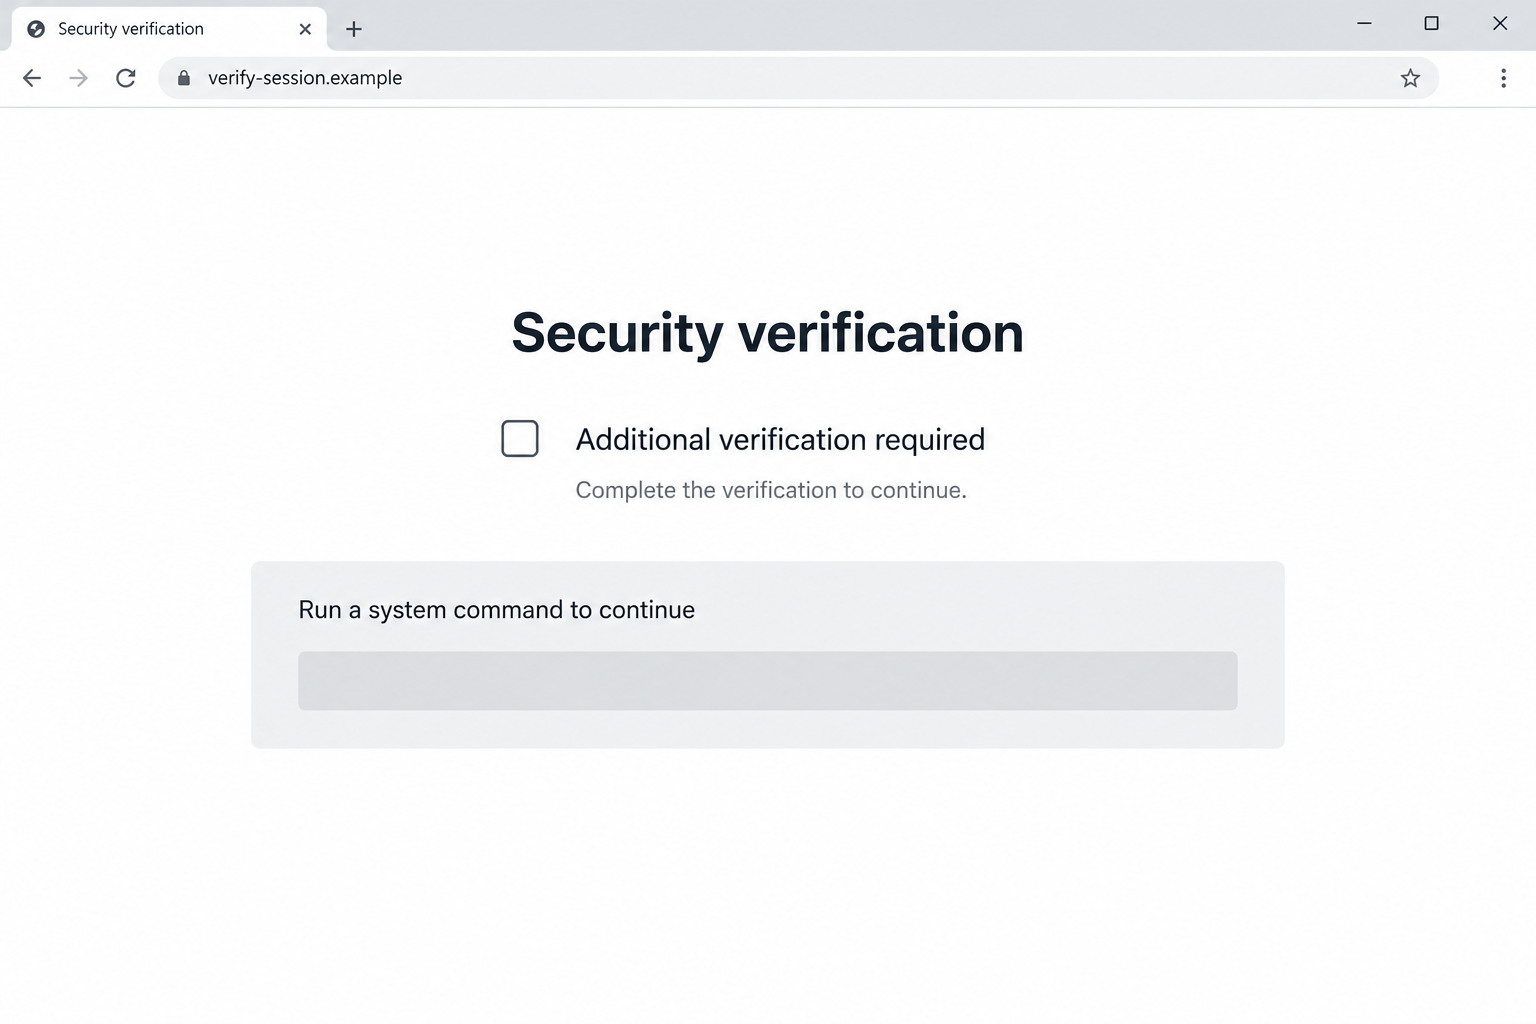
The reported entry point persuades a visitor to run a command. That’s a substantial change from checking a box or selecting pictures inside a webpage.
Don’t paste commands into Windows because an unfamiliar site calls them verification. A realistic-looking challenge doesn’t make its instructions safe.
The illustration shows that kind of suspicious request without supplying an executable command. It is an explanatory interface, not an original campaign capture.
The priorities if you think it ran
- Stop using the affected computer for private or financial activity.
- Preserve the incident timeline, especially on an employer’s device.
- Assess the complete infection rather than deleting one suspicious file.
- Recover exposed accounts and sessions from a separate clean device.
A detection name is useful evidence, but it doesn’t identify everything that happened. The response should reflect your actual execution history and accessible accounts.
Why a Stealer Can Remain Dangerous After a Password Change
Most people understand why a stolen password matters. Browser sessions are easier to overlook because they let you stay signed in without repeatedly entering that password.
If account access associated with a session is stolen, replacing the password may not terminate every existing connection. Use the provider’s session-revocation controls as well.
Start with accounts that can recover other accounts. An email inbox may receive reset links, billing messages, and warnings that an attacker would prefer you never see.
Then consider the services available through the affected browser: work systems, shopping accounts, cloud storage, financial platforms, and any administrative access.
This isn’t a reason to declare that every account was taken over. It’s a practical way to decide what deserves prompt inspection.
A wallet requires a different assessment. An exchange login, a browser extension, and a private recovery phrase do not expose the same form of control.
Don’t apply a universal remedy to all three. Ask the actual provider how to protect the specific access involved, using a route you independently trust.
Likewise, a password-manager database being present doesn’t automatically prove its protected contents were decrypted. Document the circumstances rather than guessing about every secret.
The useful question is what was available while the program might have been active. That leads to better decisions than judging the incident by visible symptoms alone.
How a Lunex Stealer Infection Can Unfold
Step 1: A webpage persuades the visitor to start an installer
The fake challenge makes the user perform the action that moves the attack out of the browser. That social instruction is the central warning sign.
Windows installers can do work without presenting the familiar sequence of setup windows. A quiet desktop isn’t reliable evidence that nothing started.
If you followed such instructions, record whether you pasted text, pressed Enter, downloaded a file, or approved a prompt. Those distinctions help reconstruct execution.
Don’t repeat the command to see what it does. The original webpage and your memory of the action are enough to begin seeking help.
Step 2: Supporting software interferes with visibility
The analyzed chain abuses a vulnerable signed driver to interfere with security monitoring before the stealer is deployed. A signature alone doesn’t guarantee safe behavior.
This explains why a security application’s visible presence isn’t the whole answer. A running program and a trustworthy view of system activity are different things.
Don’t react by disabling protections yourself or adding exclusions for the suspect file. That would make a difficult assessment harder.
For a managed computer, tell the security team about any protection alerts or unexpected changes. It can compare the device’s local state with other records.
Step 3: Information collection creates risks outside the computer
Ontinue reports browser credential and session collection alongside wallet-data theft. What any individual victim lost still depends on the particular device and activity.
Once information has been copied, uninstalling a program can’t make the remote copy disappear. Account recovery needs to proceed alongside device cleanup.
Use a clean device for that work. Entering replacement credentials into a computer still under assessment can expose the new credentials too.
If work access was available, involve the organization even when no unauthorized transaction is visible. The consequences may extend beyond your personal inbox.
Step 4: A remaining helper can outlast the main file
The research describes persistent browser-linked access through a native-messaging helper. Deleting only the main stealer executable therefore isn’t an adequate cleanup plan.
Persistence means software has a way to start again or continue operating. It doesn’t mean every unfamiliar startup entry on your computer is malicious.
A technician needs to assess the associated components together. Randomly removing drivers, registry entries, or browser files can damage legitimate software without eliminating the threat.
If detections return, preserve that information and escalate. Repeatedly deleting the same file without understanding what restores it is not a dependable resolution.
What to Record Before You Start Repairing Everything
Build a short, usable timeline
Note when the verification page appeared, what you did, and when any warning followed. Approximate times are more useful than pretending to remember exact seconds.
Keep the original message or website address that led there. Don’t send active malware to friends or colleagues as a way of asking whether it’s dangerous.
If security software supplied a detection name, record its exact wording and status. Detected, blocked, quarantined, and allowed are not interchangeable outcomes.
Identify the scope of access
Make a private list of important services used on the computer. Include accounts that were already signed in, not only passwords you typed afterward.
Record whether cloud storage or business resources were accessible. Your employer may have obligations or incident procedures that a personal cleanup checklist cannot address.
Avoid putting actual passwords or recovery phrases in the list. The aim is to document exposure without creating another sensitive file to lose.
Choose evidence preservation over guesswork
For an organization, the security team should decide whether a device image or other records are needed before destructive repair.
On a personal PC, seek reputable help if you cannot establish what ran. Don’t let an unsolicited caller sell you a diagnosis based only on this article’s title.
A family name in an alert isn’t a complete forensic report. It is a starting point for containment, investigation, and recovery.
Before You Trust the Browser Again
A browser profile contains more than bookmarks. It may hold remembered sessions, extensions, preferences, and links to other services used throughout the day.
If you rebuild a computer, decide what to restore instead of importing the entire old environment automatically. Convenience can bring back a configuration you meant to investigate.
Keep essential documents separate from executable installers and unknown scripts. Ask the person handling recovery which files need checking before being opened.
Do not assume a newly installed browser makes the underlying computer clean. System-level components require assessment outside the browser’s own settings.
The reverse is also important: replacing Windows doesn’t automatically terminate access already established on a remote service. Complete account recovery separately.
For workplace access, identify whether the browser could reach administrative systems. An employee’s ordinary work session can carry permissions that matter to colleagues or customers.
Let the responsible team decide whether additional secrets need rotation. Examples may include application credentials or service tokens accessible from the device.
Don’t rotate shared business access informally without coordination. A rushed change can interrupt other users while leaving the actual exposed route unaddressed.
If personal payment details were saved, tell the issuer about relevant suspicious activity. The presence of stored details doesn’t by itself prove a fraudulent charge occurred.
Keep a distinction between precaution and confirmed loss in your records. That makes later reports clearer and prevents an uncertain incident from becoming an inaccurate accusation.
Also consider where security notifications are delivered. Recovering a financial account while leaving its notification mailbox exposed can leave an important blind spot.
Use an existing trusted contact method if you’re locked out. Search advertisements and unsolicited support replies can introduce another impersonator during an already stressful recovery.
A legitimate recovery process may take time. Don’t replace it with someone promising instant access in exchange for a private payment or remote control.
Finally, agree when the computer can return to normal use. That decision should reflect the cleanup findings and intended use, not merely your need to finish work.
Keep the incident notes after recovery. If a later account alert appears, those notes can help establish whether the event overlaps the period of possible exposure.
What to Do If Lunex Stealer May Have Run
Contain the affected PC. Disconnect its network access and stop logging in to sensitive services there while the incident is assessed.
If it belongs to work, contact IT from another device. Follow its evidence-preservation instructions rather than wiping the machine yourself.
Use the Windows removal guidance. Run Malwarebytes from a trusted source, update its protection data, and review the complete scan results.
The reusable guide below contains device-specific sections. Use the Windows section for this threat, not instructions meant for a different operating system.
Ask for help if security tools cannot run or findings keep returning. Don’t solve an installation problem by disabling security controls for an unfamiliar download.
Consider an offline assessment when appropriate. Microsoft documents offline scanning for threats that can hide while Windows is running.
Save your work before a scan that restarts the computer. On a managed system, let the responsible team select the procedure and timing.
Recover priority accounts elsewhere. From a known-clean device, replace affected credentials and end unrecognized sessions using the real provider’s controls.
Check recovery addresses, authentication methods, app access, and mailbox forwarding. Changing one password doesn’t automatically remove every route back into an account.
Assess financial and wallet exposure specifically. Tell a bank or exchange about actual suspicious access or transactions, including their timing and references.
If private wallet control may be exposed, use that wallet’s official recovery guidance. Don’t give a recovery phrase to someone offering to secure it.
Choose a trustworthy recovery point. If rebuilding is necessary, preserve needed documents carefully and obtain fresh software from established vendors.
Avoid restoring the suspect installer, unknown extensions, or a full environment that may reintroduce the problem. A backup needs assessment before reuse.
Verify behavior after cleanup. Check that security protections work, the operating system updates normally, and previously identified unwanted components haven’t returned.
Continue monitoring important account activity. A malware-free device doesn’t tell you whether stolen access was used before cleanup.
Close the route that persuaded you to install. Keep browser protections enabled, update applications, and reject verification instructions that leave the webpage to run commands.
AdGuard can reduce exposure to some malicious advertisements and redirects. It isn’t a substitute for refusing a system command from an untrusted page.
Is Your Device Infected? Run a Free Malware Scan
Slow performance, constant pop-ups, or strange behavior? These are classic signs of a malware infection. The fastest way to find out is to scan your device with Malwarebytes Free — one of the most trusted malware removal tools available.
The free version detects and removes the most common threats, including:
- Adware — the cause of those annoying pop-ups
- Browser hijackers — unwanted redirects and changed homepages
- Trojans and spyware — hidden programs stealing your data
- Potentially unwanted programs (PUPs) — software you never asked for
👉 Select your device below — Windows, Mac, or Android — then follow the simple steps to download Malwarebytes, scan your system, and remove any threats it finds. The scan usually takes 5 to 20 minutes.
Run a Malware Scan with Malwarebytes for Windows
Malwarebytes is one of the most popular and trusted anti-malware tools for Windows — and it’s completely free for removing infections. It catches threats that many antivirus programs miss, including adware, browser hijackers, and trojans. Follow the steps below to scan and clean your PC in just a few minutes.
Download Malwarebytes
Click the button below to download the latest version of Malwarebytes for Windows from the official source. The free version is all you need — it will scan your computer and remove adware, browser hijackers, and other malicious software at no cost.
Download MalwarebytesOfficial installer for Windows 11 and 10. Your download starts right away.Want real-time protection? See Malwarebytes Premium Malwarebytes Free for WindowsScans and removes malware at no cost
-
Install Malwarebytes
When the download finishes, open your Downloads folder and double-click the MBSetup file. If Windows shows a User Account Control pop-up, click “Yes” to allow the installation.

Follow the On-Screen Prompts to Install Malwarebytes
The setup wizard will walk you through a few quick screens:
-
Choose where you’re installing the program — “Personal Computer” or “Work Computer” — then click Next.

-
Malwarebytes will now install on your device. This usually takes under a minute.

-
When installation is complete, the “Welcome to Malwarebytes” screen will open automatically.

-
On the final screen, click Open Malwarebytes to launch the program.

-
Enable “Scan for Rootkits”
Before scanning, turn on rootkit detection so Malwarebytes can find even the most hidden threats. Click the Settings gear icon on the left side of the screen.

In the settings menu, find “Scan for rootkits” and click the toggle so it turns blue.

Done? Click “Dashboard” in the left pane to return to the main screen.
Start the Scan
Click the blue Scan button. Malwarebytes will automatically update its virus database and start checking your computer for malware.

-
Wait for the Scan to Finish
The scan checks your entire system for browser hijackers and other malicious programs, so it can take 5 to 20 minutes depending on your computer. Feel free to do something else — just check back occasionally to see the progress.

-
Quarantine the Detected Threats
When the scan is done, you’ll see a list of everything Malwarebytes found — malware, adware, and potentially unwanted programs. Click the “Quarantine” button to remove all of them at once.

Malwarebytes will now remove the malicious files and registry entries and move them safely into quarantine.

-
Restart Your Computer
Some threats can only be fully removed after a reboot. If Malwarebytes asks you to restart, click Yes. Once you’re logged back in, Malwarebytes has finished removing the threats it found.

That’s it — your Windows PC is now clean of trojans, adware, and other malware, and should be back to running smoothly.
If you are still having problems with your computer after completing these instructions, then please follow one of the steps:
- Run a computer scan with ESET Online Scanner
- Ask for help in our Windows Malware Removal Help & Support forum.
Run a Malware Scan with Malwarebytes for Mac
Malwarebytes for Mac is a free on-demand scanner that removes the malware other security software tends to miss — adware, browser hijackers, and unwanted programs included. Cleaning an infected Mac with Malwarebytes has always been completely free, and it’s our go-to recommendation. Follow the steps below to scan and clean your Mac in just a few minutes.
-
Download Malwarebytes for Mac
Click the button below to download the latest version of Malwarebytes for Mac.
Download MalwarebytesOfficial installer for macOS. Your download starts right away.Want real-time protection? See Malwarebytes PremiumMalwarebytes Free for MacScans and removes malware at no cost -
Open the Malwarebytes setup file
When the download finishes, open your Downloads folder and double-click the setup file to begin the installation.

-
Follow the On-Screen Prompts to Install Malwarebytes
The Malwarebytes for Mac Installer will guide you through a few quick screens. Click “Continue” and keep following the prompts until the installation completes.



When the installation is complete, Malwarebytes opens to the Welcome to Malwarebytes screen. Click “Get started“.
-
Select “Personal Computer” or “Work Computer”
Malwarebytes will ask what type of computer you’re installing it on. Click either Personal Computer or Work Computer, whichever applies.

-
Start the Scan
Click the “Scan” button. Malwarebytes will automatically update its detection database and begin checking your Mac for malware.

-
Wait for the Scan to Finish
Malwarebytes will scan your Mac for adware, browser hijackers, and other malicious programs. This can take a few minutes, so feel free to do something else — just check back occasionally to see the progress.

-
Quarantine the Detected Threats
When the scan is done, you’ll see a list of everything Malwarebytes found. Click the “Quarantine” button to remove all the threats at once.

-
Restart Your Mac
Malwarebytes will now remove all the malicious files it found. Some threats can only be fully removed after a reboot — if Malwarebytes asks you to restart, allow it. Once you’re logged back in, your Mac is clean.

That’s it — your Mac is now free of adware, rogue browser extensions, and other potentially harmful software.
If you are still experiencing problems while trying to remove a malicious program from your computer, please ask for help in our Mac Malware Removal Help & Support forum.
Run a Malware Scan with Malwarebytes for Android
Malwarebytes for Android automatically detects and removes dangerous threats like malware and ransomware so you don’t have to worry about your most-used device being compromised. Aggressive detection of adware and potentially unwanted programs keeps your Android phone or tablet running smooth.
-
Download Malwarebytes for Android.
You can download Malwarebytes for Android by clicking the link below.
Get Malwarebytes for AndroidOpens Google Play in a new tab.Want real-time protection? See Malwarebytes Premium for AndroidMalwarebytes for AndroidScans your phone and removes malware at no cost -
Install Malwarebytes for Android on your phone.
In the Google Play Store, tap “Install” to install Malwarebytes for Android on your device.

When the installation process has finished, tap “Open” to begin using Malwarebytes for Android. You can also open Malwarebytes by tapping on its icon in your phone menu or home screen.

-
Follow the on-screen prompts to complete the setup process
When Malwarebytes will open, you will see the Malwarebytes Setup Wizard which will guide you through a series of permissions and other setup options.
This is the first of two screens that explain the difference between the Premium and Free versions. Swipe this screen to continue.
Tap on “Got it” to proceed to the next step.
Malwarebytes for Android will now ask for a set of permissions that are required to scan your device and protect it from malware. Tap on “Give permission” to continue.
Tap on “Allow” to permit Malwarebytes to access the files on your phone.
-
Update database and run a scan with Malwarebytes for Android
You will now be prompted to update the Malwarebytes database and run a full system scan.

Click on “Update database” to update the Malwarebytes for Android definitions to the latest version, then click on “Run full scan” to perform a system scan.

-
Wait for the Malwarebytes scan to complete.
Malwarebytes will now start scanning your phone for adware and other malicious apps. This process can take a few minutes, so we suggest you do something else and periodically check on the status of the scan to see when it is finished.

-
Click on “Remove Selected”.
When the scan has been completed, you will be presented with a screen showing the malware infections that Malwarebytes for Android has detected. To remove the malicious apps that Malwarebytes has found, tap on the “Remove Selected” button.

-
Restart your phone.
Malwarebytes for Android will now remove all the malicious apps that it has found. To complete the malware removal process, Malwarebytes may ask you to restart your device.
That’s it — your Android phone is now clean — no more malicious apps, adware, or browser redirects.
If you are still having problems with your phone after completing these instructions, then please follow one of the steps:
- Restore your phone to factory settings by going to Settings > General management > Reset > Factory data reset.
- Ask for help in our Mobile Malware Removal Help & Support forum.
Stay Protected: Block Ads and Malicious Sites
Now that your device is clean, keep it that way. Most infections start with a malicious ad or a fake download button — so blocking them at the source is your best defense.
We recommend AdGuard, which blocks malicious ads, phishing pages, and dangerous redirects before they can reach you.
👉 Download AdGuard and browse safely
How to Tell Whether Recovery Is Actually Moving Forward
Separate the device checklist from the account checklist. A completed scan and a completed password reset answer different questions.
For the device, retain the security report and any remediation notes. If a technician rebuilt the system, record what was restored afterward.
For accounts, record which sessions were ended and which recovery methods were reviewed. That is more informative than writing that everything was secured.
If another unauthorized login appears, compare it with the timeline. It may reflect previously stolen access, continuing compromise, or an unrelated problem requiring its own assessment.
Don’t pay anyone who claims a special fee can erase information already stolen by Lunex. Neither a scan license nor a private investigator can promise that.
Use Microsoft’s malware troubleshooting guidance if standard Windows protection encounters problems, and obtain assistance when the system cannot be trusted.
Be careful with security advice copied into chats. A stranger’s cleanup script can be as unsafe as the original verification command.
The goal is a computer you can use confidently and accounts under your control, not merely a disappearing warning or a reassuring screenshot.
Frequently Asked Questions
What is Lunex Stealer?
It is Windows information-stealing malware. The analyzed chain also interferes with security monitoring and establishes additional access, making one-file cleanup insufficient.
Does seeing a fake CAPTCHA mean I’m infected?
Not by itself. Determine whether you followed instructions that started software. Viewing the challenge and executing a system command are materially different events.
Why should I sign out existing account sessions?
Session access can matter independently of a password. Use each provider’s controls to revoke unfamiliar connections as part of account recovery.
Can I remove Lunex by deleting its executable?
Don’t rely on that. Supporting components or persistence may remain, so assess the infection comprehensively using trusted security tools and appropriate assistance.
Does a clean scan prove no information was stolen?
No. It describes the scan’s findings, not every historical action. Review potentially exposed accounts and records separately.
Should every affected PC be immediately wiped?
The recovery plan depends on the scope and trustworthiness of cleanup. Preserve necessary evidence first, especially on an employer’s machine, and seek qualified advice.
The Bottom Line
Prioritize Lunex Stealer removal and account recovery together. Don’t execute verification commands or assume that removing one file restores trust.
If the suspect software ran, contain the computer, follow the Windows cleanup route, and recover exposed access from a clean device.

Join the discussion
0 commentsShare your experience or ask a question about this article.
Discussion
Start the conversation
Have a question or something useful to share? Add the first comment.