

A familiar dependency name can make an installation feel routine. You update a project, the package manager finishes, and work carries on.
The uncomfortable question comes later: did that release contain the code you expected? DebugElevator belongs to an incident where the release label wasn’t enough.
Overview
The incident involves community packages, not every Laravel application
DebugElevator is the name identified for a Windows credential-stealing component associated with the Laravel-Lang supply-chain incident. The wider malicious payload targets several operating systems.
The affected localization packages are third-party projects, separate from the official Laravel framework. Using Laravel alone does not establish that your machine encountered the compromised code.
Researchers described manipulated release tags and a malicious helper registered for Composer autoloading. Assess the package contents actually fetched and executed, not simply the version label.
Windows browser theft is one part of a wider secrets problem
The campaign’s PHP payload searches for developer and infrastructure secrets. The Windows component adds browser-credential extraction to that broader risk.
That makes a developer workstation different from an ordinary isolated browser incident. Credentials available to a build runner or project may reach services beyond the computer itself.
Cleanup should therefore address affected dependencies, execution environments, and accessible secrets. Removing one downloaded executable leaves too many questions unanswered.
Start with artifacts and access that belong to your project
- Preserve the lockfile, dependency files, and relevant build records.
- Identify which environments fetched and ran the suspect package.
- Restrict exposed credentials through the services that issued them.
- Rebuild affected environments from verified sources before reusing secrets.
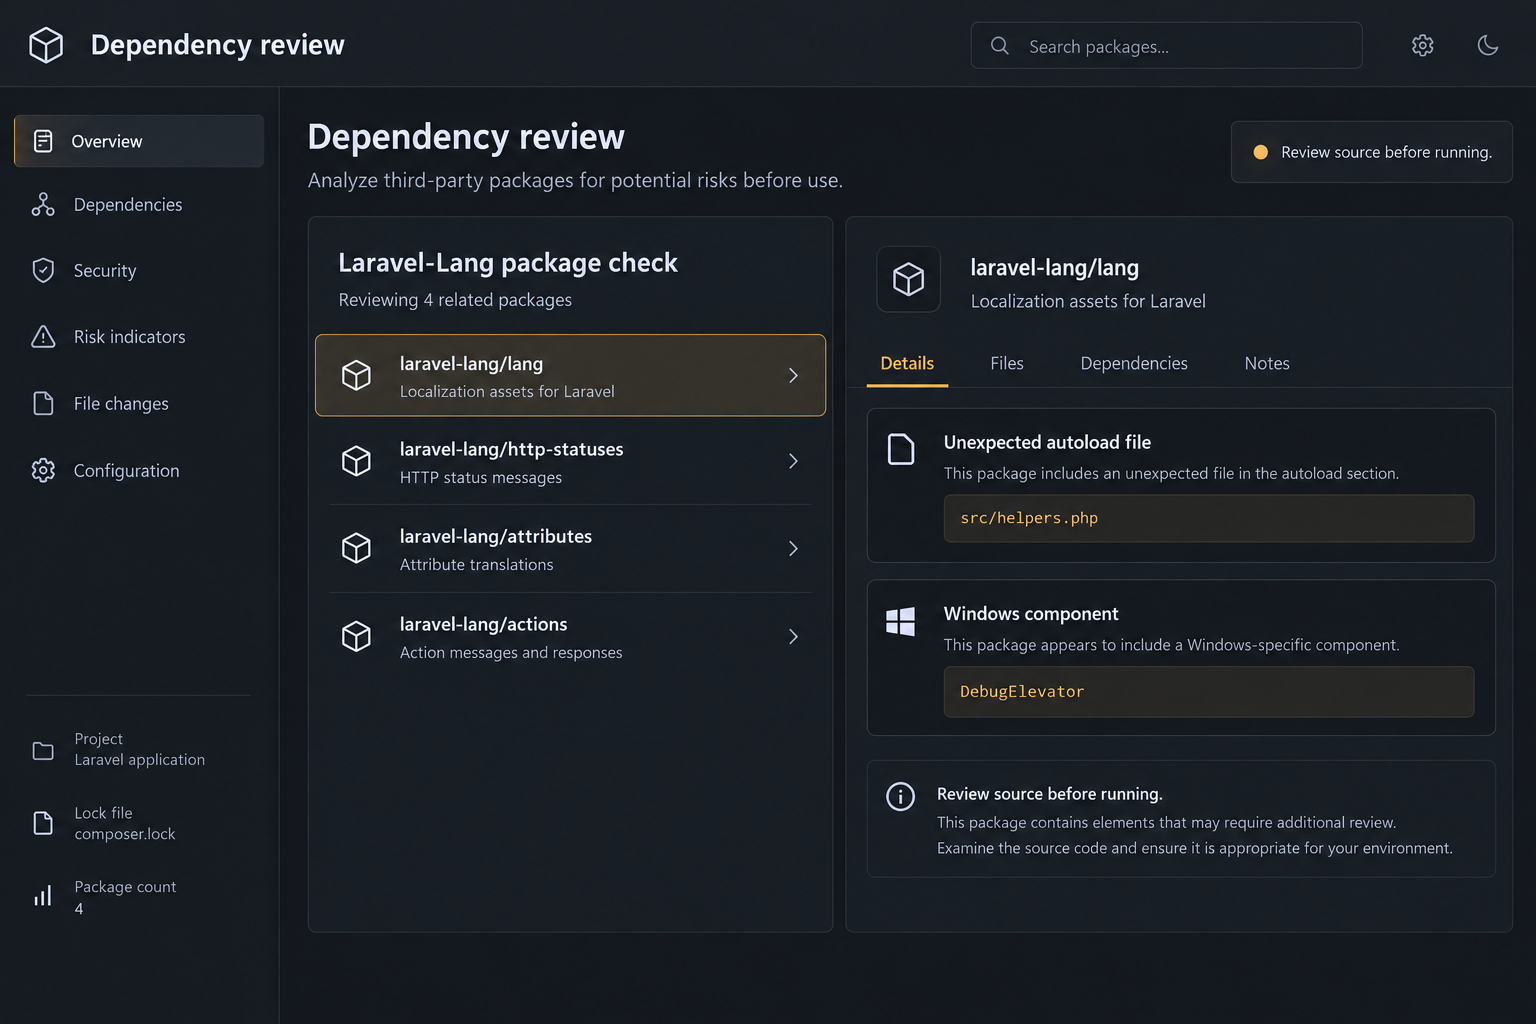
The image is an explanatory dependency-review interface, not a real scan or package-manager result. The listed indicators need investigation, not blind deletion by filename.
Why a Version Number Did Not Settle This Case
A release tag is a label pointing to code. Many developers reasonably expect that a published tag will continue to identify the same release.
When tags are manipulated, an older-looking version can lead to unexpected contents. A reassuring number is then an incomplete answer to the integrity question.
Ask what your environment actually downloaded. The installed files, lockfile references, package archives, cache, and build logs can help reconstruct that history.
Those artifacts also help distinguish two machines reporting the same package version. They may have fetched it at different times or from different stored sources.
Do not reinstall the suspect dependency on a normal workstation merely to compare it. Reproducing an installation can repeat the exposure you are trying to understand.
A security team can inspect artifacts in an appropriately isolated environment. Preserve the originals rather than editing them until they look clean.
The same principle applies to deployment images. A fixed source repository does not prove that an older container or cached build has been replaced.
Trace the material that reached each environment. Recovery becomes much clearer when source, build, artifact, and deployed application are treated as separate stages.
How the Laravel-Lang Infection Chain Can Reach DebugElevator
Step 1: Altered releases are fetched through a familiar dependency channel
The incident involved Laravel-Lang packages including laravel-lang/lang, laravel-lang/http-statuses, laravel-lang/attributes, and laravel-lang/actions.
Reports describe rewritten historical tags rather than one obviously new malicious release. That is why a check limited to newly added package names can miss the issue.
Establish whether the relevant dependency was present in your own project. Don’t infer exposure from a framework name mentioned in a headline.
Next, compare actual downloaded contents with trustworthy references. Preserve when and where the artifact was fetched so the release history can be assessed accurately.
Step 2: Composer’s autoload mechanism reaches the added helper
Researchers identified a malicious src/helpers.php entry under autoload.files. This mechanism can run registered files when the Composer autoloader is loaded.
Installation and execution are related but not identical questions. Determine whether the affected code was loaded in the application, build process, or development workflow.
A package-manager command finishing normally does not demonstrate harmlessness. A background action may not present an obvious installer or separate permission prompt.
At the same time, a file named helpers.php is not inherently malicious. Its package context, contents, and provenance are what make the indicator meaningful.
Step 3: Additional code gathers secrets available to the environment
The documented chain retrieves a larger PHP payload. That payload targets credentials and configuration material available to the user or environment running it.
Think about what a development process can already read. A project may expose database access, source-control tokens, cloud configuration, or deployment credentials without another interactive login.
Those examples explain the response priority; they do not prove every category was present or stolen from a particular system.
Record the relevant access privately. An incident spreadsheet should name services and credential owners, not become another uncontrolled collection of the secrets themselves.
Step 4: A Windows component targets stored browser credentials
Original analysis of the Windows payload identified DebugElevator, designed to obtain Chromium App-Bound Encryption keys for credential extraction.
The broader campaign also has cross-platform behavior. Do not conclude that a Linux runner or Mac developer system is unaffected merely because it cannot run the Windows executable.
Conversely, not every report of DebugElevator means an organization’s entire infrastructure was reached. Investigate the permissions and data available in the affected environment.
For a workstation, include browser sessions in that assessment. For a server or runner, focus on the actual application and service access it held.
Step 5: Collected information leaves consequences outside the package
The researched payload collects and transfers sensitive information. Replacing the dependency cannot make an external copy of a credential stop working.
Each issuing service needs its own response: revoke or replace exposed access, inspect relevant activity, and verify that necessary applications still work afterward.
That work should happen alongside environment remediation. Creating replacement secrets on a machine still running the malicious code can expose the replacements too.
Coordinate the order with the team responsible for deployment. An emergency response should close access without accidentally restoring the compromised artifact during the next build.
Build an Exposure Map Before Rotating Everything
Developer machines may hold personal and business access together
A developer’s browser, shell environment, and project directory can contain different kinds of access. Treat them separately rather than assuming one password reset covers the machine.
Identify services reached through stored browser sessions, local configuration, and authenticated development tools. Prioritize credentials with broad permissions or access to sensitive data.
For personal accounts on a work device, coordinate with the security team without unnecessarily sharing private account contents.
Build runners can expose credentials without a person at the keyboard
A runner may receive secrets as environment variables or mounted files. A malicious dependency executing there may encounter access that was never stored in a browser.
Check which workflow ran, which secrets were available, and whether later jobs reused the same environment. Preserve relevant logs under the organization’s access controls.
Do not paste those logs into a public chat without review. A recovery discussion can accidentally disclose tokens the original incident did not expose.
Production artifacts need their own trace
A clean developer checkout is not proof that production uses the same files. Identify the image, archive, or deployment that actually reached the running service.
Review which application secrets were accessible there. Have service owners decide how revocation and replacement will affect sessions, stored data, and integrations.
Some keys have application-specific consequences when changed. Don’t rotate them blindly without a migration and recovery plan that protects legitimate users.
Useful Indicators Without Dangerous Shortcuts
The reported campaign used flipboxstudio[.]info. Historical outbound connections to that destination can be useful context for an incident team.
Don’t visit the address or download a payload to check whether it is still active. Existing network records are the appropriate starting point.
Also avoid treating absence of one domain in logs as proof of safety. Logging gaps and changes in delivery can limit what a single indicator tells you.
Preserve package archives, cached dependency material, and lockfiles before rebuilding. A later clean install may erase evidence of what the earlier build contained.
Use artifact hashes and source references where available, but compare them with a trusted source. Matching two uncontrolled copies does not establish authenticity.
Be cautious with one-line cleanup instructions from strangers. A script that promises to repair every Laravel-Lang installation may introduce another unreviewed change.
This incident does not make all PHP dependencies untrustworthy. It shows why release integrity, limited credential access, and reproducible deployment records are worth maintaining.
The immediate goal is narrower: identify your exposure, replace affected artifacts, and stop any credentials available to the malware from remaining useful.
What to Do If DebugElevator or the Compromised Packages Ran
Pause affected workflows. Stop using a potentially compromised workstation for privileged access and prevent suspect build artifacts from being promoted.
Notify your security or infrastructure team. For a live service, follow its containment plan rather than deleting production files without preserving evidence.
Preserve the dependency history. Keep relevant lockfiles, package archives, source references, installation records, and deployment identifiers.
Record which systems used each artifact and when. This makes the scope more reliable than a list containing only package version numbers.
Assess whether the malicious code executed. Review the autoloaded files and relevant process or network records in a safe investigation environment.
Downloading a dependency, loading its code, and confirming credential theft are different findings. Label them accurately while deciding precautionary containment.
Check Windows endpoints for the stealer. Run trusted security tools such as Malwarebytes according to the organization’s response process.
The reusable guide below includes a Windows route. It is not a Linux-server cleanup procedure or a replacement for investigating compromised application dependencies.
Replace affected environments and artifacts. Rebuild from verified source material and trustworthy images after preserving what investigators need.
Review dependency caches and deployment pipelines so they do not reintroduce the same material. Merely removing one executable does not clean a poisoned application artifact.
Revoke exposed credentials with their owners. Include relevant cloud, source-control, deployment, database, and other service access actually available to the affected process.
Use a clean environment for replacements. Plan application-specific key changes carefully, and verify essential integrations after rotating access.
Recover browser accounts where applicable. Replace disclosed passwords, inspect sign-ins, and use service controls to end suspicious sessions.
Review recovery methods and authorized applications. If work access extends across multiple services, let administrators coordinate the wider account investigation.
Verify the return to service. Confirm the deployed artifact is clean, old secrets are revoked, and expected application functions still work.
AdGuard can reduce some unrelated malicious advertising while browsing, but it cannot validate Composer dependencies. Dependency controls and limited secret access address this entry route.
Is Your Device Infected? Run a Free Malware Scan
Slow performance, constant pop-ups, or strange behavior? These are classic signs of a malware infection. The fastest way to find out is to scan your device with Malwarebytes Free — one of the most trusted malware removal tools available.
The free version detects and removes the most common threats, including:
- Adware — the cause of those annoying pop-ups
- Browser hijackers — unwanted redirects and changed homepages
- Trojans and spyware — hidden programs stealing your data
- Potentially unwanted programs (PUPs) — software you never asked for
👉 Select your device below — Windows, Mac, or Android — then follow the simple steps to download Malwarebytes, scan your system, and remove any threats it finds. The scan usually takes 5 to 20 minutes.
Run a Malware Scan with Malwarebytes for Windows
Malwarebytes is one of the most popular and trusted anti-malware tools for Windows — and it’s completely free for removing infections. It catches threats that many antivirus programs miss, including adware, browser hijackers, and trojans. Follow the steps below to scan and clean your PC in just a few minutes.
Download Malwarebytes
Click the button below to download the latest version of Malwarebytes for Windows from the official source. The free version is all you need — it will scan your computer and remove adware, browser hijackers, and other malicious software at no cost.
Download MalwarebytesOfficial installer for Windows 11 and 10. Your download starts right away.Want real-time protection? See Malwarebytes Premium Malwarebytes Free for WindowsScans and removes malware at no cost
-
Install Malwarebytes
When the download finishes, open your Downloads folder and double-click the MBSetup file. If Windows shows a User Account Control pop-up, click “Yes” to allow the installation.

Follow the On-Screen Prompts to Install Malwarebytes
The setup wizard will walk you through a few quick screens:
-
Choose where you’re installing the program — “Personal Computer” or “Work Computer” — then click Next.

-
Malwarebytes will now install on your device. This usually takes under a minute.

-
When installation is complete, the “Welcome to Malwarebytes” screen will open automatically.

-
On the final screen, click Open Malwarebytes to launch the program.

-
Enable “Scan for Rootkits”
Before scanning, turn on rootkit detection so Malwarebytes can find even the most hidden threats. Click the Settings gear icon on the left side of the screen.

In the settings menu, find “Scan for rootkits” and click the toggle so it turns blue.

Done? Click “Dashboard” in the left pane to return to the main screen.
Start the Scan
Click the blue Scan button. Malwarebytes will automatically update its virus database and start checking your computer for malware.

-
Wait for the Scan to Finish
The scan checks your entire system for browser hijackers and other malicious programs, so it can take 5 to 20 minutes depending on your computer. Feel free to do something else — just check back occasionally to see the progress.

-
Quarantine the Detected Threats
When the scan is done, you’ll see a list of everything Malwarebytes found — malware, adware, and potentially unwanted programs. Click the “Quarantine” button to remove all of them at once.

Malwarebytes will now remove the malicious files and registry entries and move them safely into quarantine.

-
Restart Your Computer
Some threats can only be fully removed after a reboot. If Malwarebytes asks you to restart, click Yes. Once you’re logged back in, Malwarebytes has finished removing the threats it found.

That’s it — your Windows PC is now clean of trojans, adware, and other malware, and should be back to running smoothly.
If you are still having problems with your computer after completing these instructions, then please follow one of the steps:
- Run a computer scan with ESET Online Scanner
- Ask for help in our Windows Malware Removal Help & Support forum.
Run a Malware Scan with Malwarebytes for Mac
Malwarebytes for Mac is a free on-demand scanner that removes the malware other security software tends to miss — adware, browser hijackers, and unwanted programs included. Cleaning an infected Mac with Malwarebytes has always been completely free, and it’s our go-to recommendation. Follow the steps below to scan and clean your Mac in just a few minutes.
-
Download Malwarebytes for Mac
Click the button below to download the latest version of Malwarebytes for Mac.
Download MalwarebytesOfficial installer for macOS. Your download starts right away.Want real-time protection? See Malwarebytes PremiumMalwarebytes Free for MacScans and removes malware at no cost -
Open the Malwarebytes setup file
When the download finishes, open your Downloads folder and double-click the setup file to begin the installation.

-
Follow the On-Screen Prompts to Install Malwarebytes
The Malwarebytes for Mac Installer will guide you through a few quick screens. Click “Continue” and keep following the prompts until the installation completes.



When the installation is complete, Malwarebytes opens to the Welcome to Malwarebytes screen. Click “Get started“.
-
Select “Personal Computer” or “Work Computer”
Malwarebytes will ask what type of computer you’re installing it on. Click either Personal Computer or Work Computer, whichever applies.

-
Start the Scan
Click the “Scan” button. Malwarebytes will automatically update its detection database and begin checking your Mac for malware.

-
Wait for the Scan to Finish
Malwarebytes will scan your Mac for adware, browser hijackers, and other malicious programs. This can take a few minutes, so feel free to do something else — just check back occasionally to see the progress.

-
Quarantine the Detected Threats
When the scan is done, you’ll see a list of everything Malwarebytes found. Click the “Quarantine” button to remove all the threats at once.

-
Restart Your Mac
Malwarebytes will now remove all the malicious files it found. Some threats can only be fully removed after a reboot — if Malwarebytes asks you to restart, allow it. Once you’re logged back in, your Mac is clean.

That’s it — your Mac is now free of adware, rogue browser extensions, and other potentially harmful software.
If you are still experiencing problems while trying to remove a malicious program from your computer, please ask for help in our Mac Malware Removal Help & Support forum.
Run a Malware Scan with Malwarebytes for Android
Malwarebytes for Android automatically detects and removes dangerous threats like malware and ransomware so you don’t have to worry about your most-used device being compromised. Aggressive detection of adware and potentially unwanted programs keeps your Android phone or tablet running smooth.
-
Download Malwarebytes for Android.
You can download Malwarebytes for Android by clicking the link below.
Get Malwarebytes for AndroidOpens Google Play in a new tab.Want real-time protection? See Malwarebytes Premium for AndroidMalwarebytes for AndroidScans your phone and removes malware at no cost -
Install Malwarebytes for Android on your phone.
In the Google Play Store, tap “Install” to install Malwarebytes for Android on your device.

When the installation process has finished, tap “Open” to begin using Malwarebytes for Android. You can also open Malwarebytes by tapping on its icon in your phone menu or home screen.

-
Follow the on-screen prompts to complete the setup process
When Malwarebytes will open, you will see the Malwarebytes Setup Wizard which will guide you through a series of permissions and other setup options.
This is the first of two screens that explain the difference between the Premium and Free versions. Swipe this screen to continue.
Tap on “Got it” to proceed to the next step.
Malwarebytes for Android will now ask for a set of permissions that are required to scan your device and protect it from malware. Tap on “Give permission” to continue.
Tap on “Allow” to permit Malwarebytes to access the files on your phone.
-
Update database and run a scan with Malwarebytes for Android
You will now be prompted to update the Malwarebytes database and run a full system scan.

Click on “Update database” to update the Malwarebytes for Android definitions to the latest version, then click on “Run full scan” to perform a system scan.

-
Wait for the Malwarebytes scan to complete.
Malwarebytes will now start scanning your phone for adware and other malicious apps. This process can take a few minutes, so we suggest you do something else and periodically check on the status of the scan to see when it is finished.

-
Click on “Remove Selected”.
When the scan has been completed, you will be presented with a screen showing the malware infections that Malwarebytes for Android has detected. To remove the malicious apps that Malwarebytes has found, tap on the “Remove Selected” button.

-
Restart your phone.
Malwarebytes for Android will now remove all the malicious apps that it has found. To complete the malware removal process, Malwarebytes may ask you to restart your device.
That’s it — your Android phone is now clean — no more malicious apps, adware, or browser redirects.
If you are still having problems with your phone after completing these instructions, then please follow one of the steps:
- Restore your phone to factory settings by going to Settings > General management > Reset > Factory data reset.
- Ask for help in our Mobile Malware Removal Help & Support forum.
Stay Protected: Block Ads and Malicious Sites
Now that your device is clean, keep it that way. Most infections start with a malicious ad or a fake download button — so blocking them at the source is your best defense.
We recommend AdGuard, which blocks malicious ads, phishing pages, and dangerous redirects before they can reach you.
👉 Download AdGuard and browse safely
Recovery Is Complete Only When the Next Build Stays Clean
Make the repaired state reproducible. Another authorized team member should be able to identify the approved artifact and understand why it is being trusted.
Separate the evidence archive from the deployment inputs. Keeping a malicious sample for investigation must not allow it back into an ordinary build cache.
Also review long-lived development containers and rarely used runners. Fixing the main pipeline leaves an avoidable gap if another trusted workflow can still reuse the old artifact.
Document how the approved source and dependencies are selected during a fresh build. A colleague should not need an undocumented local cache to reproduce the repaired application.
Review downstream access for the period of exposure. A credential may have been used outside the workstation even after local cleanup succeeded.
If customer data or regulated information may be involved, let the organization’s responsible teams determine its reporting obligations. A detection name alone does not answer that question.
Keep practical follow-up items with named owners. Artifact integrity, endpoint remediation, credential revocation, and service validation should not disappear into one vague completed ticket.
That is also how you avoid unnecessary damage: preserve evidence, make targeted changes, and verify both security and the work the application is supposed to perform.
Frequently Asked Questions
Is DebugElevator the same thing as the Laravel framework?
No. The Windows stealer is associated with a compromise of third-party Laravel-Lang packages. The official framework is not synonymous with those packages or that payload.
Can an older package version still need investigation?
Yes. Manipulated historical tags mean the version label alone is insufficient. Compare the actual fetched artifact, source reference, and execution history.
Is every helpers.php file malicious?
No. That filename is common. The warning concerns the added file and autoload behavior in the compromised package context, not every matching name.
Are only Windows systems affected?
No. DebugElevator is the Windows component, while the wider PHP credential-stealing chain has cross-platform behavior that requires separate environment assessment.
Does replacing the dependency make stolen API keys safe?
No. Revoke or rotate exposed credentials through their issuing services. Cleaning the files does not invalidate a copy that has already left the environment.
Should I run an online cleanup command I found in a comment?
Not without trusted review. Preserve evidence and use your established response process rather than replacing one unexpected execution path with another.
The Bottom Line
Remove the compromised dependency chain and investigate DebugElevator wherever it ran. Don’t stop at the Windows executable or assume a familiar release tag proves integrity.
Rebuild affected environments from verified artifacts, revoke exposed access, and confirm the next deployment cannot restore the poisoned package.

Join the discussion
0 commentsShare your experience or ask a question about this article.
Your progress
Did these steps help?
Let us know how the guide worked for you.
Describe what you see and the step you reached. Keep passwords and other private information out.
Discussion
Start the conversation
Have a question or something useful to share? Add the first comment.