

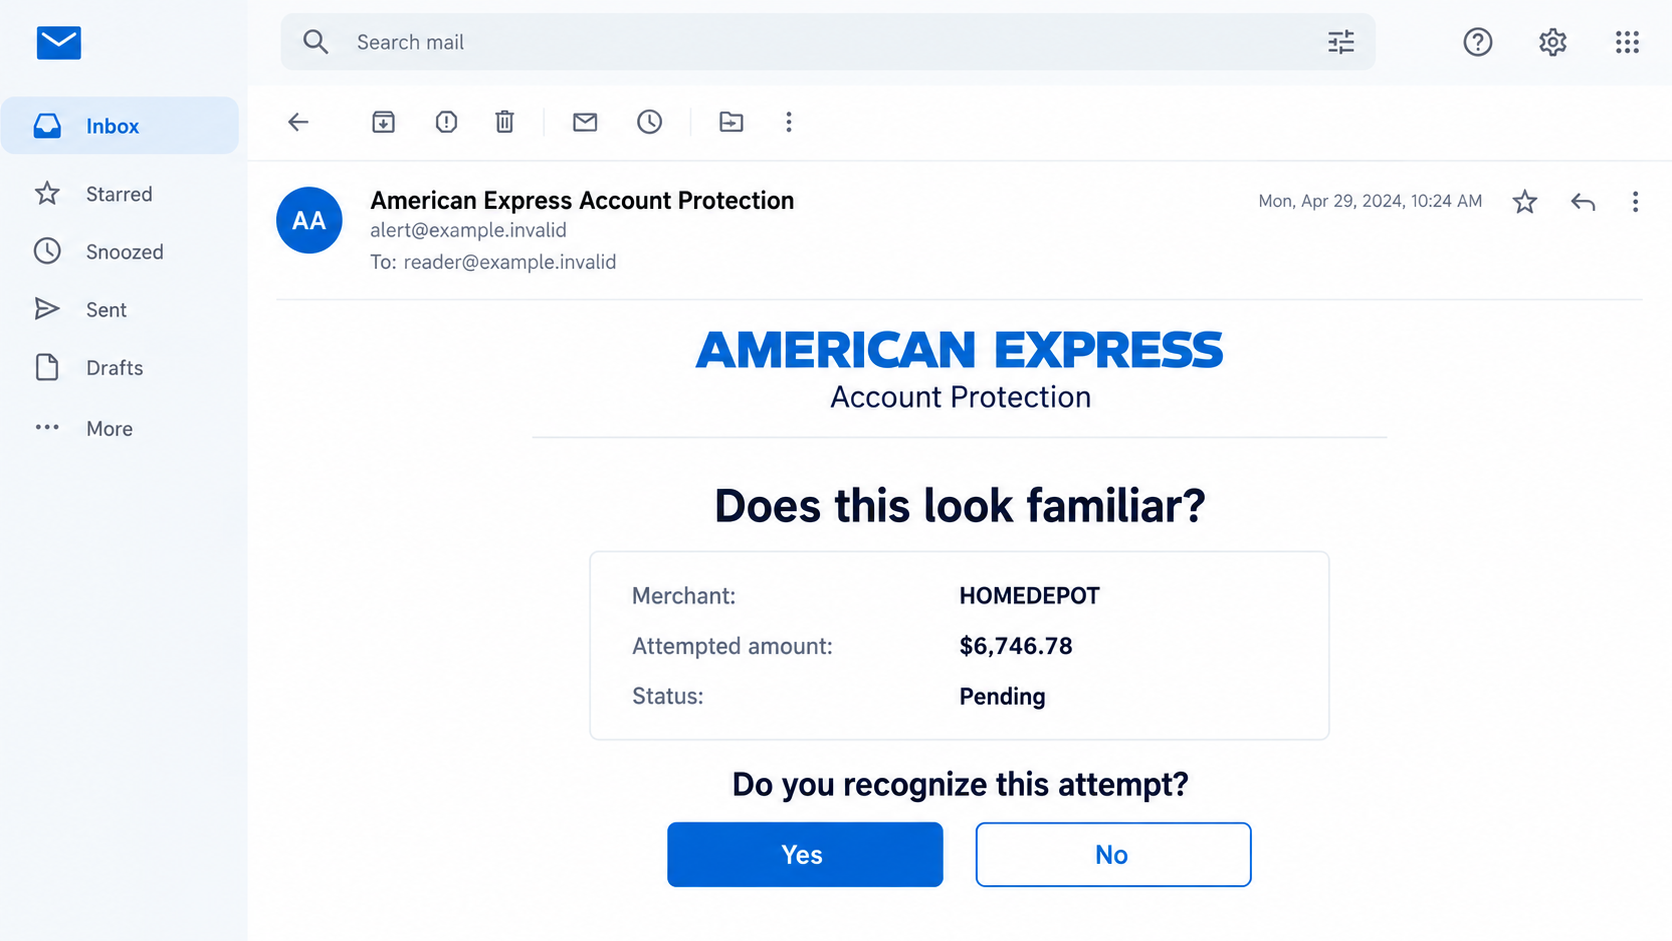
A $6,746.78 purchase attempt is enough to interrupt whatever you were doing. An American Express-style email puts that amount beside a familiar store name.
It asks a simple question, with two familiar answers. There is more to check before choosing either one.
Overview
A large purchase makes an ordinary alert feel urgent
The American Express attempted charge email scam presents a supposed fraud alert involving HOMEDEPOT and $6,746.78. It asks whether the recipient recognizes the attempt.
The reported message borrows American Express account-protection branding and displays transaction details. Yes and No buttons make responding appear quick and protective.
This warning concerns a fraudulent message impersonating the card issuer. It does not accuse American Express or Home Depot of operating the campaign.
It also does not establish that the printed amount was charged to your card. Your genuine account records, not the email, determine whether a transaction exists.
Both the fear and the proposed solution come from the message
The email frames a No response as a way to protect the account. Someone alarmed by the amount may choose it without checking the destination.
- The merchant is presented as HOMEDEPOT or a similar transaction descriptor.
- The displayed amount is $6,746.78.
- The message describes an attempted or pending charge.
- Two response buttons are offered as the next action.
The original destination was unavailable in the reported analysis. Credential theft is the suspected purpose, but the exact page and fields cannot be reconstructed as confirmed facts.
There is no need to resolve that uncertainty by opening it. You can verify the card directly without touching either response button.
Real fraud alerts still matter
American Express genuinely uses fraud notifications. The right response is not to ignore every alert, but to verify this suspicious one through the actual issuer.
Use the app you already installed or call the number printed on your card. That route works whether the email is false or a separate card problem exists.
The image is an original illustrative email with fictional sender information. Its interface and date are explanatory details, not an authenticated copy of a victim’s inbox.
If you clicked earlier, recall what the page asked and what you entered. An attempted card purchase and an exposed online-account password are separate issues.
Why the No Button Can Feel Safer Than Doing Nothing
Most people know not to approve a purchase they did not make. The scam takes advantage of that instinct rather than asking you to abandon it.
Its apparent choice is reassuring: recognize the purchase or stop it. What is missing is the third option, leave the message and check independently.
A button labeled No is still a link. Its wording describes the story the sender wants you to accept, not necessarily what happens when you press it.
That distinction matters when the proposed destination is outside your established banking routine. A protective-sounding action can still hand control to an unverified site.
Likewise, a Yes button does not prove a real charge can be authorized through this email. The sender controls both sides of the conversation shown on screen.
You do not need to decide which button is more dangerous. Decline the entire untrusted interaction and ask the real issuer about the transaction.
If the bank confirms an actual unauthorized purchase, deal with that promptly. Finding a fake email does not prove that every transaction on the card is legitimate.
Keeping those questions separate prevents two mistakes: surrendering credentials to a fake alert, or overlooking real fraud because a suspicious message was involved.
How the American Express Attempted Charge Email Scam Works
Step 1: Supply a Specific Amount and a Recognizable Merchant
The amount $6,746.78 looks more like a transaction entry than a vague warning. Its precision encourages the reader to treat it as an account event.
A recognizable home-improvement merchant makes the story easy to picture. You do not need to know the supposed items to imagine an expensive unauthorized order.
The specificity is persuasive, but it is not verification. Anyone composing a message can insert an amount, merchant descriptor and transaction date.
Even a partially masked account reference should be checked against your real card. It is not enough that the general layout resembles other financial emails.
There is no confirmed explanation for how this campaign obtained every recipient’s address. Do not assume the sender already controls your card solely because the email arrived.
Take the details as something to ask the issuer about, not as instructions supplied by the issuer.
Step 2: Borrow the Card Issuer’s Protective Role
The sender presents itself as account protection, placing the message on your side of the problem. You are encouraged to cooperate with a supposed security process.
That changes the emotional pressure. The fear is no longer only losing money; it is failing to act when your bank appears to be asking for help.
A pending label adds uncertainty. You may believe there is a short opportunity to intervene before a large purchase completes.
But a pending amount in an email is not a live view of card processing. The message cannot prove the status of an authorization.
The issuer can explain whether an attempted charge was declined, is pending or has posted. Use its genuine service rather than interpreting a stranger’s transaction panel.
Do not call a number in the questionable notice to ask if that notice is real. A false alert can include its own false support contact.
Step 3: Offer an Immediate Response Through Untrusted Buttons
The message asks you to recognize the charge and suggests that selecting No helps protect the account. This narrows attention to a convenient answer.
The safer question comes earlier: who receives the response? A copied banking design does not show who operates the linked server.
In phishing campaigns, a protective button commonly leads to a page requesting account credentials or financial information. That risk explains why this notice should not be used.
For this version, the destination’s exact contents remain unavailable. Claims that it definitely asked for a particular code or card field would go beyond the evidence.
If you reached a form, describe its actual requests when contacting the bank. A password, card security code and one-time approval code create different exposures.
Do not reopen the site to complete your notes. Browser history, the original email and what you remember are a safer starting point.
Step 4: Use Disclosed Details for Account or Payment Abuse
If an attacker obtains usable credentials, they may attempt to sign in as the cardholder. Additional protections can block that attempt, but they do not make disclosure harmless.
Reused passwords can expose unrelated accounts. A personal mailbox using the same secret may allow further password resets or convincing follow-up messages.
A caller following the email could request a one-time code under the same account-protection story. Do not share it simply because the caller knows the printed amount.
Knowledge of the scam’s own details is not proof of bank employment. The sender already knows what its message said.
Remote-control requests, demands for payment or instructions to move money would be additional warning signs. They are possible escalations, not established features of every copy.
End the contact and tell American Express what was disclosed. A precise exposure report is more useful than waiting to see whether the attacker spends anything.
How to Verify the Charge Without Replying
Start with the card account you already use
Open the official app from your device’s normal app list. Alternatively, use an established bookmark or type the issuer’s known website address yourself.
Inspect the relevant card, including authorized-user activity if applicable. Compare merchant, amount and date, recognizing that legitimate merchant descriptors can differ from store names.
If an entry is unclear, ask the issuer to identify it. Do not rely on a search result ad offering urgent account help.
Use the printed contact route when uncertainty remains
American Express’s phishing guidance advises contacting the number on the card when a communication seems suspicious.
Explain that you received a notice describing an attempted Home Depot charge. Ask whether that event appears in the actual account.
The answer may concern both the fraudulent communication and a real transaction. Let the issuer distinguish them rather than insisting the email proves either outcome.
Keep the alert available without continuing its workflow
Save the original message, preferably with headers. Record any website address you already visited without opening it again.
If another person uses the account, compare notes through a familiar channel. Do not ask them to click the button as a test.
Information copied from your real activity may help the issuer investigate. Screenshots alone can miss sender and routing details, so preserve the email when possible.
When Someone Else Also Uses the Card
A household or business card can make an unfamiliar merchant harder to interpret. There may be an authorized user whose recent purchases you have not discussed.
Ask that person directly, using the contact you normally use. Do not forward the email and ask them to select Yes if they recognize it.
Compare the real account entry instead. An authorized user can explain a genuine purchase without giving the suspicious sender another opportunity to collect information.
If nobody recognizes an actual transaction, contact the issuer. Keep the possibility of genuine card fraud open even while rejecting this particular email.
If no matching activity appears, ask about the claimed attempt rather than assuming it must appear as a posted purchase. A declined attempt and a completed charge differ.
The issuer can clarify which status applies and whether protective action is needed. An emailed pending label should not decide that question for you.
For a business card, preserve the expense record and tell the account administrator about any credential disclosure. A personal response may affect centrally managed access.
Do not ask a colleague to test the page on another computer. Verification should move toward the genuine account, not spread the untrusted workflow to another user.
What to Do if You Have Fallen Victim to This Scam
Stop using either response button. Close any associated page. Reading the alert or refusing its request does not itself require replacing a card.
If you clicked without entering details, tell the issuer what happened and check for unexpected downloads or permissions. Do not describe an unverified charge as confirmed loss.
Notify American Express about submitted secrets. Use the card’s contact number or the genuine account service, and list exactly what you provided.
Ask whether online access should be reset, the card restricted or other monitoring arranged. Follow the issuer’s verified instructions rather than a return call from the message’s sender.
Secure passwords and authentication. Replace the exposed online-account password through the real service. Change reused versions on other accounts, especially the mailbox linked to the card.
Review account contact details and security notifications. Tell the issuer if an unfamiliar verification request was accepted or a code was shared.
Report genuine unauthorized activity separately. If the account shows a purchase you did not make, ask the issuer about its transaction-dispute process immediately.
Distinguish a pending authorization from a posted entry when describing it. Do not wait for the email sender to cancel something it may never have controlled.
Check any software exposure. If you installed a purported security utility, allowed remote access or ran a download, use a different trusted device for account recovery.
Malwarebytes is relevant for checking potentially unwanted software. AdGuard may reduce deceptive advertising, but it cannot cancel a card purchase or invalidate an exposed login.
The device-scanning block below is supplementary. A clean scan does not establish that your financial account is safe.
Keep evidence and refuse recovery-fee demands. Preserve the notice, submission details and issuer case reference. Review new account notices for changes you did not request.
Report the impersonation using instructions from the genuine American Express Security Center. Do not pay a stranger to erase a fraudulent charge.
Is Your Device Infected? Run a Free Malware Scan
Slow performance, constant pop-ups, or strange behavior? These are classic signs of a malware infection. The fastest way to find out is to scan your device with Malwarebytes Free — one of the most trusted malware removal tools available.
The free version detects and removes the most common threats, including:
- Adware — the cause of those annoying pop-ups
- Browser hijackers — unwanted redirects and changed homepages
- Trojans and spyware — hidden programs stealing your data
- Potentially unwanted programs (PUPs) — software you never asked for
👉 Select your device below — Windows, Mac, or Android — then follow the simple steps to download Malwarebytes, scan your system, and remove any threats it finds. The scan usually takes 5 to 20 minutes.
Run a Malware Scan with Malwarebytes for Windows
Malwarebytes is one of the most popular and trusted anti-malware tools for Windows — and it’s completely free for removing infections. It catches threats that many antivirus programs miss, including adware, browser hijackers, and trojans. Follow the steps below to scan and clean your PC in just a few minutes.
Download Malwarebytes
Click the button below to download the latest version of Malwarebytes for Windows from the official source. The free version is all you need — it will scan your computer and remove adware, browser hijackers, and other malicious software at no cost.
Download MalwarebytesOfficial installer for Windows 11 and 10. Your download starts right away.Want real-time protection? See Malwarebytes Premium Malwarebytes Free for WindowsScans and removes malware at no cost
-
Install Malwarebytes
When the download finishes, open your Downloads folder and double-click the MBSetup file. If Windows shows a User Account Control pop-up, click “Yes” to allow the installation.

Follow the On-Screen Prompts to Install Malwarebytes
The setup wizard will walk you through a few quick screens:
-
Choose where you’re installing the program — “Personal Computer” or “Work Computer” — then click Next.

-
Malwarebytes will now install on your device. This usually takes under a minute.

-
When installation is complete, the “Welcome to Malwarebytes” screen will open automatically.

-
On the final screen, click Open Malwarebytes to launch the program.

-
Enable “Scan for Rootkits”
Before scanning, turn on rootkit detection so Malwarebytes can find even the most hidden threats. Click the Settings gear icon on the left side of the screen.

In the settings menu, find “Scan for rootkits” and click the toggle so it turns blue.

Done? Click “Dashboard” in the left pane to return to the main screen.
Start the Scan
Click the blue Scan button. Malwarebytes will automatically update its virus database and start checking your computer for malware.

-
Wait for the Scan to Finish
The scan checks your entire system for browser hijackers and other malicious programs, so it can take 5 to 20 minutes depending on your computer. Feel free to do something else — just check back occasionally to see the progress.

-
Quarantine the Detected Threats
When the scan is done, you’ll see a list of everything Malwarebytes found — malware, adware, and potentially unwanted programs. Click the “Quarantine” button to remove all of them at once.

Malwarebytes will now remove the malicious files and registry entries and move them safely into quarantine.

-
Restart Your Computer
Some threats can only be fully removed after a reboot. If Malwarebytes asks you to restart, click Yes. Once you’re logged back in, Malwarebytes has finished removing the threats it found.

That’s it — your Windows PC is now clean of trojans, adware, and other malware, and should be back to running smoothly.
If you are still having problems with your computer after completing these instructions, then please follow one of the steps:
- Run a computer scan with ESET Online Scanner
- Ask for help in our Windows Malware Removal Help & Support forum.
Run a Malware Scan with Malwarebytes for Mac
Malwarebytes for Mac is a free on-demand scanner that removes the malware other security software tends to miss — adware, browser hijackers, and unwanted programs included. Cleaning an infected Mac with Malwarebytes has always been completely free, and it’s our go-to recommendation. Follow the steps below to scan and clean your Mac in just a few minutes.
-
Download Malwarebytes for Mac
Click the button below to download the latest version of Malwarebytes for Mac.
Download MalwarebytesOfficial installer for macOS. Your download starts right away.Want real-time protection? See Malwarebytes PremiumMalwarebytes Free for MacScans and removes malware at no cost -
Open the Malwarebytes setup file
When the download finishes, open your Downloads folder and double-click the setup file to begin the installation.

-
Follow the On-Screen Prompts to Install Malwarebytes
The Malwarebytes for Mac Installer will guide you through a few quick screens. Click “Continue” and keep following the prompts until the installation completes.



When the installation is complete, Malwarebytes opens to the Welcome to Malwarebytes screen. Click “Get started“.
-
Select “Personal Computer” or “Work Computer”
Malwarebytes will ask what type of computer you’re installing it on. Click either Personal Computer or Work Computer, whichever applies.

-
Start the Scan
Click the “Scan” button. Malwarebytes will automatically update its detection database and begin checking your Mac for malware.

-
Wait for the Scan to Finish
Malwarebytes will scan your Mac for adware, browser hijackers, and other malicious programs. This can take a few minutes, so feel free to do something else — just check back occasionally to see the progress.

-
Quarantine the Detected Threats
When the scan is done, you’ll see a list of everything Malwarebytes found. Click the “Quarantine” button to remove all the threats at once.

-
Restart Your Mac
Malwarebytes will now remove all the malicious files it found. Some threats can only be fully removed after a reboot — if Malwarebytes asks you to restart, allow it. Once you’re logged back in, your Mac is clean.

That’s it — your Mac is now free of adware, rogue browser extensions, and other potentially harmful software.
If you are still experiencing problems while trying to remove a malicious program from your computer, please ask for help in our Mac Malware Removal Help & Support forum.
Run a Malware Scan with Malwarebytes for Android
Malwarebytes for Android automatically detects and removes dangerous threats like malware and ransomware so you don’t have to worry about your most-used device being compromised. Aggressive detection of adware and potentially unwanted programs keeps your Android phone or tablet running smooth.
-
Download Malwarebytes for Android.
You can download Malwarebytes for Android by clicking the link below.
Get Malwarebytes for AndroidOpens Google Play in a new tab.Want real-time protection? See Malwarebytes Premium for AndroidMalwarebytes for AndroidScans your phone and removes malware at no cost -
Install Malwarebytes for Android on your phone.
In the Google Play Store, tap “Install” to install Malwarebytes for Android on your device.

When the installation process has finished, tap “Open” to begin using Malwarebytes for Android. You can also open Malwarebytes by tapping on its icon in your phone menu or home screen.

-
Follow the on-screen prompts to complete the setup process
When Malwarebytes will open, you will see the Malwarebytes Setup Wizard which will guide you through a series of permissions and other setup options.
This is the first of two screens that explain the difference between the Premium and Free versions. Swipe this screen to continue.
Tap on “Got it” to proceed to the next step.
Malwarebytes for Android will now ask for a set of permissions that are required to scan your device and protect it from malware. Tap on “Give permission” to continue.
Tap on “Allow” to permit Malwarebytes to access the files on your phone.
-
Update database and run a scan with Malwarebytes for Android
You will now be prompted to update the Malwarebytes database and run a full system scan.

Click on “Update database” to update the Malwarebytes for Android definitions to the latest version, then click on “Run full scan” to perform a system scan.

-
Wait for the Malwarebytes scan to complete.
Malwarebytes will now start scanning your phone for adware and other malicious apps. This process can take a few minutes, so we suggest you do something else and periodically check on the status of the scan to see when it is finished.

-
Click on “Remove Selected”.
When the scan has been completed, you will be presented with a screen showing the malware infections that Malwarebytes for Android has detected. To remove the malicious apps that Malwarebytes has found, tap on the “Remove Selected” button.

-
Restart your phone.
Malwarebytes for Android will now remove all the malicious apps that it has found. To complete the malware removal process, Malwarebytes may ask you to restart your device.
That’s it — your Android phone is now clean — no more malicious apps, adware, or browser redirects.
If you are still having problems with your phone after completing these instructions, then please follow one of the steps:
- Restore your phone to factory settings by going to Settings > General management > Reset > Factory data reset.
- Ask for help in our Mobile Malware Removal Help & Support forum.
Stay Protected: Block Ads and Malicious Sites
Now that your device is clean, keep it that way. Most infections start with a malicious ad or a fake download button — so blocking them at the source is your best defense.
We recommend AdGuard, which blocks malicious ads, phishing pages, and dangerous redirects before they can reach you.
👉 Download AdGuard and browse safely
Frequently Asked Questions
Is the $6,746.78 American Express alert real?
The described email is a fraudulent alert. Only the actual issuer can confirm whether a separate transaction matching that amount exists on your account.
Should I click No if I never shopped at Home Depot?
No. Leave the message and check through your genuine card account. A protective label does not make a sender-controlled link safe.
Are all American Express fraud-alert emails scams?
No. Legitimate notifications exist. The safer approach to a suspicious one is independent verification, not ignoring every warning or trusting every familiar design.
Did clicking the email authorize the printed purchase?
The printed claim does not prove that. Ask the issuer about actual account activity and explain any information, approvals or payments you supplied afterward.
What if the linked website no longer works?
A dead page does not authenticate the message or erase details previously submitted. Respond to any disclosure based on what happened while it was available.
Do I need a malware scan after seeing the amount?
The alarming number is not evidence of infection. Scan when downloads, installed programs or suspicious device behavior create a software concern, while handling card issues separately.
The Bottom Line
Do not answer the American Express attempted charge email through its Yes or No buttons. Check the $6,746.78 story using your real card account.
If you disclosed details, contact the issuer promptly and secure the exposed access. If an actual unauthorized transaction exists, report it through the issuer’s genuine process.

Join the discussion
0 commentsShare your experience or ask a question about this article.
Discussion
Start the conversation
Have a question or something useful to share? Add the first comment.