


Your search engine keeps changing to Bing, even after you set Google again. Sometimes it’s only new tabs; sometimes every address-bar search lands on Bing.
You’ll learn which Bing behavior is normal, remove whatever is forcing it in Chrome, Edge, Firefox or Safari, and keep the search engine you picked.
Overview
Is Bing showing up normally, or is something forcing it?
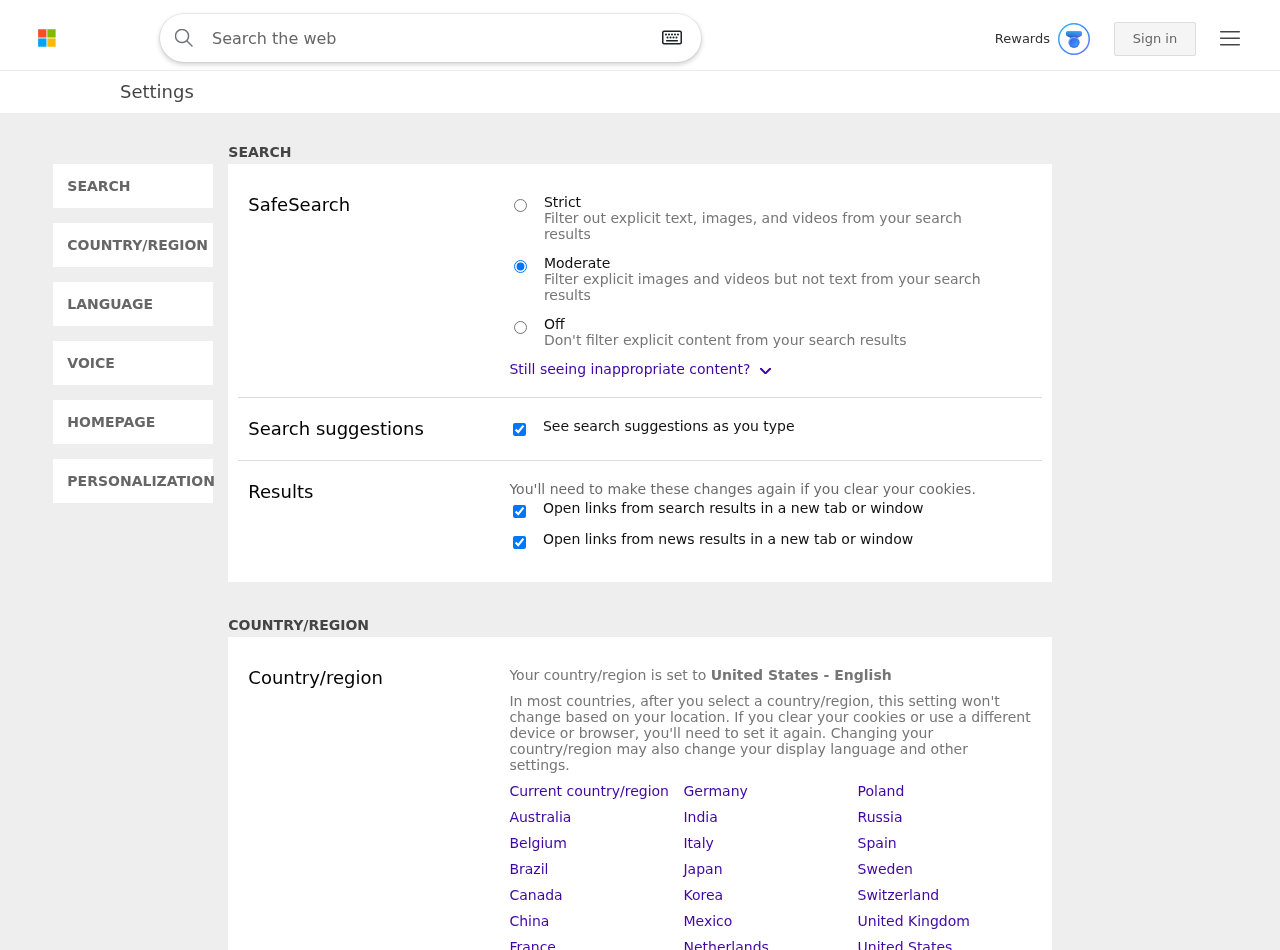
Bing is Microsoft’s legitimate search engine, and its own settings page (above) can’t change your browser’s search engine. The problem is Bing appearing after you chose something else.
Some Bing is normal. Edge uses Bing until you change it, and web results from the Windows taskbar search box come from Bing and usually open in Edge.
Microsoft also makes Chrome extensions, such as Microsoft Bing Search with Rewards, that set Bing as your default search. Installed one for Rewards points? That explains it.
Use this to tell normal from forced:
- Bing in Edge: normal until you pick another engine.
- Bing from the Windows taskbar search box: normal, because that box uses Bing for web results.
- Bing in Chrome, Firefox or Safari after you chose Google: something changed it.
- A strange site flashes before Bing: an extension or adware sits in the middle.
- The search setting is greyed out: a policy is forcing Bing.
How to switch back to Google in a few minutes
Work down this list and test a search after each item. Step 1 below has screenshots for every browser.
- In Chrome, open chrome://settings/search. In Firefox, open about:preferences#search. In Safari, choose Safari > Settings > Search. Pick Google or another engine.
- In Edge, Bing is the built-in default. Open edge://settings/search and choose another engine under Search engine used in the address bar.
- Remove Bing extensions you don’t want, including Microsoft’s own. Check chrome://extensions, edge://extensions, about:addons or Safari > Settings > Extensions.
- Uninstall recent free programs you don’t need. Windows: Settings > Apps > Installed apps. Mac: drag the app from Applications to the Trash.
- Restart the browser and search from the address bar. If Bing is gone, stop here.
Why your search engine keeps changing to Bing after you fix it
If Bing returns after a restart, something keeps resetting it. The usual suspects are an extension, a program that came bundled with other software, or a policy.
On some work PCs, Microsoft 365 Apps added a Microsoft Search in Bing extension that made Bing Chrome’s default. It was retired in 2025, but its helper service can linger.
Look in Control Panel > Programs > Programs and Features for Microsoft Search in Bing. Uninstall it there, or ask IT if it’s a work computer.
A greyed-out setting or a “managed by your organization” message means a policy is in control. The advanced section shows how to check it.
Use this guide for search hijacks, unwanted extensions and adware on Windows and Mac. A hacked account needs its own fix, starting with a password change.
How to Get Rid of Bing in Chrome, Firefox, Safari and Edge on Windows or Mac
Pick your browser below. Once searches go where you want, jump to the last check; the later steps are only for stubborn cases.
- Fix Chrome’s search engine
- Fix Firefox’s search engine
- Fix Edge’s search engine
- Fix Safari’s search engine
- Test the fix
- If Bing returns or a setting is locked
Step 1: Put your own search engine back
Chrome: replace Bing as the search engine
-
Open Search engine
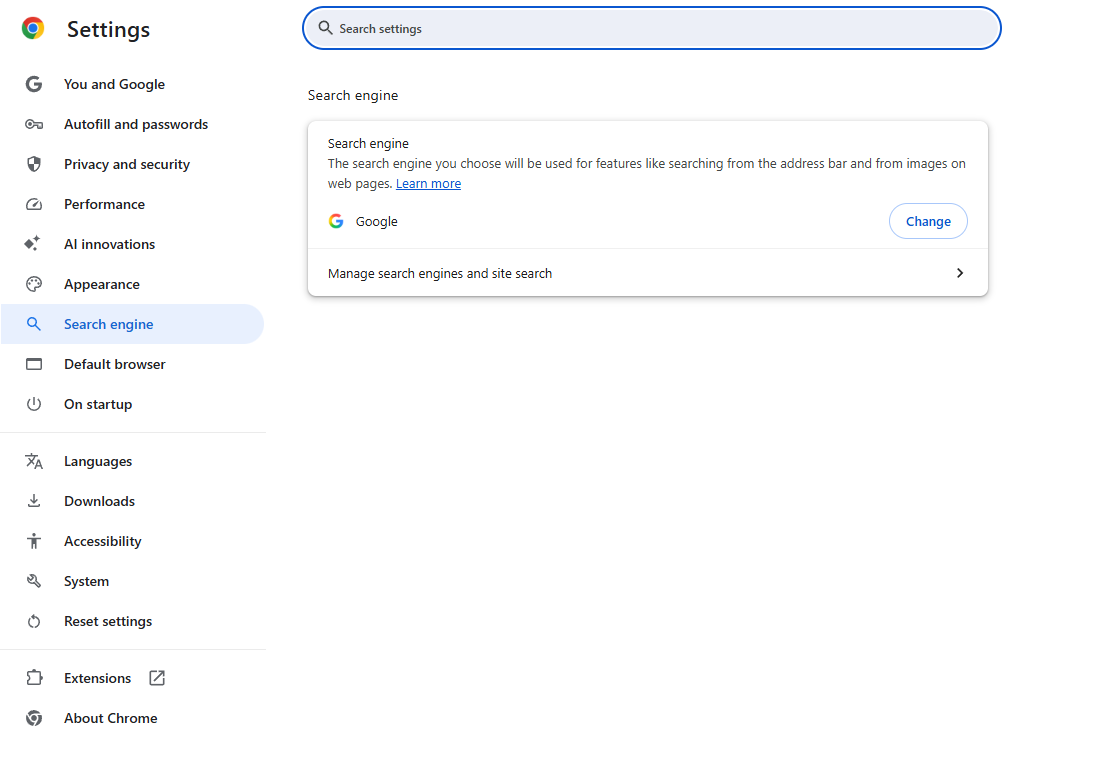
Type chrome://settings/search in Chrome’s address bar and press Enter. Next to the Change button you’ll see which engine Chrome uses now.
-
Switch away from Bing
Click Change, pick Google or any engine you prefer, and confirm your choice in the dialog.
Test it from a new tab’s address bar. Searching on google.com itself won’t show whether the setting worked.
-
Stop here if that fixed it
Bing gone and your choice still selected? Skip to the final check; a reset isn’t needed for this.
Bing back already? Move on to extensions. A greyed-out setting belongs in the separate advanced section.
Firefox: set a default engine other than Bing
-
Open Firefox Settings
Open the menu with three lines in the top-right corner and click Settings. Mac users can also choose Firefox > Settings from the menu bar.

-
Select Search and choose the engine
In the sidebar, click Search. Use the Default search engine drop-down to choose anything other than Bing.
Typing about:preferences#search in the address bar opens the same page. Changes take effect at once.
-
Try a fresh address-bar search
Search from a new tab. Bing gone? Finish with the final check.
A note saying an extension controls search tells you which add-on to deal with next. A locked setting needs the policy checks instead of more resets.
Edge: choose a search engine other than Bing
-
Open Address bar and search
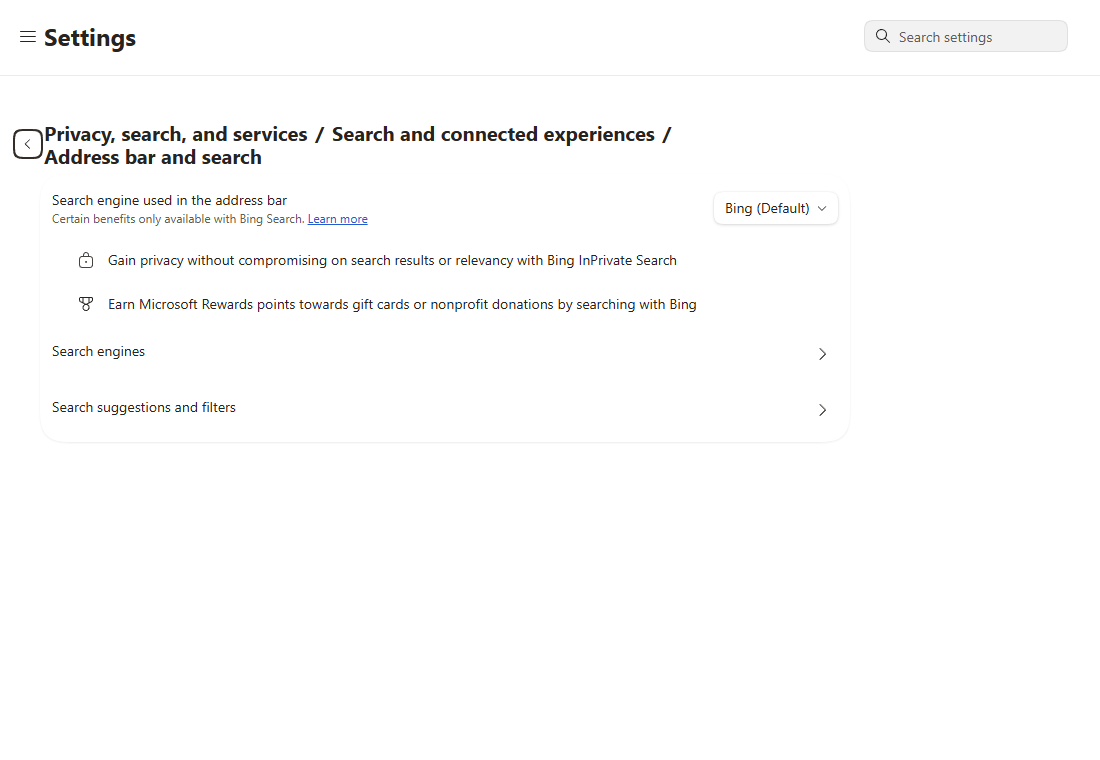
Type edge://settings/search and press Enter. Edge opens Address bar and search, sometimes under Privacy, search, and services > Search and connected experiences.
-
Select the engine you want
In Search engine used in the address bar, pick Google or another engine. Edge ships with Bing, so this is the setting most people need.
Missing from the list? Visit that engine’s real site and search once there, then come back. Edge will now offer it.
-
Test the address bar separately from a new-tab box
The box in the middle of Edge’s new-tab page can still use Bing when the address bar doesn’t. Test both.
If your version has the option, make new-tab searches use the address bar instead of the page’s box.
Then go to the final check. Only look at extensions if Bing still appears.
Safari: change the search engine and the start page
-
Open Safari Settings
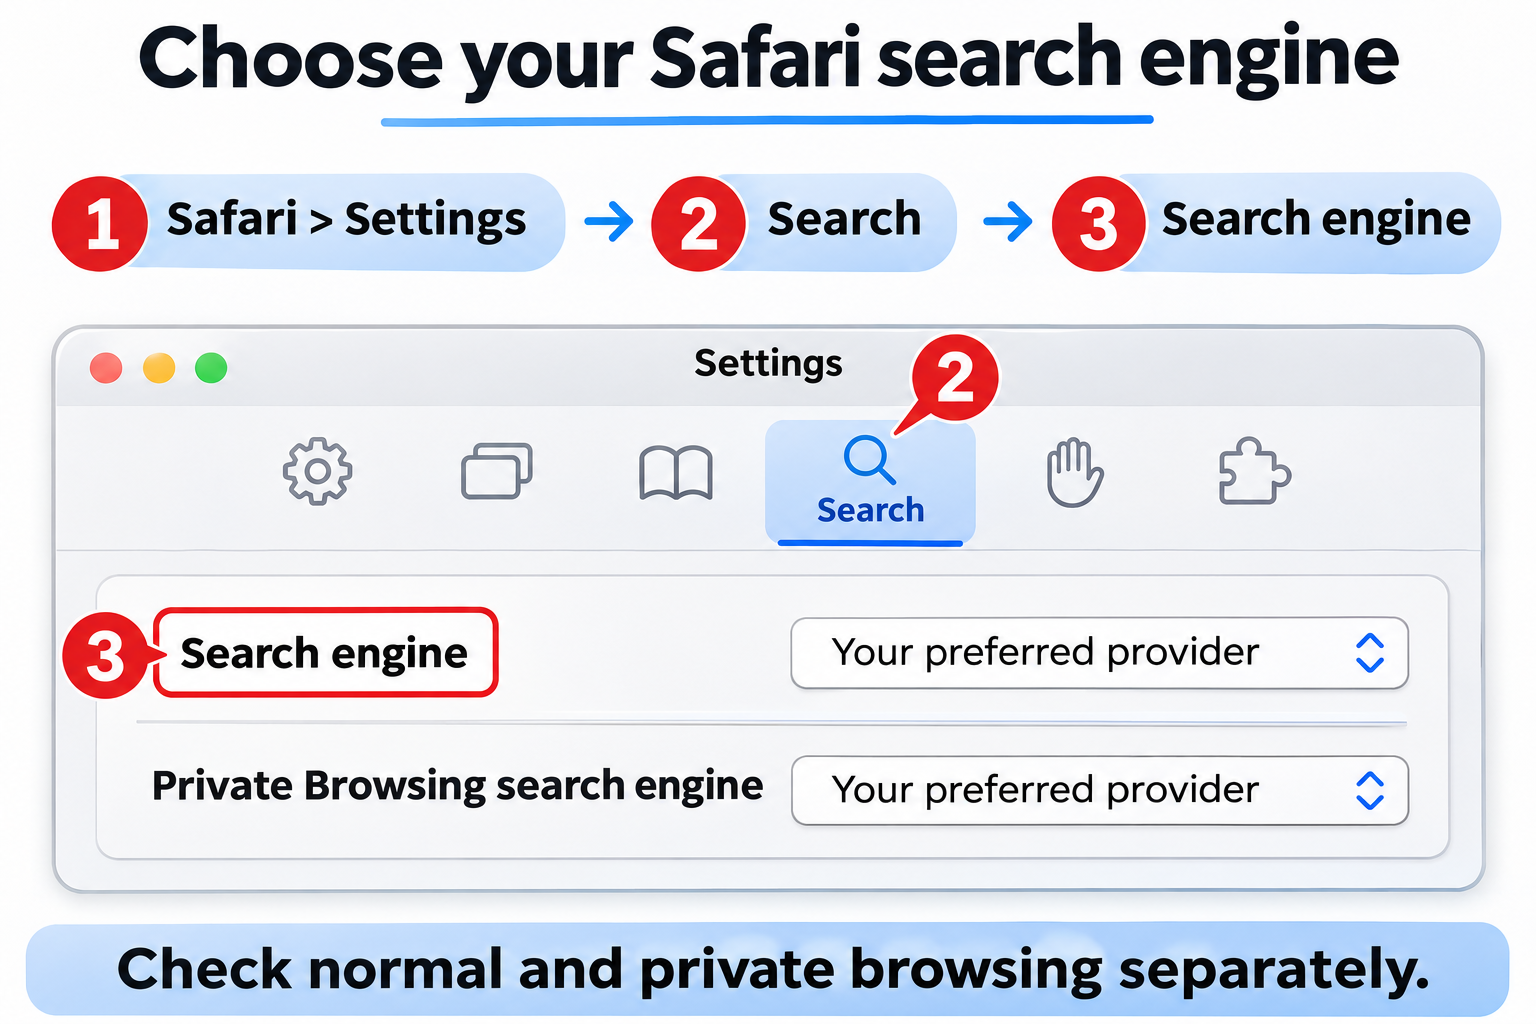
Choose Safari > Settings > Search. The picture below is an illustrated guide to the controls, not a real macOS screenshot.
-
Choose the search engine
Under Search, choose an engine other than Bing. Newer versions also have a Private Browsing search engine, so set that one too.
Test from the Smart Search field in a regular window. Private windows follow their own setting.
-
Check General only if a page opens automatically
Does Bing load before you’ve searched for anything? Open General and fix Homepage and the new-window option, replacing only the Bing address.
Searches working now? Go to the final check. If Bing hangs on, carry on with extensions.
Step 2: Find and remove the extension forcing Bing
Chrome: check for a Bing or new-tab extension
-
Open the installed-extension list
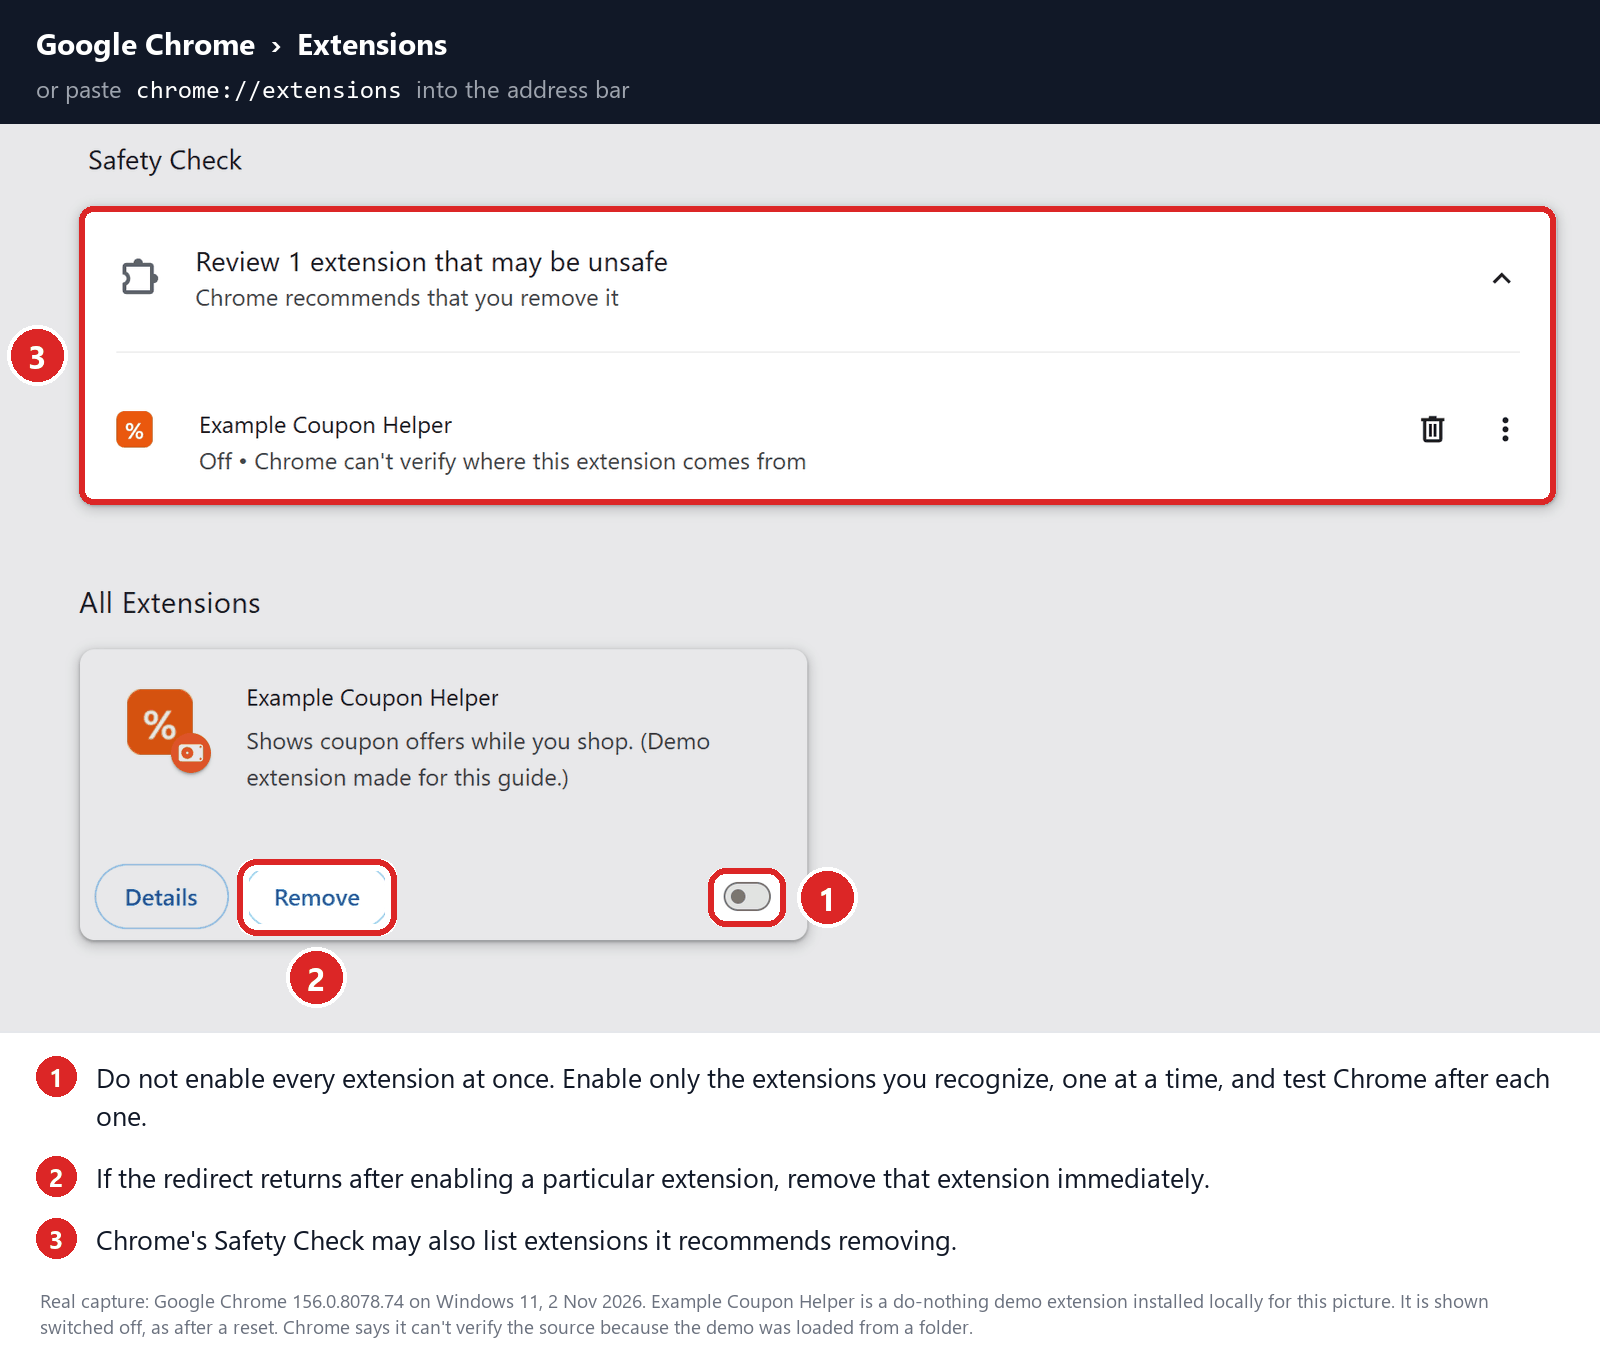
Type chrome://extensions and press Enter. The sample screenshot marks the on/off switch and the Remove button; the extension in it is only a demo.
-
Turn one suspect off and repeat the search
Look for Microsoft Bing Search with Rewards, Microsoft Bing Homepage & Search for Chrome, or a new-tab tool you don’t remember adding. Switch it off and search again.
If Bing goes away, click Remove on that card and confirm. Leave password managers and security extensions in place unless they’re clearly involved.
Nothing listed? Skip ahead. If Remove is greyed out or the extension reappears, see the checks for extensions that come back.
-
Confirm it stuck
Quit Chrome, reopen it and search once more. If Bing stays gone, head to the final check and skip the scans and resets.
Firefox: look for a Bing add-on
-
Open Add-ons Manager, then Extensions
Enter about:addons in the address bar. Choose Extensions on the left, not the recommendations on the first page.
-
Switch off a suspect add-on and test
Turn off one extension you don’t trust, then repeat a search that used to end on Bing.
When Bing stops, use that add-on’s three-dot menu to Remove it. Re-select your search engine in Settings if Firefox changed it.
No extensions installed? Move on. Add-ons that can’t be removed or keep coming back are covered in the separate advanced checks.
-
Test again before anything drastic
Reopen Firefox and search. If Bing is gone, do the final check rather than refreshing Firefox.
Edge: remove an add-on that locks your search
-
Open the Extensions page
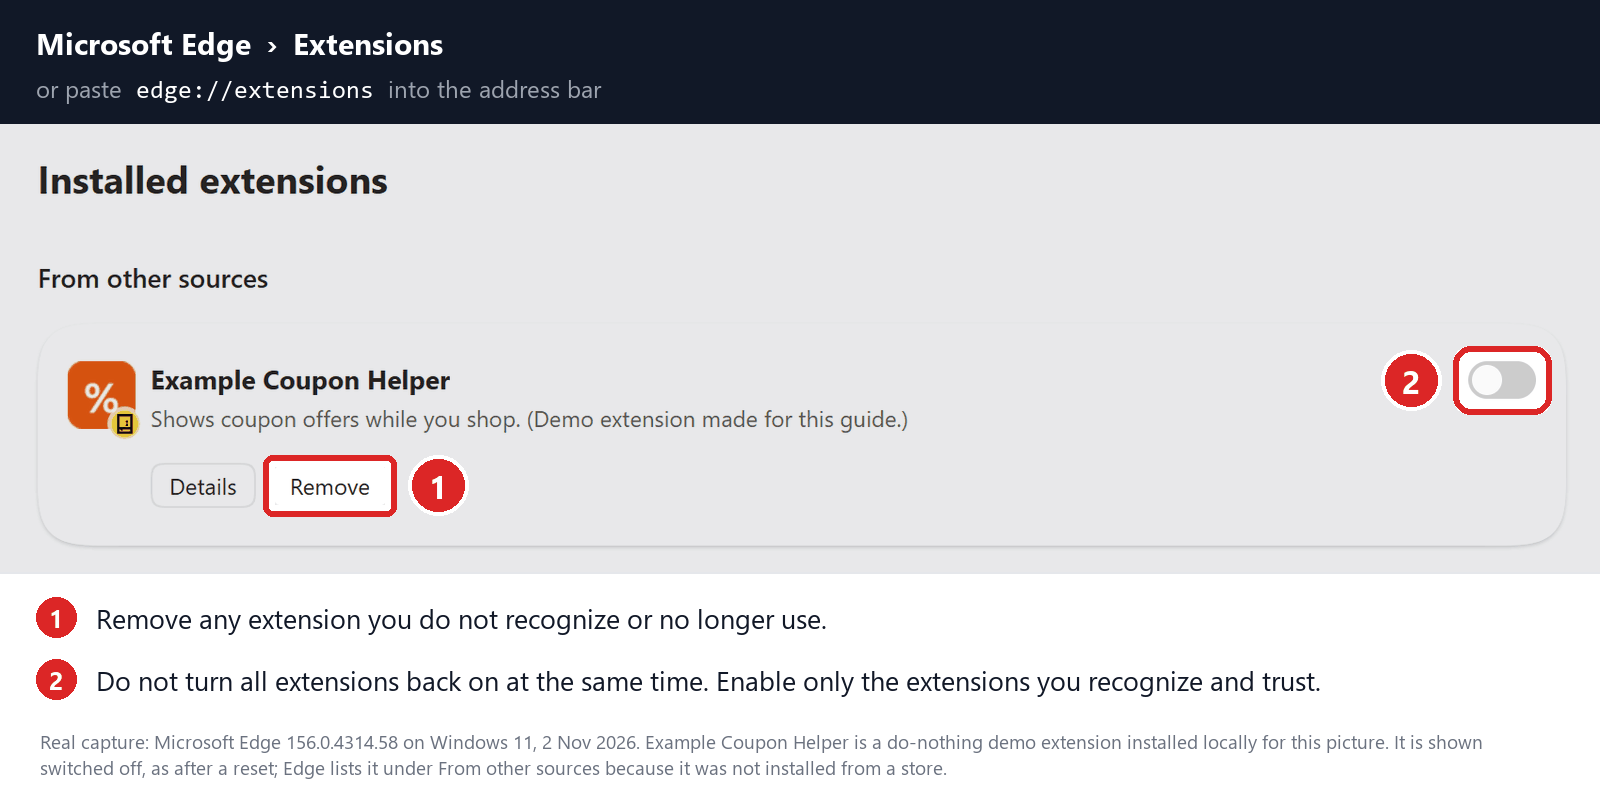
Go to edge://extensions. The screenshot uses a demo extension to show where the toggle and the Remove button are.
-
Test one add-on at a time
In Edge, Bing as the default isn’t suspicious. An add-on that locks Bing or replaces your new tab is. Switch that one off and search again.
If that solves it, click Remove and confirm, then look at your search engine choice once more.
No add-ons? Skip this. One that can’t be removed needs the advanced branch; don’t start deleting extension folders.
-
Stop when your choice sticks
Close and reopen Edge. If your engine is still selected, continue to verification and leave other profiles as they are.
Safari: remove an extension and the app behind it
-
Open the Extensions pane
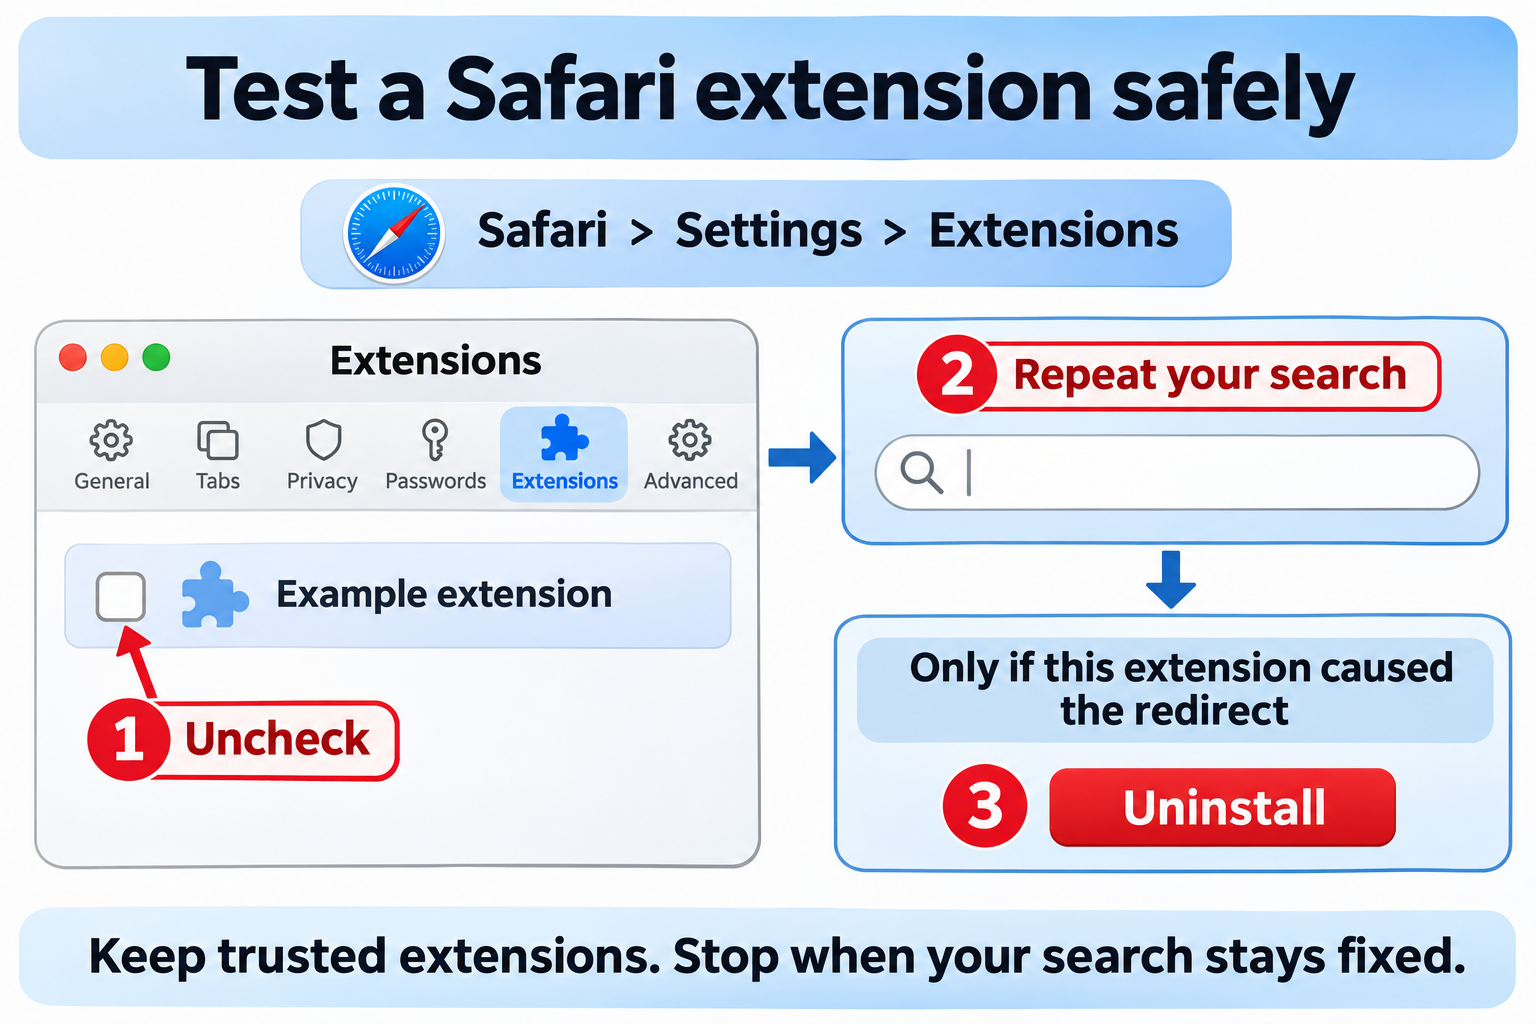
Go to Safari > Settings > Extensions. The illustration shows a safe order: switch off, test, then uninstall.
-
Disable one suspect before uninstalling it
Untick an extension you don’t recognize and search again. If Bing stops, select it and click Uninstall.
The extension in the illustration is made up. Act on what your own test shows, and keep the extensions you rely on.
-
Uninstall the app that installed it
Safari may say the extension came with a Mac app. Find out what that app is before removing it, and use its own uninstall instructions.
Nothing listed, or Bing already gone? Skip this and reopen Safari before checking the result.
If notifications keep opening pages by themselves
Only use this if pages pop open without you searching. That’s a website you allowed to send notifications, not a hijacked search engine.
-
Chrome: go to chrome://settings/content/notifications. In the list of sites allowed to send notifications, open the site’s menu and choose Block or Remove.
-
Firefox: go to Settings, Privacy & Security. Under Permissions, click Settings next to Notifications. Set the site to Block and click Save Changes.
-
Edge: open Settings and search for Notifications. In the site permissions, find the site you didn’t mean to allow and choose Block or Remove.
-
Safari: go to Settings, Websites, Notifications. Choose Deny for the site. Stopping future requests won’t undo permissions you already gave.
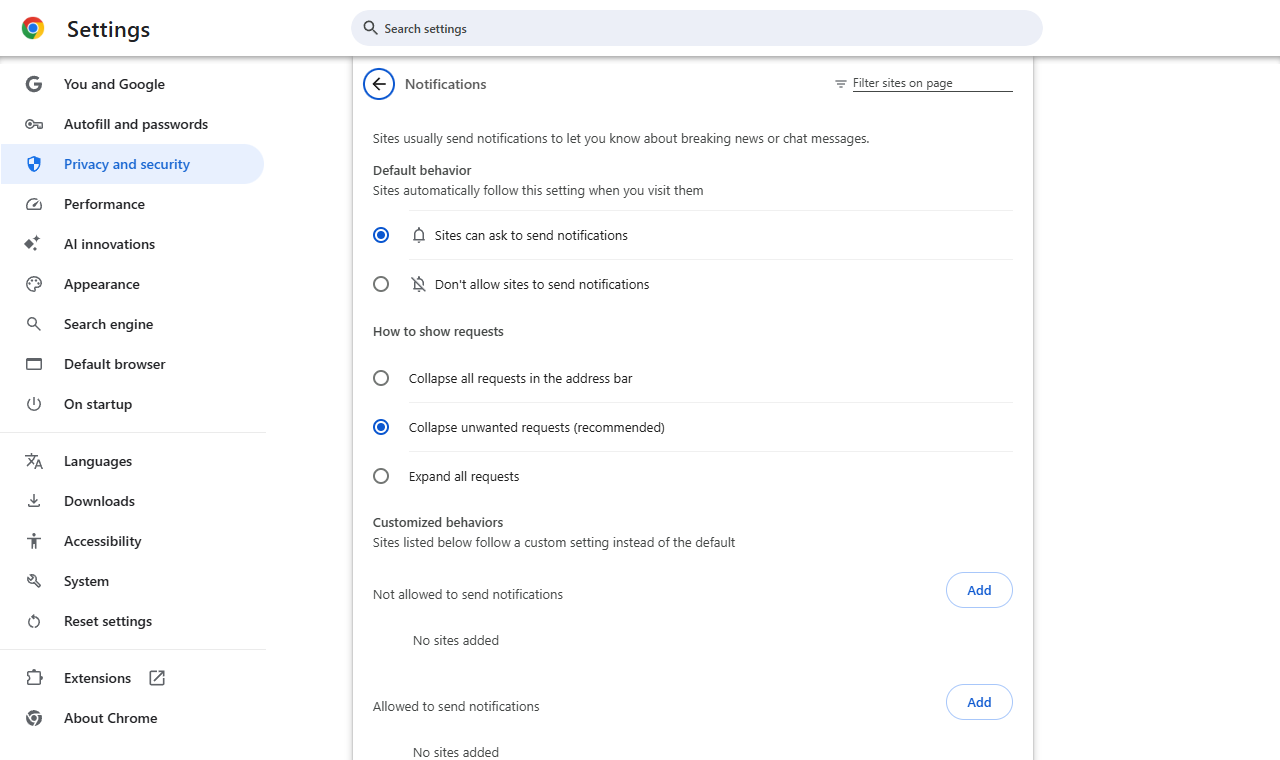
The screenshot shows Chrome’s version. Whatever your browser, change these in settings, never with a notification’s own buttons. Alerts gone and searches fine? Skip the scans and resets.
Step 3: Run a scan if Bing returns after a restart
Did changing the setting work? Then skip this step. Scan when an extension reinstalls itself, a program you don’t recognize appears, or Bing keeps returning.
Scan Windows for adware that resets your search
If Bing keeps returning on a Windows PC, check for adware and potentially unwanted programs with the free tools below.
Screenshots are from our Windows guide. Scan options can be named differently in your version.
Buying the paid version may earn MalwareTips a commission. Nothing in this guide requires it.
-
Download the Windows installer
Get the installer from the button below. Don’t trust a “cleanup tool” advertised by a pop-up or a strange search page.
Malwarebytes for WindowsOn-demand scan and threat review -
Open the setup file and check the publisher
Go to your Downloads folder and double-click the MBSetup file.
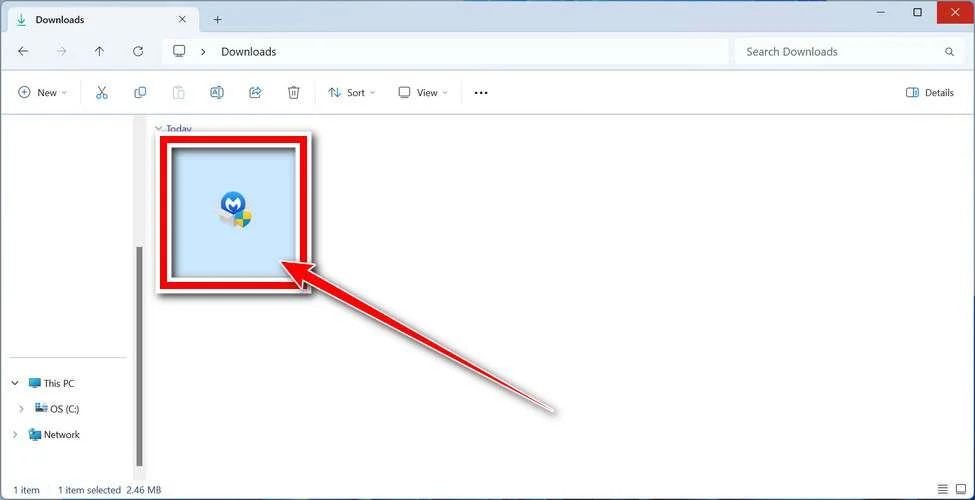
When Windows asks for permission, confirm the publisher is Malwarebytes. If a security warning makes no sense to you, stop there.
-
Install without the extras
Pick Personal if it’s your own PC, then click Next. Work computers should be handled by IT.
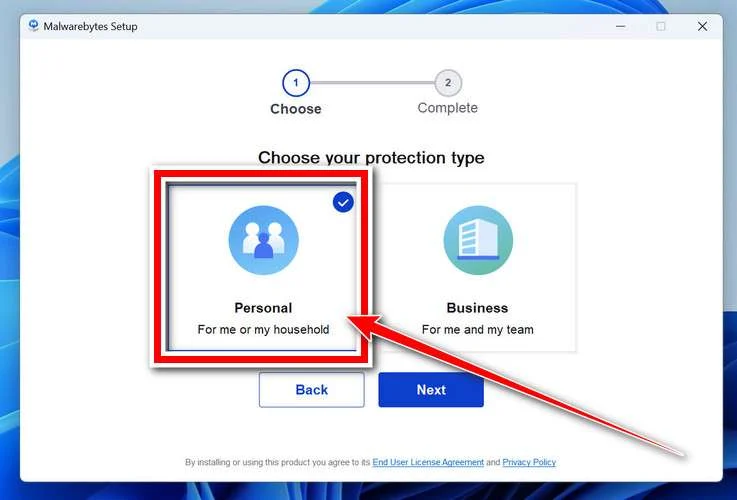
Turn down trial, subscription or browser-extension offers you have no use for.
Leave the installer running until the progress bar completes.
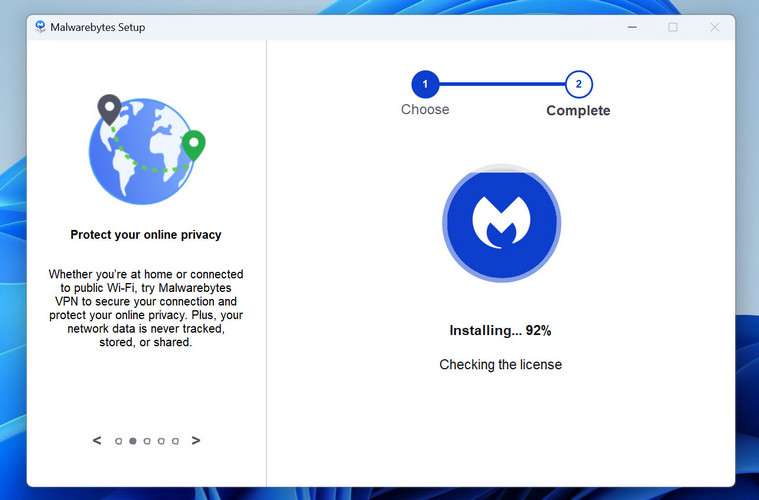
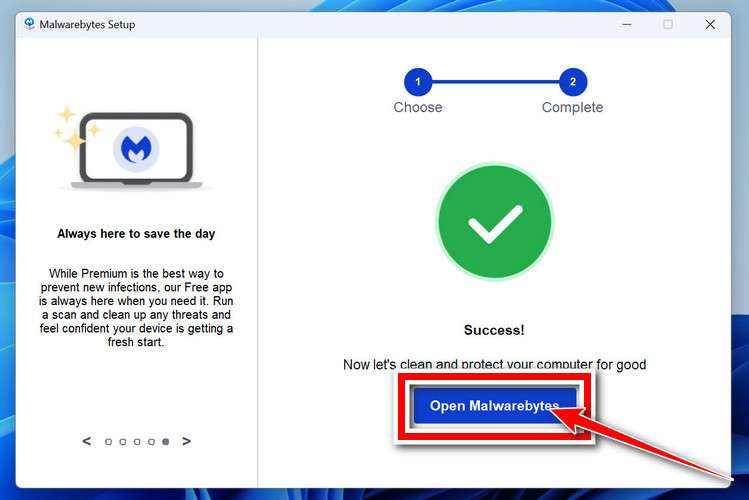
Once setup finishes, click Open Malwarebytes (pictured second below). On the welcome screen that follows, click Get started, reading any offers first.
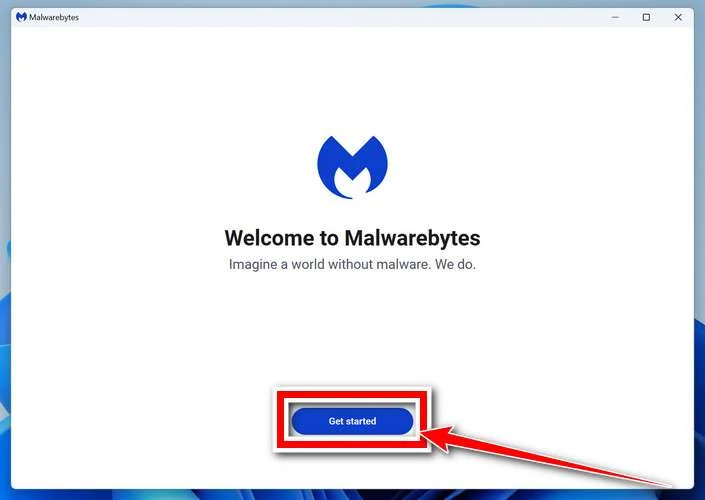
Below is that final setup screen. Open Malwarebytes takes you to the welcome screen above.
-
Run a free custom scan
In Malwarebytes for Windows, click the three dots on the Scanner tile. Choose Advanced Scan, then Custom Scan.
Quick and Custom scans cost nothing. Older screenshots show Threat Scan, which may need a trial or paid plan.
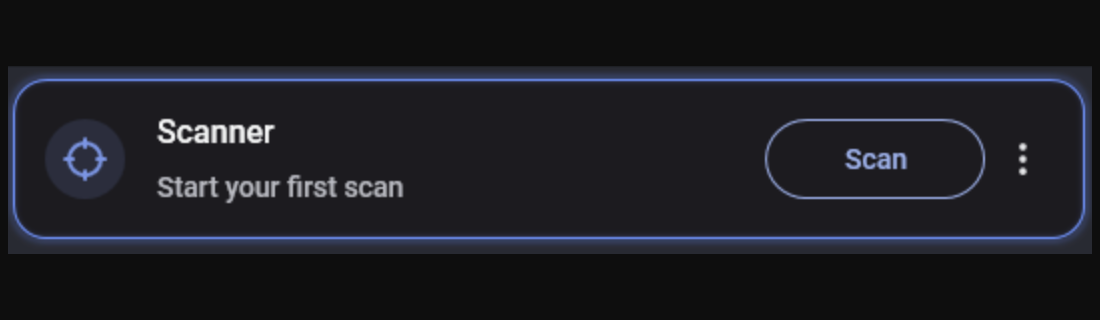
Choose the folders or drives to scan. Check the options for potentially unwanted programs and modifications, then click Start Custom Scan.
A scan of a few folders isn’t a full check. The Microsoft Defender Full scan below covers the whole PC.
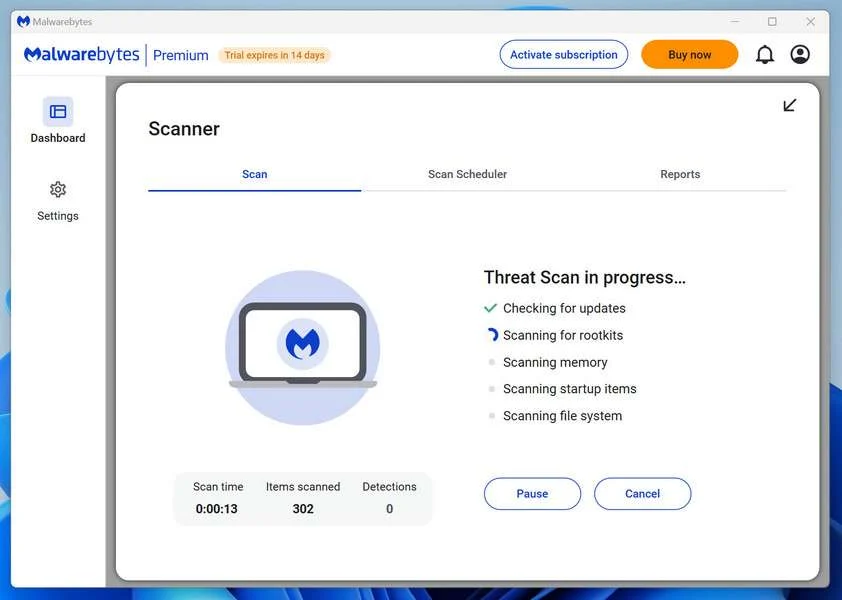
The progress screen below is from an older Threat Scan. Yours may look different, so wait until the results appear.
-
Quarantine what it finds
Look at each detection’s name and location. Select the ones to quarantine, and save the report in case you need advice later.
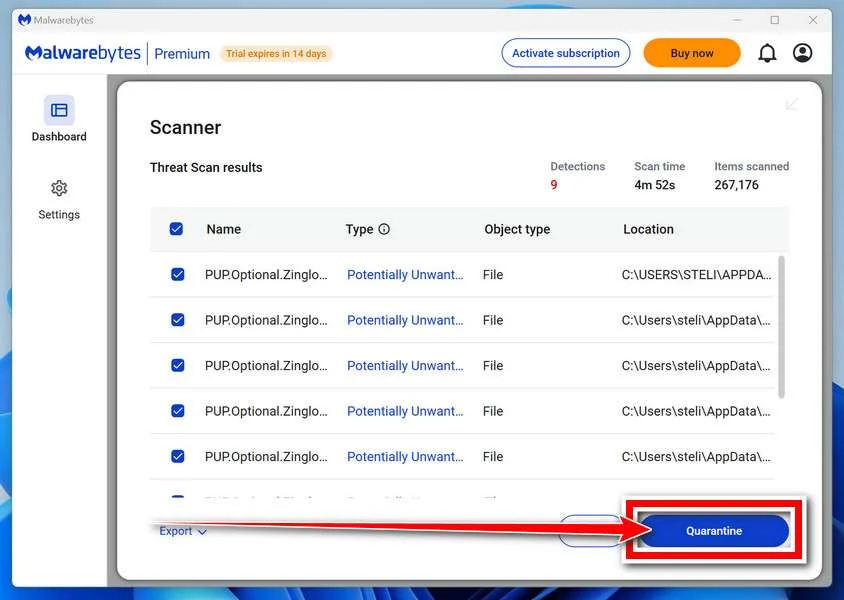
The detections pictured are samples. Yours will differ.
Click Quarantine. The report may name the program that kept setting Bing, so hold on to it.
Wait until the quarantine has completed.
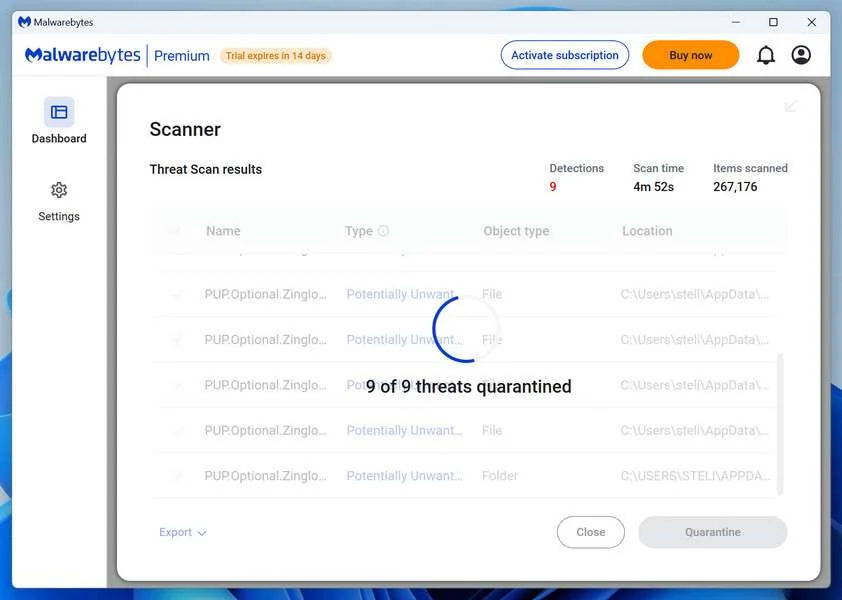
-
Restart, then search again
If Malwarebytes asks to restart, save your work and agree. Finishing the cleanup matters even if the browser looks fine.
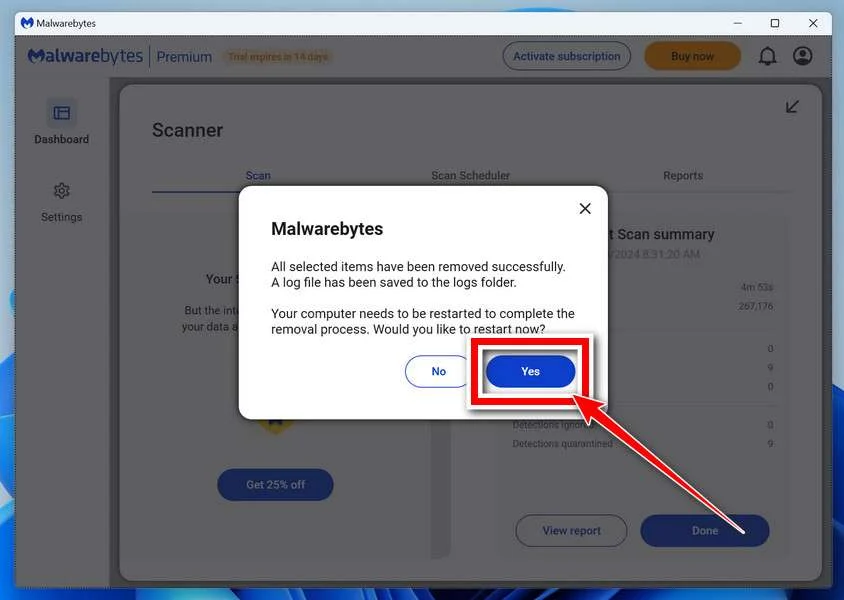
Once you’re back in Windows, recheck your search engine and extensions. Scanners don’t always reverse browser settings.
Bing or the same detection back? Save the report, note when it returns, and ask for help instead of running deletion scripts.
Microsoft Defender is built into Windows too: Windows Security, Virus & threat protection, Scan options, Full scan. Act on whatever it reports.
Run AdwCleaner if adware keeps forcing Bing
AdwCleaner is a free, Windows-only cleaner for adware and unwanted programs. Run it if Bing still comes back after the Malwarebytes scan.
-
Download and open AdwCleaner
Malwarebytes AdwCleanerOptional Windows adware checkThere’s nothing to install. You just run the file and agree to its license if you accept it.
Open the AdwCleaner file from Downloads, not a similar-looking program from an ad.
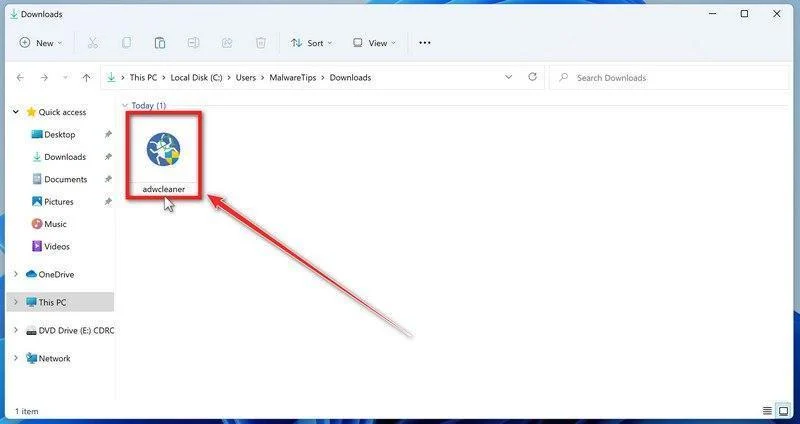
At the Windows permission prompt, make sure the file and publisher are right, then click Run or Yes.
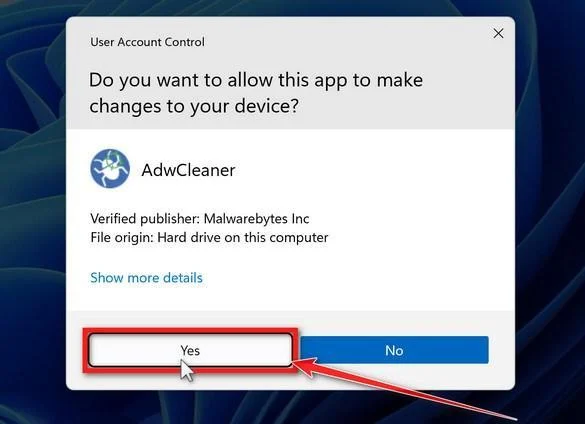
-
Keep the reset options off, then scan
Don’t turn on Reset Chrome Policies. It erases every Chrome policy, even ones your antivirus or employer set.
Network and firewall resets should stay off too. From Dashboard, click Scan Now.
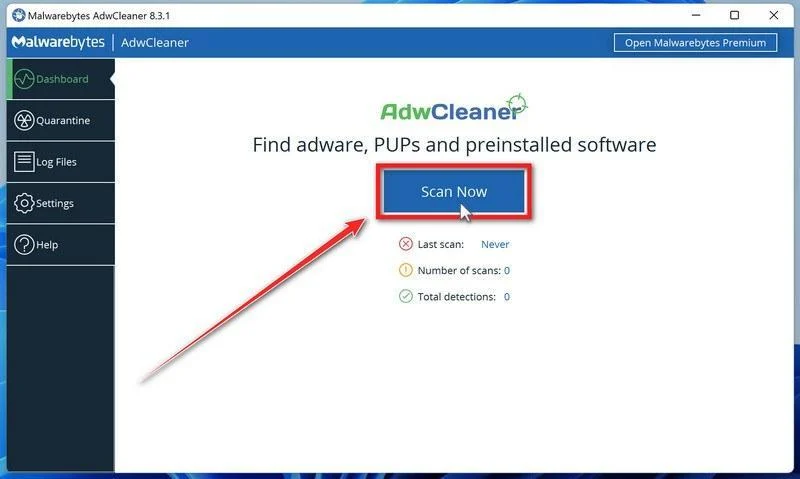
This scan just looks. It won’t remove anything until you say so.
When it finishes, go through the findings before cleaning up.
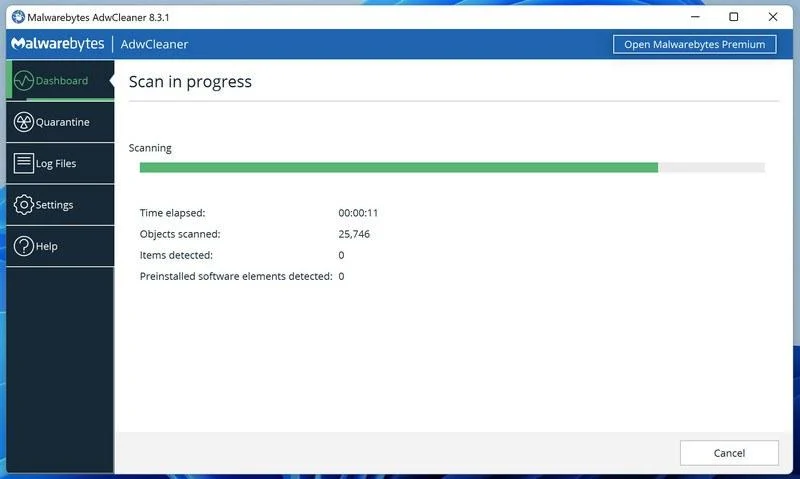
-
Go through the results
Recent versions use Next, then Quarantine. The older screenshot below shows a single Quarantine button instead.
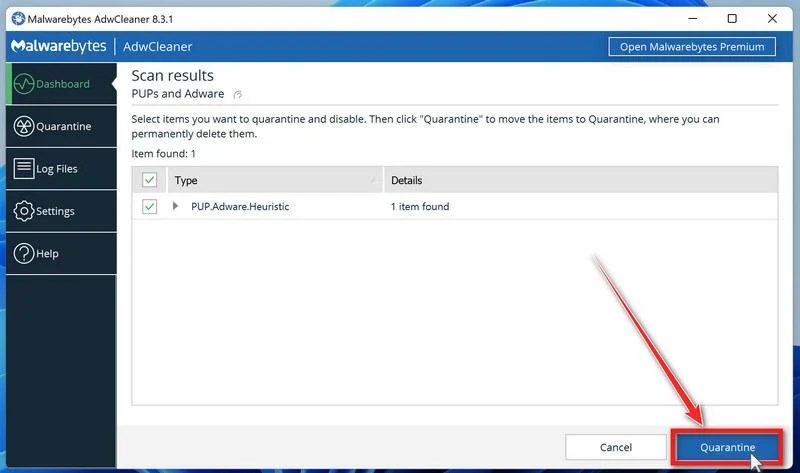
A second list of preinstalled software may appear. Uncheck any program there that you use.
-
Save your work, then clean up
AdwCleaner may close open programs. Save documents and browser tabs, then click Continue.
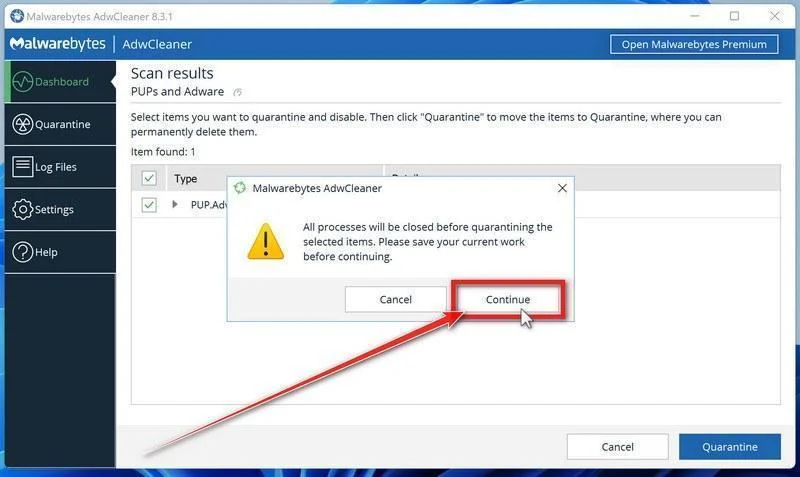
Restart when prompted and read the log. Leave Basic Repair off unless a helper recommends it for your case.
-
Search again the way you did before
Repeat the address-bar and new-tab searches, and test once more after a restart. Did Bing or the extension return?
Save leftover findings for the forum. A clean result can also mean a work policy, or Bing as Edge’s normal default, rather than adware.
Scan your Mac for adware that brings Bing back
Run this on a Mac when an app or extension keeps switching your search to Bing.
The installation screenshots are from our Mac guide. Versions and window styles vary.
MalwareTips may get a commission on paid upgrades. The free scan is all this guide needs.
-
Download Malwarebytes for Mac
Malwarebytes for MacMac-specific scan and threat reviewDownload the Mac version. The Windows installer and AdwCleaner won’t run on a Mac, and a “cleaner” from a pop-up should never be trusted.
-
Open the downloaded package
Open Finder, go to Downloads and double-click the Malwarebytes package. The version number may not match the screenshot.
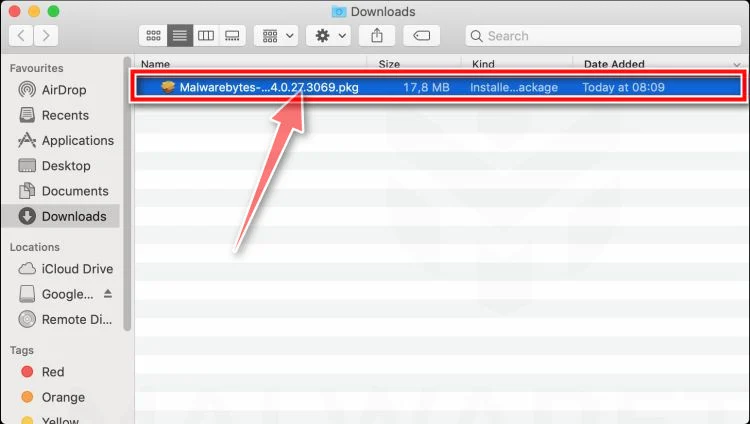
Confirm it really is the Malwarebytes package. If anything about the file seems off, stop.
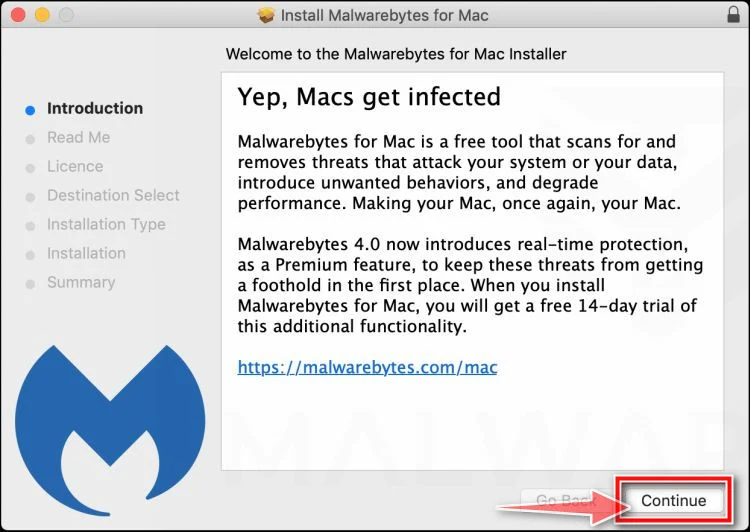
Click Continue in the installer. The screenshot is from an older release.
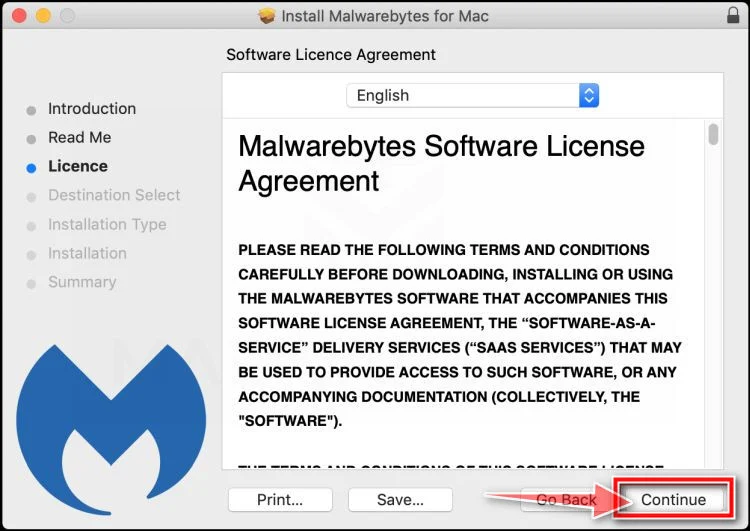
Read the license and continue if you agree. That’s separate from any subscription offer.
-
Install and grant access
Go through the installer screens and click Install once the destination looks right.
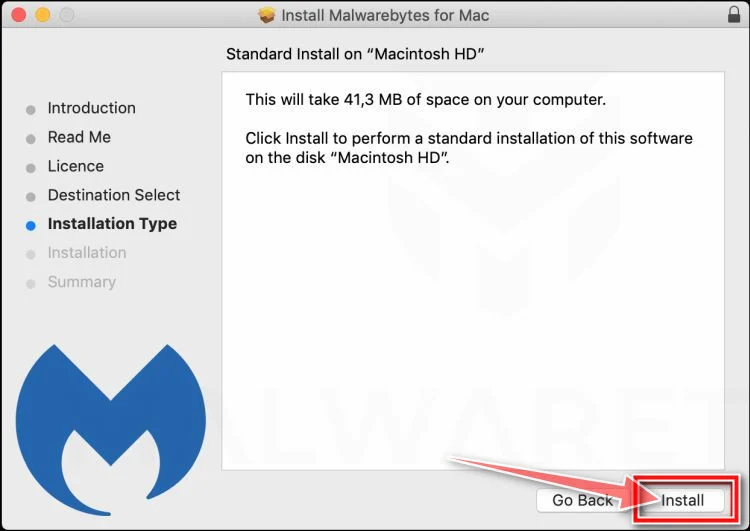
Use your Mac password or Touch ID when macOS prompts you. No website or phone caller should ever ask you for it.
If Malwarebytes needs Full Disk Access, turn it on under System Settings, Privacy & Security, Full Disk Access. Older macOS calls this System Preferences.
Back in Malwarebytes, say no to any trial or subscription you don’t want.
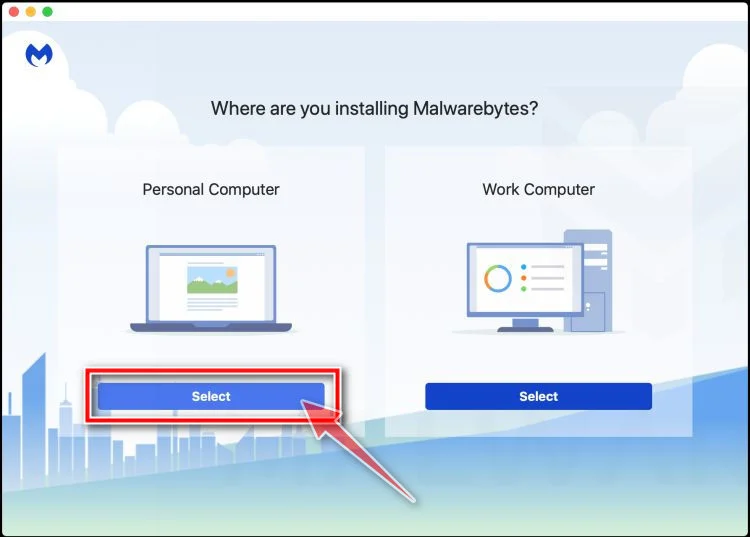
When asked about the computer type, pick Personal Computer for your own Mac. On a work Mac, follow IT’s instructions.
-
Start a free custom scan
On Mac, click the Scanner tile itself, not its Scan button. Open the Scan tab, Advanced scans, then Custom scan.
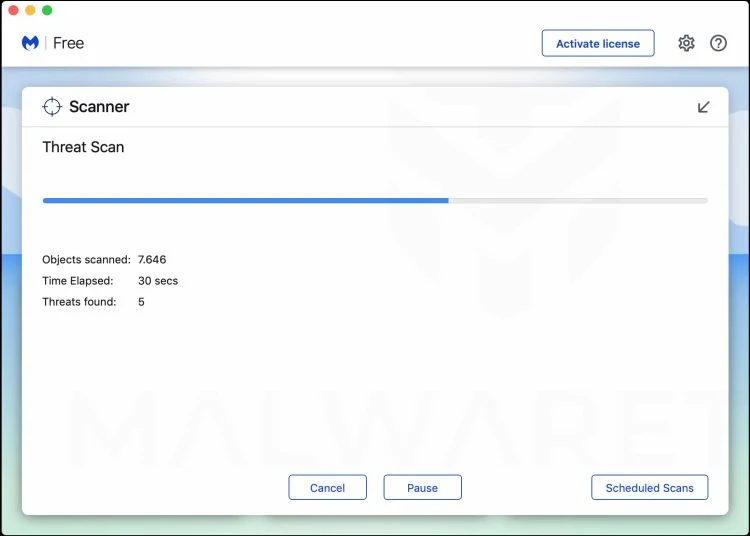
Quick and Custom scans are free. Threat Scan may require a trial or subscription; the old screenshot isn’t telling you to buy one.
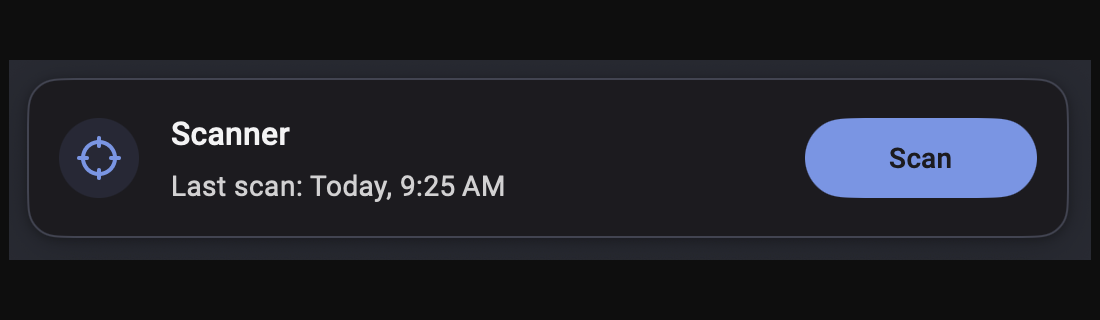
Pick a folder or app in Finder and click Open to scan it.
Note that the Scan button on the dashboard may launch a Threat Scan. Stick with the custom scan if you want the free one.
Let it run without closing Malwarebytes or uninstalling anything.
The screenshot shows an older Threat Scan. Wait for your own scan’s results.
-
Remove what the scan finds
Check each finding’s name and location, then quarantine or remove it. Save the report if you’re unsure about anything.
Older versions use a Confirm button, as below. Newer ones may say Quarantine or Remove.
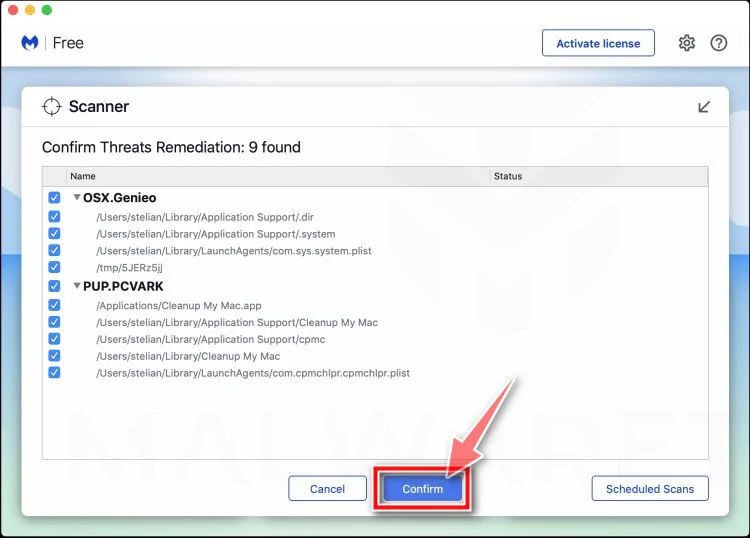
Your findings will differ from this sample list.
-
Restart if prompted
If removal needs a restart, save your work first. Reopen Malwarebytes afterward and keep the report.
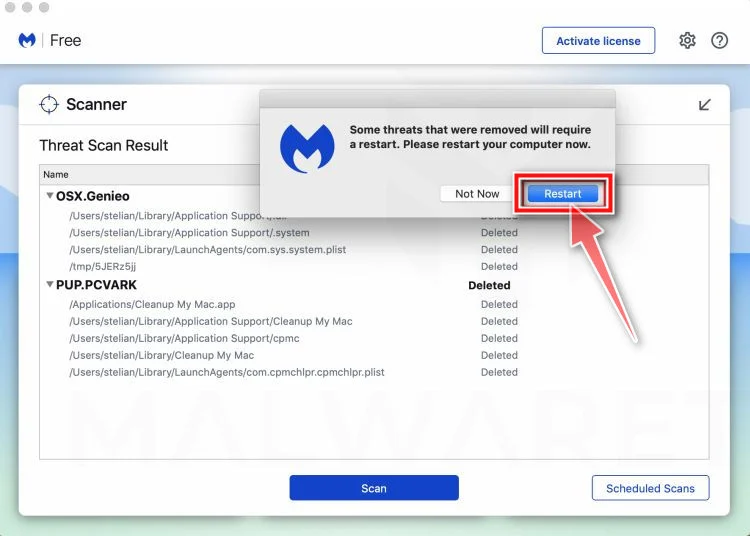
Search again and look for extensions that reappeared. A scan doesn’t always restore your browser settings.
-
Still seeing Bing? Get help
Note when Bing returns, such as after a restart or sign-in. Share that and the scan report, with personal details removed.
Avoid wiping all profiles or launch folders on the Mac. Identify each item before removing it.
Step 4: Reset your browser if Bing won’t let go
Searches working? Skip to the final check. Reset only the browser still stuck on Bing, and do it after removing whatever forced it.
Restore Chrome’s defaults once the cause is gone
Signed in to Chrome with sync? Google says a reset can carry over to your other signed-in devices, so consider pausing sync first.
Screenshots are from Chrome on Windows. The Mac reset page matches, apart from small wording differences.
-
Open the reset page in the affected profile
Save open work and make sure you’re in the right Chrome profile. Type chrome://settings/reset into its address bar and press Enter.
Or go through Chrome Settings to Reset settings. Only this profile is affected.
Using the menu? Open Settings; Reset settings is listed in the sidebar.
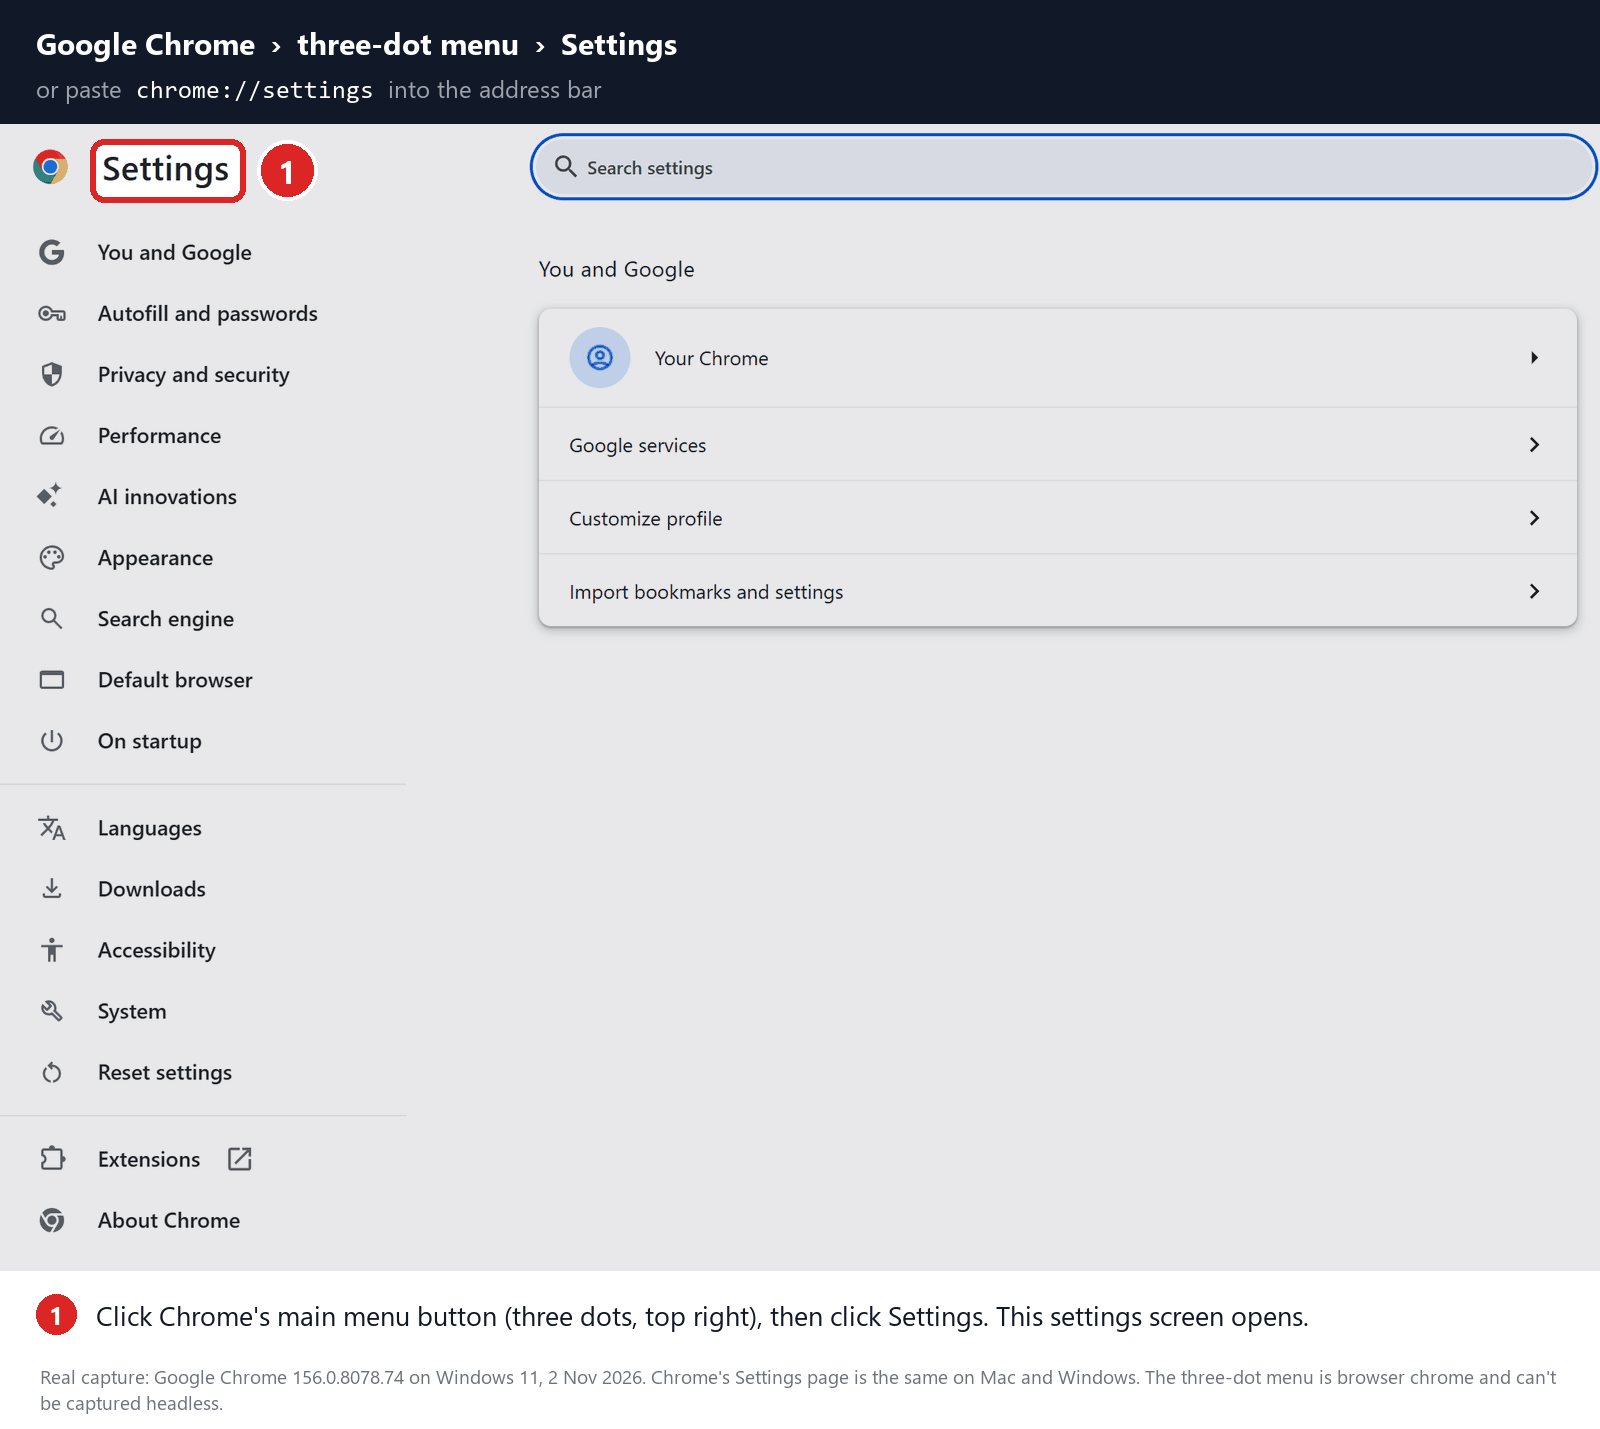
Choose Reset settings in the sidebar.
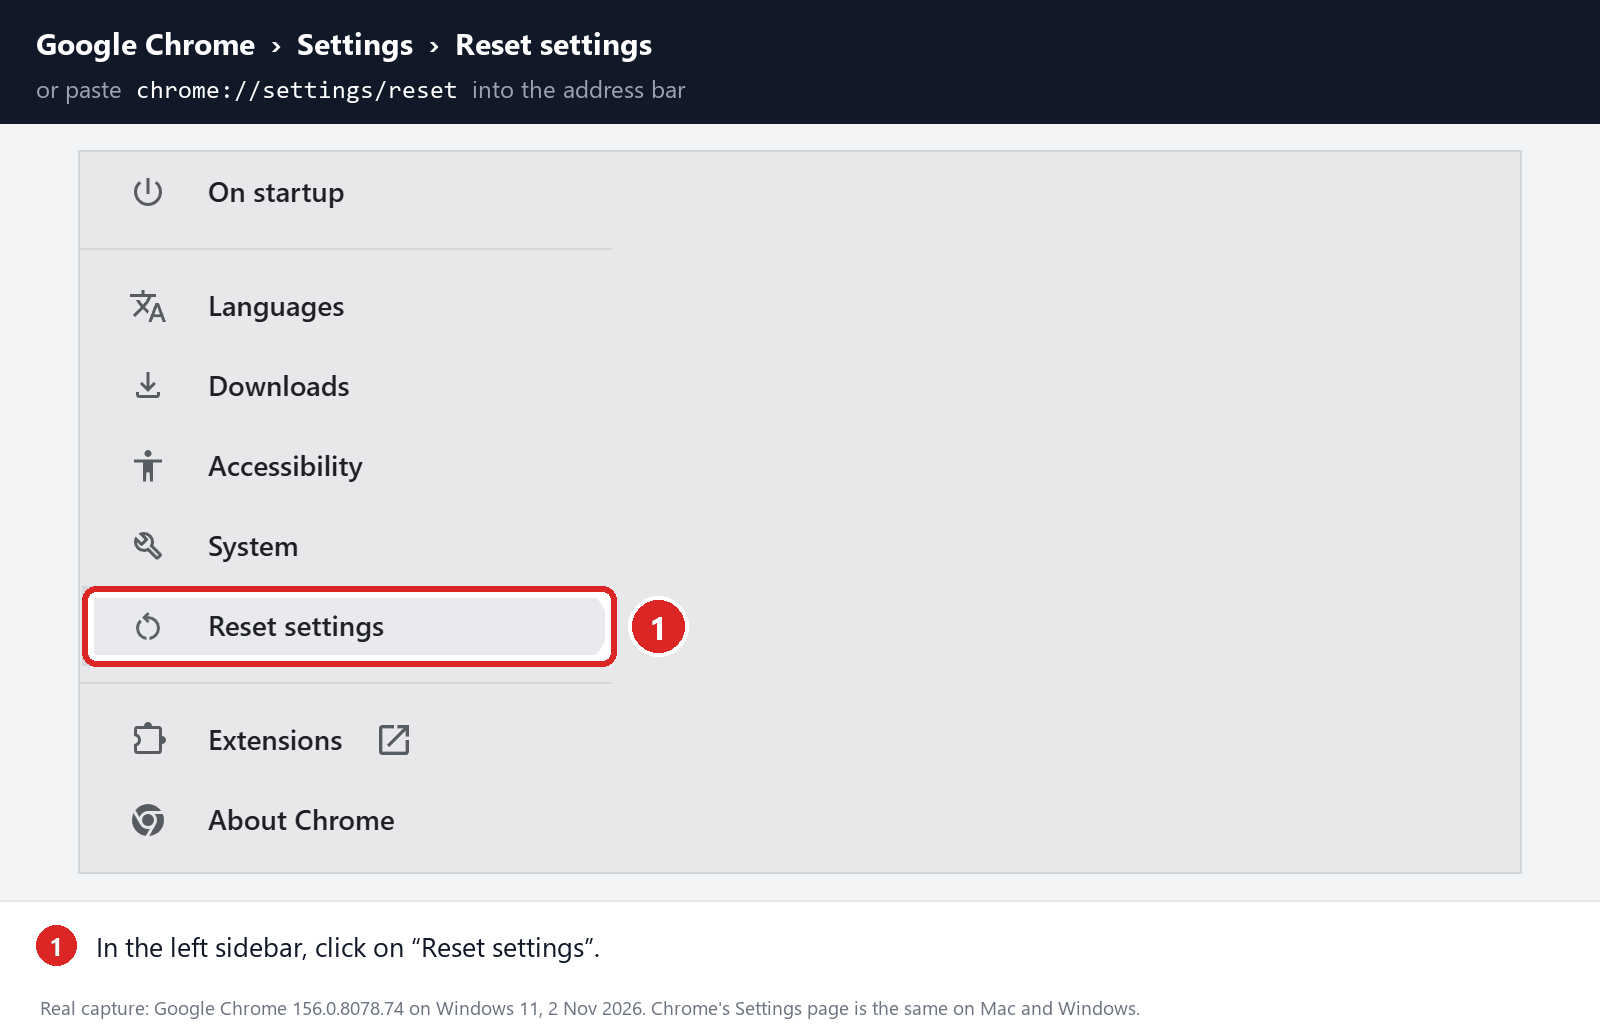
On that page, locate Restore settings to their original defaults.
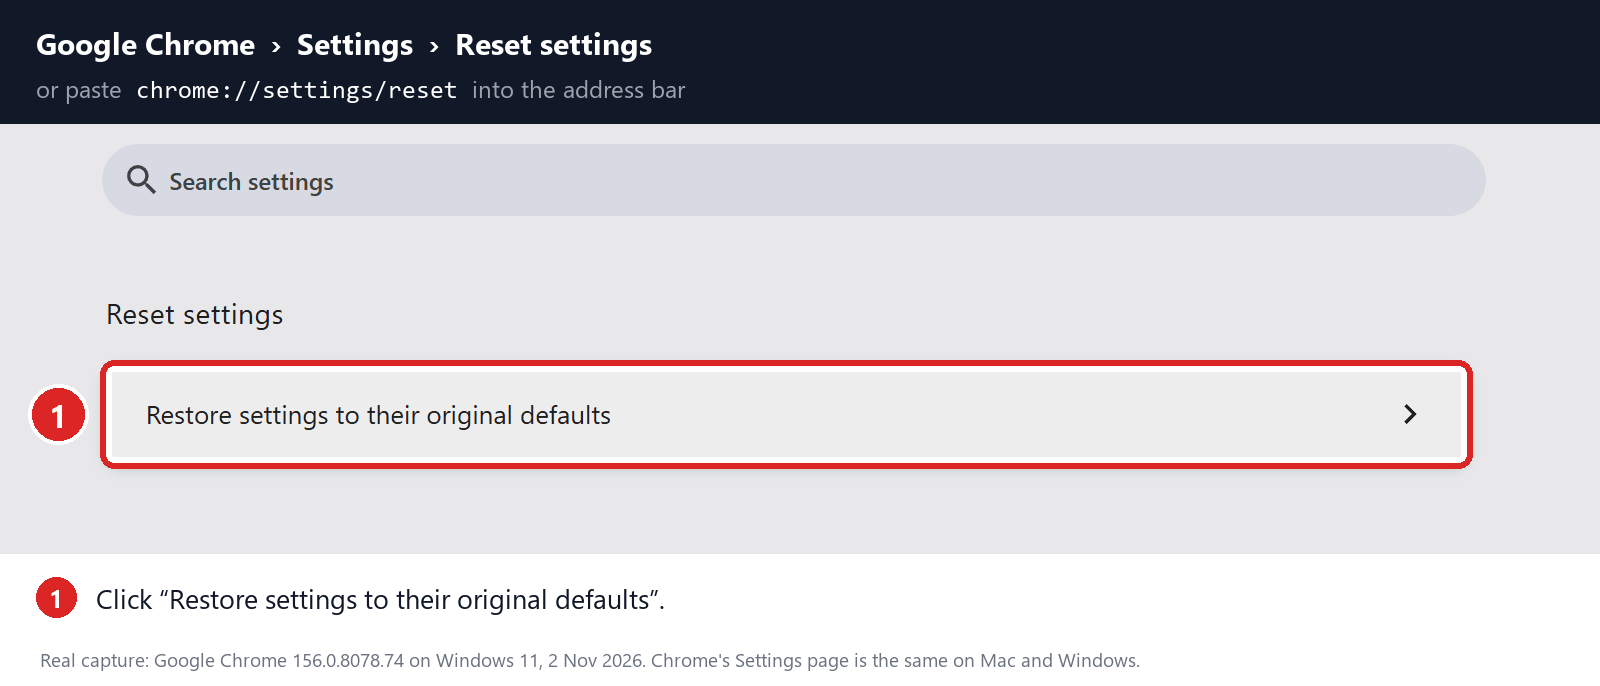
-
Read the confirmation before resetting
Click Restore settings to their original defaults. The dialog warns that it resets your startup page, new tab, search engine and pinned tabs, and turns off extensions.
Bookmarks, history and saved passwords are kept, but you may need to log in to some sites again.
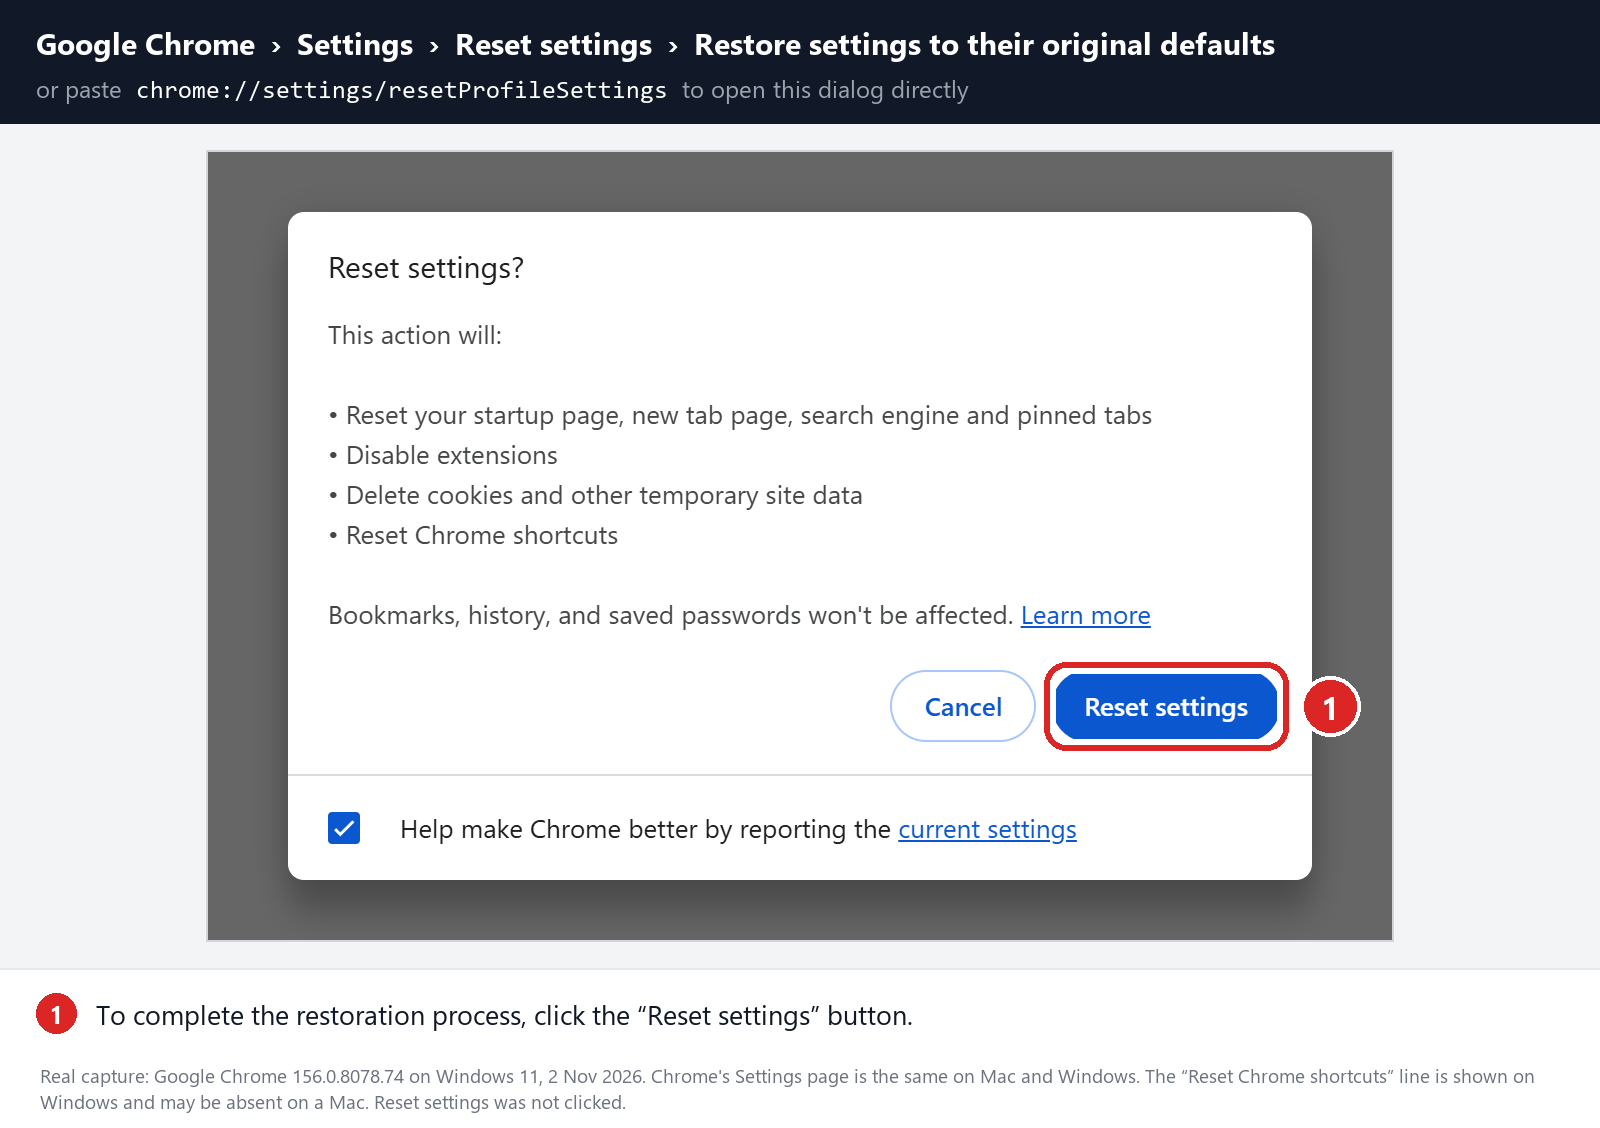
Confirm with Reset settings. A reset won’t uninstall software or override a policy that forces Bing.
-
Set your engine, then re-enable extensions one by one
Go to chrome://settings/searchEngines and set your engine. Review your startup pages, then test a search before enabling any extensions.
Enable trusted extensions one at a time. If Bing reappears, disable that extension again and remember its name.
Use Refresh Firefox as a last resort
Refresh Firefox sets up a new profile but keeps your essentials. Before you start, back up key bookmarks and check you can recover your passwords.
Our screenshots come from Windows. A Mac shows the same controls with slightly different fonts and button order.
-
Open Troubleshooting Information
Type about:support in Firefox’s address bar and press Enter. That page holds the Refresh Firefox button.
You should see Troubleshooting Information at the top, with the refresh option in a box on the right.
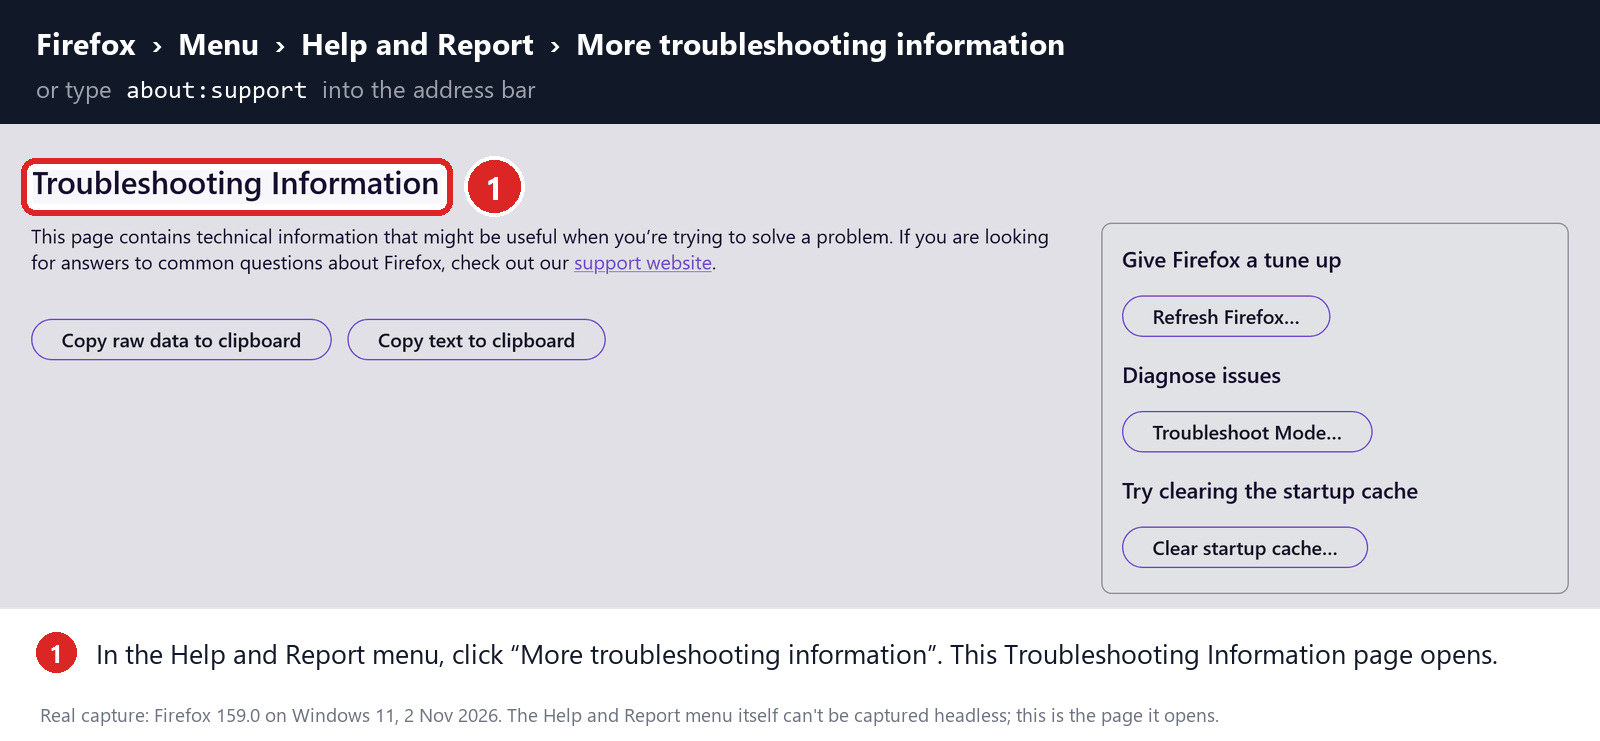
Locate Refresh Firefox in that box.
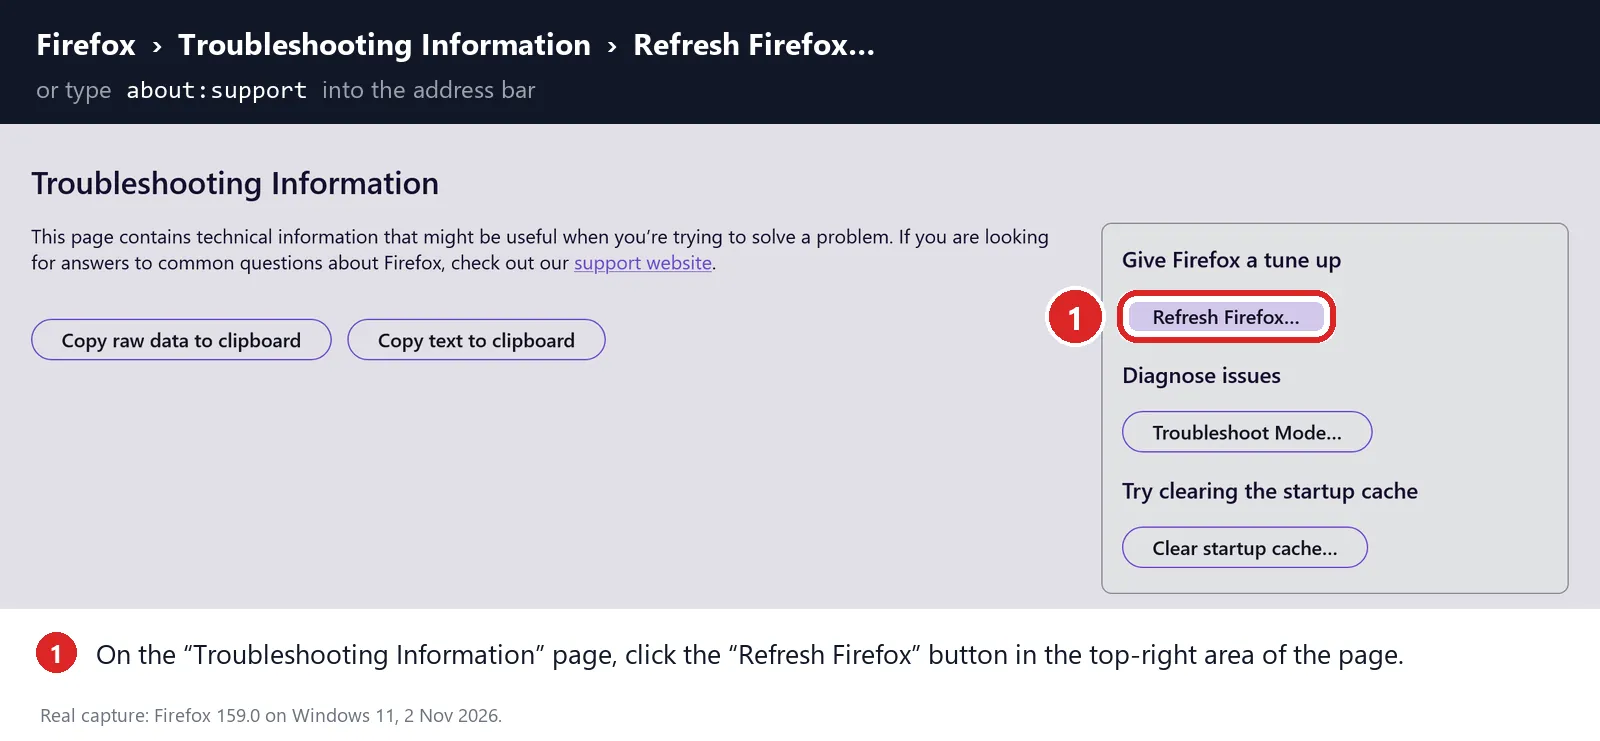
No button? Don’t delete your profile folder by hand. Check Mozilla’s help pages or ask for support.
-
Read what Refresh removes, then confirm
Firefox explains what happens: bookmarks and passwords stay, while extensions, themes and custom settings go.
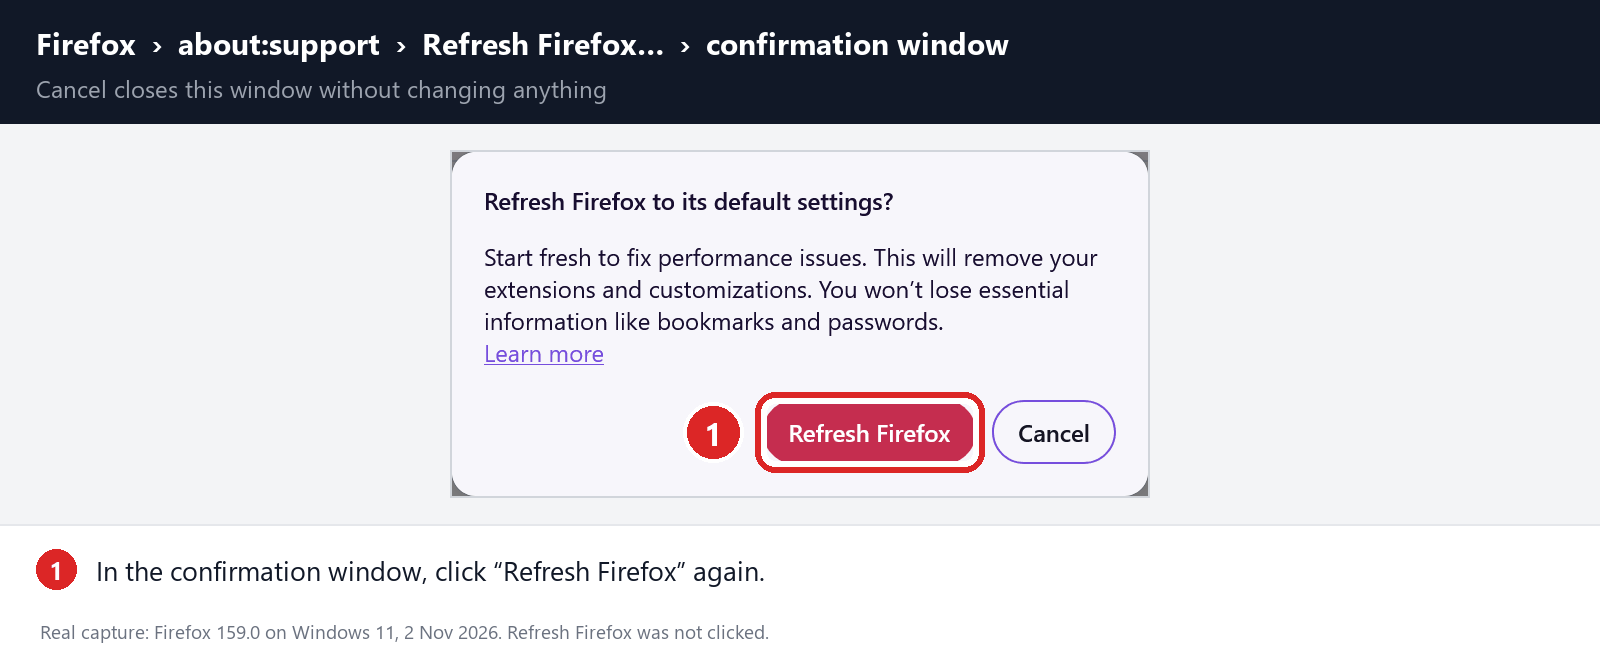
Save open work and click Refresh Firefox. It restarts, rebuilds the profile and shows a completion screen.
Choose your search engine and test before adding add-ons back. Refresh doesn’t touch policies set outside Firefox.
-
Hang on to the Old Firefox Data folder
Your old profile may be saved in a folder named Old Firefox Data. Keep it private until you’ve recovered what you need and Bing has stayed away.
Copy back only specific items. Restoring the whole folder could bring Bing right back.
Reset Edge, then choose your engine again
Resetting Edge won’t uninstall programs or clear policies, so remove the cause first.
Keep in mind that Bing is Edge’s built-in default. A reset puts Bing back as the search engine, and you’ll need to pick yours again afterward.
Save open work and back up important favorites. If sync keeps restoring Bing, pause syncing settings and extensions rather than deleting your account data.
-
Open the reset settings page
In the affected profile, type edge://settings/reset and press Enter. Select Restore settings to their default values.
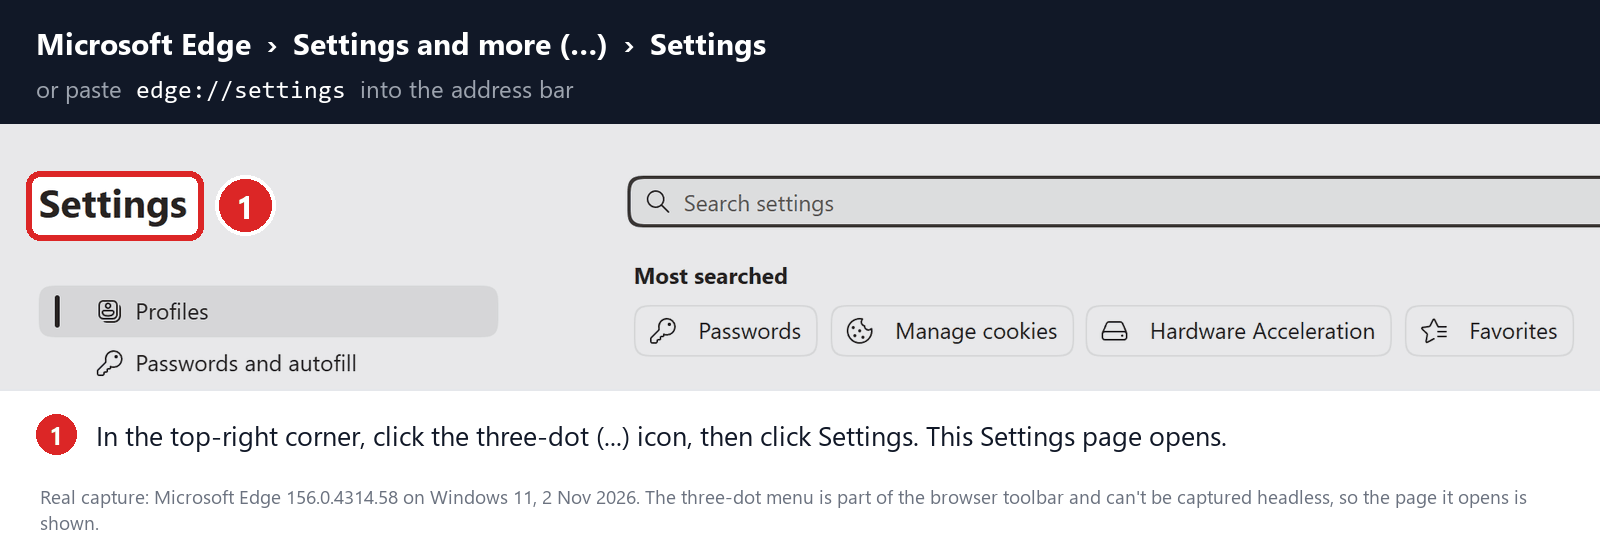
Prefer the menu? Open Edge Settings, and use its search box if the sidebar is hidden.
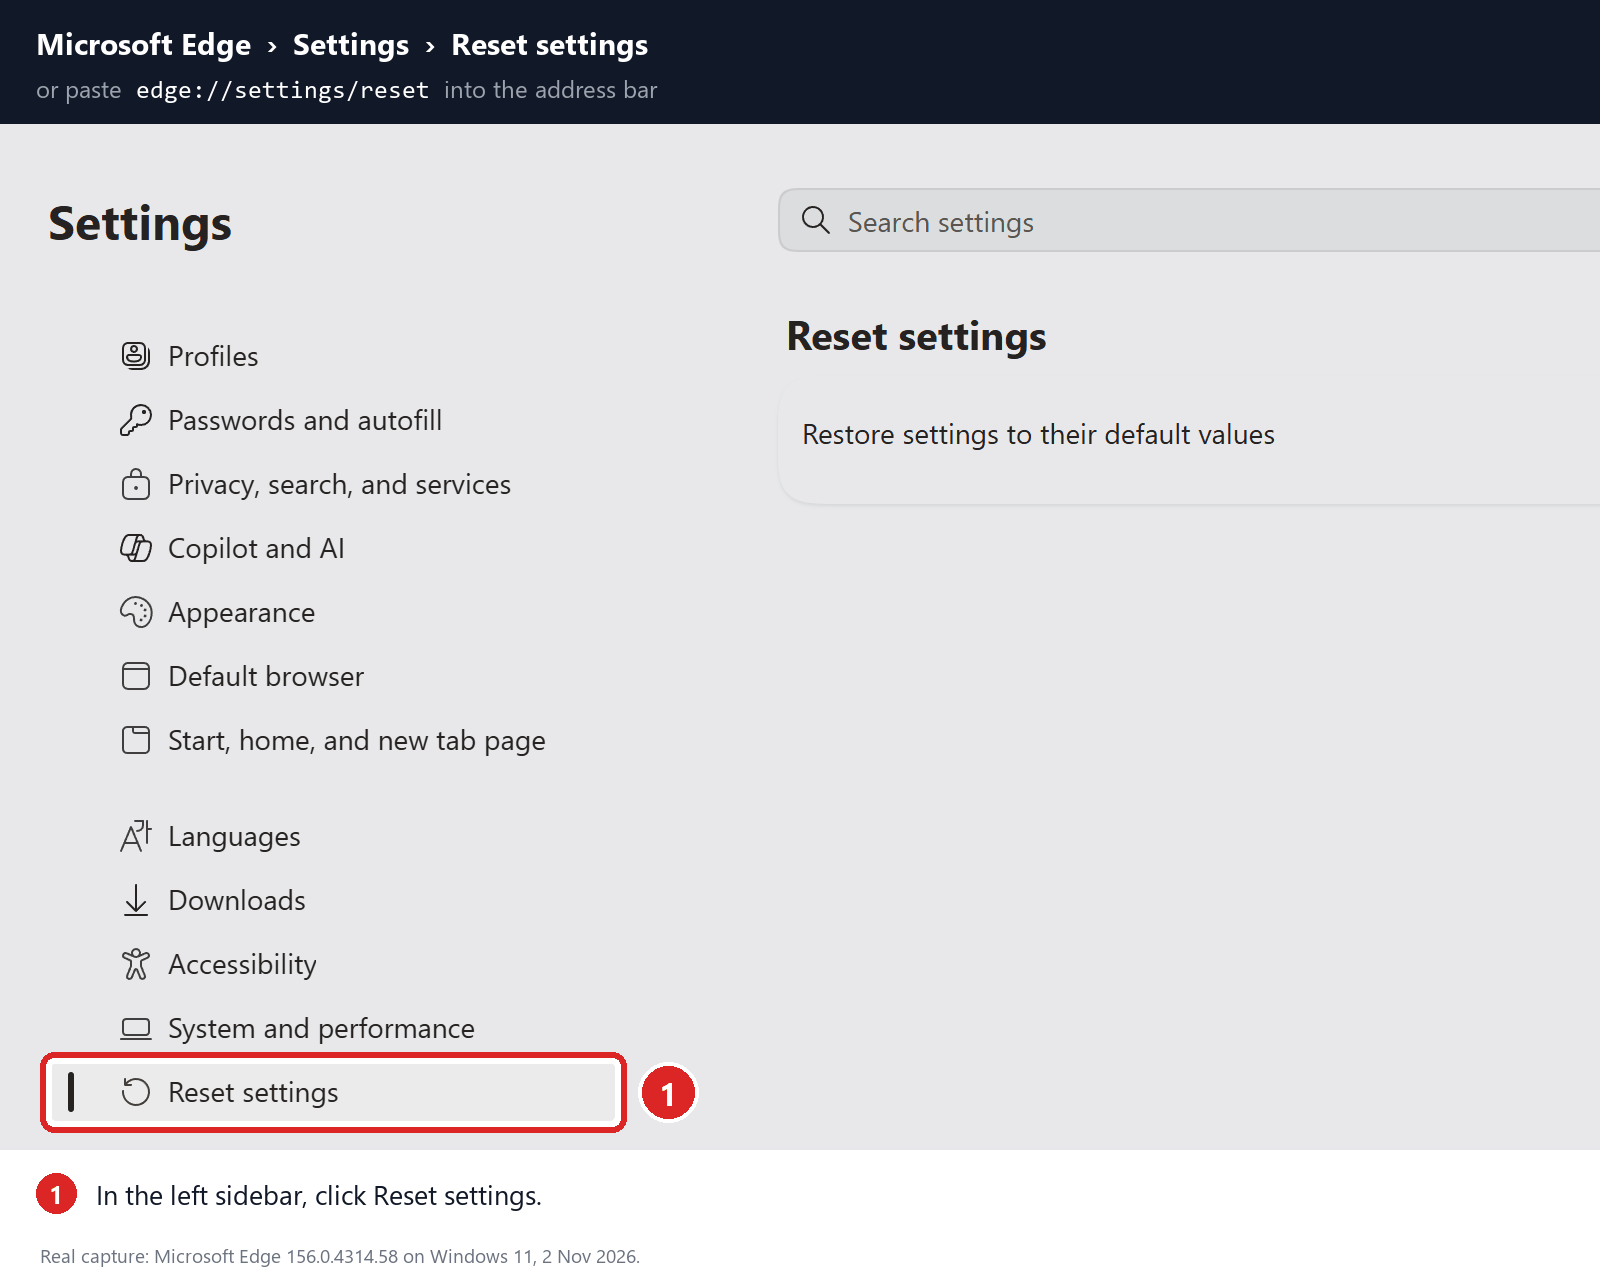
Click Reset settings in the sidebar; other profiles stay as they are.
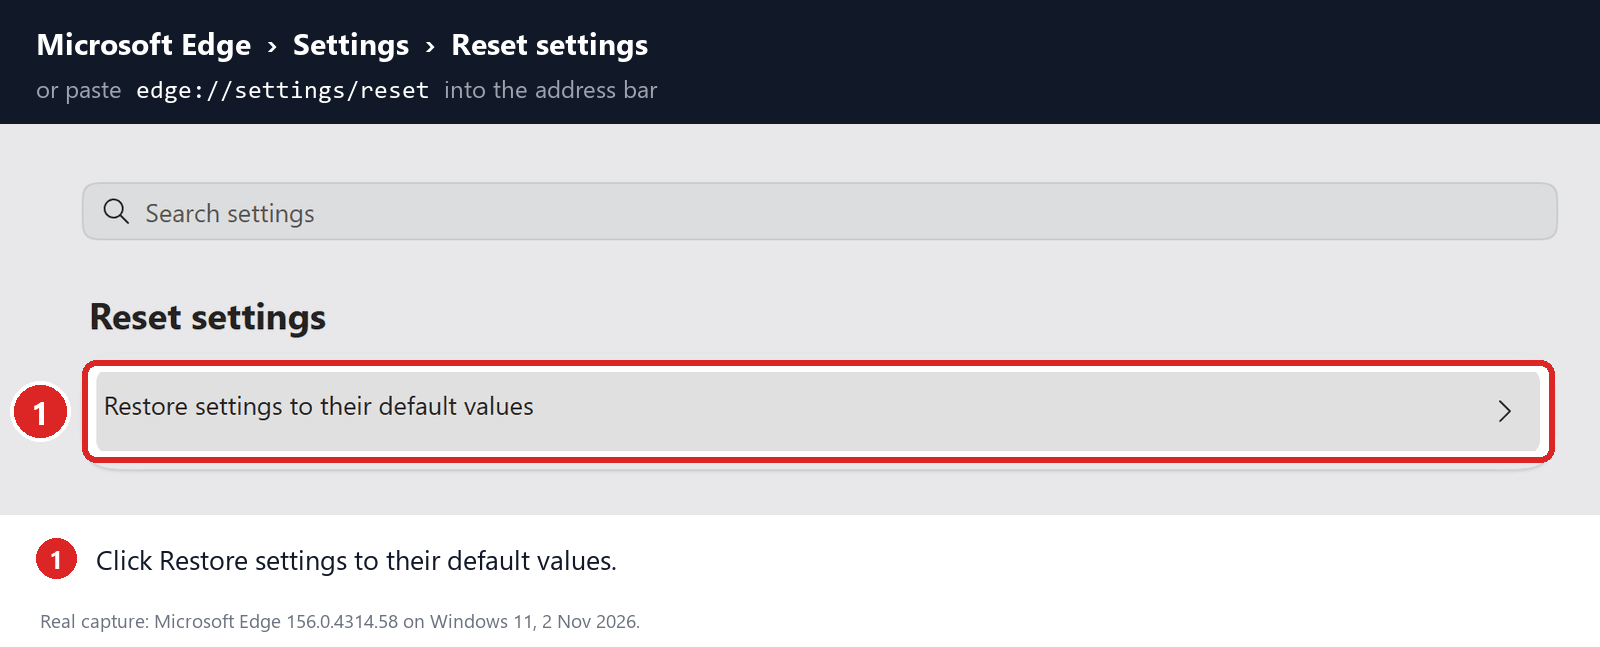
Locate Restore settings to their default values on the reset page.
Select it to open the confirmation dialog.
-
Read the warning and confirm the reset
Edge warns that it will reset search, startup and other settings, switch off extensions and clear temporary site data. Favorites, history and passwords remain.
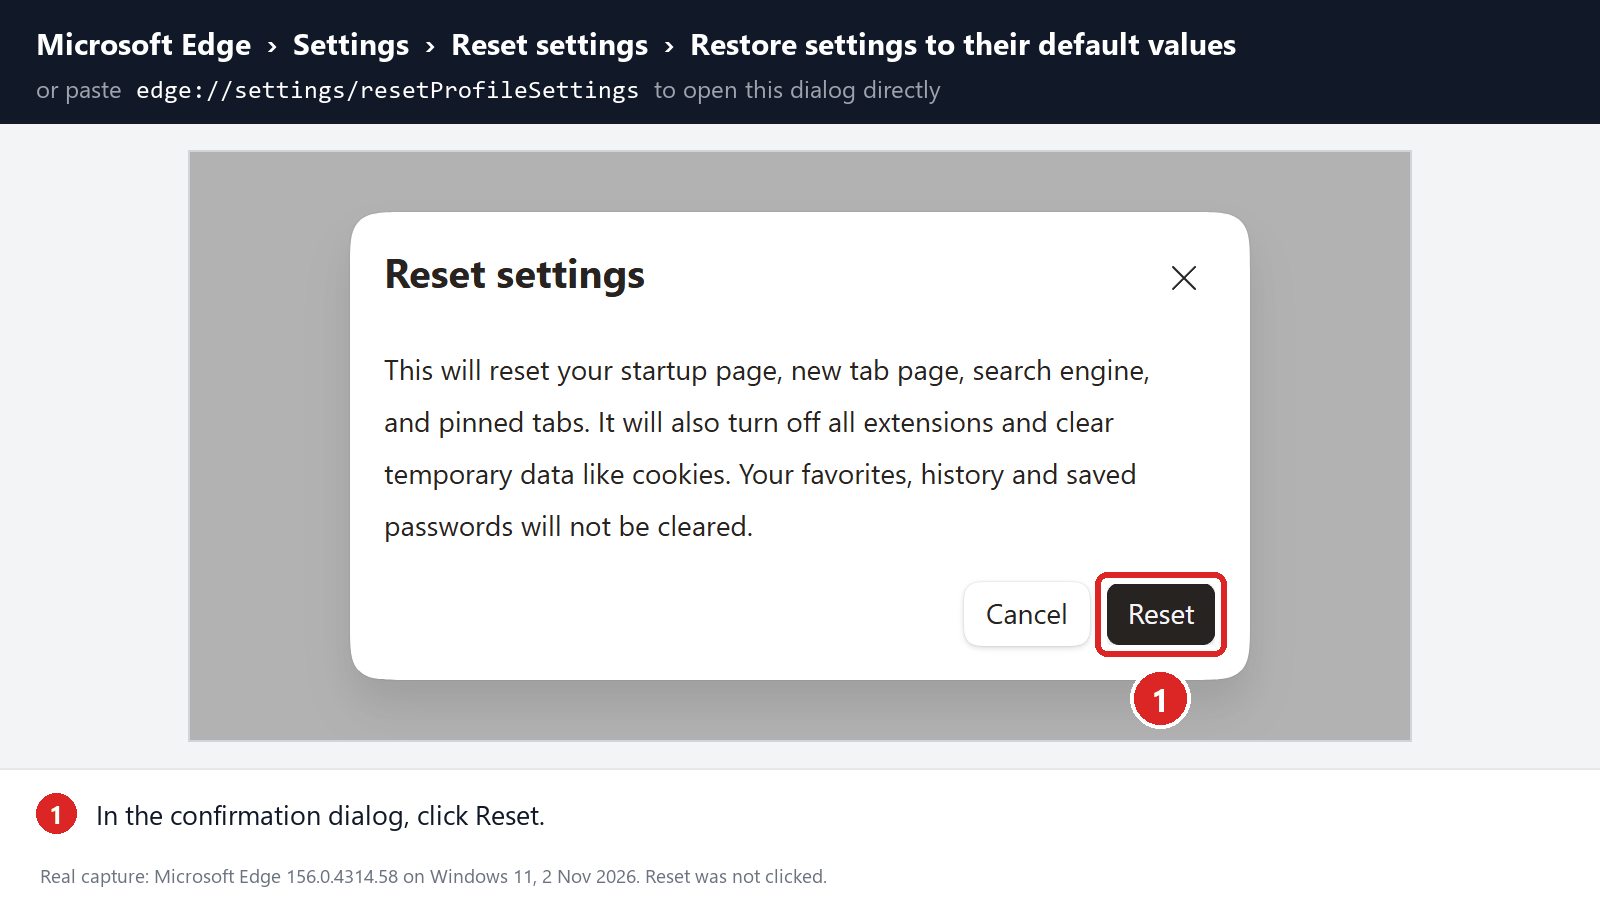
Click Reset to confirm. Some sites may sign you out, so keep your account recovery details handy.
-
Replace Bing again, then check extensions
Because the reset restores Bing, open Address bar and search and set your preferred engine once more. Check startup pages and the new-tab search setting too.
Test before turning extensions back on. Then enable them one at a time to find any that bring Bing back.
Safari: remove one site’s data or notification permission
Already fixed? Skip this. Safari doesn’t have a one-click reset.
-
Clear data for one site only
Go to Safari Settings, Privacy, Manage Website Data. Use it only if a specific site seems linked to what’s still happening.
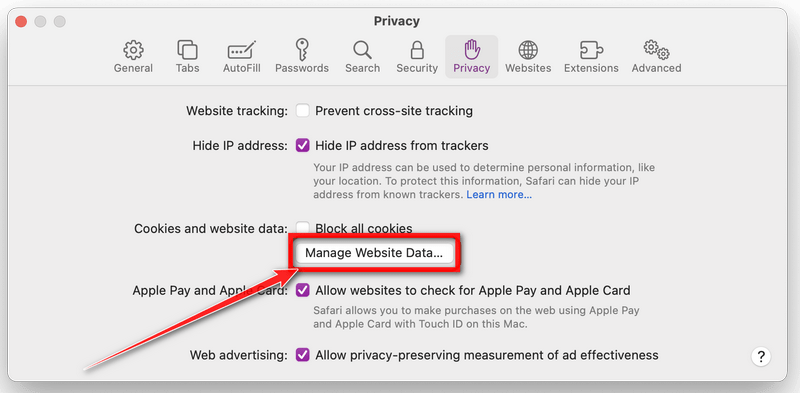
Select the site, click Remove, then Done. You may be logged out of it.
Skip Remove All. Cookies aren’t apps or Mac profiles, so wiping them won’t touch whatever forces Bing.
-
Check notifications if pages open without a search
In Settings, Websites, Notifications, find any site that opens pages by itself and choose Deny. Notifications aren’t controlled by the search-engine menu.
Leave fraud warnings and Safari’s other protections on.
Step 5: Confirm Bing is gone for good
Search the same way you did when Bing appeared: address bar first, then the new-tab box and the page your browser starts on.
-
Quit and reopen the browser, and make sure your engine is still selected.
-
If Bing used to return after a reboot, save your work, restart and search again.
-
Turn paused sync back on a little at a time. You’re finished when Bing doesn’t return through whatever used to bring it back.
Passed? You’re done. Read on only if Bing keeps returning, a setting is locked, or an extension won’t uninstall.
Advanced Fixes for Locked Settings and Bing That Returns
Open extra checks for greyed-out settings, policies and startup items
Only continue if Bing still returns. On a work or school PC, ask IT before touching policies, system files or startup settings.
First, pin down where Bing appears
Note where you typed the search and whether another site appeared before bing.com. Use a search term that isn’t private.
A Bing page opening at startup is a homepage setting. An intercepted search is a search-engine setting. They’re fixed in different places.
If the Windows taskbar search sends web searches to Bing, that alone doesn’t mean Chrome or Firefox is hijacked. Test inside the browser itself.
Check whether a work account or administrator manages search on purpose. Don’t experiment on a computer your employer owns.
Screenshot any locked setting or forced extension, and note the browser profile so you don’t change someone else’s data.
Trace a locked setting to its policy
Chrome and Edge list active policies at chrome://policy and edge://policy. Firefox shows its enterprise policies at about:policies.
Look for policies that set a default search engine, startup pages or force-installed extensions. Write down the values and extension IDs.
Microsoft documents policies such as DefaultSearchProviderSearchURL. Knowing the policy exists explains the lock, but not who set it on your PC.
On your own Windows PC, export the registry policy key before changing a value you’ve identified as unwanted. Leave everything else alone.
Never run commands that wipe the whole policies key. Antivirus or work settings may live in the same place.
On a Mac, check System Settings > General > Device Management and read what each profile does and who issued it.
Removing a profile can also remove VPN, certificate or email settings, so be sure it’s unwanted first.
If the policy comes from an employer or keeps coming back, stop and ask the administrator or a removal helper.
Find what triggers Bing’s return
If Bing only appears when you use one Windows shortcut, open its Properties and compare the Target with launching the browser from Start.
Copy the original Target first. Delete only an unwanted web address after the program path, never the path itself.
If Bing comes back after sign-in, check Startup apps and Task Scheduler. A task’s Actions tab shows what it actually runs.
Export and disable a task you’ve confirmed is unwanted before deleting it. A weird name or unsigned file is a clue, not proof.
On a Mac, start with Login Items & Extensions. Work out which app owns an item and whether it lines up with when Bing changes.
LaunchAgents and LaunchDaemons can also restart adware. Have someone experienced check a specific entry, and don’t empty your Library folders.
Firefox can also be controlled by a policies.json file. Back it up and confirm what it does before editing the unwanted entry.
Chrome: see whether a clean profile also gets Bing
Add a test profile from Chrome’s profile menu. Keep sync and imported extensions off, then repeat your search.
Test profile fine? Compare its settings and extensions with your main one. Bing in both? Check policies and the shortcut you open Chrome with.
Hold on to the original profile until bookmarks and passwords are safely recovered, and import only what you need.
Chrome: avoid editing Web Data on your own
The Web Data file stores a lot besides search engines. Renaming it across profiles, or running a script that does, can lose data.
If a helper recommends a file repair, get the Profile Path from chrome://version, quit Chrome and back up that profile first.
Keep the backup somewhere private and retest before reconnecting sync. A finished reset alone doesn’t prove the cause is gone.
Firefox: check for Bing in Troubleshoot Mode
Choose Troubleshoot Mode from Firefox’s Help menu, which some versions call Help and Report. Firefox restarts, so save your work.
Troubleshoot Mode turns off add-ons and some custom settings for the session. It won’t remove programs or policies.
Bing gone in this mode? An add-on is responsible, so test them one at a time. Still Bing? Look at about:policies and your installed software.
Firefox: make a test profile and keep the old one
Use about:profiles to create a clearly named test profile. Don’t import add-ons or turn on sync yet.
Search there and review about:policies. Computer-wide policies apply to every Firefox profile.
Don’t pick Delete Files when you’re handling your original profile.
A user.js file in the profile folder can reapply preferences at every launch. Back it up before a helper edits it.
Close Firefox fully before touching profile files. about:support shows where the folder is.
Edge: compare a clean profile
Create a second Edge profile with a clear name. Keep sync and imports off for now.
Search again and check edge://policy, since computer-wide policies apply to every Edge profile.
Remember that a new Edge profile starts with Bing as its default. Set another engine there before testing.
If the new profile then avoids Bing, your old profile holds the cause. That still doesn’t prove the whole computer is clean.
Recover what you need from the old profile before removing it, and import selectively.
Don’t rename Edge’s Web Data file yourself. If a helper asks, find the Profile Path at edge://version, close Edge and back up that profile.
Safari: browsing profiles versus Mac profiles
In newer Safari versions, a fresh browsing profile is a quick way to test whether Bing comes from your extensions.
A device management profile is something else. It sets options for the whole Mac and is checked in System Settings, not Safari.
If a new browsing profile still shows Bing, look for a Mac app or device profile instead.
Leave Safari’s Library and preference files alone. Deleting them can cost you bookmarks and logins.
Chrome site-search shortcuts can send one keyword to Bing
A site-search shortcut can use Bing for a single keyword while your main search engine stays the same. Check the shortcut you typed at chrome://settings/searchEngines.
A Two-Minute Test Before You Remove Anything
Open a normal window and search from the address bar. Then open a new tab and search from the box on the page.
If only the page’s box goes to Bing, that box has its own setting. Edge, for example, can have a separate new-tab search option.
Next, go straight to your preferred search site and search there. If that works, the problem is how the browser sends searches, not the site.
Finally, try a harmless search in another profile or browser. That narrows things down without deleting anything.
Private windows aren’t a reliable test. Extensions and policies can behave differently there, and installed apps keep running.
Why Changing DNS Won’t Remove Bing
Switching DNS servers won’t remove an extension that hijacks your searches. It just adds another change to untangle later.
Network settings matter when every browser and app is affected, especially if a proxy or DNS server you don’t recognize appears.
On Windows, look at Settings > Network & internet > Proxy and your connection’s DNS settings. Write down the current values before editing.
On a Mac, use System Settings > Network and the connection’s Details. Compare what you see with what your VPN or network actually needs.
Never turn off your firewall, secure DNS or antivirus to get search working. Find out where an unknown setting came from first.
If your network settings look normal, the last three checks tie Bing to a forced extension, an Edge policy or a scheduled task.
Matching a forced extension by its ID
Turn on Developer mode in chrome://extensions so each extension’s ID shows. Compare it with the ID named in the policy or the scan report.
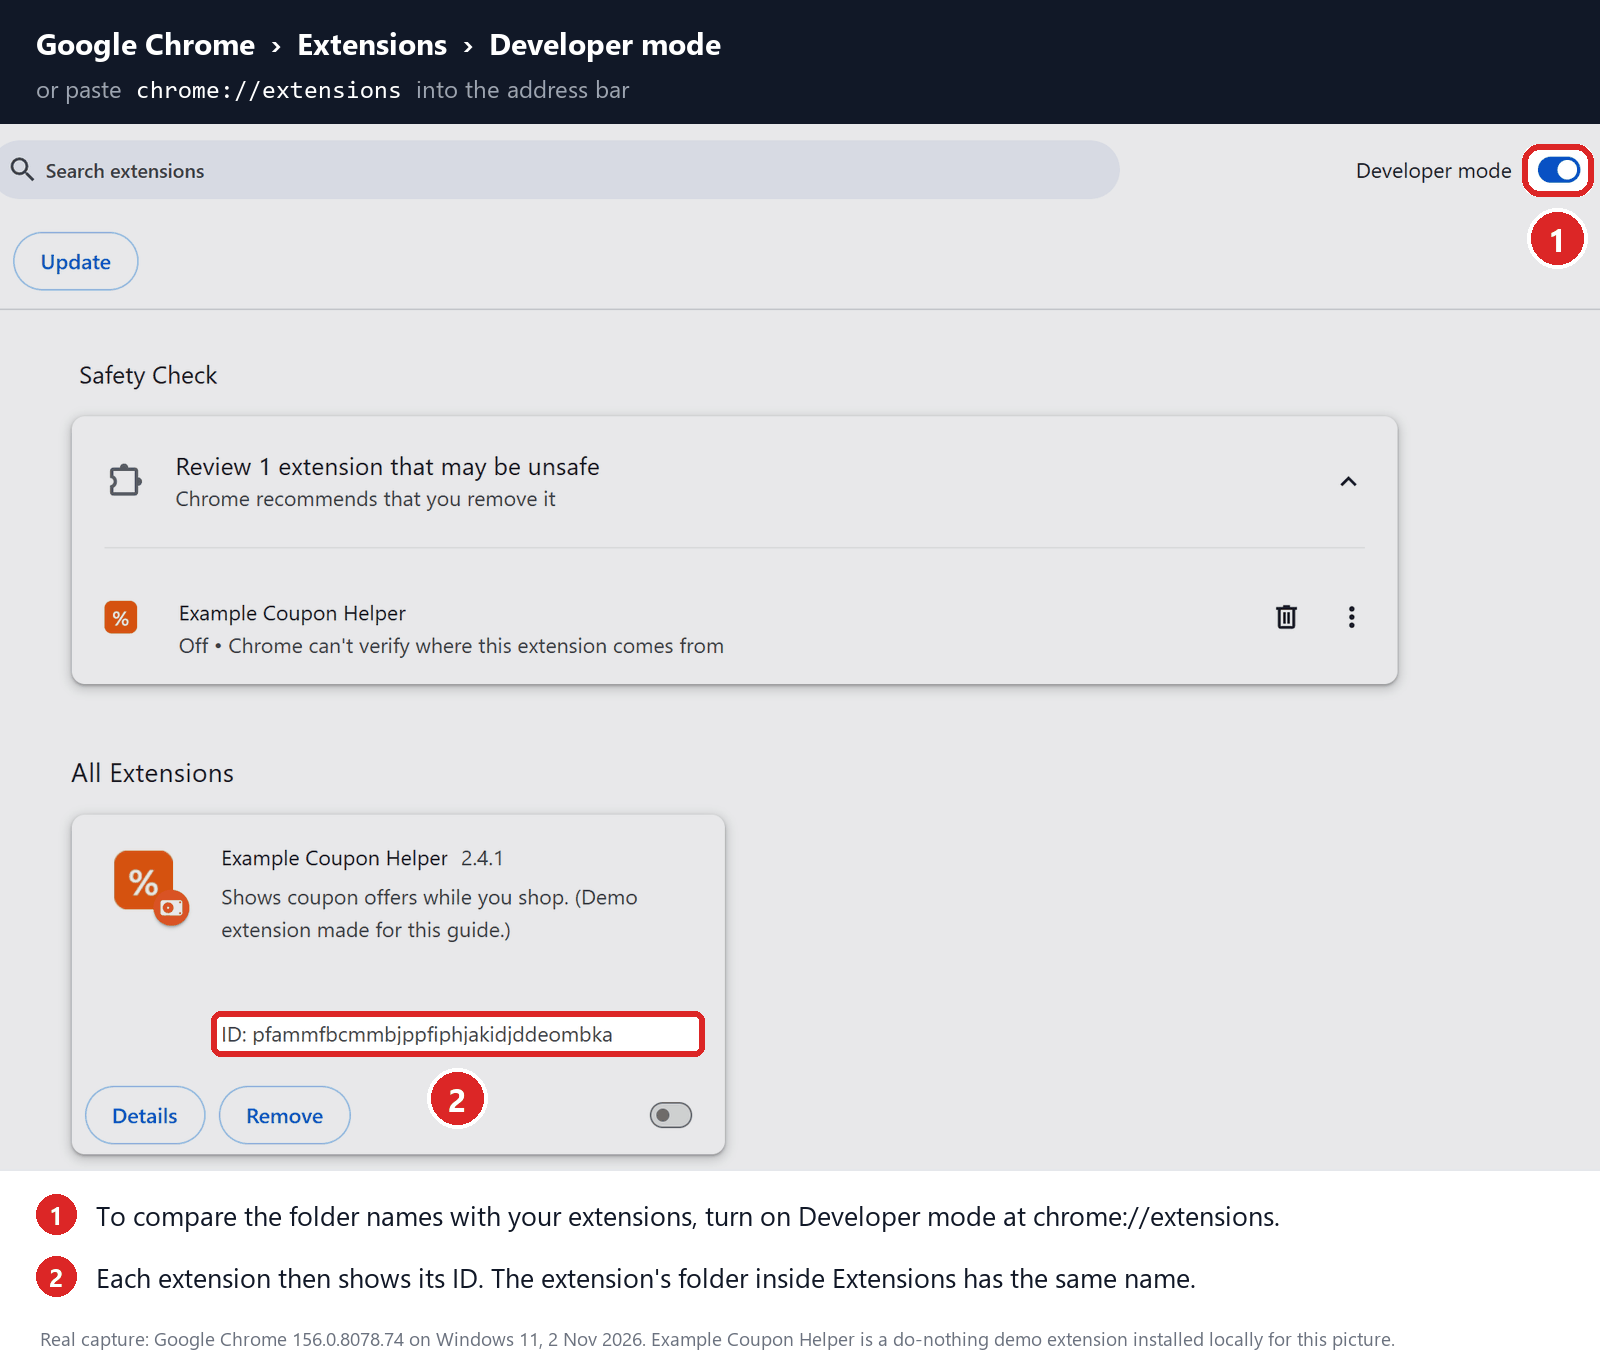
That screenshot shows a demo card, not malware on your PC. Never load unpacked extensions or clear out extension directories.
Check Edge’s policy list first
Go to edge://policy and click Reload policies. Write down any policy that controls search or extensions, along with its value and source.
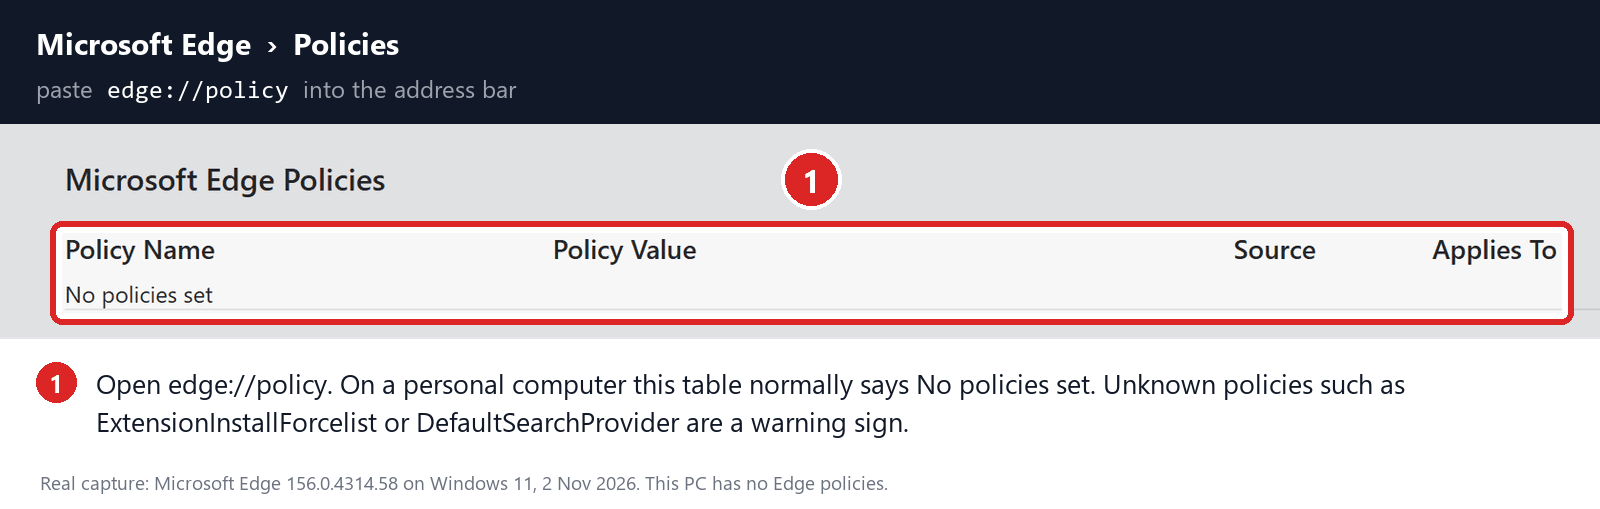
If the page says No policies set, there’s nothing for you to remove. Listed entries need tracing first, and work or school rules are IT’s call.
When a scheduled task restores Bing
Press Windows+R, type taskschd.msc, and press Enter. Open Task Scheduler Library and look at the suspect task’s Actions and Triggers.
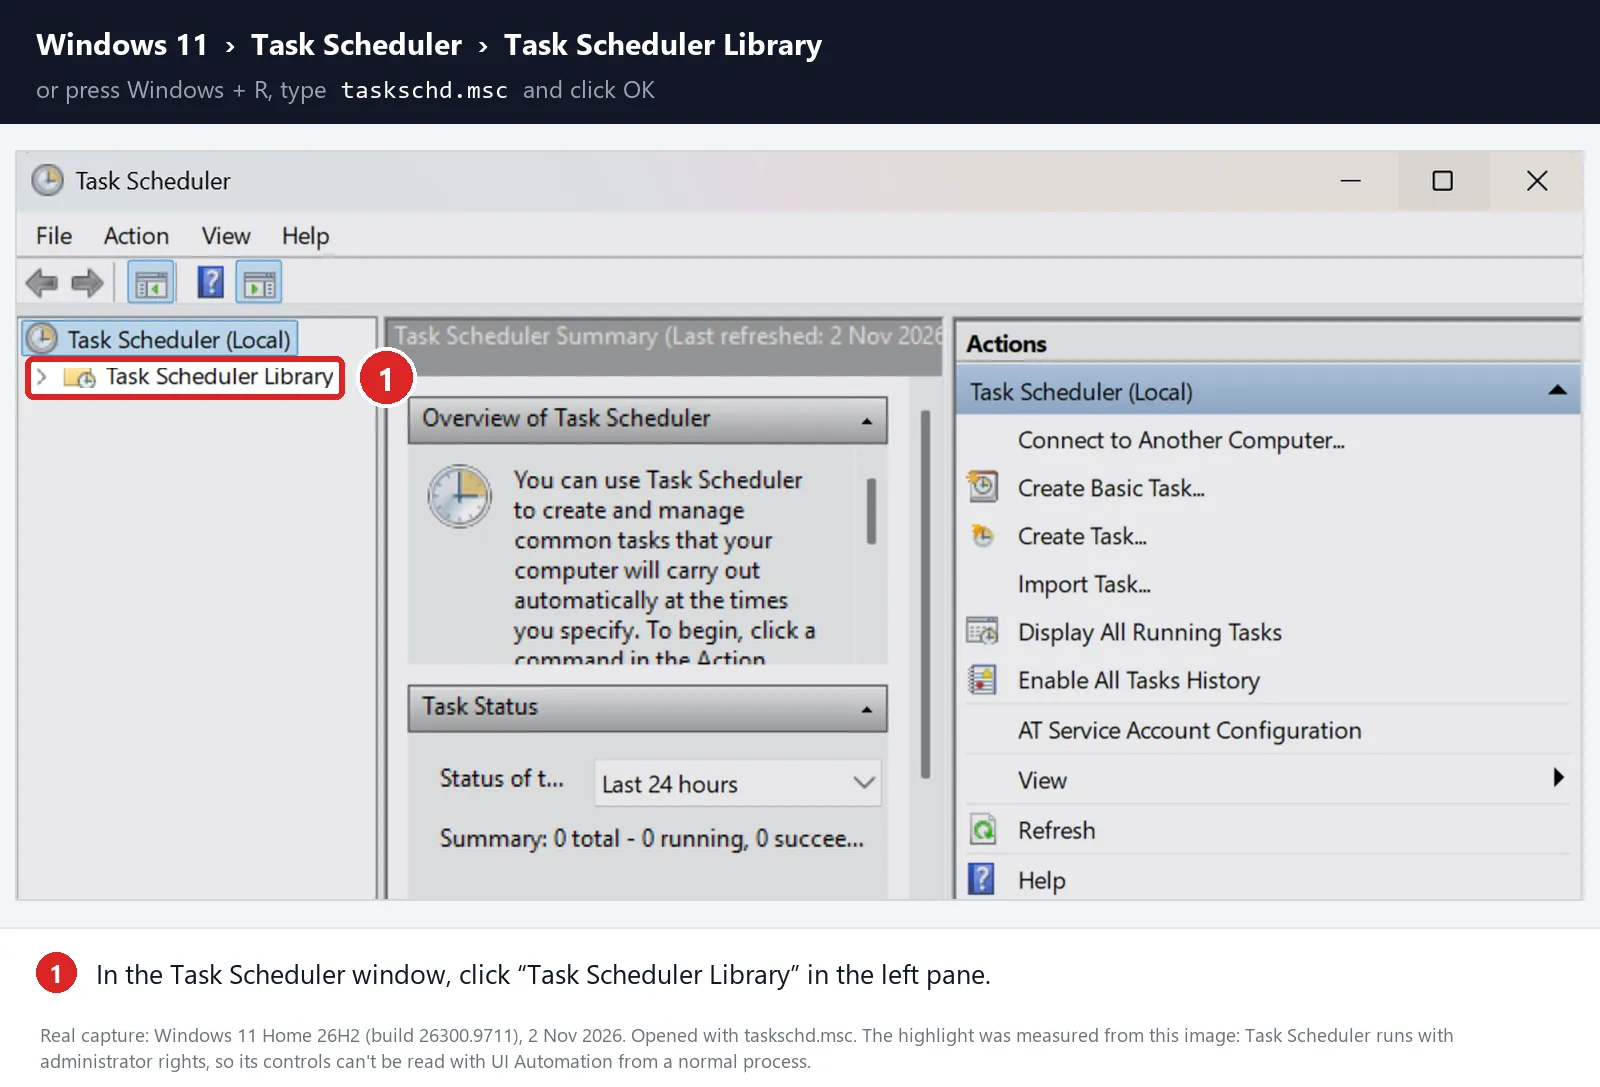
Only blame a task if what it runs matches the Bing problem or a scan result. Odd names and AppData paths aren’t enough by themselves.
Right-click a confirmed task, Export it as a backup and Disable it. Retest before deleting, and don’t touch unrelated tasks.
What to Do If Bing Keeps Coming Back
-
Make a short timeline: the search you ran, what you changed or removed, and the moment Bing returned.
-
Save scan reports, policy names and any startup tasks you found. Strip out personal details before posting logs or screenshots.
-
For a Windows PC, ask in the MalwareTips Windows forum. Mac owners need Mac-specific help, not a Windows registry fix.
Typed a password into a page that appeared before Bing? Change it on the real site. Fixing your search engine doesn’t secure an exposed account.
Never pay someone who calls or messages offering to remove a “Bing virus.” Use the real company’s support or a technician you already trust.
Step-by-step guides for one browser
Prefer a shorter guide for just the browser you use? Each one covers the same fix with that browser’s own menus.
- Bing in Chrome on Windows
- Bing in Chrome on Mac
- Bing in Firefox on Windows
- Bing in Firefox on Mac
- Bing in Safari on Mac
- Bing in Edge on Windows
- Bing in Edge on Mac
Seeing Yahoo instead of Bing? Read our guide to Yahoo search redirects.
Frequently Asked Questions
Why does my search engine keep changing to Bing?
Something on your computer keeps setting it. Common causes are a Bing extension, a free program that bundled one, or adware that rewrites browser settings.
Microsoft’s own Chrome extensions, like Microsoft Bing Homepage & Search for Chrome, also set Bing as the default. Check your extensions list first.
Why does Google redirect to Bing?
Google doesn’t send you to Bing. Your browser’s search setting, an extension or a new-tab page sends the search to Bing before Google is involved.
Try searching on google.com directly. If that works but the address bar goes to Bing, follow Steps 1 and 2.
Is it normal for Microsoft Edge to use Bing?
Yes. Bing is Edge’s built-in default search engine. You can still switch at edge://settings/search, under Search engine used in the address bar.
In most countries, web results from the Windows taskbar search box also come from Bing and open in Edge. That’s how Windows works, not a hijack.
Is the Bing redirect a virus?
Bing isn’t a virus. A “Bing redirect virus” usually means adware or a hijacking extension pushing your searches to Bing, sometimes through another site first.
Remove that software and the redirect stops. Bing itself doesn’t need removing.
How do I get rid of Bing on my Mac?
Change the search engine in your browser, using Safari > Settings > Search or chrome://settings/search in Chrome. Then remove extensions you don’t recognize.
If Bing returns, look for an unknown profile in System Settings > General > Device Management, and check Login Items for apps you didn’t install.
Did Microsoft 365 set Bing as my Chrome search engine?
On some work computers, yes. Microsoft 365 Apps for enterprise could add a Microsoft Search in Bing extension that set Bing as Chrome’s default. Microsoft retired it in 2025.
Its background service isn’t removed automatically. Uninstall Microsoft Search in Bing from Control Panel > Programs > Programs and Features, or ask IT on a managed PC.
The Bottom Line
Bing in Edge or Windows search is normal. If your search engine keeps changing to Bing in Chrome, Firefox or Safari, something on the computer is doing it.
Set your search engine back, remove the Bing extension or bundled program responsible, and restart to make sure the change holds.
If Bing still returns, run the Step 3 scan, check for locked policies, and post your details in the MalwareTips removal forum for help.

Join the discussion
0 commentsShare your experience or ask a question about this article.
Discussion
Start the conversation
Have a question or something useful to share? Add the first comment.