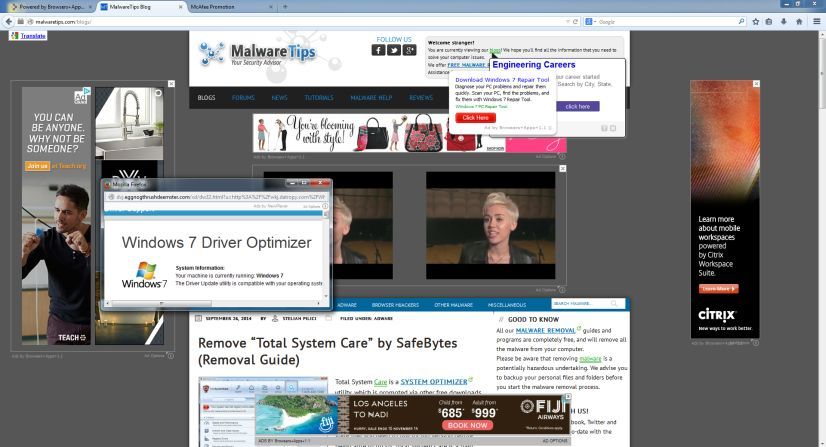
SaleZ is an adware program, that displays pop-up ads and advertisements on web pages that you visit. These advertisements will be shown as boxes containing various coupons that are available, as underlined keywords, pop-up ads or advertising banners.
What is SaleZ?
SaleZ is advertised as a program that displays coupons for sites you are visiting and competitive prices when you are viewing product pages at sites like Amazon.Though this may sound like a useful service, the SaleZ program can be intrusive and will display ads whether you want them to or not.
When installed, the SaleZ browser extension will display advertising banners, pop-up advertisements and in-text ads, stating that they are brought to you by “SaleZ”. The SaleZ Ads will have different text under the pop-up: “Powered by SaleZ”, “Brought to you by SaleZ”, “You’ve received a premium offer from SaleZ” or “Ads by SaleZ”.
These ads are aimed to promote the installation of additional questionable content including web browser toolbars, optimization utilities and other products, all so the SaleZ publisher can generate pay-per-click revenue.
When infected with SaleZ the common symptoms include:
- Advertising banners are injected with the web pages that you are visiting.
- Random web page text is turned into hyperlinks.
- Browser popups appear which recommend fake updates or other software.
- Other unwanted adware programs might get installed without the user’s knowledge.
How did got SaleZ on my computer?
SaleZ is an adware program that is commonly bundled with other free programs that you download off of the Internet.
Unfortunately, some free downloads do not adequately disclose that other software will also be installed and you may find that you have installed SaleZ without your knowledge. Most commonly SaleZ is bundled within the installers from Cnet, Softonic or other similar custom third-party installers.
You should always pay attention when installing software because often, a software installer includes optional installs, such as this SaleZ adware. Be very careful what you agree to install.
Always opt for the custom installation and deselect anything that is not familiar, especially optional software that you never wanted to download and install in the first place.
It goes without saying that you should not install software that you don’t trust.
SaleZ Overview:
- SaleZ will inject pop-up ads, advertising banners and in-text ads within your web browser
- Adware detected in the SaleZ program (SaleZ.exe, SaleZ-bg.exe, SaleZ-bho64.dll, SaleZ-nova.exe)
- Integrates into the web browser via the SaleZ browser extension
- Typically distributed through a pay-per-install bundle or with third-party software (example: CNET installer, Softonic Installer, InstallRex installer and many more)
- SaleZ has a poor reputation within the MalwareTips Community
How to remove “SaleZ” (Virus Removal Guide)
This page is a comprehensive guide, which will remove “SaleZ” virus from your computer, and any other adware program that may have been installed during the setup process.
Please perform all the steps in the correct order. If you have any questions or doubt at any point, STOP and ask for our assistance.
STEP 1: Uninstall SaleZ from Windows
STEP 2: Remove SaleZ adware from Internet Explorer, Firefox and Google Chrome with AdwCleaner
STEP 3: Remove “Ads by SaleZ” virus with Malwarebytes Anti-Malware Free
STEP 4: Double-check for the “SaleZ” malware with HitmanPro
(Optional) STEP 5: Reset Internet Explorer, Firefox or Google Chrome settings to remove “SaleZ” Ads
STEP 1 : Uninstall SaleZ from Windows
In this first step, we will try to identify and remove any malicious program that might be installed on your computer.
- To uninstall the SaleZ program from Windows XP, Windows Vista or Windows 7, click the “Start” button, then click on the “Control Panel” menu option.
![Control Panel in Windows Start Menu [Image: Control Panel in Windows Start Menu]](//malwaretips.com/blogs/wp-content/uploads/2014/08/windows-start-menu-control-panel.jpg)
If you are using Windows 8, simply drag your mouse pointer to the right edge of the screen, select Search from the list and search for “control panel” .Or you can right-click on a bottom left hot corner (formerly known as the Start button) and select Control Panel from there.
![Type Control Panel in Windows 8 search box [Image: Type Control Panel in Windows 8 search box]](//malwaretips.com/blogs/wp-content/uploads/2014/08/windows-8-uninstall.jpg)
- When the “Control Panel” window opens click on the “Uninstall a program” option under “Programs” category. This option is shown by the arrow in the image below. If you are using the “Classic View” of the Control Panel, then you would double-click on the “Programs and Features” icon instead.
![Click on Uninstall a program [Image: Uninstall a program]](//malwaretips.com/blogs/wp-content/uploads/2013/03/uninstall-a-program-windows.jpg)
- When the “Programs and Features” or the “Uninstall a Program” screen is displayed, scroll through the list of currently installed programs and uninstall SaleZ. The malicious program may have a different name on your computer.
To view the most recently installed programs, you can click on the “Installed On” column to sort your program by the installation date. Scroll through the list, and uninstall any unwanted or unknown programs.If you are having issues while trying to uninstall the SaleZ program, you can use Revo Uninstaller to completely remove this unwanted program from your machine.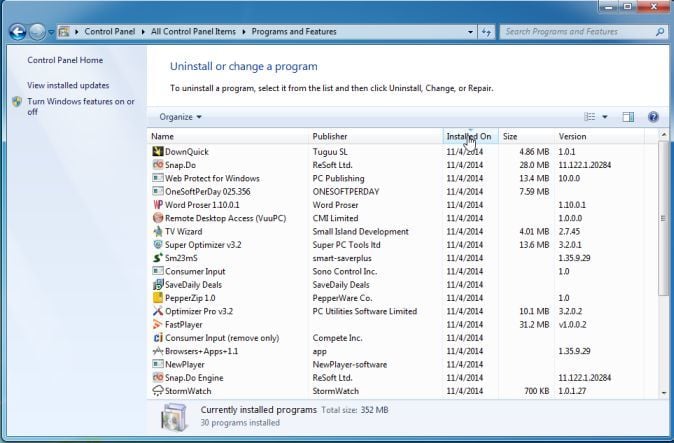
If you cannot find any unwanted or unknown programs on your machine, then you can proceed with the next step.
STEP 2: Remove SaleZ adware from Internet Explorer, Firefox and Google Chrome with AdwCleaner
The AdwCleaner utility will scan your computer and web browser for the “SaleZ” malicious files, browser extensions and registry keys, that may have been installed on your computer without your knowledge.
- You can download AdwCleaner utility from the below link.
ADWCLEANER DOWNLOAD LINK (This link will download “AdwCleaner” on your computer) - Before starting AdwCleaner, close all open programs and internet browsers, then double-click on the AdwCleaner icon.
If Windows prompts you as to whether or not you wish to run AdwCleaner, please allow it to run. - When the AdwCleaner program will open, click on the “Scan” button as shown below.
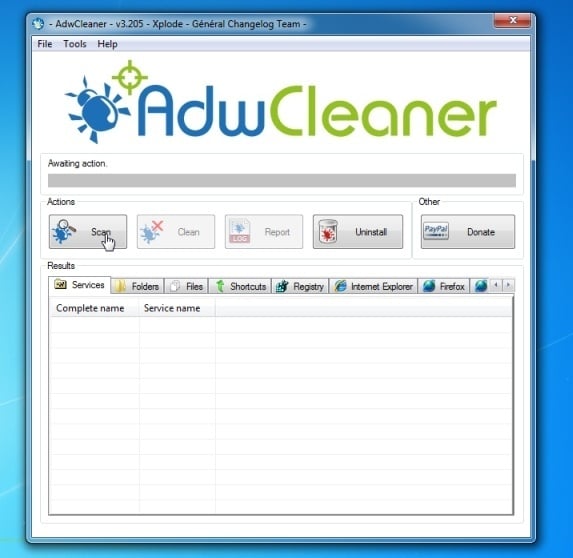
AdwCleaner will now start to search for the “SaleZ” malicious files that may be installed on your computer. - To remove the “SaleZ” malicious files that were detected in the previous step, please click on the “Clean” button.
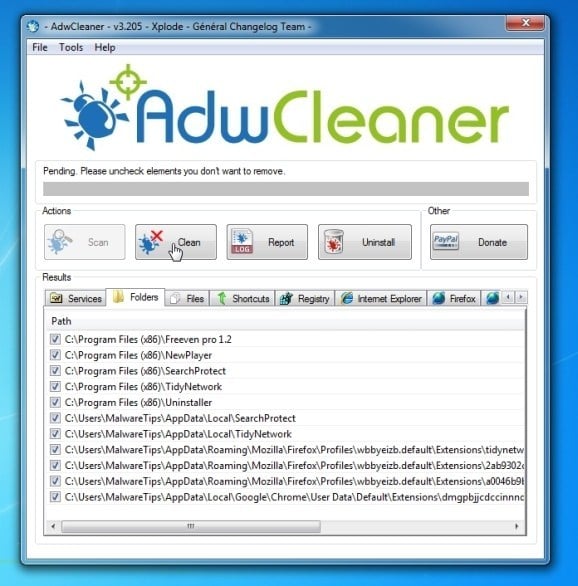
- AdwCleaner will now prompt you to save any open files or documents, as the program will need to reboot the computer. Please do so and then click on the OK button.
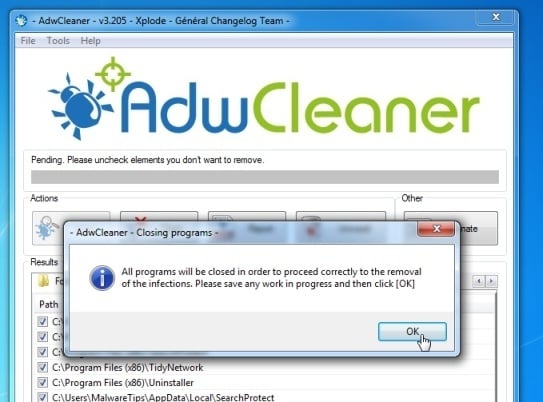
STEP 3: Remove “SaleZ” virus with Malwarebytes Anti-Malware Free
Malwarebytes Anti-Malware Free uses industry-leading technology to detect and remove all traces of malware, including worms, Trojans, rootkits, rogues, dialers, spyware, and more.
It is important to note that Malwarebytes Anti-Malware works well and should run alongside antivirus software without conflicts.
- You can download download Malwarebytes Anti-Malware from the below link.
MALWAREBYTES ANTI-MALWARE DOWNLOAD LINK (This link will open a new web page from where you can download “Malwarebytes Anti-Malware Free”) - Once downloaded, close all programs, then double-click on the icon on your desktop named “mbam-setup-consumer-2.00.xx” to start the installation of Malwarebytes Anti-Malware.
![Malwarebytes Anti-Malware setup program [Image: Malwarebytes Anti-Malware setup program]](//malwaretips.com/blogs/wp-content/uploads/2014/02/Malwarebytes-Anti-Malware-Setup.jpg)
 You may be presented with a User Account Control dialog asking you if you want to run this file. If this happens, you should click “Yes” to continue with the installation.
 - When the installation begins, you will see the Malwarebytes Anti-Malware Setup Wizard which will guide you through the installation process.
![Malwarebytes Anti-Malware Setup Wizard [Image: Malwarebytes Anti-Malware Setup Wizard]](//malwaretips.com/blogs/wp-content/uploads/2014/02/malwarebytes-anti-malware-2-0-installation.jpg)
To install Malwarebytes Anti-Malware on your machine, keep following the prompts by clicking the “Next” button.
![Malwarebytes Anti-Malware Final Setup Screen [Image: Malwarebytes Anti-Malware Final Setup Screen]](//malwaretips.com/blogs/wp-content/uploads/2014/02/malwarebytes-anti-malware-2-0-final-screen.jpg)
- Once installed, Malwarebytes Anti-Malware will automatically start and you will see a message stating that you should update the program, and that a scan has never been run on your system. To start a system scan you can click on the “Fix Now” button.
![Remove "Ads by SaleZ" pop-up virus (Removal Guide) 3 [Image: Click on the Fix Now button to start a scan]](//malwaretips.com/blogs/wp-content/uploads/2014/02/malwarebytes-anti-malware-fix-now.jpg)
Alternatively, you can click on the “Scan” tab and select “Threat Scan“, then click on the “Scan Now” button.
![Malwarebytes Anti-Malware Threat Scan [Image: Malwarebytes Anti-Malware Threat Scan]](//malwaretips.com/blogs/wp-content/uploads/2014/02/malwarebytes-anti-malware-threat-scan-option.jpg)
- Malwarebytes Anti-Malware will now check for updates, and if there are any, you will need to click on the “Update Now” button.
![Click on Update Now to update Malwarebytes Anti-Malware [Image: Click on Update Now to update Malwarebytes Anti-Malware]](//malwaretips.com/blogs/wp-content/uploads/2014/02/malwarebytes-anti-malware-2-0-update-now.jpg)
- Malwarebytes Anti-Malware will now start scanning your computer for the SaleZ virus. When Malwarebytes Anti-Malware is scanning it will look like the image below.
![Malwarebytes Anti-Malware while performing a scan [Image: Malwarebytes Anti-Malware while performing a scan]](//malwaretips.com/blogs/wp-content/uploads/2014/02/malwarebytes-anti-malware-scan.jpg)
- When the scan has completed, you will now be presented with a screen showing you the malware infections that Malwarebytes’ Anti-Malware has detected. To remove the malicious programs that Malwarebytes Anti-malware has found, click on the “Quarantine All” button, and then click on the “Apply Now” button.
![Remove the malware that Malwarebytes Anti-Malware has detected [Image: Remove SaleZ with Malwarebytes Anti-Malware]](//malwaretips.com/blogs/wp-content/uploads/2014/02/malwarebytes-anti-malware-potential-threat-detected.jpg)
Please note that the infections found may be different than what is shown in the image. - Malwarebytes Anti-Malware will now quarantine all the malicious files and registry keys that it has found. When removing the files, Malwarebytes Anti-Malware may require a reboot in order to remove some of them. If it displays a message stating that it needs to reboot your computer, please allow it to do so.
![Malwarebytes Anti-Malware asking to reboot your computer [Image: Malwarebytes Anti-Malware removing SaleZ]](//malwaretips.com/blogs/wp-content/uploads/2014/02/malwarebytes-anti-malware-remove-virus.jpg)
After your computer will restart, you should open Malwarebytes Anti-Malware and perform another “Threat Scan” scan to verify that there are no remaining threats
STEP 4: Double-check for the “SaleZ” malware infection with HitmanPro
HitmanPro is a second opinion scanner, designed to rescue your computer from malware (viruses, trojans, rootkits, etc.) that have infected your computer despite all the security measures you have taken (such as anti-virus software, firewalls, etc.). HitmanPro is designed to work alongside existing security programs without any conflicts. It scans the computer quickly (less than 5 minutes) and does not slow down the computer.
- You can download HitmanPro from the below link:
HITMANPRO DOWNLOAD LINK (This link will open a new web page from where you can download “HitmanPro”) - Double-click on the file named “HitmanPro.exe” (for 32-bit versions of Windows) or “HitmanPro_x64.exe” (for 64-bit versions of Windows). When the program starts you will be presented with the start screen as shown below.
![HitmanPro startup screen (Click Next) [Image: HitmanPro start-up screen]](//malwaretips.com/blogs/wp-content/uploads/2014/03/hitmanpro-install.jpg)
Click on the “Next” button, to install HitmanPro on your computer.
![HitmanPro installation options (Click Next) [Image: HitmanPro setup options]](//malwaretips.com/blogs/wp-content/uploads/2014/03/hitmapro-start-scan.jpg)
- HitmanPro will now begin to scan your computer for SaleZ malicious files.
![HitmanPro scanning for SaleZ pop-up virus [Image: HitmanPro scanning for malware]](//malwaretips.com/blogs/wp-content/uploads/2014/03/hitmanpro-scanning.jpg)
- When it has finished it will display a list of all the malware that the program found as shown in the image below. Click on the “Next” button, to remove SaleZ virus.
![HitmanPro scan results (Click Next) [Image: HitmanPro scan results]](//malwaretips.com/blogs/wp-content/uploads/2014/03/hitmanpro-scan-results.jpg)
- Click on the “Activate free license” button to begin the free 30 days trial, and remove all the malicious files from your computer.
![Click on the Activate free license button [Image: HitmanPro Activate Free License]](//malwaretips.com/blogs/wp-content/uploads/2014/03/hitmanpro-activation.jpg)
(Optional) STEP 5: Reset Internet Explorer, Firefox or Google Chrome settings to remove “SaleZ” Ads
If you are still experiencing issues with the “SaleZ” ads in Internet Explorer, Firefox or Chrome, we will need to reset your browser to its default settings. This step needs to be performed only if your issues have not been solved by the previous steps.
Reset Internet Explorer
- Open Internet Explorer, click on the “gear icon”
 in the upper right part of your browser, then click again on Internet Options.
![Click on the Gear Icon then on Internet Options [Image: Internet Options in Internet Explorer]](//malwaretips.com/blogs/wp-content/uploads/2014/03/Internet-Options-Internet-Explorer.jpg)
- In the “Internet Options” dialog box, click on the “Advanced” tab, then click on the “Reset” button.
![In the Advanced tab click on the Reset button [Image: Reset Internet Explorer]](//malwaretips.com/blogs/wp-content/uploads/2014/03/Reset-Internet-Explorer.jpg)
- In the “Reset Internet Explorer settings” section, select the “Delete personal settings” check box, then click on “Reset” button.
![Click on the Reset button to revert IE to its default settings [Image: Reset Internet Explorer to its default settings to remove SaleZ]](//malwaretips.com/blogs/wp-content/uploads/2014/03/reset-button-Internet-Explorer.jpg)
- When Internet Explorer has completed its task, click on the “Close” button in the confirmation dialogue box. You will now need to close your browser, and then you can open Internet Explorer again.
![Click on the Close button [Image Reset Internet Explorer settings]](//malwaretips.com/blogs/wp-content/uploads/2014/03/Close-button-Reset.jpg)
Reset Mozilla Firefox
- In the upper-right corner of the Firefox window, click the Firefox menu button (
![Firefox Menu button [Image: Firefox Menu button]](//malwaretips.com/blogs/wp-content/uploads/2014/04/Firefox-menu-button.png) ), the click on the “Help” (
), the click on the “Help” (![Firefox Help button [Image: Firefox Help button]](//malwaretips.com/blogs/wp-content/uploads/2014/04/Firefox-Help.png) ) button.
) button.
![Click on the Menu button then question mark button [Image: Click on the Menu button then Help]](//malwaretips.com/blogs/wp-content/uploads/2014/04/Firefox-Help-button.jpg)
- From the Help menu, choose Troubleshooting Information.
![Troubleshooting Information in Firefox [Image: Troubleshooting Information in Firefox]](//malwaretips.com/blogs/wp-content/uploads/2014/04/Firefox-Troubleshooting-Information.jpg)
- Click the “Reset Firefox” button in the upper-right corner of the “Troubleshooting Information” page.
![Reset Firefox to its default settings [Image: Reset Firefox to its default settings to remove SaleZ]](//malwaretips.com/blogs/wp-content/uploads/2014/04/Reset-Firefox-button.jpg)
- To continue, click on the “Reset Firefox” button in the new confirmation window that opens.
![Click on the Reset Firefox button [Image: Click on the Reset Firefox button]](//malwaretips.com/blogs/wp-content/uploads/2014/04/Reset-Firefox-to-default-settings.jpg)
- Firefox will close itself and will revert to its default settings. When it’s done, a window will list the information that was imported. Click on the “Finish“.
Note: Your old Firefox profile will be placed on your desktop in a folder named “Old Firefox Data“. If the reset didn’t fix your problem you can restore some of the information not saved by copying files to the new profile that was created. If you don’t need this folder any longer, you should delete it as it contains sensitive information.
Reset Google Chrome
- Click on Chrome’s main menu button, represented by three horizontal lines (
![Google Chrome's main menu button [Image: Chrome's main menu button]](//malwaretips.com/blogs/wp-content/uploads/2014/02/reset-Chrome-button.png) ) .When the drop-down menu appears, select the option labeled Settings.
) .When the drop-down menu appears, select the option labeled Settings.
![Click on Settings button [Image: Click on Settings button]](//malwaretips.com/blogs/wp-content/uploads/2014/02/Reset-Chrome-Settings-1.jpg)
- Chrome’s Settings should now be displayed in a new tab or window, depending on your configuration. Next, scroll to the bottom of the page and click on the Show advanced settings link (as seen in the below example).
![Click on Show advanced settings link [Image: Click on Show advanced settings link]](//malwaretips.com/blogs/wp-content/uploads/2014/02/Reset-Chrome-Settings-2.jpg)
- Chrome’s advanced Settings should now be displayed. Scroll down until the Reset browser settings section is visible, as shown in the example below. Next, click on the Reset browser settings button.
![Click on Reset browser button [Image: Click on Reset browser button]](//malwaretips.com/blogs/wp-content/uploads/2014/02/Reset-Chrome-Settings-3.jpg)
- A confirmation dialog should now be displayed, detailing the components that will be restored to their default state should you continue on with the reset process. To complete the restoration process, click on the Reset button.
![Click on Reset button to restore Chrome to default settings [Image: Click on Reset button to restore Chrome to default settings]](//malwaretips.com/blogs/wp-content/uploads/2014/02/Reset-Chrome-Settings-4.jpg)


![Control Panel in Windows Start Menu [Image: Control Panel in Windows Start Menu]](http://malwaretips.com/blogs/wp-content/uploads/2014/08/windows-start-menu-control-panel.jpg)
![Type Control Panel in Windows 8 search box [Image: Type Control Panel in Windows 8 search box]](http://malwaretips.com/blogs/wp-content/uploads/2014/08/windows-8-uninstall.jpg)
![Click on Uninstall a program [Image: Uninstall a program]](http://malwaretips.com/blogs/wp-content/uploads/2013/03/uninstall-a-program-windows.jpg)


![Malwarebytes Anti-Malware setup program [Image: Malwarebytes Anti-Malware setup program]](http://malwaretips.com/blogs/wp-content/uploads/2014/02/Malwarebytes-Anti-Malware-Setup.jpg)
![Malwarebytes Anti-Malware Setup Wizard [Image: Malwarebytes Anti-Malware Setup Wizard]](http://malwaretips.com/blogs/wp-content/uploads/2014/02/malwarebytes-anti-malware-2-0-installation.jpg)
![Malwarebytes Anti-Malware Final Setup Screen [Image: Malwarebytes Anti-Malware Final Setup Screen]](http://malwaretips.com/blogs/wp-content/uploads/2014/02/malwarebytes-anti-malware-2-0-final-screen.jpg)
![Remove "Ads by SaleZ" pop-up virus (Removal Guide) 3 [Image: Click on the Fix Now button to start a scan]](http://malwaretips.com/blogs/wp-content/uploads/2014/02/malwarebytes-anti-malware-fix-now.jpg)
![Malwarebytes Anti-Malware Threat Scan [Image: Malwarebytes Anti-Malware Threat Scan]](http://malwaretips.com/blogs/wp-content/uploads/2014/02/malwarebytes-anti-malware-threat-scan-option.jpg)
![Click on Update Now to update Malwarebytes Anti-Malware [Image: Click on Update Now to update Malwarebytes Anti-Malware]](http://malwaretips.com/blogs/wp-content/uploads/2014/02/malwarebytes-anti-malware-2-0-update-now.jpg)
![Malwarebytes Anti-Malware while performing a scan [Image: Malwarebytes Anti-Malware while performing a scan]](http://malwaretips.com/blogs/wp-content/uploads/2014/02/malwarebytes-anti-malware-scan.jpg)
![Remove the malware that Malwarebytes Anti-Malware has detected [Image: Remove SaleZ with Malwarebytes Anti-Malware]](http://malwaretips.com/blogs/wp-content/uploads/2014/02/malwarebytes-anti-malware-potential-threat-detected.jpg)
![Malwarebytes Anti-Malware asking to reboot your computer [Image: Malwarebytes Anti-Malware removing SaleZ]](http://malwaretips.com/blogs/wp-content/uploads/2014/02/malwarebytes-anti-malware-remove-virus.jpg)
![HitmanPro startup screen (Click Next) [Image: HitmanPro start-up screen]](http://malwaretips.com/blogs/wp-content/uploads/2014/03/hitmanpro-install.jpg)
![HitmanPro installation options (Click Next) [Image: HitmanPro setup options]](http://malwaretips.com/blogs/wp-content/uploads/2014/03/hitmapro-start-scan.jpg)
![HitmanPro scanning for SaleZ pop-up virus [Image: HitmanPro scanning for malware]](http://malwaretips.com/blogs/wp-content/uploads/2014/03/hitmanpro-scanning.jpg)
![HitmanPro scan results (Click Next) [Image: HitmanPro scan results]](http://malwaretips.com/blogs/wp-content/uploads/2014/03/hitmanpro-scan-results.jpg)
![Click on the Activate free license button [Image: HitmanPro Activate Free License]](http://malwaretips.com/blogs/wp-content/uploads/2014/03/hitmanpro-activation.jpg)
![Click on the Gear Icon then on Internet Options [Image: Internet Options in Internet Explorer]](http://malwaretips.com/blogs/wp-content/uploads/2014/03/Internet-Options-Internet-Explorer.jpg)
![In the Advanced tab click on the Reset button [Image: Reset Internet Explorer]](http://malwaretips.com/blogs/wp-content/uploads/2014/03/Reset-Internet-Explorer.jpg)
![Click on the Reset button to revert IE to its default settings [Image: Reset Internet Explorer to its default settings to remove SaleZ]](http://malwaretips.com/blogs/wp-content/uploads/2014/03/reset-button-Internet-Explorer.jpg)
![Click on the Close button [Image Reset Internet Explorer settings]](http://malwaretips.com/blogs/wp-content/uploads/2014/03/Close-button-Reset.jpg)
![Click on the Menu button then question mark button [Image: Click on the Menu button then Help]](http://malwaretips.com/blogs/wp-content/uploads/2014/04/Firefox-Help-button.jpg)
![Troubleshooting Information in Firefox [Image: Troubleshooting Information in Firefox]](http://malwaretips.com/blogs/wp-content/uploads/2014/04/Firefox-Troubleshooting-Information.jpg)
![Reset Firefox to its default settings [Image: Reset Firefox to its default settings to remove SaleZ]](http://malwaretips.com/blogs/wp-content/uploads/2014/04/Reset-Firefox-button.jpg)
![Click on the Reset Firefox button [Image: Click on the Reset Firefox button]](http://malwaretips.com/blogs/wp-content/uploads/2014/04/Reset-Firefox-to-default-settings.jpg)
![Click on Settings button [Image: Click on Settings button]](http://malwaretips.com/blogs/wp-content/uploads/2014/02/Reset-Chrome-Settings-1.jpg)
![Click on Show advanced settings link [Image: Click on Show advanced settings link]](http://malwaretips.com/blogs/wp-content/uploads/2014/02/Reset-Chrome-Settings-2.jpg)
![Click on Reset browser button [Image: Click on Reset browser button]](http://malwaretips.com/blogs/wp-content/uploads/2014/02/Reset-Chrome-Settings-3.jpg)
![Click on Reset button to restore Chrome to default settings [Image: Click on Reset button to restore Chrome to default settings]](http://malwaretips.com/blogs/wp-content/uploads/2014/02/Reset-Chrome-Settings-4.jpg)

![How to Remove Bro-protect.co.in Pop-ups [Virus Removal Guide] 11 McAfee scam 4](https://malwaretips.com/blogs/wp-content/uploads/2023/08/McAfee-scam-4-290x290.jpg)