
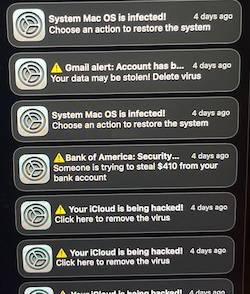
Many Mac users believe that macOS is immune to malware, but this is a myth. While macOS has built-in security features, it is still vulnerable to viruses, Trojans, adware, spyware, and ransomware. If your Mac is behaving strangely, running slow, or displaying pop-ups, it could be infected with malware.
In this guide, we’ll cover the types of malware that affect Macs, how to detect an infection, and the best methods to remove malware safely.
Types of Malware That Affect Macs
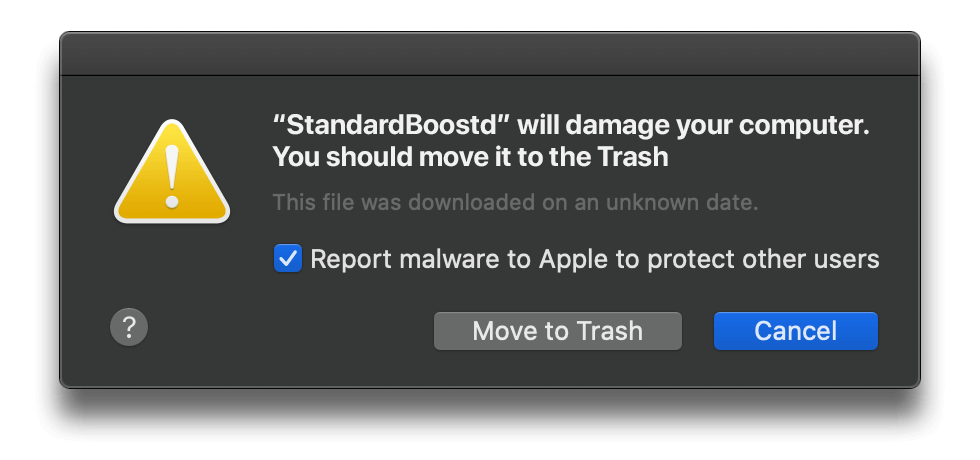
Although macOS has strong security measures like Gatekeeper, XProtect, and System Integrity Protection (SIP), malware can still find ways to infiltrate your system. Here are the most common types of malware that can infect Macs:
1. Adware
- Bombards users with unwanted advertisements and pop-ups.
- Redirects searches to malicious websites.
2. Trojans
- Disguised as legitimate software but secretly performs malicious activities.
- Often used to steal passwords, banking details, or sensitive data.
3. Ransomware
- Encrypts files and demands a ransom for decryption.
- Can cause permanent data loss if not handled properly.
4. Spyware
- Secretly monitors user activity and collects personal information.
- Can steal login credentials, browsing history, and financial details.
5. Browser Hijackers
- Modifies browser settings (home page, search engine) without permission.
- Redirects web searches to unsafe websites with ads or phishing traps.
6. Worms & Viruses
- Replicate and spread between devices, corrupting files and slowing down performance.
- Can exploit system vulnerabilities to steal personal data or damage the OS.
7. Rootkits
- Hide deep within macOS, making them difficult to detect and remove.
- Allow hackers to gain full control over an infected Mac.
How to Tell If Your Mac Is Infected with Malware
If your Mac is infected, you might notice unusual behavior. Here are the most common signs of malware infection:
1. Slow Performance & Overheating
- Apps take longer to open or crash frequently.
- Mac overheats even when running basic tasks.
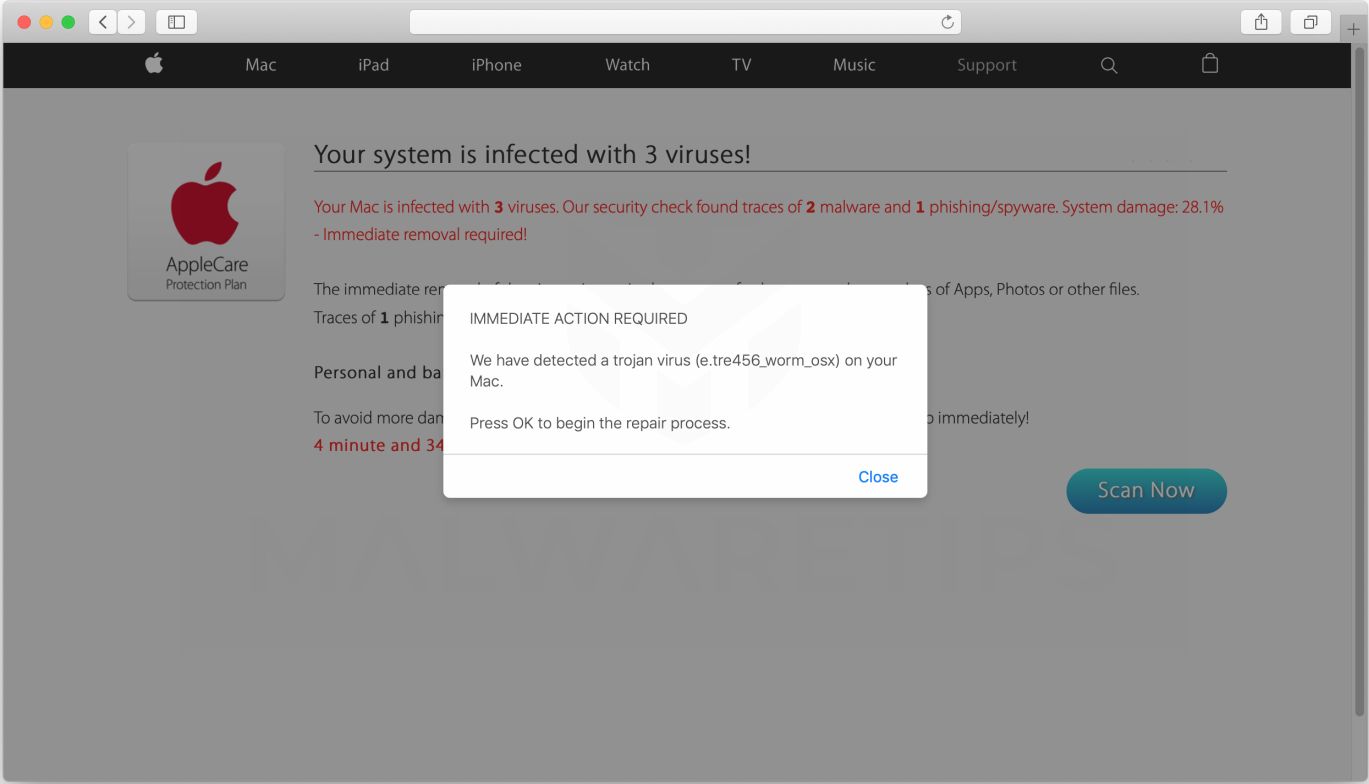
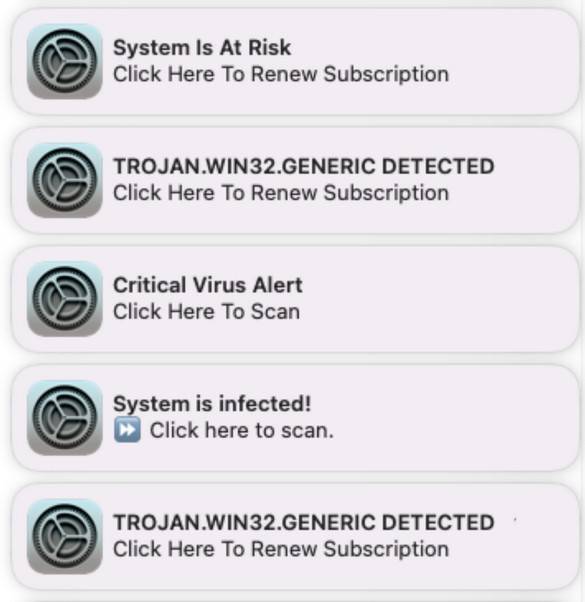
2. Excessive Pop-Ups & Ads
- Unwanted pop-ups appear even when you’re not browsing the internet.
- Fake security warnings urging you to download antivirus software.
3. Unknown Apps or Files Appear
- You notice suspicious apps in Applications or Login Items.
- Files or folders appear that you didn’t download or create.
4. Browser Changes Without Permission
- Homepage, search engine, or new tab settings change unexpectedly.
- You get redirected to strange websites when searching online.
5. Mac Running Hot & Fans Spinning Loudly
- High CPU usage without any open apps.
- Activity Monitor shows unknown processes consuming system resources.
6. Internet & Network Issues
- Slow internet speeds or frequent disconnections.
- Unknown devices connected to your Wi-Fi network.
7. Security Features Disabled
- Gatekeeper or System Integrity Protection (SIP) is turned off.
- macOS asks for your password unexpectedly.
If you notice any of these symptoms, your Mac may be infected. The next step is to remove the malware and restore your system’s security.
How to Remove Malware from Your Mac [Virus Removal Gudie]
Please perform all the steps in the correct order. If you have any questions or doubts at any point, stop and ask for our assistance.
- STEP 1: Remove malicious profiles
- STEP 2: Delete malicious apps
- STEP 3: Reset browsers back to default settings
- STEP 4: Run a scan with Malwarebytes for Mac to remove malware
STEP 1: Remove malicious profiles
Profiles are used by IT admins in businesses to control the behavior of their Macs. These profiles can configure a Mac to do many different things, some of which are not otherwise possible.
When it comes to home users, adware and browser hijackers are using the configuration profile to prevent users from removing malicious programs from the computer. This also prevents the user from changing that behavior in the browser’s settings.
In this first step, we will check your computer to see if any configuration profiles are installed. To do this, follow the below steps:
-
Open “System Settings”
From the Apple menu () in the top-left corner of the screen, select System Settings. (On macOS Monterey and earlier, this is called System Preferences.)
-
Look for “Profiles”
In the System Settings window, search for Profiles — on newer macOS versions you’ll find it under Privacy & Security, or you can type “Profiles” in the search box.
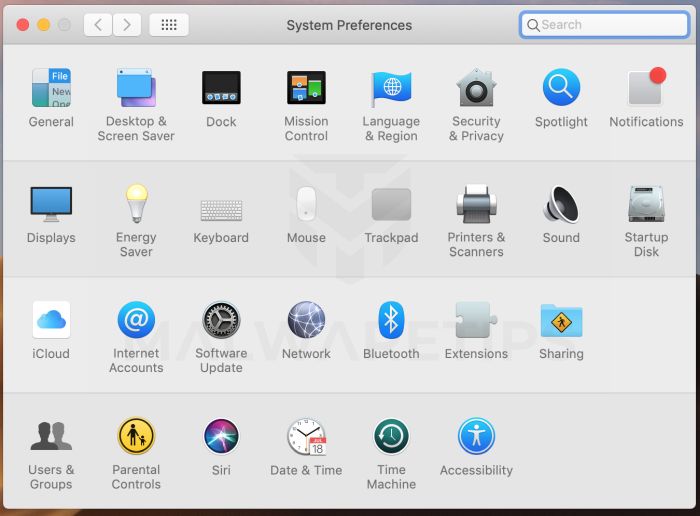 No Profiles section? Good news — that means no profiles are installed on your Mac, which is completely normal. Skip ahead to the next step of this guide.
 -
Remove the malicious profiles
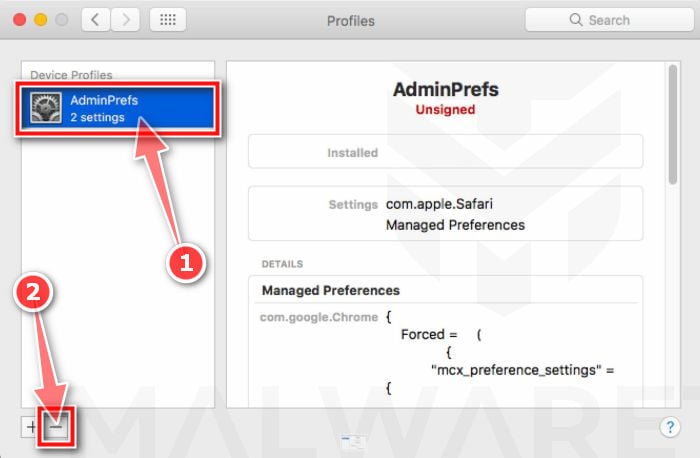
Malware uses configuration profiles to lock your browser settings — forcing a fake search engine or homepage on you and preventing you from changing it back. If you see a profile you don’t recognize (and your Mac isn’t managed by your workplace or school), select it, press the − (minus) button, and click Remove to confirm.
STEP 2: Delete malicious apps
In this second step, we will try to identify and remove any malicious apps and files that might be installed on your computer. Sometimes redirects or adware programs can have usable Uninstall entries that can be used to remove these programs.
-
Quit the malicious programs
Check the Apple menu bar in the top-right corner of your screen. If you see an icon you don’t recognize, click it and select Quit. This stops the malware from running so it can’t interfere while we remove it.
-
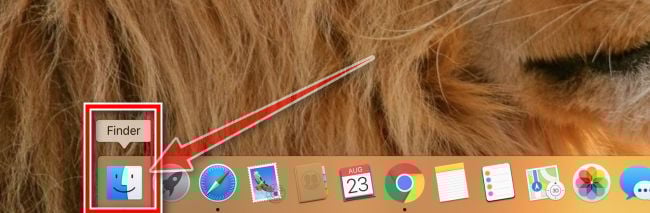
Open “Finder”
Click the Finder icon in your dock.
-
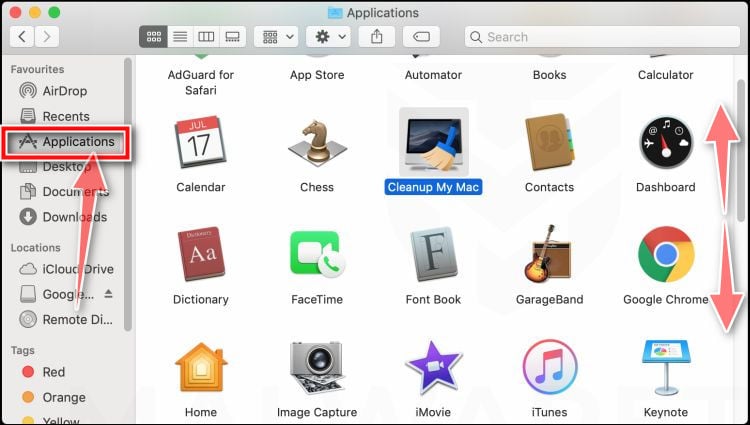
Click on “Applications”
In the Finder sidebar, click “Applications“.
-
Find and remove the malicious app
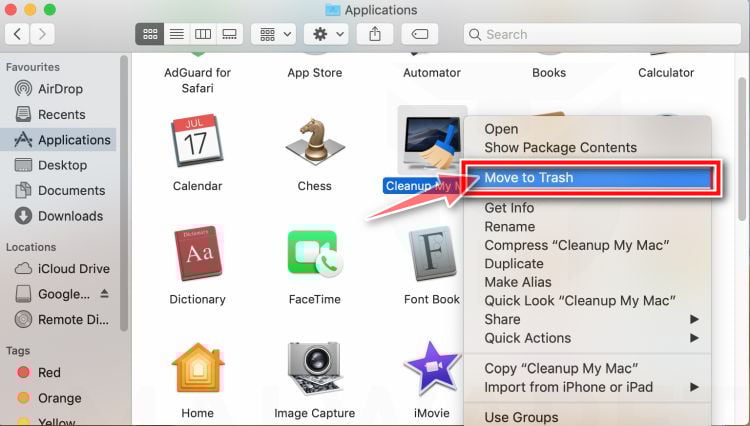
Scroll through the list of installed apps and look for anything suspicious — an app you don’t remember installing, or one with a strange or generic name. When you find it, right-click it and select “Move to Trash“.
Some known malicious programs to look for: SearchMine, TakeFresh, TopResults, FeedBack, ApplicationEvents, GeneralOpen, PowerLog, MessengerNow, ImagePrime, GeneralNetSearch, Reading Cursors, GlobalTechSearch, PDFOnline-express, See Scenic Elf, MatchKnowledge, Easy Speedtest, and WebDiscover. The names change constantly, though — so treat any app you can’t account for as suspect.
-
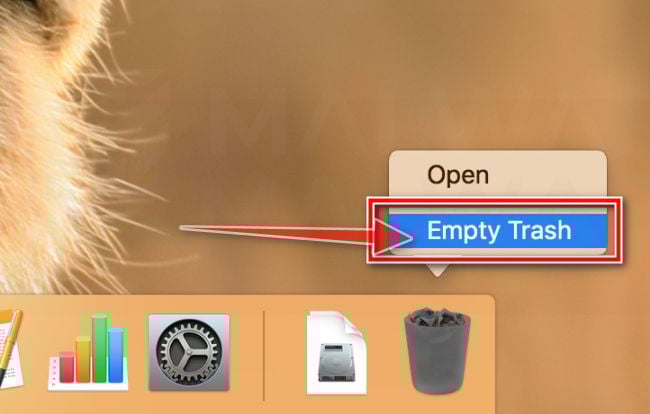
Empty the Trash
Right-click the Trash icon in your dock and select “Empty Trash“. This permanently deletes the malicious app you just removed — until you do this, the malware is still on your Mac.
Find and remove the malicious files
Malware on Mac uses launch agents and launch daemons — small files that automatically restart the malware every time you boot your Mac. We’ll check the four folders where they hide:
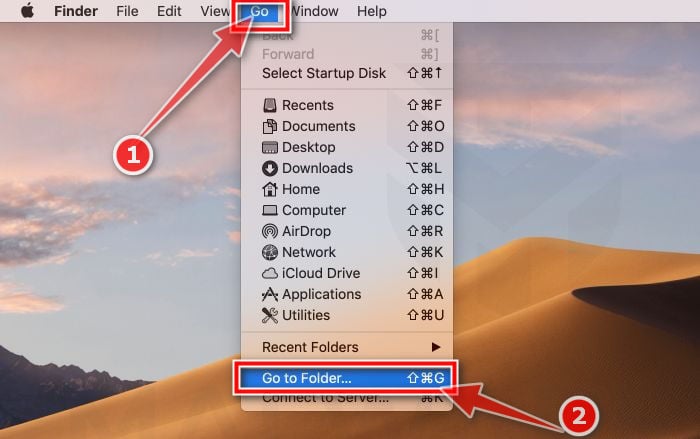
- Click the desktop to make sure you’re in Finder, then open the “Go” menu and click “Go to Folder“.
- Copy and paste each of the paths below into the window, one at a time, and click Go after each:
- /Library/LaunchAgents
- ~/Library/LaunchAgents
- /Library/Application Support
- /Library/LaunchDaemons
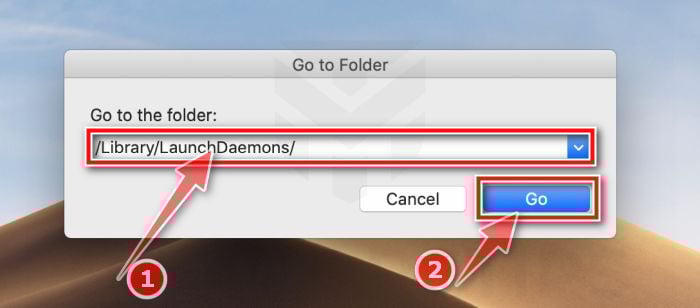
- In each folder, look for suspicious .plist files — typically named after the malware or with odd, random-looking names. Some known examples: “com.adobe.fpsaud.plist”, “installmac.AppRemoval.plist”, “myppes.download.plist”, “mykotlerino.ltvbit.plist”, and “com.myppes.net-preferences.plist”. When you find a malicious file, move it to the Trash — then empty the Trash again when you’re done.
Be careful: these folders also contain files belonging to legitimate apps — especially /Library/Application Support, where programs like Adobe, Google, and Microsoft store their data. Only delete files you’re confident are malicious. If you’re unsure about a file, search its exact name online first — or skip it; the Malwarebytes scan in the next step will catch what you miss.
- Click the desktop to make sure you’re in Finder, then open the “Go” menu and click “Go to Folder“.
STEP 3: Reset browsers back to default settings
In this third step, we will remove spam push notifications and malicious extensions, and change to default any settings that might have been changed by malware.
For each browser that you have installed on your computer, please click on the tab below and follow the displayed steps to reset that browser.
Remove malicious extensions and settings from Safari
To remove malware from Safari we will check if there are any malicious extensions installed on your browser and what settings have been changed by this malicious program.
-
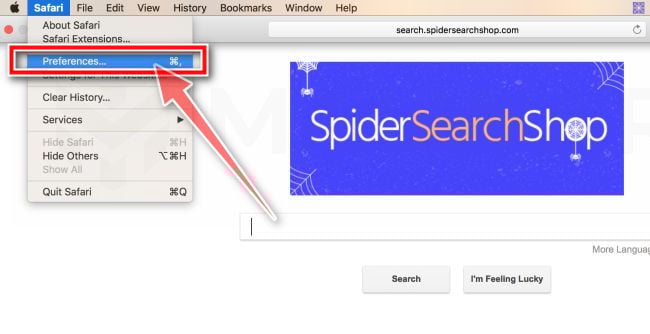
Go to Safari’s “Preferences”.
On the menu bar, click the “Safari” menu and select “Preferences”.
-
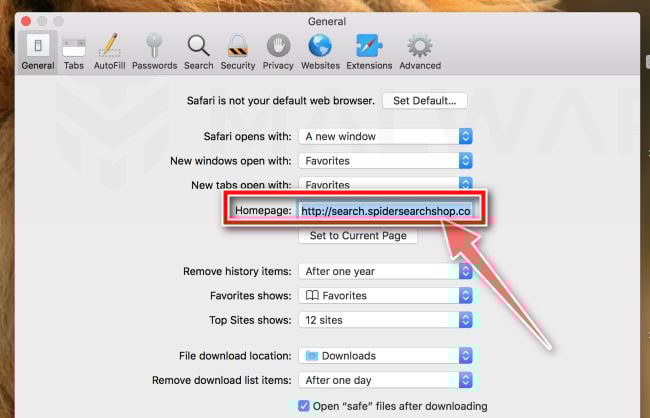
Check Homepage.
This will open a new window with your Safari preferences, opened to the “General” tab. Some browser hijackers may change your default homepage, so in the Homepage field make sure it’s a web page you want to use as your start-up page.
-
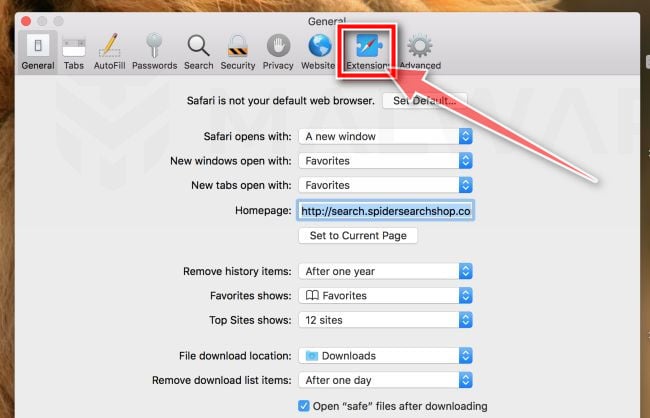
Click “Extensions”
Next, click on the “Extensions” tab.
-
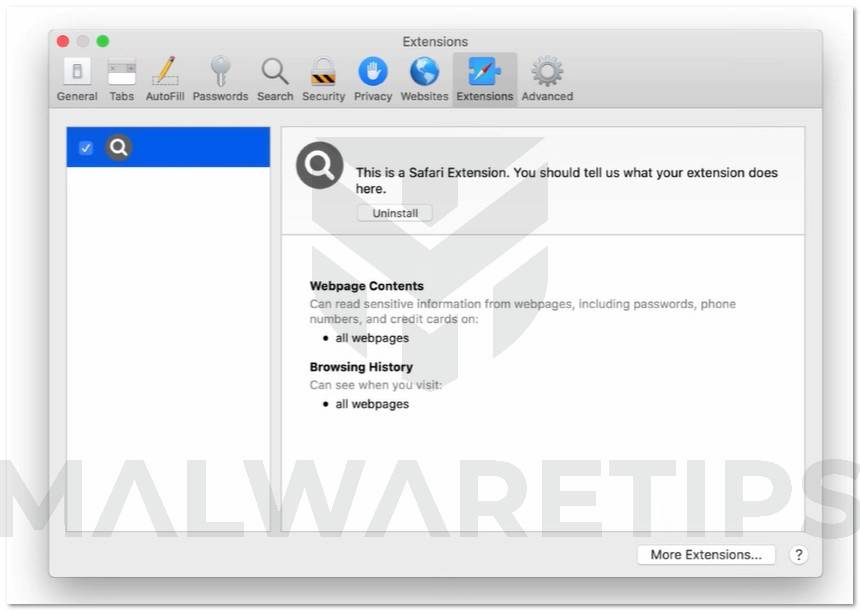
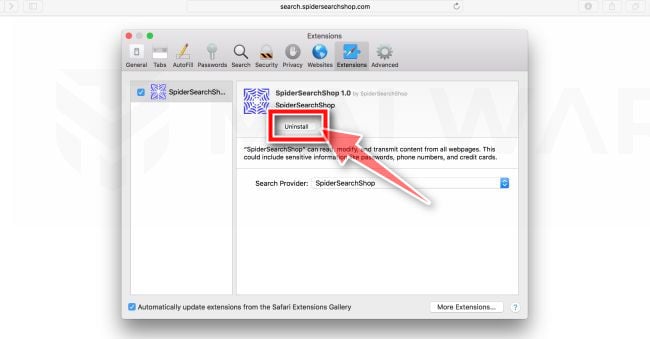
Find and uninstall malicious extensions.
The “Extensions” screen will be displayed with a list of all the extensions installed on Safari. Look out for any suspicious browser extension that could be behind all the drama – anything you don’t remember downloading or that doesn’t sound like a genuine extension. By default, there are no extensions installed on Safari so it’s safe to remove an extension
-
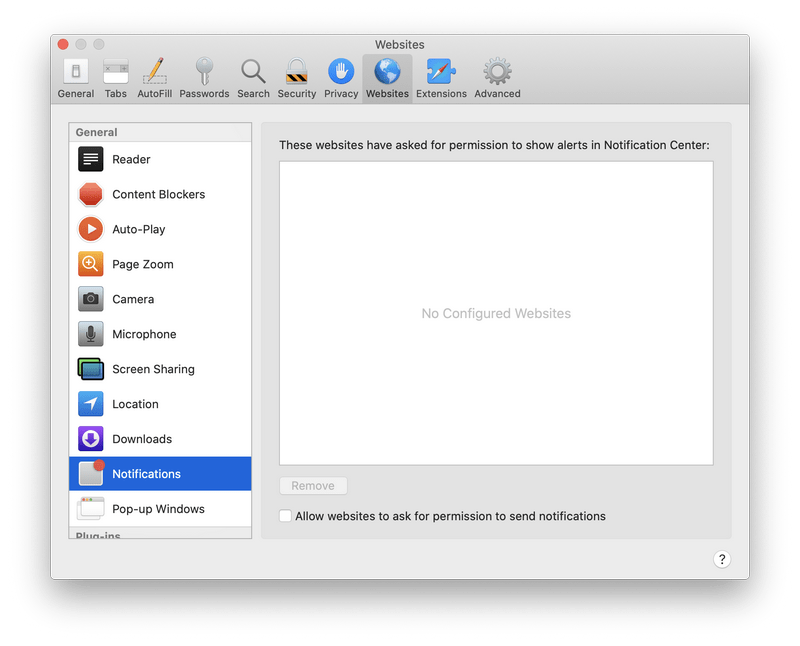
Remove spam notifications ads
Click Preferences, click Websites, then click Notifications. Deselect “Allow websites to ask for permission to send push notifications”.
-
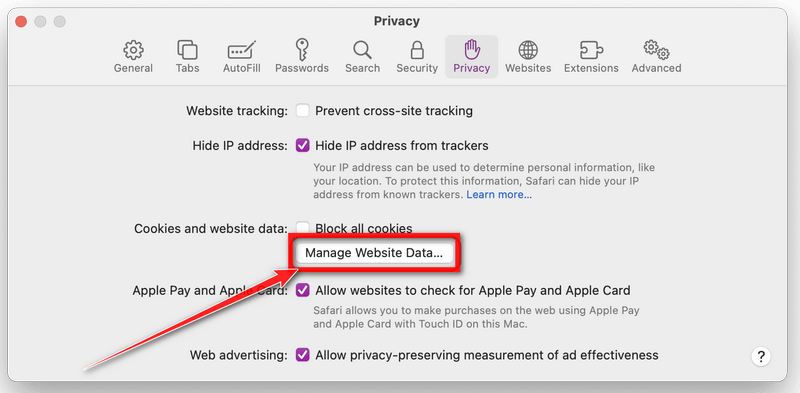
Remove all data stored by websites on your computer.
In the Safari menu, choose “Preferences…”, select “Privacy” at the top of the new window that appears, and then click the “Manage Website Data” button.
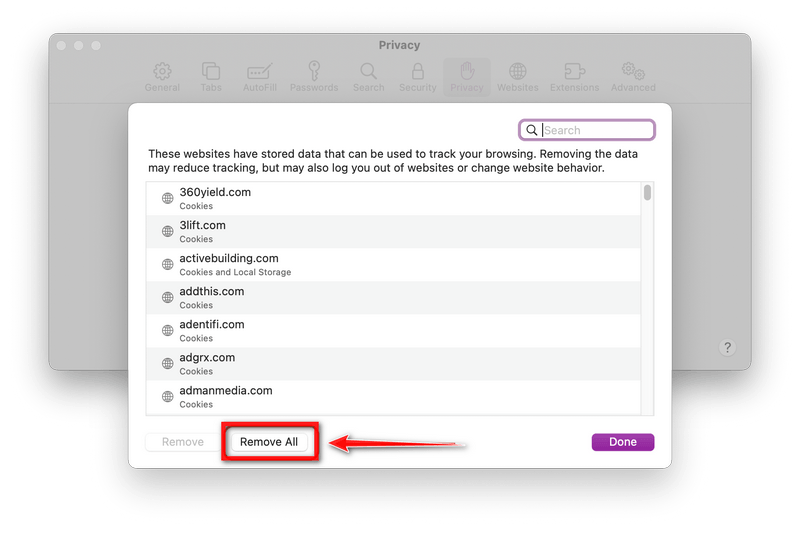
In the next dialog box, click “Remove All“. It will ask you if you are sure you want to remove all data stored by websites on your computer. Select “Remove Now” to clear data that could be used to track your browsing.
-
Empty Safari Caches.
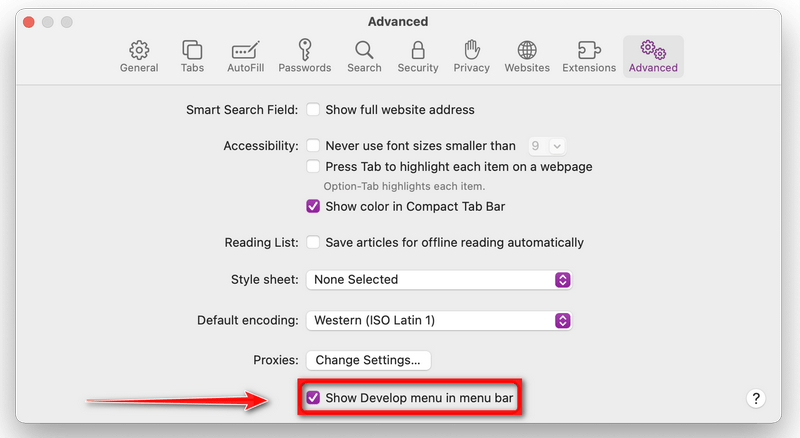
From your Safari menu bar, click Safari and select Preferences, then select the Advanced tab. Enable the checkbox to “Show Develop menu in menu bar“.
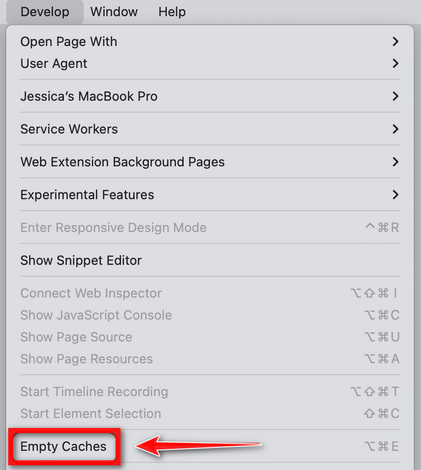
From the menu bar select Develop, then click on Empty Caches as seen in the image below.
Remove malware from Chrome for Mac
To remove malware from Chrome for Mac we will reset the browser settings to their default. Doing these steps will erase all configuration information from Chrome such as your home page, tab settings, saved form information, browsing history, and cookies. This process will also disable any installed extensions. All of your bookmarks, though, will be preserved.
-
Click on the three dots at the top right and go to Settings.
Click on Chrome’s main menu button, represented by three dots at the top right corner. Now click on the menu option labeled Settings as shown by the arrow in the picture below, which will open the basic settings screen.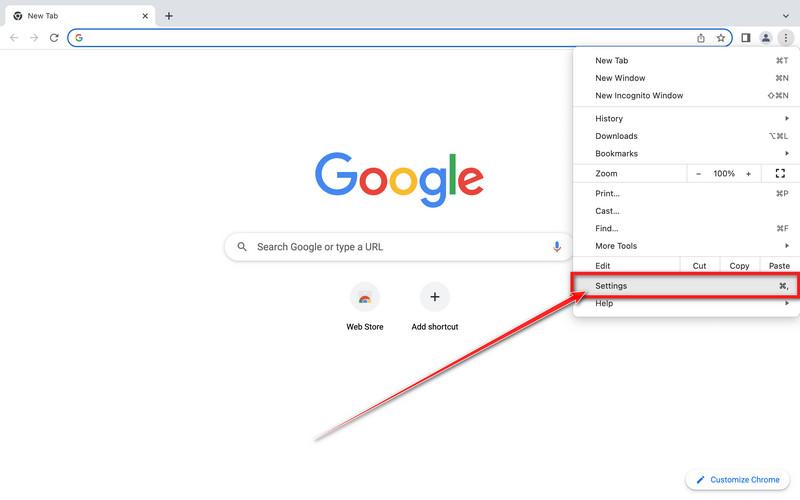
-
In the left sidebar, click on the “Reset and Cleanup” option.
In the left sidebar, click on “Reset and clean up“.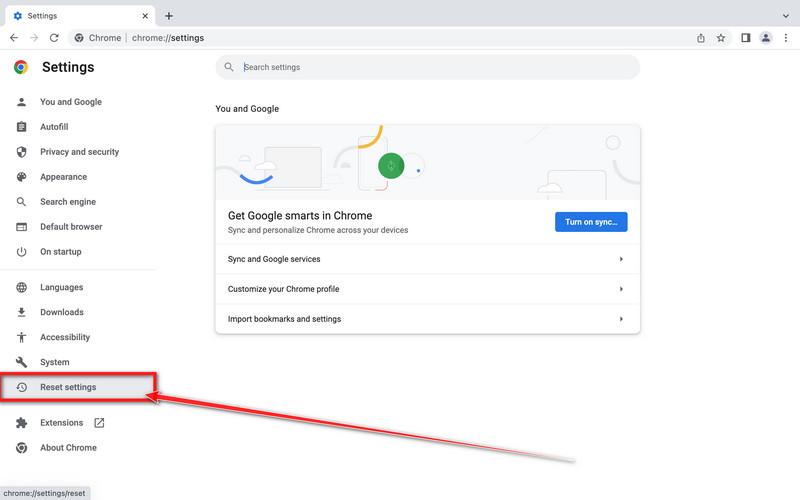
-
Click “Reset settings to their original defaults”.
Now click on the “Reset settings to their original defaults”. link as shown in the image below.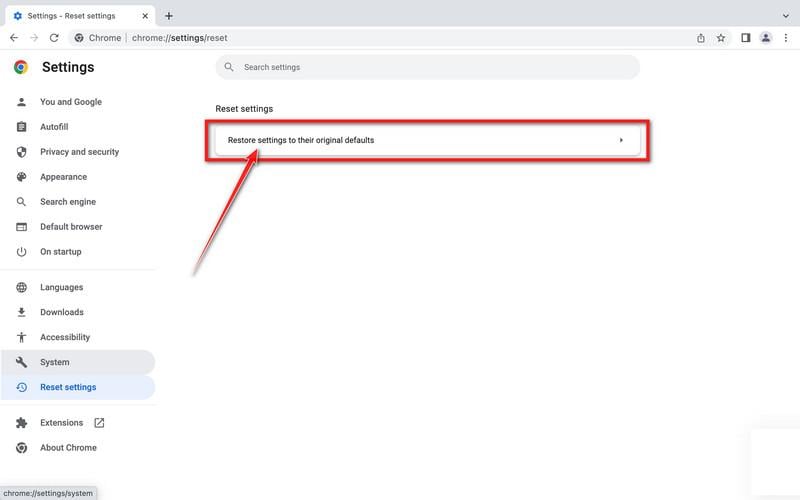
-
Click “Reset Settings” button.
A confirmation dialog should now be displayed, detailing the components that will be restored to their default state should you continue with the reset process. To complete the restoration process, click on the “Reset Settings” button.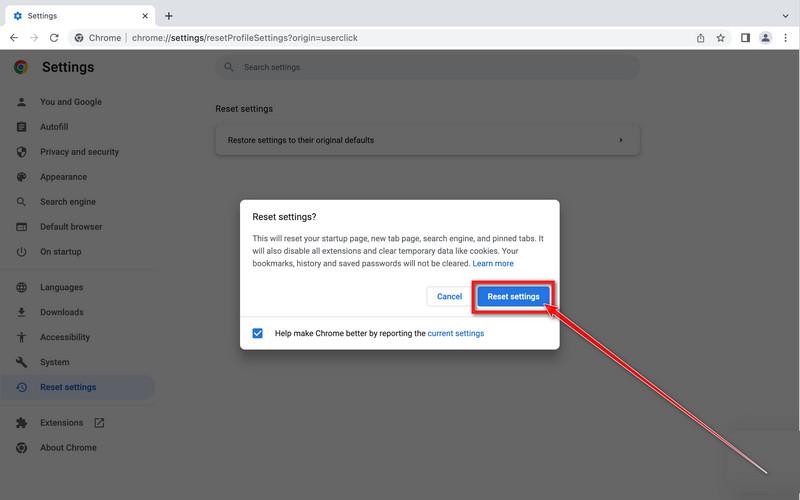
-
(Optional) Reset Chrome Data Sync.
In case a malicious extension reinstalls itself even after performing a browser reset, you have an additional option to reset the data sync for your browser. To do this, navigate to chrome.google.com/sync and click on the Clear Data button.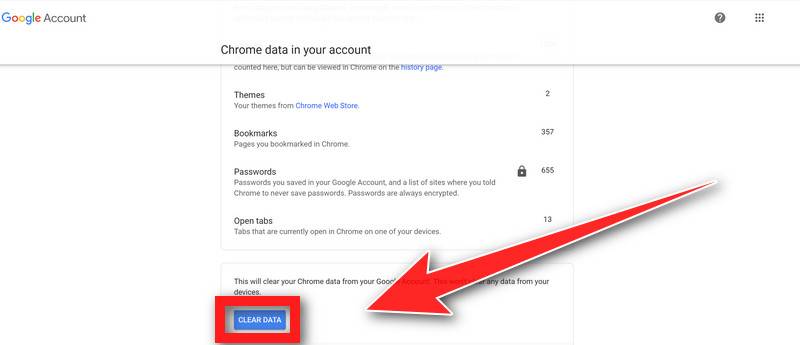
Remove malware from Firefox for Mac
To remove malware from Firefox for Mac we will reset the browser settings to its default. The reset feature fixes many issues by restoring Firefox to its factory default state while saving your essential information like bookmarks, passwords, web form auto-fill information, browsing history, and open tabs.
-
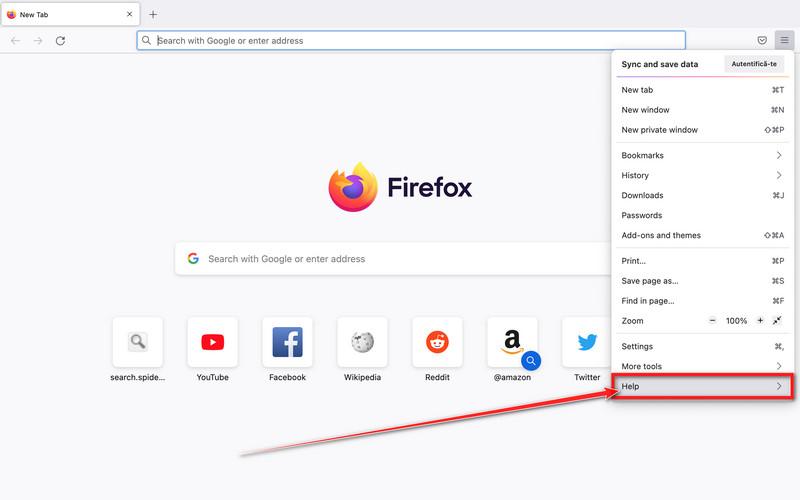
Go to the “Help” menu.
Click on Firefox’s main menu button, represented by three horizontal lines. When the drop-down menu appears, select the option labeled “Help“.
-
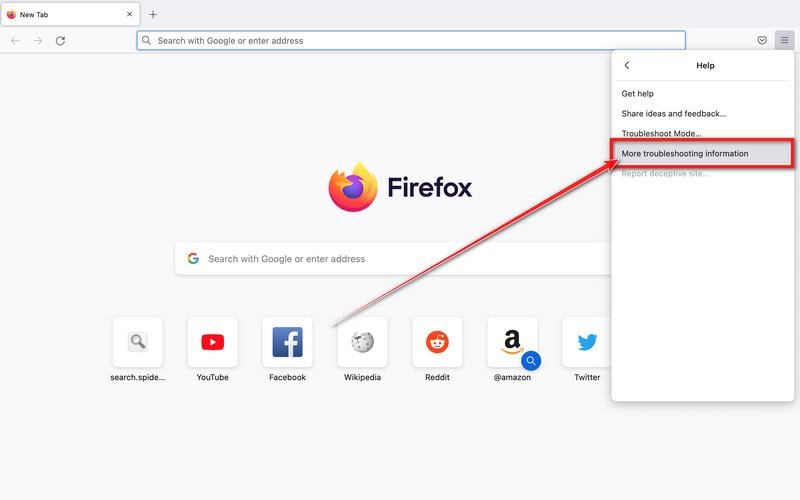
Click “Troubleshooting Information”.
Next click on the “Troubleshooting Information” option as indicated by the arrow in the image below. This will bring you to a Troubleshooting page.
-
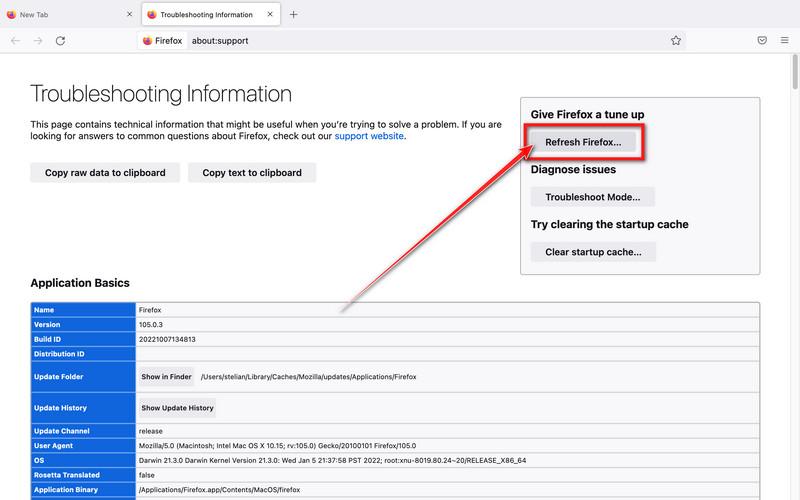
Click on “Refresh Firefox”
Click the “Refresh Firefox” button in the upper-right corner of the “Troubleshooting Information” page.
-
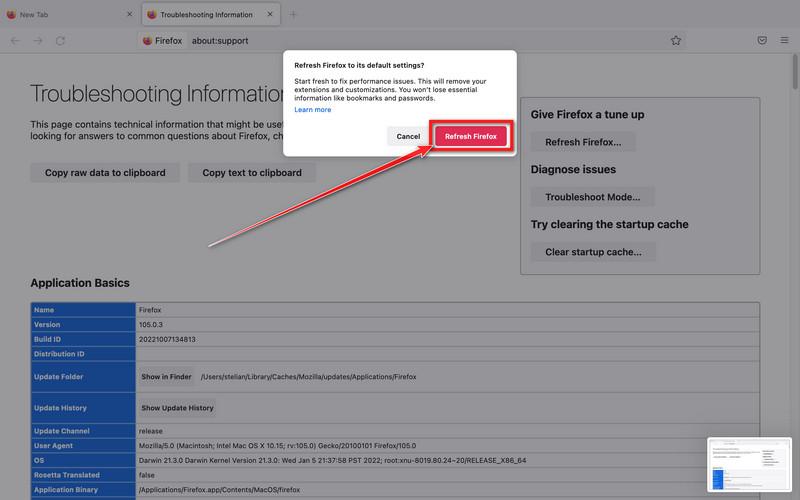
Confirm.
To continue, click on the “Refresh Firefox” button in the new confirmation window that opens.
-
Click on “Finish”.
Firefox will close itself and will revert to its default settings. When it’s done, a window will list the information that was imported. Click on the “Finish“.
STEP 4: Run a scan with Malwarebytes for Mac to remove malware
In this final step, we will scan the computer with Malwarebytes for Mac to find and remove any malicious programs that might be installed on your Mac.
Malwarebytes for Mac is a free on-demand scanner that removes the malware other security software tends to miss — adware, browser hijackers, and unwanted programs included. Cleaning an infected Mac with Malwarebytes has always been completely free, and it’s our go-to recommendation. Follow the steps below to scan and clean your Mac in just a few minutes.
-
Download Malwarebytes for Mac
Click the button below to download the latest version of Malwarebytes for Mac.
Download MalwarebytesOfficial installer for macOS. Your download starts right away.Want real-time protection? See Malwarebytes Premium Malwarebytes Free for MacScans and removes malware at no cost
 -
Open the Malwarebytes setup file
When the download finishes, open your Downloads folder and double-click the setup file to begin the installation.

-
Follow the On-Screen Prompts to Install Malwarebytes
The Malwarebytes for Mac Installer will guide you through a few quick screens. Click “Continue” and keep following the prompts until the installation completes.



When the installation is complete, Malwarebytes opens to the Welcome to Malwarebytes screen. Click “Get started“.
-
Select “Personal Computer” or “Work Computer”
Malwarebytes will ask what type of computer you’re installing it on. Click either Personal Computer or Work Computer, whichever applies.

-
Start the Scan
Click the “Scan” button. Malwarebytes will automatically update its detection database and begin checking your Mac for malware.

-
Wait for the Scan to Finish
Malwarebytes will scan your Mac for adware, browser hijackers, and other malicious programs. This can take a few minutes, so feel free to do something else — just check back occasionally to see the progress.

-
Quarantine the Detected Threats
When the scan is done, you’ll see a list of everything Malwarebytes found. Click the “Quarantine” button to remove all the threats at once.

-
Restart Your Mac
Malwarebytes will now remove all the malicious files it found. Some threats can only be fully removed after a reboot — if Malwarebytes asks you to restart, allow it. Once you’re logged back in, your Mac is clean.

Your Mac should now be free of the adware, browser hijackers, and other malware.
If you are still experiencing problems while trying to remove a malicious program from your computer, please ask for help in our Mac Malware Removal Help & Support forum.