Damaged Package Email Virus: How the Fake Customer Complaint Installs Malware
Written by: Thomas Orsolya
Published on:
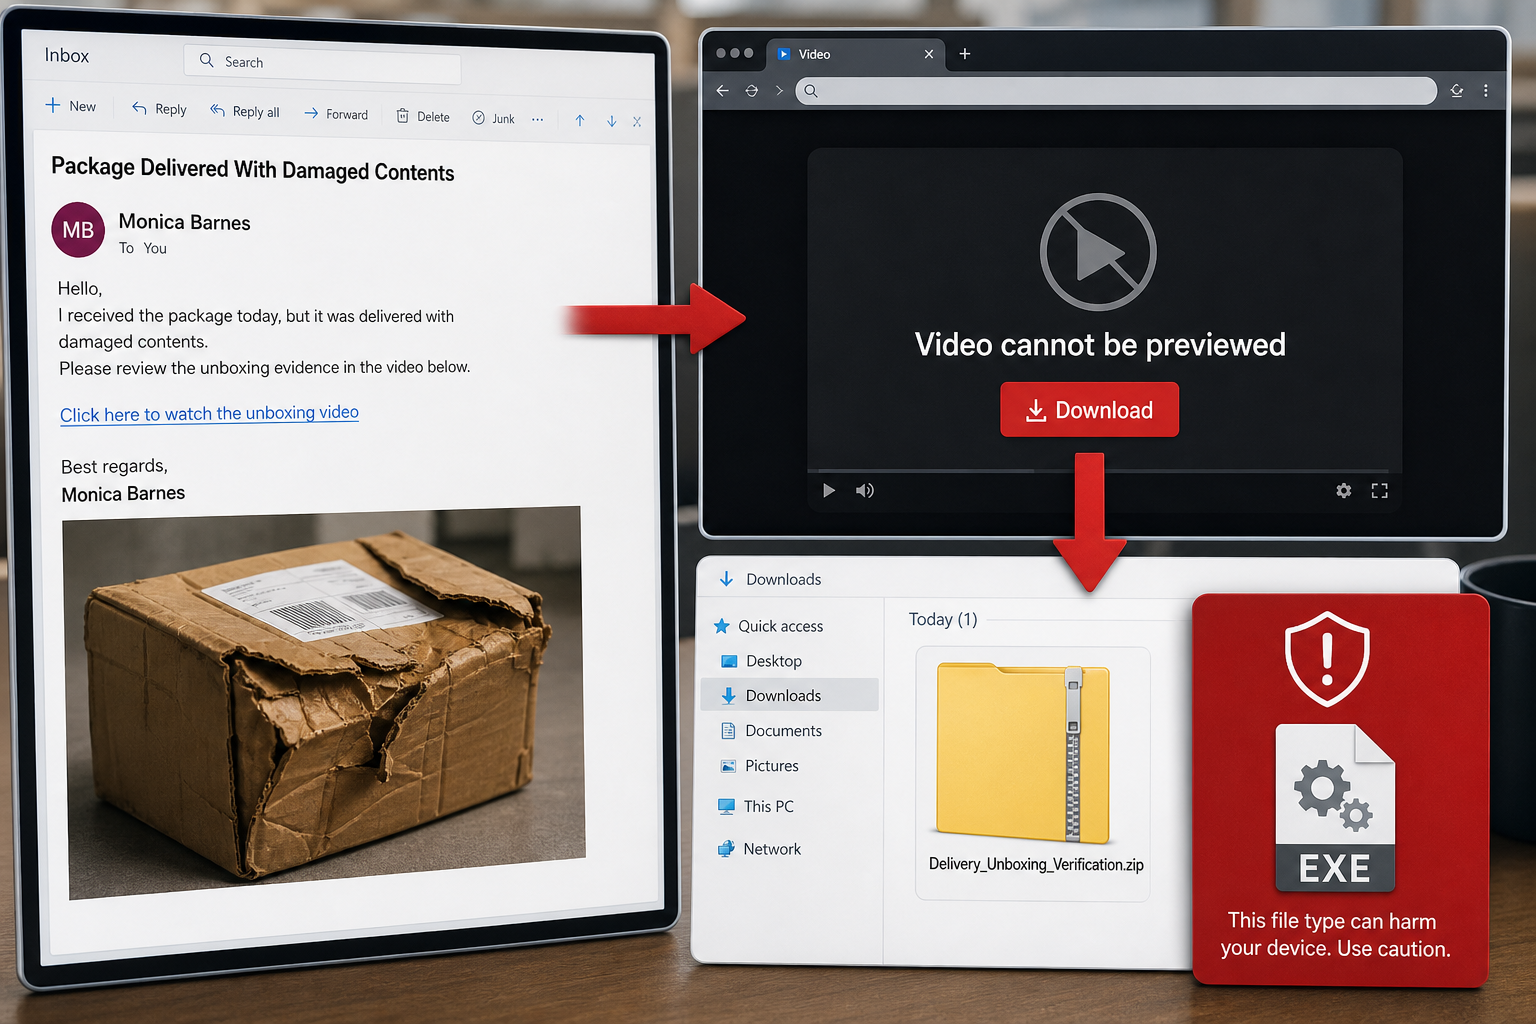
The Damaged Package email is a malware-delivery trap aimed at businesses and customer-service teams. It pretends to come from a dissatisfied customer who uploaded photos and an unboxing video because the files were too large to attach.
The link does not open evidence of a damaged parcel. It leads to a fake video page that downloads Delivery_Unboxing_Verification.zip, which contains a malicious Windows executable. Do not open or run it.
The fake customer complaint leads to a bogus video page that downloads Delivery_Unboxing_Verification.zip and a malicious executable.
Damaged Package Email Virus Overview
This malspam campaign is written as a routine customer complaint rather than a traditional security warning or unpaid invoice. A sender using the name Monica Barnes claims that a delivered product was heavily damaged inside its packaging. The message says photos and an unboxing video were recorded as evidence but could not be attached because the files were too large. The recipient is asked to view them through a link and recommend an exchange or refund.
That story is tailored to employees who regularly handle returns. A support agent may be used to opening customer photos, so the request feels like ordinary work. The link opens a counterfeit video-hosting page displaying Video cannot be previewed and a Download button. Clicking the button retrieves a ZIP archive named Delivery_Unboxing_Verification.zip. Inside is an executable installer, not a video or image.
The final malware family delivered by the executable has not been identified. That uncertainty is important: the file should not be labeled as one specific trojan without evidence. A loader like this can install an information stealer, remote access trojan, ransomware, keylogger, spyware or another payload selected by the operator. Running it can expose passwords, financial data and business systems even when no obvious window appears.
Key details that identify the campaign
The subject resembles Package Delivered With Damaged Contents.
The sender presents herself as a customer named Monica Barnes.
The message mentions damaged contents, an unboxing video and photographs.
Large file size is used as the excuse for an external link.
The fake page says the video cannot be previewed and offers a download.
The downloaded file is Delivery_Unboxing_Verification.zip.
The archive contains a Windows executable rather than customer evidence.
The message should be treated as malicious even if the download is not immediately detected by a security product. New or lightly distributed files can evade signature-based scanning, and the executable may retrieve a different payload after it starts.
How the Damaged Package Malware Email Works
Step 1: A believable customer complaint reaches the business
The scammer writes to a retailer, seller or support address and describes a common post-delivery problem. The request is professional enough to resemble a genuine return case and avoids the broken grammar people expect from spam.
Step 2: Oversized evidence explains the external link
The sender says the photos and video could not be attached. This gives the attacker a natural reason to send the employee away from the protected email environment and onto a website controlled by the campaign.
Step 3: A fake video page continues the story
The destination looks like a video viewer but displays an error. Instead of suspecting the link, the recipient may believe the browser simply cannot stream the evidence and use the prominent Download button.
Step 4: A ZIP archive hides the dangerous file
Delivery_Unboxing_Verification.zip is downloaded. Archives are commonly used to bypass attachment filters and make the enclosed executable less obvious. Windows may also hide known file extensions, making a program look like a document or media file.
Step 5: The employee extracts and launches the executable
The infection does not begin merely because a ZIP file exists in Downloads. The critical action is extracting and running the executable. Once launched, it can make system changes and connect to attacker-controlled infrastructure.
Step 6: An unknown payload compromises the computer
The installer can deploy malware chosen by the operator. Possible outcomes include credential theft, remote access, data exfiltration or ransomware. Because the payload is not confirmed, responders must investigate behavior and network activity instead of hunting for only one family name.
Why Customer-Service Teams Are Strong Targets
Support staff receive messages from strangers by design. They are expected to open order details, receipts and photographs, and a slow response can affect customer satisfaction. Attackers exploit that workflow rather than trying to convince the employee that they won a prize.
The sender does not need an existing relationship with the employee.
Damaged-delivery complaints are common and time-sensitive.
External photos and videos are normal in many return processes.
Shared support inboxes make personal familiarity with the sender unlikely.
A compromised support workstation may access customer records and internal tools.
The employee may run the file to resolve a case quickly.
What to Do If You Received the Damaged Package Email
Do not use the link or reply to the sender
Report the message to the security team and preserve the headers. If a real customer case might exist, verify it through the company’s order system and request evidence through the approved upload portal rather than the email link.
Block the destination and file indicators
Organizations should block the malicious URL, quarantine matching messages and search endpoints for Delivery_Unboxing_Verification.zip. Also search for extracted executables, browser downloads and processes launched from temporary or Downloads folders.
Warn other support agents
The same campaign may target multiple addresses or branches. A short internal alert with the subject, sender story and filename helps other employees recognize it without circulating the live link.
What to Do If You Downloaded or Ran the File
If you downloaded the ZIP but did not open it
Delete the archive, empty the recycle bin and run a security scan. Tell the IT team so they can confirm that no extracted copy or browser-delivered component remains. Downloading alone is less serious than executing the enclosed program, but it still deserves documentation.
If you extracted the archive but did not run the EXE
Delete both the archive and extracted contents, then scan the system. Do not double-click the executable to see what it does. Security staff can analyze the file safely in an isolated environment.
If you ran the executable
Disconnect the computer from Wi-Fi and Ethernet immediately. Do not sign in to more accounts or use the machine to change passwords. Contact the organization’s security team from another device and report the exact time the file was opened.
Secure accounts from a clean device
Change email, work, banking and other important passwords that were used or stored on the computer. End active sessions and enable multi-factor authentication. If the workstation accessed customer or payment data, follow the organization’s breach-response process.
Scan or rebuild the affected Windows system
Because the payload is unknown, a narrow cleanup is risky. Run a full reputable malware scan and examine persistence, recent processes and outbound connections. A company computer or administrator-level infection may require a clean Windows reimage.
If you suspect your computer is infected with malware — slow performance, pop-ups, redirects, or programs you don’t recognize — follow the free step-by-step removal guide below to clean it completely.
Remove Malware from Windows [Step-by-Step Guide]
Before you start: this guide may look long, but that’s only because we’ve broken everything down into clear, detailed steps that anyone can follow — no technical skills needed, and every tool we use is free. Please follow the steps in order. If you get stuck or have doubts at any point, stop and ask for help in our free support forum — our team will guide you personally.
To remove Trojans and other malware from your computer, follow these steps:
First, we’ll manually check your computer for unknown or malicious programs. Adware and browser hijackers often have a working uninstall entry — removing them this way takes care of the easy part before we run the scanners.
Windows 11Windows 10Windows 8Windows 7
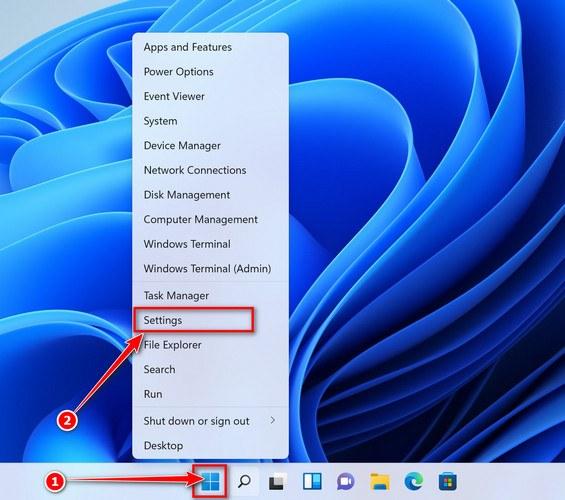
Open the Settings app
Press Windows + I on your keyboard to open Settings. Alternatively, right-click the Start button and select “Settings” from the menu.
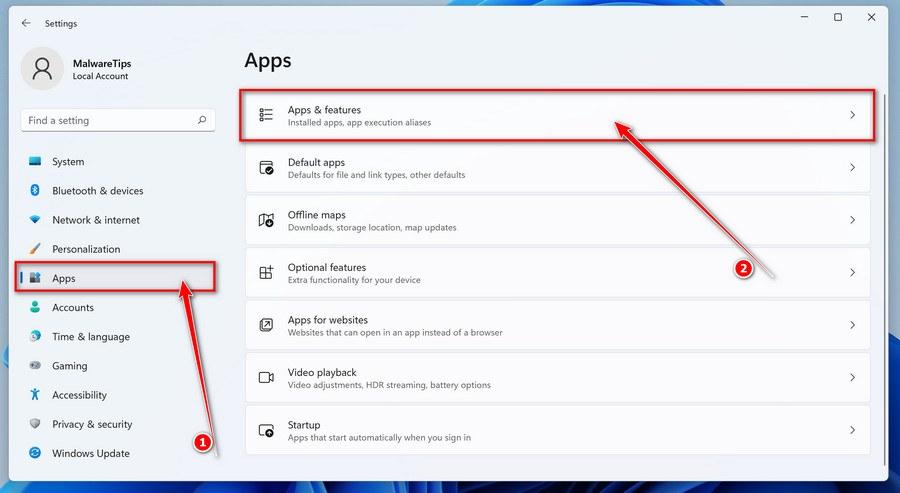
Go to “Apps & Features”
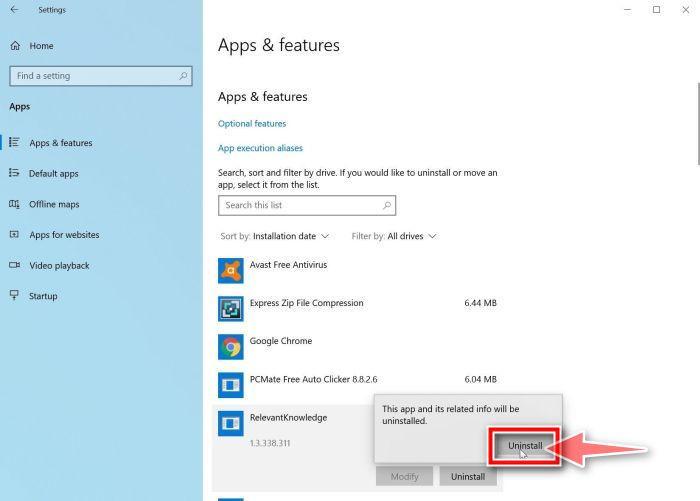
In the Settings window, click “Apps” in the sidebar, then select “Apps & Features“.
Find and uninstall the malicious program
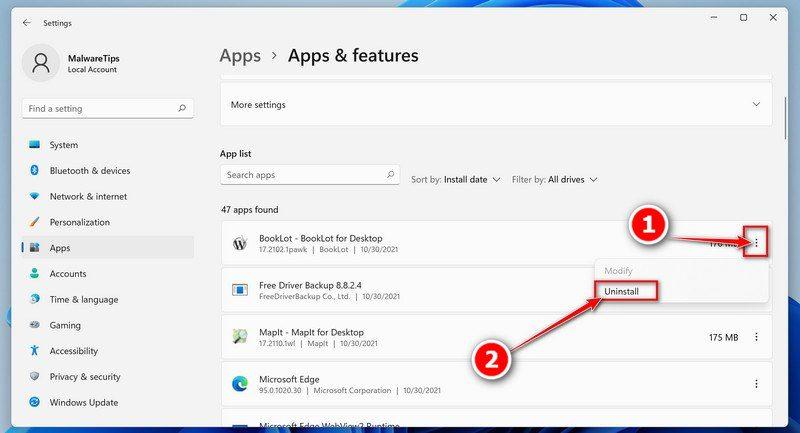
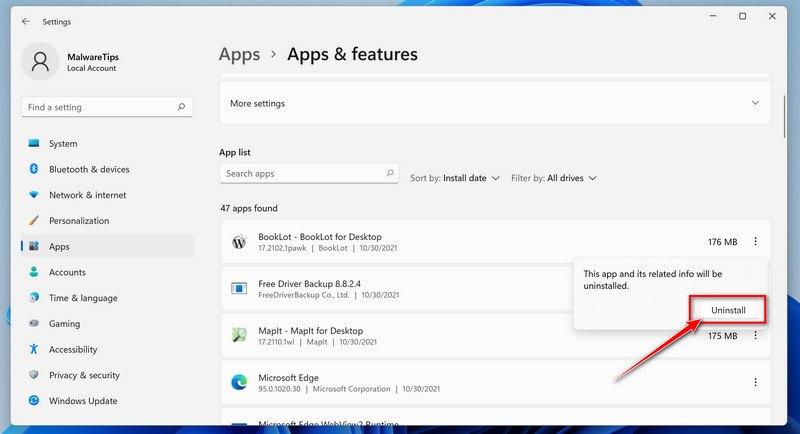
Scroll through the list of installed apps and look for anything suspicious — a program you don’t remember installing, or one with a strange or generic name. Quick tip: click “Sort by” and choose “Install date“. Malware is usually one of the most recently installed programs, so it will appear near the top.
When you find the malicious program, click the three dots next to it and select “Uninstall“.
Didn’t find any suspicious programs? That’s fine — not all infections install visible apps. Just continue with the next step in this guide.
Complete the uninstall
Confirm by clicking Uninstall in the message box, then follow the remaining prompts. Read each prompt carefully — some malicious programs use confusing wording or pre-ticked boxes hoping you’ll click through without looking.
Open the Settings app
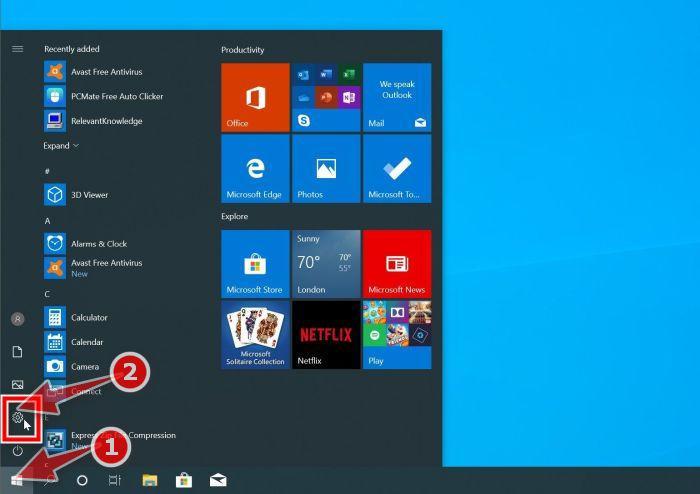
Press Windows + I on your keyboard to open Settings. Alternatively, click the Start button on the taskbar and select “Settings” (the gear icon).
Click on “Apps”
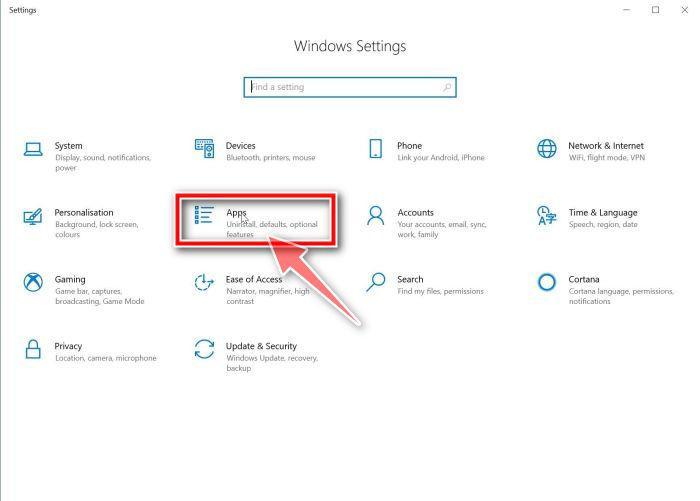
In the “Windows Settings” window, click “Apps“. The “Apps & Features” section should open by default — if it doesn’t, select it from the list on the left.
Find and uninstall the malicious program
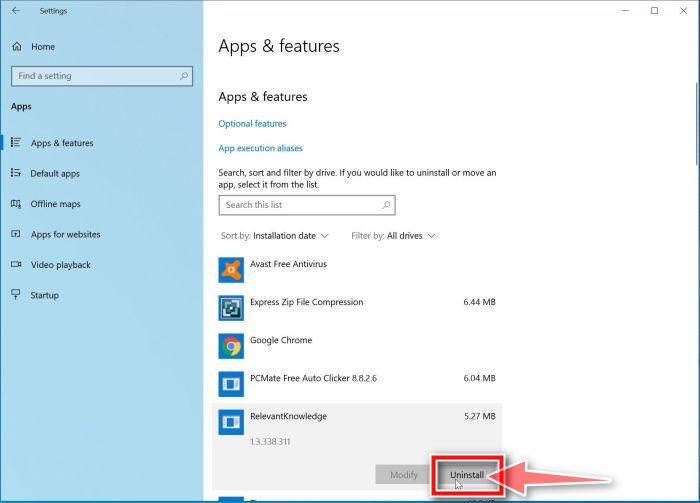
Scroll through the list of installed apps and look for anything suspicious — a program you don’t remember installing, or one with a strange or generic name. Quick tip: click “Sort by” and choose “Install date“. Malware is usually one of the most recently installed programs, so it will appear near the top.
When you find the malicious program, click on it and select “Uninstall“.
Didn’t find any suspicious programs? That’s fine — not all infections install visible apps. Just continue with the next step in this guide.
Complete the uninstall
Confirm by clicking Uninstall in the message box, then follow the remaining prompts. Read each prompt carefully — some malicious programs use confusing wording or pre-ticked boxes hoping you’ll click through without looking.
Open “Programs and Features”
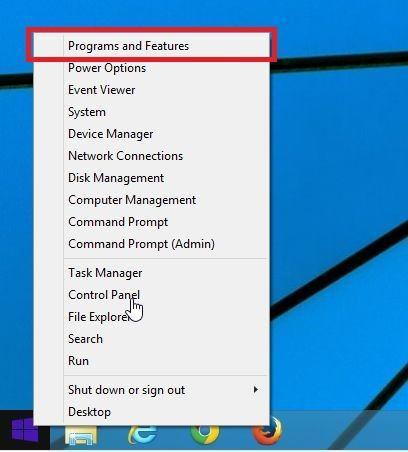
Right-click the Start button in the taskbar, then select “Programs and Features“. This takes you straight to the list of installed programs.
Find and uninstall the malicious program
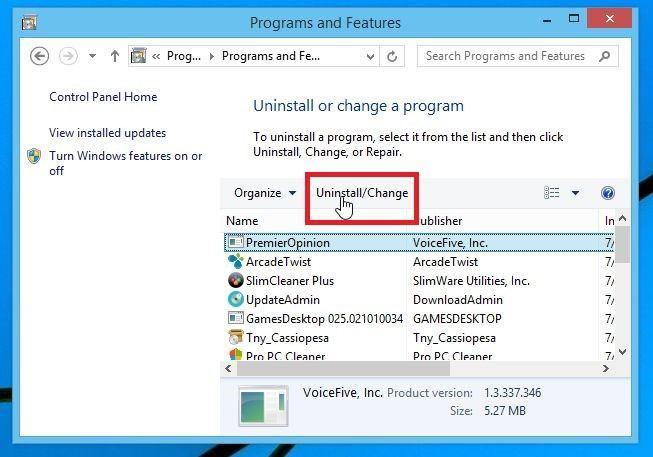
Scroll through the list of installed programs and look for anything suspicious — a program you don’t remember installing, or one with a strange or generic name. Click to highlight it, then click the “Uninstall” button.
Didn’t find any suspicious programs? That’s fine — not all infections install visible apps. Just continue with the next step in this guide.
Complete the uninstall
Confirm by clicking Yes in the message box, then follow the remaining prompts. Read each prompt carefully — some malicious programs use confusing wording or pre-ticked boxes hoping you’ll click through without looking.
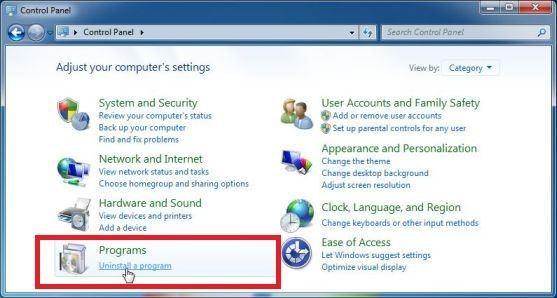
Open the Control Panel
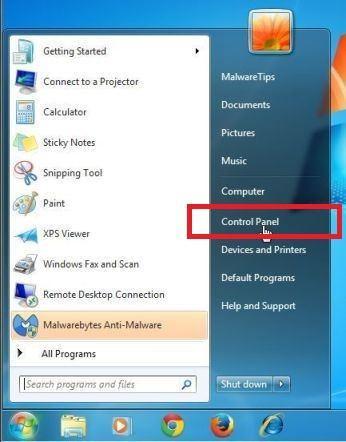
Click the “Start” button, then click “Control Panel“.
Click on “Uninstall a Program”
In the Control Panel, click “Uninstall a Program” under the Programs category.
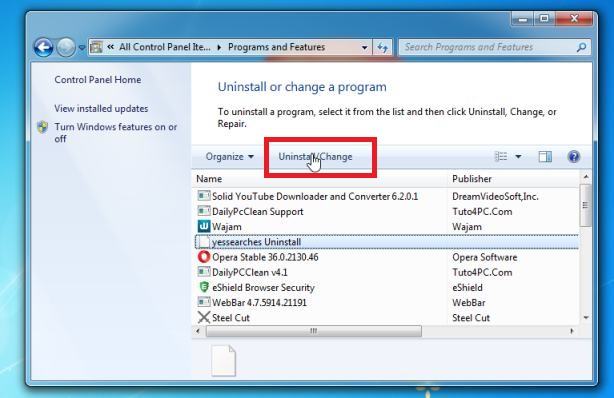
Find and uninstall the malicious program
Scroll through the list of installed programs and look for anything suspicious — a program you don’t remember installing, or one with a strange or generic name. Click to highlight it, then click the “Uninstall” button.
Didn’t find any suspicious programs? That’s fine — not all infections install visible apps. Just continue with the next step in this guide.
Complete the uninstall
Confirm by clicking Yes in the message box, then follow the remaining prompts. Read each prompt carefully — some malicious programs use confusing wording or pre-ticked boxes hoping you’ll click through without looking.
Is a stubborn program refusing to uninstall? Use Revo Uninstaller to force-remove it completely, including leftover files and registry entries.
With the malicious programs removed, you’re ready for the next step in this guide.
STEP 2: Reset browsers back to default settings
In this step, we will remove spam notifications, malicious extensions, and change to default any settings that might have been changed by malware. Please note that this method will remove all extensions, toolbars, and other customizations but will leave your bookmarks and favorites intact. For each browser that you have installed on your computer, please click on the browsers tab below and follow the displayed steps to reset that browser.
ChromeFirefoxMicrosoft EdgeInternet Explorer
Reset Chrome for Windows to default settings
We will now reset your Chrome browser settings to their original defaults. This will reset your startup page, new tab page, search engine, and pinned tabs. It will also disable all extensions and clear temporary data like cookies. Your favorites, history, and saved passwords will not be cleared.
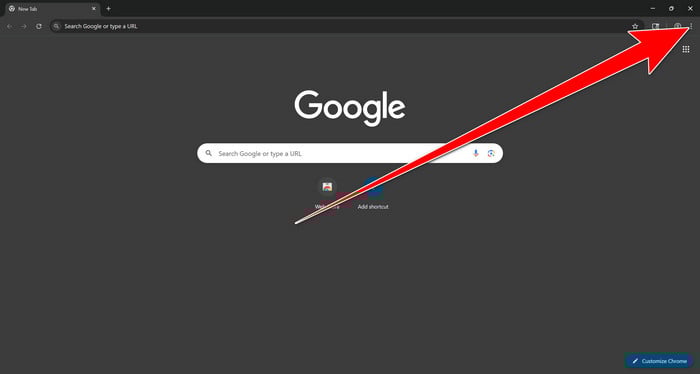
Open the Chrome menu
Open Google Chrome and click the three-dot (⋮) icon in the top-right corner.
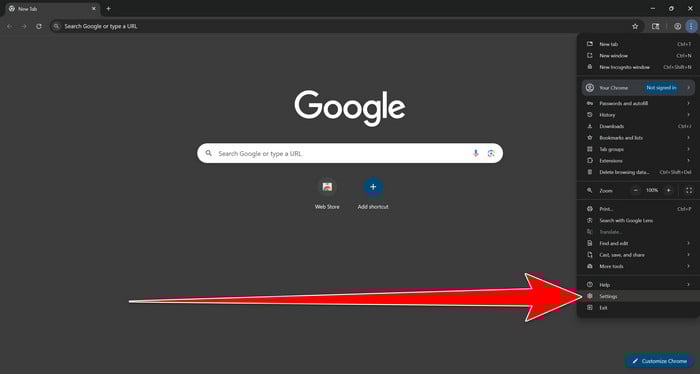
Open Chrome Settings
Select Settings from the Chrome menu.
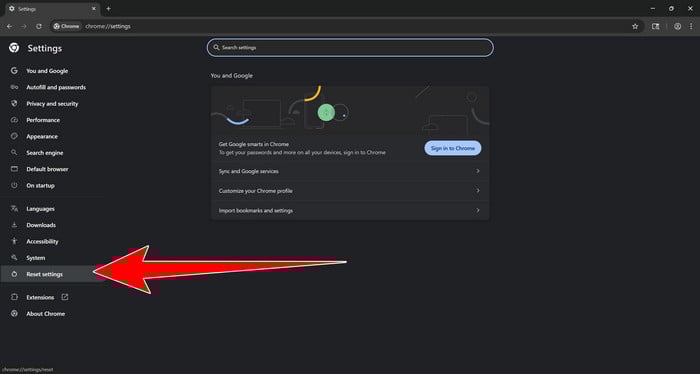
Select “Reset settings”
Look at the menu on the left side of the Settings page. Scroll down and click Reset settings.
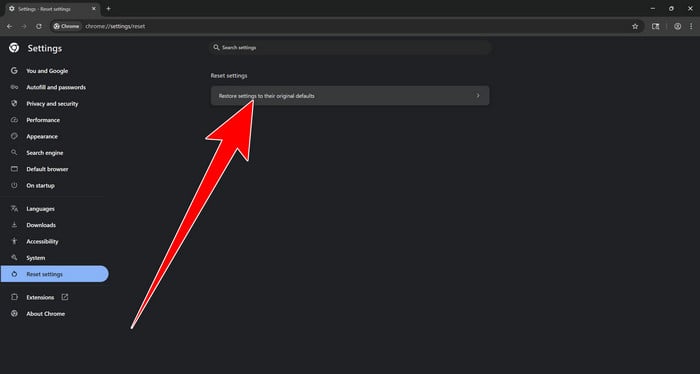
Restore Chrome’s original settings
Click Restore settings to their original defaults.
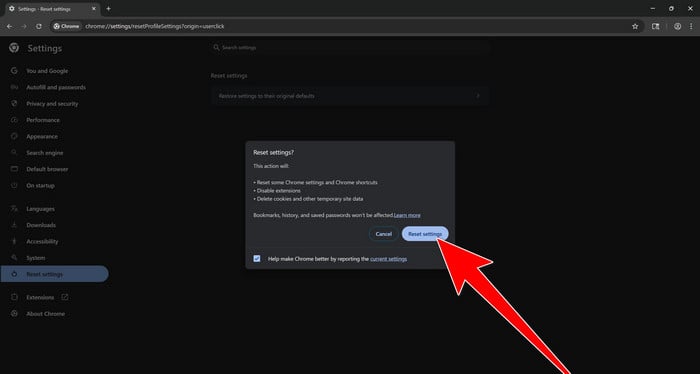
Confirm the Chrome reset
A confirmation window will appear. Click Reset settings.
This will:
Restore the default search engine, homepage, and new tab page
Reset startup pages and pinned tabs
Disable installed extensions
Clear temporary cookies and website data
Don’t worry: Chrome will not delete your bookmarks, browsing history, or saved passwords.
Restart Chrome and perform a test search. If your searches now open normally in Google, you can stop here.
If searches are still redirected through shady domains complete the additional step below.
Remove persistent search hijacker data
Only complete this step if the redirect continues after resetting Chrome.
Some browser hijackers hide inside Chrome’s local search-engine database. A standard Chrome reset may not remove this database, which is why searches can continue to pass through shady sites.
The following procedure creates a backup of the affected database and allows Chrome to build a new, clean version. This is safer and less disruptive than deleting the entire Chrome profile.
First, prevent Chrome Sync from restoring the hijacked settings:
Open a new Chrome tab.
Copy the following address, paste it into Chrome’s address bar, and press Enter:
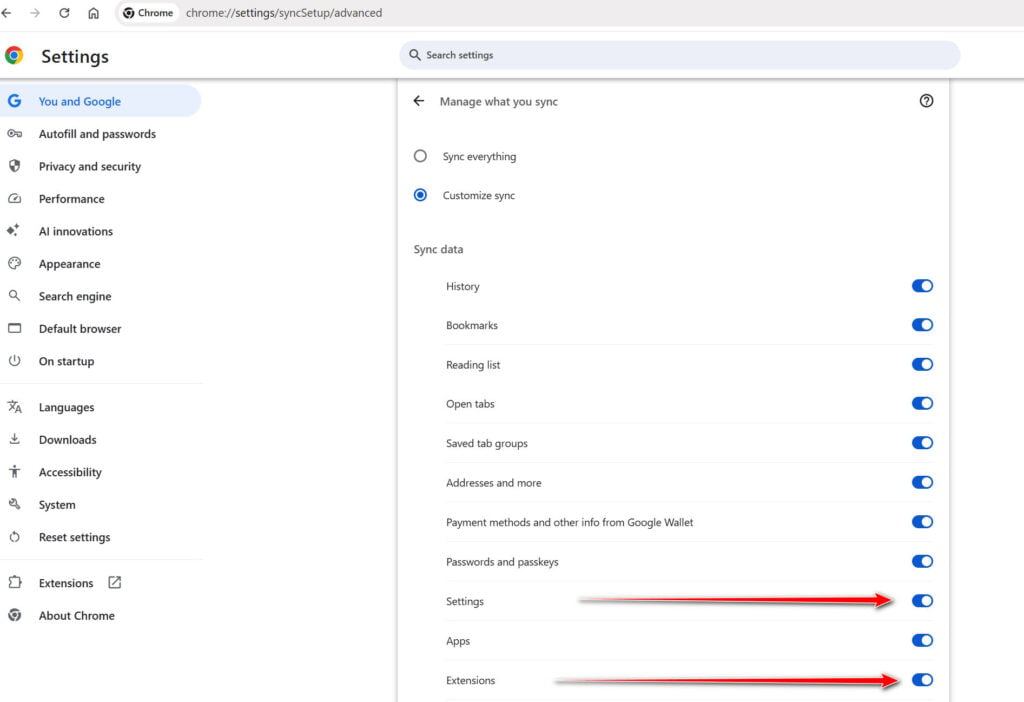
chrome://settings/syncSetup/advanced
Under Manage what you sync, select Customize sync.
Turn off Settings and Extensions.
You can leave Bookmarks and Passwords enabled so your important data remains synchronized.
Note: Some newer Chrome versions may automatically redirect this address to the Google Account settings page. If that happens, locate the list of synchronized Chrome data and turn off Settings and Extensions there.
Now save anything you are working on and close every Chrome window.
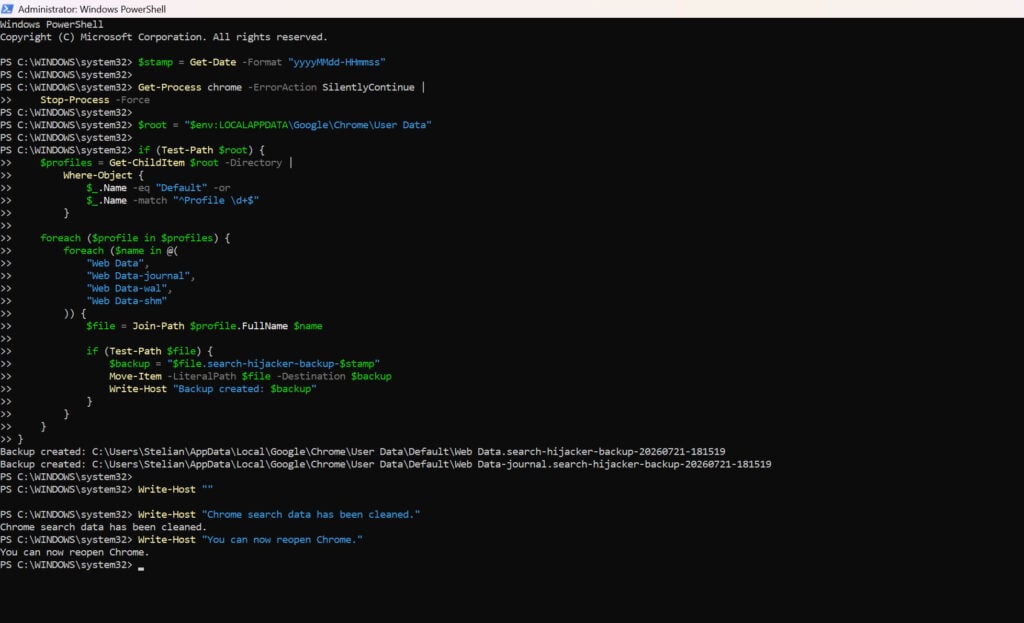
Run the cleanup command:
Press the Windows key on your keyboard.
Type PowerShell.
Open Windows PowerShell. Administrator access is not required.
Copy the entire command shown below.
Right-click inside the PowerShell window to paste the command, then press Enter.
If Windows warns you about pasting multiple lines, select the option to continue.
Write-Host "" Write-Host "Chrome search data has been cleaned." Write-Host "You can now reopen Chrome."
Wait until PowerShell displays the following message:
Chrome search data has been cleaned.
You can now reopen Chrome.
Close PowerShell and reopen Google Chrome. Chrome will automatically create a clean search database for every local profile.
Next, copy the following address, paste it into Chrome’s address bar, and press Enter:
chrome://settings/searchEngines
Make sure Google is selected as the default search engine. Test several searches from the address bar and confirm that they no longer pass through shady search engines.
Your important Chrome data is protected: the PowerShell cleanup does not remove bookmarks, saved passwords, browsing history, cookies, or installed extensions. However, it may reset locally stored Autofill addresses and form suggestions.
The original search database is not deleted. PowerShell renames it and adds search-hijacker-backup to its filename so it can be recovered if necessary.
Keep Settings and Extensions synchronization disabled while testing Chrome. Do not enable every extension at once. Enable only the extensions you recognize, one at a time, and test Chrome after each one.
If the redirect returns after enabling a particular extension, remove that extension immediately.
Reset Firefox for Windows to default settings
We will now reset your Firefox browser settings to their default. The reset feature fixes many issues by restoring Firefox to its factory default state while saving your essential information like bookmarks, passwords, web form auto-fill information, browsing history, and open tabs.
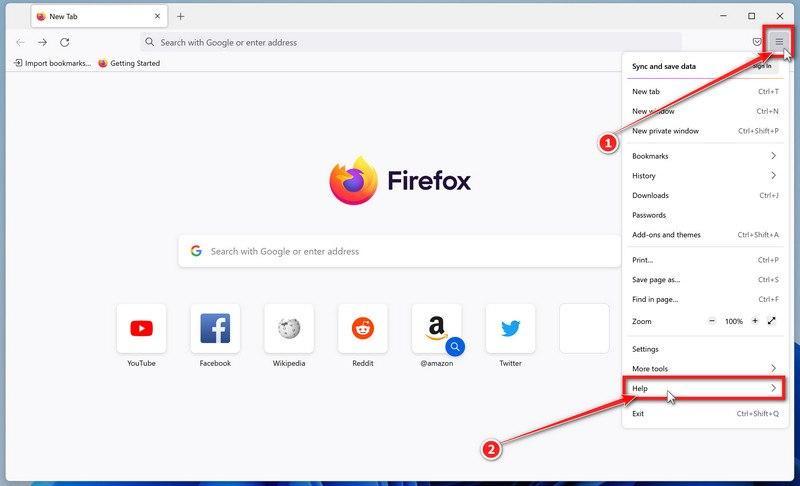
Open the Firefox menu and click “Help”
Click the three horizontal lines in the top-right corner of Firefox to open the main menu, then select “Help“.
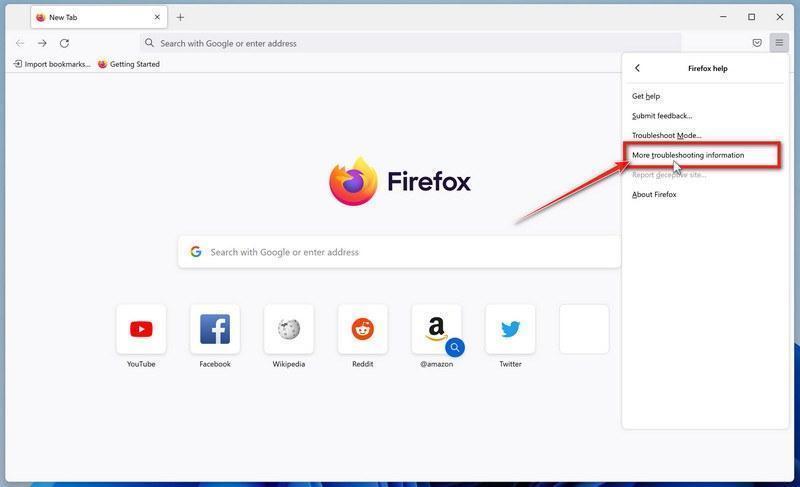
Click “More troubleshooting information”
In the Help menu, click “More troubleshooting information“.
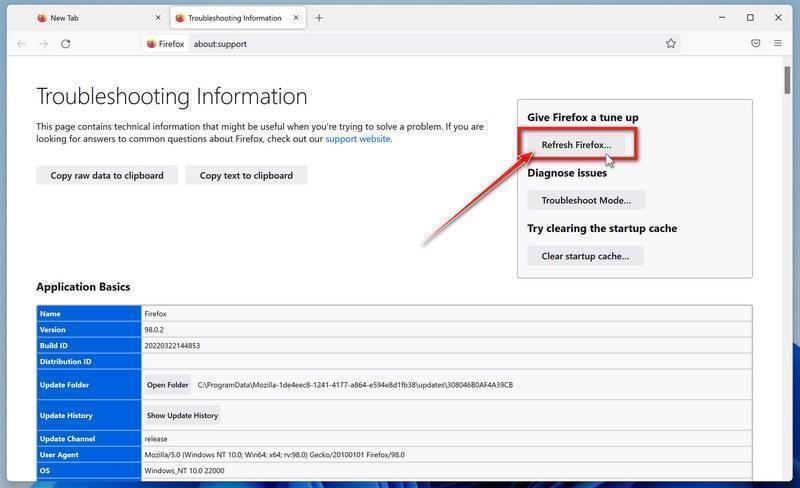
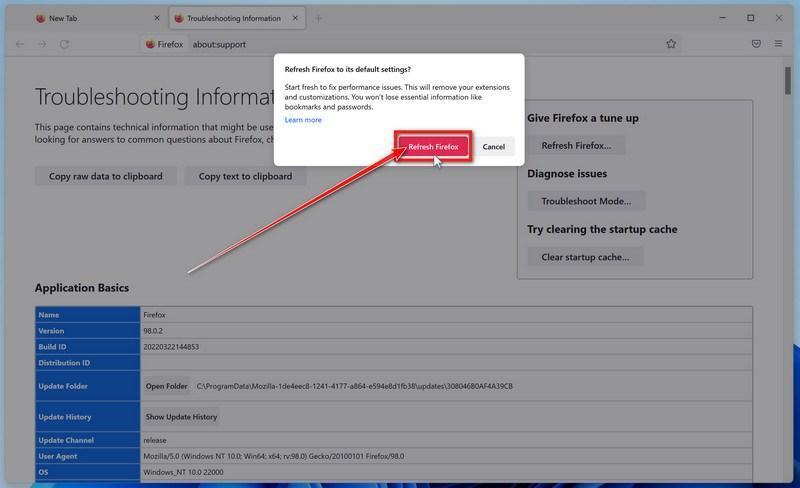
Click “Refresh Firefox”
On the “Troubleshooting Information” page, click the “Refresh Firefox” button in the top-right area of the page.
Confirm the refresh
In the confirmation window, click “Refresh Firefox” again. This removes extensions, themes, and customized settings — the usual hiding places for browser hijackers — while keeping your bookmarks, history, and saved passwords safe.
Click “Finish”
Firefox will close, reset itself to default settings, and reopen with a window listing the information that was restored. Click “Finish” — your Firefox is now clean.
About the “Old Firefox Data” folder: Firefox saves a copy of your old profile on your desktop. If something you need is missing after the reset, you can recover it from this folder. Otherwise, delete the folder — it contains sensitive data like passwords and cookies, and may also still hold the malicious files you just removed.
Reset Microsoft Edge to default settings
We will now reset your Microsoft Edge browser settings to their default. This will reset your startup page, new tab page, search engine, and pinned tabs. It will also disable all extensions and clear temporary data like cookies. Your favorites, history, and saved passwords will not be cleared.
Updated for Microsoft Edge on Windows 10 and Windows 11 — July 2026.
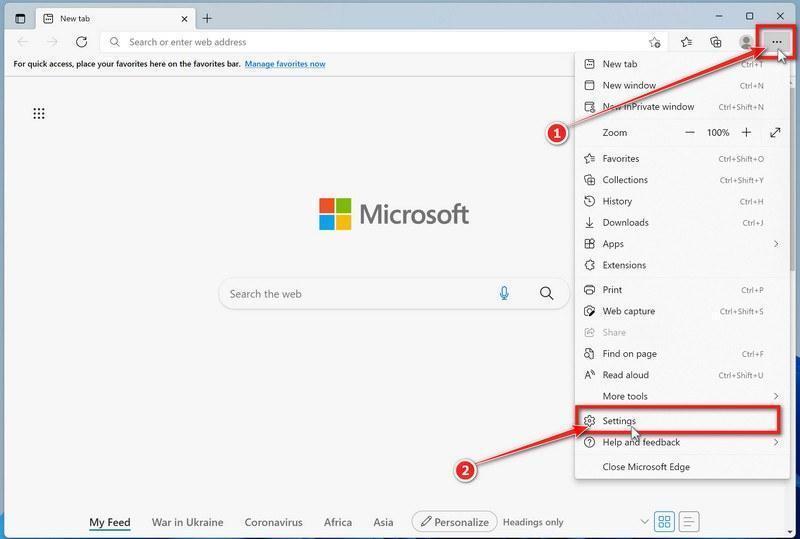
Open the Edge menu and click “Settings”
Open Microsoft Edge. In the top-right corner, click the three-dot (…) icon, then click Settings.
Prevent the unwanted settings from returning through Edge Sync
If you are signed in to Microsoft Edge, a bad setting or extension may be stored in your Microsoft account and return after the reset.
Copy the following address, paste it into the Edge address bar, and press Enter:
edge://settings/profiles/sync
On the Sync page, turn off these two options:
Settings
Extensions
You can leave Favorites and Passwords turned on.
If Edge says that sync is already off, simply continue to the next step.
Important: Edge Sync settings are separate for each profile. If you use more than one Edge profile, switch to each affected profile and repeat this step.
You do not need to sign out of your Microsoft account or delete the Edge profile.
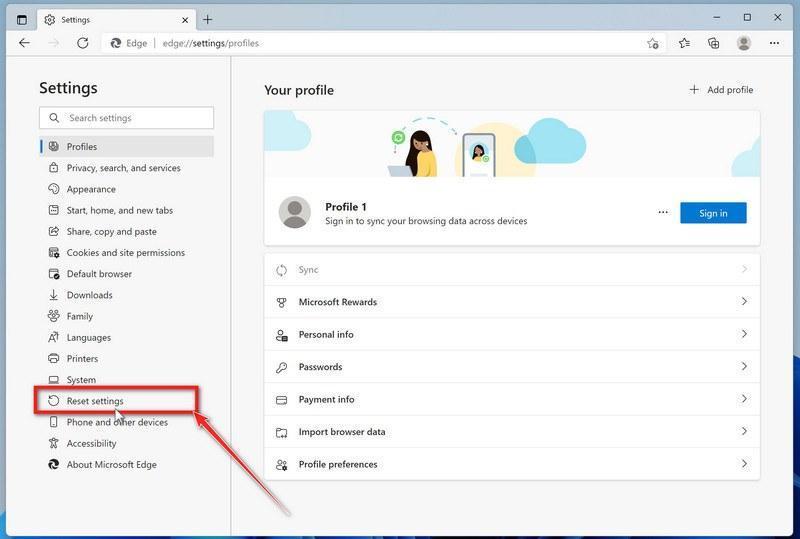
Open “Reset settings”
In the left sidebar, click Reset settings.
You can also open the reset page directly. Copy the following address, paste it into the Edge address bar, and press Enter:
edge://settings/reset
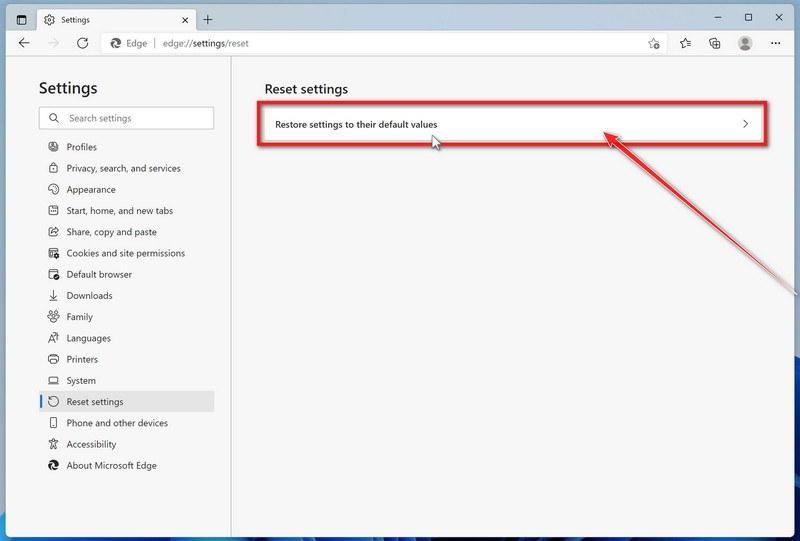
Click “Restore settings to their default values”
Click Restore settings to their default values.
Confirm the reset
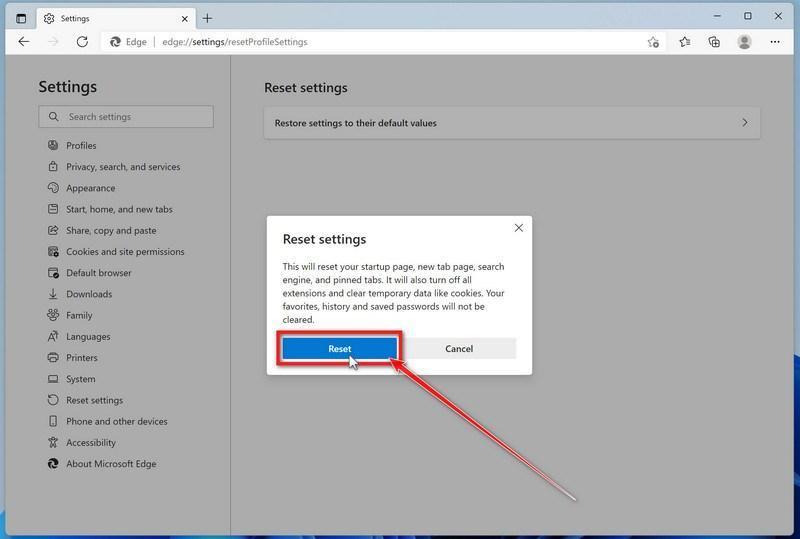
In the confirmation dialog, click Reset.
This resets the startup page, new tab page, search engine, and pinned tabs. It also disables all extensions and clears temporary site data, such as cookies.
Don’t worry: your favorites, browsing history, and saved passwords will not be deleted.
Check your extensions before turning them back on
Copy the following address, paste it into the Edge address bar, and press Enter:
edge://extensions
Remove any extension you do not recognize or no longer use. Pay particular attention to extensions related to search, coupons, shopping, PDF conversion, browser protection, new tabs, or video downloading.
Do not turn all extensions back on at the same time. Enable only the extensions you recognize and trust.
Select a trusted search engine
Copy the following address, paste it into the Edge address bar, and press Enter:
edge://settings/searchEngines
Select Bing, Google, DuckDuckGo, or another search provider you trust and make it the default.
Remove any unknown search engines, especially providers with strange names or addresses that you did not add yourself.
Restart Edge and perform a search from the address bar. If searches are no longer redirected, you can stop here.
If the redirect remains, clean the corrupted search data without deleting the Edge profile
Use this additional step only if Edge continues to redirect searches after the normal reset.
This command cleans the search-engine database from every local Edge profile while keeping your favorites, saved passwords, browsing history, cookies, and profiles.
Before continuing: save anything you are working on because the command will close Microsoft Edge.
Open the Windows Start menu.
Type PowerShell.
Open Windows PowerShell. Administrator access is not required.
Copy the entire command below.
Paste it into PowerShell and press Enter.
$stamp = Get-Date -Format "yyyyMMdd-HHmmss"
$root = Join-Path $env:LOCALAPPDATA "Microsoft\Edge\User Data"

Get-Process -Name msedge -ErrorAction SilentlyContinue |
    Stop-Process -Force -ErrorAction SilentlyContinue

Start-Sleep -Seconds 2

if (-not (Test-Path -LiteralPath $root)) {
    Write-Host "The Microsoft Edge profile folder was not found:"
    Write-Host $root
    return
}

$profiles = Get-ChildItem -LiteralPath $root -Directory |
    Where-Object {
        $_.Name -eq "Default" -or
        $_.Name -match "^Profile \d+$"
    }

$movedFiles = 0

foreach ($profile in $profiles) {
    foreach ($name in @(
        "Web Data",
        "Web Data-journal",
        "Web Data-wal",
        "Web Data-shm"
    )) {
        $file = Join-Path $profile.FullName $name

        if (Test-Path -LiteralPath $file) {
            $backup = "$file.search-reset-backup-$stamp"

            try {
                Move-Item -LiteralPath $file -Destination $backup -ErrorAction Stop
                Write-Host "Cleaned: $($profile.Name)\$name"
                $movedFiles++
            }
            catch {
                Write-Warning "Could not clean: $file"
            }
        }
    }
}

Write-Host ""

if ($movedFiles -gt 0) {
    Write-Host "Microsoft Edge search data has been cleaned." -ForegroundColor Green
    Write-Host "You can now reopen Microsoft Edge."
}
else {
    Write-Host "No Edge search database files were found." -ForegroundColor Yellow
}
The command does not permanently delete the original files. It renames them as backup files, and Edge creates a clean search database when it starts again.
Note: this additional cleanup may also reset saved form-fill suggestions, saved addresses, and manually added search engines. It does not delete favorites, passwords, or browsing history.
Reopen Edge and test the browser
Open Microsoft Edge again, visit edge://settings/searchEngines, and select your preferred search engine.
Perform several searches from the address bar to confirm that the redirect is gone.
Keep synchronization for Settings and Extensions turned off until you are certain that the computer and extensions are clean. If you enable them again, turn them on one at a time and test Edge after each change.
If Edge still redirects your searches
Open edge://policy. If this is your personal computer and Edge displays unknown policies such as ExtensionInstallForcelist or DefaultSearchProvider, the hijacker may be installed outside the browser profile.
In that situation, continue with the next malware-removal steps and run a complete antivirus scan. If the computer belongs to a company or school, contact its IT administrator before changing any policies.
Reset Internet Explorer to default settings
We will now reset your Internet Explorer browser settings to their default. You can reset Internet Explorer settings to return them to the state they were in when Internet Explorer was first installed on your computer.
Go to “Internet Options”.
Open Internet Explorer, click on the gear icon in the upper-right part of your browser, then select “Internet Options“.
Select the “Advanced” tab, then click “Reset”
In the “Internet Options” dialog box, select the “Advanced” tab, then click on the “Reset” button.
Click on “Reset”.
In the “Reset Internet Explorer settings” section, select the “Delete personal settings” checkbox, then click on the “Reset” button.
Click on “Close”.
When Internet Explorer has completed its task, click on the “Close” button in the confirmation dialogue box. Close your browser and then you can open Internet Explorer again.
STEP 3: Use Rkill to terminate suspicious programs
Next, we’ll download and run Rkill to stop any suspicious processes running in the background. This prevents the malware from interfering with the removal tools in the following steps.
RKill is a program that was developed at BleepingComputer.com that attempts to terminate known malware processes so that your normal security software can then run and clean your computer of infections. When RKill runs it will kill malware processes and then removes incorrect executable associations and fixes policies that stop us from using certain tools.
Download Rkill.
You can download RKill to your computer from the below link. When at the download page, click on the Download Now button labeled iExplore.exe. We are downloading a renamed version of Rkill (iExplore.exe) because some malware will not allow processes to run unless they have a certain filename.
RKILL DOWNLOAD LINK (The above link will open a new page from where you can download Rkill)
Run RKill.
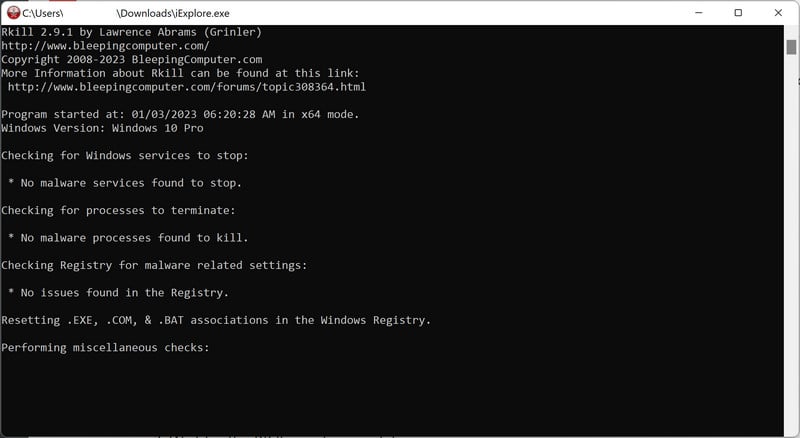
After downloading, double-click the iExplore.exe icon to kill malicious processes. In most cases, downloaded files are saved to the Downloads folder. The program may take some time to search for and end various malware programs.
When it is finished, the black window will close automatically and a log file will open. Do not restart your computer. Proceed to the next step in this guide.
STEP 4: Use Malwarebytes to remove Trojans and unwanted programs
Now we’ll install Malwarebytes and run a full scan to detect and remove infections, adware, and potentially unwanted programs from your computer.
Malwarebytes is one of the most popular and trusted anti-malware tools for Windows — and it’s completely free for removing infections. It catches threats that many antivirus programs miss, including adware, browser hijackers, and trojans. Follow the steps below to scan and clean your PC in just a few minutes.
Download Malwarebytes
Click the button below to download the latest version of Malwarebytes for Windows from the official source. The free version is all you need — it will scan your computer and remove adware, browser hijackers, and other malicious software at no cost.
(The link opens in a new page where your download will start)
Install Malwarebytes
When the download finishes, open your Downloads folder and double-click the MBSetup file. If Windows shows a User Account Control pop-up, click “Yes” to allow the installation.
Follow the On-Screen Prompts to Install Malwarebytes
The setup wizard will walk you through a few quick screens:
Choose where you’re installing the program — “Personal Computer” or “Work Computer” — then click Next.
Malwarebytes will now install on your device. This usually takes under a minute.
When installation is complete, the “Welcome to Malwarebytes” screen will open automatically.
On the final screen, click Open Malwarebytes to launch the program.
Enable “Scan for Rootkits”
Before scanning, turn on rootkit detection so Malwarebytes can find even the most hidden threats. Click the Settings gear icon on the left side of the screen.
In the settings menu, find “Scan for rootkits” and click the toggle so it turns blue.
Done? Click “Dashboard” in the left pane to return to the main screen.
Start the Scan
Click the blue Scan button. Malwarebytes will automatically update its virus database and start checking your computer for malware.
Wait for the Scan to Finish
The scan checks your entire system for browser hijackers and other malicious programs, so it can take several minutes. Feel free to do something else — just check back occasionally to see the progress.
Quarantine the Detected Threats
When the scan is done, you’ll see a list of everything Malwarebytes found — malware, adware, and potentially unwanted programs. Click the “Quarantine” button to remove all of them at once.
Malwarebytes will now remove the malicious files and registry entries and move them safely into quarantine.
Restart Your Computer
Some threats can only be fully removed after a reboot. If Malwarebytes asks you to restart, click Yes. Once you’re logged back in, your PC is clean and you can continue with the next steps in this guide.
STEP 5: Use HitmanPro to remove rootkits and other malware
Next, we’ll run a second-opinion scan with HitmanPro to catch Trojans, rootkits, and other malicious programs that may have survived the previous step.
HitmanPro is a second-opinion scanner — it’s designed to catch what your main antivirus might have missed. Instead of relying on a single detection engine, it checks the behavior of files in the locations where malware usually hides. Anything suspicious gets sent to the cloud, where it’s analyzed by two of the best antivirus engines available: Bitdefender and Kaspersky.
Good news: scanning is completely free, with no limits. You only need a license when it’s time to remove what was found — and even then, you can activate a free one-time 30-day trial to clean your PC at no cost. (A full license is $24.95 per year for 1 PC.)
Download HitmanPro
Click the button below to download HitmanPro. Remember — the scan is free, so you have nothing to lose by checking your PC.
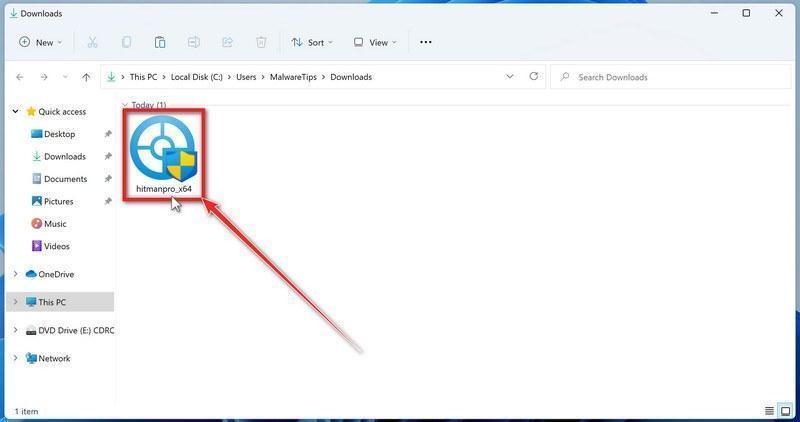
When the download finishes, open your Downloads folder and double-click the file: “hitmanpro.exe” on 32-bit Windows, or “hitmanpro_x64.exe” on 64-bit Windows.
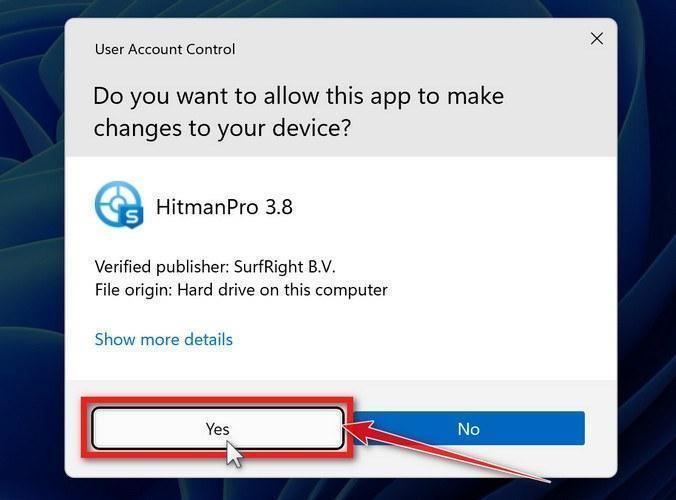
If a User Account Control pop-up asks whether HitmanPro can make changes to your device, click “Yes” to continue.
Follow the On-Screen Prompts
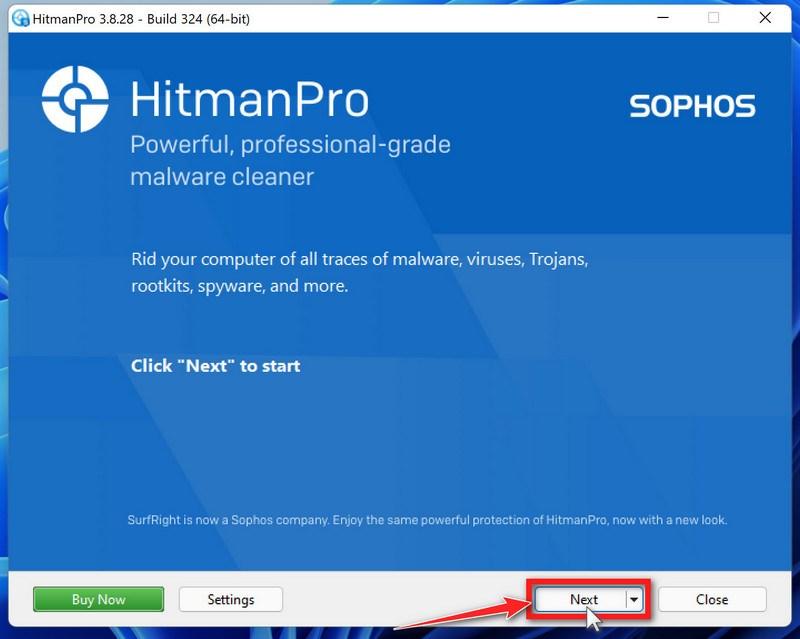
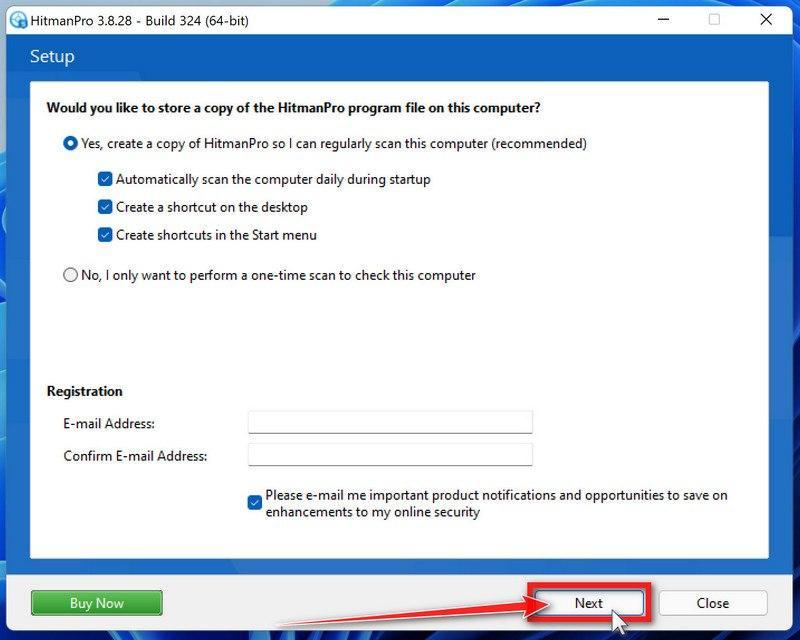
On the HitmanPro start screen, click “Next” to begin the system scan. No lengthy setup required — it goes straight to work.
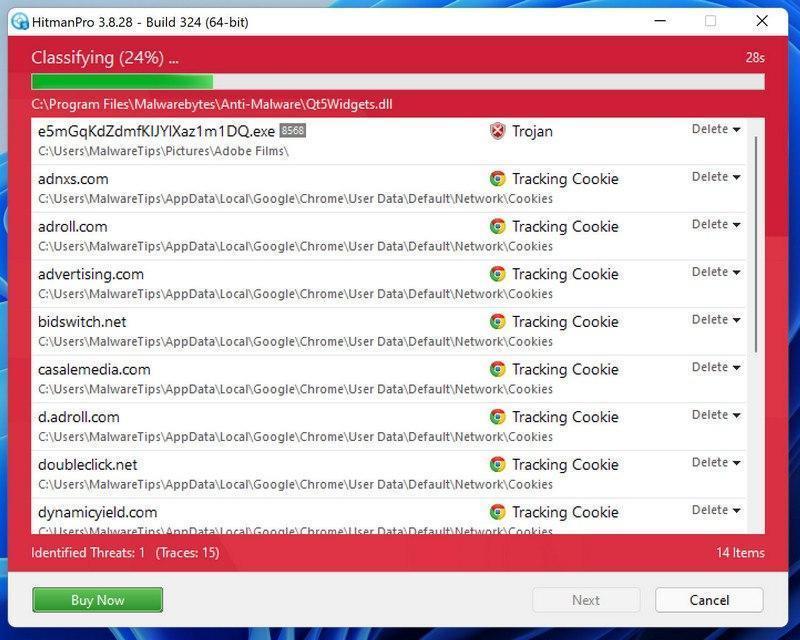
Wait for the Scan to Finish
HitmanPro will now check your computer for malicious programs. This usually takes just a few minutes thanks to its cloud-based scanning.
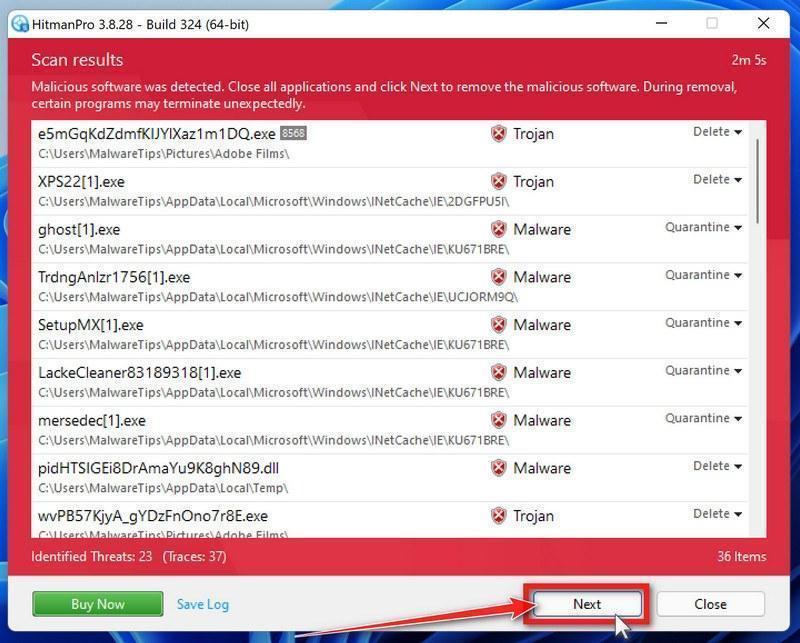
Review the Results and Click “Next”
When the scan is done, HitmanPro will show you everything it found. Click “Next” to remove the detected threats.
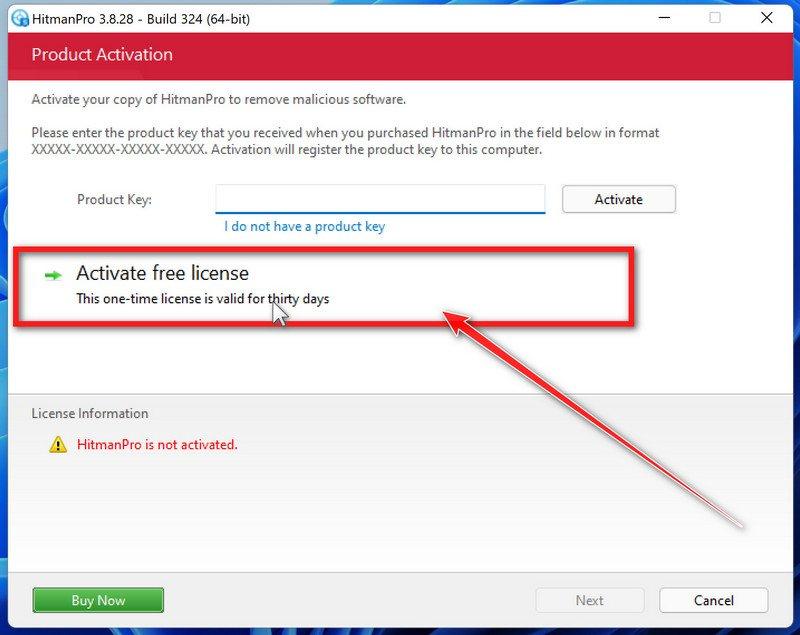
Click “Activate Free License”
To remove the malicious files, click the “Activate free license” button. This starts your free 30-day trial — no payment details needed — and unlocks the full cleanup.
When the removal is complete, HitmanPro will show a summary of everything it cleaned. Click Next, then click Reboot if prompted. If there’s no reboot prompt, just click Close — your PC is clean.
STEP 6: Use AdwCleaner to remove malicious browser policies and adware
We’ll now use AdwCleaner to remove malicious browser policies and unwanted browser extensions — the leftovers that keep hijacking your browser settings even after the malware itself is gone.
AdwCleaner is a free on-demand scanner that specializes in adware, browser hijackers, and unwanted toolbars — the exact threats that mainstream antivirus programs often miss. It also includes tools that repair the damage malware leaves behind, like hijacked browser settings and malicious policies. It’s a quick scan that’s well worth running.
Download AdwCleaner
Click the button below to download AdwCleaner — it’s free, portable, and requires no installation.
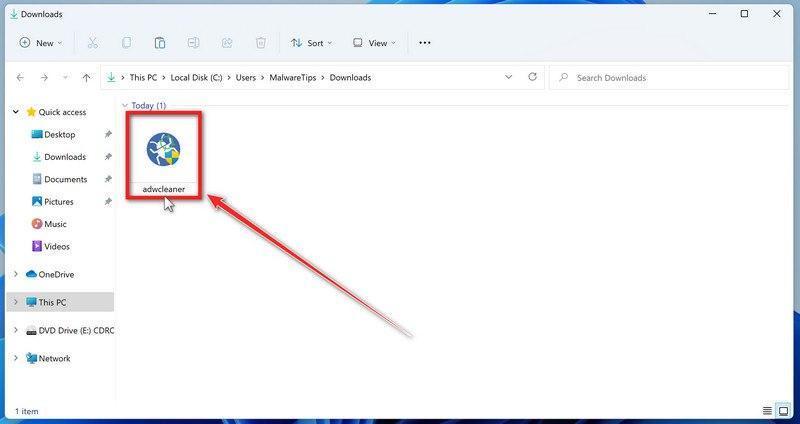
Open your Downloads folder and double-click the file named “adwcleaner_x.x.x.exe“. There’s no installation — the program starts right away.
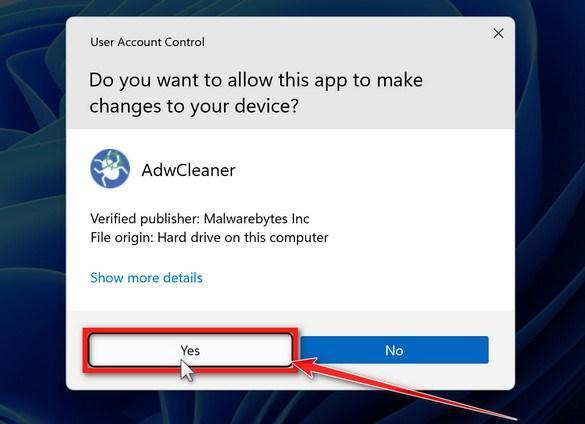
If Windows asks whether you want to allow AdwCleaner to run, click “Yes“. When the license agreement appears, click I agree to continue.
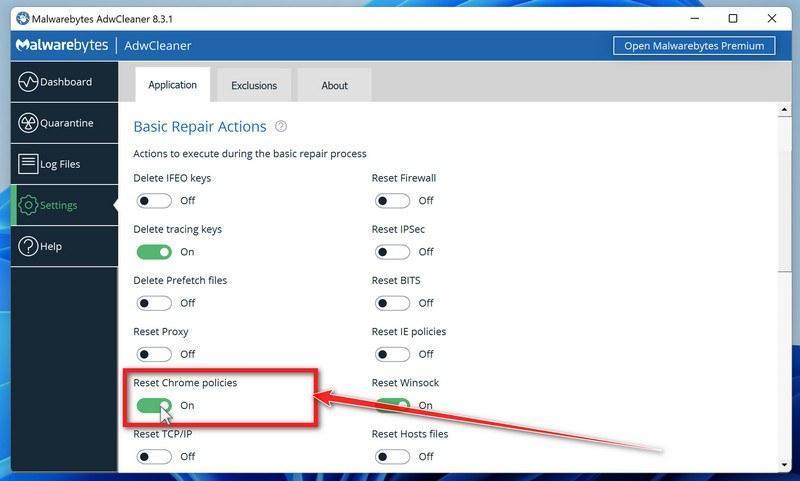
Enable “Reset Chrome policies”
This setting removes malicious browser policies — a trick malware uses to lock your browser settings so you can’t change them back. Click “Settings” on the left side of the window, then turn on “Reset Chrome policies“.
Start the Scan
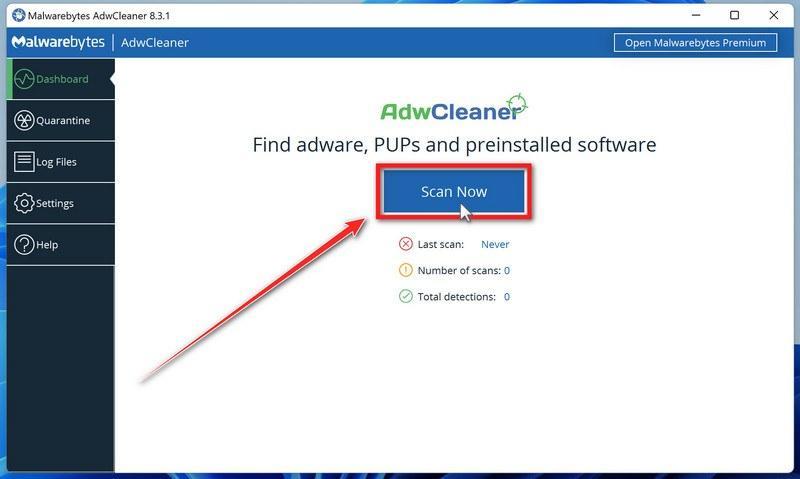
Click “Dashboard” on the left side of the window, then click the “Scan” button.
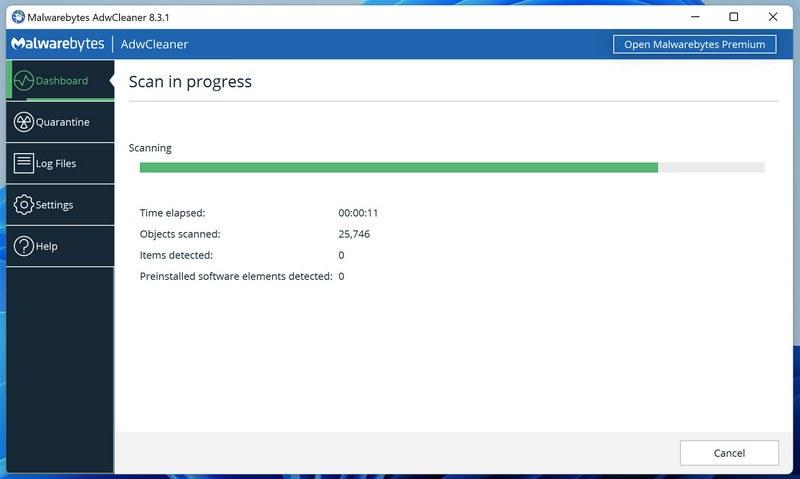
Wait for the Scan to Finish
AdwCleaner will now check your computer for adware and other malware. This usually takes only a few minutes — it’s one of the fastest scanners around.
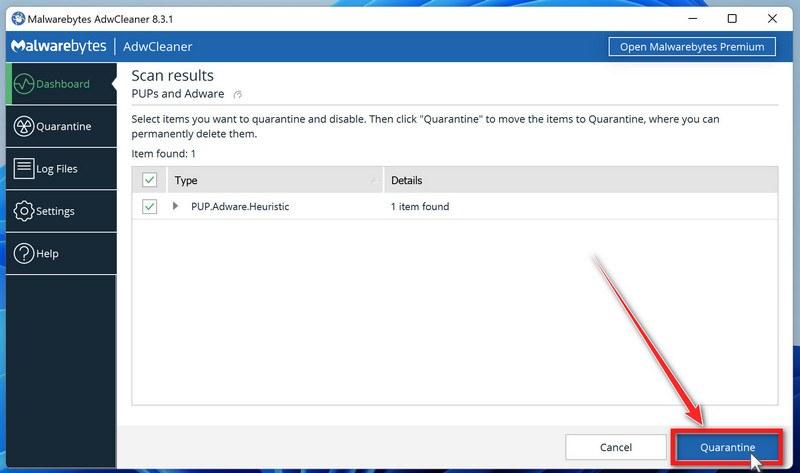
Quarantine the Detected Threats
When the scan finishes, AdwCleaner will list everything it found. Click the “Quarantine” button to remove all the malicious items at once.
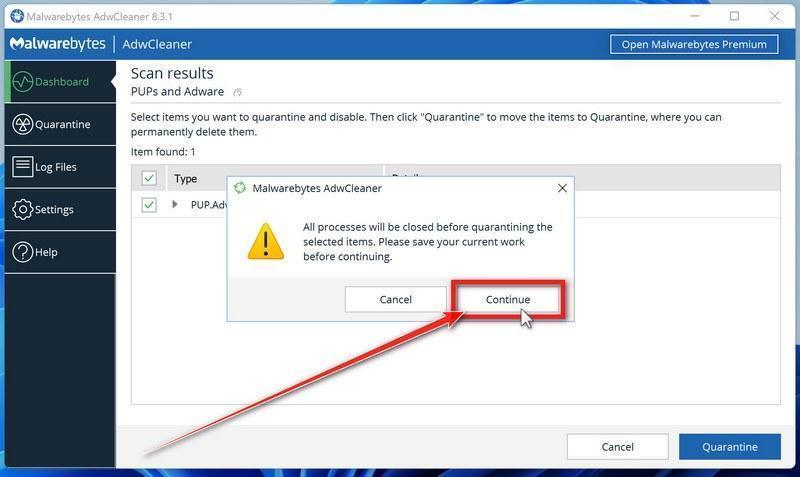
Click “Continue” to Finish the Cleanup
Save any open work first — AdwCleaner needs to close your open programs before it can clean. When you’re ready, click the “Continue” button.
AdwCleaner will now delete all detected malware from your computer. If it asks you to restart your PC, allow it — your computer will be clean when you log back in.
STEP 7: Perform a final check with ESET Online Scanner
Finally, we’ll run ESET Online Scanner as a last sweep to confirm nothing was missed. If this scan comes back clean, your computer is malware-free.
ESET Online Scanner is a free second-opinion scanner that performs a deep, full-system check for viruses, trojans, rootkits, and other malware. We use it as the final step because it’s thorough — if anything slipped past the previous scans, ESET will find it. A clean result here means your computer is malware-free.
Download ESET Online Scanner
Click the button below to download ESET Online Scanner.
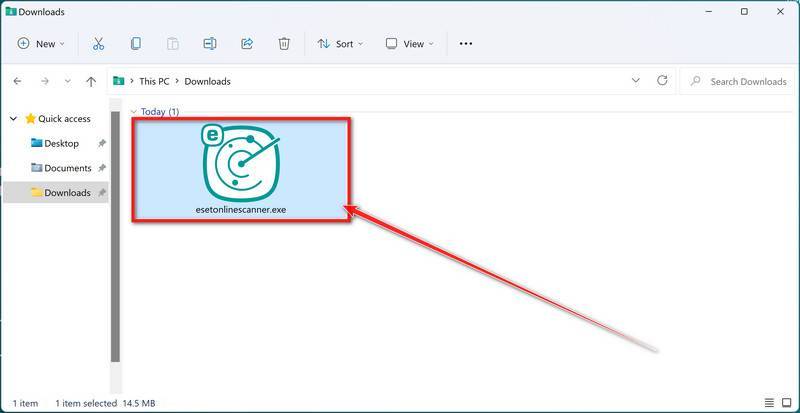
When the download finishes, open your Downloads folder and double-click “esetonlinescanner.exe“.
Install ESET Online Scanner
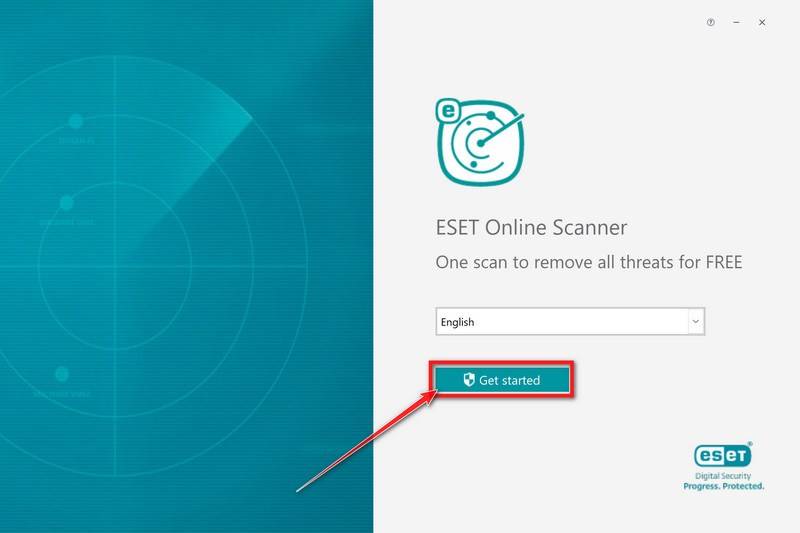
On the start screen, select your language from the drop-down menu and click Get started.
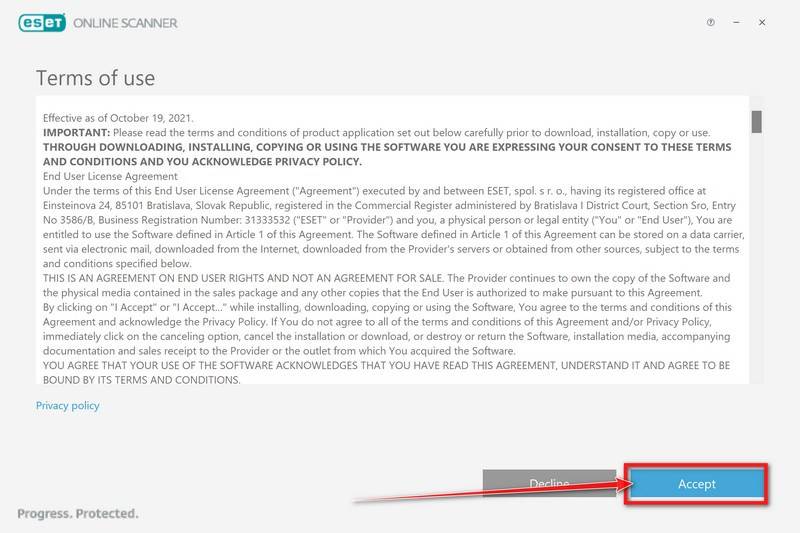
On the Terms of use screen, click Accept.
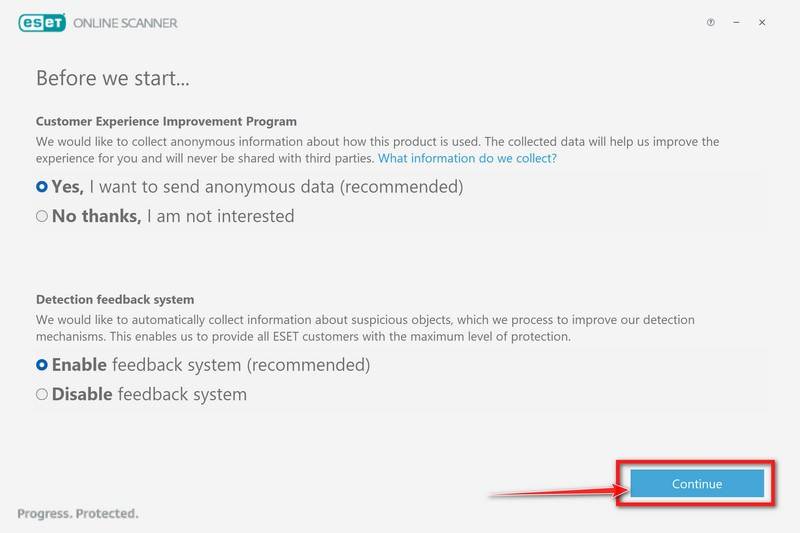
Choose your preferences for the Customer Experience Improvement Program and the Detection feedback system (either choice is fine), then click Continue.
Start a Full Scan
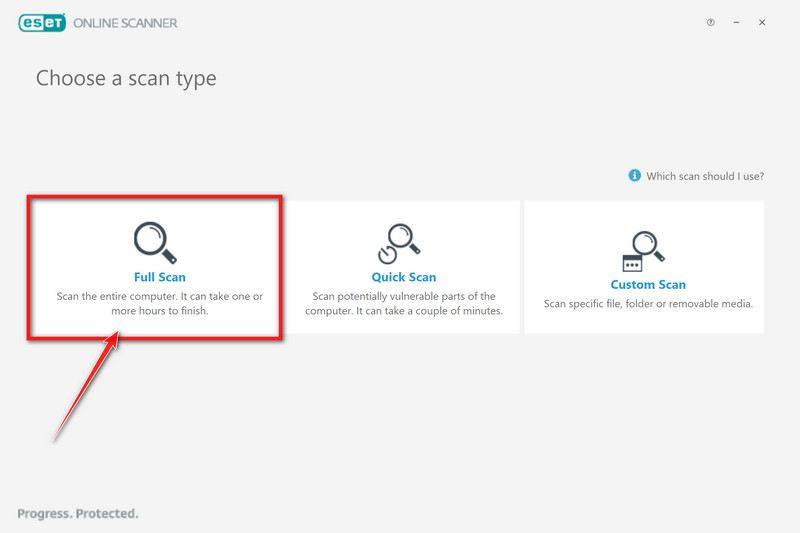
Click Full Scan — this checks your entire computer, not just the common hiding spots.
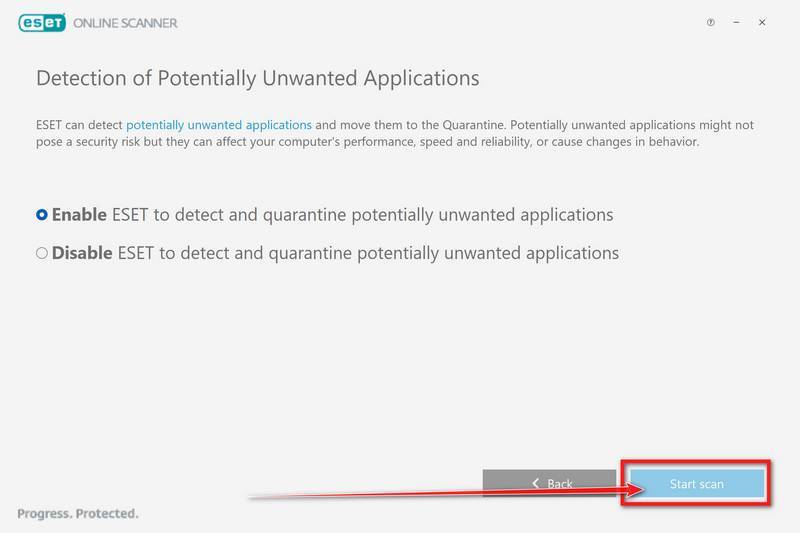
Select Enable for Detection of Potentially Unwanted Applications — this lets ESET catch adware and bundled junk programs, not just viruses. Then click Start scan.
Wait for the Scan to Finish
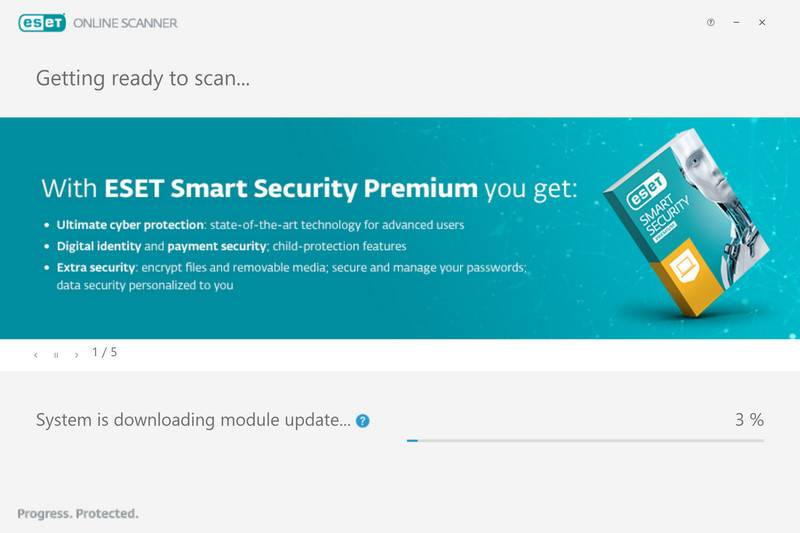
ESET will now check every file on your computer. Because it’s a full scan, this can take a while — often an hour or more, depending on how much data you have. Leave it running in the background and check on it from time to time.
Review the Results
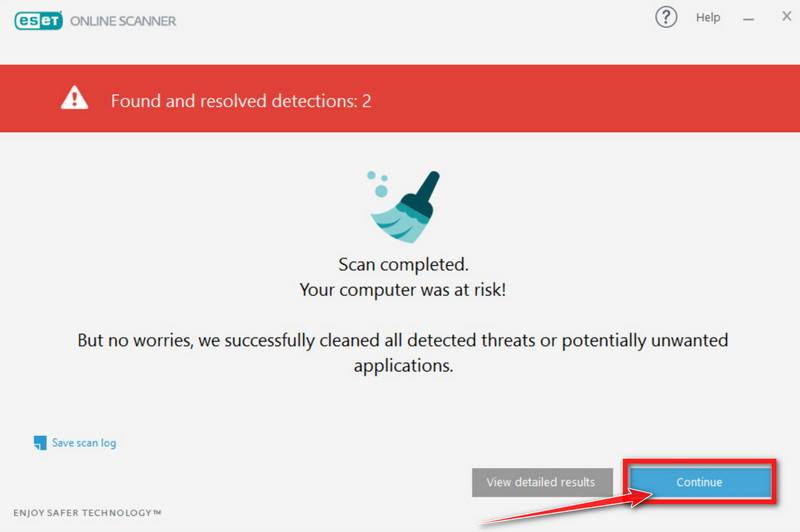
When the scan completes, the Found and resolved detections screen appears. Any threats found were automatically cleaned and quarantined — there’s nothing extra you need to do. Click View detailed results if you want to see exactly what was removed.
If ESET found nothing — congratulations, your computer has passed the final check and is malware-free.
That’s it — your Windows computer is now clean. The Trojans, adware, and any other malware have been removed.
If your current antivirus allowed this malicious program on your computer, you may want to consider purchasing Malwarebytes Premium to protect against these types of threats in the future. If you are still having problems with your computer after completing these instructions, then please follow one of the steps:
Provide customers with a controlled upload portal for photos and videos.
Block executables inside archives at the email and web gateway.
Configure Windows to show full file extensions.
Prevent ordinary support accounts from installing software.
Use application control to block programs launched from Downloads and temporary folders.
Train support staff to verify external evidence links before opening them.
Isolate shared customer-service workstations from critical servers.
Maintain tested offline or immutable backups.
The Bottom Line
The Damaged Package email is not a genuine return request. Its customer complaint and unboxing story lead to a fake video page, Delivery_Unboxing_Verification.zip and a malicious executable.
The delivered malware family is unknown, so do not reduce the incident to one guessed trojan. If the executable ran, isolate the device, secure accounts from a clean system and perform a complete investigation. Treat the workstation as compromised until responders prove otherwise.
10 Rules to Avoid Online Scams
Here are 10 practical safety rules to help you avoid malware, online shopping scams, crypto scams, and other online fraud. Each tip includes a quick “if you already got hit” action.
Stop and verify before you click, log in, download, or pay.
Most scams win by creating urgency. Verify using a trusted method: type the website address yourself, use the official app, or call a known number (not the one in the message).
If you already clicked: close the page, do not enter passwords, and run a malware scan.
Keep your operating system, browser, and apps updated.
Updates patch security holes used by malware and malicious ads. Turn on automatic updates where possible.
If you saw a scary “update now” pop-up: close it and update only through your device settings or the official app store.
Use layered protection: antivirus plus an ad blocker.
Antivirus helps block malware. An ad blocker reduces scam redirects, phishing pages, and malvertising.
If your browser is acting weird: remove unknown extensions, reset the browser, then run a full scan.
Install apps, software, and extensions only from official sources.
Avoid cracked software, “keygens,” and random downloads. During installs, choose Custom/Advanced and decline bundled offers you do not recognize.
If you already installed something suspicious: uninstall it, restart, and scan again.
Treat links and attachments as untrusted by default.
Phishing often impersonates delivery services, banks, and popular brands. If it is unexpected, do not open attachments or log in through the message.
If you entered credentials: change the password immediately and enable 2FA.
Shop safely: research the store, then pay with protection.
Be cautious with brand-new stores, “closing sale” stories, and prices that make no sense. Prefer credit cards or PayPal for dispute options. Avoid wire transfers, gift cards, and crypto payments.
If you already paid: contact your card issuer or PayPal quickly to dispute the transaction.
Crypto rule: never pay a “fee” to withdraw or recover money.
Common patterns include fake profits, then “tax,” “gas,” or “verification” fees. Another is a “recovery agent” who demands upfront crypto.
If you already sent crypto: stop paying, save evidence (wallet addresses, TXIDs, chats), and report the scam to the platform used.
Secure your accounts with unique passwords and 2FA (start with email).
Use a password manager and unique passwords for every account. Enable 2FA using an authenticator app when possible.
If you suspect an account takeover: change passwords, sign out of all devices, and review recent logins and recovery settings.
Back up important files and keep one backup offline.
Backups protect you from ransomware and device failure. Keep at least one backup on an external drive that is not always connected.
If you suspect infection: do not connect backup drives until the system is clean.
If you think you are a victim: stop losses, document evidence, and escalate fast.
Move quickly. Speed matters for disputes, account recovery, and limiting damage.
Stop payments and contact: do not send more money or respond to the scammer.
Call your bank or card issuer: block transactions, replace the card if needed, and start a dispute or chargeback.
Secure your email first: change the email password, enable 2FA, and remove unfamiliar recovery options.
Secure other accounts: change passwords, enable 2FA, and log out of all sessions.
Scan your device: remove suspicious apps or extensions, then run a full malware scan.
Save evidence: screenshots, emails, order pages, tracking pages, wallet addresses, TXIDs, and chat logs.
Report it: to the payment provider, marketplace, social platform, exchange, or wallet service involved.
These rules are intentionally simple. Most online losses happen when decisions are rushed. Slow down, verify independently, and use payment methods and account controls that give you recourse.
Thomas is an expert at uncovering scams and providing in-depth reporting on cyber threats and online fraud. As an editor, he is dedicated to keeping readers informed on the latest developments in cybersecurity and tech.