

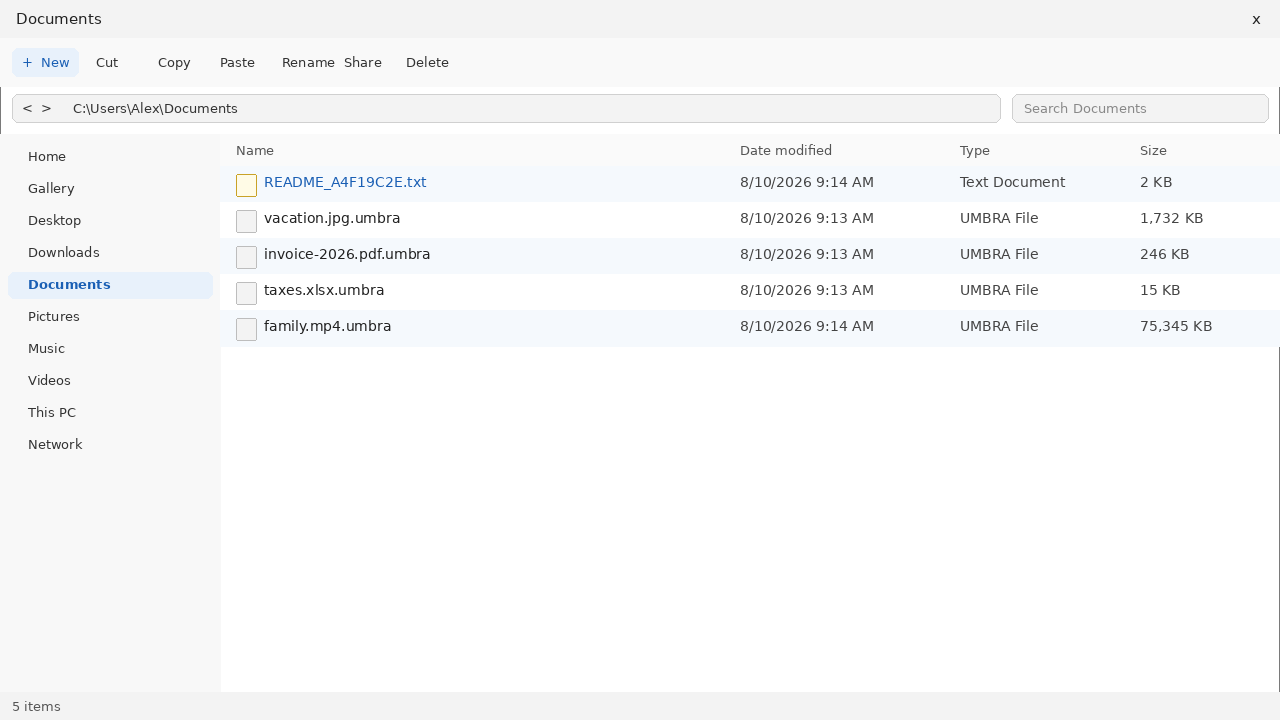
You open Documents the way you did yesterday. The vacation photo should still be vacation.jpg. The invoice should still be invoice-2026.pdf. The tax sheet should still be taxes.xlsx. Instead every familiar name has a second ending tacked on. 1.jpg is now 1.jpg.umbra. A small text file whose name starts with README_ and then a unique victim ID is sitting in the same folder, as if it has always belonged there.
That is the trap, not a glitch. UMBRA ransomware locks the files first. Then it writes .umbra on the end of the old name. Then it drops a note called README_[victim_ID].txt and paints a new wallpaper across the desktop. The note talks like a help desk. It is a storefront. It tells you the only door left is a Tor portal, and it tells you that if you do not walk through that door, they will publish what they claim they stole.
This page is for the moment those names appear. It explains the rename, the README with the victim ID, the wallpaper, the leak threat, and why that hidden portal is not a recovery team. It is not a tour of ransomware in general. It is about this strain, the one that leaves .umbra on the end and a README that carries your ID in the filename.
Overview
The first tell is the rename. UMBRA does not hide the original filename behind a code. It keeps the old name and the old extension, then appends .umbra. 1.jpg becomes 1.jpg.umbra. vacation.jpg becomes vacation.jpg.umbra. invoice-2026.pdf becomes invoice-2026.pdf.umbra. taxes.xlsx becomes taxes.xlsx.umbra. family.mp4 becomes family.mp4.umbra. You can still read what the file used to be. You cannot open it.
Windows may now call the type an UMBRA file and offer you a useless “choose an app” box. An app cannot talk the bytes back into a JPEG. Double-clicking 1.jpg.umbra does not open the photo. Spreadsheet software does not open taxes.xlsx.umbra. A video player does not open family.mp4.umbra. The listing still has one object per file. The shock lands because the names still look like yours. The lock is in the content, not in the label.
The second tell is the note. After the files are locked, the malware drops README_[victim_ID].txt into the same folders. The victim ID is a unique string assigned to that machine. This page will not invent one for you. The one on your disk is the one that matters. The filename is doing a job. README sounds like a help file. The ID makes the flyer feel personal, like a ticket number at a real counter.
The note says your data has been encrypted. It says that if you do not contact them, the data they claim they stole will be published. It tells you to install Tor Browser from torproject.org, open their contact portal inside that browser, and provide a decryption ID. They claim they will reply within 24 hours. The note does not print a ransom $ amount. It does not print an email address. The only checkout it offers is that hidden portal.
The third tell is the wallpaper. The desktop image changes so you cannot miss the flyer even if you never open the text file. Every time you minimize a window, the billboard is there. That is not a new technical step. It is the same storefront painted on the wall after the locksmith left.
That is the whole costume. A locked folder of .umbra names. A README that carries a victim ID. A desktop that now looks like a bill. A leak threat if you stay quiet. A Tor door if you do not. There is no public free decryptor known for this strain. ESET detects the family as Win64/Filecoder.Umbra.A. There is no reason to open that portal. There is no reason to type your ID into a chat they control.
The .umbra name is the first warning
Most lockers pick an extension so you notice the change in seconds. UMBRA uses .umbra. The extra cruelty is how readable the listing stays. You do not have to decode anything. You can still see 1.jpg inside 1.jpg.umbra. You can still see the invoice year. You can still see the word taxes. The familiar words are still in the folder. The files are not familiar anymore.
Do not treat that readable name as a fix. Do not strip .umbra off the end and expect Photos or Excel to open the file. Do not run a bulk “extension fixer” you found in an ad. The name is a label. The lock is in the content. Editing the label can make a later trusted tool have a harder time matching the file to what it was. Leave the locked copies as they are until you have a clean machine and a plan that does not start in a criminal portal.
The same readable names also make a later scam easier. Anyone who sees a pile of .umbra files can pretend they already “have your case.” They can quote vacation.jpg.umbra back to you. They can offer a paid unlock. The extension is branding. The leftover original name is branding. Neither one is a hint that the file can be renamed back to normal.
README_[victim_ID].txt is a sales floor, not a help file
The note is a plain text file with a name that sounds like documentation. README_[victim_ID].txt looks like a utility that came with the lock. It did. It came with the lock the way a fake invoice comes with a fake shop. README wants the first click after the panic. The victim ID wants you to feel already in a case file.
The file tells you all your data has been encrypted. Then it adds the second lock. If you do not contact them, they say your data will be published. That sentence is there for people who already have backups. A backup can replace a photo. A backup cannot unsay a leak they claim they will post. The threat is meant to pull you into the portal even when the folder is not your only copy.
Notice what the note does not give you. It does not give you a $ figure. It does not give you a wallet. It does not give you a support ticket that a real company would honor. It does not give you a refund policy. It does not give you a way to prove the other side will ever send a key. It gives you a Tor door, a decryption ID, a 24 hour promise, and a tone that says this is already decided. That tone is the product.
A ransom note can sound calm and still be a threat. Calm is cheaper than a skull. A short file is easier to read when you are scared. The people who wrote it want you to finish the page and then finish their checkout. Read it as a sales flyer that was dropped after a break-in. Then close it. Keep the file on disk. Do not treat it as a set of steps you should follow.
The wallpaper is the same bill, only louder
After the files are locked, the desktop image changes. The new wallpaper repeats the same pitch so you see it even if you never open README_[victim_ID].txt. It is there when you sit down. It is there when you close a window. It is there when a family member walks past the screen and asks what happened.
This is the hurry-up layer. A text file can be ignored if you are busy trying to open the photo. A desktop cannot. People waste the first hour on the wallpaper. They screenshot it. They search every word on it. They change the image back and hope the files follow. The files do not follow. Put the wallpaper in the same mental box as the note. Keep a copy if you need evidence. Then stop decorating the crime scene and stop talking to the people who painted it.
Changing the wallpaper back is fine for your nerves. It is not a repair. The lock does not live in the picture behind your icons. The lock lives in every .umbra file. If you spend the evening hunting a “wallpaper remover” from a search ad, you are still shopping in the market this attack created.
The leak line is a second lock
UMBRA is sold as double extortion. First they lock the files you can see. Then they claim they already copied data off the machine, and they say that copy will be published if you do not contact them. You cannot audit that claim from the desktop. You cannot see their server. You cannot see a leak site from the note, because the note does not publish one in the clear. You are asked to take their word for it inside a portal they own.
Treat the threat as real enough to take care of accounts, and fake enough that you should not pay to test it. Change passwords from a clean device. Watch bank and email alerts. Tell the people whose files lived on that PC. That is useful work. Opening Tor and typing your decryption ID is not useful work. It is the checkout.
A published-data threat is also a gift to a second shop. Anyone can write “we saw your leak” after they see .umbra in a screenshot. Anyone can invent a deadline. Anyone can sell silence. The original note already started that sale. Do not buy the sequel.
How The Scam Works
The shop is simple once you stop reading it as a rescue. Lock the files. Brand the names. Drop a README that carries an ID. Paint the desktop. Threaten a leak. Point the scared person at Tor. Keep the $ amount off the page so the first conversation can set it later, in private, after you have already stepped inside.
1. The lock keeps the old name so you recognize the loss
UMBRA encrypts the files it wants as leverage, then appends .umbra. That is why 1.jpg is still readable as 1.jpg.umbra. The operators want you to inventory the damage in seconds. They want you to see the vacation photo, the invoice, the tax sheet, and the family video in one glance. A coded filename can confuse you. A readable filename makes you feel the theft.
The types that usually get hit are the ones people miss first. Pictures. Documents. Spreadsheets. Videos. Archives. Anything that looks like work or memory. System files may still boot. The browser may still open. That is not mercy. A machine that still turns on is a machine that can still display a wallpaper and still open a Tor Browser download page.
If only one folder looks wrong, do not assume the rest of the disk is safe. Ransomware walks trees. It hits Documents, Desktop, Pictures, Downloads, and any drive letter it can reach, including a USB stick you forgot was plugged in. Unplug extra disks. Do not plug in the backup drive “just to check.” Checking is how the backup gets the same .umbra ending.
2. The README turns a break-in into a ticket number
The ransom note is a simple text file named README_[victim_ID].txt. It is meant to be the first thing you double-click when the folder already looks wrong. The name sounds like a key. The ID sounds like a case. The file is a script for what they want you to do next.
It tells you the data is encrypted. It tells you the way back is contact. It tells you the way to contact them is Tor Browser from torproject.org, then their portal, then your decryption ID. They say they will reply within 24 hours. That order matters. Install their preferred browser. Open their preferred door. Hand them the ID that already sits in the filename. Then wait in a room they built.
The victim ID is not a gift. It is a handle. It lets them keep your chat separate from the next victim. It lets a later fake helper say “send me your README” and look prepared. Copy the filename for your own records if you need to describe the incident. Do not paste that ID into a stranger’s form. Do not read the ID out on a phone call that started with “we can decrypt .umbra files.”
3. The only listed door is a Tor portal
Plenty of lockers print a Gmail address or a Telegram handle. This note does not. The contact path it advertises is a portal you can reach only through Tor. That is a choice. A hidden site does not leave a normal mailbox trail. It does not give you a company you can sue. It does not give a bank a chargeback form. It gives the operators a private counter where they can name a $ figure after they see how scared you are.
Tor Browser itself is a real project. You can get it from torproject.org. That sentence is not an invitation to finish their checkout. Installing Tor because a ransom note told you to is how a flyer becomes a live conversation. If you already use Tor for other reasons, that is your business. Do not use it today to open the address printed in README_[victim_ID].txt.
This page will not reprint their hidden address. You do not need it. Anyone who later messages you with a “faster portal” or a “new contact site” is still selling the same aisle. The note already told you where they want you. Stay out of that room.
4. The 24 hour reply is a sales timer
The note claims that if you provide the decryption ID, they will reply within 24 hours. That line is doing two jobs. It sounds like a service level. It also starts a clock in your head. Twenty-four hours is long enough to feel official and short enough to stop you from sleeping, asking a friend, or reading a page like this one twice.
There is no independent clock. There is no ticket you can escalate. If they reply in two hours, that is still the same shop. If they reply in two days, that is still the same shop. If they never reply, you have already told them you are the kind of victim who follows the flyer. The promise is not a contract. It is a way to keep you sitting at the portal.
People who enter that chat often get a price only after they have already described their files, their company, or their backups. That is why the note itself prints no ransom $ amount. The first page is the hook. The number comes later, when they think they know what you will pay.
5. The note warns you not to touch the files or use anyone else
Part of the README will warn you not to delete the locked files, not to modify them, and not to use third-party decryptors. Part of that warning is self-serving. The authors want you talking to them, not to a relative, an insurer, or a real technician. They want a monopoly on the next click.
Part of it is still a useful caution in the wrong mouth. Mystery “one-click decrypt” apps from ads can damage files. Bulk rename tools can scramble names that a later trusted project might have used. Random recovery software can write over free space you still needed. The safe reading is narrower than the note wants. Do not take technical advice from the attacker. Do not run a paid unlocker from a search ad. Do not delete the .umbra copies “to start clean.”
Keep the locked files. Keep the README. Keep a screenshot of the wallpaper. Those are evidence and, if a trusted decryptor ever appears, they are the raw material that tool would need. Destroying them because the note scared you is still doing the note’s work.
6. A second shop offers the same miracle
After a ransomware incident, search results and inbox ads fill up with companies that say they can decrypt UMBRA or “all .umbra files.” Some of those shops are ordinary overpriced consultants. Plenty are a second scam. They will quote the README pattern back to you. They will mention the victim ID so they sound close to the case. They will ask for a sample file, a remote-access session, or a deposit.
The second scam has a friendly website and a case manager. It may even open one junk file, because anyone who is in contact with the original criminals can borrow the same demo. Then the price rises, the chat dies, or the remote tool installs more malware. A scanner name in their sales copy does not make them the company that wrote the scanner. A logo in a banner does not make them a rescue desk.
A real public decryptor, when one exists, shows up on an official project page that already existed before your incident. It does not need a deposit in cryptocurrency. It does not need the Tor portal in the note. It does not need you to “hold a slot” with a $ figure they invent on the call. If the pitch is “we can decrypt, pay us first,” you are still in the market the ransomware created.
7. Payment closes nothing
Paying is not a guarantee. That sentence is not a slogan. It is the recorded experience of victims across ransomware families. The people who send the note can take the money and disappear. They can send a tool that only unlocks a few files. They can come back later and lock the same machine again. A portal that only exists on Tor makes that outcome easier, not harder. You cannot leave a review on a hidden checkout.
Even when a key arrives in some other campaign, it can fail on some file types, stop halfway, or demand a second payment. The same access that delivered UMBRA the first time can still be open. A payment teaches the operators that this victim pays. It does not close the hole that let them in. It does not give you a contract you can enforce. It does not make a leak threat go away. People who pay sometimes get a second bill for “deletion.”
If someone later tells you that 100% of paying victims got everything back, ask for a public source that is not the person selling the key. You will not get one that you should trust. There is no public free decryptor known for this family. Until a trusted project publishes one, treat any site that says “we already have the UMBRA key” as a second sales pitch.
8. A detection name is not a recovery button
Security software can name the locker. ESET’s public detection for this family is Win64/Filecoder.Umbra.A. A name like that is useful. It tells you the file you are looking at is a filecoder, not a broken JPEG. It tells a technician which family to look up. It does not unlock 1.jpg.umbra.
Do not chase a pile of extra product names from random scanners. This page will not invent them. One clear detection is enough to stop arguing with the “choose an app” box. Remove the active malware from a clean environment so it cannot encrypt the next folder. Then deal with the locked copies as locked copies. Those are two jobs. Mixing them is how people install a “repair suite” that is just more malware.
A clean scan also does not mean the files came back. People feel better when the threat name disappears from a scanner window. The .umbra names will still be there. The README will still be there. That is expected. The locker already finished the encryption pass. Cleaning the leftover program is hygiene. It is not resurrection.
What To Do If Your Files End in .umbra
Do not open the Tor portal printed in the note. Do not install Tor Browser today because README_[victim_ID].txt told you to. Do not type a decryption ID into that site. Do not send a “test file” through that chat. Do not pay a $ figure they name after you arrive. If you already opened the portal before you found this page, stop there. Do not send more files. Do not pay a deposit to “hold the price.”
- STEP 1: Use Rkill to terminate suspicious programs.
- STEP 2: Use Malwarebytes to remove Ransomware and Unwanted Programs
- STEP 3: Use HitmanPro to remove Trojans and other Malware
- STEP 4: Use AdwCleaner to remove Malicious Browser Extensions and Adware
- STEP 5: Perform a final check with ESET Online Scanner
- STEP 6: Restore the files encrypted by ransomware
STEP 1: Use Rkill to terminate suspicious programs.
In this first step, we will download and run Rkill to terminate suspicious programs that may be running on your computer.
RKill is a program that was developed at BleepingComputer.com that attempts to terminate known malware processes so that your normal security software can then run and clean your computer of infections. When RKill runs it will kill malware processes and then removes incorrect executable associations and fixes policies that stop us from using certain tools.
-
Download Rkill.
You can download RKill to your computer from the below link. When at the download page, click on the Download Now button labeled iExplore.exe. We are downloading a renamed version of Rkill (iExplore.exe) because some malware will not allow processes to run unless they have a certain filename.
Download RKillOpens the BleepingComputer download page in a new tab. RKillStops malware processes so other tools can run
 -
Run RKill.
After downloading, double-click the iExplore.exe icon to kill malicious processes. In most cases, downloaded files are saved to the Downloads folder.
The program may take some time to search for and end various malware programs.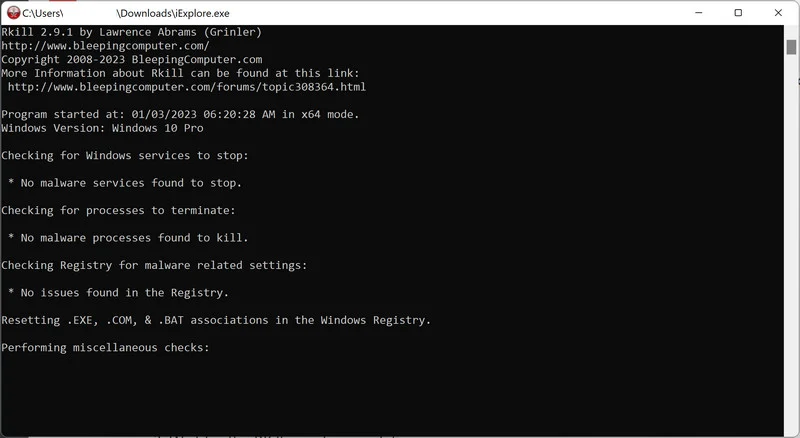
When it is finished, the black window will close automatically and a log file will open. Do not restart your computer. Proceed to the next step in this guide.
STEP 2: Use Malwarebytes to remove Ransomware and Unwanted Programs
In this second step, we will install Malwarebytes to scan and remove any infections, adware, or potentially unwanted programs that may be present on your computer.
Malwarebytes is one of the most popular and trusted anti-malware tools for Windows — and it’s completely free for removing infections. It catches threats that many antivirus programs miss, including adware, browser hijackers, and trojans. Follow the steps below to scan and clean your PC in just a few minutes.
Download Malwarebytes
Click the button below to download the latest version of Malwarebytes for Windows from the official source. The free version is all you need — it will scan your computer and remove adware, browser hijackers, and other malicious software at no cost.
Download MalwarebytesOfficial installer for Windows 11 and 10. Your download starts right away.Want real-time protection? See Malwarebytes Premium Malwarebytes Free for WindowsScans and removes malware at no cost
-
Install Malwarebytes
When the download finishes, open your Downloads folder and double-click the MBSetup file. If Windows shows a User Account Control pop-up, click “Yes” to allow the installation.

Follow the On-Screen Prompts to Install Malwarebytes
The setup wizard will walk you through a few quick screens:
-
Choose where you’re installing the program — “Personal Computer” or “Work Computer” — then click Next.

-
Malwarebytes will now install on your device. This usually takes under a minute.

-
When installation is complete, the “Welcome to Malwarebytes” screen will open automatically.

-
On the final screen, click Open Malwarebytes to launch the program.

-
Enable “Scan for Rootkits”
Before scanning, turn on rootkit detection so Malwarebytes can find even the most hidden threats. Click the Settings gear icon on the left side of the screen.

In the settings menu, find “Scan for rootkits” and click the toggle so it turns blue.

Done? Click “Dashboard” in the left pane to return to the main screen.
Start the Scan
Click the blue Scan button. Malwarebytes will automatically update its virus database and start checking your computer for malware.

-
Wait for the Scan to Finish
The scan checks your entire system for browser hijackers and other malicious programs, so it can take 5 to 20 minutes depending on your computer. Feel free to do something else — just check back occasionally to see the progress.

-
Quarantine the Detected Threats
When the scan is done, you’ll see a list of everything Malwarebytes found — malware, adware, and potentially unwanted programs. Click the “Quarantine” button to remove all of them at once.

Malwarebytes will now remove the malicious files and registry entries and move them safely into quarantine.

-
Restart Your Computer
Some threats can only be fully removed after a reboot. If Malwarebytes asks you to restart, click Yes. Once you’re logged back in, Malwarebytes has finished removing the threats it found.

STEP 3: Use HitmanPro to remove Rootkits and other Malware
In this third step, while the computer is in normal back, we will download and run a scan with HitmanPro to remove Trojans, rootkits, and other malicious programs.
HitmanPro is a second-opinion scanner — it’s designed to catch what your main antivirus might have missed. Instead of relying on a single detection engine, it checks the behavior of files in the locations where malware usually hides. Anything suspicious gets sent to the cloud, where it’s analyzed by two of the best antivirus engines available: Bitdefender and Kaspersky.
Good news: scanning is completely free, with no limits. You only need a license when it’s time to remove what was found — and even then, you can activate a free one-time 30-day trial to clean your PC at no cost. (A full license is $24.95 per year for 1 PC.)
-
Download HitmanPro
Click the button below to download HitmanPro. Remember — the scan is free, so you have nothing to lose by checking your PC.
Download HitmanProFree scan. Removing threats needs the free 30-day trial. Opens the official HitmanPro page in a new tab. HitmanProSecond-opinion malware scanner from Sophos
 -
Install HitmanPro
When the download finishes, open your Downloads folder and double-click the file: “hitmanpro.exe” on 32-bit Windows, or “hitmanpro_x64.exe” on 64-bit Windows.
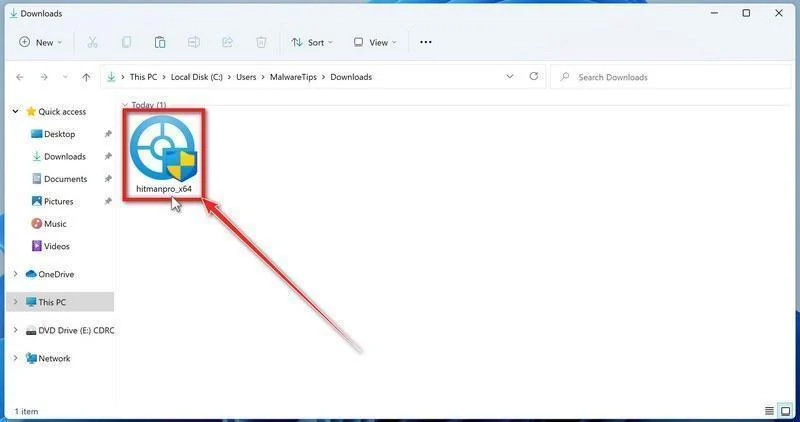
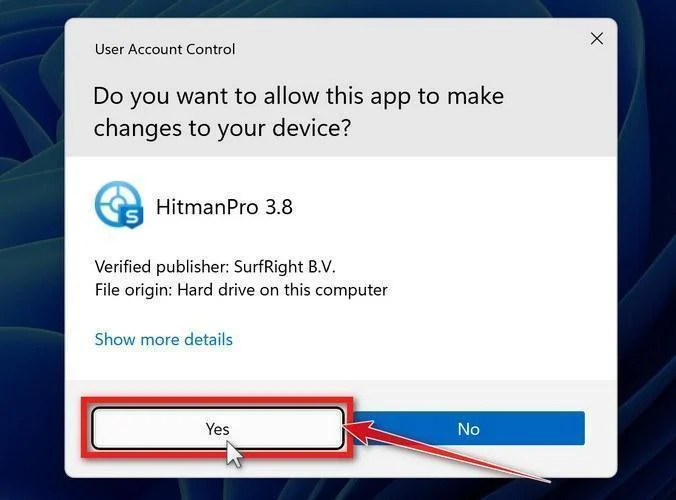
If a User Account Control pop-up asks whether HitmanPro can make changes to your device, click “Yes” to continue.
-
Follow the On-Screen Prompts
On the HitmanPro start screen, click “Next” to begin the system scan. No lengthy setup required — it goes straight to work.
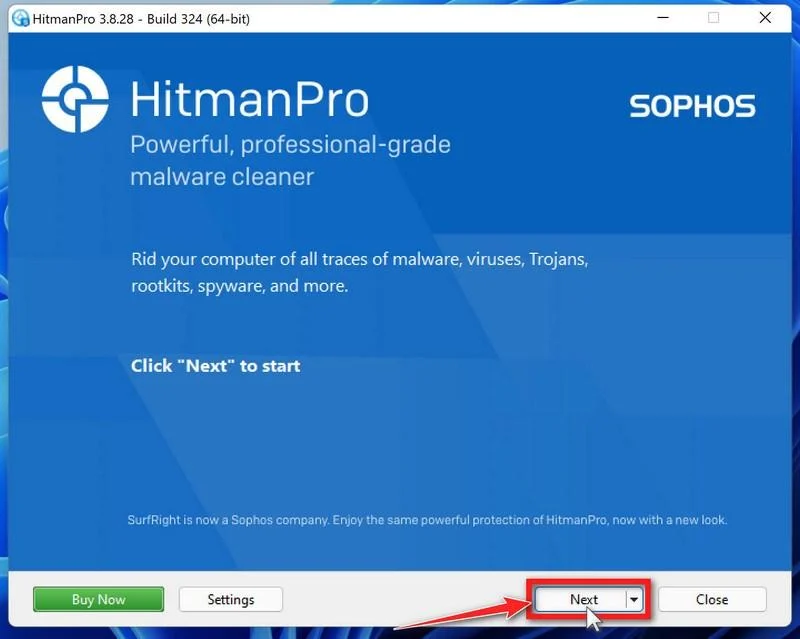
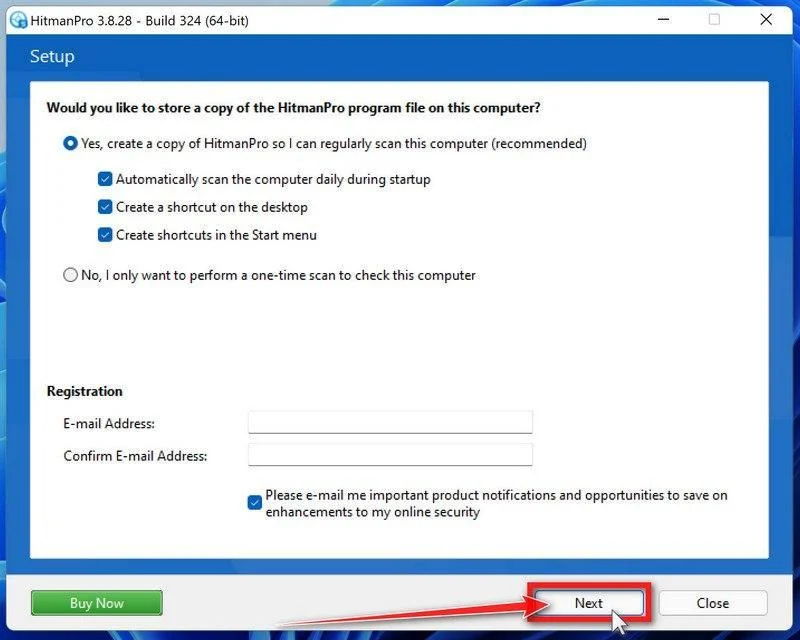
-
Wait for the Scan to Finish
HitmanPro will now check your computer for malicious programs. This usually takes just a few minutes thanks to its cloud-based scanning.
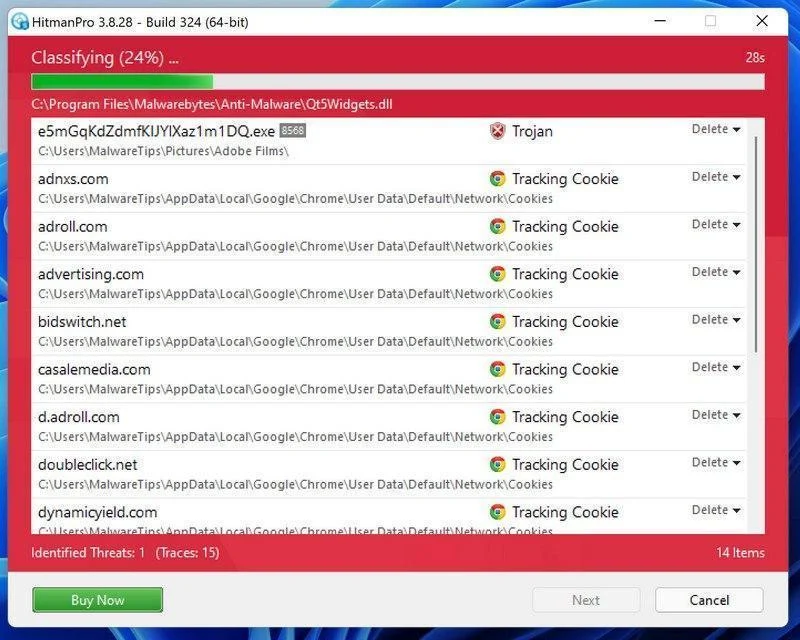
-
Review the Results and Click “Next”
When the scan is done, HitmanPro will show you everything it found. Click “Next” to remove the detected threats.
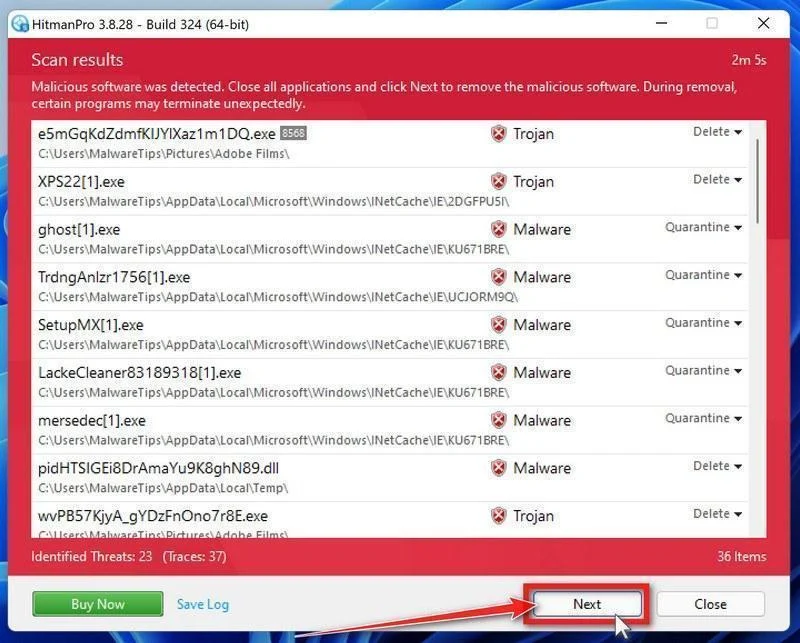
-
Click “Activate Free License”
To remove the malicious files, click the “Activate free license” button. This starts your free 30-day trial — no payment details needed — and unlocks the full cleanup.
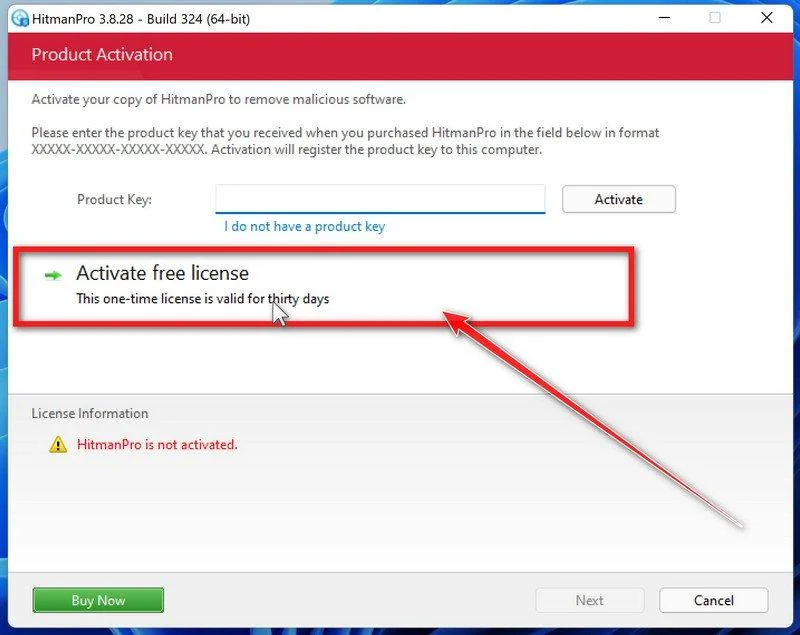
When the removal is complete, HitmanPro will show a summary of everything it cleaned. Click Next, then click Reboot if prompted. If there’s no reboot prompt, just click Close — your PC is clean.
STEP 4: Use AdwCleaner to remove Malicious Browser Extensions and Adware
In this next step, we will use AdwCleaner to remove malicious browser policies and unwanted browser extensions from your computer.
AdwCleaner is a free on-demand scanner that specializes in adware, browser hijackers, and unwanted toolbars — the exact threats that mainstream antivirus programs often miss. It also includes tools that repair the damage malware leaves behind, like hijacked browser settings and malicious policies. It’s a quick scan that’s well worth running.
-
Download AdwCleaner
Click the button below to download AdwCleaner — it’s free, portable, and requires no installation.
Download AdwCleanerOpens the official download page in a new tab. Malwarebytes AdwCleanerRemoves adware and unwanted programs at no cost
 -
Run AdwCleaner
Open your Downloads folder and double-click the file named “adwcleaner.exe“. There’s no installation — the program starts right away.
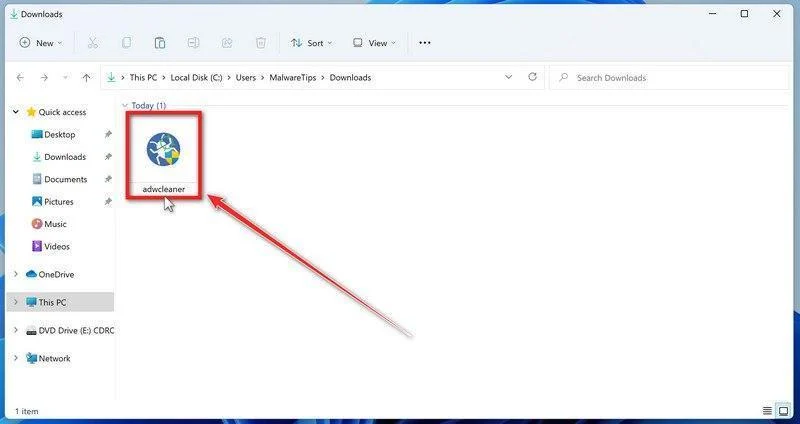
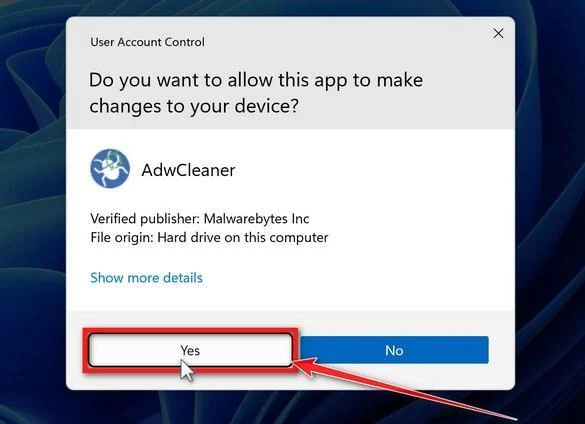
If Windows asks whether you want to allow AdwCleaner to run, click “Yes“. When the license agreement appears, click I agree to continue.
-
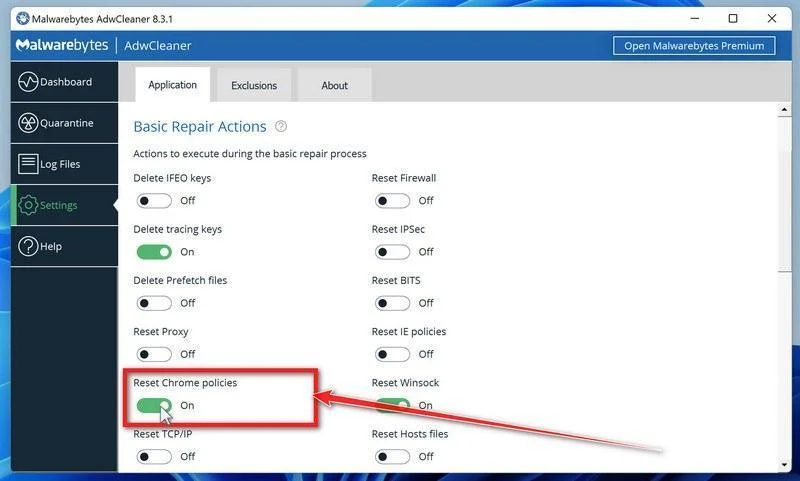
Enable “Reset Chrome policies”
This setting removes malicious browser policies — a trick malware uses to lock your browser settings so you can’t change them back. Click “Settings” on the left side of the window, then turn on “Reset Chrome policies“.
-
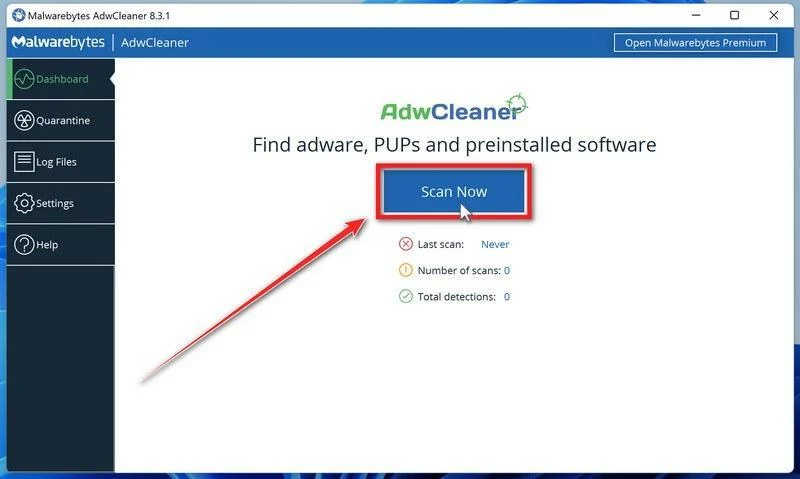
Start the Scan
Click “Dashboard” on the left side of the window, then click the “Scan” button.
-
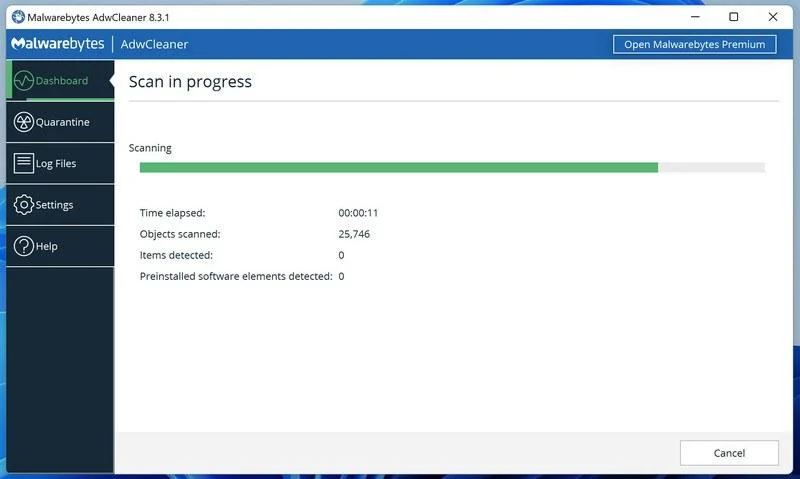
Wait for the Scan to Finish
AdwCleaner will now check your computer for adware and other malware. This usually takes only a few minutes — it’s one of the fastest scanners around.
-
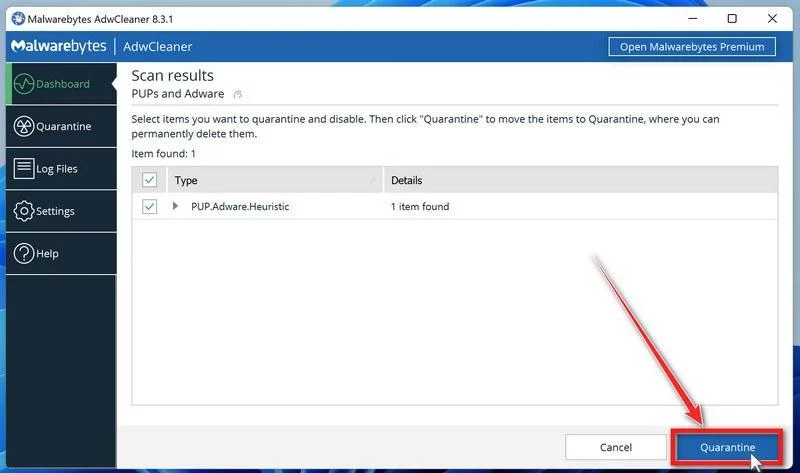
Quarantine the Detected Threats
When the scan finishes, AdwCleaner will list everything it found. Click the “Quarantine” button to remove all the malicious items at once.
-
Click “Continue” to Finish the Cleanup
Save any open work first — AdwCleaner needs to close your open programs before it can clean. When you’re ready, click the “Continue” button.
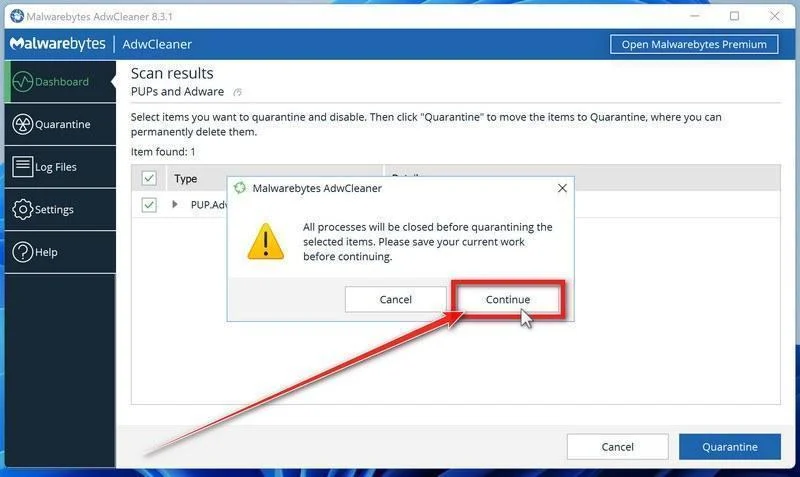
AdwCleaner will now delete all detected malware from your computer. If it asks you to restart your PC, allow it — your computer will be clean when you log back in.
STEP 5: Perform a final check with ESET Online Scanner
This final step involves installing and running a scan with ESET Online Scanner to check for any additional malicious programs that may be installed on the computer..
ESET Online Scanner is a free second-opinion scanner that performs a deep, full-system check for viruses, trojans, rootkits, and other malware. We use it as the final step because it’s thorough — if anything slipped past the previous scans, ESET will find it. A clean result here means your computer is malware-free.
-
Download ESET Online Scanner
Click the button below to download ESET Online Scanner.
Download ESET Online ScannerOpens the official download page in a new tab. ESET Online ScannerFree one-time malware scan from ESET
 -
Run the Installer
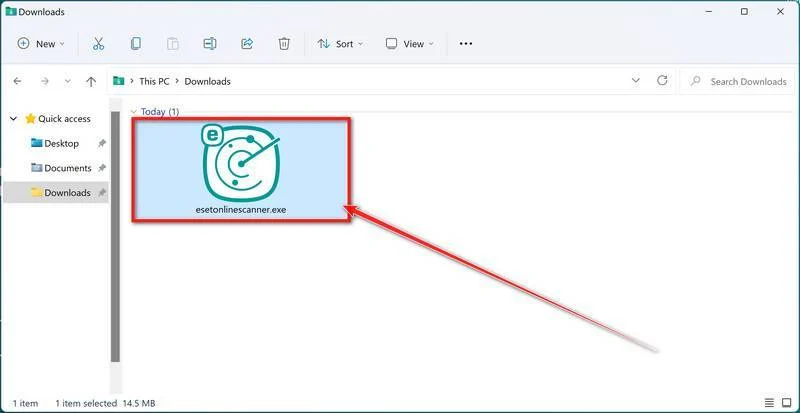
When the download finishes, open your Downloads folder and double-click “esetonlinescanner.exe“.
-
Install ESET Online Scanner
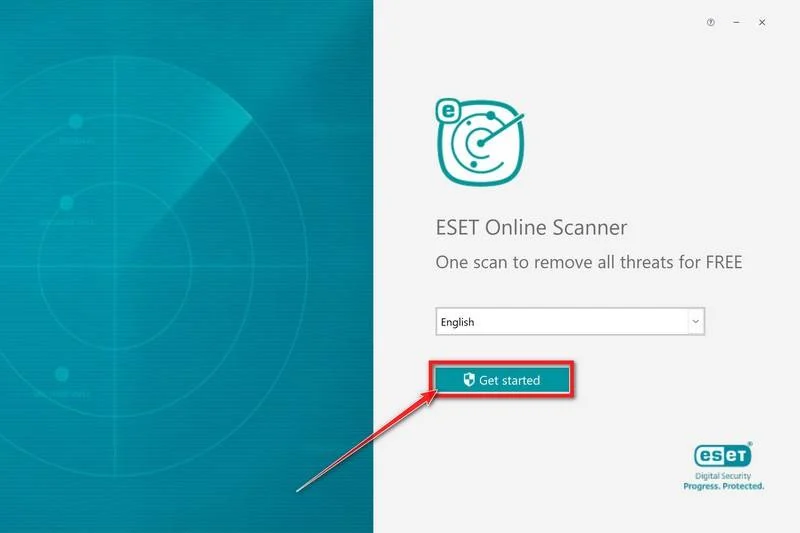
On the start screen, select your language from the drop-down menu and click Get started.
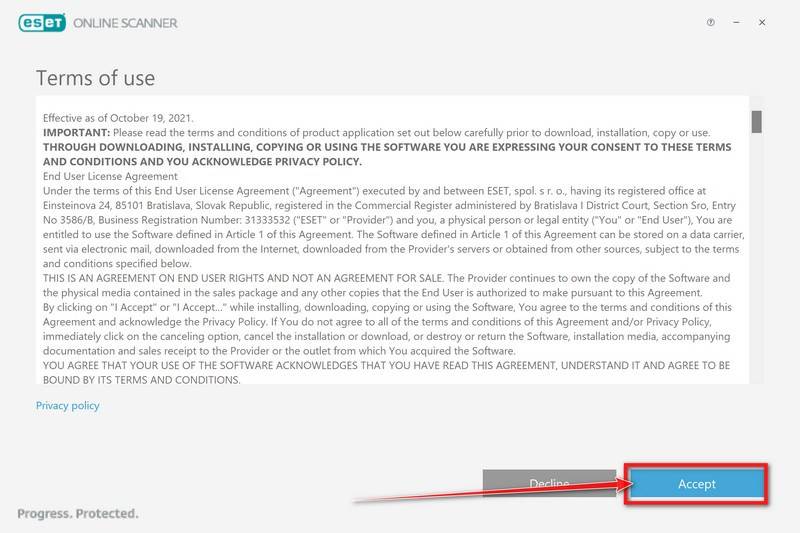
On the Terms of use screen, click Accept.
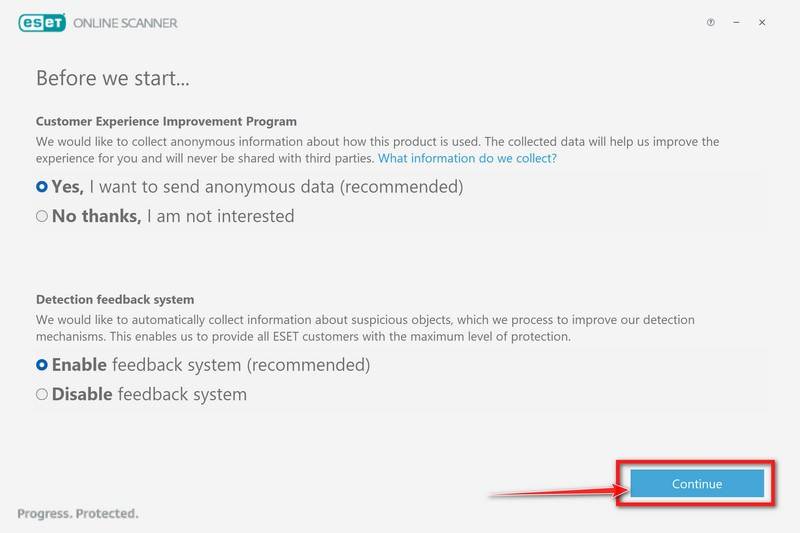
Choose your preferences for the Customer Experience Improvement Program and the Detection feedback system (either choice is fine), then click Continue.
-
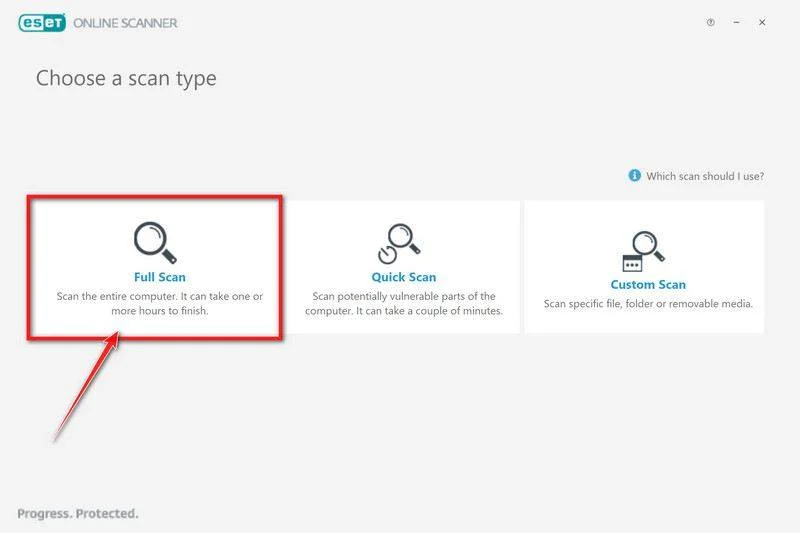
Start a Full Scan
Click Full Scan — this checks your entire computer, not just the common hiding spots.
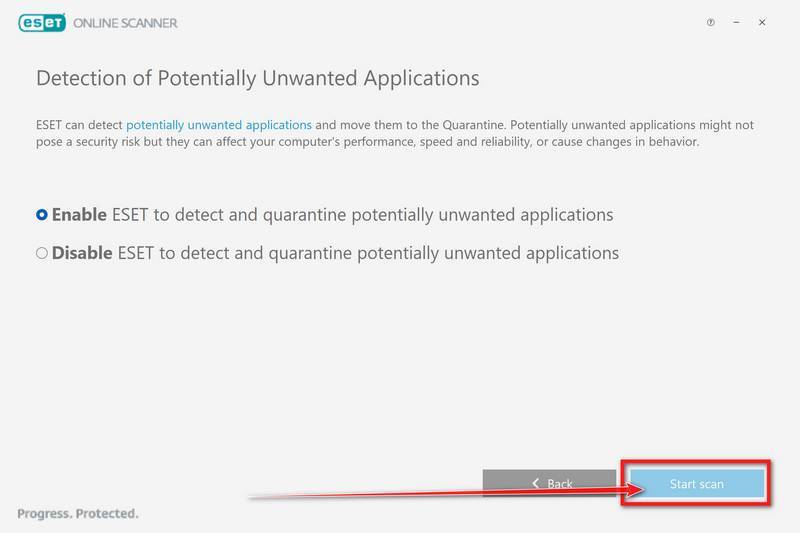
Select Enable for Detection of Potentially Unwanted Applications — this lets ESET catch adware and bundled junk programs, not just viruses. Then click Start scan.
-
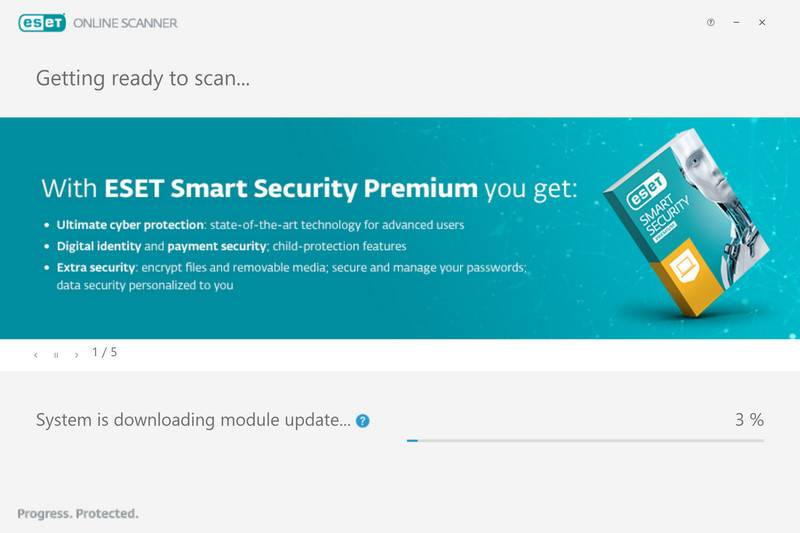
Wait for the Scan to Finish
ESET will now check every file on your computer. Because it’s a full scan, this can take a while — often an hour or more, depending on how much data you have. Leave it running in the background and check on it from time to time.
-
Review the Results
When the scan completes, the Found and resolved detections screen appears. Any threats found were automatically cleaned and quarantined — there’s nothing extra you need to do. Click View detailed results if you want to see exactly what was removed.
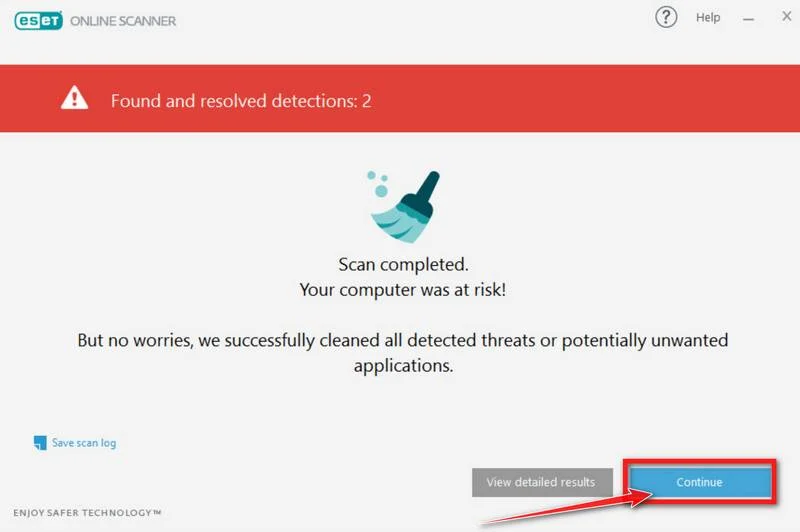
If ESET found nothing — congratulations, your computer has passed the final check and is malware-free.
STEP 6: Restore the files encrypted by ransomware
Unfortunately, in most cases, it’s not possible to recover the files encrypted by this ransomware virus because the private key which is needed to unlock the encrypted files is only available through the attackers. However, below we’ve listed three options you can use to try and recover your files.
Option 1: Search a decryption tool for this ransomware
The cybersecurity community is constantly working to create ransomware decryption tools, so you can try to search these sites for updates:
- https://id-ransomware.malwarehunterteam.com/
- https://decrypter.emsisoft.com/
- https://noransom.kaspersky.com/
- https://www.avast.com/ransomware-decryption-tools
Option 2: Use EaseUS Data Recovery Wizard Free to recover the encrypted files
EaseUS Data Recovery Wizard Free can restore files and repair corrupted files with simple clicks. Its powerful scanning algorithms can identify and retrieve huge file type library, including all of the popular video files, audio files, photos, and document formats.
While the free version only allows you to recover 2 GB of data, this can be helpful to see if the recovery is possible and restore back the most important files from your computer.
-
Download EaseUS Data Recovery Wizard Free.
You can download EaseUS Data Recovery Wizard Free by clicking the link below.
Download EaseUS Data Recovery WizardOpens the download page in a new tab. EaseUS Data Recovery WizardFile recovery tool with a free version
 -
Double-click on the EaseUS Data Recovery Wizard Free setup file.
When EaseUS Data Recovery Wizard Free has finished downloading, double-click on the setup file to install EaseUS Data Recovery Wizard on your computer. In most cases, downloaded files are saved to the Downloads folder.
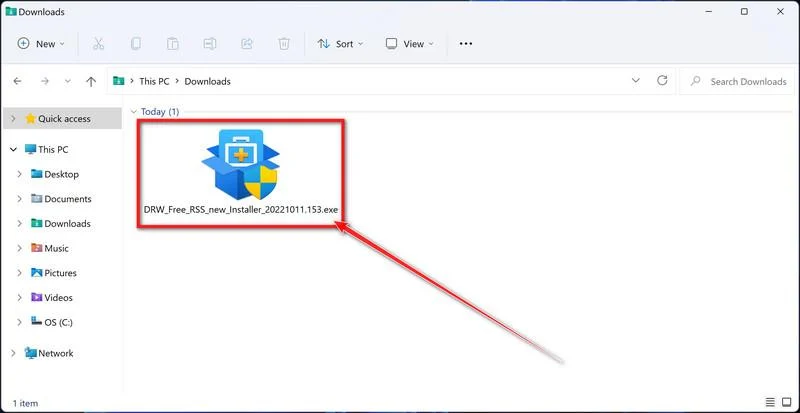
You may be presented with a User Account Control pop-up asking if you want to allow EaseUS to make changes to your device. If this happens, you should click “Yes” to continue with the EaseUS Data Recovery Wizard Free installation.
-
Follow the on-screen prompts to install EaseUS Data Recovery Wizard.
When the EaseUS Data Recovery Wizard installation begins, click on the “Install Now” as seen in the image below.
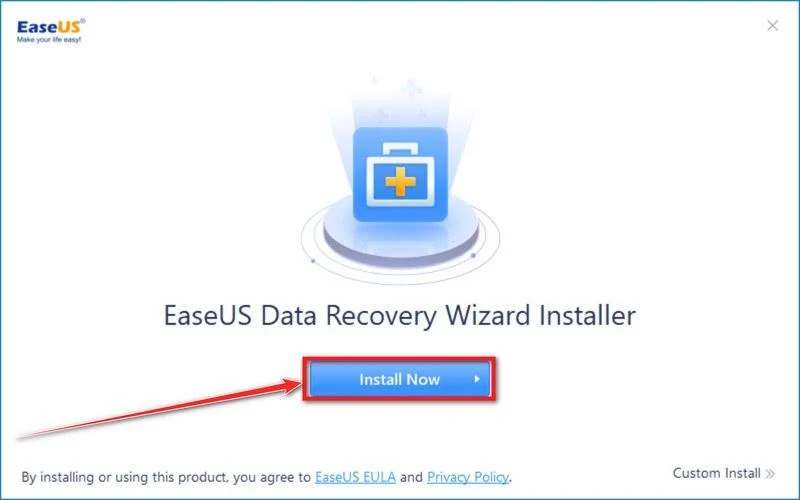
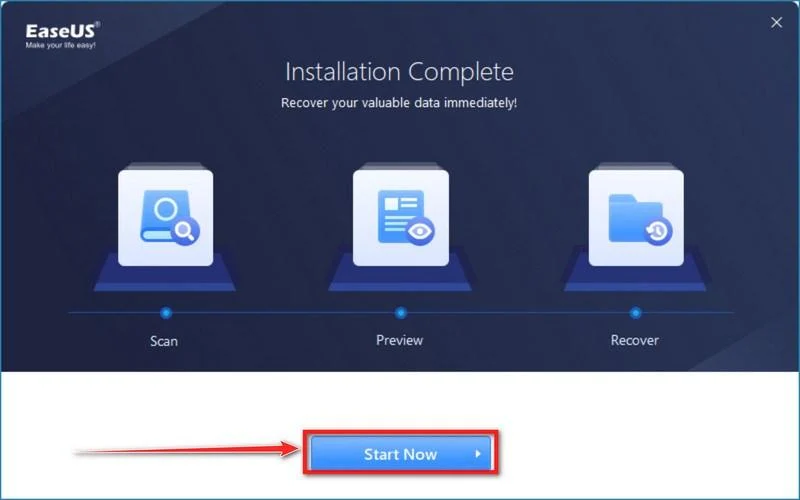
When your EaseUS Data Recovery Wizard installation completes, click the “Start Now” button to start the program.
-
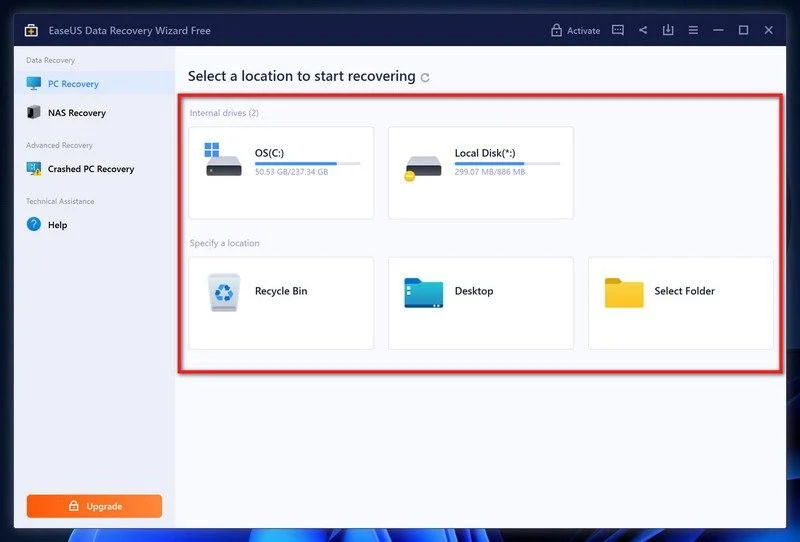
Select a location to start recovering the encrypted files.
Choose the drive or folder where you are the encrypted files that you want to recover and click “Scan“.
-
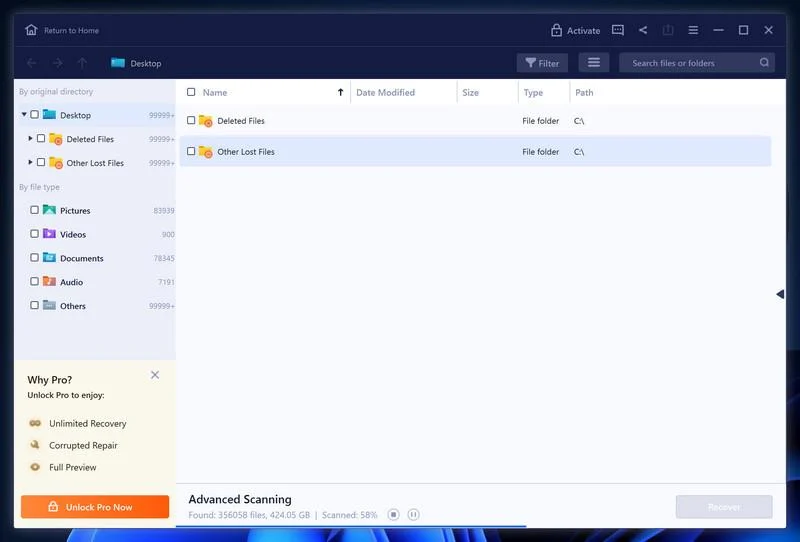
Wait for the EaseUS Data Recovery Wizard scan to complete.
EaseUS Data Recovery Wizard will now scan your computer files that can be restored. This process can take a few minutes, so we suggest you do something else and periodically check on the status of the scan to see when it is finished.
-
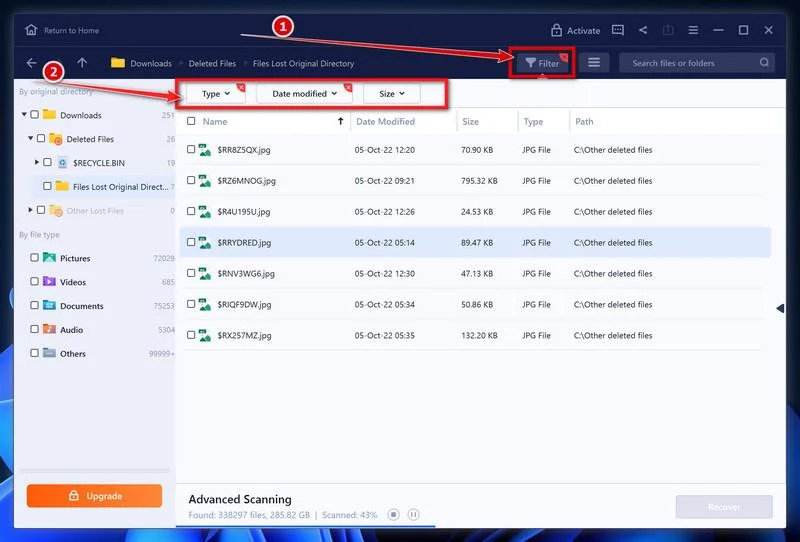
Find the files you want to recover.
When the EaseUS Data Recovery Wizard scan is finished scanning it will show a screen that displays the files that can be recovered. This tool can recover a lot of data, use the “Filter” button to quickly filter specific file types and find the files that you want to recover.
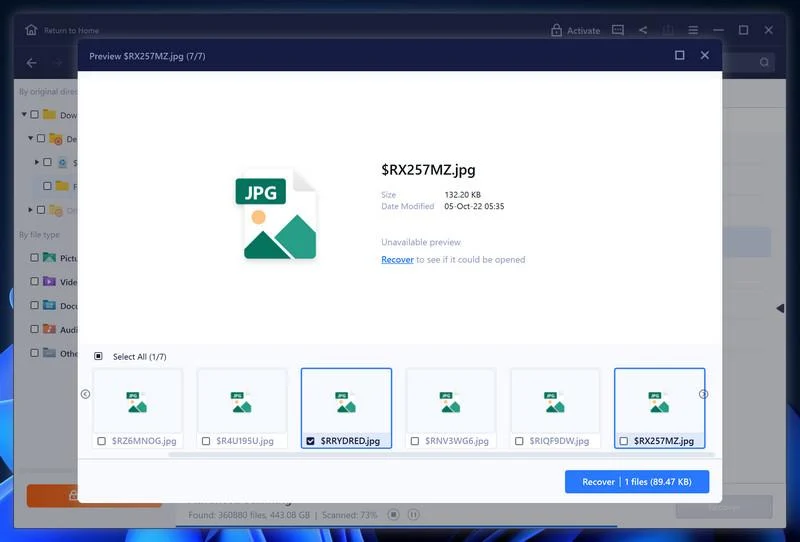
Click the “Preview” button or double-click on a file for a full preview.
-
Select your files and click “Recover”.
Finally, select the the files you want to recover and click “Recover“.
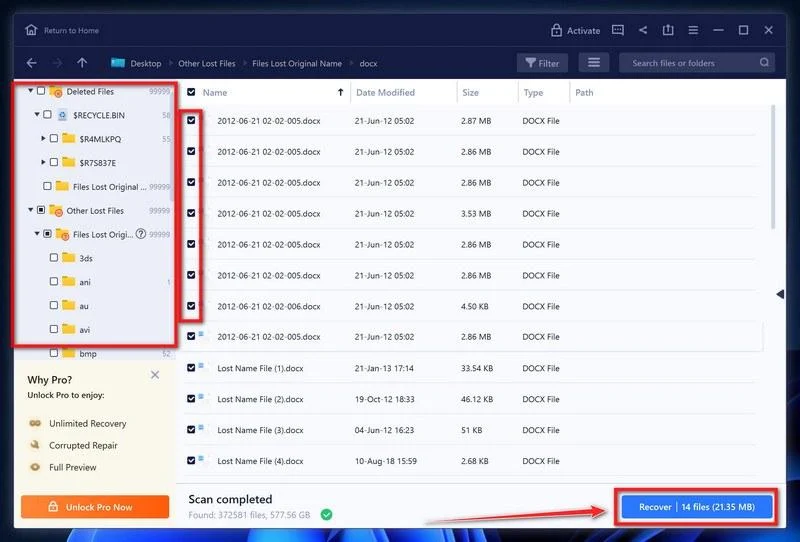
Choose a safe location to save all the files.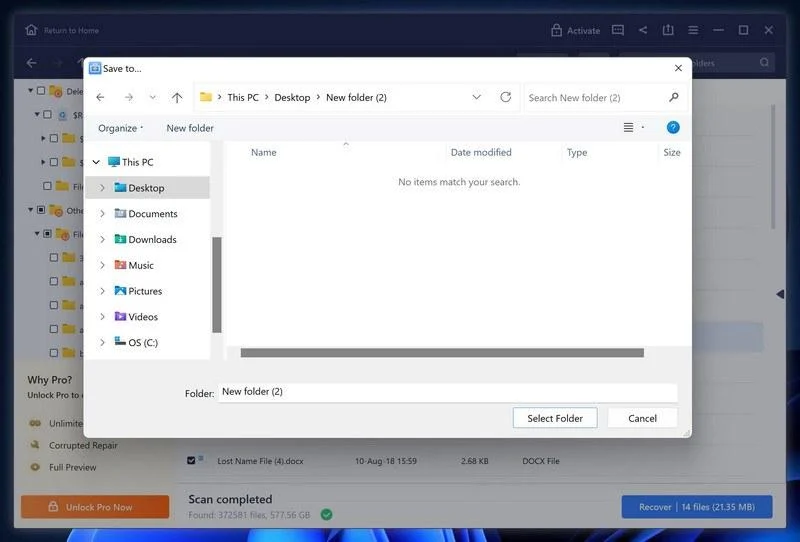
The free version only allow you to recover 2 GB of data, however, this will allow you to recover the most important files and see if EaseUS Data Recovery Wizard can correctly recover them.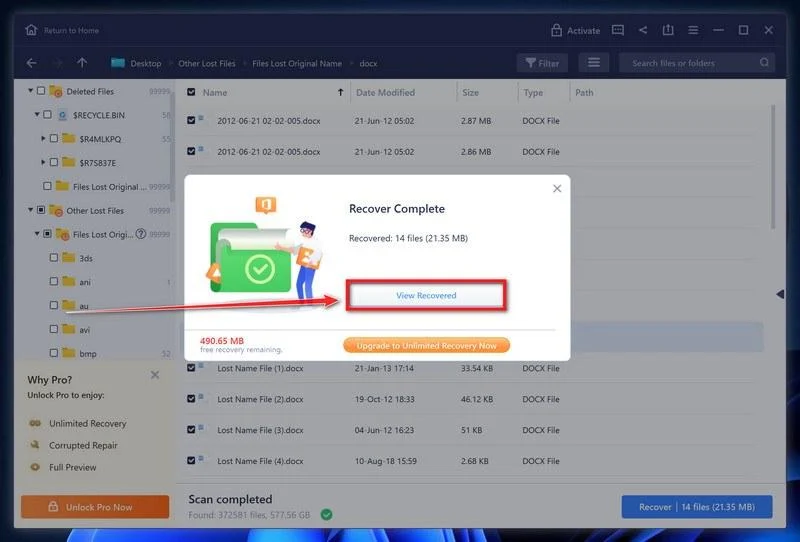
Option 3: Try to restore your files with ShadowExplorer
This ransomware will attempt to delete all shadow copies when you first start any executable on your computer after becoming infected. Thankfully, the infection is not always able to remove the shadow copies, so you should continue to try restoring your files using this method.
-
Download ShadowExplorer.
You can download ShadowExplorer from the below link.
Download ShadowExplorerOpens the official download page in a new tab.ShadowExplorerRestores files from Windows Shadow Volume Copies -
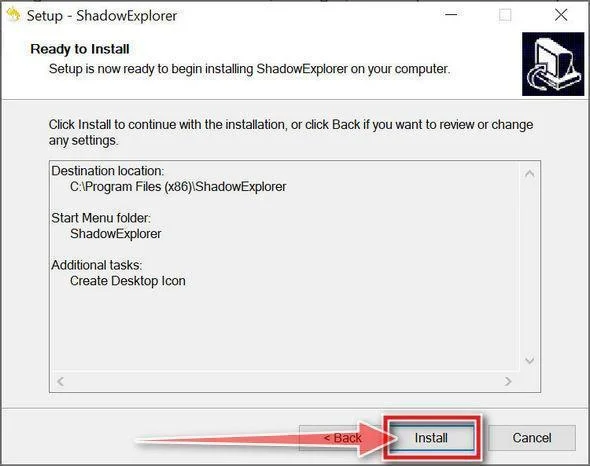
Install ShadowExplorer.
Double-click on the ShadowExplorer-x.x-setup file to start the installation process, then follow the on-screen promts to install this program.
-
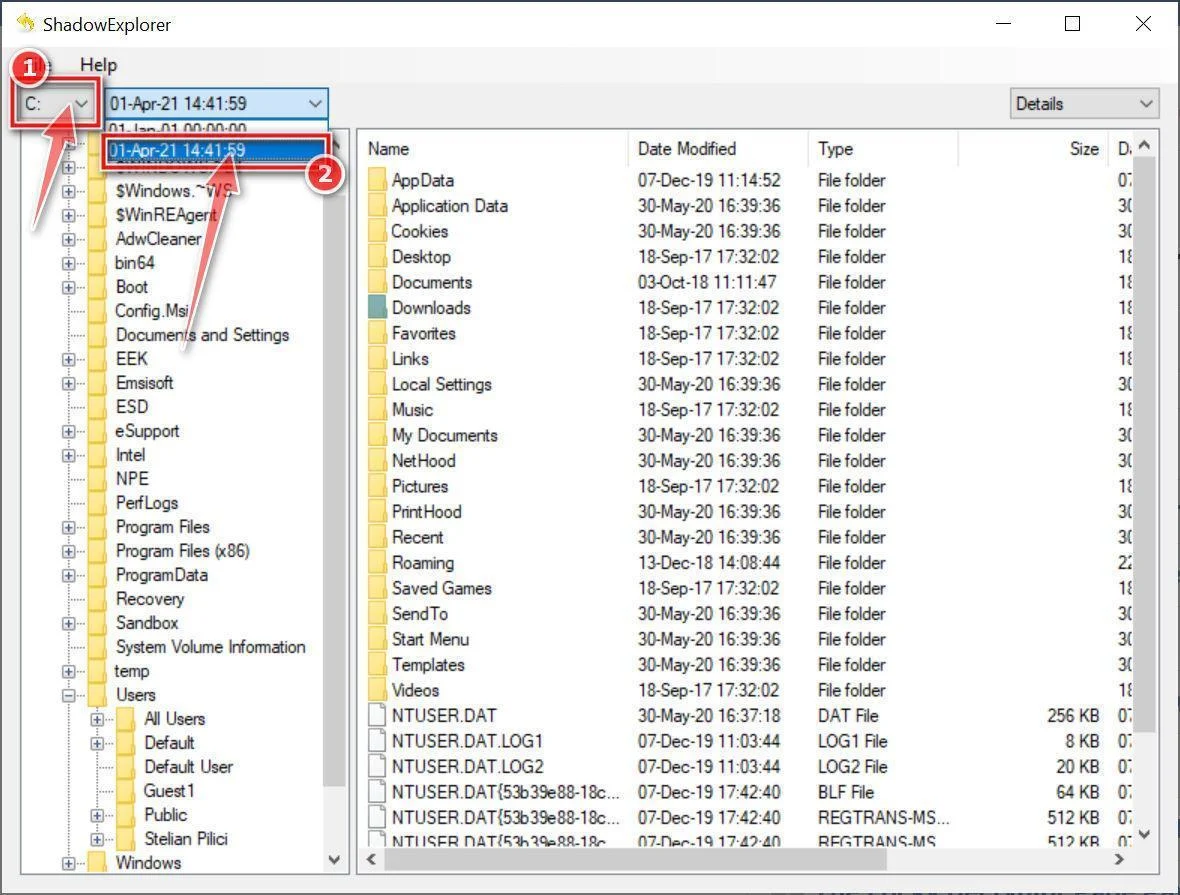
Select snapshot date.
Open ShadowExplorer and then from the top bar select the drive where the files that you want to save are located, then select from the snapshot available one previous to this infection.
-
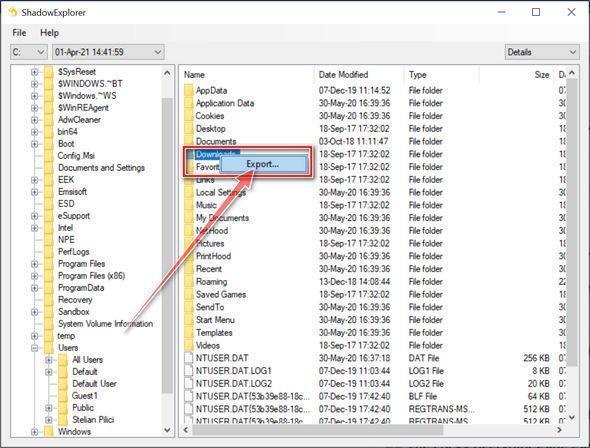
Export the files that you want to recover.
Once you have found a copy of the original file or folder, right-click on it and the select “Export”. A window will prompt you where you want to save the file or folder.
Keep every .umbra name exactly as it is. Do not bulk-rename 1.jpg.umbra back to 1.jpg, or vacation.jpg.umbra back to vacation.jpg, or invoice-2026.pdf.umbra back to a normal PDF. Stripping the extra ending is not a repair. It can make a later trusted tool worse, not better. The original name is already sitting in front of .umbra. You do not need to edit it to know what you lost.
Keep README_[victim_ID].txt with the locked files. Do not “clean up” every copy of the note. Do not invent a new victim ID if you are writing the incident down. Use the ID that is already in the filename on your disk, and keep that filename intact. Keep a copy of the wallpaper if you still have it. Those two artifacts are how you prove this was UMBRA and not a different locker that only sounds similar. They are evidence. They are not instructions you should carry out.
Do not run a third-party decryptor you found in an ad, a YouTube description, or a Telegram “recovery” channel. The note already warned you those tools can wreck the files. On that one point the criminals and the honest advice agree, for opposite reasons. They want you exclusive. You want the bytes untouched. Leave the locked copies alone until a trusted project publishes a tool for this family. None is public now.
If a later message quotes your victim ID and offers “the real portal,” that is still the same shop. If a later message skips Tor and asks for a $ figure over ordinary email, that is still the same shop, or a copycat standing in the same doorway. Do not answer. Do not correct their checkout. Do not help them set a price the original note left blank on purpose.
If the desktop still shows their wallpaper, save a screenshot for your records, then set any old picture you like. That change is for you. It does not mean family.mp4.umbra will play again. If Windows still offers to pick an app for the .umbra type, decline it. There is no player for that ending.
The Bottom Line
UMBRA ransomware is a locker with a readable filename and a README that carries a victim ID. It appends .umbra to the old name. 1.jpg becomes 1.jpg.umbra. vacation.jpg becomes vacation.jpg.umbra. invoice-2026.pdf becomes invoice-2026.pdf.umbra. taxes.xlsx becomes taxes.xlsx.umbra. family.mp4 becomes family.mp4.umbra. The note is README_[victim_ID].txt. The desktop wallpaper repeats the same bill.
The note does not print a ransom $ amount. It prints a leak threat and a Tor door. Install Tor Browser from torproject.org, it says, then open their portal and hand over a decryption ID. They claim a reply within 24 hours. They warn you not to delete or modify the locked files and not to use third-party decryptors. There is no public free decryptor known for this strain. ESET names it Win64/Filecoder.Umbra.A.
Do not pay. Do not open that portal. Do not type the victim ID into a chat they own. Do not rename the pile in bulk. If you take one sentence with you, take this. A folder of names ending in .umbra, plus a README_[victim_ID].txt note and a new wallpaper, is ransomware on the first sighting. Treat it that way before anyone in that portal names a $ figure.

Join the discussion
0 commentsShare your experience or ask a question about this article.
Discussion
Start the conversation
Have a question or something useful to share? Add the first comment.