

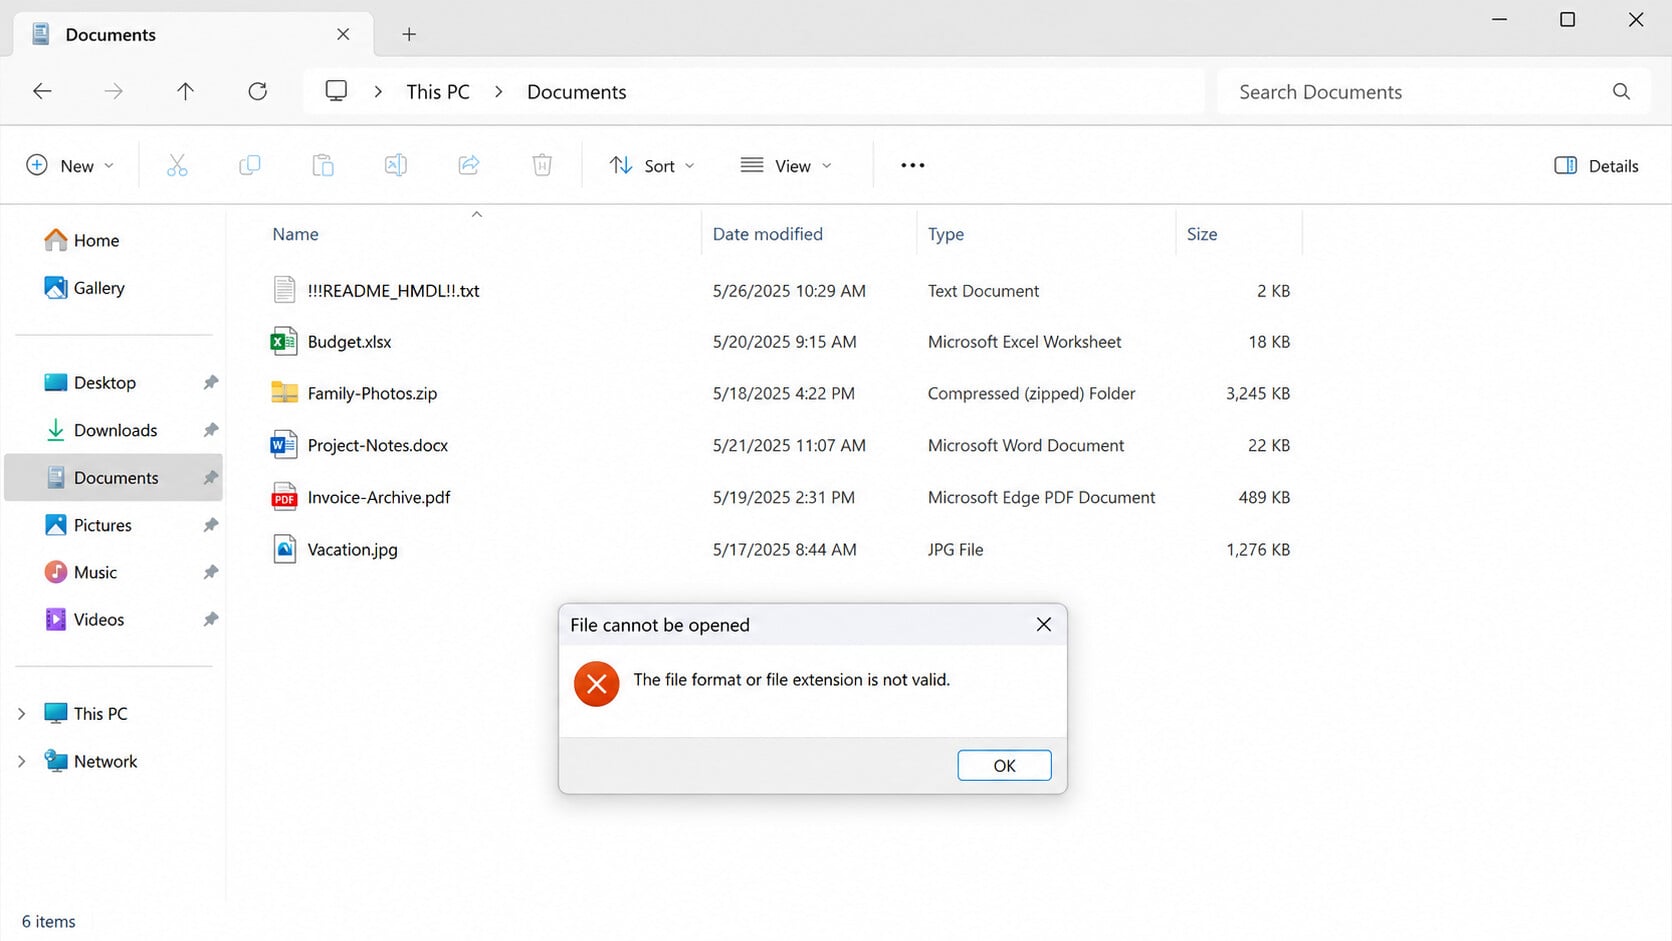
Your files still have their familiar names, yet documents and photographs suddenly refuse to open. A note called !!README_HMDL!!.txt appears nearby with an unfamiliar payment demand.
That combination points to a disruptive ransomware infection that needs careful handling. Rushing to pay or randomly renaming files can make an already stressful situation harder.
Overview
HMDL encrypts data without adding a new file extension
HMDL is file-encrypting ransomware. It changes the contents of accessible files so ordinary programs cannot interpret them, then demands cryptocurrency for the alleged recovery key.
Unlike many ransomware families, the examined HMDL sample does not append a distinctive extension. A damaged document may keep the same name, icon, and apparent file type.
This detail can cause confusion. Windows may still label a file as a photograph or spreadsheet even though the underlying encrypted data is unusable.
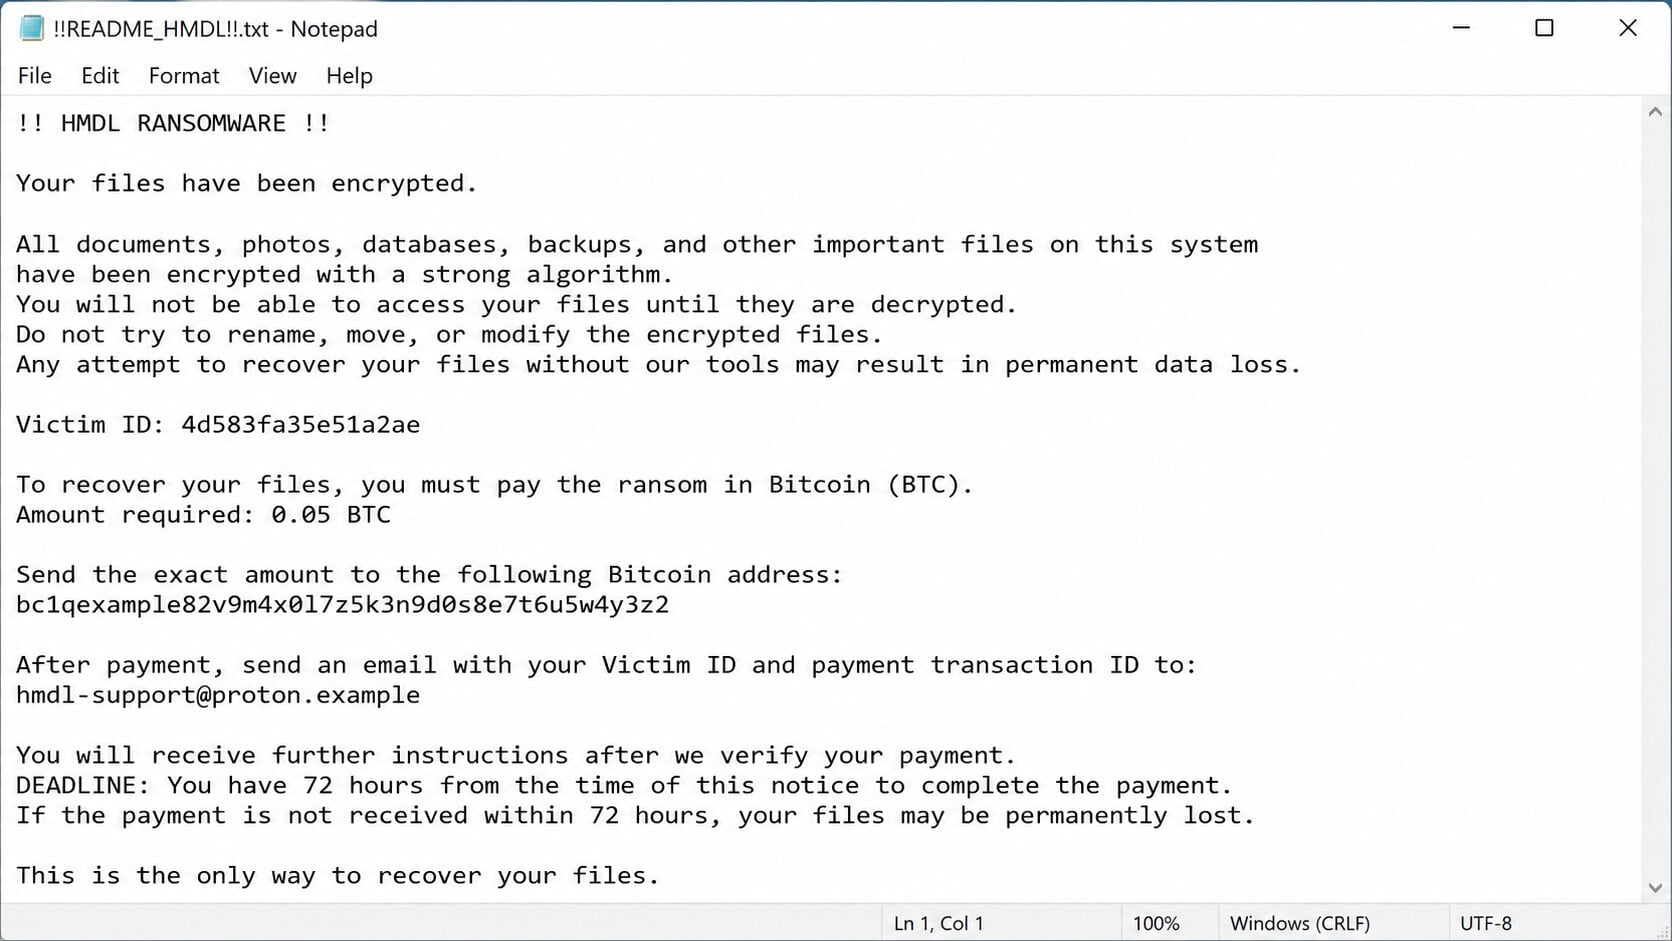
The ransom note is named !!README_HMDL!!.txt
HMDL creates a text note named !!README_HMDL!!.txt in locations where victims are likely to notice it. The message assigns the victim an identification code.
The reviewed note asks for 0.05 BTC and directs the victim to contact an address hosted by Proton Mail. Payment supposedly buys a private decryption key.
A payment request does not prove the attackers possess a working recovery tool. It only proves somebody wants cryptocurrency sent to a wallet they control.
Containment must come before cleanup or file recovery
An infected computer may remain capable of encrypting attached drives, shared folders, or synchronized cloud data. Isolate it before investigating individual files.
Keep copies of the ransom note, suspicious files, and security logs. These details may help an incident responder identify the variant and judge available recovery options.
- Disconnect the infected device from wired and wireless networks.
- Unplug backup drives that are not already affected.
- Do not delete the ransom note or encrypted originals.
- Record the displayed victim ID and cryptocurrency address.
- Remove the malware before restoring clean data.
How to Recognize an HMDL Ransomware Infection
Normal-looking filenames conceal unreadable content
A missing extension change makes HMDL less visually obvious than ransomware that renames every file. The strongest clue is a sudden wave of opening errors.
A photograph viewer may report an unsupported or corrupted image. Word processing software may say a document is damaged, encoded incorrectly, or not a recognized format.
Several unrelated file types failing at the same time is more significant than one broken document. It suggests a system-wide event rather than ordinary file corruption.
Changing a filename or extension will not reverse encryption. The readable label is separate from the scrambled data stored inside the file.
The note describes encryption and a private key
The HMDL note claims the malware used ChaCha20-Poly1305 for file encryption and protected its symmetric key with RSA-2048-OAEP.
Those technical claims cannot be trusted simply because criminals wrote them. However, modern ransomware commonly combines fast symmetric encryption with protected per-victim key material.
The note uses cryptographic language to discourage experimentation and make payment feel inevitable. Victims should treat its promises as coercion, not customer service.
The sample note includes a victim identifier, payment amount, Bitcoin address, and contact email. Preserve all four before security software removes surrounding artifacts.
How HMDL Ransomware Can Reach a Computer
A ransomware executable must run before it can encrypt local data. The initial file may arrive through email, a compromised download, pirated software, or exposed remote access.
The exact entry point varies between incidents. Finding HMDL on one computer does not prove that every victim received the same attachment or visited the same website.
Investigators should preserve browser history, email headers, download records, and Windows event logs. These can reveal how the infection began and whether other devices were exposed.
Malicious email attachments and download links
An unexpected invoice, delivery notice, payroll document, or legal complaint can carry an executable directly. It may also link to a password-protected archive on a file host.
Attackers use archive passwords to bypass automated scanning and create curiosity. The extracted file may imitate a PDF while actually being a script or executable.
Windows can hide known extensions by default. A file named Invoice.pdf.exe may appear as Invoice.pdf, especially when its icon is chosen to resemble a document.
Cracked software and fake installers
Key generators, unofficial activators, game cheats, and repackaged software are common malware delivery vehicles. Their instructions often tell users to disable antivirus protection first.
A fake update can use the same tactic. The installer may display a normal progress window while silently launching ransomware in the background.
Software should come from the developer’s official website, Microsoft Store, or another verified distribution channel. Search advertisements are not proof that a download is authentic.
Stolen passwords and exposed remote services
Some ransomware intrusions begin when criminals obtain remote desktop, VPN, or administrator credentials. They may explore the network before deploying encryption across multiple systems.
Review successful and failed sign-ins, newly created accounts, remote administration tools, and changed security policies. A single encrypted endpoint may be part of a broader compromise.
Change exposed passwords from a clean device. Reusing the infected computer for account recovery can hand the replacement credentials to remaining malware.
Software vulnerabilities and compromised websites
Unpatched internet-facing software can provide another path inside. Vulnerable gateways, remote management panels, and outdated plugins deserve immediate review during a business incident.
A compromised advertising chain or website may redirect visitors toward deceptive downloads. AdGuard can reduce malicious advertising exposure, but it cannot disinfect an encrypted computer.
Security updates, application allowlisting, restricted administrator access, and offline backups provide stronger protection than relying on browser filtering alone.
What HMDL Does After It Runs
Ransomware normally enumerates drives and searches for file types that matter to the victim. Documents, databases, archives, photographs, projects, and business records are common targets.
System files may be skipped so Windows remains usable enough to display the ransom demand. That apparent stability should not be mistaken for a minor infection.
The encryption process can consume noticeable processor, disk, or network resources. On fast systems, however, substantial damage may occur before the user notices unusual activity.
Local files and connected storage may be affected
Any writable location visible to the infected account can be at risk. This includes external disks, mapped drives, network shares, and folders synchronized to cloud services.
Cloud synchronization can upload encrypted versions and replace healthy copies. Version history may help, but only after the infected endpoint is disconnected and cleaned.
Do not attach a clean backup merely to test one file. If HMDL or another loader remains active, the backup could be encrypted as well.
Security settings and recovery features may be targeted
Ransomware sometimes attempts to delete shadow copies, disable recovery services, stop database processes, or weaken security tools. Success depends on the privileges obtained.
Failure of System Restore or missing shadow copies does not identify HMDL by itself. Those conditions can have legitimate causes or result from other malware.
Review changes rather than guessing. A qualified incident responder can compare timestamps, services, scheduled tasks, persistence entries, and event logs across affected machines.
Other malware may remain after encryption stops
The ransomware payload may be only the final stage. An information stealer, remote access trojan, or credential dumping tool could have operated earlier.
Removing the visible ransom note does not remove those components. A complete scan and account review are necessary before the system can be trusted again.
For a business, assume exposed credentials may include email, cloud storage, financial systems, and remote access until evidence shows otherwise.
Should You Pay the HMDL Ransom?
Paying is risky. Criminals can accept the Bitcoin and disappear, provide a broken tool, demand more money, or target the same victim again.
Even a functioning decryptor may be slow, unstable, or unable to restore every file. Damaged databases and large archives can remain unusable after partial recovery.
Payment also reveals that the victim can obtain cryptocurrency under pressure. That information may increase future extortion attempts rather than end them.
Organizations should consult legal counsel, their insurer, incident responders, and law enforcement before making any payment decision. Reporting requirements vary by location and exposed data.
The FBI does not support paying a ransom because payment does not guarantee recovery and encourages the ransomware economy. Reporting still matters even when no payment occurs.
Home users should resist direct negotiation. Preserve evidence, remove the malware, check trusted recovery resources, and restore from a verified clean backup when possible.
What to Do if HMDL Ransomware Infected Your Computer
- Disconnect the device. Remove Ethernet, disable Wi-Fi, and disconnect shared storage without shutting down other unaffected systems.
- Protect clean backups. Keep backup disks detached and pause cloud synchronization until the infected computer has been isolated.
- Preserve evidence. Photograph the note, record the victim ID and Bitcoin address, and copy relevant logs when it is safe.
- Notify the right people. Contact your administrator, insurer, incident responder, or law enforcement according to the situation.
- Secure accounts elsewhere. From a clean device, change exposed passwords and enable multifactor authentication, starting with email and administrator accounts.
- Scan before restoring. Use Malwarebytes and additional reputable scanners to remove ransomware, loaders, stealers, and persistence mechanisms.
- Check recovery options. Search trusted decryptor projects and test copies of encrypted files, never the only originals.
- Rebuild when trust is lost. Businesses and heavily compromised systems may require a clean Windows installation before restoring verified data.
Remove HMDL Ransomware and Recover the Files
The following process separates malware removal from data recovery. Removing HMDL prevents additional damage, but removal alone does not decrypt files already transformed.
Keep the original encrypted files on separate storage before attempting repair. Future research may produce a decryptor even when no suitable tool exists today.
If this is a company device or multiple computers are affected, stop here and involve an incident response professional. Evidence can be lost through well-intentioned cleanup.
Step 1: Restart Windows in Safe Mode with Networking
Safe Mode loads a reduced set of services and drivers. This can make active malware easier to detect, although sophisticated threats may still persist.
- Press Windows key + I to open Settings. If that doesn’t work, right-click the Start button and select Settings. Then, in the right-hand pane, click Recovery.
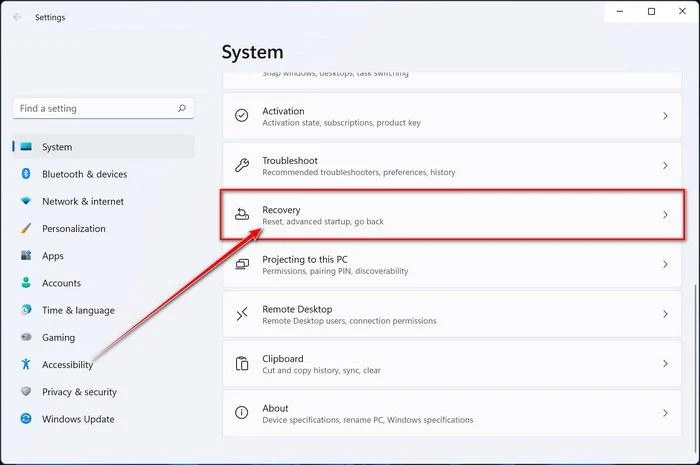
- Under Advanced startup, click Restart now. Save any open work first — your PC will restart immediately.
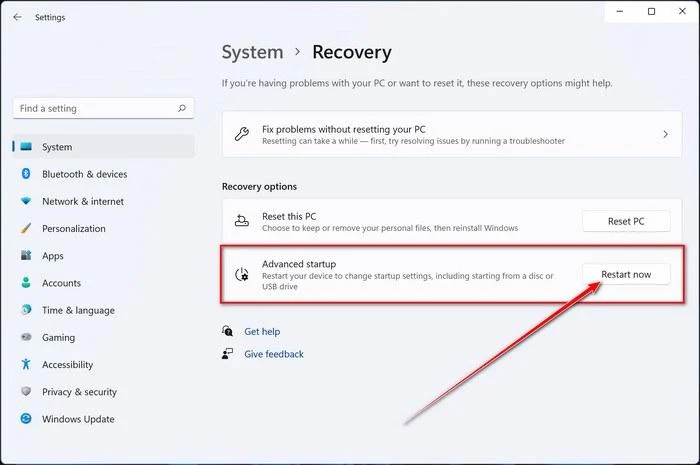
Your PC will restart into the Windows Recovery Environment. From there, follow these steps to reach Safe Mode:
- On the Choose an option screen, select Troubleshoot.
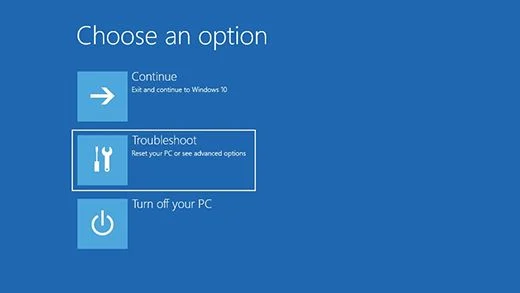
- On the Troubleshoot screen, click Advanced Options.
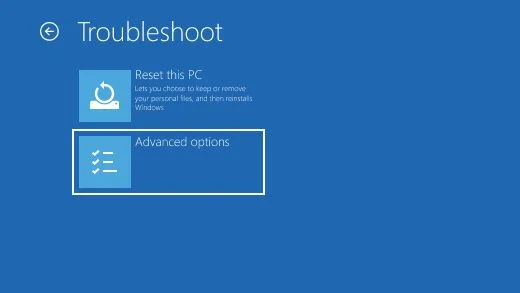
- On the Advanced Options page, click Startup Settings.
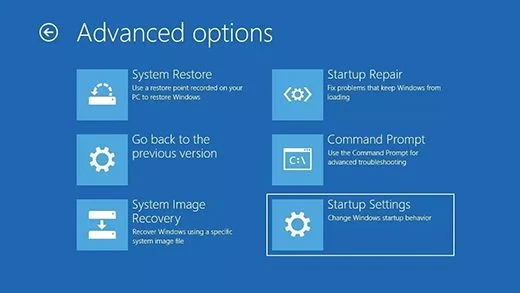
- On the Startup Settings page, click Restart.
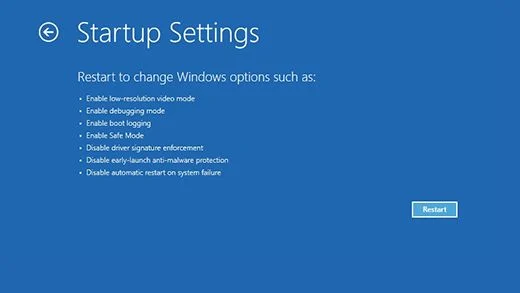
- After your PC restarts, you’ll see a list of startup options. Press 5 or F5 to start Safe Mode with Networking.
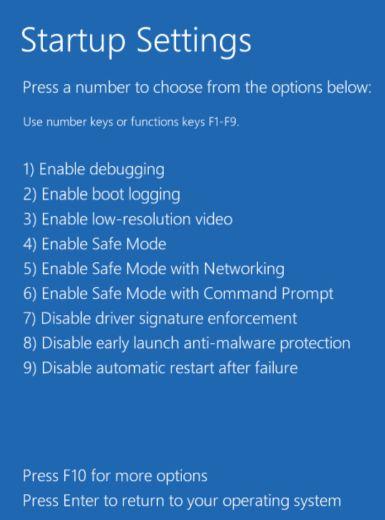
- You’ll know you’re in Safe Mode when “Safe Mode” appears in the corners of the screen. Now continue with the next step of this guide — downloading and running Malwarebytes (explained in Step 2).
- Press Windows key + I to open Settings. If that doesn’t work, click the Start button and select Settings (the gear icon).
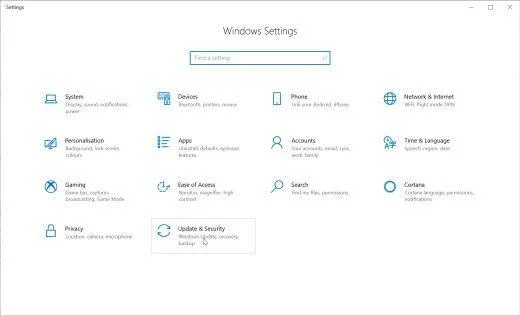
- In the Windows Settings window, select Update & Security, then click Recovery.
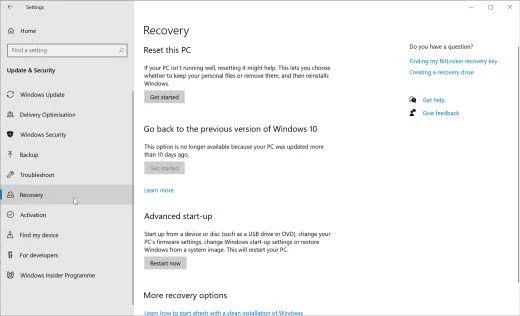
- Under Advanced startup, click Restart now. Save any open work first — your PC will restart immediately.
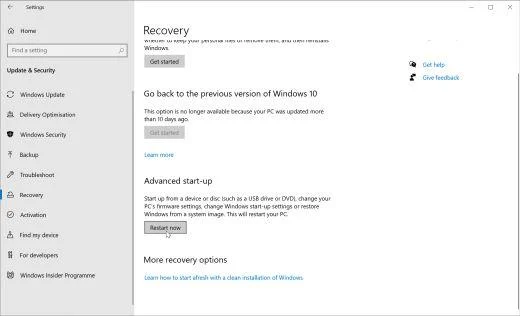
Your PC will restart into the Windows Recovery Environment. From there, follow these steps to reach Safe Mode:
- On the Choose an option screen, select Troubleshoot.
- On the Troubleshoot screen, click Advanced Options.
- On the Advanced Options page, click Startup Settings. (On Windows 8, this option is labeled Windows Startup Settings.)
- On the Startup Settings page, click Restart.
- After your PC restarts, you’ll see a list of startup options. Press 5 or F5 to start Safe Mode with Networking.
- You’ll know you’re in Safe Mode when “Safe Mode” appears in the corners of the screen. Now continue with the next step of this guide — downloading and running Malwarebytes (explained in Step 2).
- Remove any CDs, DVDs, or USB drives from your computer, then restart it.
- As soon as the computer starts (when the hardware information appears on screen), press the F8 key repeatedly until the Advanced Boot Options menu appears. If Windows starts normally instead, you pressed F8 too late — restart and try again.
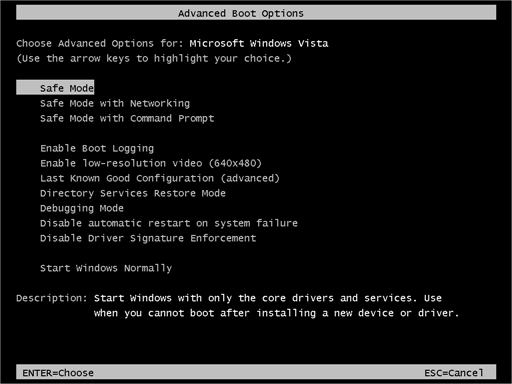
- On the Advanced Boot Options screen, use the arrow keys to highlight Safe Mode with Networking, then press Enter.
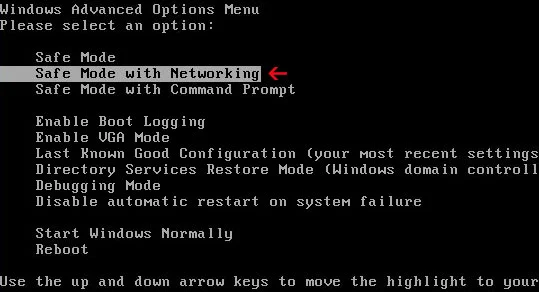
- Once you’re in Safe Mode with Networking, continue with the next step of this guide — downloading and running Malwarebytes (explained in Step 2).
Can’t get into Safe Mode with Networking? No problem — you can run the Malwarebytes scan in normal mode instead and continue the guide from there.
Step 2: Scan the computer with Malwarebytes
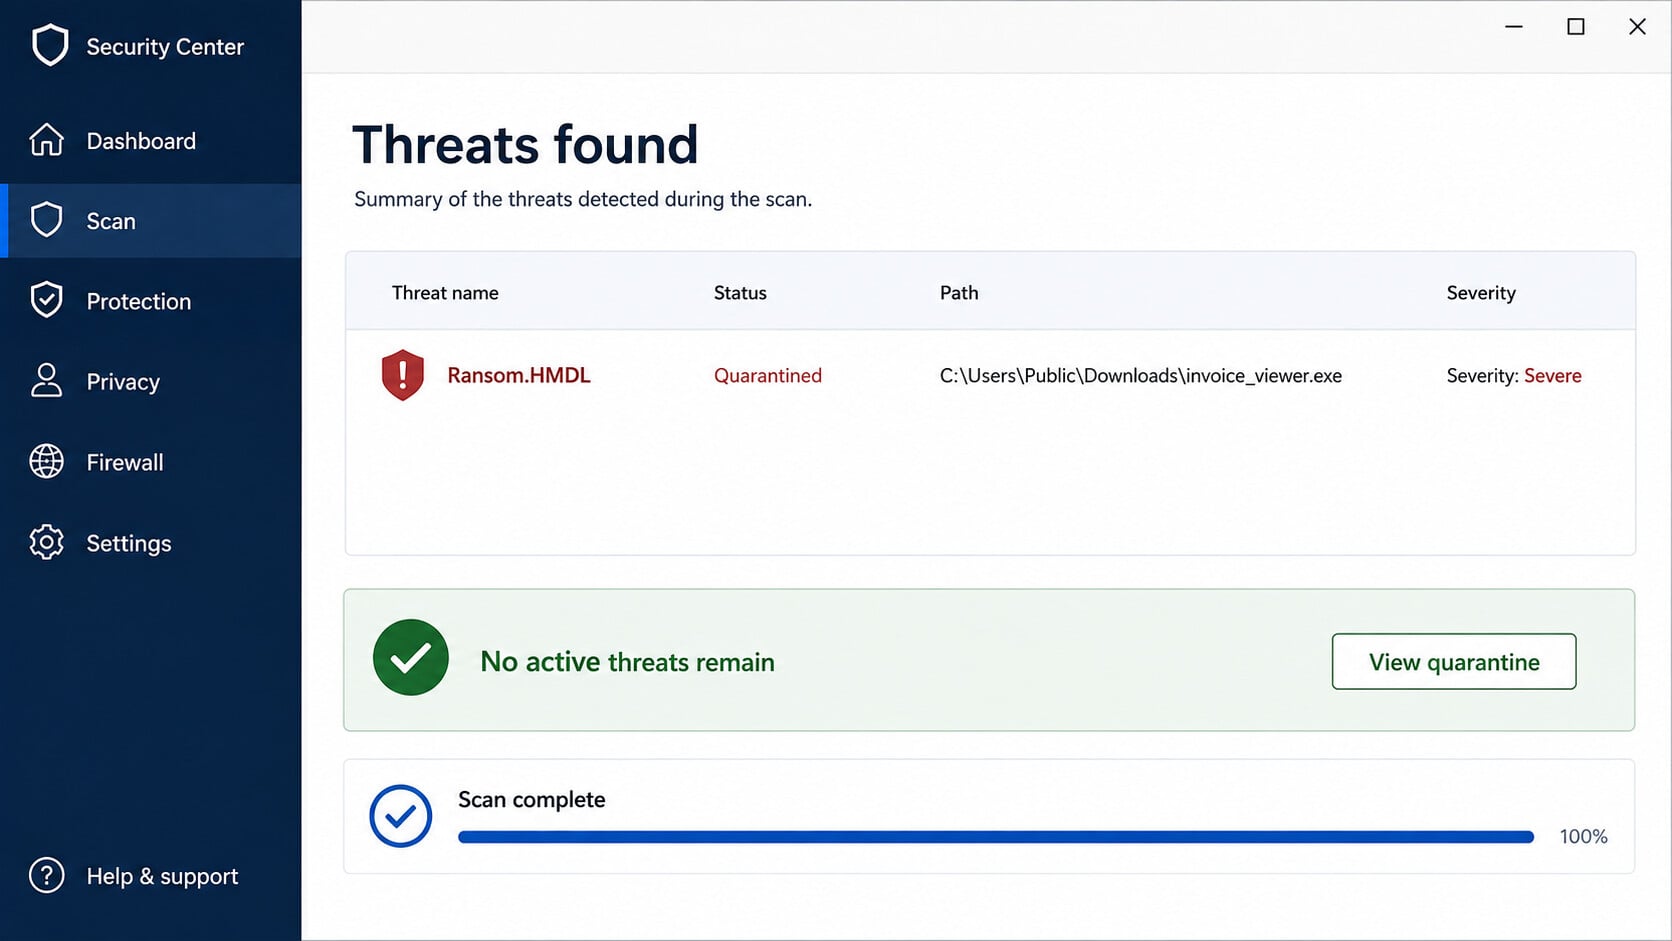
Malwarebytes can identify ransomware components, downloaders, and related threats. Update its definitions, perform a thorough scan, and quarantine everything confirmed as malicious.
Malwarebytes is one of the most popular and trusted anti-malware tools for Windows — and it’s completely free for removing infections. It catches threats that many antivirus programs miss, including adware, browser hijackers, and trojans. Follow the steps below to scan and clean your PC in just a few minutes.
Download Malwarebytes
Click the button below to download the latest version of Malwarebytes for Windows from the official source. The free version is all you need — it will scan your computer and remove adware, browser hijackers, and other malicious software at no cost.
Download MalwarebytesOfficial installer for Windows 11 and 10. Your download starts right away.Want real-time protection? See Malwarebytes Premium Malwarebytes Free for WindowsScans and removes malware at no cost
-
Install Malwarebytes
When the download finishes, open your Downloads folder and double-click the MBSetup file. If Windows shows a User Account Control pop-up, click “Yes” to allow the installation.

Follow the On-Screen Prompts to Install Malwarebytes
The setup wizard will walk you through a few quick screens:
-
Choose where you’re installing the program — “Personal Computer” or “Work Computer” — then click Next.

-
Malwarebytes will now install on your device. This usually takes under a minute.

-
When installation is complete, the “Welcome to Malwarebytes” screen will open automatically.

-
On the final screen, click Open Malwarebytes to launch the program.

-
Enable “Scan for Rootkits”
Before scanning, turn on rootkit detection so Malwarebytes can find even the most hidden threats. Click the Settings gear icon on the left side of the screen.

In the settings menu, find “Scan for rootkits” and click the toggle so it turns blue.

Done? Click “Dashboard” in the left pane to return to the main screen.
Start the Scan
Click the blue Scan button. Malwarebytes will automatically update its virus database and start checking your computer for malware.

-
Wait for the Scan to Finish
The scan checks your entire system for browser hijackers and other malicious programs, so it can take 5 to 20 minutes depending on your computer. Feel free to do something else — just check back occasionally to see the progress.

-
Quarantine the Detected Threats
When the scan is done, you’ll see a list of everything Malwarebytes found — malware, adware, and potentially unwanted programs. Click the “Quarantine” button to remove all of them at once.

Malwarebytes will now remove the malicious files and registry entries and move them safely into quarantine.

-
Restart Your Computer
Some threats can only be fully removed after a reboot. If Malwarebytes asks you to restart, click Yes. Once you’re logged back in, Malwarebytes has finished removing the threats it found.

Step 3: Run a second-opinion scan with HitmanPro
A second scanner can catch remnants missed by the first pass. Review detections carefully, especially on business systems containing custom administrative tools.
HitmanPro is a second-opinion scanner — it’s designed to catch what your main antivirus might have missed. Instead of relying on a single detection engine, it checks the behavior of files in the locations where malware usually hides. Anything suspicious gets sent to the cloud, where it’s analyzed by two of the best antivirus engines available: Bitdefender and Kaspersky.
Good news: scanning is completely free, with no limits. You only need a license when it’s time to remove what was found — and even then, you can activate a free one-time 30-day trial to clean your PC at no cost. (A full license is $24.95 per year for 1 PC.)
-
Download HitmanPro
Click the button below to download HitmanPro. Remember — the scan is free, so you have nothing to lose by checking your PC.
Download HitmanProFree scan. Removing threats needs the free 30-day trial. Opens the official HitmanPro page in a new tab. HitmanProSecond-opinion malware scanner from Sophos
 -
Install HitmanPro
When the download finishes, open your Downloads folder and double-click the file: “hitmanpro.exe” on 32-bit Windows, or “hitmanpro_x64.exe” on 64-bit Windows.
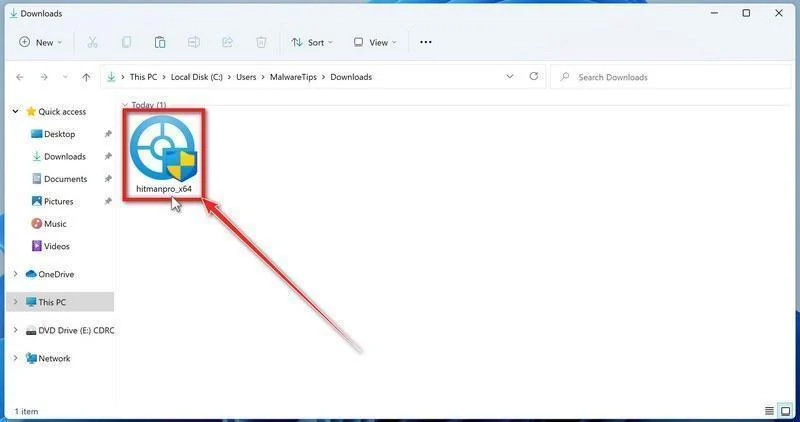
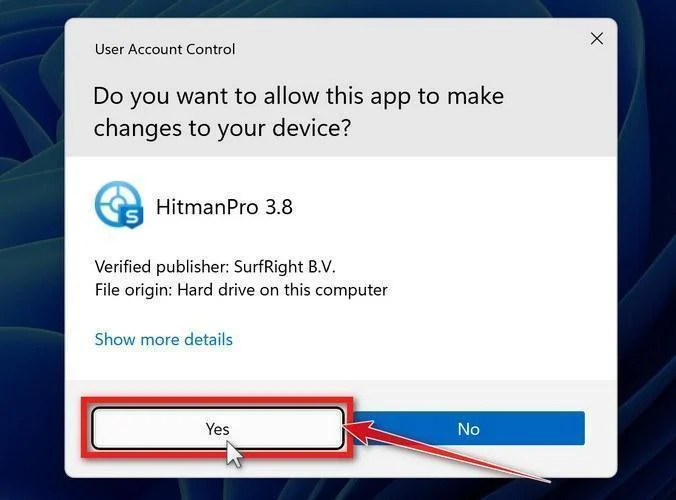
If a User Account Control pop-up asks whether HitmanPro can make changes to your device, click “Yes” to continue.
-
Follow the On-Screen Prompts
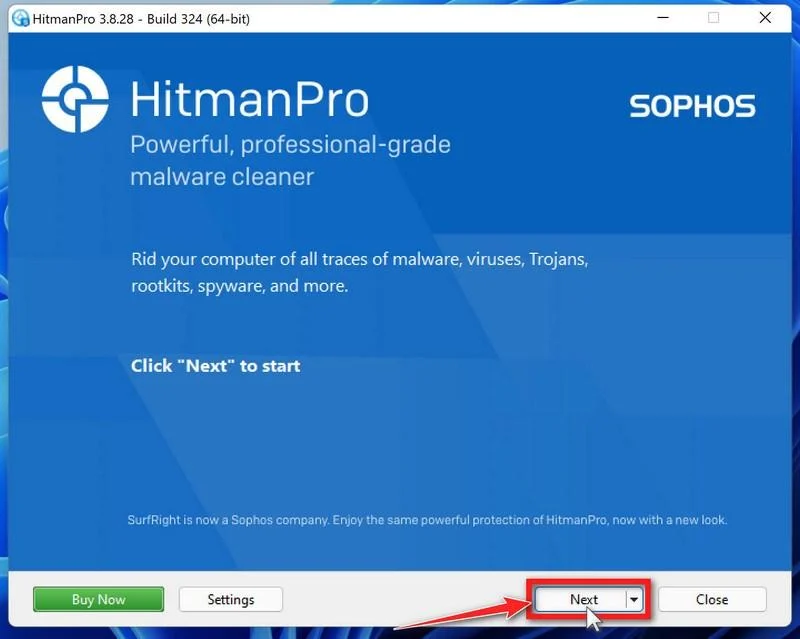
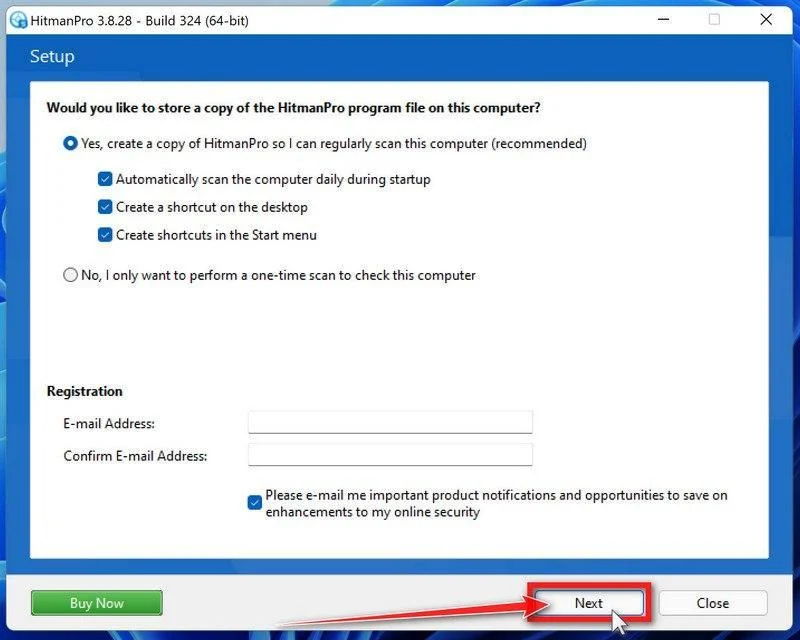
On the HitmanPro start screen, click “Next” to begin the system scan. No lengthy setup required — it goes straight to work.
-
Wait for the Scan to Finish
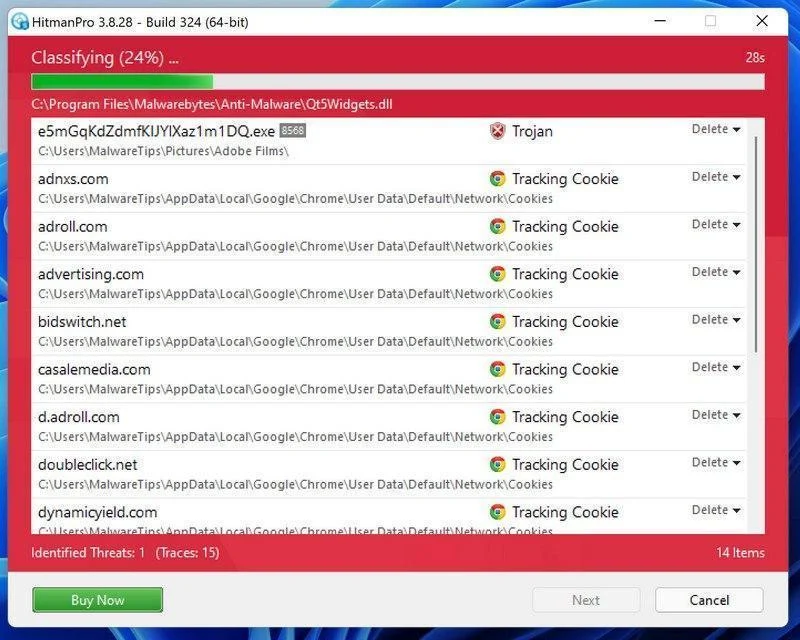
HitmanPro will now check your computer for malicious programs. This usually takes just a few minutes thanks to its cloud-based scanning.
-
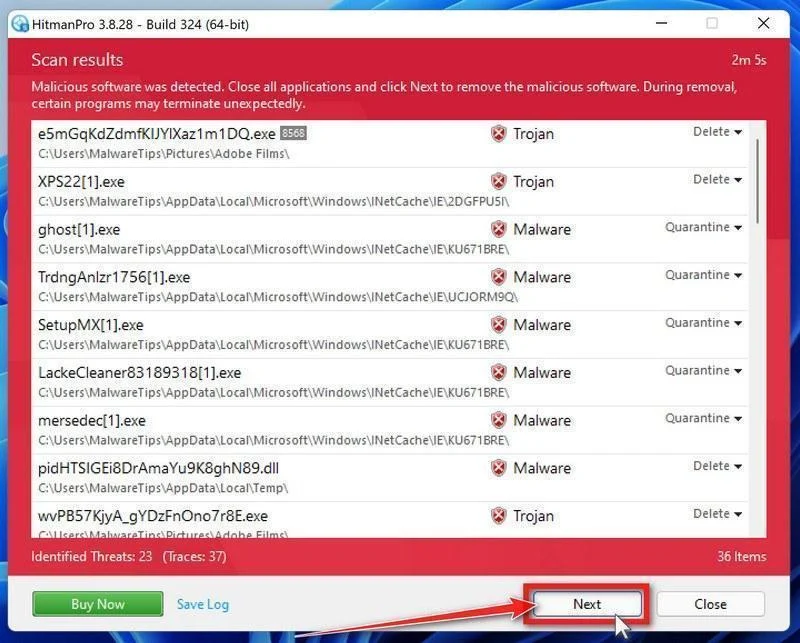
Review the Results and Click “Next”
When the scan is done, HitmanPro will show you everything it found. Click “Next” to remove the detected threats.
-
Click “Activate Free License”
To remove the malicious files, click the “Activate free license” button. This starts your free 30-day trial — no payment details needed — and unlocks the full cleanup.
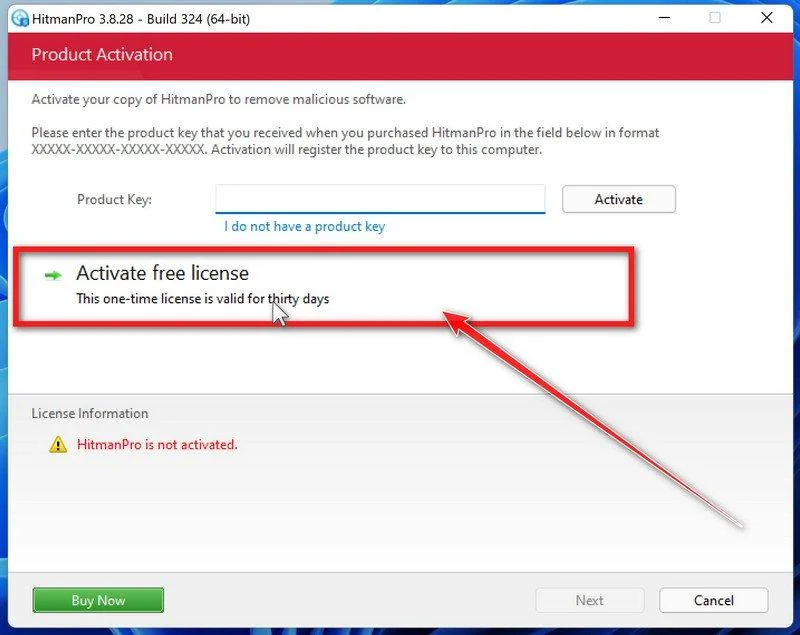
When the removal is complete, HitmanPro will show a summary of everything it cleaned. Click Next, then click Reboot if prompted. If there’s no reboot prompt, just click Close — your PC is clean.
Step 4: Check for remaining threats with ESET
An additional ESET scan helps confirm that no active payload or related malware remains. Do not reconnect backups until the system is considered clean.
ESET Online Scanner is a free second-opinion scanner that performs a deep, full-system check for viruses, trojans, rootkits, and other malware. We use it as the final step because it’s thorough — if anything slipped past the previous scans, ESET will find it. A clean result here means your computer is malware-free.
-
Download ESET Online Scanner
Click the button below to download ESET Online Scanner.
Download ESET Online ScannerOpens the official download page in a new tab. ESET Online ScannerFree one-time malware scan from ESET
 -
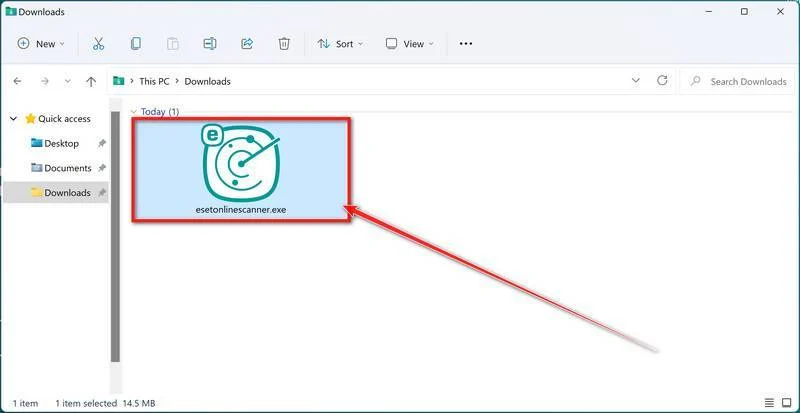
Run the Installer
When the download finishes, open your Downloads folder and double-click “esetonlinescanner.exe“.
-
Install ESET Online Scanner
On the start screen, select your language from the drop-down menu and click Get started.
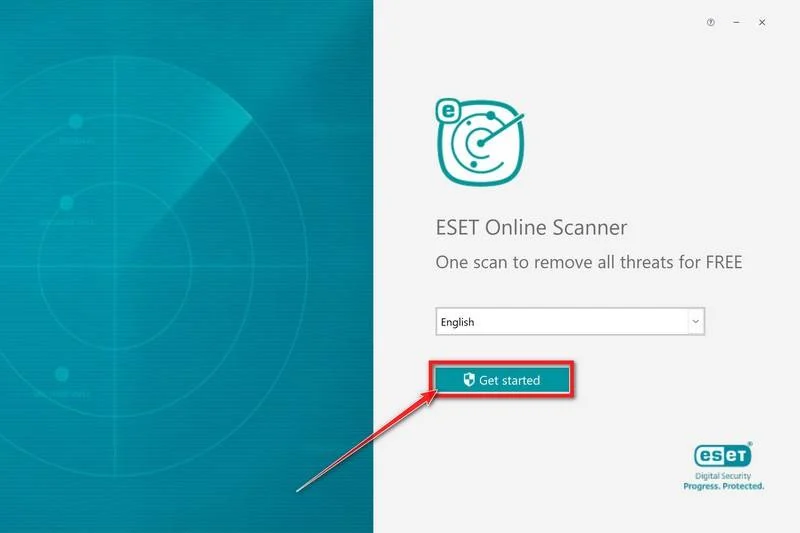
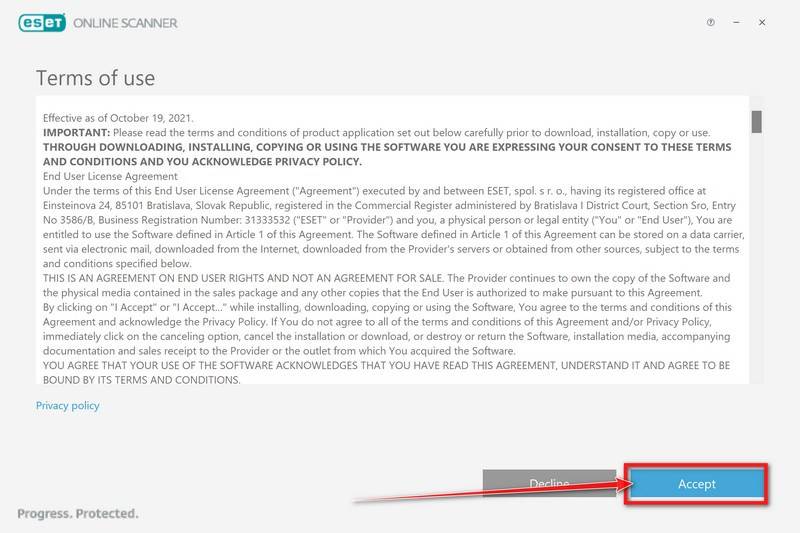
On the Terms of use screen, click Accept.
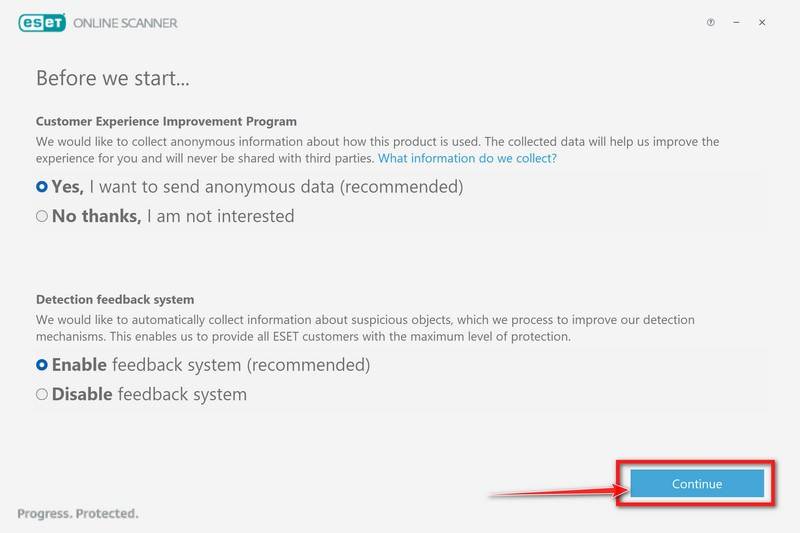
Choose your preferences for the Customer Experience Improvement Program and the Detection feedback system (either choice is fine), then click Continue.
-
Start a Full Scan
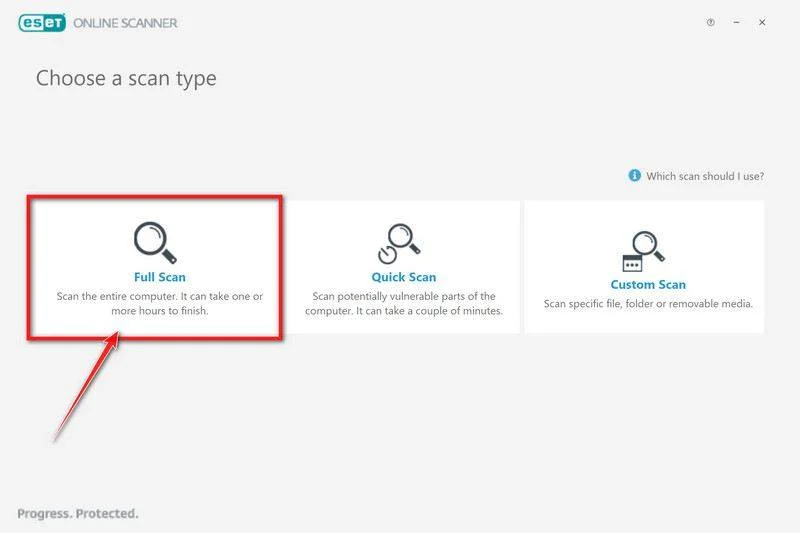
Click Full Scan — this checks your entire computer, not just the common hiding spots.
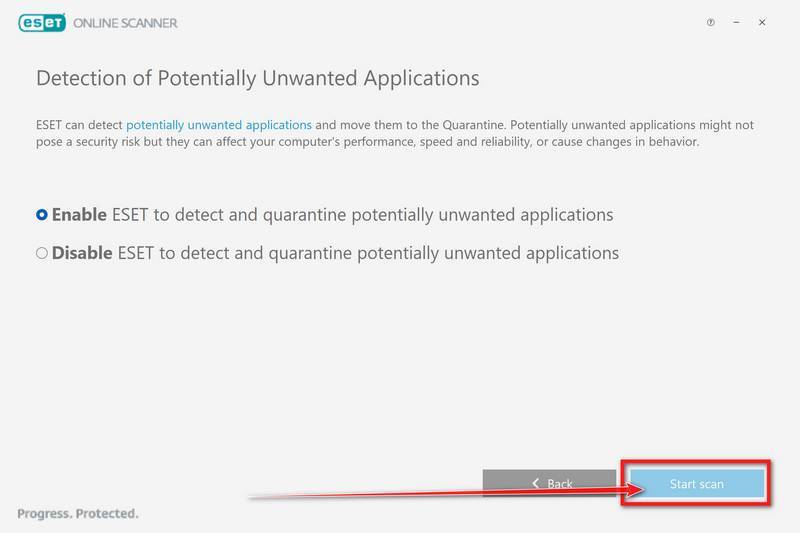
Select Enable for Detection of Potentially Unwanted Applications — this lets ESET catch adware and bundled junk programs, not just viruses. Then click Start scan.
-
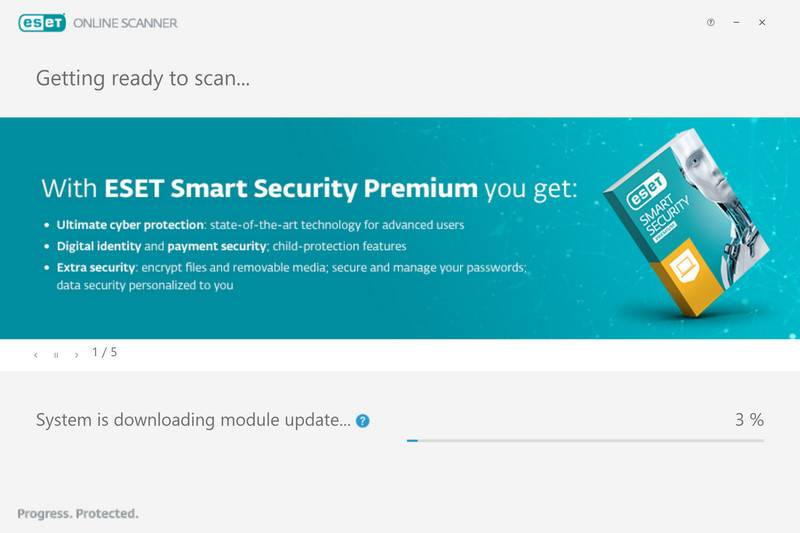
Wait for the Scan to Finish
ESET will now check every file on your computer. Because it’s a full scan, this can take a while — often an hour or more, depending on how much data you have. Leave it running in the background and check on it from time to time.
-
Review the Results
When the scan completes, the Found and resolved detections screen appears. Any threats found were automatically cleaned and quarantined — there’s nothing extra you need to do. Click View detailed results if you want to see exactly what was removed.
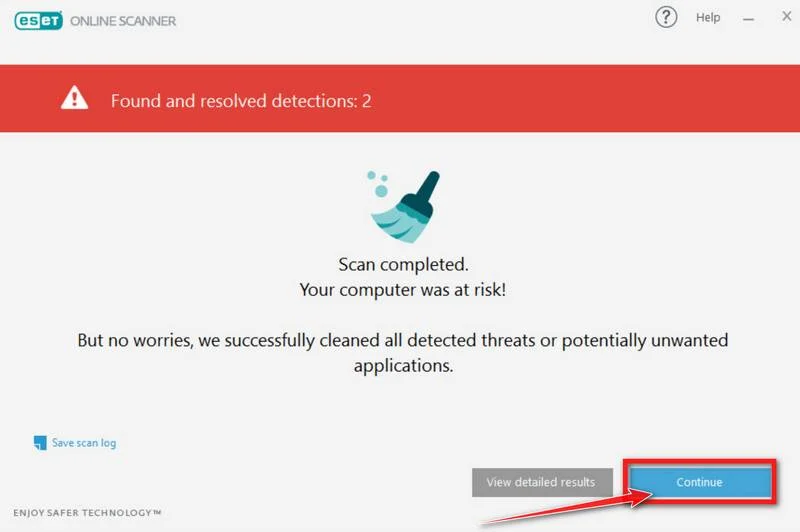
If ESET found nothing — congratulations, your computer has passed the final check and is malware-free.
Step 5: Attempt recovery only after the infection is removed
Start with a verified offline backup. If none exists, check cloud version history, trusted decryptor databases, and recovery methods on copies of the encrypted files.
Unfortunately, in most cases, it’s not possible to recover the files encrypted by this ransomware virus because the private key which is needed to unlock the encrypted files is only available through the attackers. However, below we’ve listed three options you can use to try and recover your files.
Option 1: Search a decryption tool for this ransomware
The cybersecurity community is constantly working to create ransomware decryption tools, so you can try to search these sites for updates:
- https://id-ransomware.malwarehunterteam.com/
- https://decrypter.emsisoft.com/
- https://noransom.kaspersky.com/
- https://www.avast.com/ransomware-decryption-tools
Option 2: Use EaseUS Data Recovery Wizard Free to recover the encrypted files
EaseUS Data Recovery Wizard Free can restore files and repair corrupted files with simple clicks. Its powerful scanning algorithms can identify and retrieve huge file type library, including all of the popular video files, audio files, photos, and document formats.
While the free version only allows you to recover 2 GB of data, this can be helpful to see if the recovery is possible and restore back the most important files from your computer.
-
Download EaseUS Data Recovery Wizard Free.
You can download EaseUS Data Recovery Wizard Free by clicking the link below.
Download EaseUS Data Recovery WizardOpens the download page in a new tab. EaseUS Data Recovery WizardFile recovery tool with a free version
 -
Double-click on the EaseUS Data Recovery Wizard Free setup file.
When EaseUS Data Recovery Wizard Free has finished downloading, double-click on the setup file to install EaseUS Data Recovery Wizard on your computer. In most cases, downloaded files are saved to the Downloads folder.
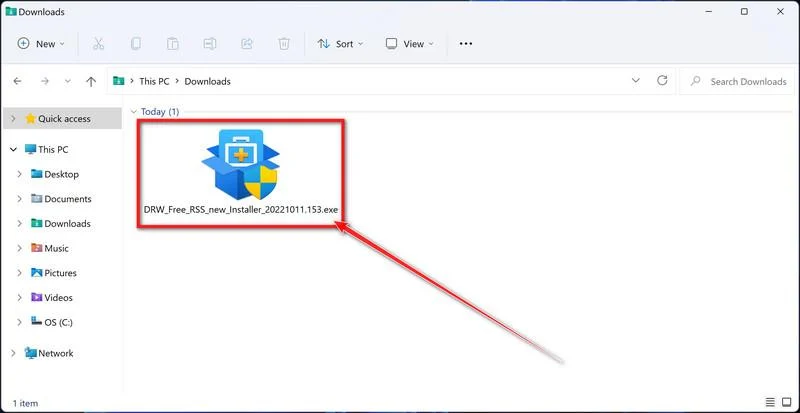
You may be presented with a User Account Control pop-up asking if you want to allow EaseUS to make changes to your device. If this happens, you should click “Yes” to continue with the EaseUS Data Recovery Wizard Free installation.
-
Follow the on-screen prompts to install EaseUS Data Recovery Wizard.
When the EaseUS Data Recovery Wizard installation begins, click on the “Install Now” as seen in the image below.
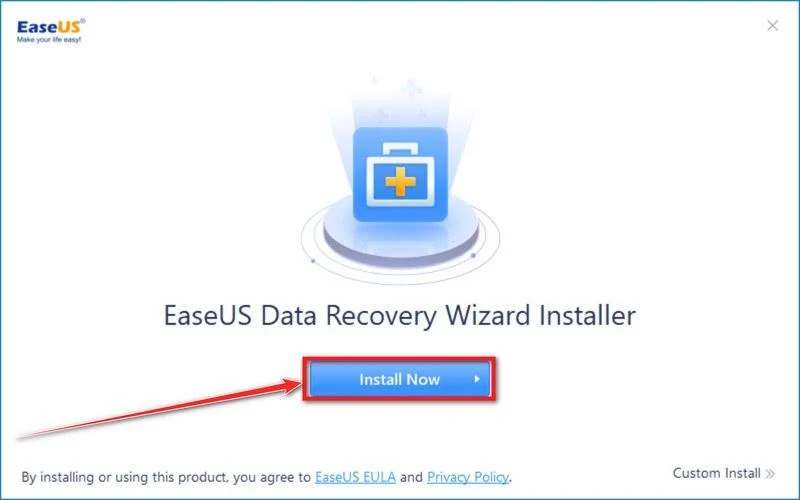
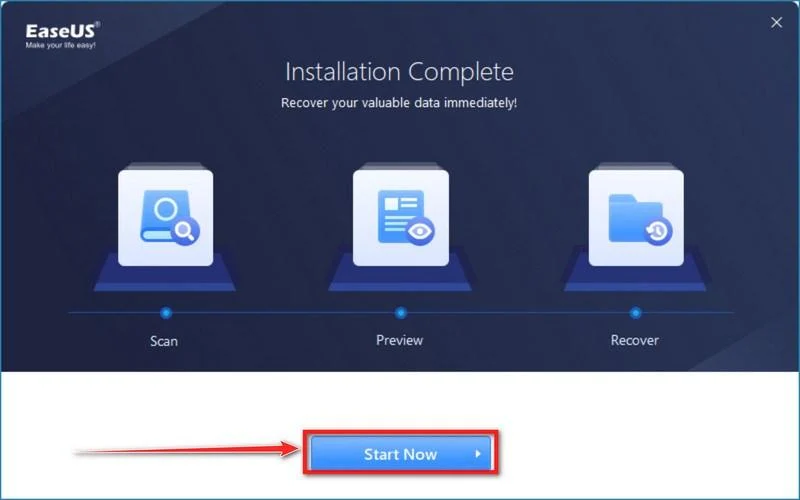
When your EaseUS Data Recovery Wizard installation completes, click the “Start Now” button to start the program.
-
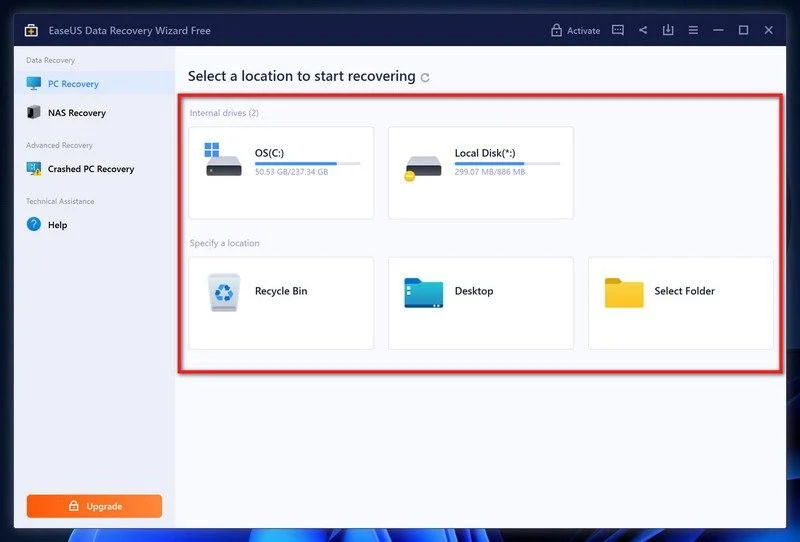
Select a location to start recovering the encrypted files.
Choose the drive or folder where you are the encrypted files that you want to recover and click “Scan“.
-
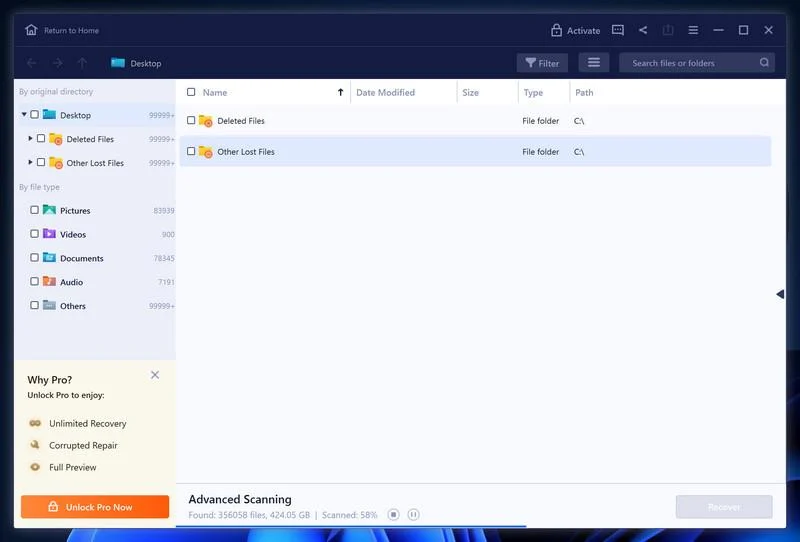
Wait for the EaseUS Data Recovery Wizard scan to complete.
EaseUS Data Recovery Wizard will now scan your computer files that can be restored. This process can take a few minutes, so we suggest you do something else and periodically check on the status of the scan to see when it is finished.
-
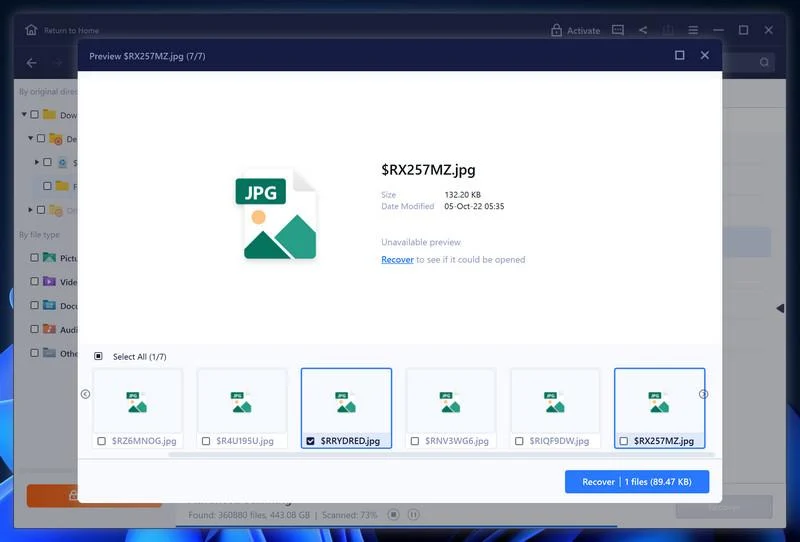
Find the files you want to recover.
When the EaseUS Data Recovery Wizard scan is finished scanning it will show a screen that displays the files that can be recovered. This tool can recover a lot of data, use the “Filter” button to quickly filter specific file types and find the files that you want to recover.
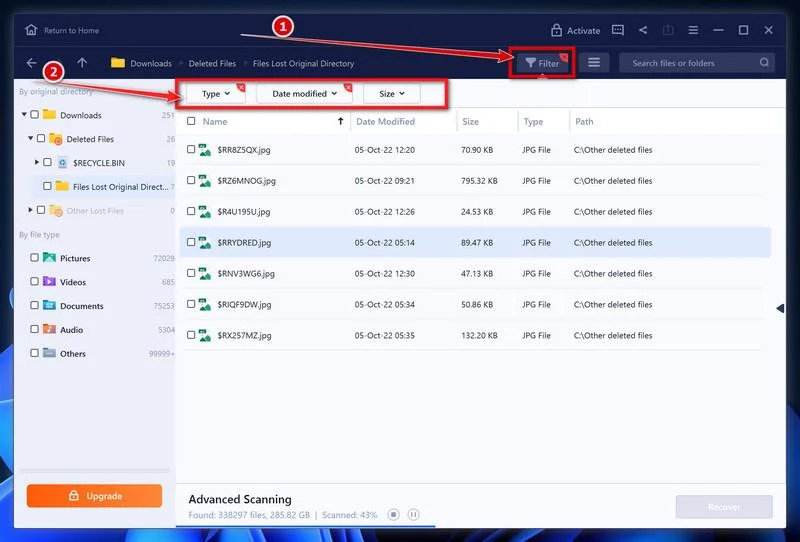
Click the “Preview” button or double-click on a file for a full preview.
-
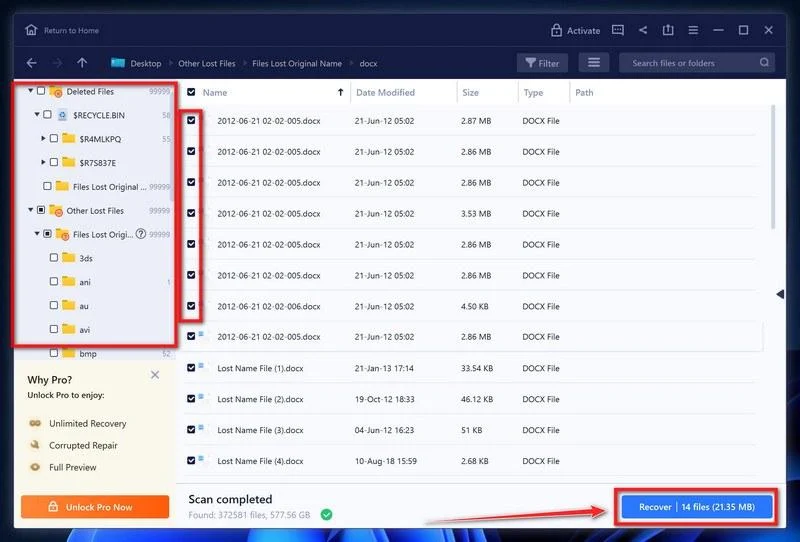
Select your files and click “Recover”.
Finally, select the the files you want to recover and click “Recover“.
Choose a safe location to save all the files.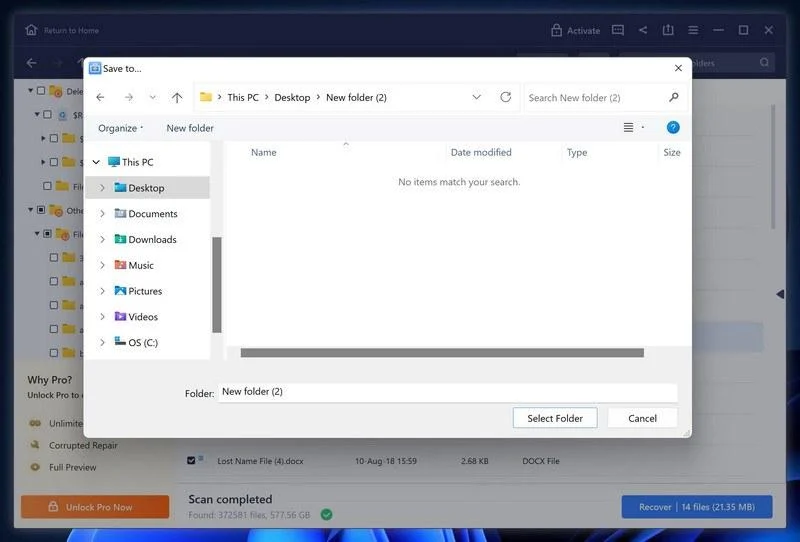
The free version only allow you to recover 2 GB of data, however, this will allow you to recover the most important files and see if EaseUS Data Recovery Wizard can correctly recover them.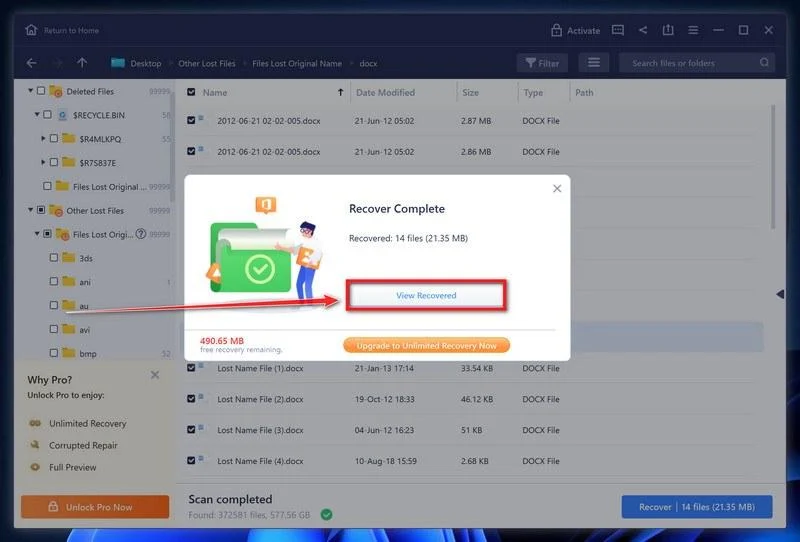
Option 3: Try to restore your files with ShadowExplorer
This ransomware will attempt to delete all shadow copies when you first start any executable on your computer after becoming infected. Thankfully, the infection is not always able to remove the shadow copies, so you should continue to try restoring your files using this method.
-
Download ShadowExplorer.
You can download ShadowExplorer from the below link.
Download ShadowExplorerOpens the official download page in a new tab.ShadowExplorerRestores files from Windows Shadow Volume Copies -
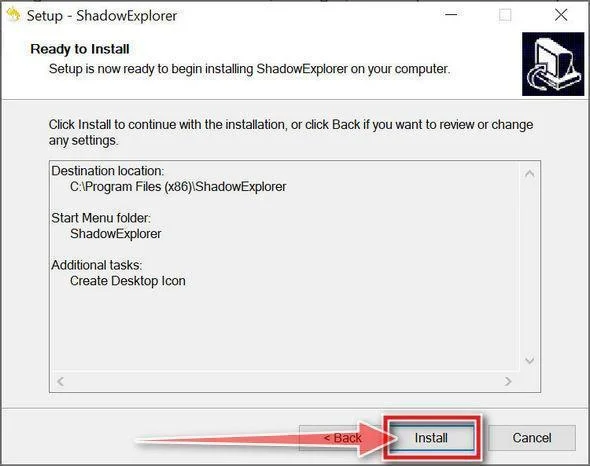
Install ShadowExplorer.
Double-click on the ShadowExplorer-x.x-setup file to start the installation process, then follow the on-screen promts to install this program.
-
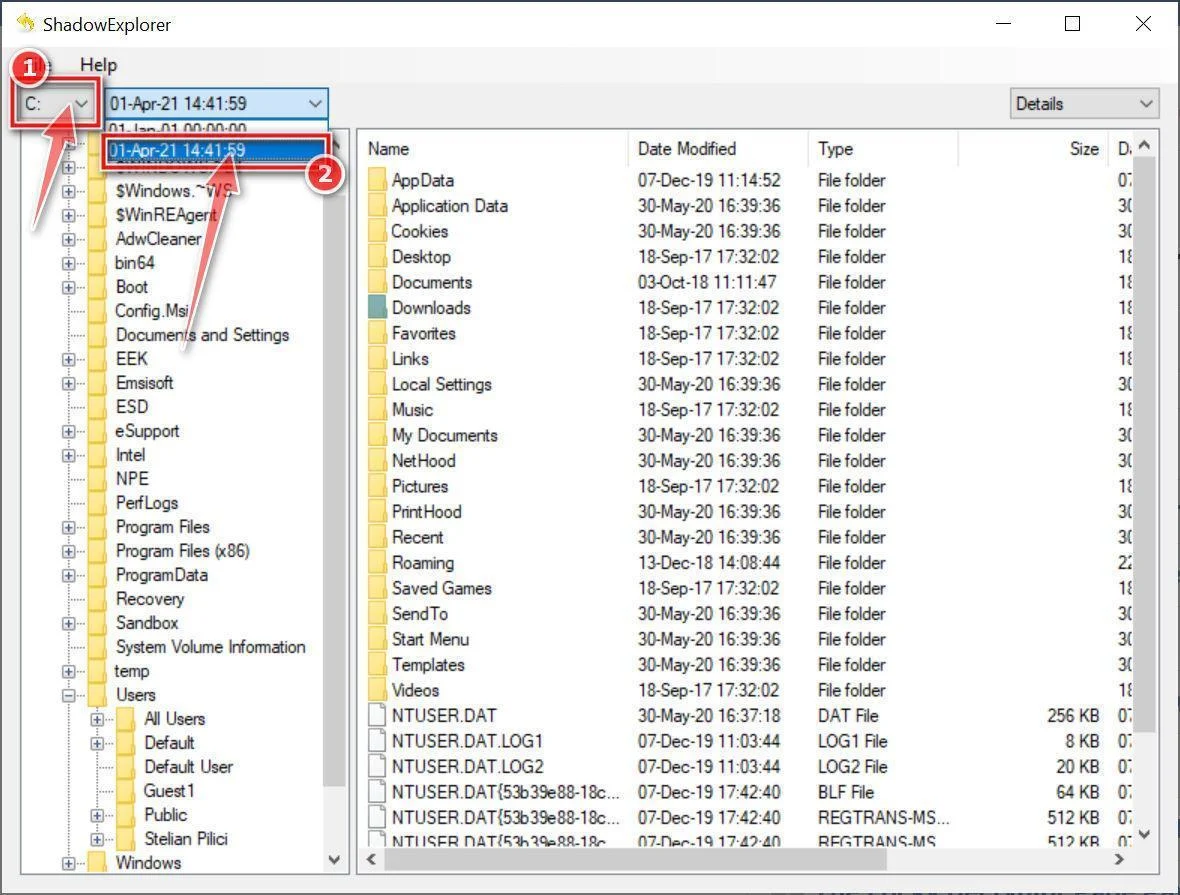
Select snapshot date.
Open ShadowExplorer and then from the top bar select the drive where the files that you want to save are located, then select from the snapshot available one previous to this infection.
-
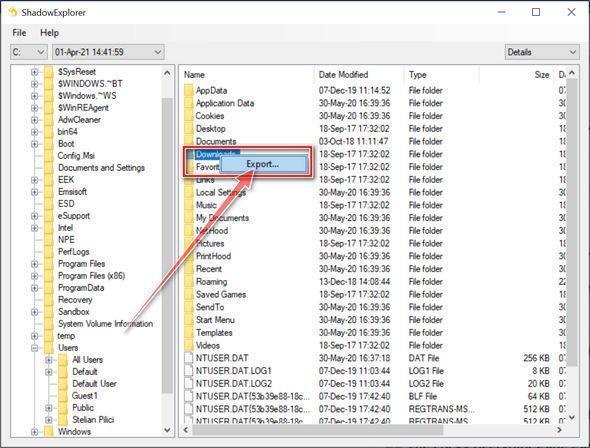
Export the files that you want to recover.
Once you have found a copy of the original file or folder, right-click on it and the select “Export”. A window will prompt you where you want to save the file or folder.
How to Protect Your Files From Another Ransomware Attack
A recovery plan is strongest when it assumes one device will eventually fail or become compromised. Keep multiple copies rather than trusting a single external drive.
Use the 3-2-1 principle: three copies, on two storage types, with one copy offline or offsite. Test restoration instead of assuming the backup works.
Versioned cloud storage can help with accidental replacement, but it should complement an offline backup. Synchronized folders alone are not a ransomware strategy.
Reduce the chance that an unknown file can run
Show file extensions in Windows, block macros from internet documents, and avoid cracked software. Standard user accounts limit damage compared with routine administrator use.
Keep Windows, browsers, document readers, remote access tools, and internet-facing applications updated. Remove software that no longer receives security fixes.
AdGuard can help block malicious advertising and known harmful destinations during browsing. Keep endpoint protection enabled because filtering cannot inspect every downloaded or locally launched file.
Harden remote access and important accounts
Disable unused remote services. Place necessary access behind a VPN, require multifactor authentication, restrict source addresses, and monitor unsuccessful sign-ins.
Use unique passwords for email, backup administration, and remote management. A password manager prevents one stolen credential from unlocking several critical systems.
Business networks should separate ordinary workstations from servers and backup repositories. Segmentation can limit how far one compromised account can reach.
Practice recovery before an emergency
Choose several representative files and restore them periodically. Confirm their contents open correctly rather than accepting a backup program’s successful status.
Document who can isolate systems, contact providers, authorize restoration, and notify affected people. A written plan reduces hesitation during a fast-moving incident.
Keep recovery instructions somewhere ransomware cannot encrypt. Printed contact details and an offline copy of the response plan can be invaluable.
HMDL Ransomware FAQ
Does HMDL add an extension to encrypted files?
The examined HMDL sample leaves filenames and extensions unchanged. Files can therefore look normal in Explorer while their encrypted contents remain unreadable.
Can renaming an HMDL file restore it?
No. Renaming changes only the label Windows displays. It does not reverse the cryptographic transformation applied to the file’s contents.
Is there a free HMDL decryptor?
No confirmed public HMDL decryptor was identified during this review. Availability can change, so check trusted recovery projects without uploading confidential originals.
Will Malwarebytes decrypt HMDL files?
Malwarebytes is intended to detect and remove malicious software. It does not automatically decrypt data that HMDL already encrypted.
Should I delete the !!README_HMDL!!.txt note?
Keep a copy. The note contains identifiers and payment details that may help researchers, incident responders, insurers, or law enforcement connect related cases.
Can I restore files immediately after disconnecting the computer?
Wait until the malware is removed and the system is trustworthy. Restoring too early can expose a clean backup to remaining ransomware or another active loader.
The Bottom Line
HMDL is dangerous because encrypted files may keep their original names. The ransom note and widespread opening errors reveal damage that ordinary icons can conceal.
Isolate the computer, preserve evidence, remove every malicious component, then restore from verified backups or trusted recovery methods. Never treat a cryptocurrency demand as guaranteed support.
If you are still having problems with your computer after completing these instructions, then please follow one of the steps:
- Run a computer scan with Emsisoft Emergency Kit
- Ask for help in our Malware Removal Assistance for Windows forum.

Join the discussion
0 commentsShare your experience or ask a question about this article.
Your progress
Did these steps help?
Let us know how the guide worked for you.
Describe what you see and the step you reached. Keep passwords and other private information out.
Discussion
Start the conversation
Have a question or something useful to share? Add the first comment.