Mailbox Overview Available Scam: Fake Storage Login Page Fully Exposed
Written by: Lapain Epuran
Published on:
A mailbox at 87% capacity sounds believable, not catastrophic. The message promises a neat summary and a chance to clear space before delivery problems begin.
That practical tone makes the alert easy to follow without much thought. The details behind its “overview” button deserve a slower, more careful reading.
Overview
A Routine Storage Reminder With Just Enough Detail
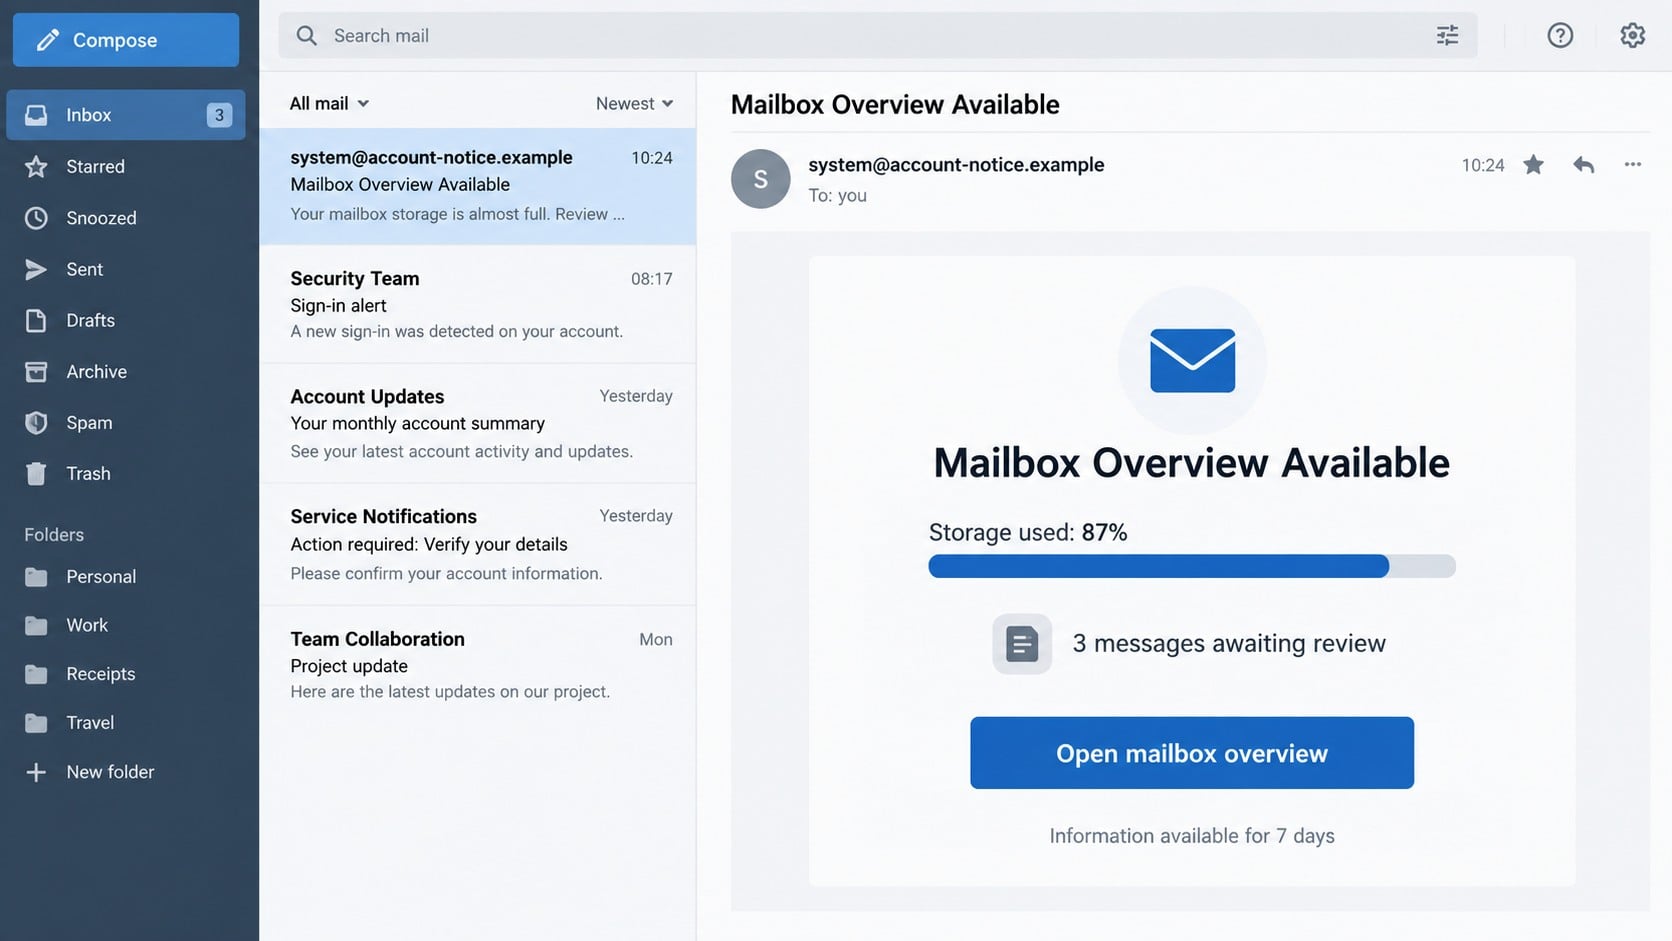
The Mailbox Overview Available email claims storage has reached 87% and recommends cleanup to maintain performance.
It may list three messages awaiting review, mention improved AI sorting, and provide a maintenance-window timestamp.
A button labeled “Open mailbox overview” promises one place to inspect messages and remove unnecessary content.
The notice says the information remains available for seven days. That soft deadline encourages action without sounding like an obvious threat.
The campaign is framed as a service update rather than a security emergency. Familiar administrative language helps it blend into a busy inbox.
The Overview Opens an Adaptive Password Form
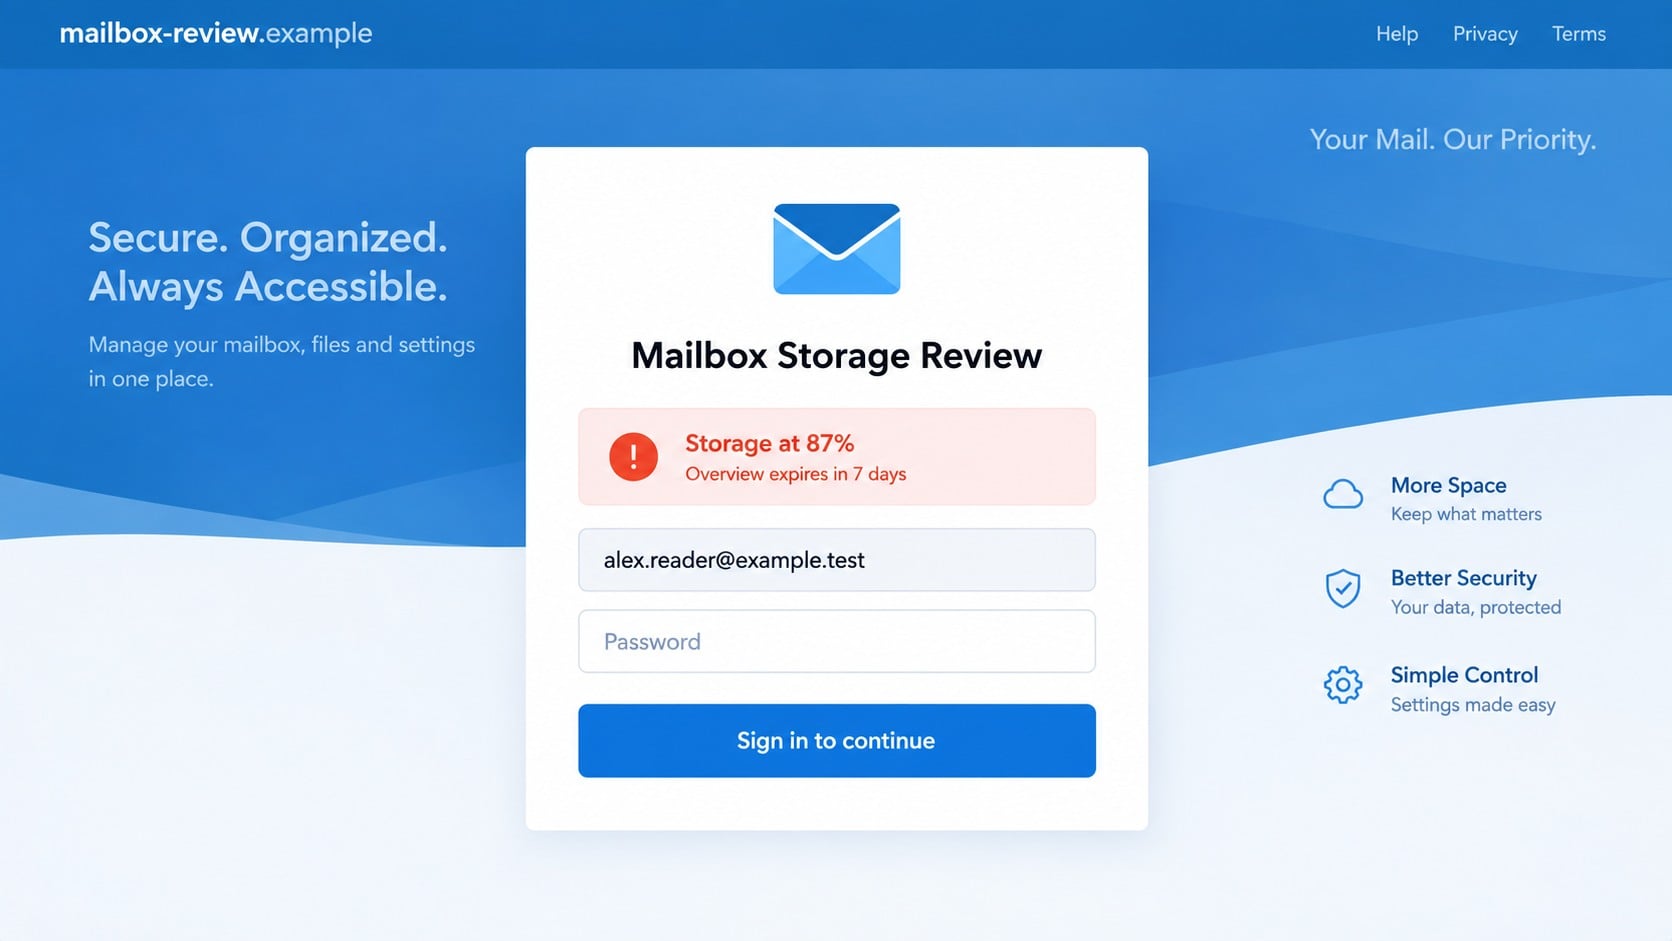
The button takes the recipient to an external phishing page hosted outside the genuine email provider’s account system.
The page can identify the address domain and imitate a corresponding provider. One visitor may see a Gmail-like form while another sees different styling.
A prefilled email address makes the session appear established. Only the password field may remain empty, reducing the effort required to comply.
The fake form cannot measure storage, review messages, or change sorting. It exists to collect the password entered into it.
Legitimate cloud platforms can be abused to host deceptive pages. Trust belongs to the complete destination and service relationship, not the hosting company’s reputation.
The Target Is the Account Behind the Storage Warning
Once criminals control email, they can read sensitive conversations, intercept recovery links, and impersonate the owner.
They may quietly forward new messages to another address while filtering genuine security notifications from view.
The email invents an exact-looking 87% storage measurement.
Three waiting messages create curiosity and mild concern.
AI sorting language makes the notice feel current.
A seven-day window introduces pressure without panic.
The button opens an unrelated provider-style login.
A prefilled address gives the counterfeit page familiarity.
The submitted password enables wider account takeover.
Google, Gmail, and other providers whose appearance may be copied are not responsible for the fraudulent page.
Reading the message alone does not normally infect a device. Credential exposure starts when information is submitted, while downloads create a separate malware concern.
A real storage warning is easy to verify inside the provider’s official dashboard. There is no reason to trust the route supplied by this email.
How the Mailbox Overview Available Scam Works
Step 1: A Generic System Notice Reaches Many Providers
The sender uses a neutral identity such as “System Services” instead of naming one email company.
That choice allows a single campaign to target personal accounts, hosted domains, schools, and businesses.
The message may insert the recipient’s address into the heading. Automated personalization does not require access to the mailbox.
Storage is a universal concern. Nearly every mail service imposes limits or sells additional capacity, making the story broadly plausible.
The campaign avoids identifying a plan, quota, billing account, or provider. Those omissions preserve flexibility but weaken authenticity.
Step 2: The 87% Figure Creates Precision Without Proof
An exact 87% figure feels like data retrieved from an account. In reality, the same number can appear in every copy.
The email offers no storage total, used amount, attachment breakdown, or link to a documented quota policy.
Three supposedly waiting messages add another specific number. The notification does not name their senders, subjects, or dates.
A maintenance timestamp and AI-sorting note fill the page with administrative detail. Neither can be verified from the email itself.
These details encourage pattern recognition. Recipients see a dashboard-like summary and assume a back-end measurement exists.
Step 3: The Button Avoids a Direct Security Warning
“Open mailbox overview” sounds less threatening than “verify now” or “prevent suspension.”
The calm wording can bypass the skepticism people reserve for urgent phishing. It resembles a convenience feature rather than a demand.
The seven-day availability line still creates a clock. People may click now so they do not forget later.
Any message claiming limited access should be checked through the official account. Provider dashboards do not depend on an email button.
The link can contain the recipient address as a parameter. That value helps the landing page choose its appearance.
Step 4: Hosted Code Builds a Provider-Specific Illusion
The phishing page may run scripts that inspect the address domain and load matching colors, words, or background images.
It can display a copied error page or generic account screen behind the login card, making the form feel embedded in a real service.
The address may already be filled in. That is not account recognition from the provider, only data passed from the campaign link.
Cloud storage hosting can add HTTPS and a familiar infrastructure name. Neither feature authorizes the page to collect email passwords.
Step 5: The Password Travels to the Phishing Operator
When the victim submits the form, the page sends the credential to an attacker-controlled endpoint.
The operator may receive the address, password, IP information, browser details, and campaign identifier together.
A fake error can request another attempt. The second entry helps confirm the credential or capture a different password.
The page may redirect afterward, creating the impression that the overview expired or temporarily failed.
No storage cleanup takes place. The form has no legitimate connection to the mailbox quota or message database.
Step 6: The Stolen Inbox Supports Quiet Secondary Attacks
Attackers may search for password resets, bank alerts, shopping receipts, payroll records, tax documents, and cloud invitations.
They can change recovery details or approve a connected application before the victim resets the password.
Forwarding rules preserve surveillance. Filters can hide security warnings and replies from contacts targeted with further phishing.
A business mailbox can reveal invoice schedules and internal approval language, enabling payment diversion with credible timing.
A personal account can unlock shopping, social, utility, and subscription services through password recovery.
The attacker may sell access to another criminal. Follow-up activity can therefore appear days or weeks after the original message.
How to Check a Mailbox Storage Warning
Read the Quota Inside the Official Account
Open the provider through a saved bookmark, official application, or manually typed address.
Locate storage settings, account usage, or plan information. Genuine figures should show the total quota and amount consumed.
Compare the dashboard with the email’s 87% claim. If the figures differ, preserve the message and report it as phishing.
Even when the quota is genuinely high, manage it inside the account. A coincidental number does not validate the email link.
Verify the Sender and Link Ownership
Expand the full sender, Return-Path, and Reply-To fields. A name such as “System Services” carries no ownership information.
Preview the button address. Identify the registered domain, not provider words placed inside a subdomain or folder.
Provider communications should remain within documented domains or clearly named delivery partners.
An unfamiliar cloud-hosting address deserves caution because storage management requires an authenticated relationship with the actual provider.
Question the Numbers and Feature Claims
Ask whether the notice includes total capacity, used capacity, account plan, and a recognizable settings route.
Three waiting messages should be visible inside the real mailbox. A legitimate system does not need another password to reveal their existence.
AI-sorting language may be fashionable decoration. Confirm whether your provider actually offers the named feature.
Maintenance windows should appear on an official status page or administration dashboard, not only inside an unsolicited message.
Contact Support From a Known Source
Use a support link inside the official dashboard, a contract, or a previously verified provider page.
Ask whether the account reached the stated threshold and whether mailbox-overview emails are part of normal service.
Company users should contact their internal help desk. An administrator can check quotas and server logs without asking for the user’s password.
Do not reply to the questionable notice. The response may confirm that your address is active.
Why the Fake Page Can Look Personally Accurate
The campaign link can carry your email address in an encoded parameter. The landing page reads that parameter when it loads.
Everything after the @ symbol identifies the mail domain. A script can use it to select a matching template.
For common providers, the kit may contain copied colors and familiar language. For custom domains, it can show a neutral webmail form.
This process does not query the real mailbox. It cannot see storage, messages, contacts, or authentication status before credentials are submitted.
A prefilled address therefore proves only that the attacker already knew where the phishing email was sent.
The strongest defense is checking the browser address. A convincing visual design cannot change who owns the destination domain.
What to Do If You Fell Victim to This Scam
Respond according to the information and permissions you provided. The most urgent recovery begins when a real mailbox password reached the fake form.
Exit the page and document the incident.
Save the phishing email, headers, landing address, screenshots, and submission time. Note whether the page displayed an error or requested multiple attempts.
Report it through the provider or workplace security channel. Do not forward the active link casually.
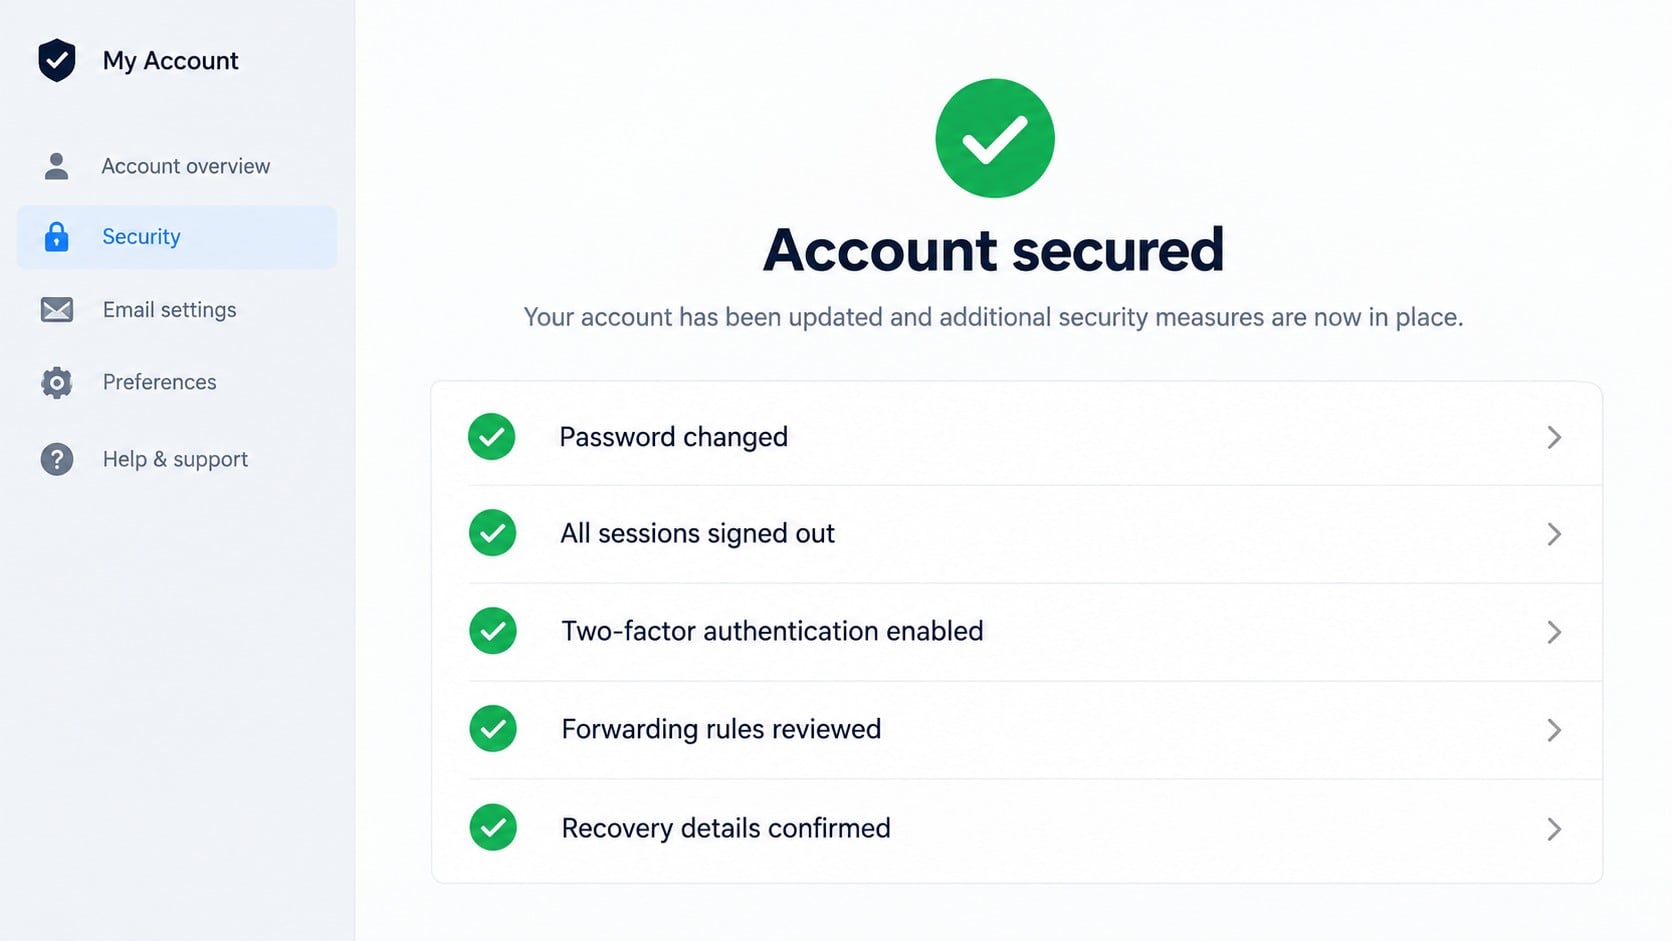
Replace the mailbox password immediately.
Use the official provider on a trusted device and create a unique credential. Avoid patterns based on the exposed password.
Change every other account using the same or similar secret. Password reuse can turn one mailbox incident into several takeovers.
End sessions and enable stronger authentication.
Sign out all devices, remove unknown sessions, and revoke application passwords or connected apps.
Enable two-factor authentication. Passkeys or hardware security keys provide stronger protection against future phishing.
Review forwarding, filters, and recovery information.
Delete external forwarding addresses, rules, delegates, and automatic replies you did not create.
Confirm recovery email, phone, security keys, and backup codes. Replace any factor that the attacker changed or observed.
Inspect linked accounts and recent messages.
Look for password-reset confirmations, new purchases, altered subscriptions, and messages sent from your account.
Reset sensitive services tied to the mailbox. Contact providers where unauthorized changes already occurred.
Check the device when extra content was opened.
If the page downloaded anything or installed an extension, run Malwarebytes and a complete operating-system scan.
AdGuard can block many known phishing destinations and deceptive advertisements. It provides another barrier but cannot reverse credential theft.
Warn contacts and address financial harm.
Notify people who received unusual mail from your account. Use a separate channel when the compromised mailbox may still be monitored.
Contact the bank for unauthorized payments and report the incident to the appropriate fraud authority. Keep every case and transaction reference.
Is Your Device Infected? Run a Free Malware Scan
Slow performance, constant pop-ups, or strange behavior? These are classic signs of a malware infection. The fastest way to find out is to scan your device with Malwarebytes Anti-Malware Free — one of the most trusted malware removal tools available.
The free version detects and removes the most common threats, including:
Adware — the cause of those annoying pop-ups
Browser hijackers — unwanted redirects and changed homepages
Trojans and spyware — hidden programs stealing your data
Potentially unwanted programs (PUPs) — software you never asked for
👉 Select your device below — Windows, Mac, or Android — then follow the simple steps to download Malwarebytes, scan your system, and remove any threats it finds. The whole process takes about 5 minutes.
Malwarebytes for WindowsMalwarebytes for MacMalwarebytes for Android
Run a Malware Scan with Malwarebytes for Windows
Malwarebytes is one of the most popular and trusted anti-malware tools for Windows — and it’s completely free for removing infections. It catches threats that many antivirus programs miss, including adware, browser hijackers, and trojans. Follow the steps below to scan and clean your PC in just a few minutes.
Download Malwarebytes
Click the button below to download the latest version of Malwarebytes for Windows from the official source. The free version is all you need — it will scan your computer and remove adware, browser hijackers, and other malicious software at no cost.
(The link opens in a new page where your download will start)
Install Malwarebytes
When the download finishes, open your Downloads folder and double-click the MBSetup file. If Windows shows a User Account Control pop-up, click “Yes” to allow the installation.
Follow the On-Screen Prompts to Install Malwarebytes
The setup wizard will walk you through a few quick screens:
Choose where you’re installing the program — “Personal Computer” or “Work Computer” — then click Next.
Malwarebytes will now install on your device. This usually takes under a minute.
When installation is complete, the “Welcome to Malwarebytes” screen will open automatically.
On the final screen, click Open Malwarebytes to launch the program.
Enable “Scan for Rootkits”
Before scanning, turn on rootkit detection so Malwarebytes can find even the most hidden threats. Click the Settings gear icon on the left side of the screen.
In the settings menu, find “Scan for rootkits” and click the toggle so it turns blue.
Done? Click “Dashboard” in the left pane to return to the main screen.
Start the Scan
Click the blue Scan button. Malwarebytes will automatically update its virus database and start checking your computer for malware.
Wait for the Scan to Finish
The scan checks your entire system for browser hijackers and other malicious programs, so it can take several minutes. Feel free to do something else — just check back occasionally to see the progress.
Quarantine the Detected Threats
When the scan is done, you’ll see a list of everything Malwarebytes found — malware, adware, and potentially unwanted programs. Click the “Quarantine” button to remove all of them at once.
Malwarebytes will now remove the malicious files and registry entries and move them safely into quarantine.
Restart Your Computer
Some threats can only be fully removed after a reboot. If Malwarebytes asks you to restart, click Yes. Once you’re logged back in, your PC is clean and you can continue with the next steps in this guide.
When the scan finishes, click Quarantine to remove everything Malwarebytes found. That’s it — your Windows PC is now clean of trojans, adware, and other malware, and should be back to running smoothly.
If your current antivirus allowed this malicious program on your computer, you may want to consider purchasing Malwarebytes Premium to protect against these types of threats in the future. If you are still having problems with your computer after completing these instructions, then please follow one of the steps:
Malwarebytes for Mac is a free on-demand scanner that removes the malware other security software tends to miss — adware, browser hijackers, and unwanted programs included. Cleaning an infected Mac with Malwarebytes has always been completely free, and it’s our go-to recommendation. Follow the steps below to scan and clean your Mac in just a few minutes.
Download Malwarebytes for Mac
Click the button below to download the latest version of Malwarebytes for Mac.
When the download finishes, open your Downloads folder and double-click the setup file to begin the installation.
Follow the On-Screen Prompts to Install Malwarebytes
The Malwarebytes for Mac Installer will guide you through a few quick screens. Click “Continue” and keep following the prompts until the installation completes.
When the installation is complete, Malwarebytes opens to the Welcome to Malwarebytes screen. Click “Get started“.
Select “Personal Computer” or “Work Computer”
Malwarebytes will ask what type of computer you’re installing it on. Click either Personal Computer or Work Computer, whichever applies.
Start the Scan
Click the “Scan” button. Malwarebytes will automatically update its detection database and begin checking your Mac for malware.
Wait for the Scan to Finish
Malwarebytes will scan your Mac for adware, browser hijackers, and other malicious programs. This can take a few minutes, so feel free to do something else — just check back occasionally to see the progress.
Quarantine the Detected Threats
When the scan is done, you’ll see a list of everything Malwarebytes found. Click the “Quarantine” button to remove all the threats at once.
Restart Your Mac
Malwarebytes will now remove all the malicious files it found. Some threats can only be fully removed after a reboot — if Malwarebytes asks you to restart, allow it. Once you’re logged back in, your Mac is clean.
Once the scan is done, remove every threat it detected. Your Mac is now free of adware, rogue browser extensions, and other potentially harmful software.
If your current antivirus allowed a malicious program on your computer, you might want to consider purchasing the full-featured version of Malwarebytes Anti-Malware to protect against these types of threats in the future. If you are still experiencing problems while trying to remove a malicious program from your computer, please ask for help in our Mac Malware Removal Help & Support forum.
Run a Malware Scan with Malwarebytes for Android
Malwarebytes for Android automatically detects and removes dangerous threats like malware and ransomware so you don’t have to worry about your most-used device being compromised. Aggressive detection of adware and potentially unwanted programs keeps your Android phone or tablet running smooth.
Download Malwarebytes for Android.
You can download Malwarebytes for Android by clicking the link below.
In the Google Play Store, tap “Install” to install Malwarebytes for Android on your device.
When the installation process has finished, tap “Open” to begin using Malwarebytes for Android. You can also open Malwarebytes by tapping on its icon in your phone menu or home screen.
Follow the on-screen prompts to complete the setup process
When Malwarebytes will open, you will see the Malwarebytes Setup Wizard which will guide you through a series of permissions and other setup options. This is the first of two screens that explain the difference between the Premium and Free versions. Swipe this screen to continue. Tap on “Got it” to proceed to the next step. Malwarebytes for Android will now ask for a set of permissions that are required to scan your device and protect it from malware. Tap on “Give permission” to continue. Tap on “Allow” to permit Malwarebytes to access the files on your phone.
Update database and run a scan with Malwarebytes for Android
You will now be prompted to update the Malwarebytes database and run a full system scan.
Click on “Update database” to update the Malwarebytes for Android definitions to the latest version, then click on “Run full scan” to perform a system scan.
Wait for the Malwarebytes scan to complete.
Malwarebytes will now start scanning your phone for adware and other malicious apps. This process can take a few minutes, so we suggest you do something else and periodically check on the status of the scan to see when it is finished.
Click on “Remove Selected”.
When the scan has been completed, you will be presented with a screen showing the malware infections that Malwarebytes for Android has detected. To remove the malicious apps that Malwarebytes has found, tap on the “Remove Selected” button.
Restart your phone.
Malwarebytes for Android will now remove all the malicious apps that it has found. To complete the malware removal process, Malwarebytes may ask you to restart your device.
After the scan, tap Remove Selected to delete all detected threats. Your Android phone is now clean — no more malicious apps, adware, or browser redirects.
If your current antivirus allowed a malicious app on your phone, you may want to consider purchasing the full-featured version of Malwarebytes to protect against these types of threats in the future. If you are still having problems with your phone after completing these instructions, then please follow one of the steps:
Restore your phone to factory settings by going to Settings > General management > Reset > Factory data reset.
Now that your device is clean, keep it that way. Most infections start with a malicious ad or a fake download button — so blocking them at the source is your best defense.
We recommend AdGuard, which blocks malicious ads, phishing pages, and dangerous redirects before they can reach you.
The exact 87% value appears authoritative but is not supported by a total quota or account plan.
The notice lists three messages without senders, subjects, dates, or folder locations.
AI sorting and a maintenance window add modern detail while avoiding verifiable provider information.
The sender uses a generic service identity instead of the organization that manages the account.
The button opens unrelated hosting rather than known mailbox settings.
The login address may be prefilled, but that information came from the phishing link.
The page requests a password even though the user can check storage by opening the existing mailbox normally.
A seven-day expiry encourages haste. Genuine quota information remains visible inside the official account.
How Providers and Organizations Can Reduce These Attacks
Give users a single documented path for viewing mailbox quotas and quarantined messages.
Use external-sender banners and detect messages that combine storage warnings with credential links.
Require phishing-resistant authentication and block legacy protocols that accept passwords without modern safeguards.
Alert on unfamiliar sign-ins, recovery changes, new forwarding rules, mass sending, and suspicious application consent.
Restrict employee approval of third-party mailbox applications. Consent should follow a reviewed business need.
Provide a quick reporting button and automatically search for matching messages after one report.
Teach users to inspect domains and requested actions. Spelling quality alone is a poor phishing test.
Maintain backups and retention policies for important mail. Users under storage pressure are less likely to trust surprise cleanup offers when recovery is understood.
Frequently Asked Questions
Is my mailbox really at 87%?
The email does not prove that figure. Check storage usage directly inside the official provider account.
Are three messages actually waiting for review?
Probably not in this campaign. Any genuine messages should appear in the real inbox, quarantine, or provider dashboard.
Why was my email address already filled in?
The phishing link can pass your address to the page. Prefilling does not mean the provider recognized or authenticated you.
Does cloud hosting make the login safe?
No. Criminals can abuse legitimate hosting services. Verify the exact application and domain relationship before entering credentials.
What if I clicked but entered nothing?
Close the page, inspect downloads and browser permissions, report the message, and monitor the account for unusual activity.
Will deleting old mail fix a real quota issue?
It can, but perform cleanup inside the official account. Also review large attachments, Trash, Spam, and plan options there.
The Bottom Line
The Mailbox Overview Available email uses a believable 87% storage figure and waiting-message summary to direct users into an adaptive password-stealing page.
Check quotas inside the real provider. If you submitted a password, secure sessions, rules, recovery details, and connected services without delay.
10 Rules to Avoid Online Scams
Here are 10 practical safety rules to help you avoid malware, online shopping scams, crypto scams, and other online fraud. Each tip includes a quick “if you already got hit” action.
Stop and verify before you click, log in, download, or pay.
Most scams win by creating urgency. Verify using a trusted method: type the website address yourself, use the official app, or call a known number (not the one in the message).
If you already clicked: close the page, do not enter passwords, and run a malware scan.
Keep your operating system, browser, and apps updated.
Updates patch security holes used by malware and malicious ads. Turn on automatic updates where possible.
If you saw a scary “update now” pop-up: close it and update only through your device settings or the official app store.
Use layered protection: antivirus plus an ad blocker.
Antivirus helps block malware. An ad blocker reduces scam redirects, phishing pages, and malvertising.
If your browser is acting weird: remove unknown extensions, reset the browser, then run a full scan.
Install apps, software, and extensions only from official sources.
Avoid cracked software, “keygens,” and random downloads. During installs, choose Custom/Advanced and decline bundled offers you do not recognize.
If you already installed something suspicious: uninstall it, restart, and scan again.
Treat links and attachments as untrusted by default.
Phishing often impersonates delivery services, banks, and popular brands. If it is unexpected, do not open attachments or log in through the message.
If you entered credentials: change the password immediately and enable 2FA.
Shop safely: research the store, then pay with protection.
Be cautious with brand-new stores, “closing sale” stories, and prices that make no sense. Prefer credit cards or PayPal for dispute options. Avoid wire transfers, gift cards, and crypto payments.
If you already paid: contact your card issuer or PayPal quickly to dispute the transaction.
Crypto rule: never pay a “fee” to withdraw or recover money.
Common patterns include fake profits, then “tax,” “gas,” or “verification” fees. Another is a “recovery agent” who demands upfront crypto.
If you already sent crypto: stop paying, save evidence (wallet addresses, TXIDs, chats), and report the scam to the platform used.
Secure your accounts with unique passwords and 2FA (start with email).
Use a password manager and unique passwords for every account. Enable 2FA using an authenticator app when possible.
If you suspect an account takeover: change passwords, sign out of all devices, and review recent logins and recovery settings.
Back up important files and keep one backup offline.
Backups protect you from ransomware and device failure. Keep at least one backup on an external drive that is not always connected.
If you suspect infection: do not connect backup drives until the system is clean.
If you think you are a victim: stop losses, document evidence, and escalate fast.
Move quickly. Speed matters for disputes, account recovery, and limiting damage.
Stop payments and contact: do not send more money or respond to the scammer.
Call your bank or card issuer: block transactions, replace the card if needed, and start a dispute or chargeback.
Secure your email first: change the email password, enable 2FA, and remove unfamiliar recovery options.
Secure other accounts: change passwords, enable 2FA, and log out of all sessions.
Scan your device: remove suspicious apps or extensions, then run a full malware scan.
Save evidence: screenshots, emails, order pages, tracking pages, wallet addresses, TXIDs, and chat logs.
Report it: to the payment provider, marketplace, social platform, exchange, or wallet service involved.
These rules are intentionally simple. Most online losses happen when decisions are rushed. Slow down, verify independently, and use payment methods and account controls that give you recourse.
Hello! I'm Lapain Epuran, your go-to source for detailed and honest product reviews. From tech gadgets to miracle cures, I provide insights to help you make informed choices. Join me as we discover what's truly worth your time and money.