Altair Ransomware Virus: Removal, Recovery, and Decryption Guide
Written by: Lapain Epuran
Published on:
Files that opened normally yesterday now carry an unfamiliar Altair extension, while an HTML note claims the network was breached. That discovery demands a measured response.
This guide explains what the visible evidence means, which actions protect remaining data, and how to approach recovery without making unsupported promises.
Overview
What Altair ransomware does
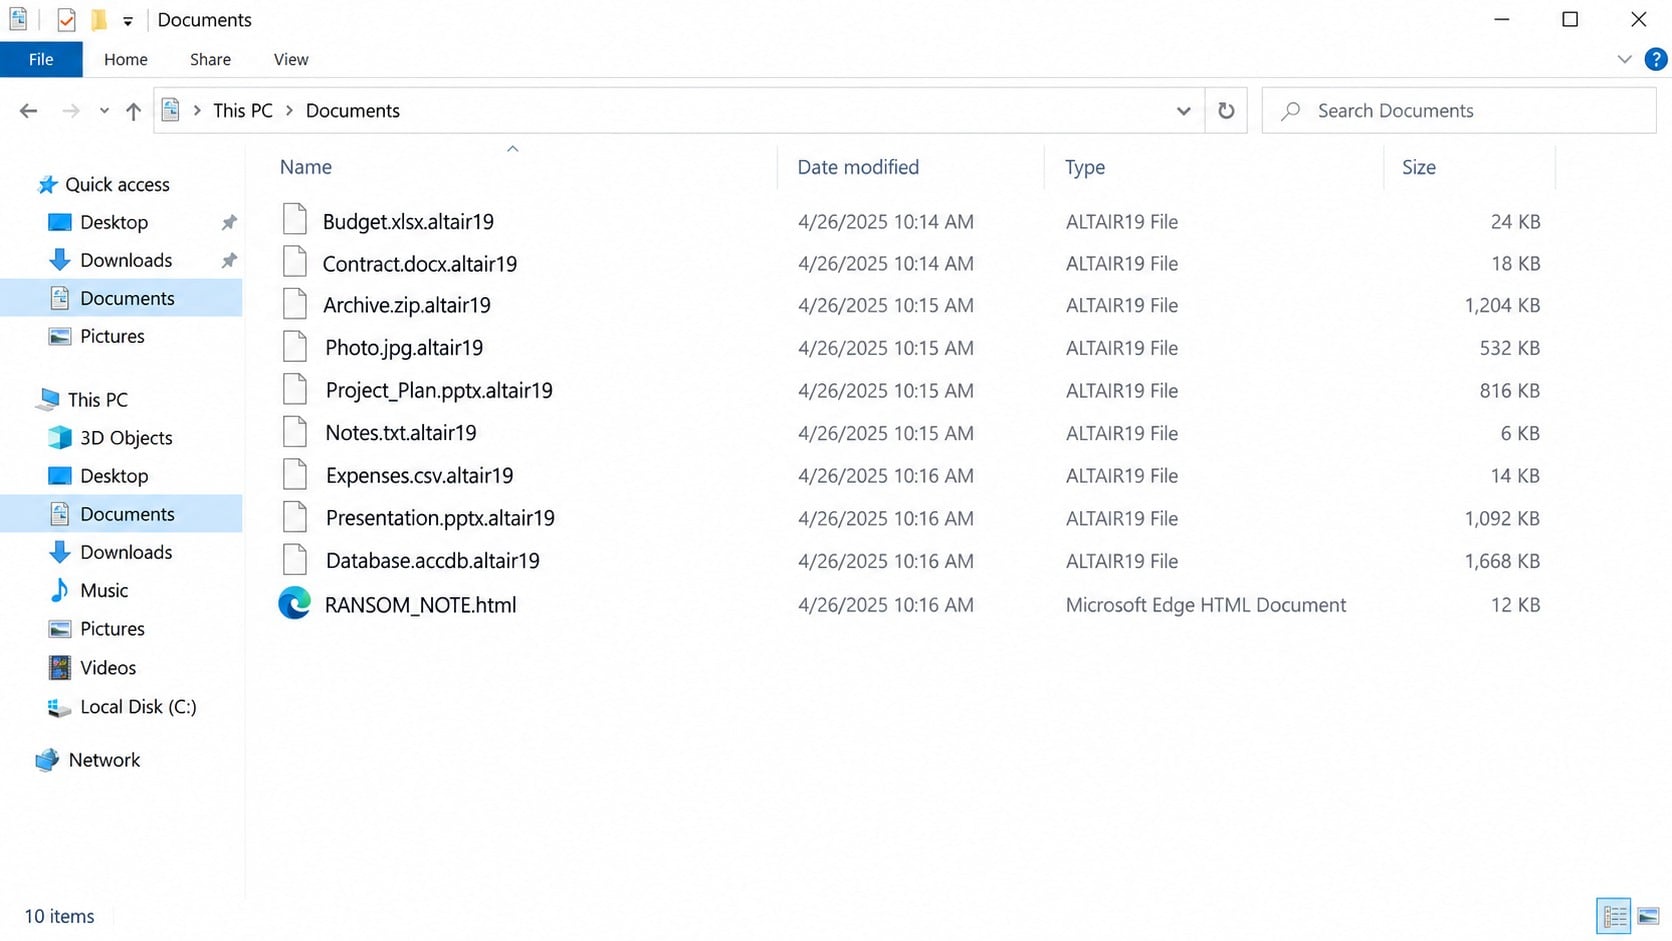
Altair is file-encrypting malware. A documented sample renames affected data with an extension containing the Altair name and a number.
The observed variant added “.altair19” after the original filename. For example, a photograph named “1.jpg” became “1.jpg.altair19.”
Renaming is only the visible symptom. The malware changes file contents through encryption, preventing ordinary applications from reading them.
What the ransom note claims
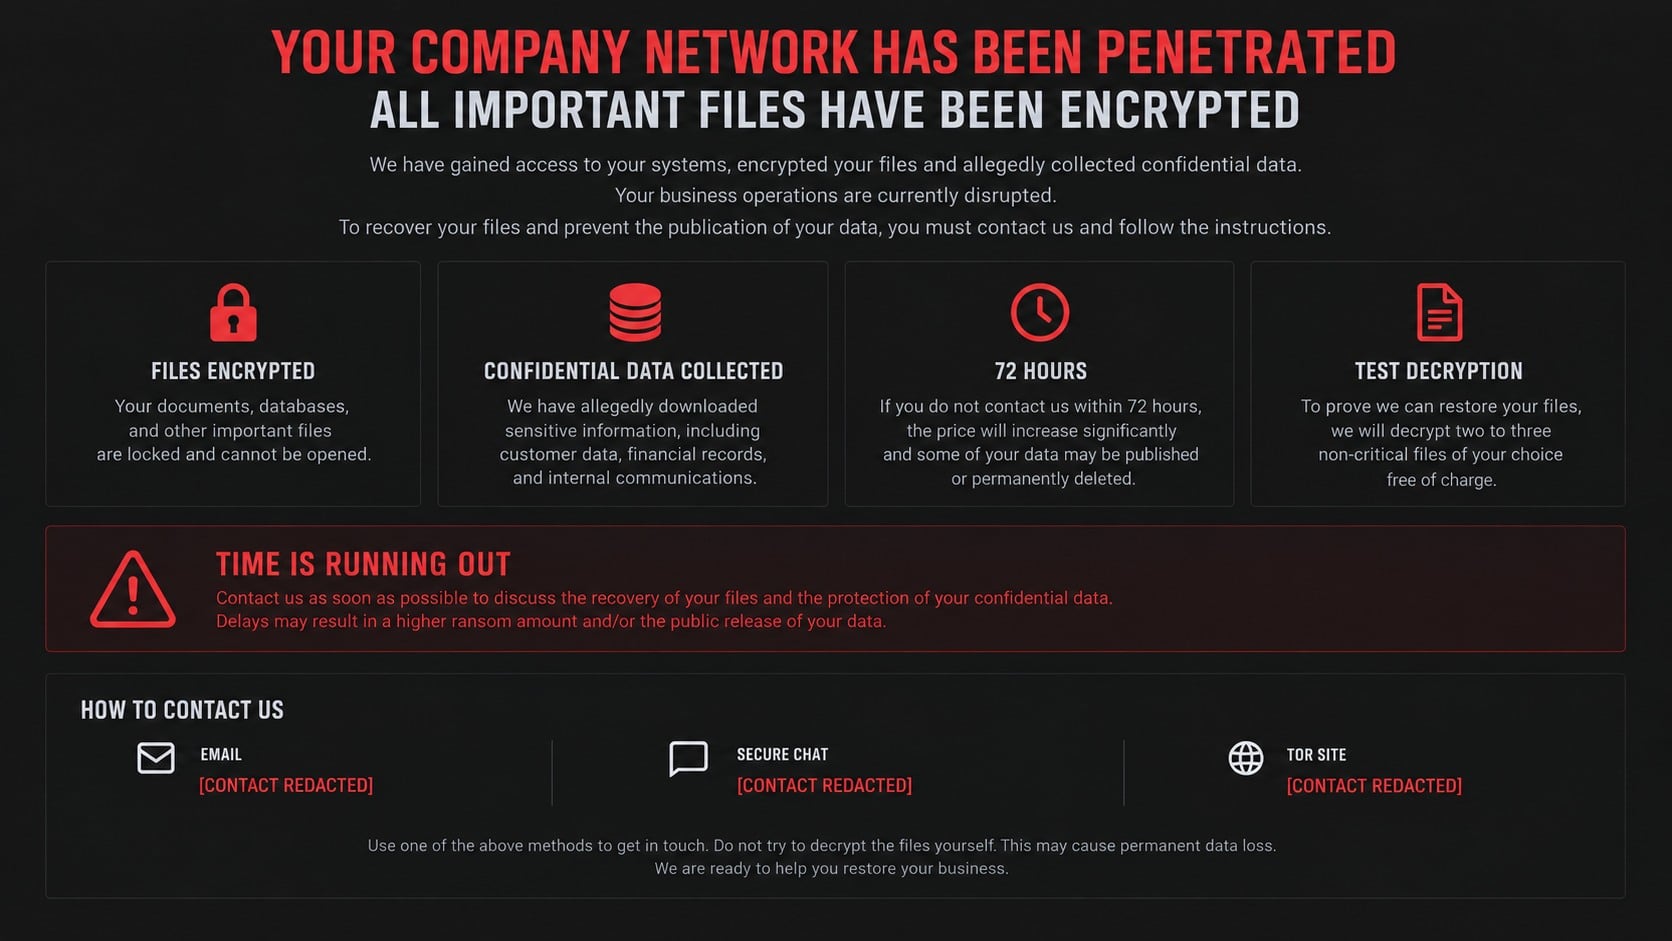
After encryption, Altair creates an HTML document named “RANSOM_NOTE.html.” The note says the victim’s network was penetrated and data was stolen.
It threatens publication or sale if the victim refuses to negotiate. A 72-hour deadline supposedly increases the price, adding pressure during confusion.
The criminals offer to decrypt two or three noncritical files as proof. That offer demonstrates capability, not honesty or a reliable recovery agreement.
What victims should understand immediately
No confirmed free decryptor was available for the observed Altair sample during analysis. That can change, so preserving encrypted files remains important.
Removing the malware prevents further encryption but does not decrypt data already transformed. Recovery depends on clean backups, unaffected copies, or future decryption research.
The immediate priorities are:
Isolate affected systems without destroying evidence.
Protect offline backups and unaffected credentials.
Determine the scope of encryption and possible data theft.
Remove persistence before beginning restoration.
Retain encrypted copies in case a safe decryptor becomes available.
How Altair Ransomware Works
Step 1: The attackers obtain an initial foothold
The exact entry method can vary between incidents. Common routes include stolen remote-access credentials, vulnerable internet-facing services, phishing attachments, and compromised administrative tools.
An infection found on one computer does not reveal how the environment was entered. Logs and account history are needed before assigning a cause.
Organizations should examine exposed services, recent patches, unusual logins, newly created accounts, and files executed shortly before encryption began.
Personal systems require the same caution. Cracked software, unexpected attachments, malicious advertisements, and fake updates can all introduce ransomware or supporting malware.
Step 2: Access is expanded and valuable data is located
In a network attack, criminals may search for administrative credentials, shared folders, backup consoles, virtual machines, and systems containing sensitive information.
They can use legitimate tools already present in the environment, making some activity resemble normal administration. Context and timing become essential during investigation.
Data discovery helps the attackers decide what to encrypt and what might create extortion pressure. Financial, customer, legal, and operational files are common targets.
The ransom note claims information was stolen. Treat that statement seriously, but verify it through outbound traffic, archive creation, cloud activity, and endpoint evidence.
Step 3: Security controls and recovery paths may be targeted
Ransomware operators often try to weaken defenses before widespread encryption. They may stop services, delete shadow copies, or interfere with backup access.
Not every Altair incident will contain every behavior. Responders should rely on observed logs rather than assuming the sample performed a standard checklist.
Backups connected with ordinary administrative credentials are particularly vulnerable. Offline or immutable copies are harder for an intruder to alter from the compromised environment.
Endpoint alerts that occur before encryption can reveal the preparation stage. Preserve those records because later cleanup may erase useful traces.
Step 4: Altair encrypts accessible files
The malware processes selected files and makes their original content unreadable. Documents, images, databases, archives, and business data may become unavailable.
An affected filename retains its original extension and receives the additional Altair marker. The documented form ended in “.altair19,” though later versions could differ.
Changing the filename back does not reverse encryption. The problem is inside the file contents, not merely the visible suffix.
Do not edit encrypted originals unnecessarily. Accidental modification can complicate later analysis or damage data that a future tool might otherwise recover.
Step 5: The HTML ransom note applies pressure
“RANSOM_NOTE.html” explains the attackers’ terms and directs the victim toward private contact channels. Those contact details should not be shared publicly.
The note presents encryption and alleged theft as a combined crisis. It threatens disclosure while implying that payment can solve both problems.
A short deadline is intended to discourage technical investigation, legal review, and consultation with insurers or authorities. Urgency benefits the extortionist.
The offer to decrypt a few files is a sales tactic. It may prove possession of a working key without proving that every system can be restored.
Step 6: The victim faces recovery and extortion decisions
Paying does not guarantee a functioning decryptor, complete restoration, deletion of stolen data, or protection from another demand.
A faulty tool can corrupt files, and the criminals may disappear after payment. Even successful decryption does not remove malware or close the original access path.
Decisions should involve incident responders, legal counsel, leadership, insurers, and law enforcement where appropriate. Sanctions and payment regulations may also apply.
Technical containment should continue regardless of negotiation decisions. Restoring into an environment that remains compromised can trigger another round of encryption.
How to Identify an Altair Ransomware Infection
Check the filename pattern
Look for files whose names gained an Altair extension plus a number. The analyzed sample used “.altair19” after the complete original filename.
One extension alone is not absolute attribution. Copy a small set of names and timestamps for analysis without opening or modifying every affected file.
Map which folders, shares, and hosts contain the marker. That distribution helps identify affected accounts and the possible start of encryption.
Locate and preserve the ransom note
Search affected directories for “RANSOM_NOTE.html.” Preserve a copy as evidence, but avoid using embedded contact links on an unprotected production device.
Record the note’s wording, timestamps, and file hash. Different incidents can use similar names, so the contents help analysts distinguish variants.
Do not publish victim identifiers, negotiation links, or attacker contact tokens. Those details can expose the organization and interfere with response.
Review endpoint and network evidence
Examine process history, scheduled tasks, services, startup entries, remote sessions, and newly created administrative accounts.
Network logs may show connections between the initially affected host and file servers. Large outbound transfers can support or challenge the theft allegation.
Centralized logs should be copied to protected storage. Attackers sometimes delete local records or return after responders begin containment.
Rule out lookalikes and secondary infections
Other ransomware families can use similar notes or extension patterns. A qualified analyst should inspect samples safely rather than relying only on the displayed name.
Credential stealers, remote-access tools, and loaders may accompany the encryptor. Finding Altair does not mean it was the only malicious program present.
Scan unaffected systems too. A machine without encrypted files might still contain the initial access tool or stolen administrator session.
Why Renaming Files or Reinstalling Windows Is Not Enough
Removing “.altair19” only changes the label. Applications still encounter encrypted content and cannot reconstruct the original document.
Reinstalling Windows can remove malware from one machine, but it also destroys evidence and does not restore encrypted files.
A clean rebuild may become part of recovery after evidence collection. It should happen according to a coordinated plan, not as the first reaction.
Network credentials, cloud sessions, and compromised accounts survive a disk reinstall unless they are separately revoked. That is why identity containment matters.
Likewise, restoring files without addressing the entry point can repeat the incident. Recovery is a sequence, not a single software action.
Safe Recovery Options for Altair-Encrypted Data
Offline backups are the strongest recovery route when they predate the intrusion and were inaccessible to the attacker.
Test backup integrity in an isolated environment. A successful job report does not guarantee that stored files are complete, clean, or decryptable.
Check unaffected devices, removable media, cloud version history, email attachments, and recipient copies. These sources may recover critical files selectively.
Preserve at least one untouched set of encrypted data. Researchers sometimes release decryptors later when keys, implementation flaws, or criminal infrastructure become available.
Only obtain decryptors through reputable security researchers or recognized public initiatives. Unknown “recovery tools” can contain malware or demand another fee.
If a decryptor appears, test copies first. Never experiment on the only surviving encrypted version of important data.
How to Handle the Data Theft Claim
Altair’s note claims files were stolen before encryption. Extortionists may exaggerate, but dismissing the claim without investigation creates serious legal risk.
Look for archive utilities, unusual compression, large outbound connections, cloud uploads, and access to repositories containing regulated data.
Identify what the compromised accounts could reach, even when exfiltration logs are incomplete. Access capability helps define the potential exposure.
Legal counsel can guide notification duties, preservation, and communications. Public statements should reflect verified facts rather than repeating every criminal assertion.
Changing passwords and restoring servers does not neutralize copied data. Organizations need a separate privacy and extortion workstream for that possibility.
What to Do If Altair Encrypted Your Files
Do not rush into deleting files or contacting the attackers. Stabilize the environment first, then make decisions using preserved evidence and qualified support.
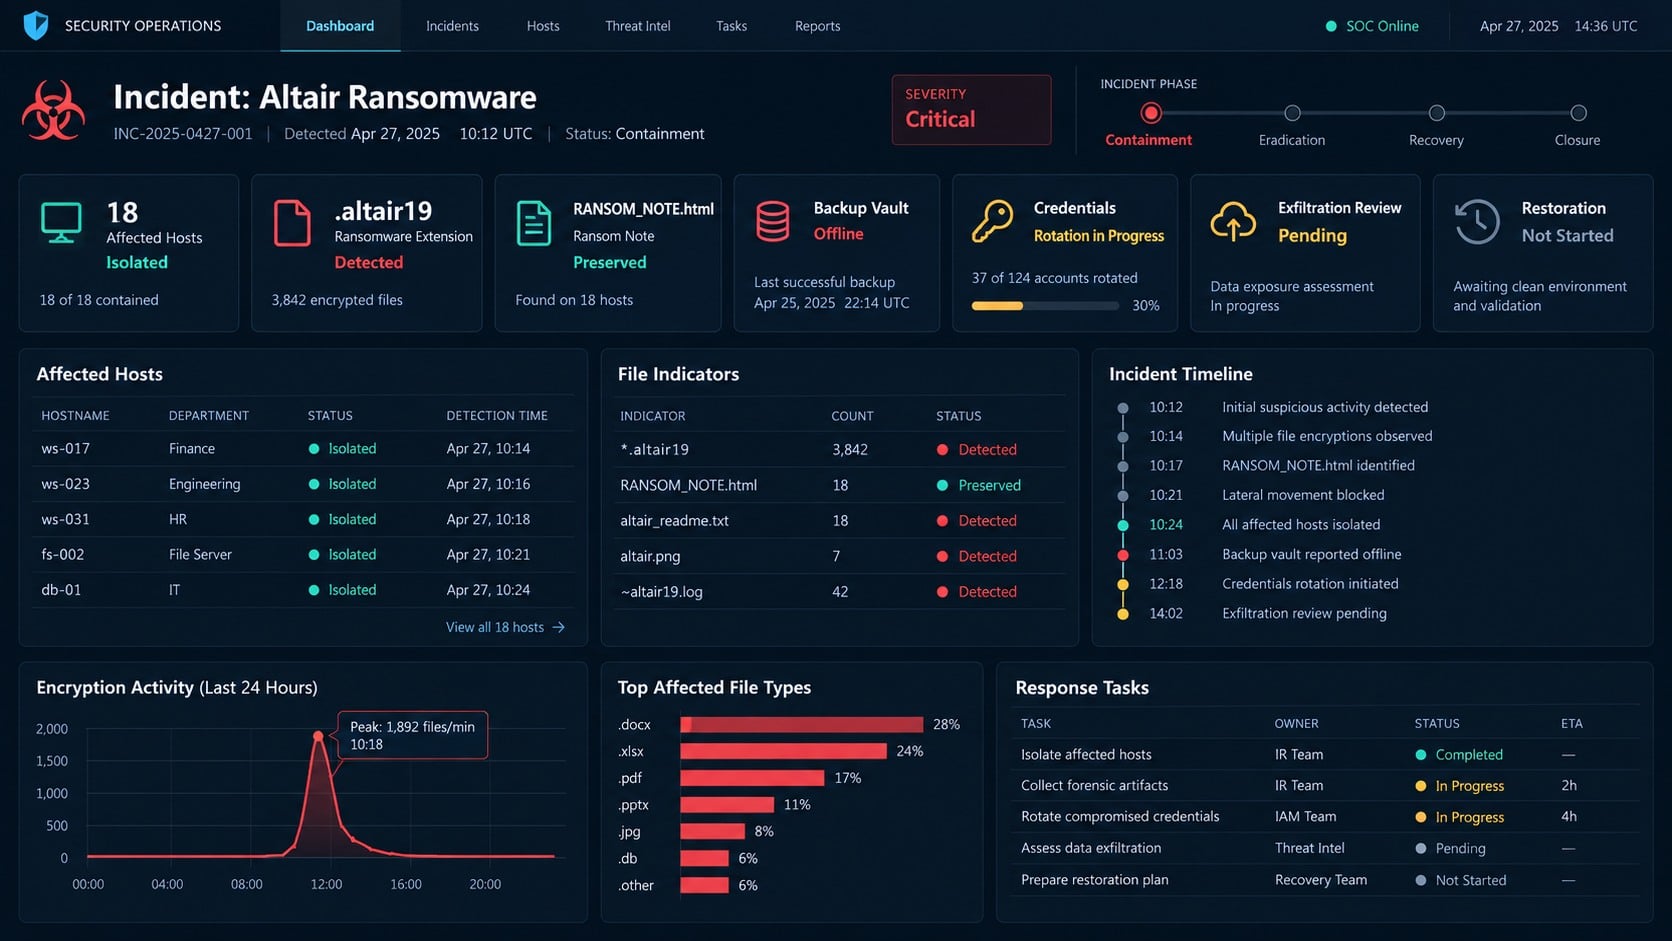
Isolate affected systems. Disconnect network access while preserving power when live evidence matters. Disable compromised wireless or switch ports through administrators.
Protect clean backups. Remove their network accessibility, secure backup administrator accounts, and prevent automatic synchronization from overwriting known-good versions.
Activate the incident plan. Notify security, leadership, legal counsel, insurers, and trusted responders according to the organization’s established process.
Preserve evidence. Copy the ransom note, record extensions and timestamps, retain logs, and capture volatile data before rebuilding systems.
Reset exposed identities. Revoke active sessions, rotate administrative and service credentials, secure remote access, and replace compromised keys.
Scan with Malwarebytes. Use it on isolated systems as part of malware discovery, while recognizing that enterprise incidents require broader forensic coverage.
Use AdGuard as a supporting layer. Blocking known malicious destinations can help prevent callbacks, but it cannot decrypt files or complete containment.
Remove persistence before restoration. Rebuild affected machines when appropriate and verify that the original intrusion path is closed.
Restore cautiously. Prioritize critical services, test backup dates and integrity, then monitor rebuilt systems for renewed malicious activity.
Report the incident. Contact relevant law enforcement and data-protection authorities, following legal advice and applicable notification deadlines.
Is Your Device Infected? Run a Free Malware Scan
Slow performance, constant pop-ups, or strange behavior? These are classic signs of a malware infection. The fastest way to find out is to scan your device with Malwarebytes Anti-Malware Free — one of the most trusted malware removal tools available.
The free version detects and removes the most common threats, including:
Adware — the cause of those annoying pop-ups
Browser hijackers — unwanted redirects and changed homepages
Trojans and spyware — hidden programs stealing your data
Potentially unwanted programs (PUPs) — software you never asked for
👉 Select your device below — Windows, Mac, or Android — then follow the simple steps to download Malwarebytes, scan your system, and remove any threats it finds. The whole process takes about 5 minutes.
Malwarebytes for WindowsMalwarebytes for MacMalwarebytes for Android
Run a Malware Scan with Malwarebytes for Windows
Malwarebytes is one of the most popular and trusted anti-malware tools for Windows — and it’s completely free for removing infections. It catches threats that many antivirus programs miss, including adware, browser hijackers, and trojans. Follow the steps below to scan and clean your PC in just a few minutes.
Download Malwarebytes
Click the button below to download the latest version of Malwarebytes for Windows from the official source. The free version is all you need — it will scan your computer and remove adware, browser hijackers, and other malicious software at no cost.
(The link opens in a new page where your download will start)
Install Malwarebytes
When the download finishes, open your Downloads folder and double-click the MBSetup file. If Windows shows a User Account Control pop-up, click “Yes” to allow the installation.
Follow the On-Screen Prompts to Install Malwarebytes
The setup wizard will walk you through a few quick screens:
Choose where you’re installing the program — “Personal Computer” or “Work Computer” — then click Next.
Malwarebytes will now install on your device. This usually takes under a minute.
When installation is complete, the “Welcome to Malwarebytes” screen will open automatically.
On the final screen, click Open Malwarebytes to launch the program.
Enable “Scan for Rootkits”
Before scanning, turn on rootkit detection so Malwarebytes can find even the most hidden threats. Click the Settings gear icon on the left side of the screen.
In the settings menu, find “Scan for rootkits” and click the toggle so it turns blue.
Done? Click “Dashboard” in the left pane to return to the main screen.
Start the Scan
Click the blue Scan button. Malwarebytes will automatically update its virus database and start checking your computer for malware.
Wait for the Scan to Finish
The scan checks your entire system for browser hijackers and other malicious programs, so it can take several minutes. Feel free to do something else — just check back occasionally to see the progress.
Quarantine the Detected Threats
When the scan is done, you’ll see a list of everything Malwarebytes found — malware, adware, and potentially unwanted programs. Click the “Quarantine” button to remove all of them at once.
Malwarebytes will now remove the malicious files and registry entries and move them safely into quarantine.
Restart Your Computer
Some threats can only be fully removed after a reboot. If Malwarebytes asks you to restart, click Yes. Once you’re logged back in, your PC is clean and you can continue with the next steps in this guide.
When the scan finishes, click Quarantine to remove everything Malwarebytes found. That’s it — your Windows PC is now clean of trojans, adware, and other malware, and should be back to running smoothly.
If your current antivirus allowed this malicious program on your computer, you may want to consider purchasing Malwarebytes Premium to protect against these types of threats in the future. If you are still having problems with your computer after completing these instructions, then please follow one of the steps:
Malwarebytes for Mac is a free on-demand scanner that removes the malware other security software tends to miss — adware, browser hijackers, and unwanted programs included. Cleaning an infected Mac with Malwarebytes has always been completely free, and it’s our go-to recommendation. Follow the steps below to scan and clean your Mac in just a few minutes.
Download Malwarebytes for Mac
Click the button below to download the latest version of Malwarebytes for Mac.
When the download finishes, open your Downloads folder and double-click the setup file to begin the installation.
Follow the On-Screen Prompts to Install Malwarebytes
The Malwarebytes for Mac Installer will guide you through a few quick screens. Click “Continue” and keep following the prompts until the installation completes.
When the installation is complete, Malwarebytes opens to the Welcome to Malwarebytes screen. Click “Get started“.
Select “Personal Computer” or “Work Computer”
Malwarebytes will ask what type of computer you’re installing it on. Click either Personal Computer or Work Computer, whichever applies.
Start the Scan
Click the “Scan” button. Malwarebytes will automatically update its detection database and begin checking your Mac for malware.
Wait for the Scan to Finish
Malwarebytes will scan your Mac for adware, browser hijackers, and other malicious programs. This can take a few minutes, so feel free to do something else — just check back occasionally to see the progress.
Quarantine the Detected Threats
When the scan is done, you’ll see a list of everything Malwarebytes found. Click the “Quarantine” button to remove all the threats at once.
Restart Your Mac
Malwarebytes will now remove all the malicious files it found. Some threats can only be fully removed after a reboot — if Malwarebytes asks you to restart, allow it. Once you’re logged back in, your Mac is clean.
Once the scan is done, remove every threat it detected. Your Mac is now free of adware, rogue browser extensions, and other potentially harmful software.
If your current antivirus allowed a malicious program on your computer, you might want to consider purchasing the full-featured version of Malwarebytes Anti-Malware to protect against these types of threats in the future. If you are still experiencing problems while trying to remove a malicious program from your computer, please ask for help in our Mac Malware Removal Help & Support forum.
Run a Malware Scan with Malwarebytes for Android
Malwarebytes for Android automatically detects and removes dangerous threats like malware and ransomware so you don’t have to worry about your most-used device being compromised. Aggressive detection of adware and potentially unwanted programs keeps your Android phone or tablet running smooth.
Download Malwarebytes for Android.
You can download Malwarebytes for Android by clicking the link below.
In the Google Play Store, tap “Install” to install Malwarebytes for Android on your device.
When the installation process has finished, tap “Open” to begin using Malwarebytes for Android. You can also open Malwarebytes by tapping on its icon in your phone menu or home screen.
Follow the on-screen prompts to complete the setup process
When Malwarebytes will open, you will see the Malwarebytes Setup Wizard which will guide you through a series of permissions and other setup options. This is the first of two screens that explain the difference between the Premium and Free versions. Swipe this screen to continue. Tap on “Got it” to proceed to the next step. Malwarebytes for Android will now ask for a set of permissions that are required to scan your device and protect it from malware. Tap on “Give permission” to continue. Tap on “Allow” to permit Malwarebytes to access the files on your phone.
Update database and run a scan with Malwarebytes for Android
You will now be prompted to update the Malwarebytes database and run a full system scan.
Click on “Update database” to update the Malwarebytes for Android definitions to the latest version, then click on “Run full scan” to perform a system scan.
Wait for the Malwarebytes scan to complete.
Malwarebytes will now start scanning your phone for adware and other malicious apps. This process can take a few minutes, so we suggest you do something else and periodically check on the status of the scan to see when it is finished.
Click on “Remove Selected”.
When the scan has been completed, you will be presented with a screen showing the malware infections that Malwarebytes for Android has detected. To remove the malicious apps that Malwarebytes has found, tap on the “Remove Selected” button.
Restart your phone.
Malwarebytes for Android will now remove all the malicious apps that it has found. To complete the malware removal process, Malwarebytes may ask you to restart your device.
After the scan, tap Remove Selected to delete all detected threats. Your Android phone is now clean — no more malicious apps, adware, or browser redirects.
If your current antivirus allowed a malicious app on your phone, you may want to consider purchasing the full-featured version of Malwarebytes to protect against these types of threats in the future. If you are still having problems with your phone after completing these instructions, then please follow one of the steps:
Restore your phone to factory settings by going to Settings > General management > Reset > Factory data reset.
Now that your device is clean, keep it that way. Most infections start with a malicious ad or a fake download button — so blocking them at the source is your best defense.
We recommend AdGuard, which blocks malicious ads, phishing pages, and dangerous redirects before they can reach you.
There is no risk-free answer, but payment carries major uncertainty. Criminals control the tool, timetable, and promises after receiving funds.
A decryptor may be slow, incomplete, or damaging. Payment also cannot prove that copied information was deleted or that another group lacks access.
Organizations considering any negotiation need legal, regulatory, sanctions, insurance, and technical guidance. Employees should never contact or pay attackers independently.
Even when business leaders decide to engage, responders must continue containment and backup recovery. Negotiation is not a substitute for rebuilding trust in the environment.
The safest long-term investment is resilient recovery: tested offline backups, protected identities, segmented networks, rapid patching, and practiced incident procedures.
How to Prioritize Systems During Restoration
Begin with services required for safety, communication, identity, and core operations. A documented dependency map prevents restoring applications whose foundations remain unavailable.
Use clean installation media and verified configurations. Copying an entire compromised system image can reintroduce malicious tools alongside recovered business data.
Restore a small, isolated group first and monitor it closely. Successful testing provides evidence before the recovery team expands access across the network.
Validate database consistency and application permissions, not only file presence. A folder that opens may still contain incomplete or outdated business records.
Reconnect users in controlled stages. Newly rotated credentials, restricted privileges, and heightened logging make suspicious activity easier to detect.
Record every restoration source and decision. That history supports technical troubleshooting, legal review, insurance documentation, and lessons learned after operations stabilize.
Frequently Asked Questions
Can Altair ransomware files be decrypted for free?
No confirmed universal free decryptor was available for the analyzed sample. Preserve encrypted copies and monitor reputable research channels for future developments.
Does removing Altair restore encrypted documents?
No. Malware removal stops the malicious program, while decryption or restoration addresses data already transformed. These are separate recovery tasks.
Should I delete the .altair19 files?
No. Keep untouched encrypted copies when storage permits. Future research or recovered keys may create options that do not exist today.
Is the claim that data was stolen definitely true?
The note makes that claim, but only forensic investigation can establish what left the environment. Treat the allegation seriously until evidence clarifies it.
Can I rename an affected file to make it open?
No. Removing the added extension changes only the filename. It does not reverse the cryptographic transformation of the file’s contents.
Is paying guaranteed to recover everything?
No. Criminals may provide a broken tool, omit systems, demand more money, or retain stolen data even after receiving payment.
The Bottom Line
Altair ransomware encrypts files, adds a numbered Altair extension, creates an HTML ransom note, and may combine operational disruption with a data-theft threat.
Isolate the environment, preserve evidence, secure identities, remove persistence, and restore from verified clean sources with professional incident-response guidance.
10 Rules to Avoid Online Scams
Here are 10 practical safety rules to help you avoid malware, online shopping scams, crypto scams, and other online fraud. Each tip includes a quick “if you already got hit” action.
Stop and verify before you click, log in, download, or pay.
Most scams win by creating urgency. Verify using a trusted method: type the website address yourself, use the official app, or call a known number (not the one in the message).
If you already clicked: close the page, do not enter passwords, and run a malware scan.
Keep your operating system, browser, and apps updated.
Updates patch security holes used by malware and malicious ads. Turn on automatic updates where possible.
If you saw a scary “update now” pop-up: close it and update only through your device settings or the official app store.
Use layered protection: antivirus plus an ad blocker.
Antivirus helps block malware. An ad blocker reduces scam redirects, phishing pages, and malvertising.
If your browser is acting weird: remove unknown extensions, reset the browser, then run a full scan.
Install apps, software, and extensions only from official sources.
Avoid cracked software, “keygens,” and random downloads. During installs, choose Custom/Advanced and decline bundled offers you do not recognize.
If you already installed something suspicious: uninstall it, restart, and scan again.
Treat links and attachments as untrusted by default.
Phishing often impersonates delivery services, banks, and popular brands. If it is unexpected, do not open attachments or log in through the message.
If you entered credentials: change the password immediately and enable 2FA.
Shop safely: research the store, then pay with protection.
Be cautious with brand-new stores, “closing sale” stories, and prices that make no sense. Prefer credit cards or PayPal for dispute options. Avoid wire transfers, gift cards, and crypto payments.
If you already paid: contact your card issuer or PayPal quickly to dispute the transaction.
Crypto rule: never pay a “fee” to withdraw or recover money.
Common patterns include fake profits, then “tax,” “gas,” or “verification” fees. Another is a “recovery agent” who demands upfront crypto.
If you already sent crypto: stop paying, save evidence (wallet addresses, TXIDs, chats), and report the scam to the platform used.
Secure your accounts with unique passwords and 2FA (start with email).
Use a password manager and unique passwords for every account. Enable 2FA using an authenticator app when possible.
If you suspect an account takeover: change passwords, sign out of all devices, and review recent logins and recovery settings.
Back up important files and keep one backup offline.
Backups protect you from ransomware and device failure. Keep at least one backup on an external drive that is not always connected.
If you suspect infection: do not connect backup drives until the system is clean.
If you think you are a victim: stop losses, document evidence, and escalate fast.
Move quickly. Speed matters for disputes, account recovery, and limiting damage.
Stop payments and contact: do not send more money or respond to the scammer.
Call your bank or card issuer: block transactions, replace the card if needed, and start a dispute or chargeback.
Secure your email first: change the email password, enable 2FA, and remove unfamiliar recovery options.
Secure other accounts: change passwords, enable 2FA, and log out of all sessions.
Scan your device: remove suspicious apps or extensions, then run a full malware scan.
Save evidence: screenshots, emails, order pages, tracking pages, wallet addresses, TXIDs, and chat logs.
Report it: to the payment provider, marketplace, social platform, exchange, or wallet service involved.
These rules are intentionally simple. Most online losses happen when decisions are rushed. Slow down, verify independently, and use payment methods and account controls that give you recourse.
Hello! I'm Lapain Epuran, your go-to source for detailed and honest product reviews. From tech gadgets to miracle cures, I provide insights to help you make informed choices. Join me as we discover what's truly worth your time and money.