

Files that worked yesterday can suddenly become unreadable, renamed, and surrounded by an unfamiliar recovery note. That moment is alarming, but hurried decisions can make recovery harder.
Vricpe leaves several recognizable traces. Identifying them carefully helps separate containment, malware removal, and data recovery into safer tasks.
Overview
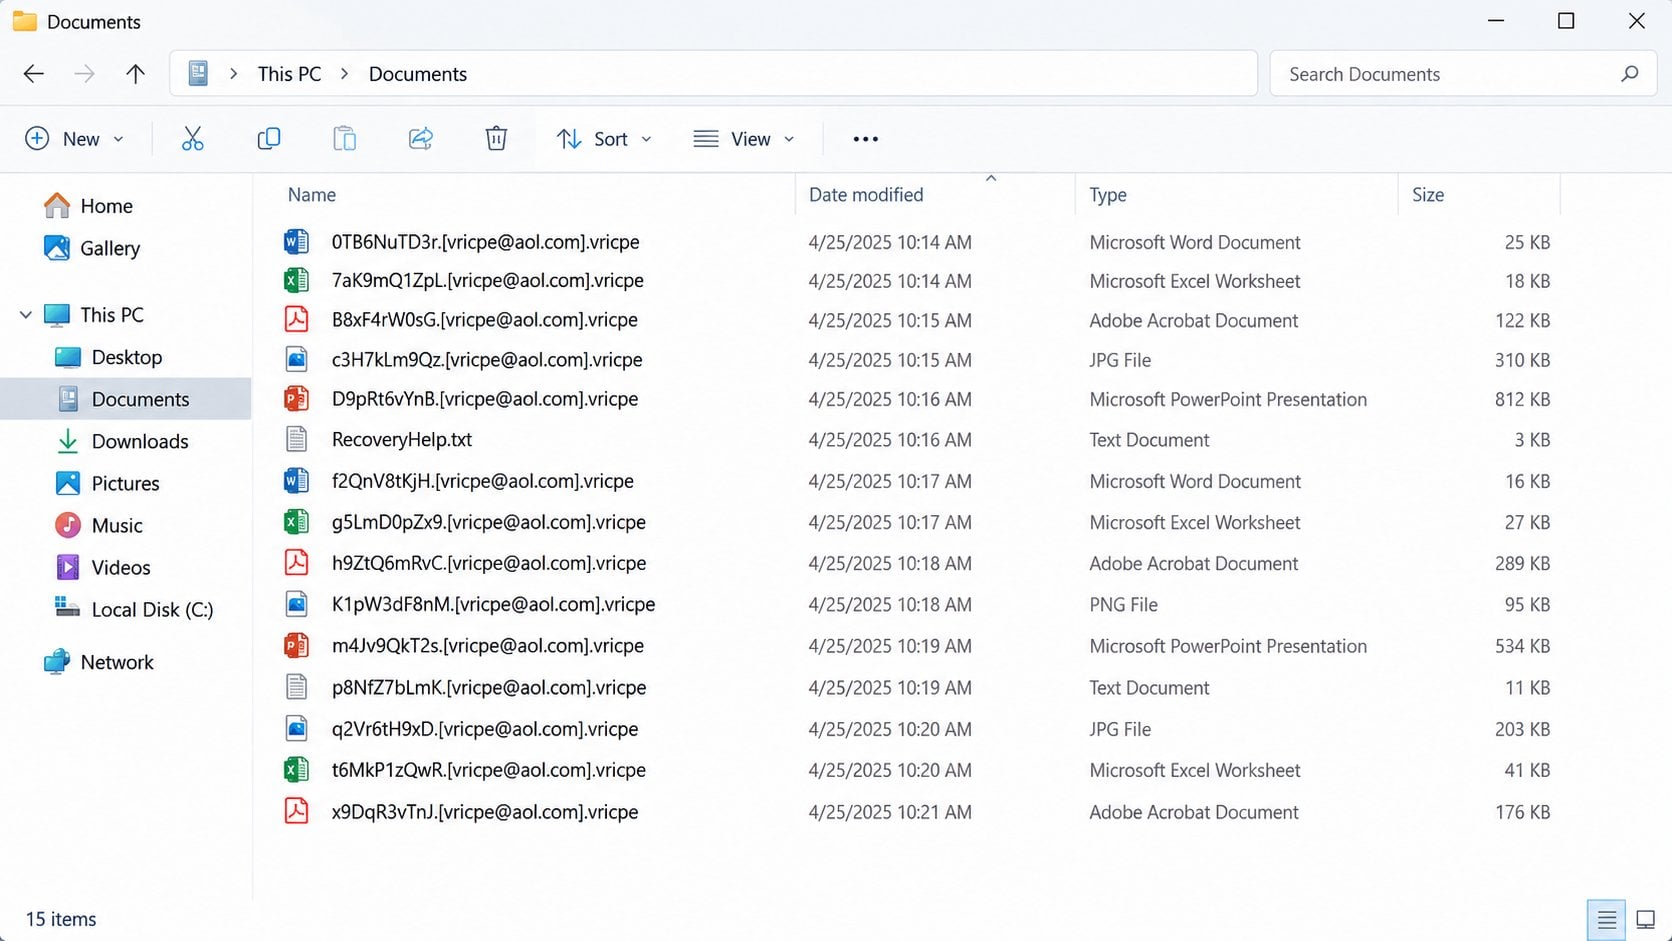
Vricpe Encrypts Files and Replaces Their Names
Vricpe is file-encrypting ransomware. It makes documents, pictures, archives, databases, and other targeted data unreadable, then demands contact with its operators.
The malware does more than append a short extension. It replaces the original filename with a random character string.
It then adds an attacker email address inside brackets and finishes the name with the .vricpe extension.
A file named 1.jpg can become 0TB6NuTD3r.[vricpe@aol.com].vricpe. This pattern is one of the most useful identification clues.
The icon or listed file type may still resemble the original application, but the encrypted contents cannot be opened normally.
RecoveryHelp.txt Delivers the Extortion Message
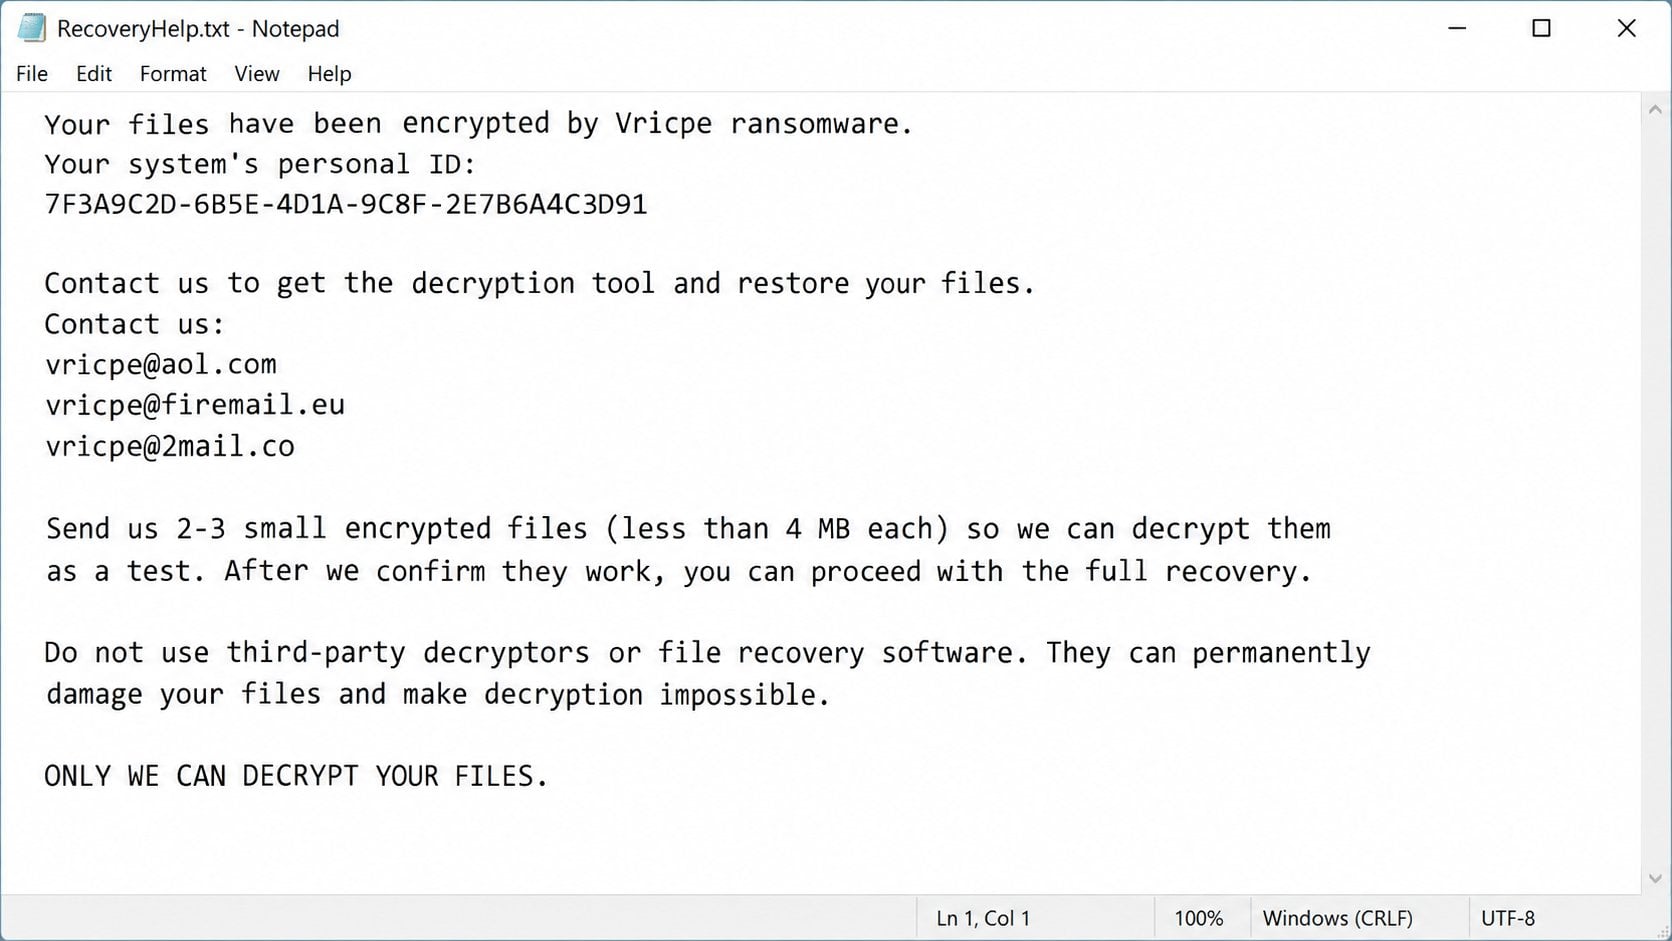
After encryption, Vricpe creates a text note named RecoveryHelp.txt. The note says victims must contact the attackers for decryption information.
It lists vricpe@aol.com, vricpe@firemail.eu, and vricpe@2mail.co as contact addresses.
Victims are asked to send a system personal ID and several small encrypted samples under 4 MB.
The note warns that delays reduce recovery chances. It also claims third-party tools may permanently damage encrypted data.
Those warnings are pressure tactics. They attempt to isolate victims from independent assistance and move negotiations into private email.
Removal and Decryption Are Different Problems
Removing the ransomware prevents the active malware from encrypting more accessible files. It does not automatically reverse encryption that already happened.
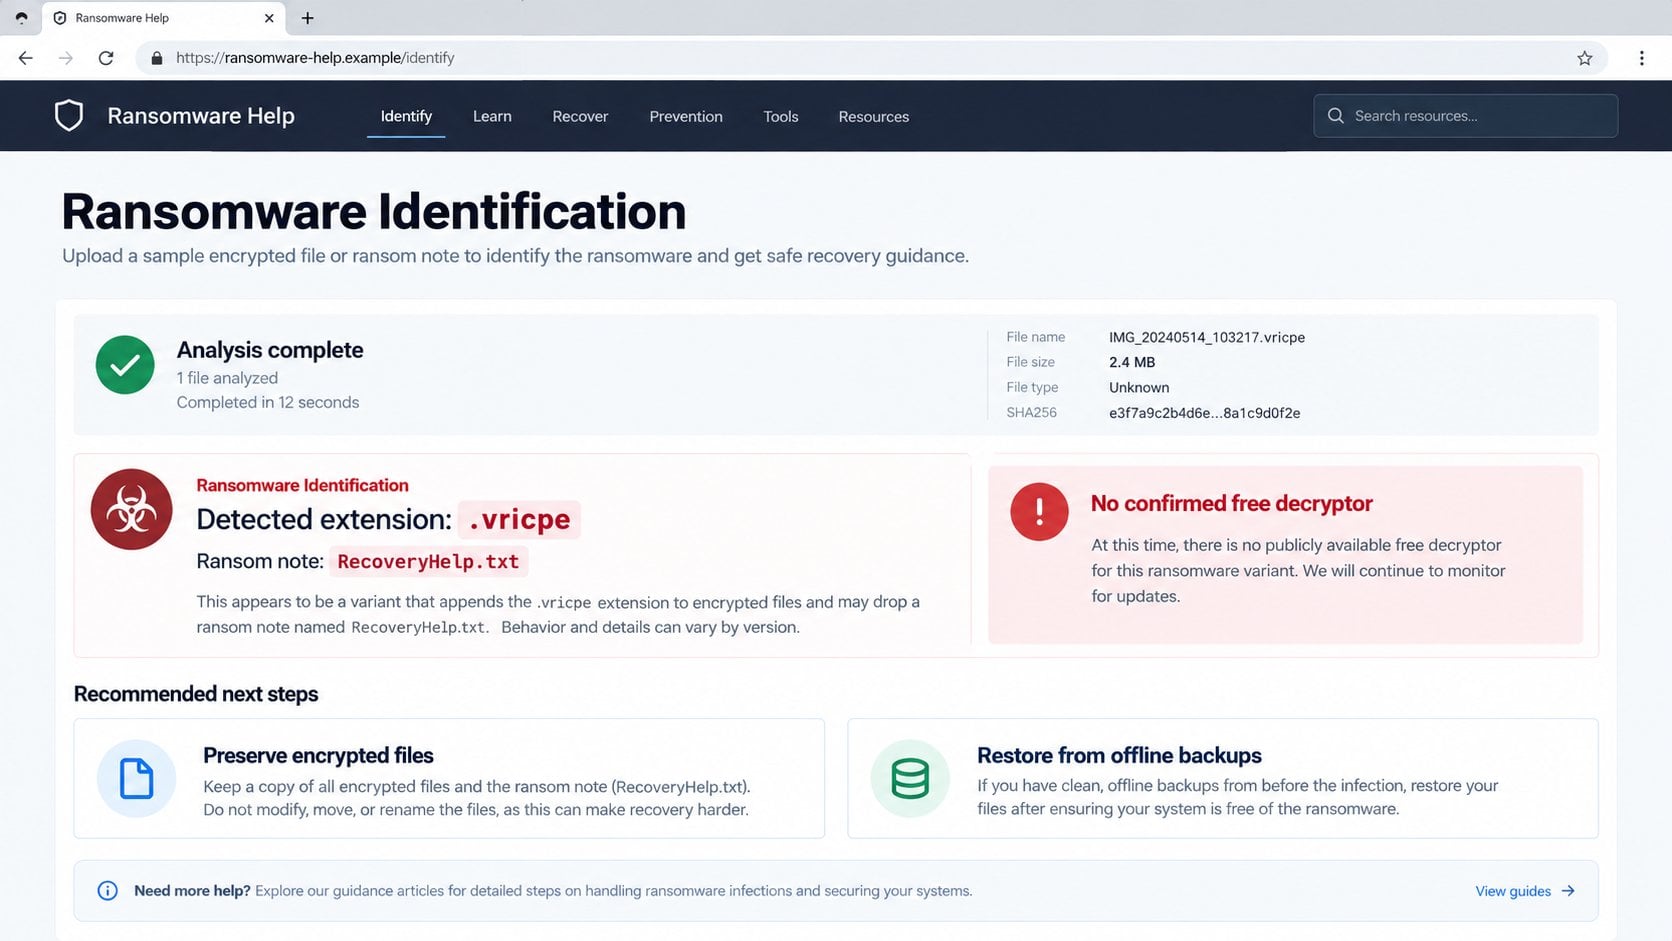
No confirmed free decryptor was available during the reviewed analysis. That status can change if researchers later discover weaknesses or obtain keys.
- Original filenames become random strings.
- Encrypted names contain an attacker email address.
- The final extension is .vricpe.
- The ransom note is called RecoveryHelp.txt.
- The note requests contact rather than naming a price.
- Three attacker email addresses are supplied.
- Payment cannot guarantee working decryption.
- Offline backups remain the safest recovery source.
The ransom amount is not printed in the note. Operators can set different prices after learning whether the victim is an individual or organization.
Paying is risky because criminals may disappear, send broken software, or demand more money. A successful payment also funds continued attacks.
Preserve encrypted files even when immediate recovery is impossible. Future tools, recovered keys, or improved analysis may create another opportunity.
How Vricpe Ransomware Works
Step 1: The Malicious File Reaches the Computer
Ransomware commonly arrives through phishing attachments, deceptive download links, pirated software, cracks, fake updates, malicious advertisements, or another installed Trojan.
The initial file may look like an invoice, archive, document, installer, or media download. Its visible name can conceal the executable type.
Some documents require macros or another unsafe action. Executables can begin running as soon as the victim opens them.
Unpatched software and exposed remote access can provide different entry routes. Investigators should avoid assuming email was responsible without evidence.
Step 2: Vricpe Establishes Execution
Once launched, the malware operates with the permissions of the compromised user. Higher privileges can expose more folders, services, and connected storage.
It may attempt persistence so encryption resumes after a restart. Related malware can also arrive before or alongside the ransomware.
Security tools sometimes detect the payload under generic Filecoder, Trojan-Ransom, Wacatac, or heuristic names instead of “Vricpe.”
A generic detection does not reduce the danger. Antivirus labels often describe behavior or code similarity rather than the ransom-note name.
Step 3: The Malware Searches for Accessible Data
Vricpe enumerates local folders and drives available to the account. Mapped shares and synchronized storage can increase the encryption scope.
The program selects useful file types while avoiding data needed for basic system operation. Keeping Windows running ensures the victim can read instructions.
Network connections matter because ransomware can reach shared files with the victim’s permissions. Quick isolation can protect data not yet processed.
Cloud synchronization can copy encrypted versions outward. Version history may still help, but synchronization should be paused during containment.
Step 4: Data Is Encrypted and Renamed
The ransomware transforms file contents using cryptography, making them unreadable without the required decryption material.
Vricpe replaces meaningful filenames with random strings. It then attaches [vricpe@aol.com].vricpe to the result.
Randomized names make manual identification more difficult. Folder location, file size, backups, and metadata may help determine what each item contained.
Renaming the extension back will not restore data. The internal bytes remain encrypted regardless of the visible filename.
Step 5: RecoveryHelp.txt Directs Victims to Email
The note records contact addresses and requests a personal identifier. It offers sample decryption as supposed proof that recovery is possible.
A sample result does not guarantee full recovery. Criminals control the key, payment terms, software, and future communication.
The absence of a fixed amount encourages contact. Operators can inspect the victim’s apparent resources before choosing a demand.
Sending sensitive samples can expose additional information. Never provide confidential business or personal files to an extortionist.
Step 6: Pressure Turns Technical Damage Into Extortion
The operators claim only they can decrypt files and that independent tools are dangerous. This language attempts to eliminate safer alternatives.
Some ransomware groups steal data before encryption, creating a separate disclosure risk. Vricpe analysis should not assume exfiltration without network evidence.
Victims may face operational downtime even when good backups exist. Systems require containment, cleaning, validation, and controlled restoration.
Incident response must therefore address malware, credentials, persistence, data recovery, and possible exposure as separate workstreams.
How to Identify a Vricpe Infection
Check the Complete Encrypted Filename Pattern
Look for random replacement names followed by .[vricpe@aol.com].vricpe. Record the exact capitalization, punctuation, and email address.
Do not rename the originals during investigation. Copy several encrypted samples to safe storage while preserving timestamps and folder structure.
Different ransomware can use similar extensions. The full pattern provides stronger evidence than the last suffix alone.
File size also matters. A zero-byte file may indicate corruption rather than normal ransomware encryption and should be preserved separately.
Preserve RecoveryHelp.txt
Keep the ransom note because its filename, wording, contacts, and personal ID help researchers identify the variant.
Save copies from several affected folders when available. Slight differences may reveal multiple executions or changed campaign settings.
Do not email attackers merely to test whether addresses work. Contact begins an extortion conversation and exposes a reachable victim.
Provide the note to trusted incident responders, law enforcement, or reputable identification services instead.
Use Independent Ransomware Identification
Upload a copy of the ransom note and one non-sensitive encrypted sample to a reputable ransomware identification service.
Never upload confidential material. A harmless duplicate or test document is safer when the service retains samples for research.
Check recognized decryption projects for updates, but download tools only from their official websites.
Determine Whether Encryption Is Still Active
Watch for newly renamed files, high disk activity, unexpected processes, or continuing changes on network shares.
Disconnect network cables and disable wireless connections when activity may continue. Avoid a normal shutdown if forensic guidance is immediately available.
In businesses, call the incident-response team from a separate device. They may need volatile memory, process, and network evidence.
Do not attach backup drives to an untrusted system. Active ransomware can encrypt the recovery source as soon as it becomes accessible.
What to Do If Vricpe Encrypted Your Files
Move deliberately. The immediate goals are to stop further damage, preserve evidence, remove malicious code, and recover from trustworthy copies.
- Isolate the affected computer.
Disconnect Ethernet, Wi-Fi, Bluetooth, external drives, and mapped shares. Leave other systems offline until their status is checked.
For an organization, notify incident responders immediately. They can isolate accounts, switches, storage, and remote access more comprehensively.
- Preserve evidence before cleaning.
Copy RecoveryHelp.txt, several non-sensitive encrypted files, screenshots, event times, and suspected delivery messages to controlled storage.
Do not delete the note or mass-rename encrypted data. Evidence can support identification, insurance, reporting, and future recovery.
- Identify the variant independently.
Use the .vricpe pattern and note details with reputable ransomware identification resources. Check whether a recognized decryptor becomes available.
Avoid random tools promoted through advertisements or video comments. Fake decryptors commonly install additional malware.
- Remove the ransomware before restoration.
Scan with Malwarebytes and additional trusted tools from a clean download route. Confirm persistence and related malware are gone.
When business systems or sensitive data are involved, professional reimaging is often safer than trusting a cleaned operating system.
- Change exposed credentials from a clean device.
Replace passwords used on the infected computer, especially administrator, email, cloud, remote-access, and financial credentials.
Revoke sessions and rotate service keys when appropriate. Information-stealing malware may have preceded the ransomware.
- Restore only from verified backups.
Choose offline or immutable backups created before infection. Scan them and restore into a clean environment.
Test a small recovery set first. Confirm file integrity, application function, permissions, and timestamps before wider restoration.
- Report the incident and assess disclosure.
Contact law enforcement or the national cyber authority. Businesses should consult legal, insurance, regulatory, and data-protection teams.
Investigate possible data theft rather than assuming encryption was the only action. Network and identity logs can provide evidence.
- Avoid paying the ransom.
Payment offers no enforceable guarantee of a working key, complete recovery, deleted stolen data, or freedom from another demand.
If an organization considers payment, involve legal counsel, law enforcement, insurers, and sanctions specialists before any decision.
- Harden browsing after the system is rebuilt.
AdGuard can block many malicious advertising and download destinations that distribute unwanted software or deceptive update prompts.
It cannot decrypt files or remove an active infection. Use it alongside patched software, endpoint protection, and tested backups.
Is Your Device Infected? Run a Free Malware Scan
Slow performance, constant pop-ups, or strange behavior? These are classic signs of a malware infection. The fastest way to find out is to scan your device with Malwarebytes Free — one of the most trusted malware removal tools available.
The free version detects and removes the most common threats, including:
- Adware — the cause of those annoying pop-ups
- Browser hijackers — unwanted redirects and changed homepages
- Trojans and spyware — hidden programs stealing your data
- Potentially unwanted programs (PUPs) — software you never asked for
👉 Select your device below — Windows, Mac, or Android — then follow the simple steps to download Malwarebytes, scan your system, and remove any threats it finds. The scan usually takes 5 to 20 minutes.
Run a Malware Scan with Malwarebytes for Windows
Malwarebytes is one of the most popular and trusted anti-malware tools for Windows — and it’s completely free for removing infections. It catches threats that many antivirus programs miss, including adware, browser hijackers, and trojans. Follow the steps below to scan and clean your PC in just a few minutes.
Download Malwarebytes
Click the button below to download the latest version of Malwarebytes for Windows from the official source. The free version is all you need — it will scan your computer and remove adware, browser hijackers, and other malicious software at no cost.
Download MalwarebytesOfficial installer for Windows 11 and 10. Your download starts right away.Want real-time protection? See Malwarebytes Premium Malwarebytes Free for WindowsScans and removes malware at no cost
-
Install Malwarebytes
When the download finishes, open your Downloads folder and double-click the MBSetup file. If Windows shows a User Account Control pop-up, click “Yes” to allow the installation.

Follow the On-Screen Prompts to Install Malwarebytes
The setup wizard will walk you through a few quick screens:
-
Choose where you’re installing the program — “Personal Computer” or “Work Computer” — then click Next.

-
Malwarebytes will now install on your device. This usually takes under a minute.

-
When installation is complete, the “Welcome to Malwarebytes” screen will open automatically.

-
On the final screen, click Open Malwarebytes to launch the program.

-
Enable “Scan for Rootkits”
Before scanning, turn on rootkit detection so Malwarebytes can find even the most hidden threats. Click the Settings gear icon on the left side of the screen.

In the settings menu, find “Scan for rootkits” and click the toggle so it turns blue.

Done? Click “Dashboard” in the left pane to return to the main screen.
Start the Scan
Click the blue Scan button. Malwarebytes will automatically update its virus database and start checking your computer for malware.

-
Wait for the Scan to Finish
The scan checks your entire system for browser hijackers and other malicious programs, so it can take 5 to 20 minutes depending on your computer. Feel free to do something else — just check back occasionally to see the progress.

-
Quarantine the Detected Threats
When the scan is done, you’ll see a list of everything Malwarebytes found — malware, adware, and potentially unwanted programs. Click the “Quarantine” button to remove all of them at once.

Malwarebytes will now remove the malicious files and registry entries and move them safely into quarantine.

-
Restart Your Computer
Some threats can only be fully removed after a reboot. If Malwarebytes asks you to restart, click Yes. Once you’re logged back in, Malwarebytes has finished removing the threats it found.

That’s it — your Windows PC is now clean of trojans, adware, and other malware, and should be back to running smoothly.
If you are still having problems with your computer after completing these instructions, then please follow one of the steps:
- Run a computer scan with ESET Online Scanner
- Ask for help in our Windows Malware Removal Help & Support forum.
Run a Malware Scan with Malwarebytes for Mac
Malwarebytes for Mac is a free on-demand scanner that removes the malware other security software tends to miss — adware, browser hijackers, and unwanted programs included. Cleaning an infected Mac with Malwarebytes has always been completely free, and it’s our go-to recommendation. Follow the steps below to scan and clean your Mac in just a few minutes.
-
Download Malwarebytes for Mac
Click the button below to download the latest version of Malwarebytes for Mac.
Download MalwarebytesOfficial installer for macOS. Your download starts right away.Want real-time protection? See Malwarebytes PremiumMalwarebytes Free for MacScans and removes malware at no cost -
Open the Malwarebytes setup file
When the download finishes, open your Downloads folder and double-click the setup file to begin the installation.

-
Follow the On-Screen Prompts to Install Malwarebytes
The Malwarebytes for Mac Installer will guide you through a few quick screens. Click “Continue” and keep following the prompts until the installation completes.



When the installation is complete, Malwarebytes opens to the Welcome to Malwarebytes screen. Click “Get started“.
-
Select “Personal Computer” or “Work Computer”
Malwarebytes will ask what type of computer you’re installing it on. Click either Personal Computer or Work Computer, whichever applies.

-
Start the Scan
Click the “Scan” button. Malwarebytes will automatically update its detection database and begin checking your Mac for malware.

-
Wait for the Scan to Finish
Malwarebytes will scan your Mac for adware, browser hijackers, and other malicious programs. This can take a few minutes, so feel free to do something else — just check back occasionally to see the progress.

-
Quarantine the Detected Threats
When the scan is done, you’ll see a list of everything Malwarebytes found. Click the “Quarantine” button to remove all the threats at once.

-
Restart Your Mac
Malwarebytes will now remove all the malicious files it found. Some threats can only be fully removed after a reboot — if Malwarebytes asks you to restart, allow it. Once you’re logged back in, your Mac is clean.

That’s it — your Mac is now free of adware, rogue browser extensions, and other potentially harmful software.
If you are still experiencing problems while trying to remove a malicious program from your computer, please ask for help in our Mac Malware Removal Help & Support forum.
Run a Malware Scan with Malwarebytes for Android
Malwarebytes for Android automatically detects and removes dangerous threats like malware and ransomware so you don’t have to worry about your most-used device being compromised. Aggressive detection of adware and potentially unwanted programs keeps your Android phone or tablet running smooth.
-
Download Malwarebytes for Android.
You can download Malwarebytes for Android by clicking the link below.
Get Malwarebytes for AndroidOpens Google Play in a new tab.Want real-time protection? See Malwarebytes Premium for AndroidMalwarebytes for AndroidScans your phone and removes malware at no cost -
Install Malwarebytes for Android on your phone.
In the Google Play Store, tap “Install” to install Malwarebytes for Android on your device.

When the installation process has finished, tap “Open” to begin using Malwarebytes for Android. You can also open Malwarebytes by tapping on its icon in your phone menu or home screen.

-
Follow the on-screen prompts to complete the setup process
When Malwarebytes will open, you will see the Malwarebytes Setup Wizard which will guide you through a series of permissions and other setup options.
This is the first of two screens that explain the difference between the Premium and Free versions. Swipe this screen to continue.
Tap on “Got it” to proceed to the next step.
Malwarebytes for Android will now ask for a set of permissions that are required to scan your device and protect it from malware. Tap on “Give permission” to continue.
Tap on “Allow” to permit Malwarebytes to access the files on your phone.
-
Update database and run a scan with Malwarebytes for Android
You will now be prompted to update the Malwarebytes database and run a full system scan.

Click on “Update database” to update the Malwarebytes for Android definitions to the latest version, then click on “Run full scan” to perform a system scan.

-
Wait for the Malwarebytes scan to complete.
Malwarebytes will now start scanning your phone for adware and other malicious apps. This process can take a few minutes, so we suggest you do something else and periodically check on the status of the scan to see when it is finished.

-
Click on “Remove Selected”.
When the scan has been completed, you will be presented with a screen showing the malware infections that Malwarebytes for Android has detected. To remove the malicious apps that Malwarebytes has found, tap on the “Remove Selected” button.

-
Restart your phone.
Malwarebytes for Android will now remove all the malicious apps that it has found. To complete the malware removal process, Malwarebytes may ask you to restart your device.
That’s it — your Android phone is now clean — no more malicious apps, adware, or browser redirects.
If you are still having problems with your phone after completing these instructions, then please follow one of the steps:
- Restore your phone to factory settings by going to Settings > General management > Reset > Factory data reset.
- Ask for help in our Mobile Malware Removal Help & Support forum.
Stay Protected: Block Ads and Malicious Sites
Now that your device is clean, keep it that way. Most infections start with a malicious ad or a fake download button — so blocking them at the source is your best defense.
We recommend AdGuard, which blocks malicious ads, phishing pages, and dangerous redirects before they can reach you.
👉 Download AdGuard and browse safely
Remove Vricpe Ransomware and Recover the Files
The reusable steps below provide the established MalwareTips removal and recovery workflow. Complete containment before connecting the affected machine to outside services.
Removal prevents continued malicious activity, while file recovery addresses encrypted data. Finishing one task does not automatically complete the other.
Start Windows in Safe Mode with Networking
Safe Mode loads a reduced set of drivers and startup components. This can prevent some ransomware persistence from interfering with removal tools.
Disconnect ordinary network access first. Reconnect only when a trusted scanner must download updates or the incident responder instructs you.
On Windows 11 or Windows 10, hold Shift while selecting Restart. Choose Troubleshoot, Advanced options, Startup Settings, and Restart.
After the startup menu appears, select Safe Mode with Networking. Sign in with an administrator account reserved for recovery when possible.
If BitLocker requests a recovery key, stop and retrieve it through the organization’s approved process. Do not guess or disable encryption.
Safe Mode is a temporary troubleshooting environment, not proof that Vricpe disappeared. Continue with full scans and controlled restoration.
Malwarebytes is one of the most popular and trusted anti-malware tools for Windows — and it’s completely free for removing infections. It catches threats that many antivirus programs miss, including adware, browser hijackers, and trojans. Follow the steps below to scan and clean your PC in just a few minutes.
Download Malwarebytes
Click the button below to download the latest version of Malwarebytes for Windows from the official source. The free version is all you need — it will scan your computer and remove adware, browser hijackers, and other malicious software at no cost.
Download MalwarebytesOfficial installer for Windows 11 and 10. Your download starts right away.Want real-time protection? See Malwarebytes PremiumMalwarebytes Free for WindowsScans and removes malware at no cost-
Install Malwarebytes
When the download finishes, open your Downloads folder and double-click the MBSetup file. If Windows shows a User Account Control pop-up, click “Yes” to allow the installation.
Follow the On-Screen Prompts to Install Malwarebytes
The setup wizard will walk you through a few quick screens:
-
Choose where you’re installing the program — “Personal Computer” or “Work Computer” — then click Next.
-
Malwarebytes will now install on your device. This usually takes under a minute.
-
When installation is complete, the “Welcome to Malwarebytes” screen will open automatically.
-
On the final screen, click Open Malwarebytes to launch the program.
-
Enable “Scan for Rootkits”
Before scanning, turn on rootkit detection so Malwarebytes can find even the most hidden threats. Click the Settings gear icon on the left side of the screen.
In the settings menu, find “Scan for rootkits” and click the toggle so it turns blue.
Done? Click “Dashboard” in the left pane to return to the main screen.
Start the Scan
Click the blue Scan button. Malwarebytes will automatically update its virus database and start checking your computer for malware.
-
Wait for the Scan to Finish
The scan checks your entire system for browser hijackers and other malicious programs, so it can take 5 to 20 minutes depending on your computer. Feel free to do something else — just check back occasionally to see the progress.
-
Quarantine the Detected Threats
When the scan is done, you’ll see a list of everything Malwarebytes found — malware, adware, and potentially unwanted programs. Click the “Quarantine” button to remove all of them at once.
Malwarebytes will now remove the malicious files and registry entries and move them safely into quarantine.
-
Restart Your Computer
Some threats can only be fully removed after a reboot. If Malwarebytes asks you to restart, click Yes. Once you’re logged back in, Malwarebytes has finished removing the threats it found.
HitmanPro is a second-opinion scanner — it’s designed to catch what your main antivirus might have missed. Instead of relying on a single detection engine, it checks the behavior of files in the locations where malware usually hides. Anything suspicious gets sent to the cloud, where it’s analyzed by two of the best antivirus engines available: Bitdefender and Kaspersky.
Good news: scanning is completely free, with no limits. You only need a license when it’s time to remove what was found — and even then, you can activate a free one-time 30-day trial to clean your PC at no cost. (A full license is $24.95 per year for 1 PC.)
-
Download HitmanPro
Click the button below to download HitmanPro. Remember — the scan is free, so you have nothing to lose by checking your PC.
Download HitmanProFree scan. Removing threats needs the free 30-day trial. Opens the official HitmanPro page in a new tab. HitmanProSecond-opinion malware scanner from Sophos
 -
Install HitmanPro
When the download finishes, open your Downloads folder and double-click the file: “hitmanpro.exe” on 32-bit Windows, or “hitmanpro_x64.exe” on 64-bit Windows.
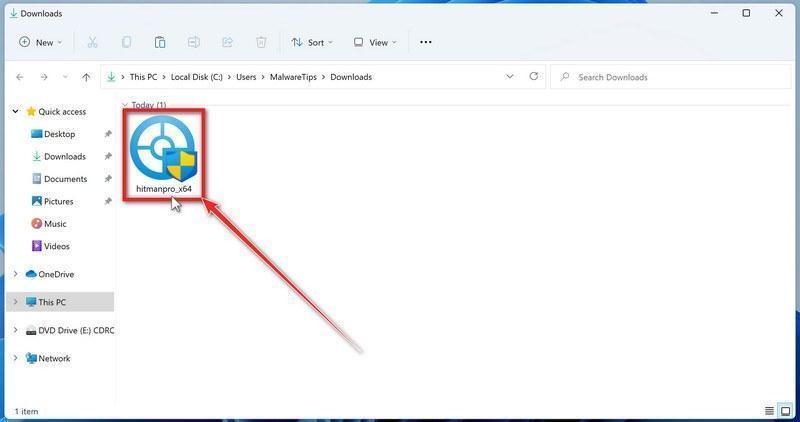
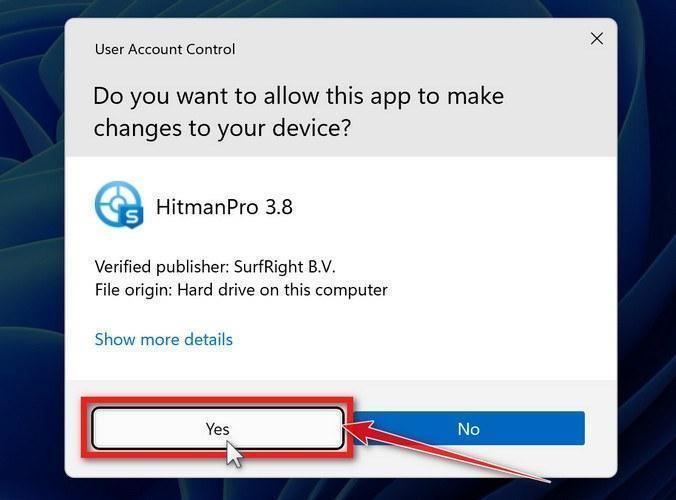
If a User Account Control pop-up asks whether HitmanPro can make changes to your device, click “Yes” to continue.
-
Follow the On-Screen Prompts
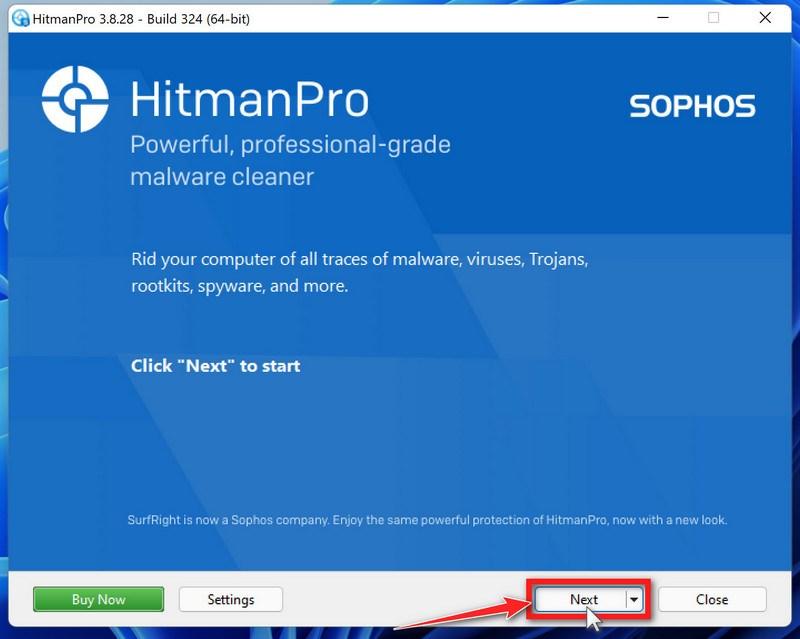
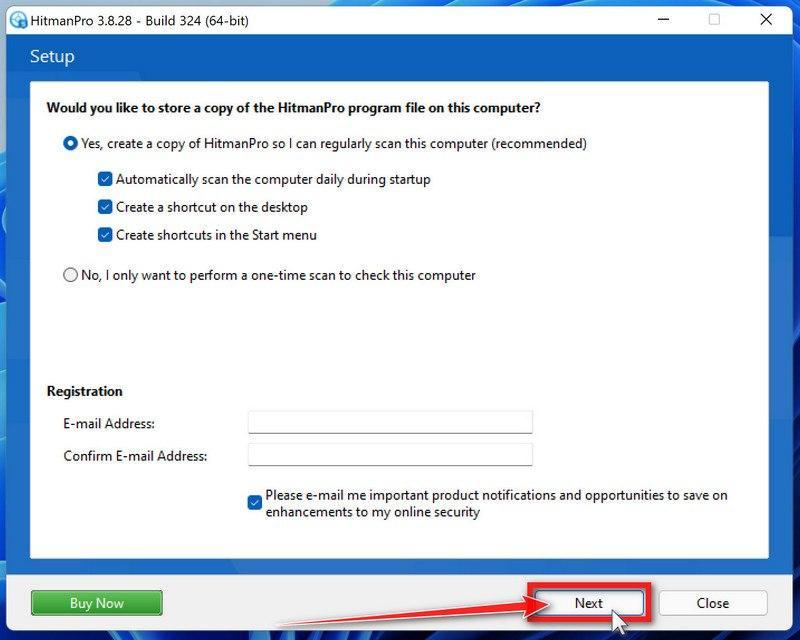
On the HitmanPro start screen, click “Next” to begin the system scan. No lengthy setup required — it goes straight to work.
-
Wait for the Scan to Finish
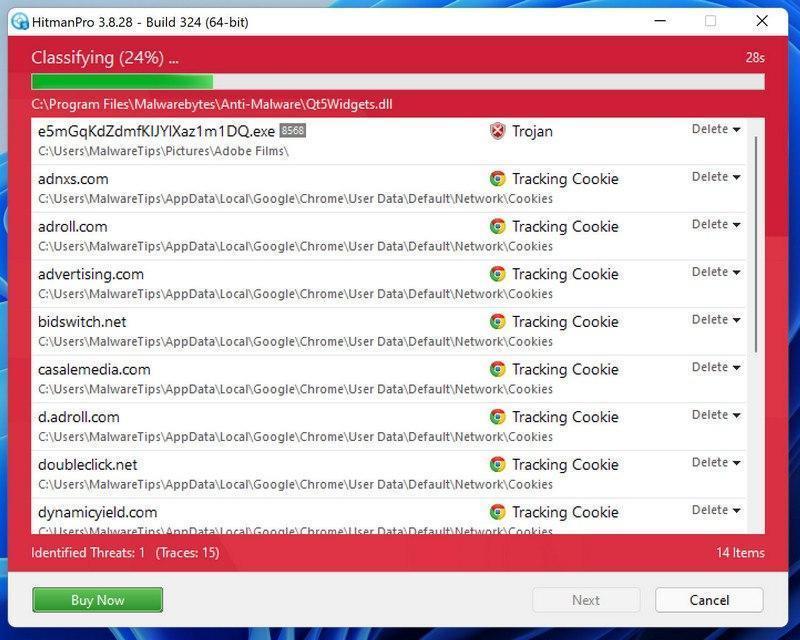
HitmanPro will now check your computer for malicious programs. This usually takes just a few minutes thanks to its cloud-based scanning.
-
Review the Results and Click “Next”
When the scan is done, HitmanPro will show you everything it found. Click “Next” to remove the detected threats.
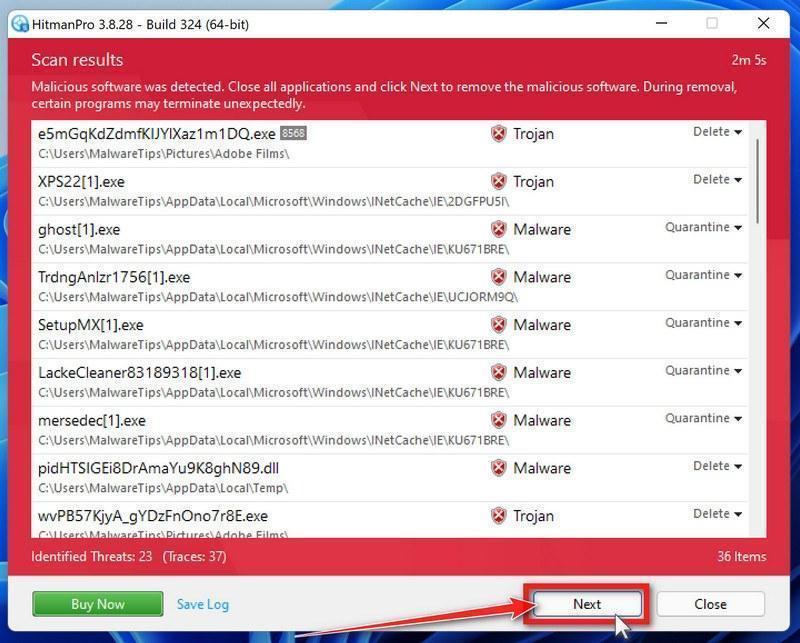
-
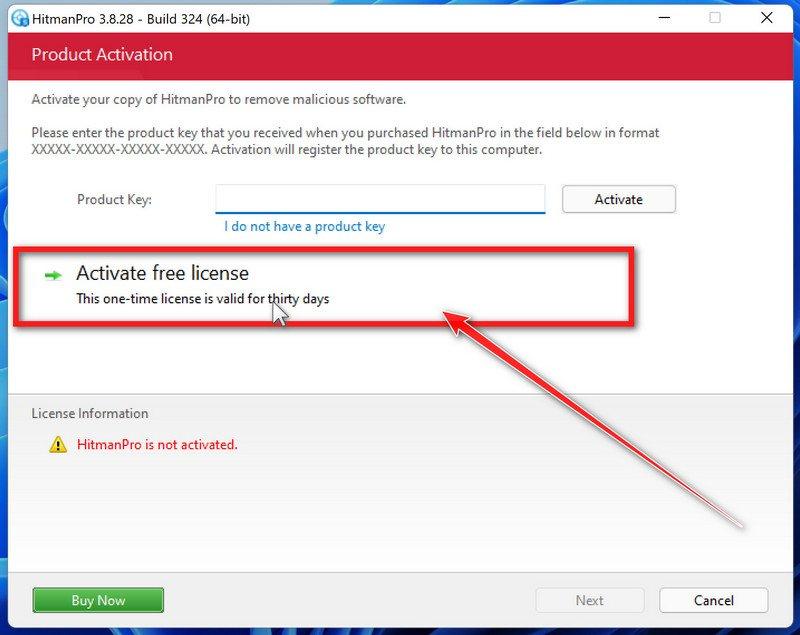
Click “Activate Free License”
To remove the malicious files, click the “Activate free license” button. This starts your free 30-day trial — no payment details needed — and unlocks the full cleanup.
When the removal is complete, HitmanPro will show a summary of everything it cleaned. Click Next, then click Reboot if prompted. If there’s no reboot prompt, just click Close — your PC is clean.
ESET Online Scanner is a free second-opinion scanner that performs a deep, full-system check for viruses, trojans, rootkits, and other malware. We use it as the final step because it’s thorough — if anything slipped past the previous scans, ESET will find it. A clean result here means your computer is malware-free.
-
Download ESET Online Scanner
Click the button below to download ESET Online Scanner.
Download ESET Online ScannerOpens the official download page in a new tab. ESET Online ScannerFree one-time malware scan from ESET
 -
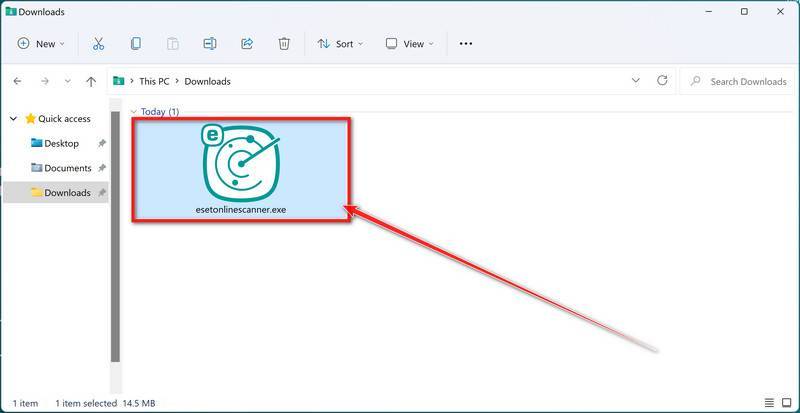
Run the Installer
When the download finishes, open your Downloads folder and double-click “esetonlinescanner.exe“.
-
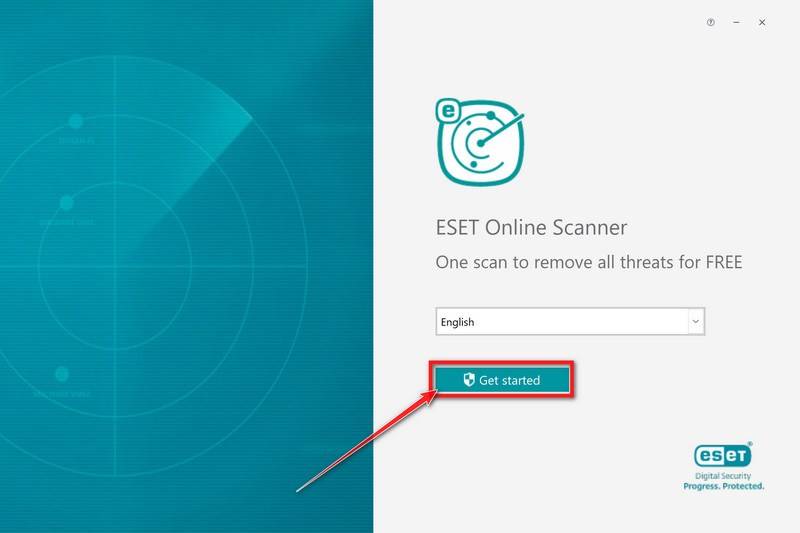
Install ESET Online Scanner
On the start screen, select your language from the drop-down menu and click Get started.
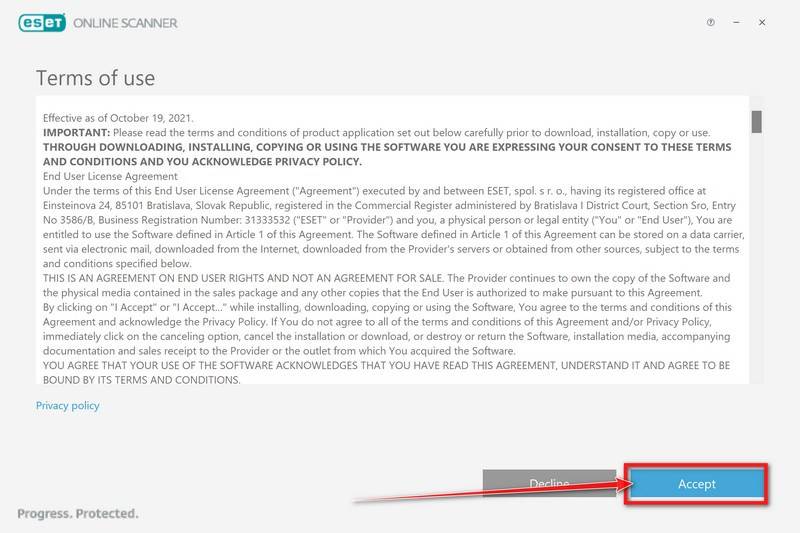
On the Terms of use screen, click Accept.
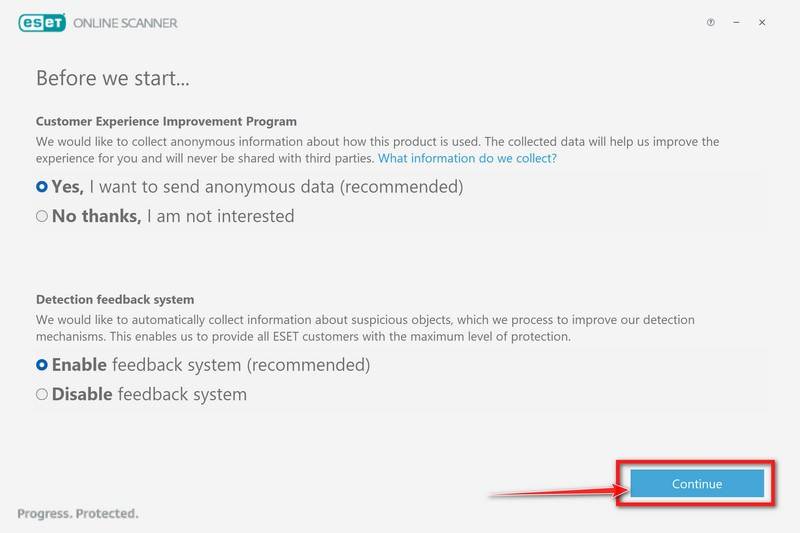
Choose your preferences for the Customer Experience Improvement Program and the Detection feedback system (either choice is fine), then click Continue.
-
Start a Full Scan
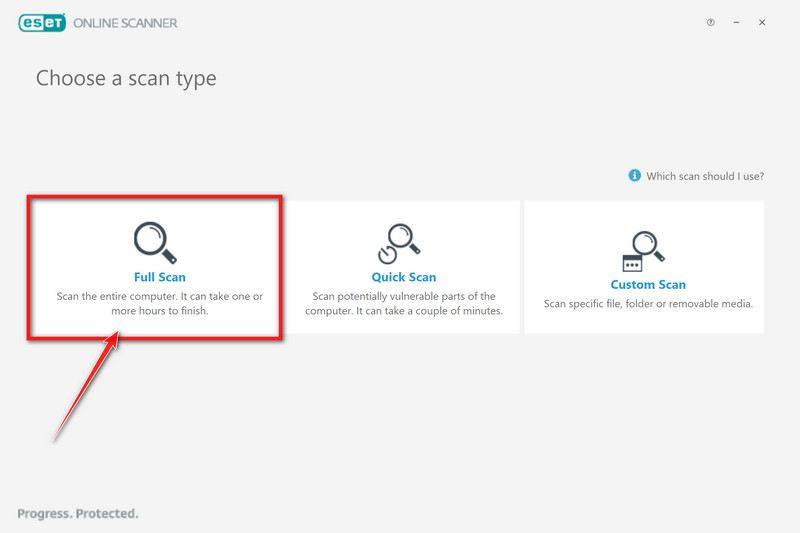
Click Full Scan — this checks your entire computer, not just the common hiding spots.
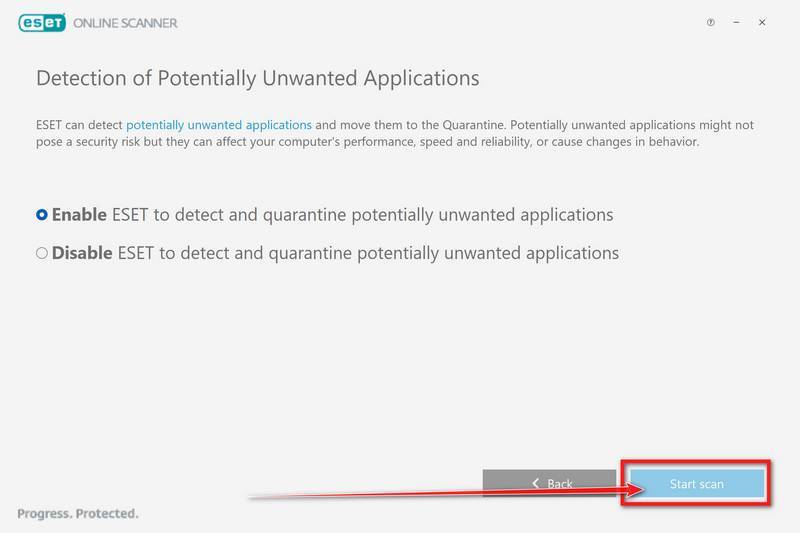
Select Enable for Detection of Potentially Unwanted Applications — this lets ESET catch adware and bundled junk programs, not just viruses. Then click Start scan.
-
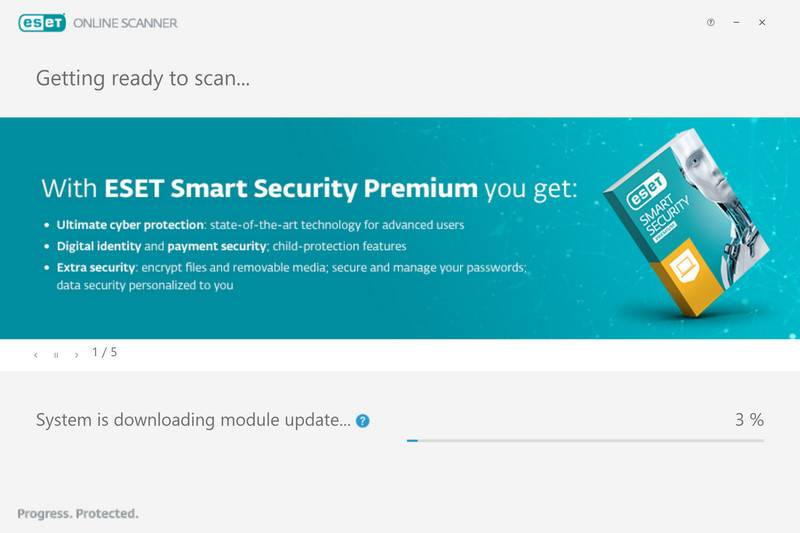
Wait for the Scan to Finish
ESET will now check every file on your computer. Because it’s a full scan, this can take a while — often an hour or more, depending on how much data you have. Leave it running in the background and check on it from time to time.
-
Review the Results
When the scan completes, the Found and resolved detections screen appears. Any threats found were automatically cleaned and quarantined — there’s nothing extra you need to do. Click View detailed results if you want to see exactly what was removed.
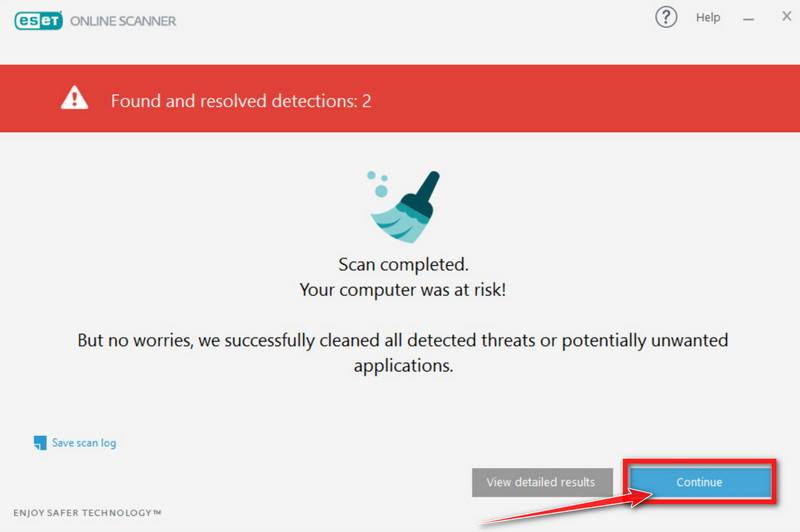
If ESET found nothing — congratulations, your computer has passed the final check and is malware-free.
Unfortunately, in most cases, it’s not possible to recover the files encrypted by this ransomware virus because the private key which is needed to unlock the encrypted files is only available through the attackers. However, below we’ve listed three options you can use to try and recover your files.
Option 1: Search a decryption tool for this ransomware
The cybersecurity community is constantly working to create ransomware decryption tools, so you can try to search these sites for updates:
- https://id-ransomware.malwarehunterteam.com/
- https://decrypter.emsisoft.com/
- https://noransom.kaspersky.com/
- https://www.avast.com/ransomware-decryption-tools
Option 2: Use EaseUS Data Recovery Wizard Free to recover the encrypted files
EaseUS Data Recovery Wizard Free can restore files and repair corrupted files with simple clicks. Its powerful scanning algorithms can identify and retrieve huge file type library, including all of the popular video files, audio files, photos, and document formats.
While the free version only allows you to recover 2 GB of data, this can be helpful to see if the recovery is possible and restore back the most important files from your computer.
-
Download EaseUS Data Recovery Wizard Free.
You can download EaseUS Data Recovery Wizard Free by clicking the link below.
Download EaseUS Data Recovery WizardOpens the download page in a new tab. EaseUS Data Recovery WizardFile recovery tool with a free version
 -
Double-click on the EaseUS Data Recovery Wizard Free setup file.
When EaseUS Data Recovery Wizard Free has finished downloading, double-click on the setup file to install EaseUS Data Recovery Wizard on your computer. In most cases, downloaded files are saved to the Downloads folder.
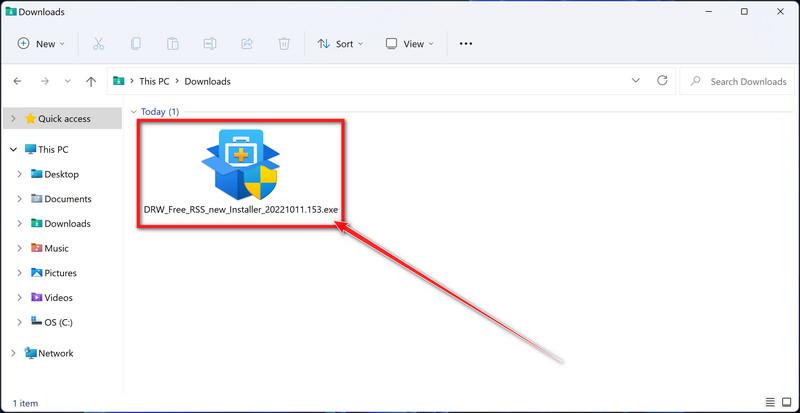
You may be presented with a User Account Control pop-up asking if you want to allow EaseUS to make changes to your device. If this happens, you should click “Yes” to continue with the EaseUS Data Recovery Wizard Free installation.
-
Follow the on-screen prompts to install EaseUS Data Recovery Wizard.
When the EaseUS Data Recovery Wizard installation begins, click on the “Install Now” as seen in the image below.
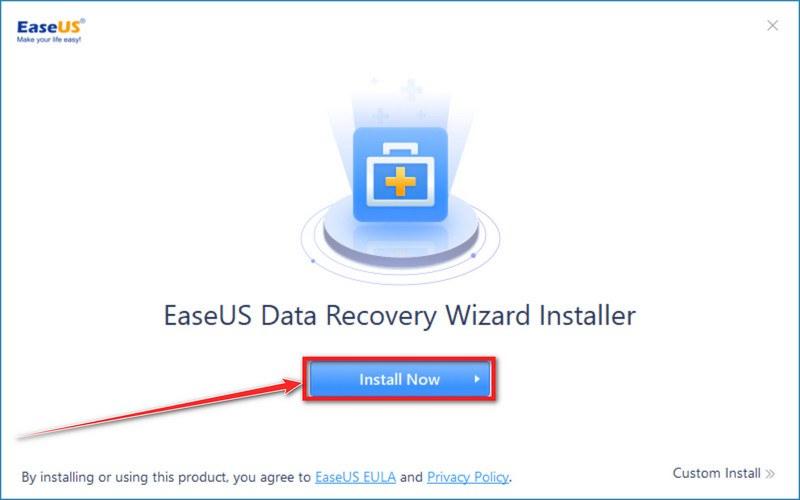
When your EaseUS Data Recovery Wizard installation completes, click the “Start Now” button to start the program.
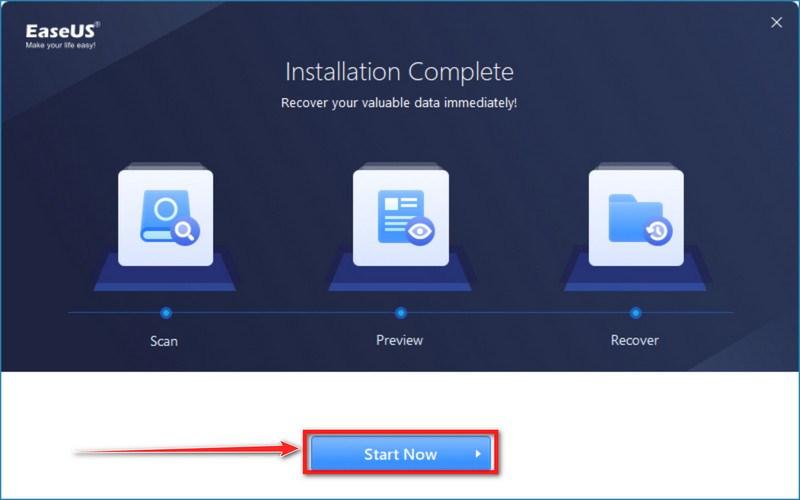
-
Select a location to start recovering the encrypted files.
Choose the drive or folder where you are the encrypted files that you want to recover and click “Scan“.
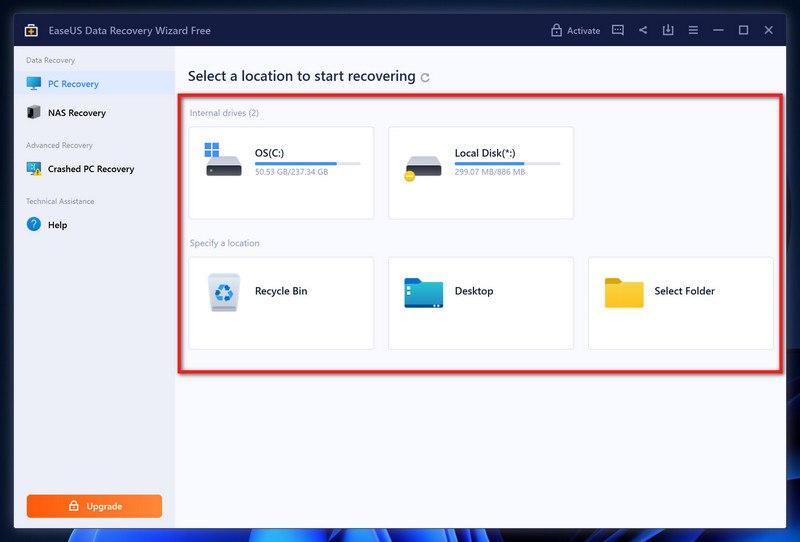
-
Wait for the EaseUS Data Recovery Wizard scan to complete.
EaseUS Data Recovery Wizard will now scan your computer files that can be restored. This process can take a few minutes, so we suggest you do something else and periodically check on the status of the scan to see when it is finished.
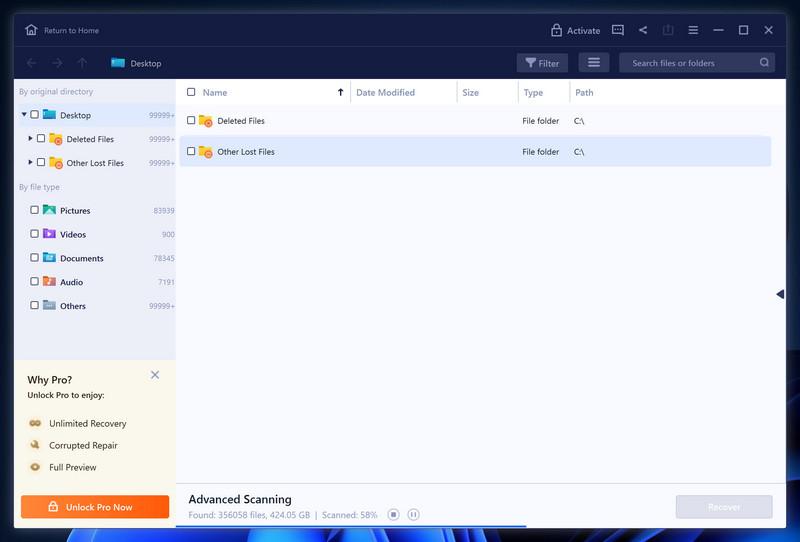
-
Find the files you want to recover.
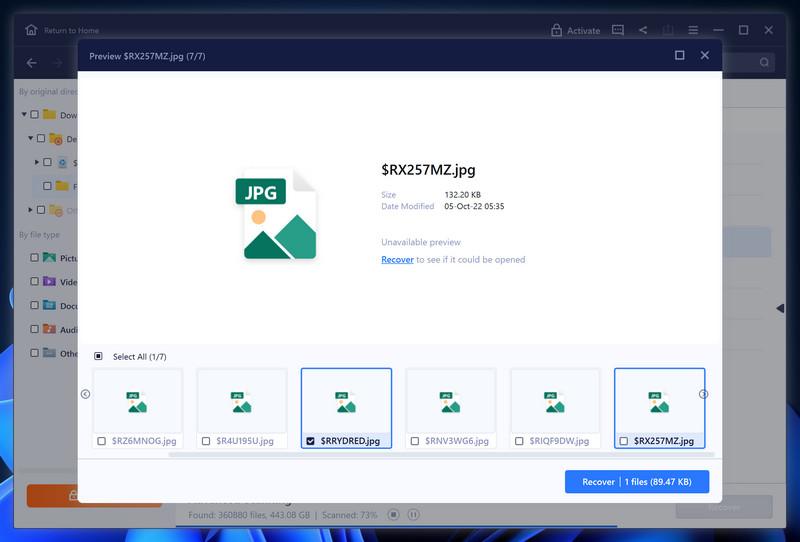
When the EaseUS Data Recovery Wizard scan is finished scanning it will show a screen that displays the files that can be recovered. This tool can recover a lot of data, use the “Filter” button to quickly filter specific file types and find the files that you want to recover.
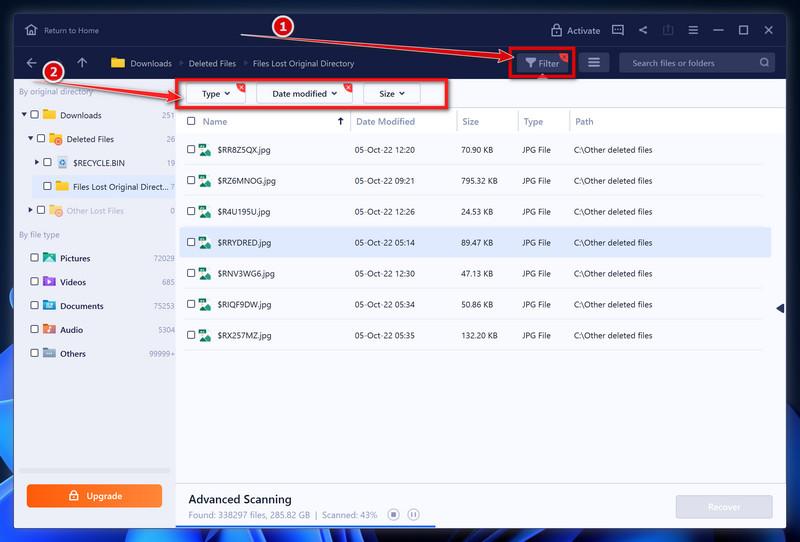
Click the “Preview” button or double-click on a file for a full preview.
-
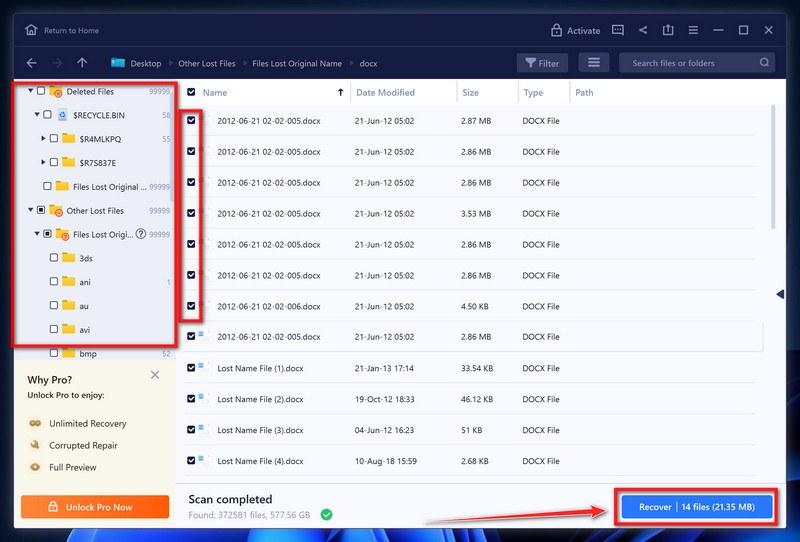
Select your files and click “Recover”.
Finally, select the the files you want to recover and click “Recover“.
Choose a safe location to save all the files.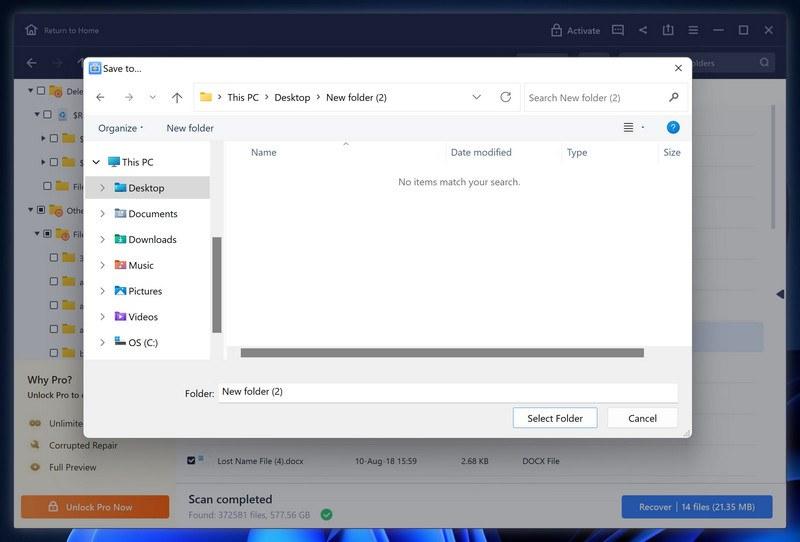
The free version only allow you to recover 2 GB of data, however, this will allow you to recover the most important files and see if EaseUS Data Recovery Wizard can correctly recover them.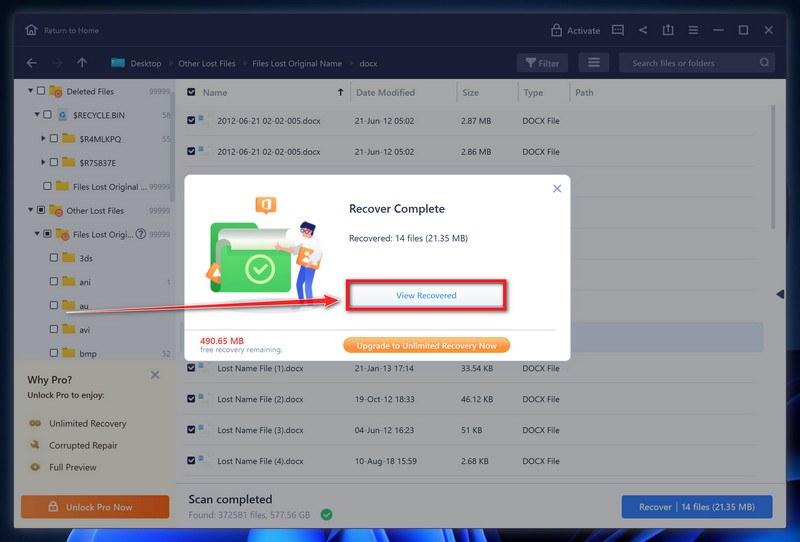
Option 3: Try to restore your files with ShadowExplorer
This ransomware will attempt to delete all shadow copies when you first start any executable on your computer after becoming infected. Thankfully, the infection is not always able to remove the shadow copies, so you should continue to try restoring your files using this method.
-
Download ShadowExplorer.
You can download ShadowExplorer from the below link.
Download ShadowExplorerOpens the official download page in a new tab.ShadowExplorerRestores files from Windows Shadow Volume Copies -
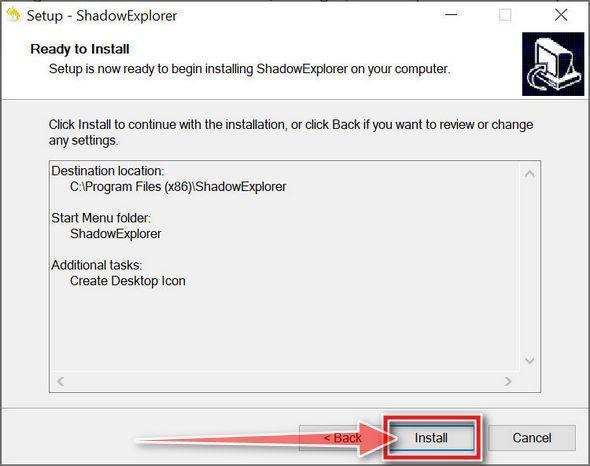
Install ShadowExplorer.
Double-click on the ShadowExplorer-x.x-setup file to start the installation process, then follow the on-screen promts to install this program.
-
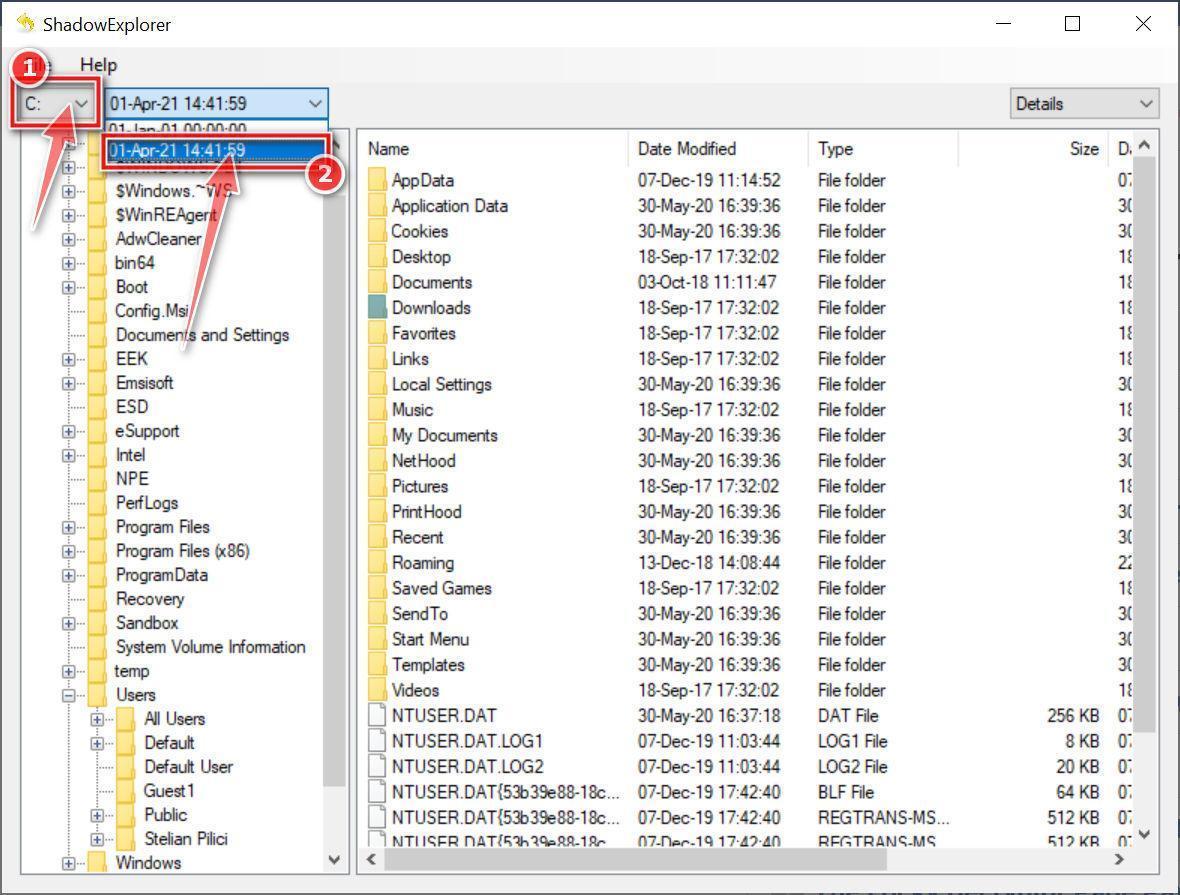
Select snapshot date.
Open ShadowExplorer and then from the top bar select the drive where the files that you want to save are located, then select from the snapshot available one previous to this infection.
-
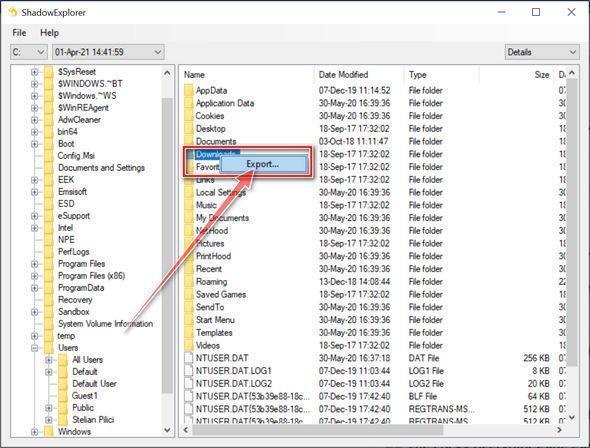
Export the files that you want to recover.
Once you have found a copy of the original file or folder, right-click on it and the select “Export”. A window will prompt you where you want to save the file or folder.
If you are still having problems with your computer after completing these instructions, then please follow one of the steps:
- Run a computer scan with Emsisoft Emergency Kit
- Ask for help in our Malware Removal Assistance for Windows forum.
Keep untouched copies of encrypted files even after rebuilding the computer. Store them offline and document their origin.
Recheck trusted decryption resources periodically. A future key release or technical discovery may change the recovery outlook.
How Vricpe May Reach a System
Phishing email remains a common route. Attachments and links can imitate invoices, delivery documents, resumes, tax records, or shared files.
Pirated software and activation cracks are especially dangerous because users expect antivirus warnings and may disable protection intentionally.
Fake updates can appear through compromised websites or aggressive advertisements. Software should update through built-in mechanisms or official vendor pages.
Another Trojan may download ransomware after stealing credentials. Removing only the visible encryptor can leave the original access method behind.
Exposed remote desktop services allow password attacks and direct deployment. Remote access should sit behind strong authentication and restricted network controls.
Unpatched applications can provide entry without an obvious file launch. Internet-facing services deserve rapid security updates and continuous inventory.
Shared administrator passwords amplify damage. Separate accounts and least privilege reduce how much one compromised identity can reach.
Investigation should seek the actual entry point. Otherwise, restored systems can be encrypted again through the unchanged weakness.
Preventing Another Ransomware Incident
Maintain offline or immutable backups and test restoration regularly. A backup that has never been restored is only an assumption.
Separate backup credentials from daily administrator accounts. Ransomware should not reach backup management through the same compromised identity.
Patch operating systems, browsers, office suites, remote-access tools, and internet-facing applications promptly. Unsupported software increases long-term exposure.
Block untrusted macros and script interpreters where business needs allow. Application control can prevent unfamiliar executables from launching.
Use endpoint protection and central logging. Alerts should reach staff even when the affected device becomes unavailable.
Restrict network shares according to role. Users should not have write access to data they never need to modify.
Protect remote access with multifactor authentication, allowlists, and rate limits. Exposing management services directly to the internet is dangerous.
Teach employees to verify unexpected files through another channel. Training should include archives, fake cloud shares, and password-protected attachments.
Run incident exercises that include isolation, communication, legal decisions, and restoration. Technical recovery is only one part of organizational resilience.
Review every real incident afterward. Fix the entry path, detection gap, excessive permission, and backup weakness that allowed the damage.
Frequently Asked Questions
What is the Vricpe ransomware extension?
Encrypted files receive random names followed by an attacker address in brackets and the .vricpe suffix, such as .[vricpe@aol.com].vricpe.
What ransom note does Vricpe create?
It creates RecoveryHelp.txt, which lists contact addresses, requests a personal ID and test files, and warns against independent recovery tools.
Is a free Vricpe decryptor available?
No confirmed free decryptor was identified during the reviewed analysis. Preserve files and check reputable decryption projects for future updates.
Will removing Vricpe decrypt my files?
No. Removal stops malicious activity but does not reverse existing encryption. Recovery requires clean backups, a valid decryptor, or another proven method.
Should I contact the attacker email addresses?
Not casually. Contact begins an extortion negotiation and may expose sensitive information. Seek professional and law-enforcement guidance first.
Should I pay for a Vricpe decryption key?
Payment has no guaranteed outcome and supports criminal activity. Focus on containment, trusted recovery, reporting, and professional response.
The Bottom Line
Vricpe encrypts data, randomizes filenames, appends .vricpe, and uses RecoveryHelp.txt to pressure victims into contacting its operators.
Isolate the system, preserve evidence, remove every malicious component, and restore from verified backups. Keep encrypted copies in case legitimate decryption later becomes possible.








