RIED Ransomware Exposed: .RIED Files, Ransom Note, and Safe Recovery Steps
Written by: Lapain Epuran
Published on:
A renamed photograph is easy to dismiss as a file glitch. When every important document changes at once, the silence around that screen feels very different.
RIED ransomware creates exactly that moment, leaving victims to separate urgent decisions from demands written by the people who caused the damage.
Overview
RIED is a file-encrypting threat from the Makop family
RIED ransomware is a Makop variant that encrypts accessible files and changes their names with an attacker-controlled extension pattern.
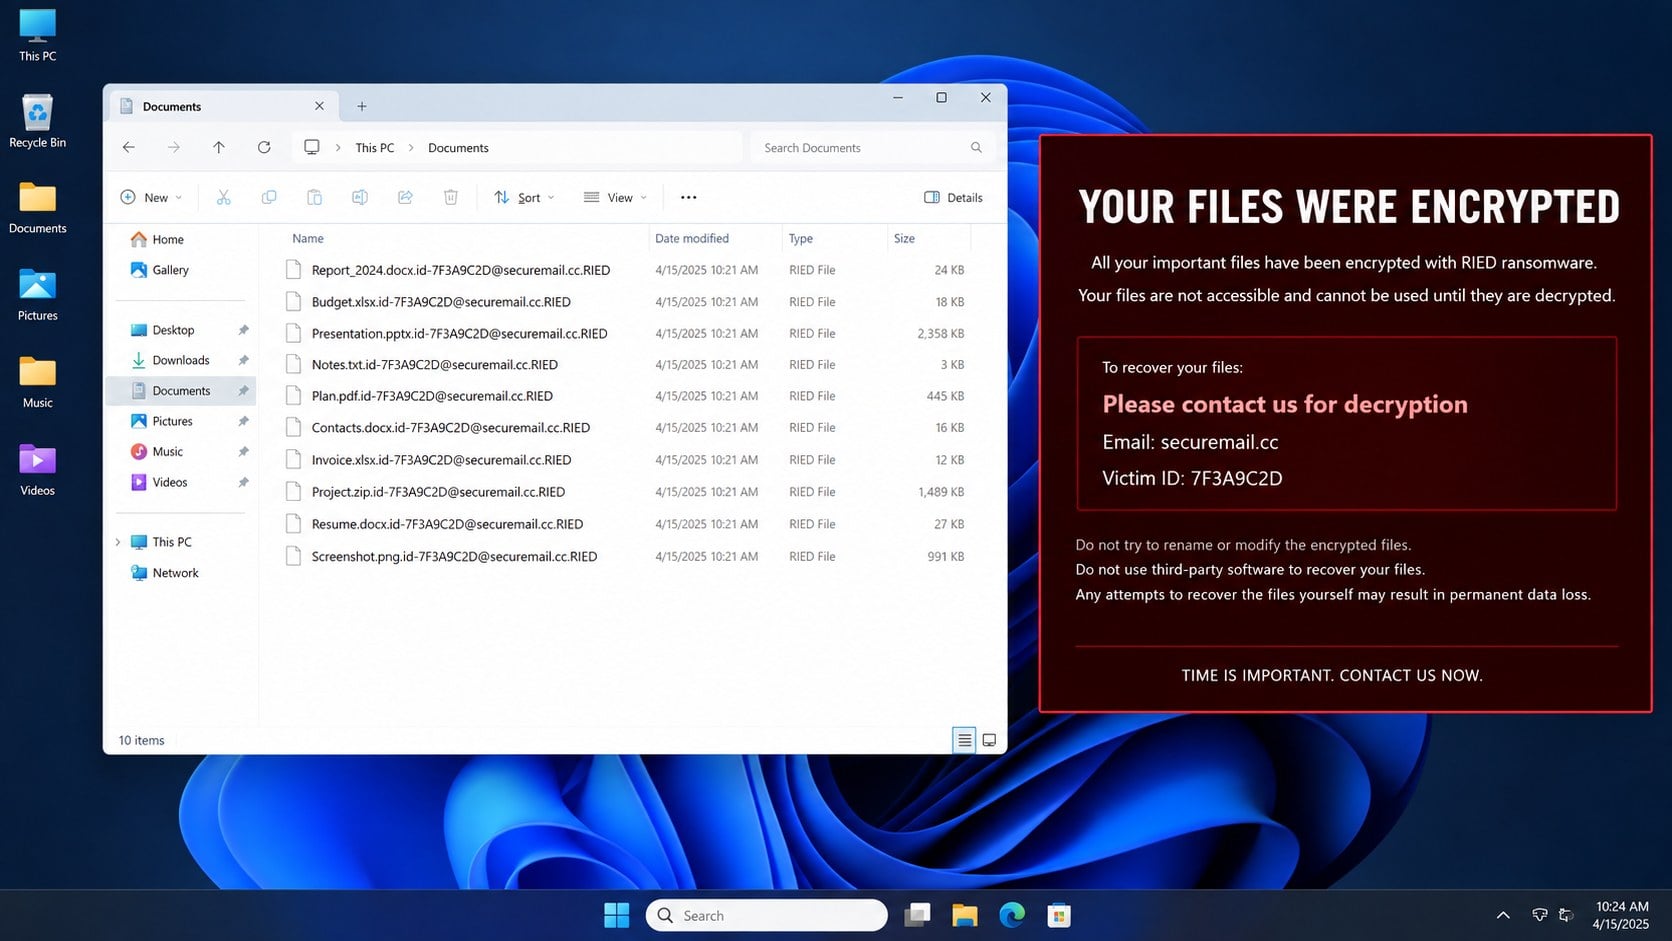
An affected picture may become photo.jpg.[victim ID].[contact address].RIED, making the infection visible across folders within minutes.
The original filename remains recognizable, but the added identifier, contact address, and .RIED ending show that encryption has occurred.
Changing that filename back does not reverse the cryptographic transformation. It only removes evidence that can help identify the ransomware family.
The ransom note turns technical damage into pressure
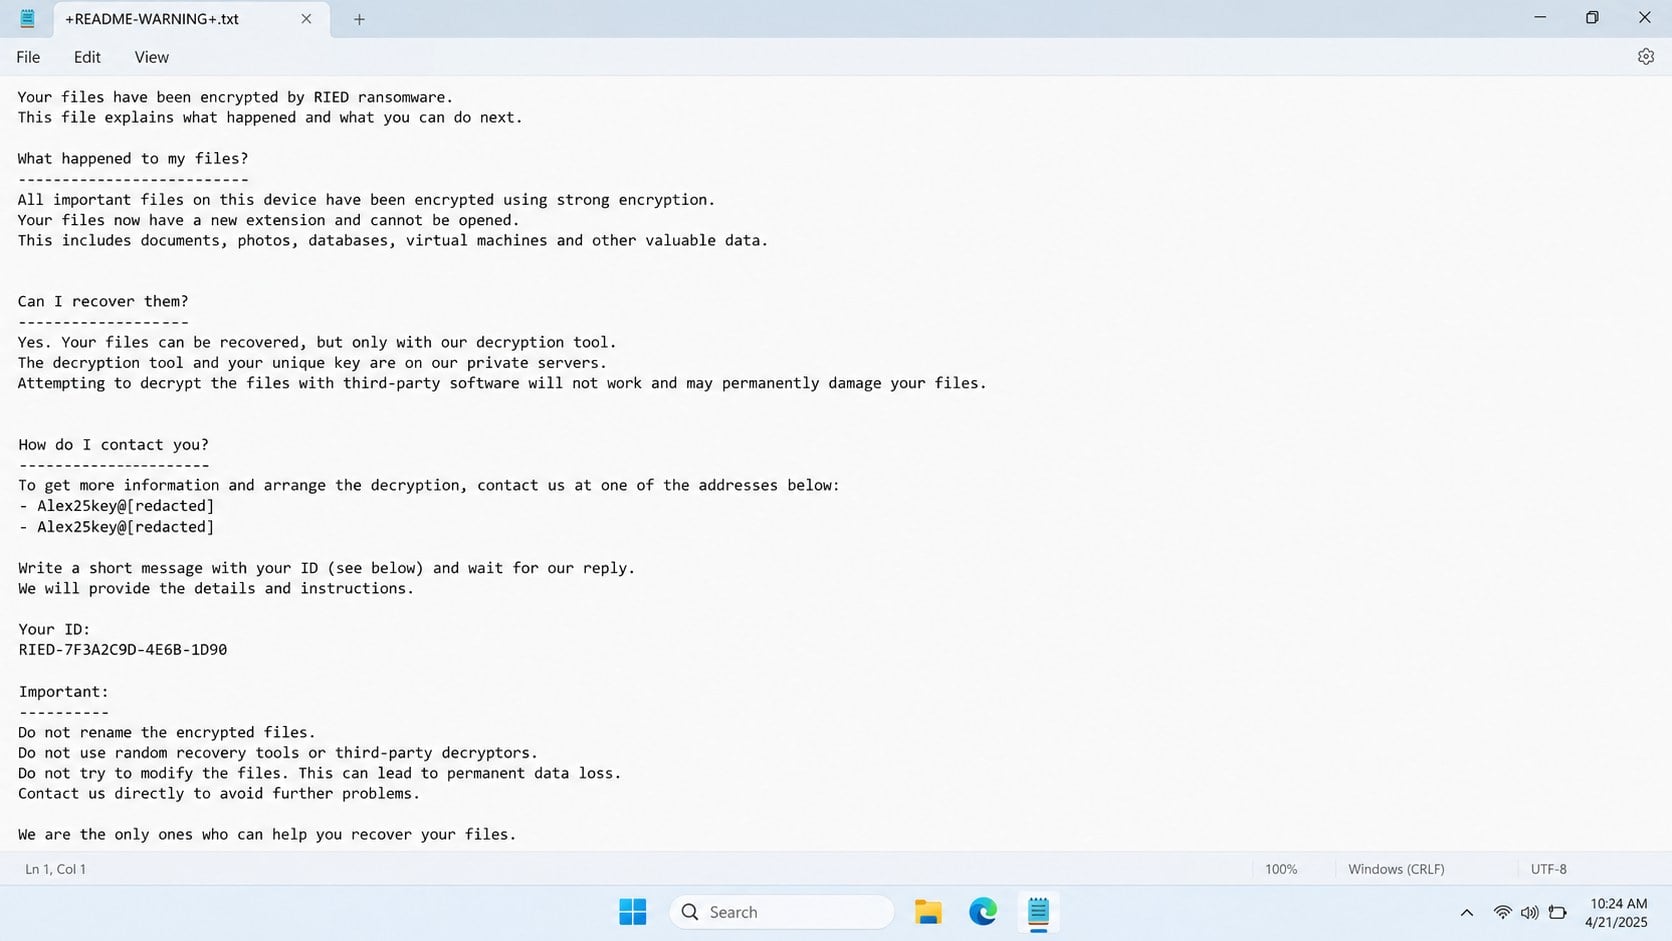
RIED creates a text file named +README-WARNING+.txt and may replace the desktop wallpaper with a short contact demand.
The note presents a question-and-answer format, promises a paid decryption service, and offers to unlock two small files as supposed proof.
It also warns victims not to rename files or use outside recovery utilities. Those warnings are designed to control the response.
Observed notes list Alex25key@aol.com and Alex25key@mailum.com. An email address is an attacker contact point, not a legitimate support channel.
Recovery depends on evidence, backups, and careful containment
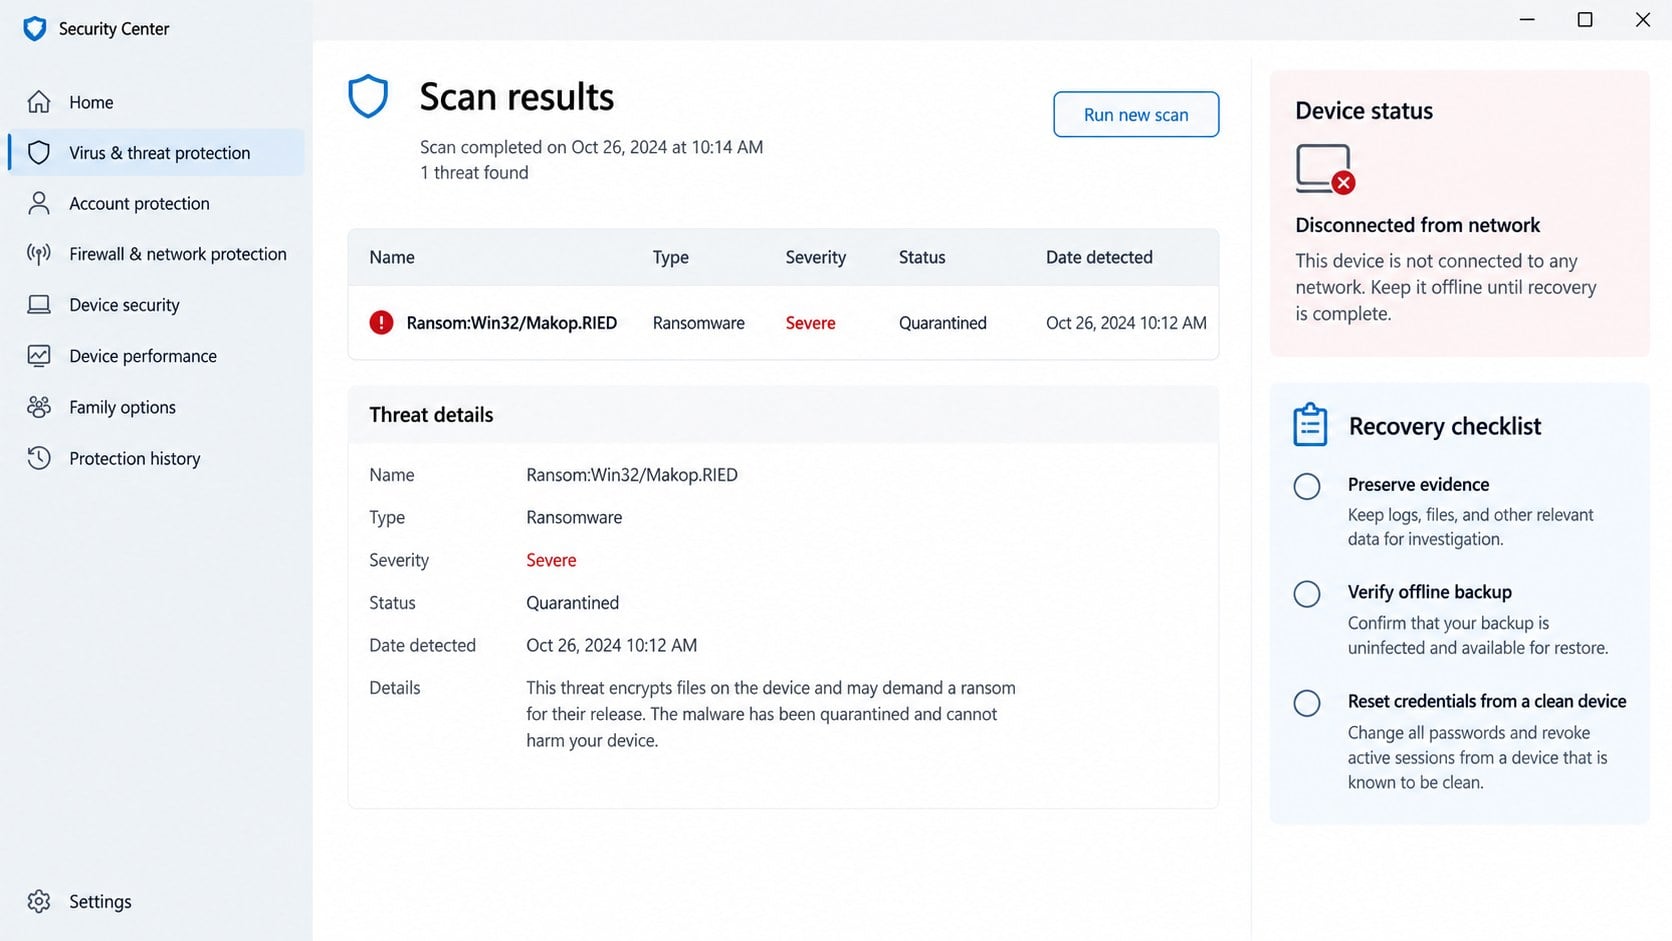
Removing the ransomware can stop more malicious activity, but a malware scan cannot automatically decrypt files already transformed by RIED.
A clean, offline backup remains the safest recovery source when it was disconnected before the intrusion and has been tested.
There was no publicly confirmed free RIED decryptor during this investigation. That can change, so preserve encrypted samples and revisit trusted recovery projects.
Key facts to recognize include:
The ransomware belongs to the Makop family.
Encrypted names end with an ID, contact address, and .RIED.
The primary note is called +README-WARNING+.txt.
The desktop may show an additional ransom message.
The attackers offer two small test decryptions.
Payment does not guarantee a working key or honest support.
Malware removal and file restoration are separate tasks.
Every affected machine should be isolated before cleanup begins.
What the RIED Ransom Note Really Means
The note is written to sound like a technical service agreement. It describes encryption, contact rules, payment, and a supposedly unique private key.
That orderly format can make the criminals appear predictable. Nothing in the message creates a contract, refund right, or enforceable recovery promise.
The free-file offer serves as sales theater. Attackers can decrypt a sample while withholding the key needed for the remaining collection.
They may also demand more money after the first payment, stop answering, or provide a damaged tool that restores only part of the data.
Warnings against third-party tools contain a grain of technical truth. Writing over encrypted storage carelessly can reduce recovery options.
However, the warning also discourages victims from contacting incident responders, preserving evidence, checking backups, or discovering a future community decryptor.
Why the attacker identifier matters
The identifier embedded in each filename may help the operator associate a machine with a conversation and a proposed decryption key.
Record it exactly, but do not publish confidential filenames, customer details, or internal paths while asking for assistance.
Preserve several encrypted samples, the ransom note, the changed wallpaper, and security alerts in a protected evidence folder.
Those artifacts can support family identification, insurance reporting, law-enforcement reports, and later decryptor testing.
Why a renamed extension is not the real lock
Windows uses file extensions to associate content with applications. RIED changes both the data and the visible name.
Removing .RIED only changes the label. The internal bytes remain encrypted, so the original program still cannot interpret them.
Bulk-renaming files also destroys a useful marker separating affected copies from intact material. Work only on duplicates during recovery experiments.
Keep the originals read-only whenever possible. A failed tool can corrupt the only evidence needed by a better method later.
How the RIED Ransomware Attack Works
Step 1: A malicious file reaches the computer
Ransomware rarely arrives with an honest filename. The opening may be a fake invoice, shipping notice, application, update, crack, or urgent business document.
Attackers also use compromised websites, misleading advertisements, trojanized downloads, and earlier malware that installs additional payloads.
The file may hide behind a familiar icon or double extension. Windows can conceal the final executable ending under default viewing settings.
A message that creates urgency reduces the chance that the recipient will verify the sender or inspect the attachment carefully.
Step 2: Execution establishes the malicious process
Opening the payload allows code to run with the current user’s permissions. Exploited software or stolen administrator credentials can expand that reach.
The malware may check system details, available drives, running processes, locale, and security products before beginning visible encryption.
Some attacks disable recovery features or remove local shadow copies. Others rely on ordinary access to documents, shared folders, and attached storage.
The absence of a dramatic installer window does not mean nothing happened. Encryption programs are intentionally quiet until the damage is useful.
Step 3: Accessible files are encrypted
RIED searches for valuable formats, including office documents, photographs, archives, databases, project files, and other user-created data.
System files needed to keep Windows running may remain untouched. A usable desktop makes the ransom demand easier to deliver.
Mapped network drives and synchronized folders can also be affected when the infected account has write permission.
Cloud synchronization may upload encrypted versions, although version history can sometimes preserve earlier copies. Pause synchronization before investigating.
Step 4: Filenames receive the RIED identity pattern
After processing a file, the ransomware appends the victim identifier, attacker contact address, and .RIED extension.
This naming convention advertises which operator to contact and distinguishes the incident from unrelated corruption.
Do not assume every file was processed successfully. Test copies, duplicates, temporary files, and disconnected backups may remain intact.
Inventory those unaffected sources before attempting repairs. An overlooked export or colleague’s copy can become the cleanest recovery route.
Step 5: The note demands private contact and payment
The ransomware drops its warning file in accessible locations and may change the wallpaper so the demand cannot be missed.
Victims are told to email the operator, include their identifier, and submit samples for a demonstration.
The later price may be quoted in cryptocurrency because transfers are difficult to reverse and can cross borders quickly.
Contacting the operator also confirms that someone is reading the demand. Organizations should coordinate communications through experienced incident counsel or responders.
Step 6: Persistence or remaining access can trigger more damage
Even after encryption stops, the original entry point may remain open. A stolen remote account, loader, web shell, or scheduled task can survive.
Simply deleting the ransom note does not close that access. Restoring files onto an untrusted system can lead to another encryption cycle.
Incident response must identify how RIED entered, which credentials were exposed, and whether another machine shares the same weakness.
Containment comes before restoration because a clean backup is valuable only when restored into a trustworthy environment.
Ransom Note, Extension, and Recovery Checks
Match the complete filename pattern
Compare several affected filenames, not just one. Look for the bracketed identifier, attacker email, and consistent .RIED ending.
Keep original examples and record when they changed. Similar extensions can belong to unrelated families with different recovery prospects.
A family-identification service can compare the note and a small encrypted sample without relying on the attacker’s description.
Treat contact addresses as evidence, not support
The addresses inside the note identify a criminal communication channel. They do not prove the operator owns a universal decryption system.
Do not send identity documents, network maps, customer records, or confidential contracts as test material.
Organizations should preserve the message headers and coordinate any contact with counsel, insurers, responders, and law enforcement.
Challenge every decryptor and recovery claim
Search results can contain fake decryptors, paid data-recovery promises, and copycat criminals who target desperate victims.
A legitimate recovery specialist explains limitations, protects originals, documents the process, and never guarantees an impossible universal key.
Test tools only against copies. Confirm the ransomware identification before applying a decryptor built for another Makop variant.
Verify backups before connecting them
Check creation dates, retention history, access logs, and whether the backup was reachable during the attack.
Scan restored material in an isolated environment. Confirm that applications open representative files before declaring the recovery complete.
Keep at least one untouched backup copy. A rushed restoration can overwrite versions that become essential later.
Can RIED Files Be Decrypted for Free?
No public free decryptor was confirmed for RIED during this review. That answer describes the current evidence, not every future possibility.
Ransomware researchers sometimes recover keys, discover implementation mistakes, or seize criminal infrastructure months after an outbreak begins.
Preserving original encrypted files therefore matters, even when immediate restoration is impossible.
Use a trusted ransomware-identification project to confirm the family and monitor reputable community initiatives for updates.
Be skeptical of downloadable tools that demand payment before showing a diagnosis. Criminal affiliates often advertise recovery scams beside ransomware searches.
A proper decryptor should be matched to the exact family, used on copies first, and obtained through a well-established security source.
Recovery Options That Do Not Depend on the Criminals
Restore from a known-clean offline backup
This is the preferred path when backup media was unreachable from the infected computer and predates the intrusion.
Rebuild or thoroughly clean the affected environment first. Rotate exposed credentials before reconnecting restored systems to shared resources.
Restore a small test set, validate applications, then expand. Logging every decision prevents accidental gaps and repeated work.
Check version history and independent copies
Cloud platforms, document systems, source repositories, email attachments, and collaboration tools may retain earlier versions.
Pause synchronization before browsing history. Otherwise, a still-compromised endpoint may continue replacing clean versions.
Colleagues, customers, vendors, exported reports, and archived mailboxes may hold usable copies that were never connected to the infected device.
Explore file recovery cautiously
Data-recovery software may locate deleted originals when the ransomware created an encrypted copy and removed the source.
Success depends on storage type, overwrite activity, trimming behavior, and the malware’s implementation. It is not guaranteed.
Stop unnecessary disk use and image the drive before experiments. Every new write can replace recoverable remnants.
Signs the Incident May Extend Beyond One Computer
RIED filenames on a shared drive indicate that an account or endpoint had write access there. They do not identify which machine started the encryption.
Compare file modification times, authentication logs, endpoint alerts, and network connections to build a reliable timeline.
Unexpected administrator logins, disabled security tools, new remote software, or changed backup settings suggest hands-on access before the ransomware ran.
Multiple computers displaying notes at similar times can indicate lateral movement or centralized deployment.
Check domain controllers, remote-management systems, VPN accounts, virtualization hosts, file servers, and backup consoles for related activity.
Small organizations should not assume one cleaned laptop ends the incident. A compromised mailbox or remote credential can reopen the environment.
Look for matching alerts on every endpoint.
Review privileged logins during the preceding weeks.
Identify newly created users and scheduled tasks.
Inspect remote desktop and VPN authentication records.
Confirm backup consoles have not been altered.
Check whether security logging was disabled.
Preserve suspicious emails and downloaded files.
Document every affected share and account.
Should You Pay the Ransom?
Payment may appear faster than rebuilding, especially when operations have stopped. It still carries technical, legal, financial, and ethical risks.
The attacker can send the wrong key, a fragile tool, or nothing. Decryption may take days and leave corrupted files behind.
Payment does not remove malware, close stolen access, delete copied data, or prove the criminals kept no credentials.
Some jurisdictions and insurers impose reporting, sanctions, or consultation requirements. Organizations need qualified legal guidance before any decision.
Do not make the choice from a personal inbox while under a countdown. Build a verified inventory of backups, impact, and recovery alternatives first.
Even when a decryptor is obtained, the environment must be investigated and rebuilt safely. The key addresses only one part of the incident.
What to Do if You Have Fallen Victim to This Scam
Isolate every suspected device. Disconnect Ethernet, Wi-Fi, shared storage, and synchronization without powering systems off unless active encryption cannot otherwise be stopped.
Preserve evidence. Save the ransom note, wallpaper, several encrypted samples, filenames, alerts, logs, and a timeline before cleanup changes the scene.
Confirm the ransomware family. Submit the note and a non-sensitive sample to a trusted identification service, then record the result and any decryptor status.
Run Malwarebytes from a controlled environment. Update it, scan all affected systems, quarantine detections, restart, and scan again. Organizations should follow their responder’s collection plan first.
Close the original entry point. Patch vulnerable software, remove malicious remote tools, disable compromised accounts, and rotate passwords from a separate clean device.
Protect backups before restoration. Keep backup media disconnected, scan representative files, verify dates, and restore first into an isolated rebuilt system.
Check every connected account. Revoke active sessions, review mailbox rules, inspect cloud sharing, and enable multi-factor authentication with newly generated recovery codes.
Use AdGuard to reduce risky delivery paths. It can block many malicious advertisements and known scam pages, but it cannot replace patching, backups, or endpoint protection.
Report and document the incident. Notify organizational security, insurers, regulators, law enforcement, and affected partners when your obligations require it.
Monitor recovery projects without modifying originals. Retain read-only encrypted copies because a verified decryptor or recovered key may become available later.
Is Your Device Infected? Run a Free Malware Scan
Slow performance, constant pop-ups, or strange behavior? These are classic signs of a malware infection. The fastest way to find out is to scan your device with Malwarebytes Anti-Malware Free — one of the most trusted malware removal tools available.
The free version detects and removes the most common threats, including:
Adware — the cause of those annoying pop-ups
Browser hijackers — unwanted redirects and changed homepages
Trojans and spyware — hidden programs stealing your data
Potentially unwanted programs (PUPs) — software you never asked for
👉 Select your device below — Windows, Mac, or Android — then follow the simple steps to download Malwarebytes, scan your system, and remove any threats it finds. The whole process takes about 5 minutes.
Malwarebytes for WindowsMalwarebytes for MacMalwarebytes for Android
Run a Malware Scan with Malwarebytes for Windows
Malwarebytes is one of the most popular and trusted anti-malware tools for Windows — and it’s completely free for removing infections. It catches threats that many antivirus programs miss, including adware, browser hijackers, and trojans. Follow the steps below to scan and clean your PC in just a few minutes.
Download Malwarebytes
Click the button below to download the latest version of Malwarebytes for Windows from the official source. The free version is all you need — it will scan your computer and remove adware, browser hijackers, and other malicious software at no cost.
(The link opens in a new page where your download will start)
Install Malwarebytes
When the download finishes, open your Downloads folder and double-click the MBSetup file. If Windows shows a User Account Control pop-up, click “Yes” to allow the installation.
Follow the On-Screen Prompts to Install Malwarebytes
The setup wizard will walk you through a few quick screens:
Choose where you’re installing the program — “Personal Computer” or “Work Computer” — then click Next.
Malwarebytes will now install on your device. This usually takes under a minute.
When installation is complete, the “Welcome to Malwarebytes” screen will open automatically.
On the final screen, click Open Malwarebytes to launch the program.
Enable “Scan for Rootkits”
Before scanning, turn on rootkit detection so Malwarebytes can find even the most hidden threats. Click the Settings gear icon on the left side of the screen.
In the settings menu, find “Scan for rootkits” and click the toggle so it turns blue.
Done? Click “Dashboard” in the left pane to return to the main screen.
Start the Scan
Click the blue Scan button. Malwarebytes will automatically update its virus database and start checking your computer for malware.
Wait for the Scan to Finish
The scan checks your entire system for browser hijackers and other malicious programs, so it can take several minutes. Feel free to do something else — just check back occasionally to see the progress.
Quarantine the Detected Threats
When the scan is done, you’ll see a list of everything Malwarebytes found — malware, adware, and potentially unwanted programs. Click the “Quarantine” button to remove all of them at once.
Malwarebytes will now remove the malicious files and registry entries and move them safely into quarantine.
Restart Your Computer
Some threats can only be fully removed after a reboot. If Malwarebytes asks you to restart, click Yes. Once you’re logged back in, your PC is clean and you can continue with the next steps in this guide.
When the scan finishes, click Quarantine to remove everything Malwarebytes found. That’s it — your Windows PC is now clean of trojans, adware, and other malware, and should be back to running smoothly.
If your current antivirus allowed this malicious program on your computer, you may want to consider purchasing Malwarebytes Premium to protect against these types of threats in the future. If you are still having problems with your computer after completing these instructions, then please follow one of the steps:
Malwarebytes for Mac is a free on-demand scanner that removes the malware other security software tends to miss — adware, browser hijackers, and unwanted programs included. Cleaning an infected Mac with Malwarebytes has always been completely free, and it’s our go-to recommendation. Follow the steps below to scan and clean your Mac in just a few minutes.
Download Malwarebytes for Mac
Click the button below to download the latest version of Malwarebytes for Mac.
When the download finishes, open your Downloads folder and double-click the setup file to begin the installation.
Follow the On-Screen Prompts to Install Malwarebytes
The Malwarebytes for Mac Installer will guide you through a few quick screens. Click “Continue” and keep following the prompts until the installation completes.
When the installation is complete, Malwarebytes opens to the Welcome to Malwarebytes screen. Click “Get started“.
Select “Personal Computer” or “Work Computer”
Malwarebytes will ask what type of computer you’re installing it on. Click either Personal Computer or Work Computer, whichever applies.
Start the Scan
Click the “Scan” button. Malwarebytes will automatically update its detection database and begin checking your Mac for malware.
Wait for the Scan to Finish
Malwarebytes will scan your Mac for adware, browser hijackers, and other malicious programs. This can take a few minutes, so feel free to do something else — just check back occasionally to see the progress.
Quarantine the Detected Threats
When the scan is done, you’ll see a list of everything Malwarebytes found. Click the “Quarantine” button to remove all the threats at once.
Restart Your Mac
Malwarebytes will now remove all the malicious files it found. Some threats can only be fully removed after a reboot — if Malwarebytes asks you to restart, allow it. Once you’re logged back in, your Mac is clean.
Once the scan is done, remove every threat it detected. Your Mac is now free of adware, rogue browser extensions, and other potentially harmful software.
If your current antivirus allowed a malicious program on your computer, you might want to consider purchasing the full-featured version of Malwarebytes Anti-Malware to protect against these types of threats in the future. If you are still experiencing problems while trying to remove a malicious program from your computer, please ask for help in our Mac Malware Removal Help & Support forum.
Run a Malware Scan with Malwarebytes for Android
Malwarebytes for Android automatically detects and removes dangerous threats like malware and ransomware so you don’t have to worry about your most-used device being compromised. Aggressive detection of adware and potentially unwanted programs keeps your Android phone or tablet running smooth.
Download Malwarebytes for Android.
You can download Malwarebytes for Android by clicking the link below.
In the Google Play Store, tap “Install” to install Malwarebytes for Android on your device.
When the installation process has finished, tap “Open” to begin using Malwarebytes for Android. You can also open Malwarebytes by tapping on its icon in your phone menu or home screen.
Follow the on-screen prompts to complete the setup process
When Malwarebytes will open, you will see the Malwarebytes Setup Wizard which will guide you through a series of permissions and other setup options. This is the first of two screens that explain the difference between the Premium and Free versions. Swipe this screen to continue. Tap on “Got it” to proceed to the next step. Malwarebytes for Android will now ask for a set of permissions that are required to scan your device and protect it from malware. Tap on “Give permission” to continue. Tap on “Allow” to permit Malwarebytes to access the files on your phone.
Update database and run a scan with Malwarebytes for Android
You will now be prompted to update the Malwarebytes database and run a full system scan.
Click on “Update database” to update the Malwarebytes for Android definitions to the latest version, then click on “Run full scan” to perform a system scan.
Wait for the Malwarebytes scan to complete.
Malwarebytes will now start scanning your phone for adware and other malicious apps. This process can take a few minutes, so we suggest you do something else and periodically check on the status of the scan to see when it is finished.
Click on “Remove Selected”.
When the scan has been completed, you will be presented with a screen showing the malware infections that Malwarebytes for Android has detected. To remove the malicious apps that Malwarebytes has found, tap on the “Remove Selected” button.
Restart your phone.
Malwarebytes for Android will now remove all the malicious apps that it has found. To complete the malware removal process, Malwarebytes may ask you to restart your device.
After the scan, tap Remove Selected to delete all detected threats. Your Android phone is now clean — no more malicious apps, adware, or browser redirects.
If your current antivirus allowed a malicious app on your phone, you may want to consider purchasing the full-featured version of Malwarebytes to protect against these types of threats in the future. If you are still having problems with your phone after completing these instructions, then please follow one of the steps:
Restore your phone to factory settings by going to Settings > General management > Reset > Factory data reset.
Now that your device is clean, keep it that way. Most infections start with a malicious ad or a fake download button — so blocking them at the source is your best defense.
We recommend AdGuard, which blocks malicious ads, phishing pages, and dangerous redirects before they can reach you.
How to Reduce the Risk of Another Ransomware Incident
Maintain at least one offline or immutable backup that ordinary user and administrator accounts cannot rewrite.
Test restoration on a schedule. A backup that has never been opened is a hope, not a recovery plan.
Patch internet-facing services quickly and remove unused remote access. Protect active remote tools with multi-factor authentication and restricted source addresses.
Filter executable attachments, scripts, archives, and password-protected files according to business need.
Show users how to reveal file extensions and verify unexpected invoices, updates, and download links through a separate channel.
Use separate administrator accounts, least privilege, network segmentation, endpoint monitoring, and centralized logs that attackers cannot easily erase.
Practice an incident scenario before one occurs. Teams respond better when ownership, contact numbers, backup priorities, and shutdown authority are already clear.
Frequently Asked Questions
What is the .RIED extension?
It is a marker appended by RIED ransomware after encryption, usually alongside a victim identifier and attacker contact address.
The extension helps identify the incident, but removing it does not restore the original file contents.
Is RIED ransomware part of Makop?
Yes. Its filename pattern, ransom-note behavior, and contact-based recovery demand are consistent with the Makop ransomware family.
Family identification still should be confirmed using the actual note and an encrypted sample from the affected system.
Can Malwarebytes decrypt RIED files?
Malwarebytes can detect and remove malicious components, helping prevent continued activity. It does not provide the attacker’s private decryption key.
File restoration requires clean backups, version history, a compatible decryptor, or other recoverable copies.
Will renaming a .RIED file fix it?
No. Renaming changes the visible label while leaving encrypted data untouched.
Keep original filenames and work only on duplicates when testing any future recovery method.
Should I email the addresses in the ransom note?
Individuals should avoid impulsive contact. Organizations should coordinate any communication through counsel, incident responders, insurers, and law enforcement when appropriate.
Never send sensitive documents as proof, and remember that an attacker can change the demand after receiving a reply.
How can I tell whether my backups are safe?
Check whether they were disconnected or immutable during the intrusion, review access history, and scan test restores inside an isolated environment.
Keep one untouched copy until the investigation and recovery are complete.
The Bottom Line
RIED is a serious Makop ransomware infection, not a harmless filename problem. Isolation, evidence preservation, and verified clean backups should guide the response.
Do not let the ransom note dictate the timeline. Secure the environment first, protect original evidence, and test every recovery step on copies.
10 Rules to Avoid Online Scams
Here are 10 practical safety rules to help you avoid malware, online shopping scams, crypto scams, and other online fraud. Each tip includes a quick “if you already got hit” action.
Stop and verify before you click, log in, download, or pay.
Most scams win by creating urgency. Verify using a trusted method: type the website address yourself, use the official app, or call a known number (not the one in the message).
If you already clicked: close the page, do not enter passwords, and run a malware scan.
Keep your operating system, browser, and apps updated.
Updates patch security holes used by malware and malicious ads. Turn on automatic updates where possible.
If you saw a scary “update now” pop-up: close it and update only through your device settings or the official app store.
Use layered protection: antivirus plus an ad blocker.
Antivirus helps block malware. An ad blocker reduces scam redirects, phishing pages, and malvertising.
If your browser is acting weird: remove unknown extensions, reset the browser, then run a full scan.
Install apps, software, and extensions only from official sources.
Avoid cracked software, “keygens,” and random downloads. During installs, choose Custom/Advanced and decline bundled offers you do not recognize.
If you already installed something suspicious: uninstall it, restart, and scan again.
Treat links and attachments as untrusted by default.
Phishing often impersonates delivery services, banks, and popular brands. If it is unexpected, do not open attachments or log in through the message.
If you entered credentials: change the password immediately and enable 2FA.
Shop safely: research the store, then pay with protection.
Be cautious with brand-new stores, “closing sale” stories, and prices that make no sense. Prefer credit cards or PayPal for dispute options. Avoid wire transfers, gift cards, and crypto payments.
If you already paid: contact your card issuer or PayPal quickly to dispute the transaction.
Crypto rule: never pay a “fee” to withdraw or recover money.
Common patterns include fake profits, then “tax,” “gas,” or “verification” fees. Another is a “recovery agent” who demands upfront crypto.
If you already sent crypto: stop paying, save evidence (wallet addresses, TXIDs, chats), and report the scam to the platform used.
Secure your accounts with unique passwords and 2FA (start with email).
Use a password manager and unique passwords for every account. Enable 2FA using an authenticator app when possible.
If you suspect an account takeover: change passwords, sign out of all devices, and review recent logins and recovery settings.
Back up important files and keep one backup offline.
Backups protect you from ransomware and device failure. Keep at least one backup on an external drive that is not always connected.
If you suspect infection: do not connect backup drives until the system is clean.
If you think you are a victim: stop losses, document evidence, and escalate fast.
Move quickly. Speed matters for disputes, account recovery, and limiting damage.
Stop payments and contact: do not send more money or respond to the scammer.
Call your bank or card issuer: block transactions, replace the card if needed, and start a dispute or chargeback.
Secure your email first: change the email password, enable 2FA, and remove unfamiliar recovery options.
Secure other accounts: change passwords, enable 2FA, and log out of all sessions.
Scan your device: remove suspicious apps or extensions, then run a full malware scan.
Save evidence: screenshots, emails, order pages, tracking pages, wallet addresses, TXIDs, and chat logs.
Report it: to the payment provider, marketplace, social platform, exchange, or wallet service involved.
These rules are intentionally simple. Most online losses happen when decisions are rushed. Slow down, verify independently, and use payment methods and account controls that give you recourse.
Hello! I'm Lapain Epuran, your go-to source for detailed and honest product reviews. From tech gadgets to miracle cures, I provide insights to help you make informed choices. Join me as we discover what's truly worth your time and money.