

A security alert can interrupt an ordinary morning with one unsettling question: who just added that device to my account?
The Untrusted Device Added email is built around that uncertainty, borrowing the language and timing of a real account warning.
Overview
The message imitates a useful security notification
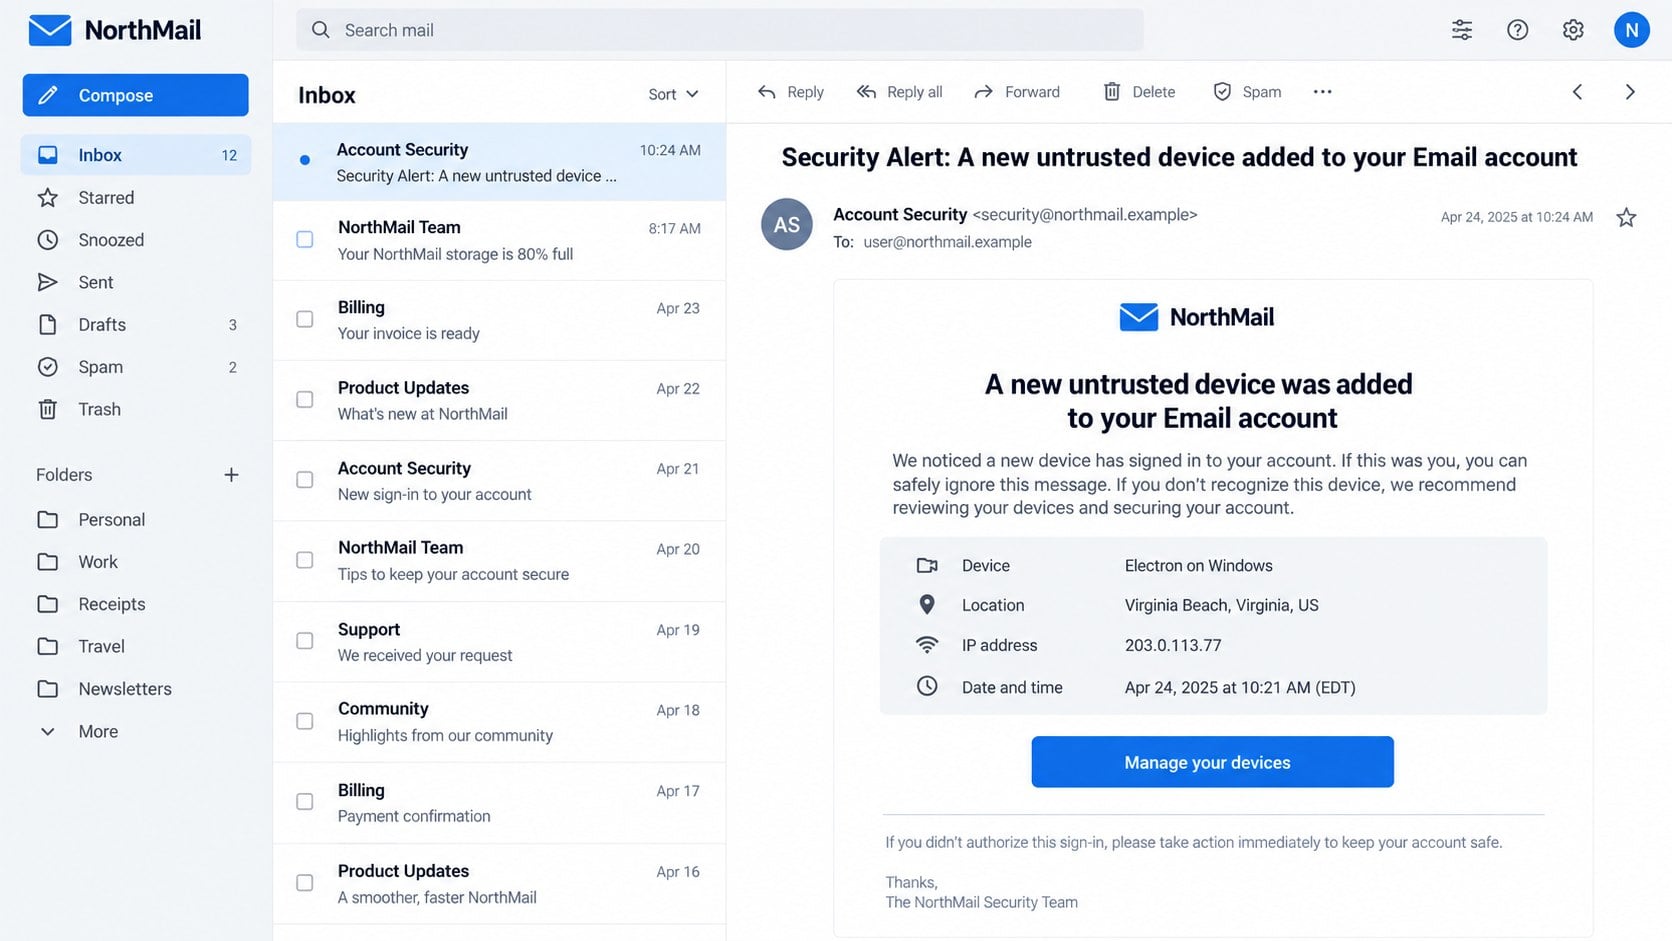
The Untrusted Device Was Added email claims that a new device has been connected to the recipient’s mailbox or online account.
Observed versions used the subject “Security Alert: A new untrusted device added to your Email account.”
The body named “Electron on Windows,” displayed a Virginia Beach location, and supplied an unfamiliar address and timestamp.
These concrete details are meant to feel like telemetry. They are not proof that the sender can see the recipient’s account.
The button leads away from the real provider
A “Manage your devices” button appears to offer the fastest way to stop the unknown session.
The destination is an attacker-controlled page rather than the security center operated by the recipient’s email provider.
One analyzed campaign used networkbolt-rphz.bolt[.]host. Domains and paths can change rapidly, so the exact address is not the only warning.
The dangerous behavior is the same: an unexpected message directs the reader to sign in through a link.
The final target is the mailbox password
The phishing site identifies the address being targeted and can display a login design matching that person’s provider.
Some campaign links carry the email address in Base64, an encoding format that hides readable text without providing meaningful secrecy.
Credentials entered on the page go to the attacker. The real email service never receives a legitimate sign-in request.
Common warning signs include:
- An urgent device alert arrives without expected account branding.
- The sender domain does not belong to the email provider.
- The message pushes one prominent device-management button.
- The linked host is unrelated to the provider’s normal domain.
- The page already knows the recipient’s email address.
- A “session expired” message appears immediately after the click.
- The sign-in form asks for a password outside the official service.
- Pressure replaces a clear route to independent verification.
Why the Alert Feels Convincing
Real providers do send warnings when a new browser, application, or device accesses an account.
That familiar safety feature gives the fake message a believable frame. The scammers only need the recipient to act before checking independently.
Location data adds emotional force. A distant city suggests that a stranger is already inside the account.
Technical labels such as “Electron on Windows” sound specific while remaining obscure enough that many recipients cannot confidently dismiss them.
The alert may also mention an IP address. Any attacker can place a random or copied address inside an email.
A genuine-looking timestamp proves only that the sender knows the current date. It does not establish access to private security logs.
The most important detail is therefore not the device name. It is where the button actually goes.
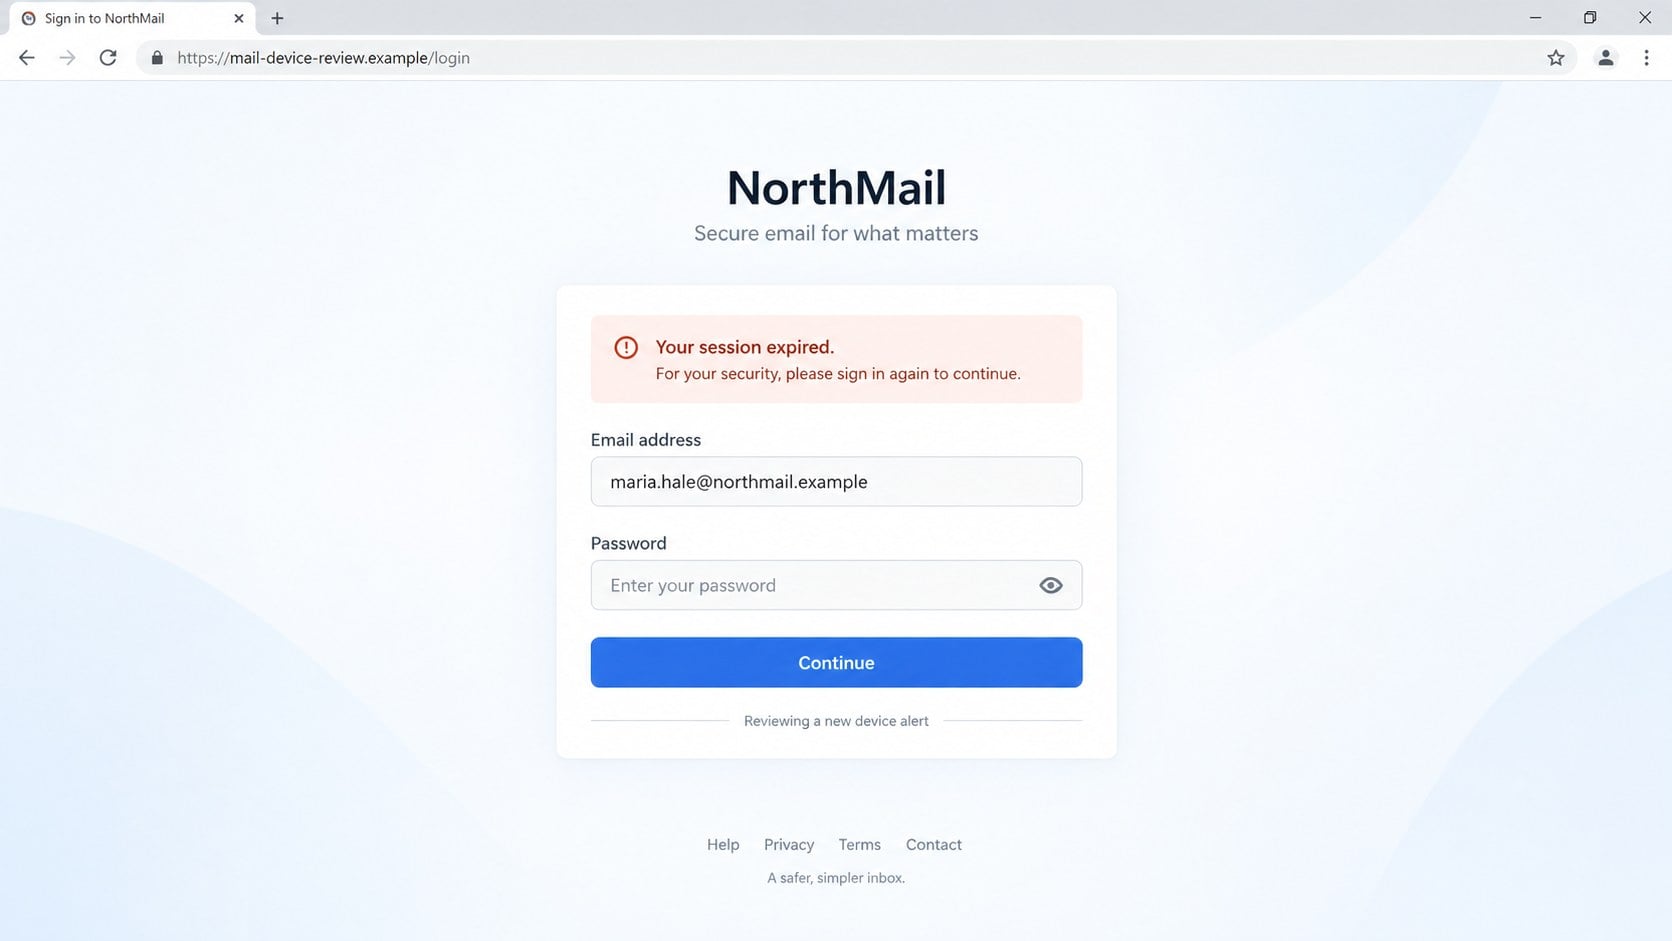
A prefilled address creates false continuity
When the fake page already displays the recipient’s email address, it seems connected to the alert.
In reality, the address may simply have traveled inside the link. Mailing lists and previous breaches give criminals millions of valid targets.
The page can inspect the part after the @ symbol, select matching colors, and serve a provider-specific imitation.
Personalization improves the disguise without proving the page has any relationship with that provider.
“Session expired” explains why another password is needed
A fresh security page should not necessarily require a new login, especially when the user already has an active session.
Phishing pages display an expired-session banner to turn that inconsistency into an expected step.
The banner also encourages quick re-entry. A worried reader may focus on removing the device instead of reading the address bar.
After submission, the site may show an error, redirect to the genuine provider, or request a second credential.
How the Untrusted Device Added Email Scam Works
Step 1: The attacker sends a broad or targeted security alert
The campaign begins with email addresses collected from data breaches, public pages, compromised contacts, marketing lists, or earlier phishing.
The sender does not need the password. The message is designed to persuade the recipient to provide it.
Some copies use a generic greeting. Others insert the address, organization, or display name to appear more specific.
Bulk delivery allows the attacker to reach people using many providers with one adaptable template.
Step 2: Device details create a believable emergency
The email announces an untrusted device, unfamiliar location, recent time, and unknown network address.
Those details encourage the reader to imagine an active intruder. Fear narrows attention toward the offered button.
The recipient may not recognize Electron, a framework used by many desktop applications, making the label sound suspicious by itself.
A real security event cannot be confirmed from the wording alone. It must be checked inside the independently opened account.
Step 3: The management button opens an attacker domain
The visible button text says “Manage your devices,” but HTML can send a click anywhere.
Desktop users can hover to preview the destination. Mobile users can press and hold, although the safest response is not opening it.
The host may use HTTPS. The padlock only indicates an encrypted connection to that host, not an endorsement by the email provider.
Short-lived hosting and disposable subdomains help campaigns move after browsers or security tools block one address.
Step 4: The link identifies the intended provider
The URL can include an encoded email address or campaign identifier.
The landing page decodes the address, recognizes its provider, and loads a corresponding login style.
Gmail, Microsoft, Yahoo, corporate webmail, and hosting logins can be imitated from the same criminal backend.
A page that adapts to an address is technically simple. It is not evidence of a connection with the real service.
Step 5: A fake login form captures credentials
The victim sees a familiar logo, prefilled address, password field, and explanation that authentication is required.
Typing the password sends it to the phishing operator or a collection panel controlled by the campaign.
Some pages request a one-time code next. A live attacker may immediately relay that code to the real provider.
Others ask for a recovery phone or backup address, giving the criminal more ways to lock out the owner.
Step 6: The attacker uses the mailbox as a master key
Email access reveals private conversations, invoices, contacts, password-reset messages, and links to other accounts.
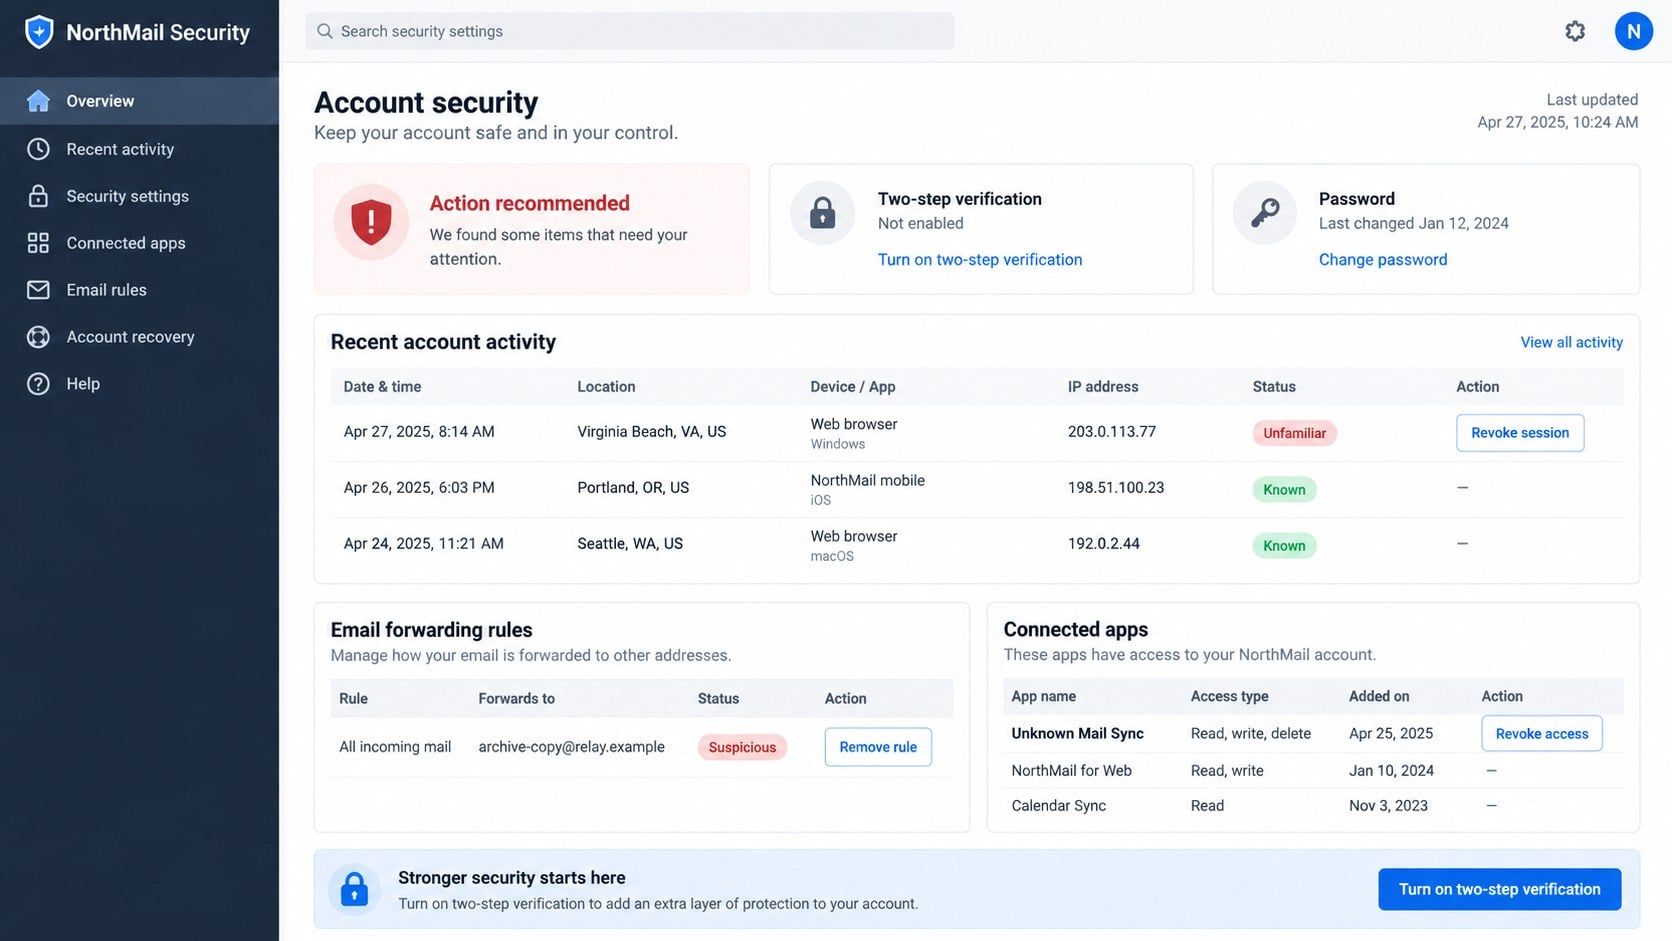
The intruder may create forwarding rules, hide security notices, register malicious applications, or steal active sessions.
Business mailboxes can be used to redirect payments by replying inside genuine invoice threads.
Personal accounts can enable shopping, cloud, social, and financial takeovers through password resets.
Step 7: The same account helps spread the next wave
Messages from a real compromised mailbox inherit the trust of its owner and existing conversations.
The attacker can send document lures to contacts, request urgent transfers, or harvest more credentials.
Automatic deletion rules may hide replies and security alerts, allowing abuse to continue after the victim changes one password.
Recovery must therefore include sessions, rules, applications, recovery details, and connected accounts.
Sender, Link, and Account Verification Checks
Inspect the complete sender address
A display name such as “Account Security” is freely chosen by the sender and carries no authority.
Expand the message details and compare the domain after @ with the provider’s genuine notification domains.
Authentication results can help investigators, but ordinary recipients should not rely on a polished display name or profile icon.
Read the destination from right to left
The registrable domain controls the page. Brand words elsewhere in a long path or subdomain do not change that ownership.
For example, provider.security.attacker.example belongs to attacker.example, not the brand mentioned at the beginning.
Encoded address fragments, tracking strings, and HTTPS can appear on both legitimate and malicious links.
Open the security center independently
Use a trusted bookmark, the official app, or a manually typed provider address.
Review active sessions and devices there. If the named device does not appear, the email’s emergency was fabricated.
If an unfamiliar session is present, revoke it inside the real account and follow the provider’s recovery process.
Check rules, recovery details, and connected apps
A password change alone may not remove forwarding rules or attacker-authorized applications.
Inspect automatic forwarding, inbox filters, delegates, application passwords, recovery addresses, phone numbers, and recent sign-ins.
Save suspicious timestamps and network addresses before removing them, especially when business or financial data is involved.
What Criminals Can Do With a Stolen Email Login
A mailbox contains more than messages. It often acts as the recovery channel for a person’s digital identity.
Attackers can search terms such as “invoice,” “statement,” “password,” “verification,” “tax,” or “wallet” to locate valuable accounts.
They can request password resets and delete the resulting notices, leaving the owner unaware until another service stops accepting the old password.
Saved contacts reveal family, colleagues, customers, and suppliers. That relationship map supports convincing impersonation.
In a business account, criminals may study payment routines for days before inserting a replacement bank account into a real conversation.
Forwarding rules provide ongoing surveillance. Even after a password change, new messages can continue reaching the attacker.
Connected applications can retain mailbox permissions through tokens. Revoking those grants is as important as changing the password.
Cloud documents, calendars, address books, chat archives, and stored files may share the same identity provider.
Why Base64 in the Link Is Not Encryption
Base64 converts text into a transport-friendly character sequence. Anyone can reverse it without a secret key.
Campaigns use it to make an email address less obvious and pass the value between the message and landing page.
The decoded address helps the site choose branding and prefill the username field.
Security analysts may decode a copied URL offline, but ordinary recipients should avoid loading the destination in a browser.
An encoded value is not automatically malicious. Its presence also does not make a link private or trustworthy.
The controlling domain remains the decisive clue, followed by whether the interaction was initiated through an official channel.
Signs Your Mailbox May Already Be Compromised
A successful phish does not always produce an immediate lockout. Quiet access can be more valuable than changing the password.
Review the account carefully if you typed credentials, approved a prompt, or entered a one-time code.
- Recent activity includes locations or devices you cannot explain.
- Messages appear read before you open them.
- Sent mail contains notices you did not write.
- Inbox rules move security messages into hidden folders.
- Forwarding sends copies to an unfamiliar address.
- Recovery details have changed without your approval.
- A new application has permission to read or send mail.
- Password-reset messages arrive for unrelated services.
- Contacts report unexpected documents or payment requests.
- Valid credentials suddenly stop working.
One unusual location can reflect travel, a mobile network, or a VPN. A cluster of changes deserves immediate action.
What to Do if You Have Fallen Victim to This Scam
- Open the real provider directly. Use a trusted bookmark or official app, not the email link, and begin the provider’s account-recovery process.
- Change the password from a clean device. Create a unique passphrase that has never been used on another service.
- Revoke every unfamiliar session. Use “sign out everywhere” when available, then remove devices and application passwords you do not recognize.
- Remove hidden access. Check forwarding, filters, delegates, connected apps, recovery addresses, phone numbers, and multi-factor authentication methods.
- Replace reused passwords. Start with banking, shopping, cloud, work, and social accounts that used the same or a similar password.
- Run a full Malwarebytes scan. This checks whether the phishing page also delivered malware or whether another threat remains on the computer.
- Warn affected contacts. Tell colleagues, customers, friends, and family to ignore unexpected links, files, payment changes, or urgent requests from your account.
- Review financial activity. Contact banks through verified numbers if messages exposed statements, cards, invoices, payroll, or transfer instructions.
- Save evidence and report the campaign. Keep the original email, headers, destination, timestamps, and screenshots before deleting anything.
- Use AdGuard as an additional layer. It can block many known phishing and malicious advertising destinations, but independent verification remains essential.
Is Your Device Infected? Run a Free Malware Scan
Slow performance, constant pop-ups, or strange behavior? These are classic signs of a malware infection. The fastest way to find out is to scan your device with Malwarebytes Free — one of the most trusted malware removal tools available.
The free version detects and removes the most common threats, including:
- Adware — the cause of those annoying pop-ups
- Browser hijackers — unwanted redirects and changed homepages
- Trojans and spyware — hidden programs stealing your data
- Potentially unwanted programs (PUPs) — software you never asked for
👉 Select your device below — Windows, Mac, or Android — then follow the simple steps to download Malwarebytes, scan your system, and remove any threats it finds. The scan usually takes 5 to 20 minutes.
Run a Malware Scan with Malwarebytes for Windows
Malwarebytes is one of the most popular and trusted anti-malware tools for Windows — and it’s completely free for removing infections. It catches threats that many antivirus programs miss, including adware, browser hijackers, and trojans. Follow the steps below to scan and clean your PC in just a few minutes.
Download Malwarebytes
Click the button below to download the latest version of Malwarebytes for Windows from the official source. The free version is all you need — it will scan your computer and remove adware, browser hijackers, and other malicious software at no cost.
Download MalwarebytesOfficial installer for Windows 11 and 10. Your download starts right away.Want real-time protection? See Malwarebytes Premium Malwarebytes Free for WindowsScans and removes malware at no cost
-
Install Malwarebytes
When the download finishes, open your Downloads folder and double-click the MBSetup file. If Windows shows a User Account Control pop-up, click “Yes” to allow the installation.

Follow the On-Screen Prompts to Install Malwarebytes
The setup wizard will walk you through a few quick screens:
-
Choose where you’re installing the program — “Personal Computer” or “Work Computer” — then click Next.

-
Malwarebytes will now install on your device. This usually takes under a minute.

-
When installation is complete, the “Welcome to Malwarebytes” screen will open automatically.

-
On the final screen, click Open Malwarebytes to launch the program.

-
Enable “Scan for Rootkits”
Before scanning, turn on rootkit detection so Malwarebytes can find even the most hidden threats. Click the Settings gear icon on the left side of the screen.

In the settings menu, find “Scan for rootkits” and click the toggle so it turns blue.

Done? Click “Dashboard” in the left pane to return to the main screen.
Start the Scan
Click the blue Scan button. Malwarebytes will automatically update its virus database and start checking your computer for malware.

-
Wait for the Scan to Finish
The scan checks your entire system for browser hijackers and other malicious programs, so it can take 5 to 20 minutes depending on your computer. Feel free to do something else — just check back occasionally to see the progress.

-
Quarantine the Detected Threats
When the scan is done, you’ll see a list of everything Malwarebytes found — malware, adware, and potentially unwanted programs. Click the “Quarantine” button to remove all of them at once.

Malwarebytes will now remove the malicious files and registry entries and move them safely into quarantine.

-
Restart Your Computer
Some threats can only be fully removed after a reboot. If Malwarebytes asks you to restart, click Yes. Once you’re logged back in, Malwarebytes has finished removing the threats it found.

That’s it — your Windows PC is now clean of trojans, adware, and other malware, and should be back to running smoothly.
If you are still having problems with your computer after completing these instructions, then please follow one of the steps:
- Run a computer scan with ESET Online Scanner
- Ask for help in our Windows Malware Removal Help & Support forum.
Run a Malware Scan with Malwarebytes for Mac
Malwarebytes for Mac is a free on-demand scanner that removes the malware other security software tends to miss — adware, browser hijackers, and unwanted programs included. Cleaning an infected Mac with Malwarebytes has always been completely free, and it’s our go-to recommendation. Follow the steps below to scan and clean your Mac in just a few minutes.
-
Download Malwarebytes for Mac
Click the button below to download the latest version of Malwarebytes for Mac.
Download MalwarebytesOfficial installer for macOS. Your download starts right away.Want real-time protection? See Malwarebytes PremiumMalwarebytes Free for MacScans and removes malware at no cost -
Open the Malwarebytes setup file
When the download finishes, open your Downloads folder and double-click the setup file to begin the installation.

-
Follow the On-Screen Prompts to Install Malwarebytes
The Malwarebytes for Mac Installer will guide you through a few quick screens. Click “Continue” and keep following the prompts until the installation completes.



When the installation is complete, Malwarebytes opens to the Welcome to Malwarebytes screen. Click “Get started“.
-
Select “Personal Computer” or “Work Computer”
Malwarebytes will ask what type of computer you’re installing it on. Click either Personal Computer or Work Computer, whichever applies.

-
Start the Scan
Click the “Scan” button. Malwarebytes will automatically update its detection database and begin checking your Mac for malware.

-
Wait for the Scan to Finish
Malwarebytes will scan your Mac for adware, browser hijackers, and other malicious programs. This can take a few minutes, so feel free to do something else — just check back occasionally to see the progress.

-
Quarantine the Detected Threats
When the scan is done, you’ll see a list of everything Malwarebytes found. Click the “Quarantine” button to remove all the threats at once.

-
Restart Your Mac
Malwarebytes will now remove all the malicious files it found. Some threats can only be fully removed after a reboot — if Malwarebytes asks you to restart, allow it. Once you’re logged back in, your Mac is clean.

That’s it — your Mac is now free of adware, rogue browser extensions, and other potentially harmful software.
If you are still experiencing problems while trying to remove a malicious program from your computer, please ask for help in our Mac Malware Removal Help & Support forum.
Run a Malware Scan with Malwarebytes for Android
Malwarebytes for Android automatically detects and removes dangerous threats like malware and ransomware so you don’t have to worry about your most-used device being compromised. Aggressive detection of adware and potentially unwanted programs keeps your Android phone or tablet running smooth.
-
Download Malwarebytes for Android.
You can download Malwarebytes for Android by clicking the link below.
Get Malwarebytes for AndroidOpens Google Play in a new tab.Want real-time protection? See Malwarebytes Premium for AndroidMalwarebytes for AndroidScans your phone and removes malware at no cost -
Install Malwarebytes for Android on your phone.
In the Google Play Store, tap “Install” to install Malwarebytes for Android on your device.

When the installation process has finished, tap “Open” to begin using Malwarebytes for Android. You can also open Malwarebytes by tapping on its icon in your phone menu or home screen.

-
Follow the on-screen prompts to complete the setup process
When Malwarebytes will open, you will see the Malwarebytes Setup Wizard which will guide you through a series of permissions and other setup options.
This is the first of two screens that explain the difference between the Premium and Free versions. Swipe this screen to continue.
Tap on “Got it” to proceed to the next step.
Malwarebytes for Android will now ask for a set of permissions that are required to scan your device and protect it from malware. Tap on “Give permission” to continue.
Tap on “Allow” to permit Malwarebytes to access the files on your phone.
-
Update database and run a scan with Malwarebytes for Android
You will now be prompted to update the Malwarebytes database and run a full system scan.

Click on “Update database” to update the Malwarebytes for Android definitions to the latest version, then click on “Run full scan” to perform a system scan.

-
Wait for the Malwarebytes scan to complete.
Malwarebytes will now start scanning your phone for adware and other malicious apps. This process can take a few minutes, so we suggest you do something else and periodically check on the status of the scan to see when it is finished.

-
Click on “Remove Selected”.
When the scan has been completed, you will be presented with a screen showing the malware infections that Malwarebytes for Android has detected. To remove the malicious apps that Malwarebytes has found, tap on the “Remove Selected” button.

-
Restart your phone.
Malwarebytes for Android will now remove all the malicious apps that it has found. To complete the malware removal process, Malwarebytes may ask you to restart your device.
That’s it — your Android phone is now clean — no more malicious apps, adware, or browser redirects.
If you are still having problems with your phone after completing these instructions, then please follow one of the steps:
- Restore your phone to factory settings by going to Settings > General management > Reset > Factory data reset.
- Ask for help in our Mobile Malware Removal Help & Support forum.
Stay Protected: Block Ads and Malicious Sites
Now that your device is clean, keep it that way. Most infections start with a malicious ad or a fake download button — so blocking them at the source is your best defense.
We recommend AdGuard, which blocks malicious ads, phishing pages, and dangerous redirects before they can reach you.
👉 Download AdGuard and browse safely
How to Handle a Real New-Device Alert Safely
Do not decide whether an alert is genuine from its design. Treat the email as a notification, not as the place to fix the account.
Open the provider through a bookmark or app and compare the time, location, browser, and network information.
Remember that mobile networks and VPNs can report unexpected cities. Focus on whether you recognize the session and activity.
If the login was yours, mark it as recognized only inside the official security center.
If it was not yours, revoke it, change the password, review recovery details, and enable phishing-resistant multi-factor authentication when available.
Never provide a one-time code to someone who calls after the alert. Attackers sometimes combine email phishing with follow-up phone pressure.
Frequently Asked Questions
Is every untrusted-device alert a scam?
No. Email providers legitimately report unfamiliar access. The safe response is to open the official account independently and verify the activity there.
Do not use an embedded button simply because the warning resembles a message you have seen before.
What is “Electron on Windows”?
Electron is a framework used by many desktop applications. The phrase can describe software, but its appearance inside an email proves nothing.
Only the genuine account activity page can show whether such a client actually accessed your mailbox.
Why did the phishing page already know my address?
The link can carry the address in plain text, tracking parameters, or Base64 encoding.
Criminals may also obtain addresses from public sources, marketing lists, previous breaches, or compromised contacts.
Does HTTPS make the device-management page safe?
No. HTTPS encrypts traffic between the browser and the displayed domain. Phishing sites can obtain certificates too.
Verify the controlling domain and reach account settings through the official service.
Is changing my password enough after entering it?
Not always. Revoke sessions, remove forwarding rules, inspect connected apps, replace recovery details, and check whether other accounts reused the password.
Enable multi-factor authentication with new recovery codes after access is under control.
Can Malwarebytes or AdGuard prevent every phishing attack?
No single tool catches every new destination. Malwarebytes can detect malicious content, while AdGuard can reduce exposure to known dangerous pages and advertisements.
Opening accounts independently remains the most reliable habit for unexpected security alerts.
The Bottom Line
The Untrusted Device Added email turns a sensible security feature into a credential trap. The button’s destination matters more than the alarming device details.
Verify alerts inside the official account, and respond broadly after exposure. Sessions, rules, recovery methods, and connected services all deserve review.

Join the discussion
0 commentsShare your experience or ask a question about this article.
Discussion
Start the conversation
Have a question or something useful to share? Add the first comment.