

Your missing iPhone has supposedly been found. The message names a device you recognize, and a location button offers the update you have been waiting for.
The found iPhone scam becomes especially persuasive when a helpful-sounding caller follows up. Before taking that next step, there are a few things worth knowing.
Overview
A recovery promise targets someone who has already lost a phone
This is a second attack after the original loss or theft. The message offers hope of recovery while steering the owner toward secret account information.
The confirmed scam involves criminals impersonating Apple or a device-location service. Apple and Find My are legitimate services, not the operators of this deception.
Someone who has lost an expensive phone has an understandable reason to pay attention. A relevant model name can make an unsolicited message feel unusually credible.
However, knowing which phone you own is not the same as having authority to request its passcode. That distinction is central to this story.
An investigated network connects email lures with AI calls
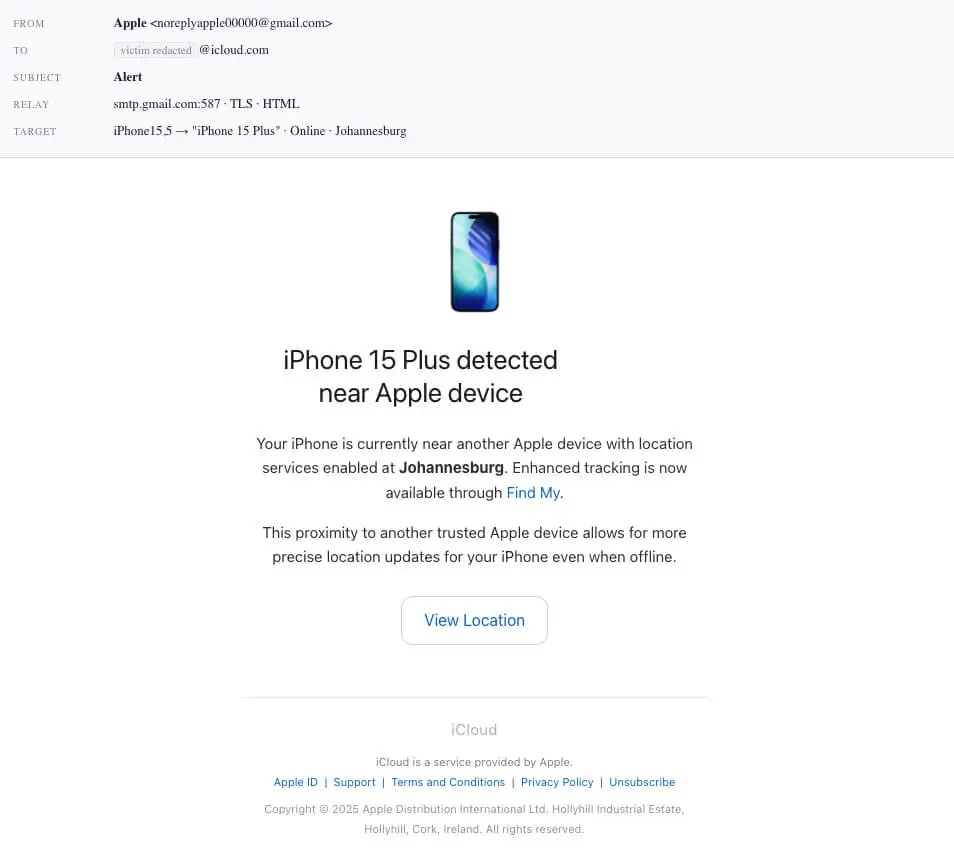
SOCRadar’s AnonyMousKIT investigation, published in August 2026, analyzed code and logs from a phishing service built around stolen Apple devices.
The researchers linked a broader ecosystem of 506 domains and 168 reseller storefronts. Those are infrastructure counts, not a count of successful phone unlocks.
Recovered material included fake location emails and AI-driven support calls seeking passcodes. Recorded activity extended through August 10, not an independent live check of every domain today.
The first image is the researcher’s reconstructed email from campaign logs. Our later location screen is illustrative, with a fictional address rather than a live destination.
The secrets requested matter more than the caller’s confidence
The attraction is the phone’s return. The dangerous request is to prove ownership by disclosing information that protects the phone or its associated account.
- Your device passcode is not a public ownership reference.
- An Apple Account password belongs only in a verified Apple sign-in process.
- A verification code should not be dictated to an unsolicited caller.
- A map picture does not establish that the sender can return your device.
- Removing a missing device from Find My can undermine an important theft protection.
You can check the real device status without using the message’s link. Start from your own Find My app or Apple’s independently opened service.
Why the Message Feels Different From Ordinary Spam
Most junk mail has to invent a problem. A lost-phone lure arrives when a real problem already exists, so its subject feels immediately relevant.
You may have already checked maps, contacted your carrier, retraced your route, and told friends. An apparent update fits into that sequence.
The emotional shift can be sudden: frustration becomes relief. That relief makes a short verification request seem like the final step toward getting the phone back.
Pause at that moment. A message can be well timed because someone knows about the loss, not because the sender is authorized to help.
Accurate details are useful evidence that the sender knows something. They are not evidence that everything else the sender says is true.
The same principle applies to a caller who repeats your device model. Do not let a correct detail answer a completely different question about trust.
It is reasonable to want the phone returned. Protecting the account while checking the claim does not mean abandoning recovery.
How the Found iPhone Scam Works
Step 1: A device-specific message offers a location update
The investigated service generates messages around stolen-device information. Familiar branding and a recovery theme are used to make the contact seem helpful.
A displayed sender name such as Apple Support can be chosen by the sender. Open the full address instead of relying on the short label.
This is a device-specific version of phishing through trusted-looking messages. The missing phone supplies an especially persuasive reason to respond.
Even an address using a familiar consumer email service does not make the sender an employee of that company. Account hosting and official authority are different.
Do not respond with additional identifying details to test the sender. You could provide information that makes the next message more convincing.
Use your own records when contacting legitimate support. The suspicious message should not become the source of your recovery instructions.
Step 2: A location page asks you to verify ownership
A map-themed page creates the impression that the phone is almost within reach. The sensitive request is presented as a condition for revealing more.
In the researched phishing flow, criminals sought device passcodes, Apple Account credentials, and authentication codes. A normal-looking sequence does not make those requests safe.
Our example below illustrates that decision point. It is not a captured live page, and its reserved example address is deliberately nonfunctional.
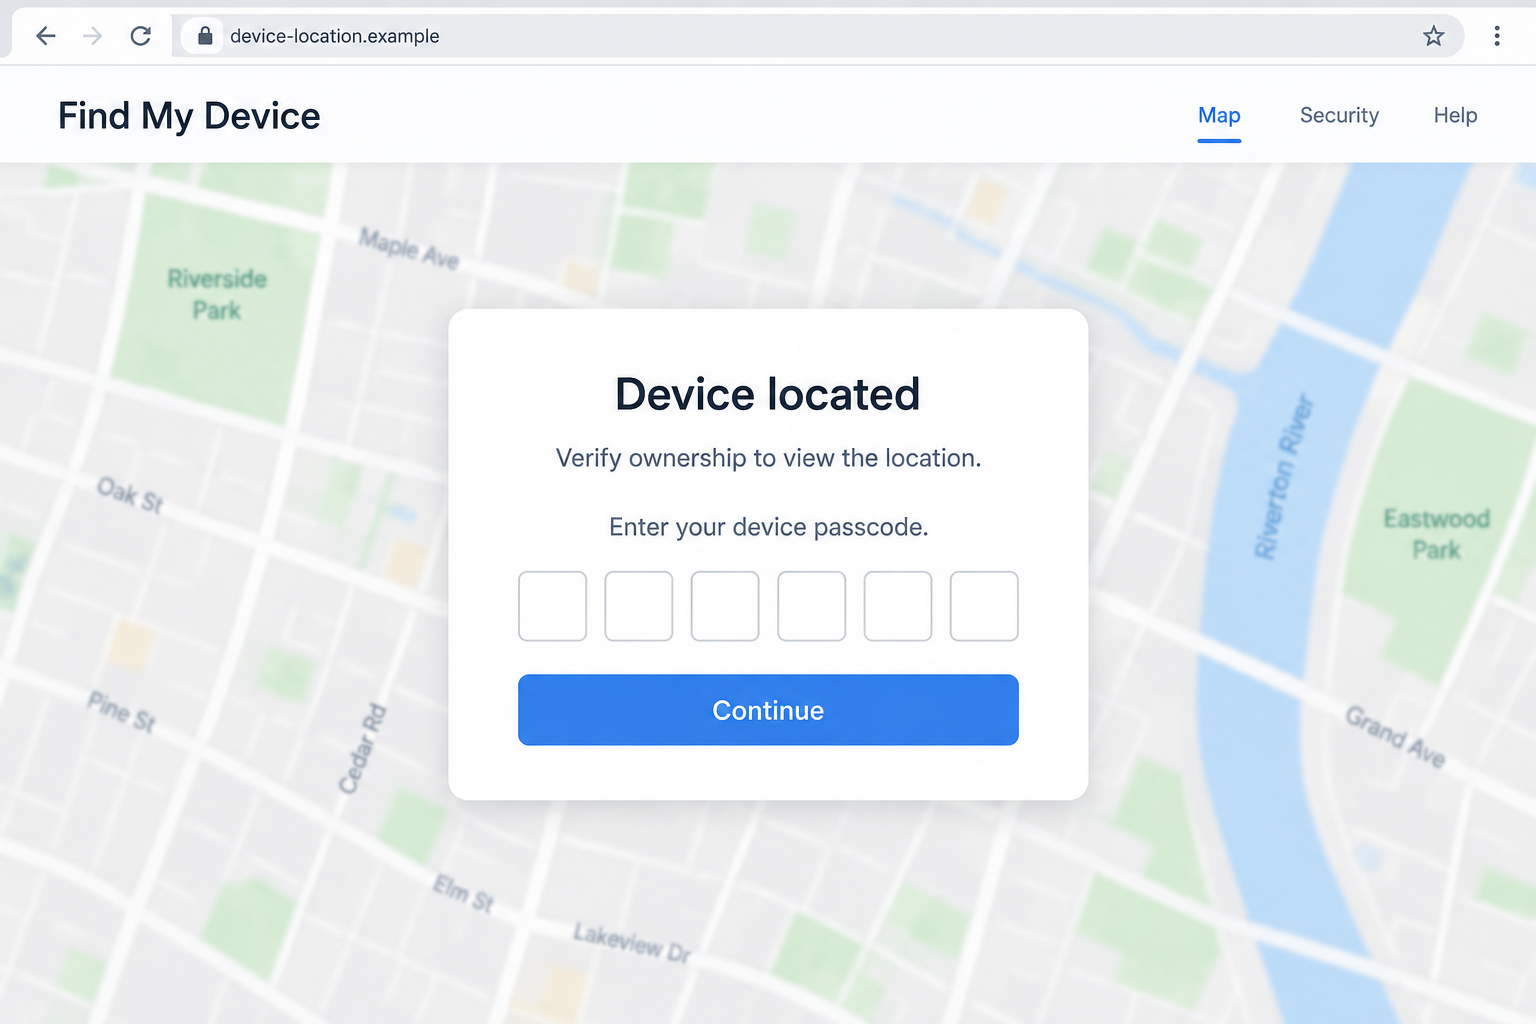
If a recovery link asks for your phone’s unlock code, stop. Verify the situation using Apple’s own tools rather than completing the form.
A blurred map is not a reason to surrender a secret. Anyone designing a page can hide a picture behind a verification prompt.
Step 3: A support persona may guide the owner through the request
The investigation also recovered AI-call records and support personas. This is documented automation, not an assumption based on a voice sounding unusual.
A caller can make the process feel personal by explaining a supposed recovery case and staying available while you enter information.
That assistance changes the pressure. Instead of judging a silent webpage, you may feel that a cooperative employee is waiting for you to finish.
You are allowed to end the call. A genuine concern can be checked through an independently obtained support channel without continuing the unsolicited conversation.
Do not try to determine authenticity from accents, natural pauses, or whether the voice sounds human. Verify the request and the contact route instead.
Step 4: Stolen information can put the device and account at greater risk
The criminal objective is to turn recovery-themed contact into access that helps monetize stolen hardware or compromise the associated account.
This does not demonstrate a universal technical bypass of Activation Lock. Device settings, account protections, and the information obtained affect what an attacker can do.
Do not assume that one disclosed code always produces the same outcome. Equally, do not wait for visible account changes before seeking help.
Tell legitimate support exactly which secret you entered. A device passcode, account password, and one-time verification code require different consideration.
That precision is more useful than saying you “clicked something” when you also completed a form or followed a caller’s instructions.
Check Recovery Claims Without Helping the Thief
Open Find My yourself
Use a trusted device and navigate independently. Do not use a button from the message just because its label says Find My.
Apple’s lost-device guidance warns that Apple will not contact you to say your iPhone has been found.
The same guidance cautions against sharing device passcodes, passwords, or verification codes. Keep those boundaries even if the caller knows the phone’s model.
A genuine location shown through your independently opened account is more useful than a screenshot supplied by a stranger. It still does not justify a dangerous confrontation.
Keep erasing and removing separate
Erasing a lost device and removing it from Find My are not interchangeable actions. Read the official instructions before selecting either option.
Do not remove the missing device from Find My at a stranger’s request. That can remove Activation Lock and make the device easier to reuse.
If an insurance or AppleCare claim is involved, follow the relevant official process. Do not let a caller substitute an improvised “release” procedure.
The fact that someone says a step is necessary for shipping or verification does not make it part of Apple’s recovery process.
Separate a location clue from a safe retrieval plan
A map may identify an area without identifying the person holding the phone. Do not travel to an unknown address and confront someone yourself.
Preserve useful information for local law enforcement. Let the appropriate authorities advise on recovery rather than negotiating through a suspicious support persona.
Do not send a deposit, courier fee, or gift card to prove ownership. Those additional demands would need their own verification, regardless of the original message.
What to Do if You Have Fallen Victim to This Scam
- End the conversation and stop entering information.
Close the questionable page and stop responding to the caller. Do not provide one final code because they claim it will cancel the process.
Write down the order of events while you remember it. Include which account was involved and whether you disclosed the phone’s passcode.
- Secure the missing device through the official route.
Open Find My independently and follow Apple’s lost-device instructions. Contact your carrier about protecting the mobile service associated with the missing phone.
If you have already reported the theft, retain the reference number. Keep messages and call details together so the new contact can be added to the report.
Do not remove the device from Find My simply to make a threatening message stop. A stranger’s deadline does not override your security interests.
- Recover an exposed Apple Account from a trusted device.
If you entered your account password, follow Apple’s compromised-account recovery instructions and change it through a verified Apple route.
Review unfamiliar account details and devices. Check that the trusted contact information still belongs to you, and investigate changes you did not make.
When reviewing devices, distinguish an unknown device added by an attacker from your own stolen phone. Do not accidentally remove the stolen phone’s Find My protection.
If you cannot regain access, use Apple’s official account recovery process. Avoid services promising to skip that process for a payment.
- Explain any passcode disclosure specifically.
Tell official support if you supplied the code used to unlock the missing phone. Do not describe it only as an email password issue.
If you reused that code elsewhere, assess those other devices or services separately. A reused secret can create risks beyond the original phone.
Do not post the code publicly while asking for help. You can describe its type and when it was shared without revealing the digits.
- Preserve messages without publishing private identifiers.
Save full sender addresses, timestamps, phone numbers, and screenshots. Keep any original email available for a provider or investigator to inspect.
Redact personal addresses, serial numbers, account identifiers, and recovery details before sharing a warning publicly. Preserve an unredacted copy privately for legitimate reporting.
A public post should not give another impersonator enough information to sound like the next helpful recovery agent.
- Check for additional exposure only where it occurred.
If the message persuaded you to install software on a computer, a Malwarebytes scan may help inspect that computer. Account recovery still needs separate attention.
A computer scanner cannot retrieve your stolen iPhone or revoke secrets already disclosed. Do not confuse a clean scan with a restored Apple Account.
AdGuard’s relevant web protections can help block some malicious destinations before a later visit. They cannot establish that a found-phone claim is genuine.
If you only read the email, do not assume every device is infected. Focus on the actions you actually took and the information you actually shared.
- Be prepared for another approach.
Keep the recovery plan with trusted contacts. Repeated emails, a new caller, or a different website can still relate to the same missing device.
Do not let threats or promises push you into changing account protections. If messages become threatening, preserve them and seek help from local authorities.
Help a Family Member Without Taking Over Their Account
A person dealing with phone theft may be exhausted before the phishing message arrives. Practical assistance is more useful than telling them they were careless.
Offer a trusted device for contacting official support. Help write down the timeline, but let the account owner enter passwords privately.
Separate the immediate tasks: protect the account, protect the mobile number, document the theft, and assess recovery information. They do not all require the same provider.
Do not turn the search for the phone into an open-ended conversation with strangers. Every new recovery claim should be checked independently.
For a replacement device, review available theft protections and recovery contacts before an emergency. Set them up through official settings, not an unsolicited “security upgrade.”
Also decide where essential recovery information will be stored. Keeping everything solely on the phone you might lose makes an already stressful situation harder.
Frequently Asked Questions
Will Apple call to tell me my stolen iPhone was found?
Apple’s official guidance says it will not contact you to announce that your iPhone has been found. Verify recovery claims independently.
What if the message contains my real device model?
Accurate device details do not prove the sender is authorized. Someone connected to the theft may know information that makes a false recovery claim persuasive.
Does a realistic voice prove the caller is genuine?
No. This investigation includes documented AI calling. A natural conversation, by itself, cannot establish the caller’s identity or authority.
Should I remove the phone from Find My?
Not at an unsolicited caller’s request. Removing the missing device can disable Activation Lock. Follow Apple’s official lost-device and applicable claim instructions.
Did this campaign break every iPhone’s security?
No. The evidence concerns social engineering for secrets and account access. It does not establish a universal defeat of Apple device protections.
Can recovery software bring the phone back?
No scanner can physically recover stolen hardware. Use official account tools, your carrier, and law enforcement, while treating unsolicited paid recovery offers cautiously.
The Bottom Line
The found iPhone scam takes advantage of a genuine loss. A convincing location message or patient caller does not deserve your passcode.
Check Find My yourself, protect the account, and keep the missing device’s theft protections in place. Recovery should not require helping a stranger unlock it.








