

- no bootable device – insert boot disk and press any key
- NTLDR is missing or corrupted
- Ntoskrnl.exe is missing
- Ntdetect.com is missing
- BOOTMGR is missing or corrupted
- NTFS.SYS is missing
- Hal.dll is missing
Windows 10 or 11: start with the recovery steps below. The older commands later in this guide apply to legacy BIOS/MBR installations; do not apply the active-partition procedure to a UEFI/GPT system.

Repair startup on Windows 10 or Windows 11
Open Windows Recovery Environment.
If the sign-in screen is available, hold Shift while selecting Power → Restart. If Windows already shows Automatic Repair, choose Advanced options. If neither is available, boot from Microsoft Windows installation media and choose Repair your computer, not Install.
Run Startup Repair.
Select Troubleshoot → Advanced options → Startup Repair. Choose the Windows installation if asked. Have your BitLocker recovery key ready; enter it only on the recovery screen for your own device. Let the repair finish without interrupting it.
Restart and check the result.
Remove the installation USB if you used one, then restart. If Startup Repair fails, record the message. In Advanced options, use System Restore if you have a restore point from before the problem. It reverts system changes; review the affected programs before confirming.
Stop before changing partitions.
If the drive is missing, encrypted, making unusual noises, or contains files you cannot replace, get help before using partition commands. Do not format, delete partitions, or guess which disk should be active. Back up recoverable data before attempting further repairs.
Legacy Windows 7 and Vista repair reference
How to fix a computer that won’t boot – Instructions
- Turn your computer on, booting from either your Windows 7 Installation DVD or Windows 7 System Recovery Disc. Remember, you may need to change the boot order inside your BIOS to have the your DVD drive boot first.
- After the installation or recovery disc loads, if prompted, select your language settings and then continue. If you are using the installation DVD, when prompted by the following screen select Repair your computer.
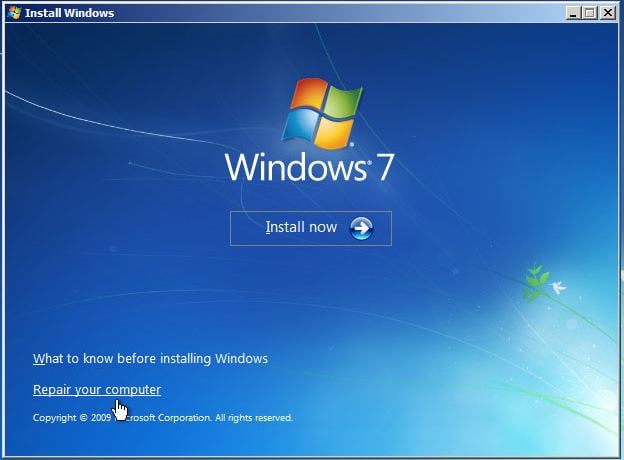
- The computer will take a moment now to scan itself for any Windows installations, after which you will likely be given a choice to select which installation you wish to repair. Select the appropriate Windows installation from the list and then continue. If by chance a problem is detected in one of your Windows installations at this initial stage, the system may also ask you if it can try to repair the problem automatically. It is up to you if you wish to let the system try to repair itself, but otherwise just select No.
- Once you have reached the System Recovery Options screen, as shown below, you will be faced with a list of choices that can aid you in repairing a damaged Windows 7 operating system. If you wish to try the Startup Repair option first, it is often successful in automatically fixing many different start up issues, but in this article we will be using the Command Prompt option to resolve our problems manually. So, click Command Prompt to continue.
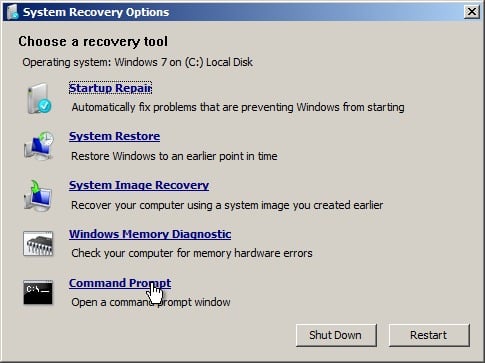
- Now sitting at the command prompt, enter the following command and then press enter:
bootrec.exe /FixMbr
If successful, you should be greeted with the message The operation completed successfully. That’s it! Your Master Boot Record has been repaired.
While the above command does fix the MBR, and sometimes that is enough, there still might be an error with the system partition’s boot sector and Boot Configuration Data (BCD). This might occur if you have tried to install another operating system alongside Windows 7, such as Windows XP. To write a new boot sector, try the following command:
bootrec.exe /FixBoot
If you are still faced with your Windows 7 installation not being detected during start up, or if you wish to include more than one operating system choice to your system’s boot list, you can try the following command to rebuild your BCD:
bootrec.exe /RebuildBcd
The above command will scan all your disks for other operating systems compatible with Windows 7 and allow you to add them to your system’s boot list. If this fails, you may need to backup the old BCD folder* and create a new one in its place with the following commands:
bcdedit /export C:\BCD_Backupc:cd bootattrib bcd -s -h -rren c:\boot\bcd bcd.oldbootrec /RebuildBcd Do not delete the Boot folder. The example assumes the correct Windows and boot partitions have been identified; drive letters can change in Recovery Environment. If you cannot confirm them, stop and ask for help.
How to change active partitions
Upon purposely changing the active partition on my system drive, I was faced with a BOOTMGR is missing error during my system’s start up that prevent Windows from starting. It is a common mistake to make when playing with partitions on a system drive and it can be a headache to solve if not prepared. To change your active partition back using the Windows 7 recovery disc or Installation DVD, follow the steps below.- Follow steps one to four in the above guide. This should take you to the Command Prompt in the Windows Recovery Environment.
- Type DiskPart and then press Enter.
- Type List Disk now and then press Enter. This command will list all disks attached to your computer and assign them a disk number.
- Type Select Disk x, where x is the number for the disk containing the partition you wish to make active. Press Enter.
- Type List Partition and then press Enter. You will now be shown a list of the partitions on the selected disk. Determine which partition you wish to make active.
You’ll see a list which will display your system partition.
(this is an example list)
Partition 1 OEM 39 MB Partition 2 Primary 750 MB Partition 3 Primary 297 GB < example only: do not choose a partition by size. Confirm the existing BIOS/MBR system partition before making a change
- Type Select Partition x, where x is the number of the partition you wish to make active.
- Now, just type Active and then press Enter. That should be it – the selected partition is now active.
