

Unwanted browser ads and pop-ups can be extremely annoying and even dangerous. These intrusive ads often bombard users with flashing graphics, auto-playing video and audio, and misleading claims about having “won” prizes or needing to “update software.” They can appear out of nowhere, sometimes covering the entire screen, and will not go away until clicked.
While the goal is to get users to engage with the ads by clicking, downloading, or sharing personal information, these pop-ups and ads frequently spread malware, collect data without consent, or scam users into paying for unnecessary services. Seeing a pop-up is not proof that anything was installed. Malware may be delivered through a deceptive download or an exploited vulnerability; notification spam can also come from a website permission.
Fortunately, with some knowledge and the right tools, you can identify unwanted browser ads and pop-ups, prevent them from appearing, and remove any traces of malware. This guide will cover:
- What are unwanted browser ads and pop-ups?
- How they infect devices and trick users
- How to tell if your device is infected
- Removing pop-up malware and adware
- Preventing future infections
Equipped with the information below, you can browse the web safely and prevent unwanted ads and pop-ups from disrupting your experience.
What Are Unwanted Browser Ads and Pop-Ups?
Unwanted browser ads are marketing messages that show up in your web browser unsolicited. They include pop-up, pop-under, notification, and overlay ads:
1. Pop-Up Ads
Pop-up ads appear in new browser windows overlaid on top of the current window. They range from somewhat legitimate advertisements to full-page scams designed to get clicks and downloads. Even legal pop-up ads can be unexpected and annoying.
2. Pop-Under Ads
Pop-under ads open stealthily behind the current browser window. So when you close your current tab or browser, the pop-under appears on your screen. This sly method aims to get you to view the ad without realizing where it came from.
3. Notification Ads
Notification ads mimic browser or system notifications, using warnings about viruses or claiming you’ve won a prize. They trick users into clicking. Some even make a notification sound or cause other distractions.
4. Overlay Ads
Overlay ads appear directly over page content, either as you load a page or after a delay. Because they cover page content, they force you to acknowledge the ad before continuing to the page.
While not all pop-ups and ads have malicious intent, many unwanted ones promote dubious offers, collect data without consent, or spread malware. They are nuisances at best and can pose threats to your privacy and security.
How Unwanted Ads and Pop-Ups Infect Devices and Trick Users
Infection often starts with clicking a link or downloading a program that secretly installs adware – software that forcibly displays ads. Adware may also sneak onto devices as part of software bundles.
Once installed, adware changes browser settings and connects to advertising networks. It can inject code into pages or create new tabs and windows for ads. Adware may also install browser extensions, alter DNS settings, and make other changes to route browser traffic through ad networks.
Common Tricks Used by Unwanted Ads and Pop-Ups
While their end goal is getting clicks and downloads, unwanted ads and pop-ups use a variety of tricks and false claims to achieve it:
- “You’re infected – click here to scan.”
- “Your Flash player is out of date.”
- Fake browser notifications about viruses.
- Flashing graphics and countdown timers.
- “You won an iPhone!” Or similar false prizes.
- Claims you have a “secret admirer.”
- Your computer is “slow” and needs fixing.
These tactics aim to alarm users or make them curious enough to click on the ads. But engaging with these scammy ads and pop-ups will only lead to more unwanted content or malware.
Some pop-ups launch pages that won’t let you leave or close the tab until you click something. Others open infinite loops of new tabs to bombard you with more ads.
Unwanted pop-ups and ads may collect your IP address, browser history, and other system data. They can also drop tracking cookies on your device to follow you online. At their worst, they install keyloggers, rootkits, botnets, ransomware, and other malware.
How to Tell if Your Device is Infected with Adware or Malware from Pop-Ups
If you’ve noticed a sudden increase in pop-ups, annoying ads, and browser redirects, your device may be infected with adware or malware. Here are some signs your device has been infected:
- New tabs open to ads or random sites.
- Lots of pop-ups, pop-unders, and overlay ads appear.
- New browser extensions or toolbars you didn’t install.
- Homepage and search settings have changed unexpectedly.
- New, unknown programs running in the background.
- Sluggish browser performance.
- Problems shutting down browser windows and tabs.
Unwanted ads that cover the screen, redirect browsing, or keep reopening deserve investigation. They can come from a website, a notification permission, or installed adware. Close the page first and check its permissions; use the removal steps below if the behavior continues across unrelated sites or an app was installed.
You may also notice general system performance slowing down, more crashes, and strange activity in Task Manager. Keyloggers and botnets can cause typing lag, computer freezing, and data or bandwidth draining in the background.
How to Remove Adware and Malware Causing Unwanted Browser Pop-Ups
Please perform all the steps in the correct order. If you have any questions or doubts at any point, stop and ask for our assistance.
 Remove Pop-up Viruses from Windows
-
 Remove Pop-up Viruses from Mac
  Remove Pop-up Viruses from Android
Remove Pop-up Viruses from Windows
- STEP 1: Use Rkill to terminate malicious processes
- STEP 2: Uninstall malicious programs from Windows
- STEP 3: Reset browsers back to default settings
- STEP 4: Use Malwarebytes to remove Trojans and unwanted programs
- STEP 5: Use HitmanPro to remove rootkits and other malware
- STEP 6: Use AdwCleaner to remove malicious browser policies and adware
- STEP 7: Perform a final check with ESET Online Scanner
STEP 1: Use Rkill to terminate malicious processes
First, we’ll download and run Rkill to stop any malicious processes running in the background. This prevents the malware from blocking or interfering with the removal steps that follow.
RKill is a program that was developed at BleepingComputer.com that attempts to terminate known malware processes so that your normal security software can then run and clean your computer of infections. When RKill runs it will kill malware processes and then removes incorrect executable associations and fixes policies that stop us from using certain tools.
-
Download Rkill.
You can download RKill to your computer from the below link. When at the download page, click on the Download Now button labeled iExplore.exe. We are downloading a renamed version of Rkill (iExplore.exe) because some malware will not allow processes to run unless they have a certain filename.
Download RKillOpens the BleepingComputer download page in a new tab. RKillStops malware processes so other tools can run
 -
Run RKill.
After downloading, double-click the iExplore.exe icon to kill malicious processes. In most cases, downloaded files are saved to the Downloads folder.
The program may take some time to search for and end various malware programs.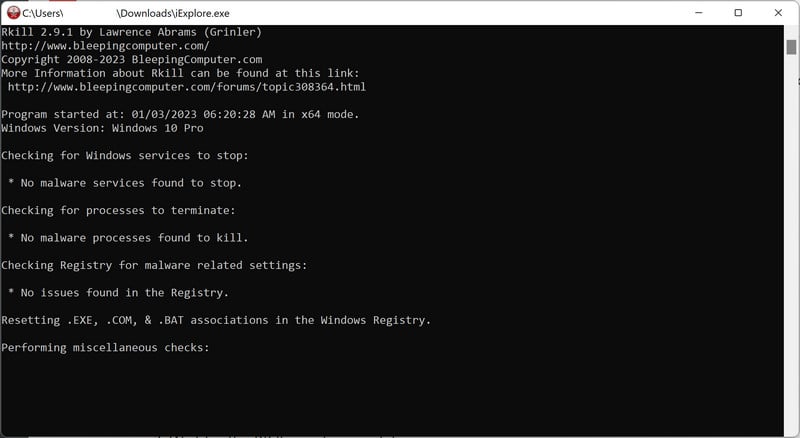
When it is finished, the black window will close automatically and a log file will open. Do not restart your computer. Proceed to the next step in this guide.
STEP 2: Uninstall malicious programs from Windows
Next, we’ll manually check your computer for unknown or malicious programs. Adware and browser hijackers often have a working uninstall entry — removing them this way takes care of the easy part before we run the scanners.
Use the tab for your Windows version. Windows 7 and 8 are legacy systems; some current scanners no longer support them. On Windows 10, check your Extended Security Updates enrollment after cleanup.
-
Open the Settings app
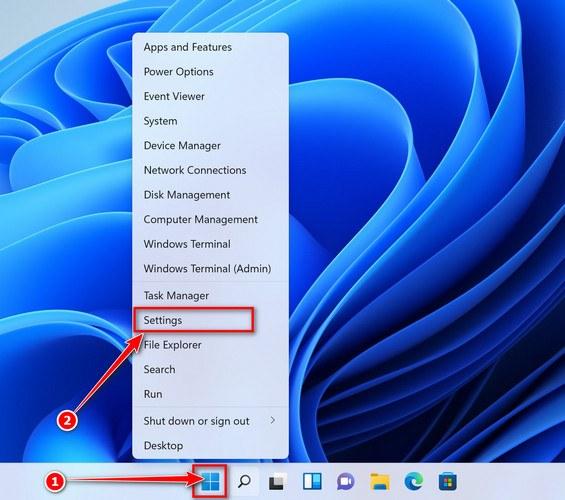
Press Windows + I on your keyboard to open Settings. Alternatively, right-click the Start button and select “Settings” from the menu.
-
Go to “Installed apps”
In the Settings window, click “Apps” in the sidebar, then select “Installed apps“.
-
Find and uninstall the malicious program
Scroll through the list of installed apps and look for anything suspicious — a program you don’t remember installing, or one with a strange or generic name.
Quick tip: click “Sort by” and choose “Install date“. Malware is usually one of the most recently installed programs, so it will appear near the top.
When you find the malicious program, click the three dots next to it and select “Uninstall“.Didn’t find any suspicious programs? That’s fine — not all infections install visible apps. Just continue with the next step in this guide. -
Complete the uninstall
Confirm by clicking Uninstall in the message box, then follow the remaining prompts.
Read each prompt carefully — some malicious programs use confusing wording or pre-ticked boxes hoping you’ll click through without looking.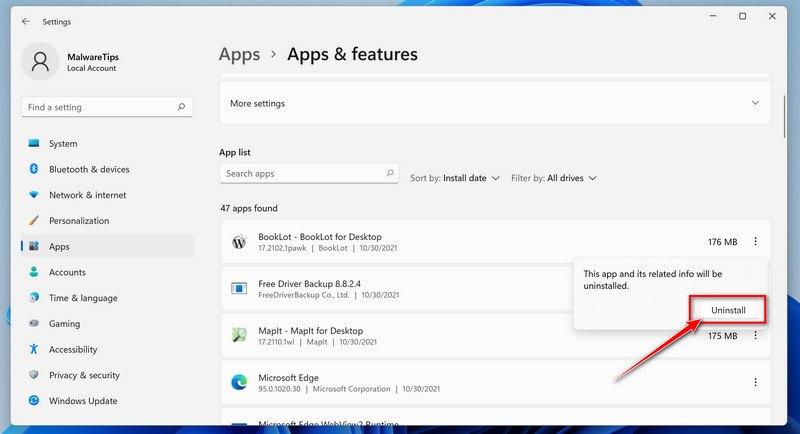
-
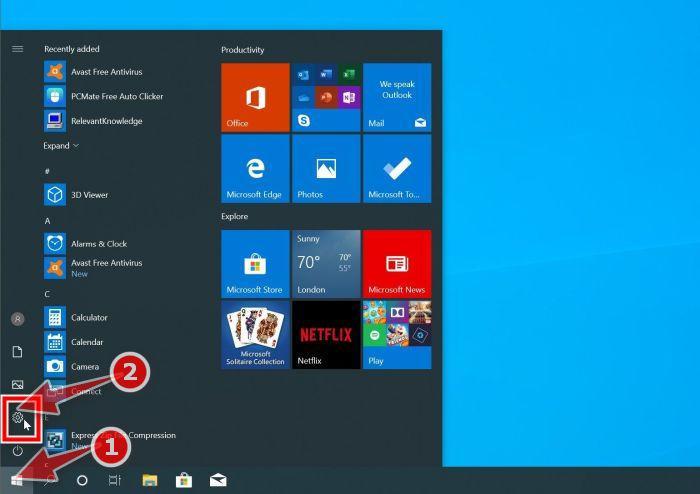
Open the Settings app
Press Windows + I on your keyboard to open Settings. Alternatively, click the Start button on the taskbar and select “Settings” (the gear icon).
-
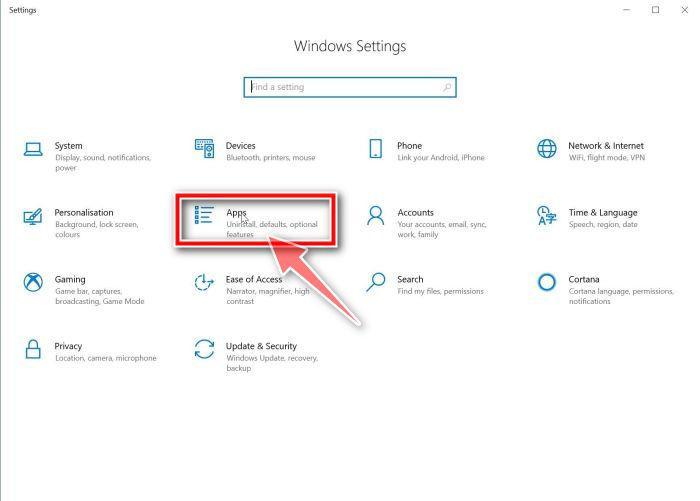
Click on “Apps”
In the “Windows Settings” window, click “Apps“. The “Apps & Features” section should open by default — if it doesn’t, select it from the list on the left.
-
Find and uninstall the malicious program
Scroll through the list of installed apps and look for anything suspicious — a program you don’t remember installing, or one with a strange or generic name.
Quick tip: click “Sort by” and choose “Install date“. Malware is usually one of the most recently installed programs, so it will appear near the top.
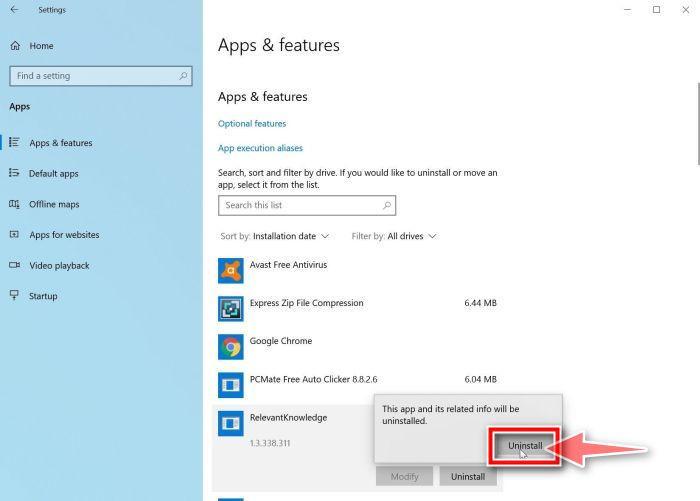
When you find the malicious program, click on it and select “Uninstall“.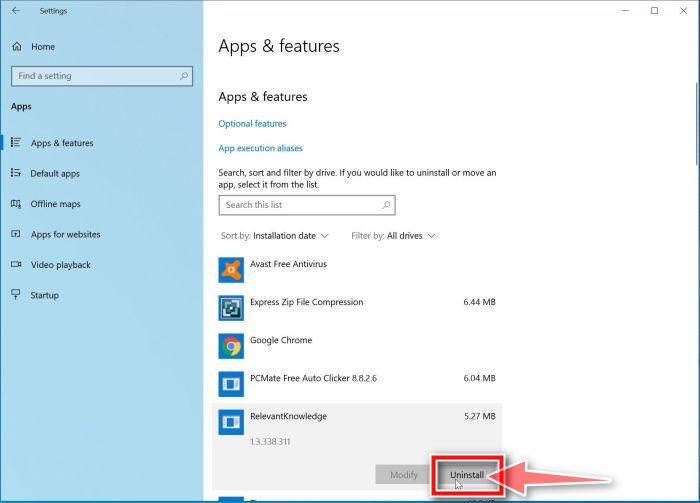 Didn’t find any suspicious programs? That’s fine — not all infections install visible apps. Just continue with the next step in this guide.
 -
Complete the uninstall
Confirm by clicking Uninstall in the message box, then follow the remaining prompts.
Read each prompt carefully — some malicious programs use confusing wording or pre-ticked boxes hoping you’ll click through without looking.
-
Open “Programs and Features”
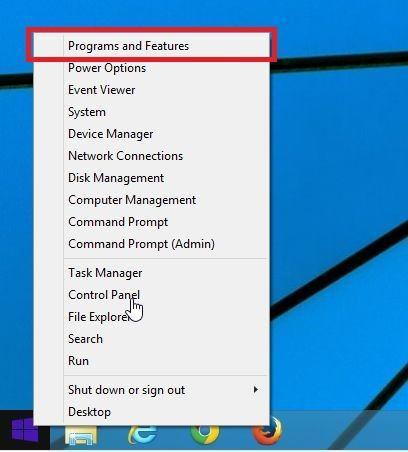
Right-click the Start button in the taskbar, then select “Programs and Features“. This takes you straight to the list of installed programs.
-
Find and uninstall the malicious program
Scroll through the list of installed programs and look for anything suspicious — a program you don’t remember installing, or one with a strange or generic name. Click to highlight it, then click the “Uninstall” button.
Didn’t find any suspicious programs? That’s fine — not all infections install visible apps. Just continue with the next step in this guide.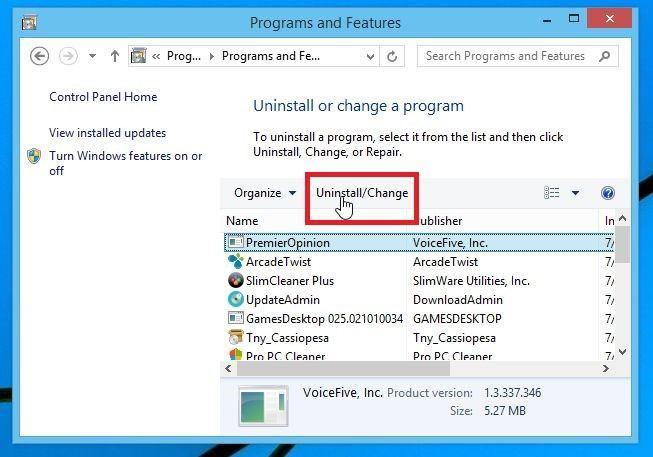
-
Complete the uninstall
Confirm by clicking Yes in the message box, then follow the remaining prompts. Read each prompt carefully — some malicious programs use confusing wording or pre-ticked boxes hoping you’ll click through without looking.
-
Open the Control Panel
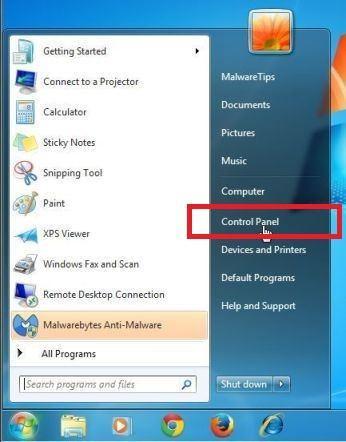
Click the “Start” button, then click “Control Panel“.
-
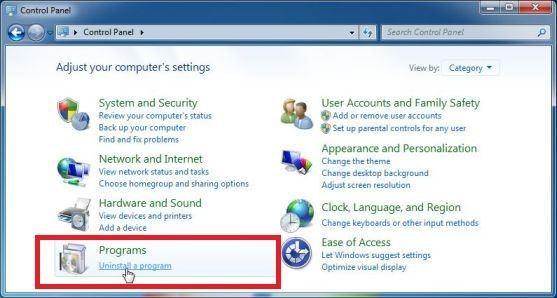
Click on “Uninstall a Program”
In the Control Panel, click “Uninstall a Program” under the Programs category.
-
Find and uninstall the malicious program
Scroll through the list of installed programs and look for anything suspicious — a program you don’t remember installing, or one with a strange or generic name. Click to highlight it, then click the “Uninstall” button.
Didn’t find any suspicious programs? That’s fine — not all infections install visible apps. Just continue with the next step in this guide.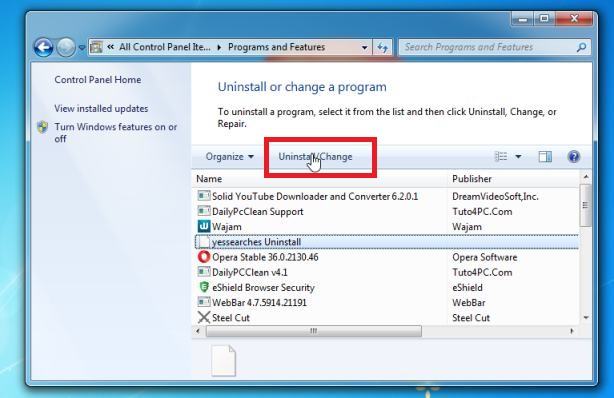
-
Complete the uninstall
Confirm by clicking Yes in the message box, then follow the remaining prompts. Read each prompt carefully — some malicious programs use confusing wording or pre-ticked boxes hoping you’ll click through without looking.
With the malicious programs removed, you’re ready for the next step in this guide.
STEP 3: Reset browsers back to default settings
In this step, we will remove spam notifications, malicious extensions, and change to default any settings that might have been changed by malware.
Please note that this method will remove all extensions, toolbars, and other customizations but will leave your bookmarks and favorites intact. For each browser that you have installed on your computer, please click on the browsers tab below and follow the displayed steps to reset that browser.
Reset Chrome for Windows to default settings
We will now reset your Chrome browser settings to their original defaults. This will reset your startup page, new tab page, search engine, and pinned tabs. It will also disable all extensions and clear temporary data like cookies. Your favorites, history, and saved passwords will not be cleared.
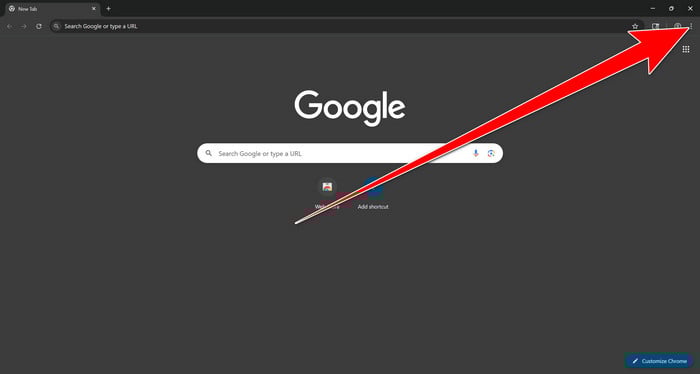
Open the Chrome menu
Open Google Chrome and click the three-dot (⋮) icon in the top-right corner.
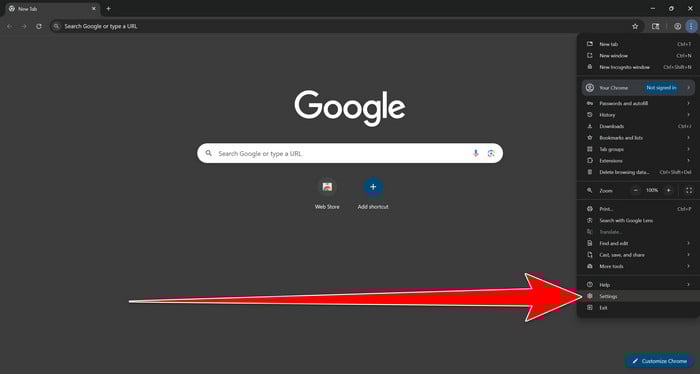
Open Chrome Settings
Select Settings from the Chrome menu.
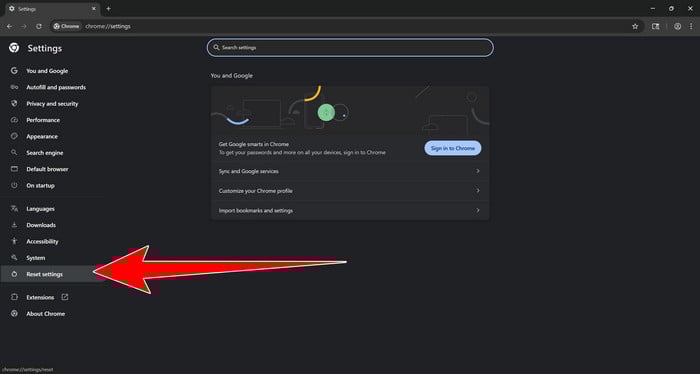
Select “Reset settings”
Look at the menu on the left side of the Settings page. Scroll down and click Reset settings.
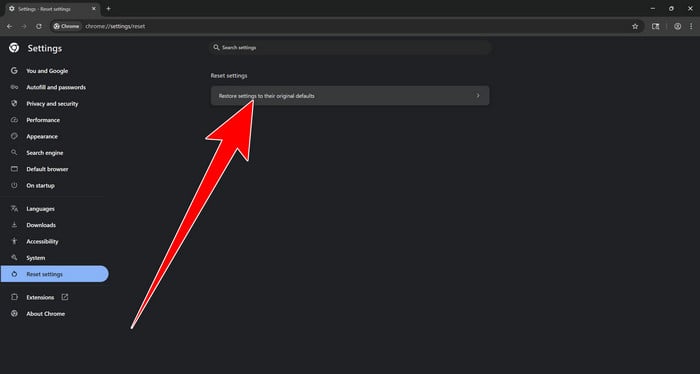
Restore Chrome’s original settings
Click Restore settings to their original defaults.
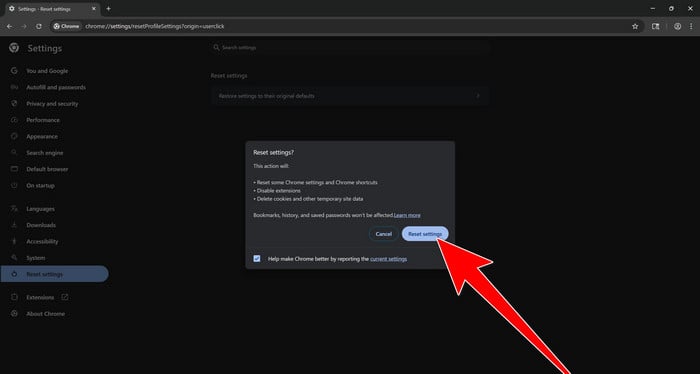
Confirm the Chrome reset
A confirmation window will appear. Click Reset settings.
This will:
- Restore the default search engine, homepage, and new tab page
- Reset startup pages and pinned tabs
- Disable installed extensions
- Clear temporary cookies and website data
Don’t worry: Chrome will not delete your bookmarks, browsing history, or saved passwords.
Restart Chrome and perform a test search. If your searches now open normally in Google, you can stop here.
If searches are still redirected through shady domains complete the additional step below.
Remove persistent search hijacker data
Only complete this step if the redirect continues after resetting Chrome.
Some browser hijackers hide inside Chrome’s local search-engine database. A standard Chrome reset may not remove this database, which is why searches can continue to pass through shady sites.
The following procedure creates a backup of the affected database and allows Chrome to build a new, clean version. This is safer and less disruptive than deleting the entire Chrome profile.
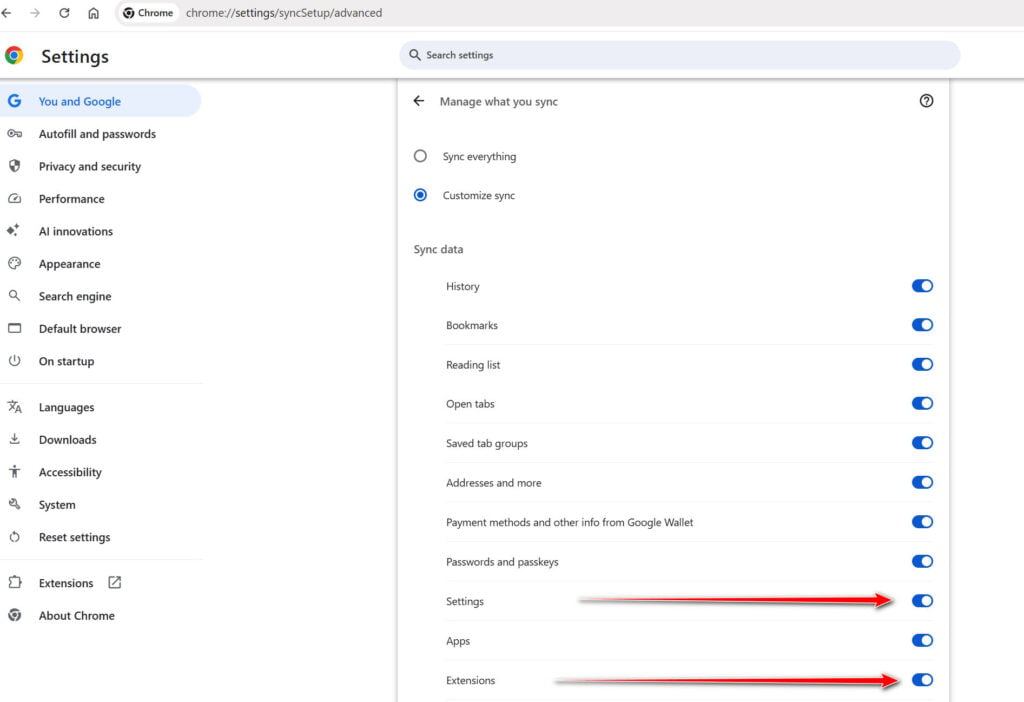
First, prevent Chrome Sync from restoring the hijacked settings:
- Open a new Chrome tab.
- Copy the following address, paste it into Chrome’s address bar, and press Enter:
chrome://settings/syncSetup/advanced - Under Manage what you sync, select Customize sync.
- Turn off Settings and Extensions.
- You can leave Bookmarks and Passwords enabled so your important data remains synchronized.
Note: Some newer Chrome versions may automatically redirect this address to the Google Account settings page. If that happens, locate the list of synchronized Chrome data and turn off Settings and Extensions there.
Now save anything you are working on and close every Chrome window.
Run the cleanup command:
- Press the Windows key on your keyboard.
- Type PowerShell.
- Open Windows PowerShell. Administrator access is not required.
- Copy the entire command shown below.
- Right-click inside the PowerShell window to paste the command, then press Enter.
- If Windows warns you about pasting multiple lines, select the option to continue.
$stamp = Get-Date -Format "yyyyMMdd-HHmmss"

Get-Process chrome -ErrorAction SilentlyContinue |
 Stop-Process -Force

$root = "$env:LOCALAPPDATA\Google\Chrome\User Data"

if (Test-Path $root) {
 $profiles = Get-ChildItem $root -Directory |
 Where-Object {
 $_.Name -eq "Default" -or
 $_.Name -match "^Profile \d+$"
 }

 foreach ($profile in $profiles) {
 foreach ($name in @(
 "Web Data",
 "Web Data-journal",
 "Web Data-wal",
 "Web Data-shm"
 )) {
 $file = Join-Path $profile.FullName $name

 if (Test-Path $file) {
 $backup = "$file.search-hijacker-backup-$stamp"
 Move-Item -LiteralPath $file -Destination $backup
 Write-Host "Backup created: $backup"
 }
 }
 }
}

Write-Host ""
Write-Host "Chrome search data has been cleaned."
Write-Host "You can now reopen Chrome."
Wait until PowerShell displays the following message:
Chrome search data has been cleaned.
You can now reopen Chrome.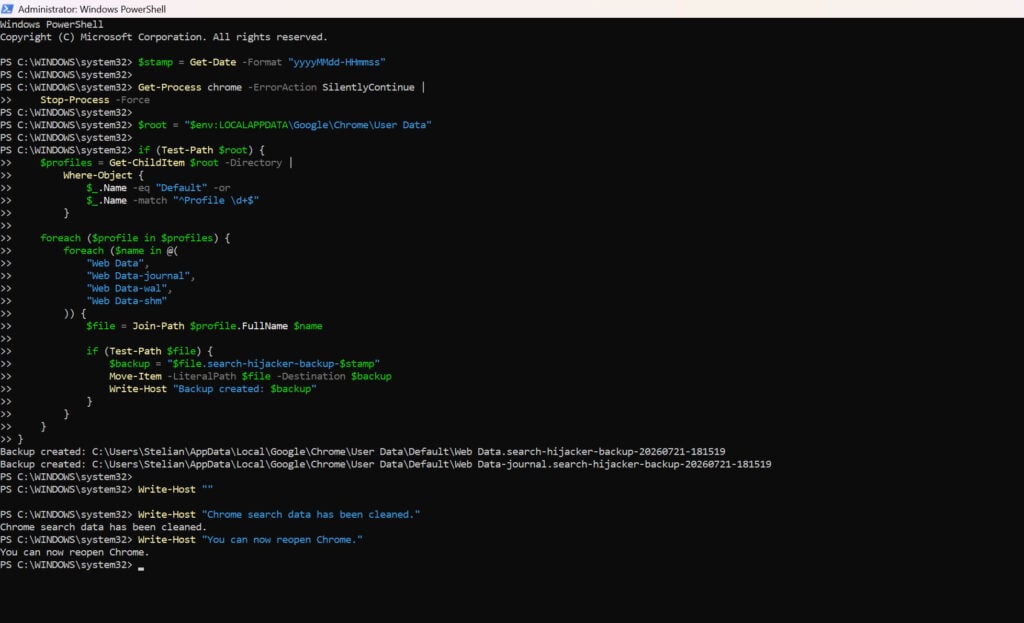
Close PowerShell and reopen Google Chrome. Chrome will automatically create a clean search database for every local profile.
Next, copy the following address, paste it into Chrome’s address bar, and press Enter:
chrome://settings/searchEnginesMake sure Google is selected as the default search engine. Test several searches from the address bar and confirm that they no longer pass through shady search engines.
Your important Chrome data is protected: the PowerShell cleanup does not remove bookmarks, saved passwords, browsing history, cookies, or installed extensions. However, it may reset locally stored Autofill addresses and form suggestions.
The original search database is not deleted. PowerShell renames it and adds
search-hijacker-backupto its filename so it can be recovered if necessary.Keep Settings and Extensions synchronization disabled while testing Chrome. Do not enable every extension at once. Enable only the extensions you recognize, one at a time, and test Chrome after each one.
If the redirect returns after enabling a particular extension, remove that extension immediately.
Reset Firefox for Windows to default settings
We will now reset your Firefox browser settings to their default. The reset feature fixes many issues by restoring Firefox to its factory default state while saving your essential information like bookmarks, passwords, web form auto-fill information, browsing history, and open tabs.
-
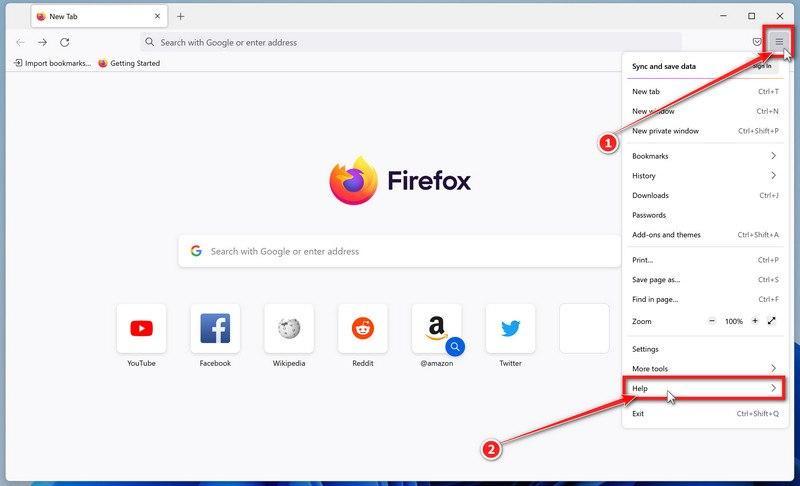
Open the Firefox menu and click “Help”
Click the three horizontal lines in the top-right corner of Firefox to open the main menu, then select “Help“.
-
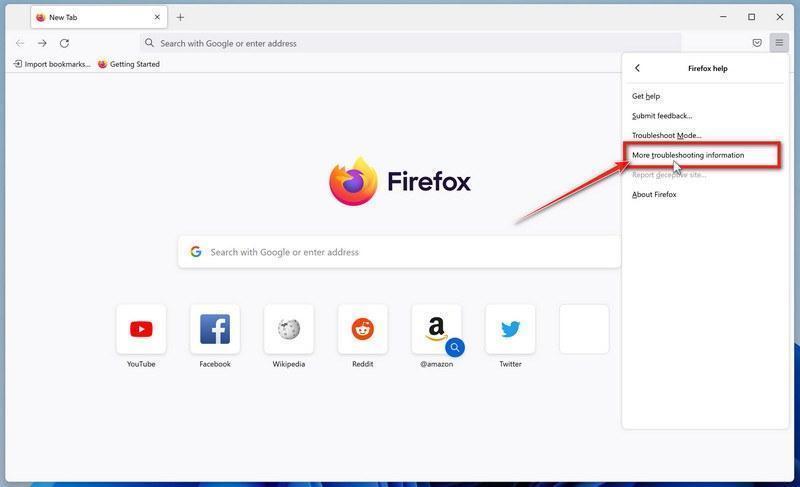
Click “More troubleshooting information”
In the Help menu, click “More troubleshooting information“.
-
Click “Refresh Firefox”
On the “Troubleshooting Information” page, click the “Refresh Firefox” button in the top-right area of the page.
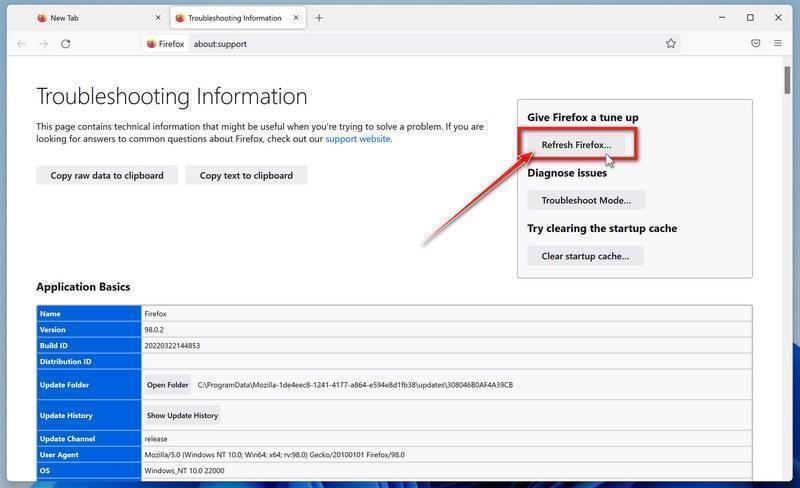
You can also type about:support in the address bar. If Refresh Firefox is missing with the newer profile manager, update Firefox; Mozilla restored that option for those profiles in version 150.
-
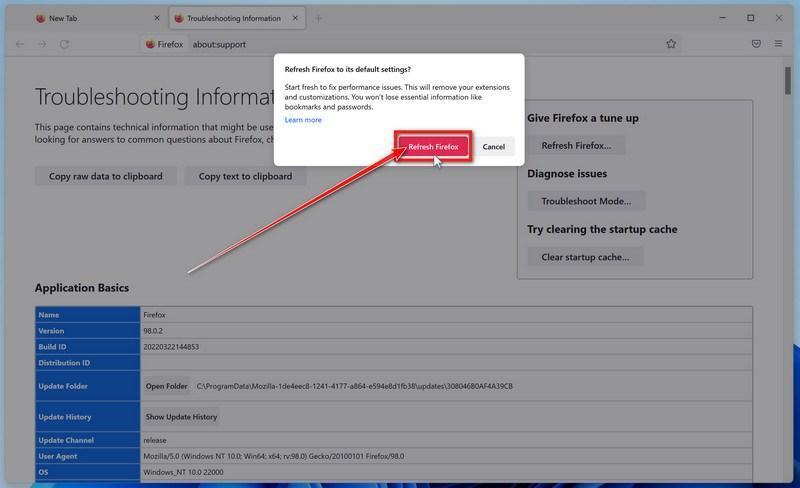
Confirm the refresh
In the confirmation window, click “Refresh Firefox” again. This removes extensions, themes, and customized settings — the usual hiding places for browser hijackers — while keeping your bookmarks, history, and saved passwords safe.
-
Click “Finish”
Firefox will close, reset itself to default settings, and reopen with a window listing the information that was restored. Click “Finish” to finish restoring your Firefox profile. Test the browser before reinstalling extensions.
About the “Old Firefox Data” folder: Firefox saves a copy of your old profile on your desktop. If something you need is missing after the reset, you can recover it from this folder. Otherwise, delete the folder — it contains sensitive data like passwords and cookies, and may also still hold the malicious files you just removed.
Reset Microsoft Edge to default settings
We will now reset your Microsoft Edge browser settings to their default. This will reset your startup page, new tab page, search engine, and pinned tabs. It will also disable all extensions and clear temporary data like cookies. Your favorites, history, and saved passwords will not be cleared.
Updated for Microsoft Edge on Windows 10 and Windows 11 — July 2026.
-
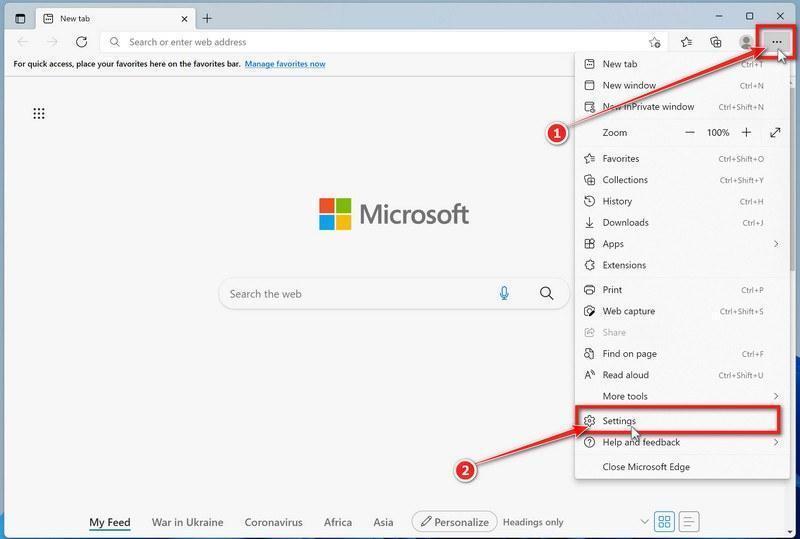
Open the Edge menu and click “Settings”
Open Microsoft Edge. In the top-right corner, click the three-dot (…) icon, then click Settings.
-
Prevent the unwanted settings from returning through Edge Sync
If you are signed in to Microsoft Edge, a bad setting or extension may be stored in your Microsoft account and return after the reset.
Copy the following address, paste it into the Edge address bar, and press Enter:
edge://settings/profiles/syncOn the Sync page, turn off these two options:
- Settings
- Extensions
You can leave Favorites and Passwords turned on.
If Edge says that sync is already off, simply continue to the next step.
Important: Edge Sync settings are separate for each profile. If you use more than one Edge profile, switch to each affected profile and repeat this step.
You do not need to sign out of your Microsoft account or delete the Edge profile.
-
Open “Reset settings”
In the left sidebar, click Reset settings.
You can also open the reset page directly. Copy the following address, paste it into the Edge address bar, and press Enter:
edge://settings/reset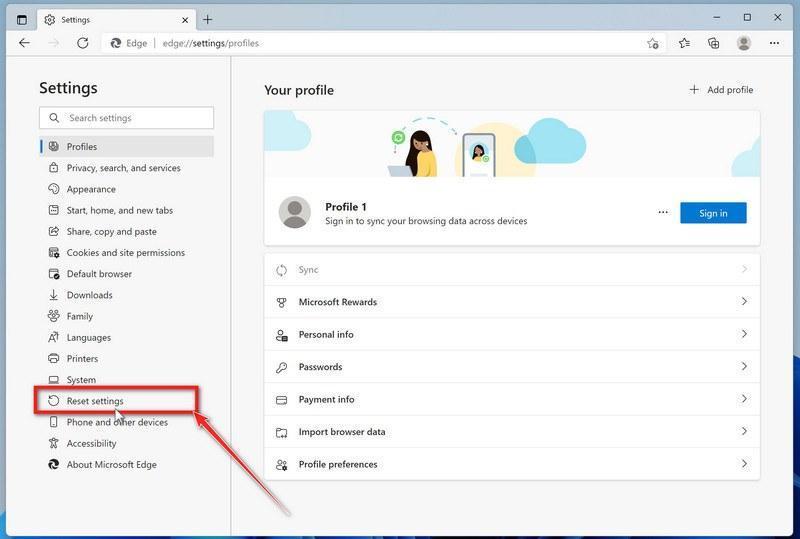
-
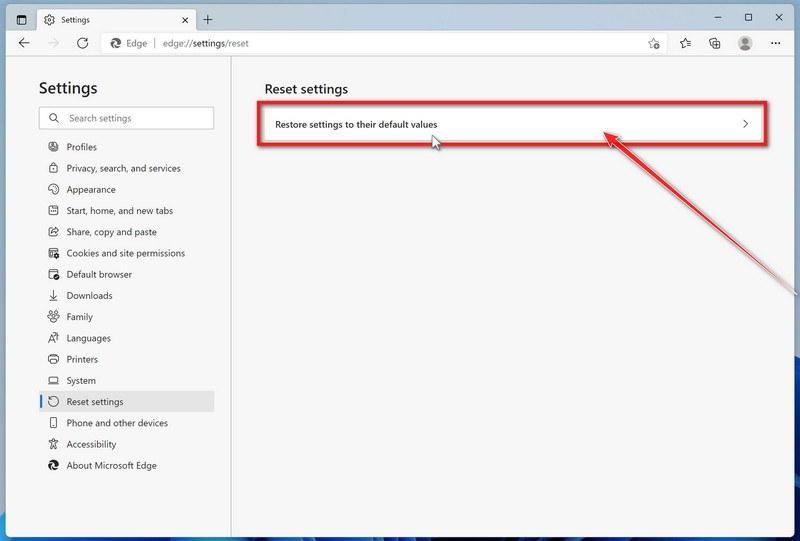
Click “Restore settings to their default values”
Click Restore settings to their default values.
-
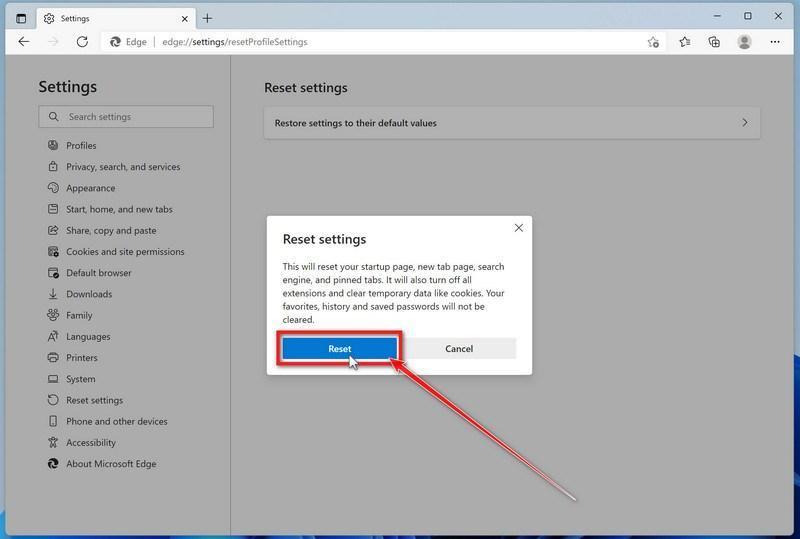
Confirm the reset
In the confirmation dialog, click Reset.
This resets the startup page, new tab page, search engine, and pinned tabs. It also disables all extensions and clears temporary site data, such as cookies.
Don’t worry: your favorites, browsing history, and saved passwords will not be deleted.
-
Check your extensions before turning them back on
Copy the following address, paste it into the Edge address bar, and press Enter:
edge://extensionsRemove any extension you do not recognize or no longer use. Pay particular attention to extensions related to search, coupons, shopping, PDF conversion, browser protection, new tabs, or video downloading.
Do not turn all extensions back on at the same time. Enable only the extensions you recognize and trust.
-
Select a trusted search engine
Copy the following address, paste it into the Edge address bar, and press Enter:
edge://settings/searchEnginesSelect Bing, Google, DuckDuckGo, or another search provider you trust and make it the default.
Remove any unknown search engines, especially providers with strange names or addresses that you did not add yourself.
Restart Edge and perform a search from the address bar. If searches are no longer redirected, you can stop here.
-
If the redirect remains, clean the corrupted search data without deleting the Edge profile
Use this additional step only if Edge continues to redirect searches after the normal reset.
This optional repair renames the Web Data database in one affected Edge profile. It may reset form-fill information, saved addresses, and custom search engines. Back up the profile first. Favorites, passwords, and browsing history are stored separately, but do not use a database repair as your first troubleshooting step.
Before continuing: save anything you are working on because the command will close Microsoft Edge.
Before closing Edge, open edge://version in the affected profile and copy its Profile path. The command asks for that path and checks it is inside Edge’s profile folder. Do not select another person’s profile or paste a folder suggested by an unverified caller.
- Open the Windows Start menu.
- Type PowerShell.
- Open Windows PowerShell. Administrator access is not required.
- Copy the entire command below.
- Paste it into PowerShell and press Enter.
$stamp = Get-Date -Format "yyyyMMdd-HHmmss"
$root = Join-Path $env:LOCALAPPDATA "Microsoft\Edge\User Data"

Get-Process -Name msedge -ErrorAction SilentlyContinue |
    Stop-Process -Force -ErrorAction SilentlyContinue

Start-Sleep -Seconds 2

if (-not (Test-Path -LiteralPath $root)) {
    Write-Host "The Microsoft Edge profile folder was not found:"
    Write-Host $root
    return
}

$profilePath = Read-Host "Paste the affected Profile path from edge://version"
$profilePath = [System.IO.Path]::GetFullPath($profilePath.Trim().Trim('"'))
$profileParent = [System.IO.Path]::GetDirectoryName($profilePath.TrimEnd('\'))
if ($profileParent -ne [System.IO.Path]::GetFullPath($root)) {
    Write-Warning "The selected folder is not a direct Edge profile folder. No files were moved."
    return
}
$profiles = @(Get-Item -LiteralPath $profilePath -ErrorAction Stop)
$movedFiles = 0

foreach ($profile in $profiles) {
    foreach ($name in @(
        "Web Data",
        "Web Data-journal",
        "Web Data-wal",
        "Web Data-shm"
    )) {
        $file = Join-Path $profile.FullName $name

        if (Test-Path -LiteralPath $file) {
            $backup = "$file.search-reset-backup-$stamp"

            try {
                Move-Item -LiteralPath $file -Destination $backup -ErrorAction Stop
                Write-Host "Cleaned: $($profile.Name)\$name"
                $movedFiles++
            }
            catch {
                Write-Warning "Could not clean: $file"
            }
        }
    }
}

Write-Host ""

if ($movedFiles -gt 0) {
    Write-Host "Microsoft Edge search data has been cleaned." -ForegroundColor Green
    Write-Host "You can now reopen Microsoft Edge."
}
else {
    Write-Host "No Edge search database files were found." -ForegroundColor Yellow
}
The command does not permanently delete the original files. It renames them as backup files, and Edge creates a clean search database when it starts again.
Note: this additional cleanup may also reset saved form-fill suggestions, saved addresses, and manually added search engines. It does not delete favorites, passwords, or browsing history.
-
Reopen Edge and test the browser
Open Microsoft Edge again, visit edge://settings/searchEngines, and select your preferred search engine.
Perform several searches from the address bar to confirm that the redirect is gone.
Keep synchronization for Settings and Extensions turned off until you are certain that the computer and extensions are clean. If you enable them again, turn them on one at a time and test Edge after each change.
-
If Edge still redirects your searches
Open edge://policy. If this is your personal computer and Edge displays unknown policies such as ExtensionInstallForcelist or DefaultSearchProvider, the hijacker may be installed outside the browser profile.
In that situation, continue with the next malware-removal steps and run a complete antivirus scan. If the computer belongs to a company or school, contact its IT administrator before changing any policies.
Reset Internet Explorer to default settings
We will now reset your Internet Explorer browser settings to their default. You can reset Internet Explorer settings to return them to the state they were in when Internet Explorer was first installed on your computer.
Legacy Internet Explorer only: the retired desktop app is unavailable on many Windows 10 PCs and is not included with Windows 11. Skip this tab if you use Edge. Resetting Edge and configuring IE mode are separate procedures.
-
Go to “Internet Options”.
Open Internet Explorer, click on the gear icon in the upper-right part of your browser, then select “Internet Options“.
If Internet Explorer will not open, press Windows + R, type inetcpl.cpl, and press Enter. Continue only if the Advanced tab actually has a Reset button. Do not reinstall an obsolete browser to obtain it.
-
Select the “Advanced” tab, then click “Reset”
In the “Internet Options” dialog box, select the “Advanced” tab, then click on the “Reset” button.
-
Click on “Reset”.
In the “Reset Internet Explorer settings” section, select the “Delete personal settings” checkbox, then click on the “Reset” button.
-
Click on “Close”.
When Internet Explorer has completed its task, click on the “Close” button in the confirmation dialogue box.
Close your browser and then you can open Internet Explorer again.
STEP 4: Use Malwarebytes to remove Trojans and unwanted programs
Now we’ll install Malwarebytes and run a full scan to detect and remove infections, adware, and potentially unwanted programs from your computer.
Malwarebytes is one of the most popular and trusted anti-malware tools for Windows — and it’s completely free for removing infections. It catches threats that many antivirus programs miss, including adware, browser hijackers, and trojans. Follow the steps below to scan and clean your PC in just a few minutes.
Download Malwarebytes
Click the button below to download the latest version of Malwarebytes for Windows from the official source. The free version is all you need — it will scan your computer and remove adware, browser hijackers, and other malicious software at no cost.
Download MalwarebytesOfficial installer for Windows 11 and 10. Your download starts right away.Want real-time protection? See Malwarebytes Premium Malwarebytes Free for WindowsScans and removes malware at no cost
-
Install Malwarebytes
When the download finishes, open your Downloads folder and double-click the MBSetup file. If Windows shows a User Account Control pop-up, click “Yes” to allow the installation.

Follow the On-Screen Prompts to Install Malwarebytes
The setup wizard will walk you through a few quick screens:
Current installers may offer Browser Guard, a trial, or a paid plan. Read each screen; use Skip for optional offers you do not want. Manual Windows scans and quarantine remain available in the free version.
-
Choose where you’re installing the program — “Personal Computer” or “Work Computer” — then click Next.

-
Malwarebytes will now install on your device. This usually takes under a minute.

-
When installation is complete, the “Welcome to Malwarebytes” screen will open automatically.

-
On the final screen, click Open Malwarebytes to launch the program.

-
Choose the scan type and optional rootkit check
Start with the normal Threat Scan. For an additional rootkit check, click the three dots on the Scanner tile, choose Advanced Scan, then Custom Scan.
In the Custom Scan options, enable Scan for rootkits and select the entire C:\ system drive. Click Start Custom Scan when you have reviewed the remaining options. This option is unavailable on Windows ARM devices; do not change Windows security settings to make it appear.
Run the Custom Scan if you selected it. Otherwise, return to the Dashboard and follow the Threat Scan steps below. You do not need rootkit scanning enabled to run a normal scan.
Start the Scan
Click the blue Scan button. Malwarebytes will automatically update its virus database and start checking your computer for malware.

-
Wait for the Scan to Finish
A Threat Scan checks memory, startup items, the registry, and common malware locations; it does not inspect every file on every drive. Allow it to finish. Use a Custom Scan if you also need to check a particular drive or folder.

-
Quarantine the Detected Threats
When the scan finishes, review the detected items and leave the threats you want removed selected. Click Quarantine. If you are unsure about a detection, save the report and ask for help before excluding it.

Malwarebytes will now remove the malicious files and registry entries and move them safely into quarantine.

-
Restart Your Computer
Some threats can only be fully removed after a reboot. If Malwarebytes asks you to restart, click Yes. Once you’re logged back in, Malwarebytes has finished removing the threats it found.

STEP 5: Use HitmanPro to remove rootkits and other malware
Next, we’ll run a second-opinion scan with HitmanPro to catch Trojans, rootkits, and other malicious programs that may have survived the previous step.
HitmanPro is a second-opinion scanner designed to check for threats your usual antivirus may have missed. It examines suspicious files and uses cloud analysis from several security labs, including SophosLabs. An internet connection is needed for that cloud check.
Scanning is free. Removing detected threats requires an eligible one-time 30-day trial or a paid license. If this computer already used its trial, do not expect another free activation; the purchase screen shows the current price.
-
Download HitmanPro
Click the button below to download HitmanPro. Remember — the scan is free, so you have nothing to lose by checking your PC.
Download HitmanProFree scan. Removal requires an eligible 30-day trial or a paid license. Opens the official HitmanPro page in a new tab. HitmanProSecond-opinion malware scanner from Sophos
 -
Install HitmanPro
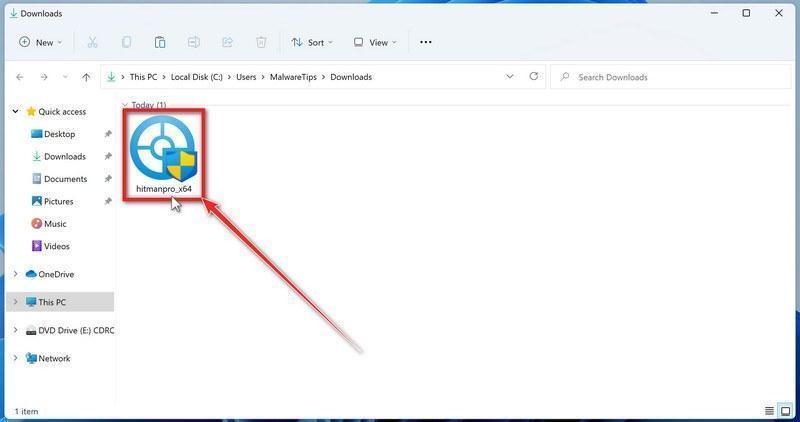
When the download finishes, open your Downloads folder and double-click the file: “hitmanpro.exe” on 32-bit Windows, or “hitmanpro_x64.exe” on 64-bit Windows.
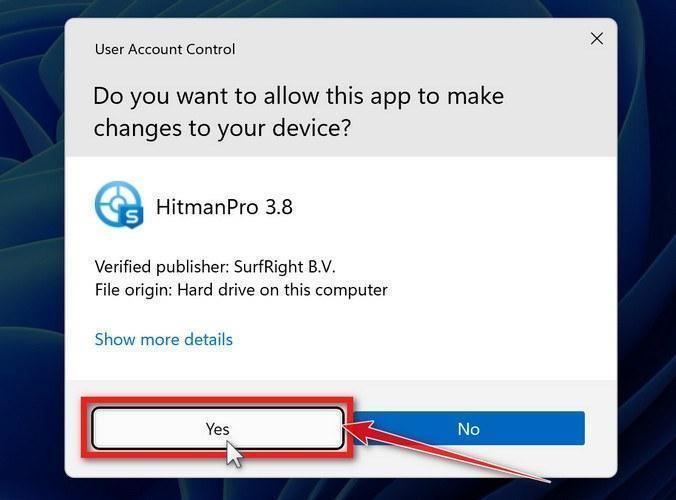
If a User Account Control pop-up asks whether HitmanPro can make changes to your device, click “Yes” to continue.
-
Follow the On-Screen Prompts
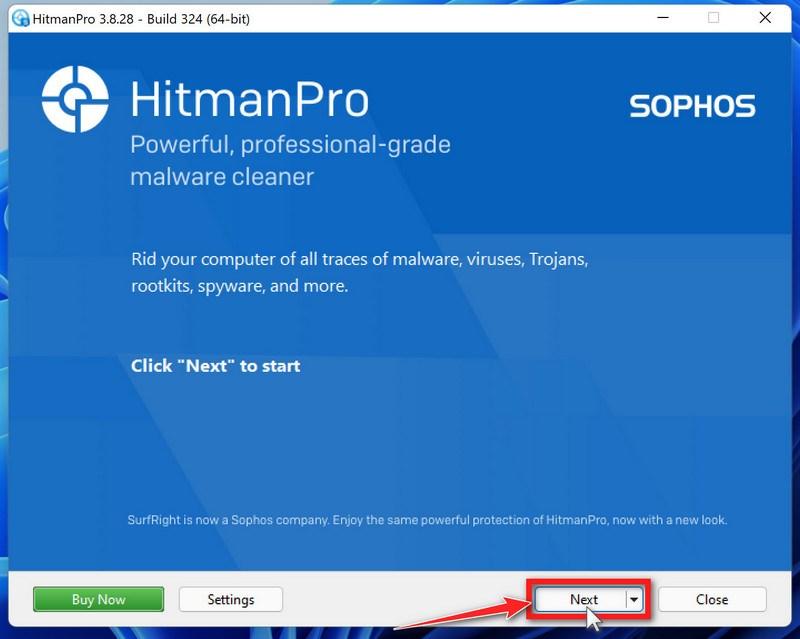
On the HitmanPro start screen, click “Next” to begin the system scan. No lengthy setup required — it goes straight to work.
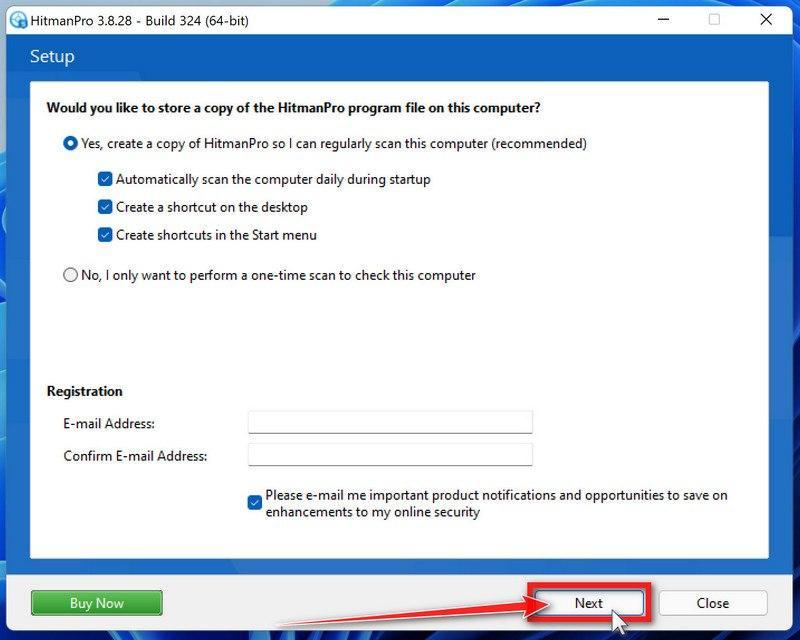
-
Wait for the Scan to Finish
HitmanPro will now check your computer for malicious programs. This usually takes just a few minutes thanks to its cloud-based scanning.
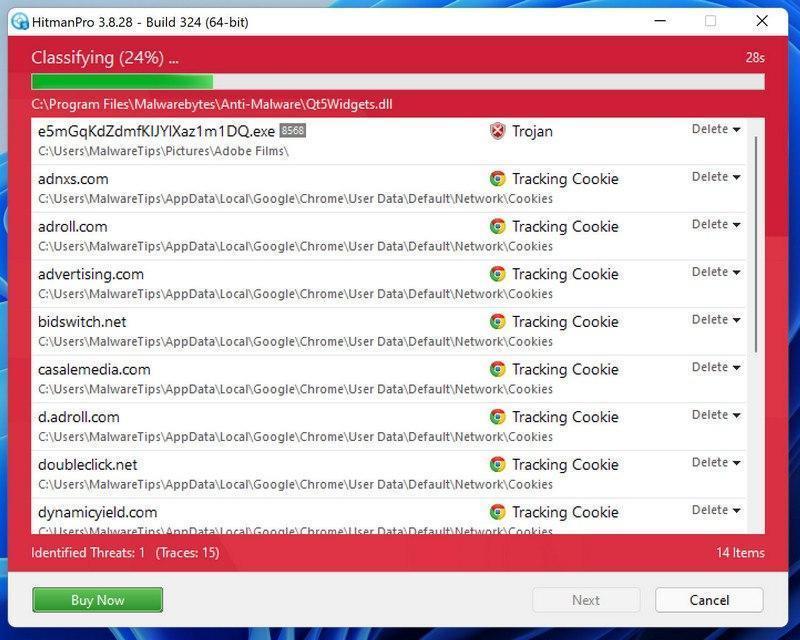
-
Review the Results and Click “Next”
When the scan is done, HitmanPro will show you everything it found. Click “Next” to remove the detected threats.
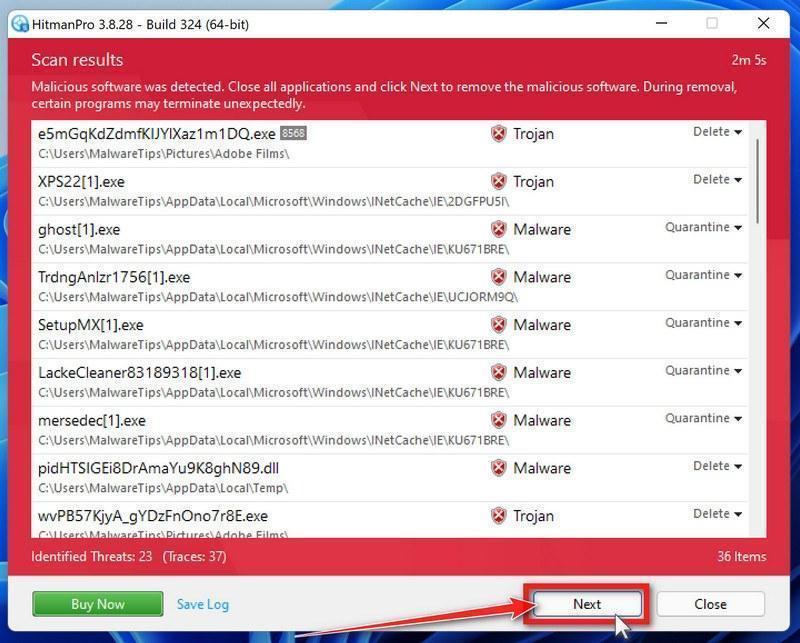
-
Click “Activate Free License”
If the trial is available on this computer, click Activate free license and follow the activation prompts. If it is unavailable, use an existing paid license or keep the report for assistance; do not buy through an unexpected pop-up.
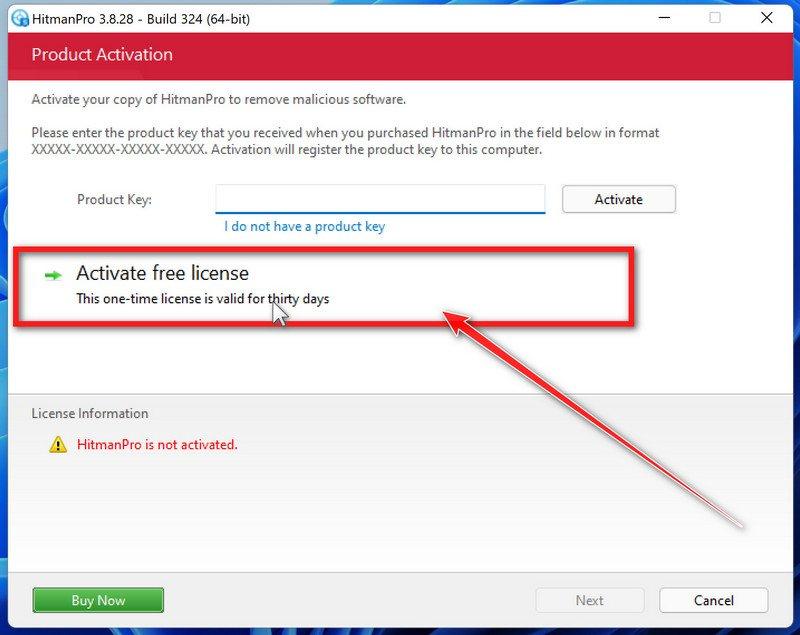
When the removal is complete, HitmanPro will show a summary of everything it cleaned. Click Next, then click Reboot if prompted. If there’s no reboot prompt, just click Close and check whether the original symptoms have stopped. A clean scan cannot rule out every threat.
STEP 6: Use AdwCleaner to remove malicious browser policies and adware
We’ll now use AdwCleaner to remove malicious browser policies and unwanted browser extensions — the leftovers that keep hijacking your browser settings even after the malware itself is gone.
AdwCleaner is a free on-demand scanner that specializes in adware, browser hijackers, and unwanted toolbars — the exact threats that mainstream antivirus programs often miss. It also includes tools that repair the damage malware leaves behind, like hijacked browser settings and malicious policies. It’s a quick scan that’s well worth running.
-
Download AdwCleaner
Click the button below to download AdwCleaner — it’s free, portable, and requires no installation.
Download AdwCleanerOpens the official download page in a new tab. Malwarebytes AdwCleanerRemoves adware and unwanted programs at no cost
 -
Run AdwCleaner
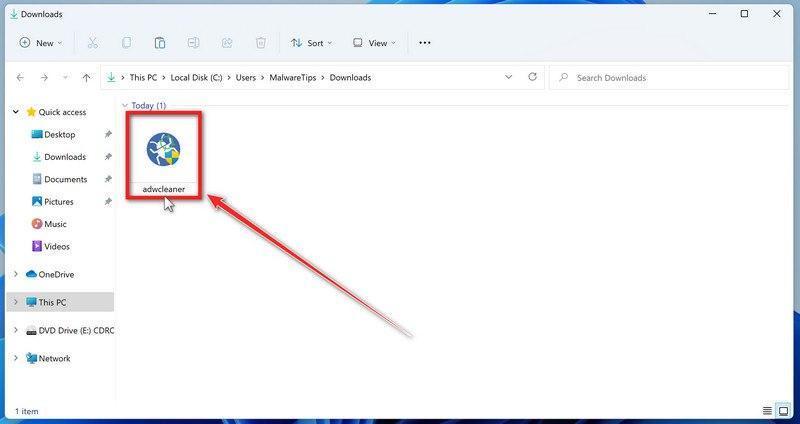
Open your Downloads folder and double-click the file named “adwcleaner.exe“. There’s no installation — the program starts right away.
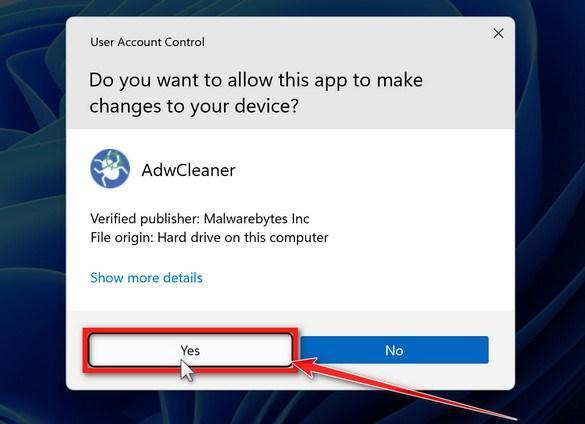
If Windows asks whether you want to allow AdwCleaner to run, click “Yes“. When the license agreement appears, click I agree to continue.
-
Check whether a Chrome policy reset is needed
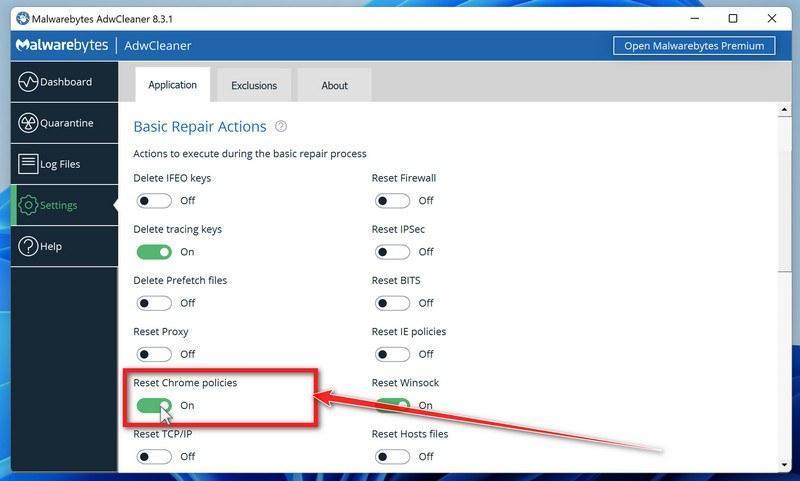
Leave policy resets off for an ordinary scan. On a personal PC with confirmed unwanted Chrome policies, open Settings and enable Reset Chrome policies only if needed. On a work or school device, ask its administrator first.
-
Start the Scan
Return to Dashboard and click Scan Now.
-
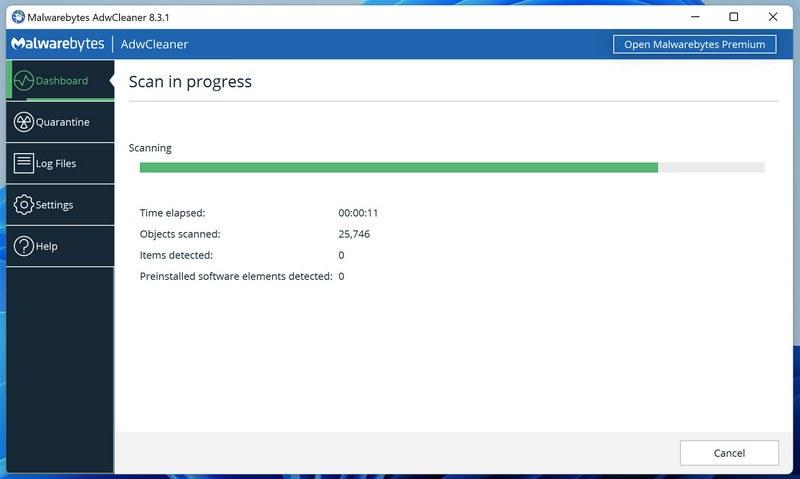
Wait for the Scan to Finish
AdwCleaner will now check your computer for adware and other malware. This usually takes only a few minutes — it’s one of the fastest scanners around.
-
Quarantine the Detected Threats
Review the detected adware and potentially unwanted programs, select the items to remove, and click Next. If a separate preinstalled-software list appears, review it too, then click Quarantine. Leave programs you intentionally use unselected.
-
Click “Continue” to Finish the Cleanup
Save any open work first — AdwCleaner needs to close your open programs before it can clean. When you’re ready, click the “Continue” button.
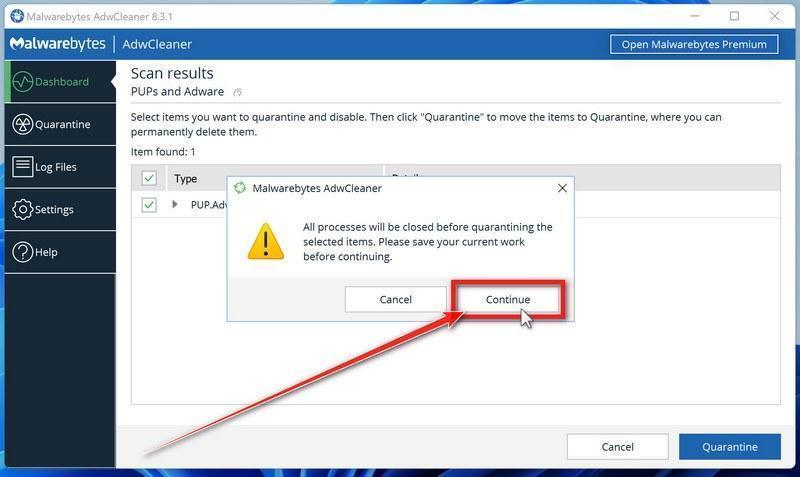
AdwCleaner quarantines the selected items. Restart when prompted, then review the cleanup log. Click Skip Basic Repair to finish; use Run Basic Repair only when a support agent has instructed you to do so.
STEP 7: Perform a final check with ESET Online Scanner
Finally, we’ll run ESET Online Scanner as a last sweep to confirm nothing was missed. If this scan comes back clean, your computer is malware-free.
ESET Online Scanner is a free second-opinion scanner for Windows. It offers a thorough check for threats other scans may have missed. Let it update before scanning, and use the final report to see what it found and whether cleanup succeeded. A clean result is useful evidence, not a guarantee that no malware remains.
-
Download ESET Online Scanner
Click the button below to download ESET Online Scanner.
Download ESET Online ScannerOpens the official download page in a new tab. ESET Online ScannerFree one-time malware scan from ESET
 -
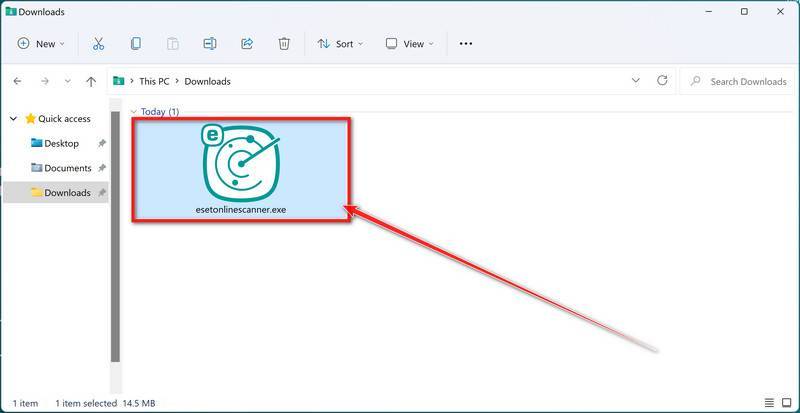
Run the Installer
When the download finishes, open your Downloads folder and double-click “esetonlinescanner.exe“.
-
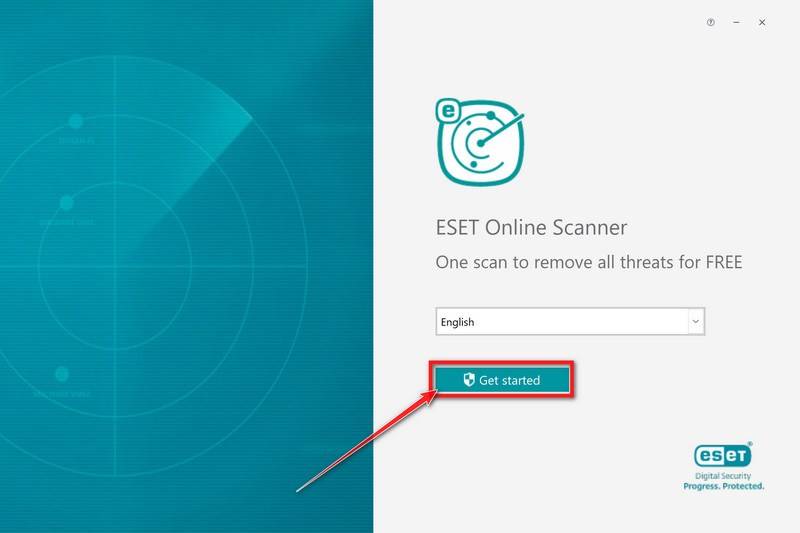
Install ESET Online Scanner
On the start screen, select your language from the drop-down menu and click Get started.
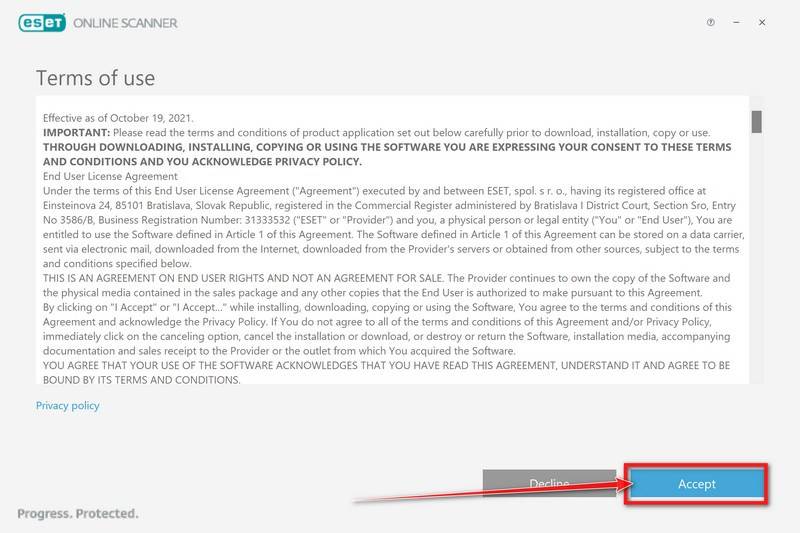
On the Terms of use screen, click Accept.
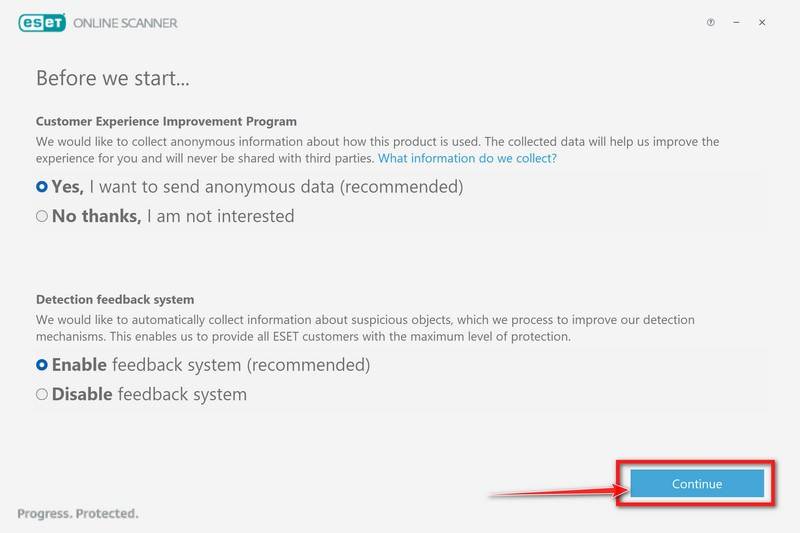
Choose your preferences for the Customer Experience Improvement Program and the Detection feedback system (either choice is fine), then click Continue.
-
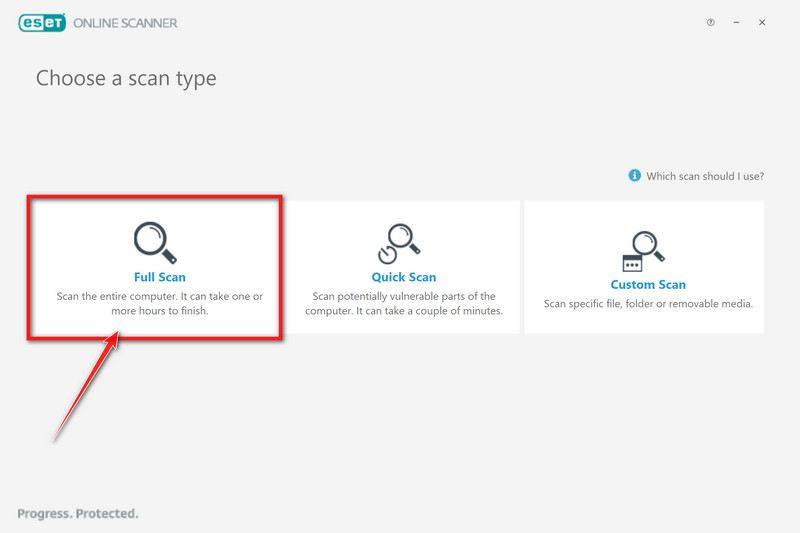
Start a Full Scan
Click Full Scan — this checks your entire computer, not just the common hiding spots.
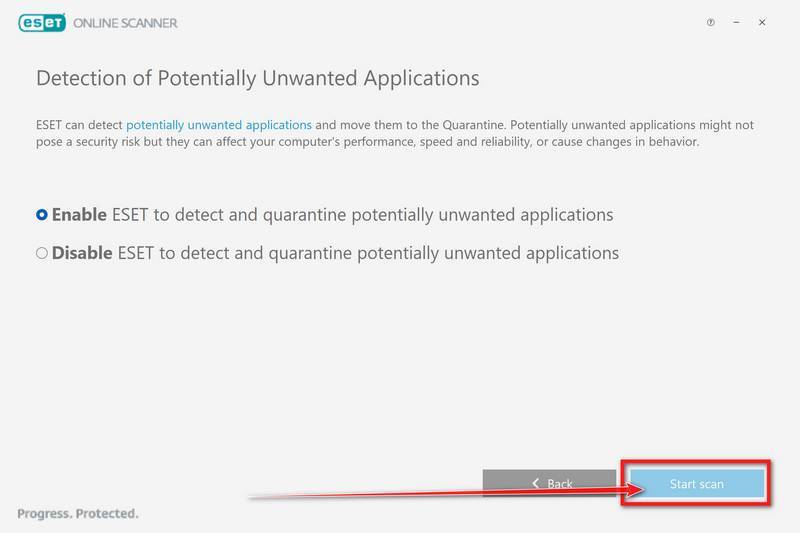
Select Enable for Detection of Potentially Unwanted Applications — this lets ESET catch adware and bundled junk programs, not just viruses. Then click Start scan.
-
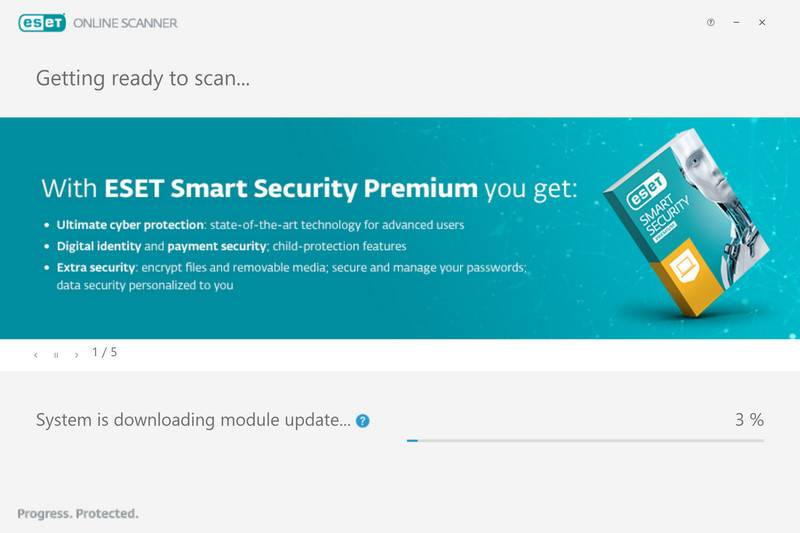
Wait for the Scan to Finish
ESET will now check every file on your computer. Because it’s a full scan, this can take a while — often an hour or more, depending on how much data you have. Leave it running in the background and check on it from time to time.
-
Review the Results
When the scan finishes, open View detailed results and check the action recorded for each detection. ESET attempts to clean detected threats, but unresolved items still need attention. Save the report if anything could not be cleaned.
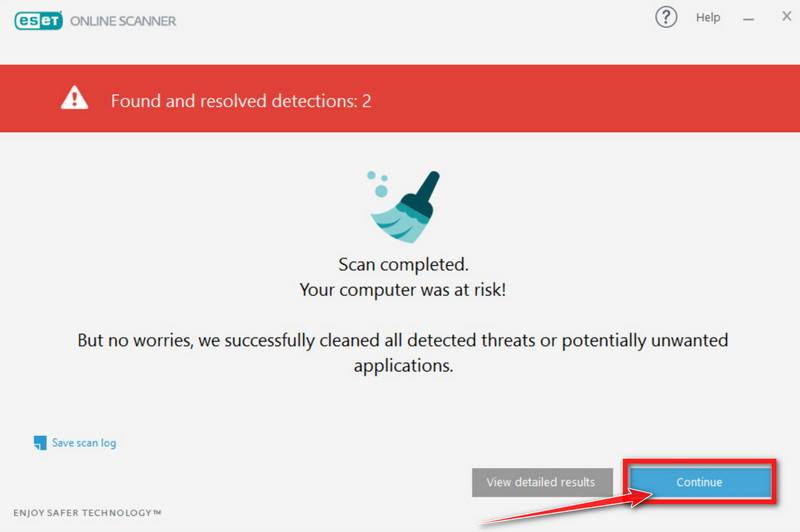
If ESET found nothing, restart and check whether the original problem is gone. If warnings, redirects, or other symptoms continue, keep the scan reports and ask for help in the MalwareTips removal forum.
Your computer should now be free of Pop-up Viruses and other malware.
If you are still having problems with your computer after completing these instructions, then please follow one of the steps:
- Run a computer scan with Emsisoft Emergency Kit
- Ask for help in our Malware Removal Assistance for Windows forum.
Remove Pop-up Viruses from Mac
- STEP 1: Remove malicious profiles
- STEP 2: Delete malicious apps
- STEP 3: Reset browsers back to default settings
- STEP 4: Run a scan with Malwarebytes for Mac to remove malware
STEP 1: Remove malicious profiles
Profiles are used by IT admins in businesses to control the behavior of their Macs. These profiles can configure a Mac to do many different things, some of which are not otherwise possible.
When it comes to home users, adware and browser hijackers are using the configuration profile to prevent users from removing malicious programs from the computer. This also prevents the user from changing that behavior in the browser’s settings.
In this first step, we will check your computer to see if any configuration profiles are installed. To do this, follow the below steps:
-
Open “System Settings”
From the Apple menu () in the top-left corner of the screen, select System Settings. (On macOS Monterey and earlier, this is called System Preferences.)
-
Look for “Profiles”
On current macOS, open System Settings → General → Device Management. You can also search Settings for “profiles.”
If Device Management contains no profiles, continue to the next step. The absence of a profile rules out this particular cause of a locked browser setting; it does not rule out other malware. -
Remove the malicious profiles
Malware uses configuration profiles to lock your browser settings — forcing a fake search engine or homepage on you and preventing you from changing it back. If you see a profile you don’t recognize (and your Mac isn’t managed by your workplace or school), select it, press the − (minus) button, and click Remove to confirm.
STEP 2: Delete malicious apps
In this second step, we will try to identify and remove any malicious apps and files that might be installed on your computer. Sometimes redirects or adware programs can have usable Uninstall entries that can be used to remove these programs.
-
Quit the malicious programs
Check the Apple menu bar in the top-right corner of your screen. If you see an icon you don’t recognize, click it and select Quit. This stops the malware from running so it can’t interfere while we remove it.
-
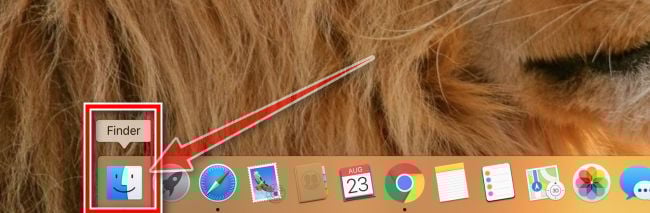
Open “Finder”
Click the Finder icon in your dock.
-
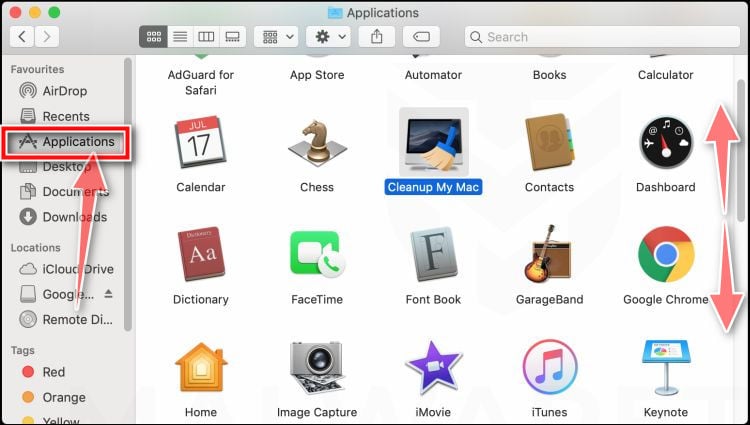
Click on “Applications”
In the Finder sidebar, click “Applications“.
-
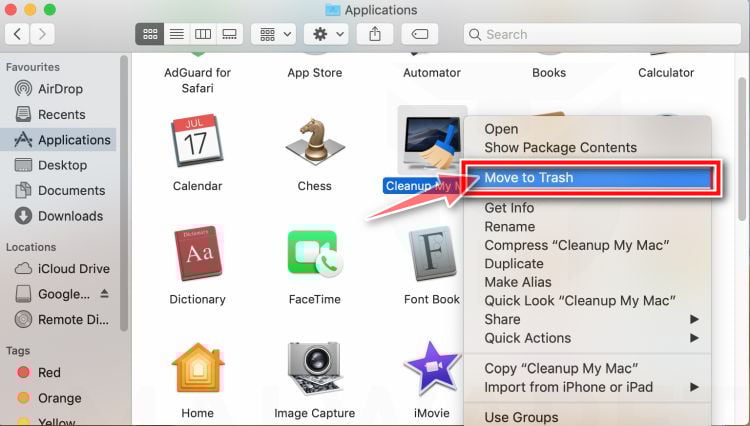
Find and remove the malicious app
Scroll through the list of installed apps and look for anything suspicious — an app you don’t remember installing, or one with a strange or generic name. When you find it, right-click it and select “Move to Trash“.
Some known malicious programs to look for: SearchMine, TakeFresh, TopResults, FeedBack, ApplicationEvents, GeneralOpen, PowerLog, MessengerNow, ImagePrime, GeneralNetSearch, Reading Cursors, GlobalTechSearch, PDFOnline-express, See Scenic Elf, MatchKnowledge, Easy Speedtest, and WebDiscover. The names change constantly, though — so treat any app you can’t account for as suspect.
-
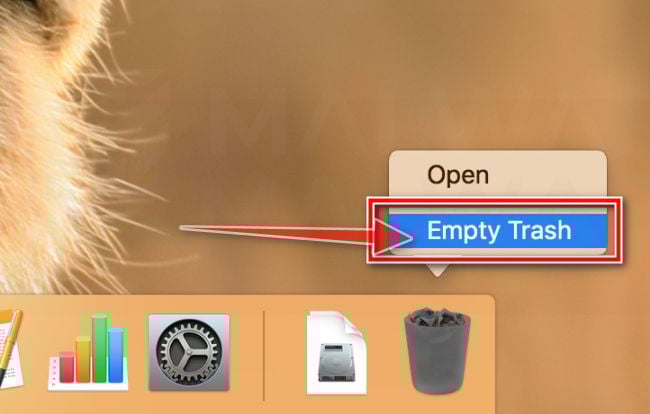
Empty the Trash
Right-click the Trash icon in your dock and select “Empty Trash“. This permanently deletes the malicious app you just removed — until you do this, the malware is still on your Mac.
Find and remove the malicious files
Malware on Mac uses launch agents and launch daemons — small files that automatically restart the malware every time you boot your Mac. We’ll check the four folders where they hide:
- Click the desktop to make sure you’re in Finder, then open the “Go” menu and click “Go to Folder“.
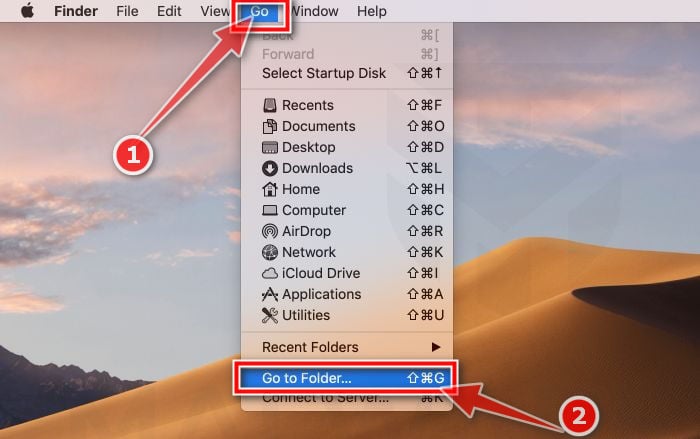
- Copy and paste each of the paths below into the window, one at a time, and click Go after each:
- /Library/LaunchAgents
- ~/Library/LaunchAgents
- /Library/Application Support
- /Library/LaunchDaemons
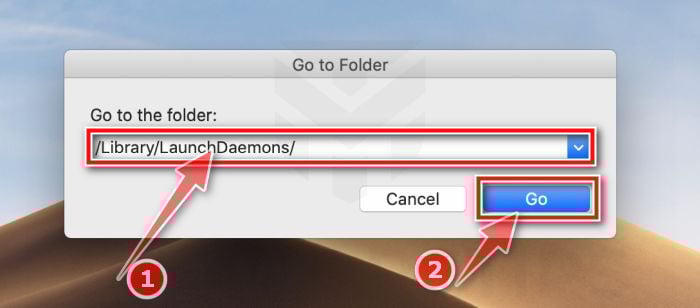
- In these folders, check only files linked to the detected malware. Examples seen in infections include installmac.AppRemoval.plist, myppes.download.plist, and mykotlerino.ltvbit.plist. Names alone are not proof. com.adobe.fpsaud.plist can belong to the old Adobe Flash updater; do not treat it as malware solely because it appears here.
Be careful: these folders also contain files belonging to legitimate apps — especially /Library/Application Support, where programs like Adobe, Google, and Microsoft store their data. Only delete files you’re confident are malicious. If you’re unsure about a file, search its exact name online first — or skip it; continue with the Malwarebytes scan and ask for help if the symptoms remain.
- Click the desktop to make sure you’re in Finder, then open the “Go” menu and click “Go to Folder“.
STEP 3: Reset browsers back to default settings
In this third step, we will remove spam push notifications and malicious extensions, and change to default any settings that might have been changed by malware.
For each browser that you have installed on your computer, please click on the tab below and follow the displayed steps to reset that browser.
Remove malicious extensions and settings from Safari
To remove malware from Safari we will check if there are any malicious extensions installed on your browser and what settings have been changed by this malicious program.
-
Go to Safari’s “Settings”.
On the menu bar, click the “Safari” menu and select “Settings”.
Choose Safari → Settings from the menu bar.
-
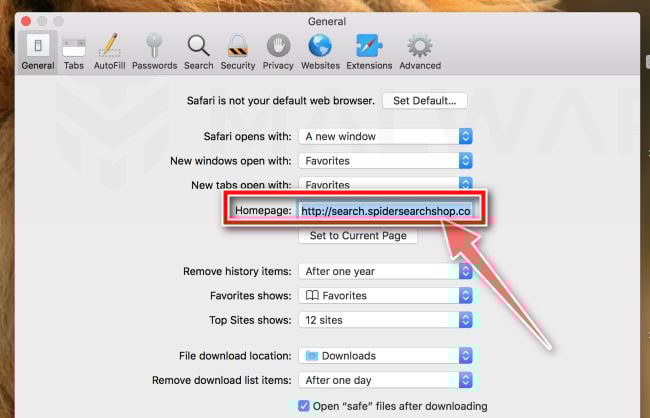
Check Homepage.
This will open a new window with your Safari preferences, opened to the “General” tab. Some browser hijackers may change your default homepage, so in the Homepage field make sure it’s a web page you want to use as your start-up page.
-
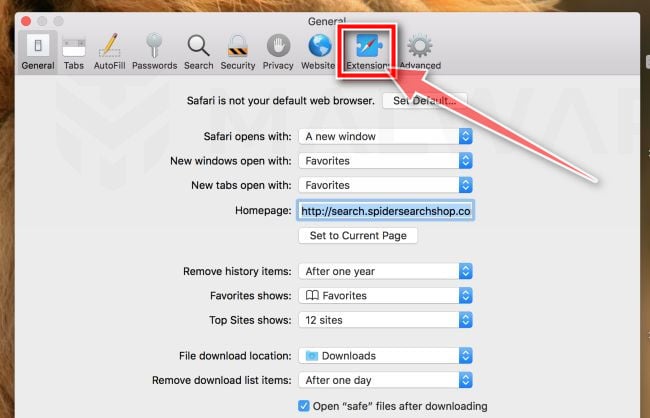
Click “Extensions”
Next, click on the “Extensions” tab.
-
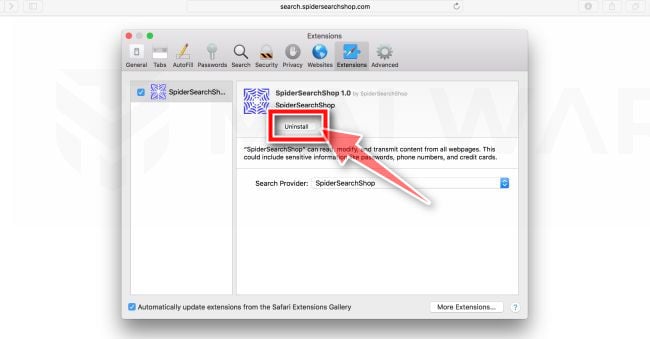
Find and uninstall malicious extensions.
The Extensions screen lists installed extensions. Select the unwanted extension and click Uninstall. Keep extensions you deliberately installed and trust. An unfamiliar name alone is not proof that an extension is malicious.
-
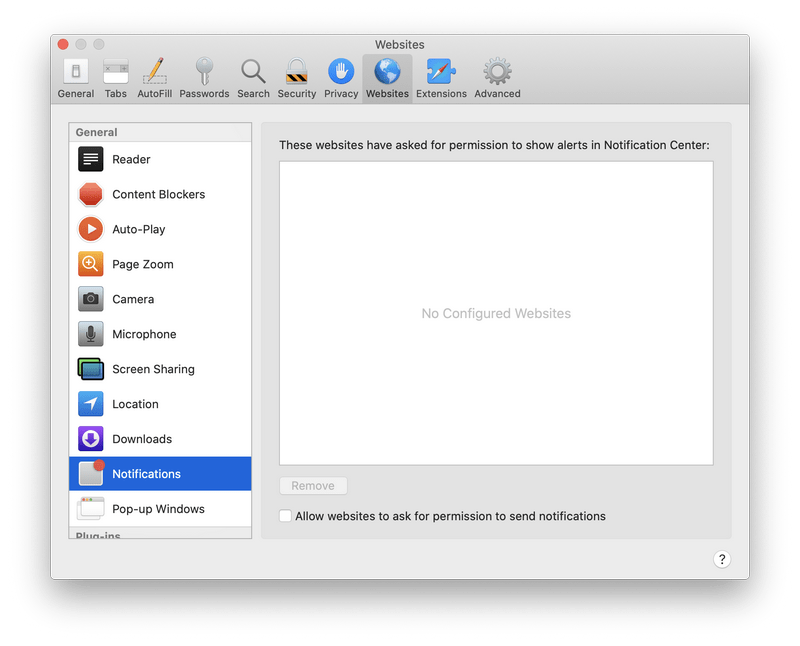
Remove spam notifications ads
Open Settings → Websites → Notifications. Set the unwanted website to Deny or remove its permission. Turning off Allow websites to ask for permission to send notifications prevents new requests; it does not revoke every existing permission.
-
Remove all data stored by websites on your computer.
In the Safari menu, choose “Settings…”, select “Privacy” at the top of the new window that appears, and then click the “Manage Website Data” button.
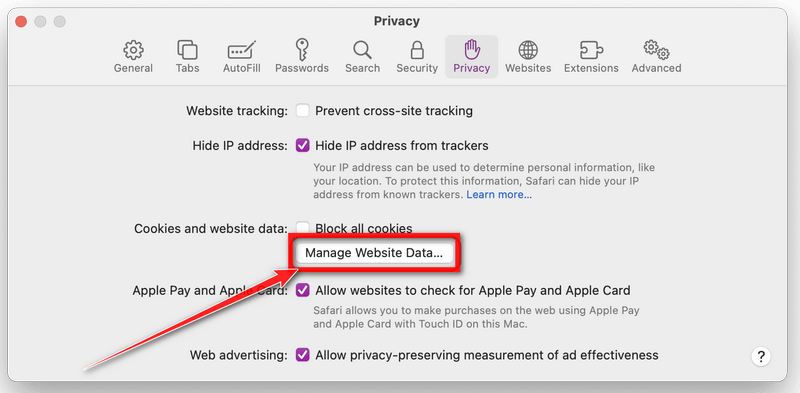
In the next dialog box, click “Remove All“. It will ask you if you are sure you want to remove all data stored by websites on your computer. Select “Remove Now” to clear data that could be used to track your browsing.
This signs you out of websites and removes local website data. If only one site is causing trouble, select that site and click Remove instead. Your saved passwords and bookmarks are separate.
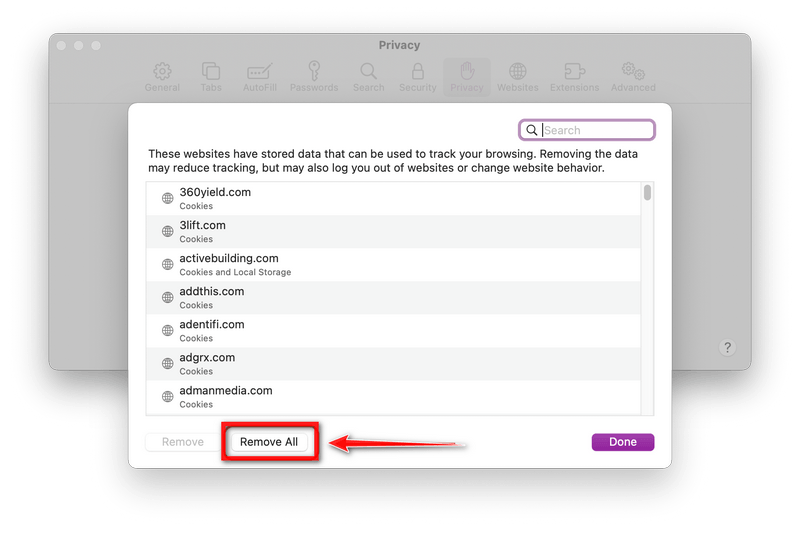
-
Empty Safari Caches.
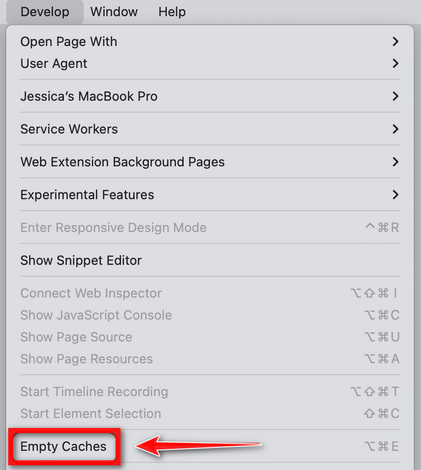
From your Safari menu bar, click Safari and select Settings, then select the Advanced tab. Enable the checkbox to “Show features for web developers (called Show Develop menu in menu bar in older versions)“.
From the menu bar select Develop, then click on Empty Caches as seen in the image below.
Remove malware from Chrome for Mac
To remove malware from Chrome for Mac, reset the browser settings to their defaults. This resets the startup page, search engine, and pinned tabs, disables extensions, and clears temporary website data such as cookies. It does not delete browsing history, saved passwords, or bookmarks. Restart Chrome afterward and test it before re-enabling extensions.
-
Click on the three dots at the top right and go to Settings.
Click on Chrome’s main menu button, represented by three dots at the top right corner. Now click on the menu option labeled Settings as shown by the arrow in the picture below, which will open the basic settings screen.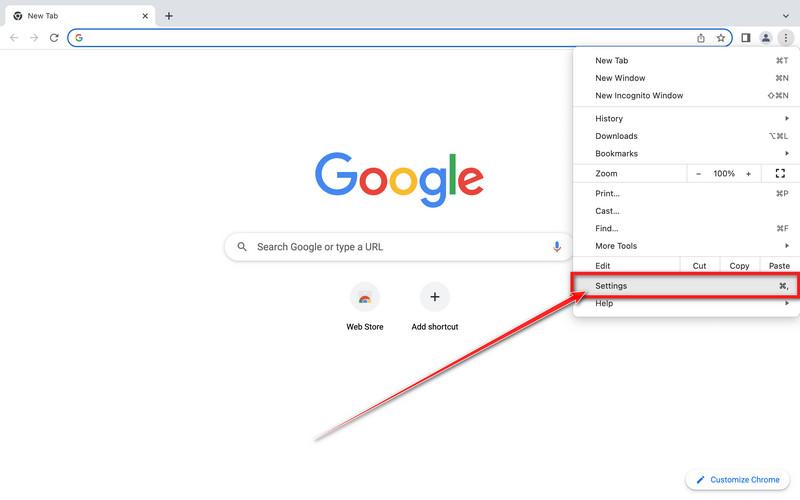
-
In the left sidebar, click on the “Reset settings” option.
In the left sidebar, click on “Reset settings“. -
Click “Reset settings to their original defaults”.
Now click on the “Reset settings to their original defaults”. link as shown in the image below.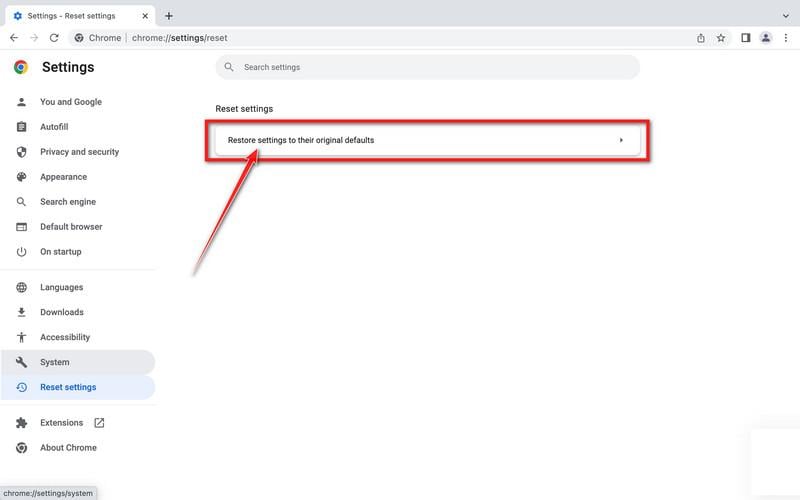
-
Click “Reset Settings” button.
A confirmation dialog should now be displayed, detailing the components that will be restored to their default state should you continue with the reset process. To complete the restoration process, click on the “Reset Settings” button.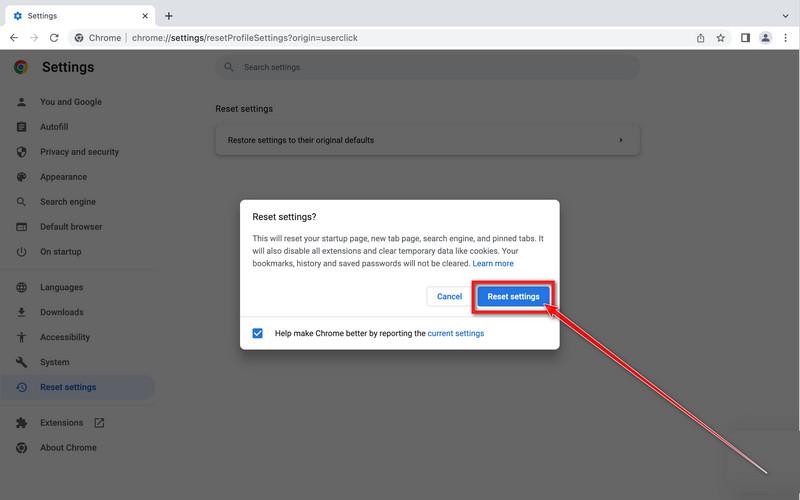
-
(Optional) Reset Chrome Data Sync.
If an unwanted extension comes back, open Chrome Settings → You and Google → Sync and Google services → Manage what you sync. Choose Customize sync, turn off Extensions and Settings, then remove the unwanted extension again. Do not clear all account data as a routine browser reset.
Remove malware from Firefox for Mac
To remove malware from Firefox for Mac we will reset the browser settings to its default. The reset feature fixes many issues by restoring Firefox to its factory default state while saving your essential information like bookmarks, passwords, web form auto-fill information, browsing history, and open tabs.
-
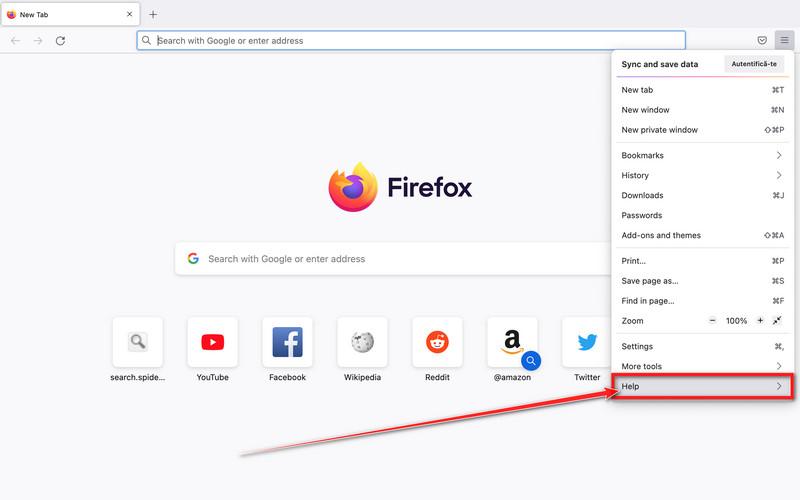
Go to the “Help” menu.
Click on Firefox’s main menu button, represented by three horizontal lines. When the drop-down menu appears, select the option labeled “Help“.
-
Click “More troubleshooting information”.
Next click on the “More troubleshooting information” option. This opens the Troubleshooting Information page, where you can check Firefox details and find the Refresh Firefox control.
You can also open about:support directly. Update Firefox if the Refresh button is missing in a profile created with the newer profile manager.
-
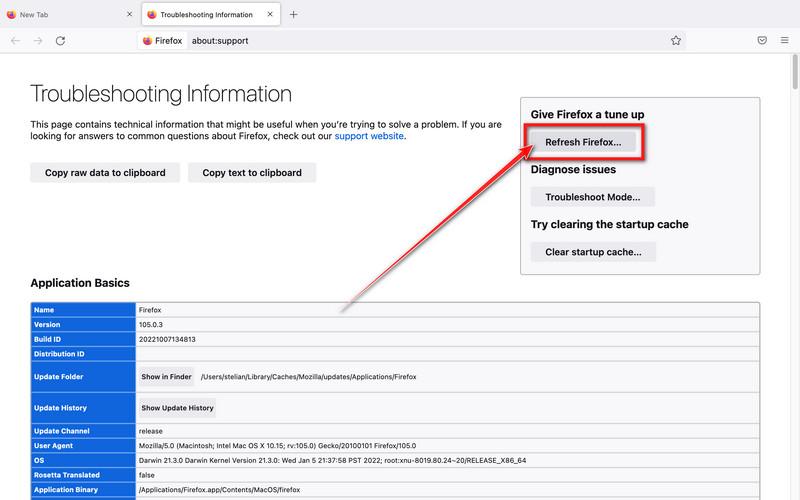
Click on “Refresh Firefox”
Click the “Refresh Firefox” button in the upper-right corner of the “More troubleshooting information” page.
-
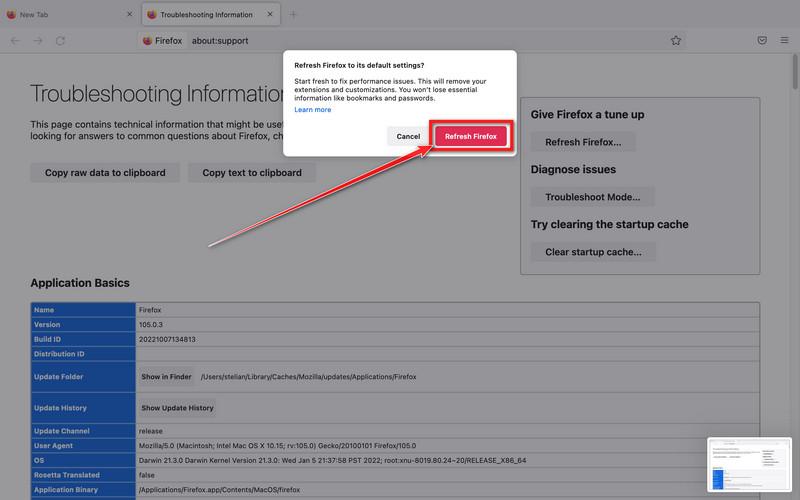
Confirm.
To continue, click on the “Refresh Firefox” button in the new confirmation window that opens.
-
Click on “Finish”.
Firefox will close itself and will revert to its default settings. When it’s done, a window will list the information that was imported. Click on the “Finish“.
STEP 4: Run a scan with Malwarebytes for Mac to remove malware
In this final step, we will scan the computer with Malwarebytes for Mac to find and remove any malicious programs that might be installed on your Mac.
Malwarebytes for Mac is a free on-demand scanner that removes the malware other security software tends to miss — adware, browser hijackers, and unwanted programs included. Cleaning an infected Mac with Malwarebytes has always been completely free, and it’s our go-to recommendation. Follow the steps below to scan and clean your Mac in just a few minutes.
-
Download Malwarebytes for Mac
Click the button below to download the latest version of Malwarebytes for Mac.
Download MalwarebytesOfficial installer for macOS. Your download starts right away.Want real-time protection? See Malwarebytes PremiumMalwarebytes Free for MacScans and removes malware at no cost -
Open the Malwarebytes setup file
When the download finishes, open your Downloads folder and double-click the setup file to begin the installation.

-
Follow the On-Screen Prompts to Install Malwarebytes
The Malwarebytes for Mac Installer will guide you through a few quick screens. Click “Continue” and keep following the prompts until the installation completes.
When prompted, enable System Settings → Privacy & Security → Full Disk Access → Malwarebytes, then authenticate with your Mac password or Touch ID. Return to Malwarebytes afterward. Older macOS versions use System Preferences instead.



When the installation is complete, Malwarebytes opens to the Welcome to Malwarebytes screen. Click “Get started“.
-
Select “Personal Computer” or “Work Computer”
Malwarebytes will ask what type of computer you’re installing it on. Click either Personal Computer or Work Computer, whichever applies.

-
Start the Scan
Click the “Scan” button. Malwarebytes will automatically update its detection database and begin checking your Mac for malware.

-
Wait for the Scan to Finish
Malwarebytes will scan your Mac for adware, browser hijackers, and other malicious programs. This can take a few minutes, so feel free to do something else — just check back occasionally to see the progress.

-
Quarantine the Detected Threats
When the scan is done, you’ll see a list of everything Malwarebytes found. Click the “Quarantine” button to remove all the threats at once.

-
Restart Your Mac
Malwarebytes will now remove all the malicious files it found. Some threats can only be fully removed after a reboot — if Malwarebytes asks you to restart, allow it. Once you’re logged back in, review the result and check whether the symptoms have stopped. If they return, save the report and ask for help.

Your Mac should now be free of Pop-up Viruses and other malware.
If you are still experiencing problems while trying to remove a malicious program from your computer, please ask for help in our Mac Malware Removal Help & Support forum.
Remove Pop-up Viruses from Android
- STEP 1: Uninstall malicious apps
- STEP 2: Reset browsers back to default settings
- STEP 3: Use Malwarebytes for Android to remove malicious apps
STEP 1: Uninstall malicious apps
In this first step, we will check if any malicious apps are installed on your phone. Sometimes browser hijackers or adware apps can have usable Uninstall entries that can be used to remove these apps.
-
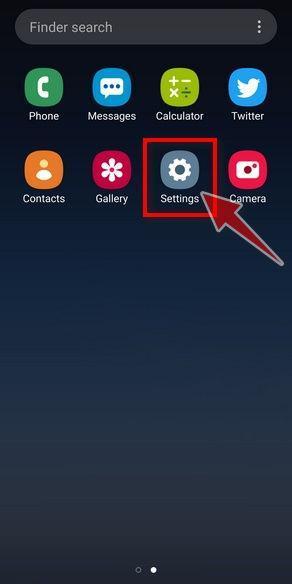
Open the “Settings” menu.
Tap on the “Settings” app from your phone menu or home screen.
-
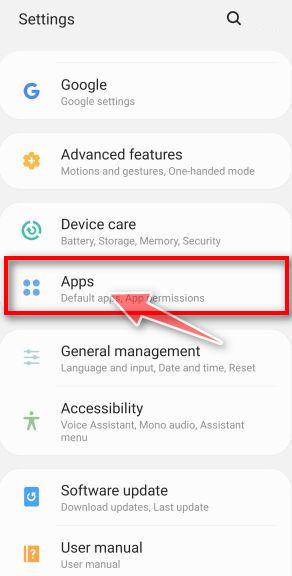
Tap on “Apps”.
When the “Settings” menu opens, tap on “Apps” (or “App Manager”) to see all the installed applications on your phone.
-
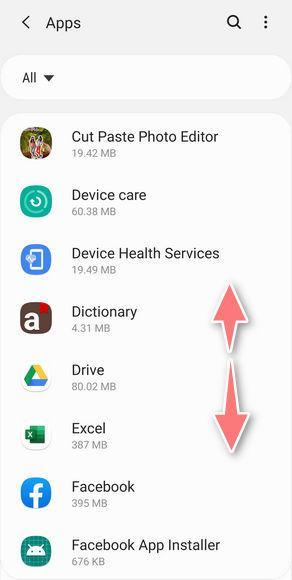
Find the malicious app.
The “Apps” screen will be displayed with a list of all the applications that are installed on your phone. Scroll through the list and look out for any suspicious app that could be behind all the drama – anything you don’t remember downloading or that doesn’t sound like a genuine program.
Most often, cyber criminals hide malware inside video or photo editing apps, weather apps, and camera apps.Check the developer, installation source, and any scanner detection before removing an app. A generic name or unfamiliar icon is not enough. If Android will not let you uninstall a confirmed unwanted app, check Device admin apps in Settings or restart in Safe Mode; do not remove a work or school management app without its administrator.
-
Uninstall the malicious app
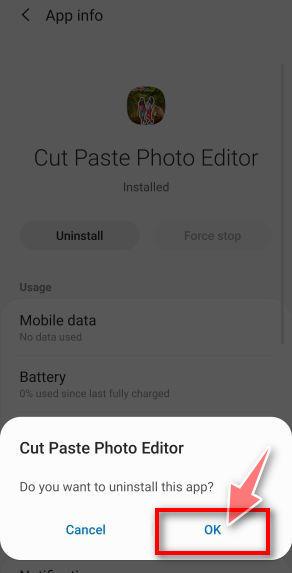
When you find a suspicious or malicious app, tap on it to uninstall it. This won’t start the app but will open up the app details screen. If the app is currently running press the “Force stop” button, then tap on “Uninstall”.
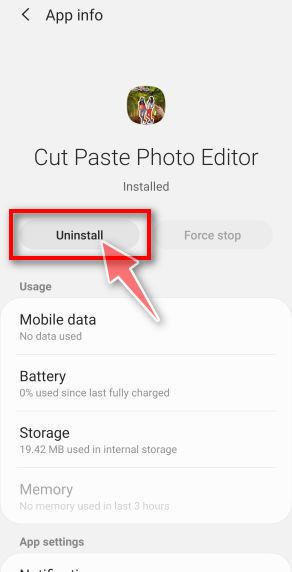
A confirmation dialog should be displayed to confirm you want to uninstall the app, tap on “OK” to remove the malicious app from your phone.
STEP 2: Reset browsers back to default settings
In this second step, we will reset your browser to its default settings to remove spam notifications, unwated search redirects, and restore its factory settings
Before clearing app storage: save important tabs and check that any bookmarks or passwords you need are backed up. This resets local browser data and signs you out of sites; it does not delete your Google or Mozilla account. For notification spam alone, first revoke that site’s notification permission.
Resetting the browser settings to their default it’s an easy task on Windows or Mac computers; however, when it comes to Android, this can’t be done directly because it’s not an option built-in into the browser settings. Restoring the browser settings on Android can be done by clearing the application data. This will remove all the cookies, cache, and other site settings that may have been saved. So let’s see how we can restore your browser to its factory settings.
Remove malware from Chrome for Android
To reset Chrome for Android to its default settings, follow the below steps:
-
Open the “Settings” menu.
Tap on the “Settings” app from your phone menu or home screen.
-
Tap on “Apps”.
When the “Settings” menu opens, tap on “Apps” (or “App Manager”) to see all the installed applications on your phone.
-
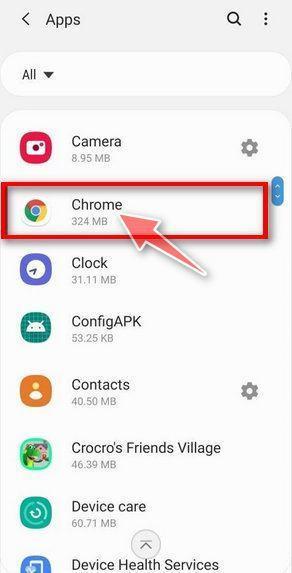
Find and tap on Chrome.
The “Apps” screen will be displayed with a list of all the apps installed on your phone. Scroll through the list until you find the Chrome app, then tap on it to open the app’s details.
-
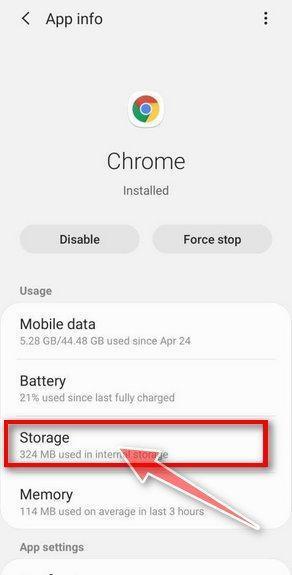
Tap “Storage”.
When Chrome’s app info menu is displayed, tap on “Storage“.
-
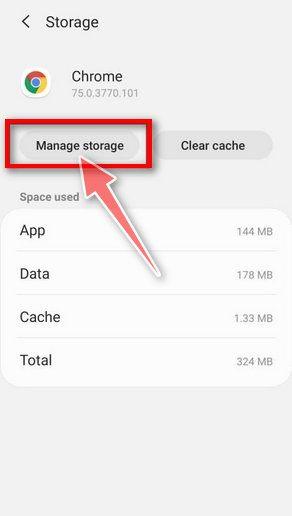
Tap “Manage Space” or “Clear storage”.
Tap Clear storage (Clear data on Samsung). If Chrome instead shows Manage space, tap it to reach Clear all data. Do not choose Clear cache when you need to reset the app’s local data.
-
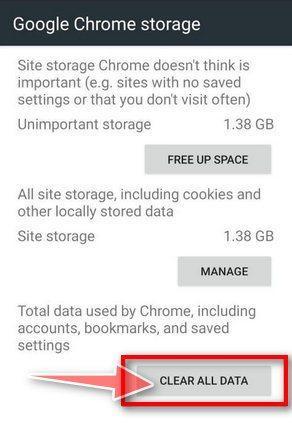
Tap “Clear all data”.
Tap “Clear all data” to delete all Chrome’s data including local sign-ins, unsynced bookmarks, and settings to reset the default settings.
-
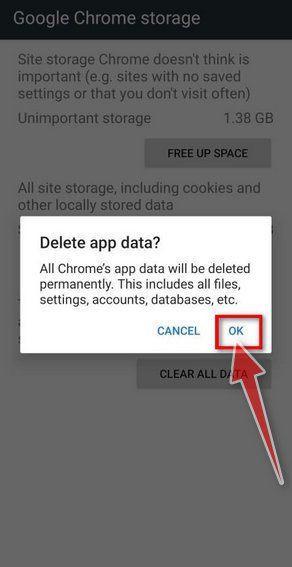
Confirm by tapping “Ok”.
A confirmation dialog should now be displayed, detailing the components that will be restored to their default state should you continue with the reset process. To complete the restoration process, tap “Ok“.
Remove malware from Firefox for Android
To reset Firefox for Android to its default settings, follow the below steps:
-
Open the “Settings” menu.
Tap on the “Settings” app from your phone menu or home screen.
-
Tap on “Apps”.
When the “Settings” menu opens, tap on “Apps” (or “App Manager”) to see all the installed applications on your phone.
-
Find and tap on Firefox.
The “Apps” screen will be displayed with a list of all the apps installed on your phone. Scroll through the list until you find the Firefox app, then tap on it to open the app’s details.
-
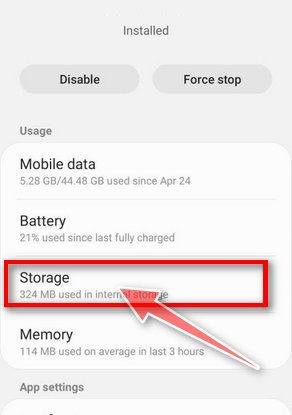
Tap “Storage”.
When Firefox’s app info menu is displayed, tap on “Storage“.
-
Tap “Manage Space” or “Clear storage”.
Tap Clear storage (Clear data on Samsung). If Chrome instead shows Manage space, tap it to reach Clear all data. Do not choose Clear cache when you need to reset the app’s local data.
-
Tap “Clear all data”.
Tap “Clear all data” to delete all Firefox data including local sign-ins, unsynced bookmarks, and settings to reset the default settings.
-
Confirm by tapping “Ok”.
A confirmation dialog should now be displayed, detailing the components that will be restored to their default state should you continue with the reset process. To complete the restoration process, tap “Ok“.
Remove malware from the Opera browser
To reset the Opera browser to its default settings, follow the below steps:
-
Open the “Settings” menu.
Tap on the “Settings” app from your phone menu or home screen.
-
Tap on “Apps”.
When the “Settings” menu opens, tap on “Apps” (or “App Manager”) to see all the installed applications on your phone.
-
Find and tap on Opera.
The “Apps” screen will be displayed with a list of all the apps installed on your phone. Scroll through the list until you find the Opera app, then tap on it to open the app’s details.
-
Tap “Storage”.
When Opera’s app info menu is displayed, tap on “Storage“.
-
Tap “Manage Space” or “Clear storage”.
Tap Clear storage (Clear data on Samsung). If Chrome instead shows Manage space, tap it to reach Clear all data. Do not choose Clear cache when you need to reset the app’s local data.
-
Tap “Clear all data”.
Tap “Clear all data” to delete all Opera’s data including local sign-ins, unsynced bookmarks, and settings to reset the default settings.
-
Confirm by tapping “Ok”.
A confirmation dialog should now be displayed, detailing the components that will be restored to their default state should you continue with the reset process. To complete the restoration process, tap “Ok“.
Remove malware from Samsung Internet Browser
To reset the Samsung Internet Browser to its default settings, follow the below steps:
-
Open the “Settings” menu.
Tap on the “Settings” app from your phone menu or home screen.
-
Tap on “Apps”.
When the “Settings” menu opens, tap on “Apps” (or “App Manager”) to see all the installed applications on your phone.
-
Find and tap on Samsung Internet Browser.
The “Apps” screen will be displayed with a list of all the apps installed on your phone. Scroll through the list until you find the Samsung Internet Browser app, then tap on it to open the app’s details.
-
Tap “Storage”.
When the Samsung Internet Browser’s app info menu is displayed, tap on “Storage“.
-
Tap “Manage Space” or “Clear storage”.
Tap Clear storage (Clear data on Samsung). If Chrome instead shows Manage space, tap it to reach Clear all data. Do not choose Clear cache when you need to reset the app’s local data.
-
Tap “Clear all data”.
Tap “Clear all data” to delete all Samsung Internet Browser’s data including local sign-ins, unsynced bookmarks, and settings to reset the default settings.
-
Confirm by tapping “Ok”.
A confirmation dialog should now be displayed, detailing the components that will be restored to their default state should you continue with the reset process. To complete the restoration process, tap “Ok“.
Remove malware from Microsoft Edge for Android
To reset the Microsoft Edge for Android to its default settings, follow the below steps:
-
Open the “Settings” menu.
Tap on the “Settings” app from your phone menu or home screen.
-
Tap on “Apps”.
When the “Settings” menu opens, tap on “Apps” (or “App Manager”) to see all the installed applications on your phone.
-
Find and tap on Microsoft Edge.
The “Apps” screen will be displayed with a list of all the apps installed on your phone. Scroll through the list until you find the Microsoft Edge app, then tap on it to open the app’s details.
-
Tap “Storage”.
When the Microsoft Edge’s app info menu is displayed, tap on “Storage“.
-
Tap “Manage Space” or “Clear storage”.
Tap Clear storage (Clear data on Samsung). If Chrome instead shows Manage space, tap it to reach Clear all data. Do not choose Clear cache when you need to reset the app’s local data.
-
Tap “Clear all data”.
Tap “Clear all data” to delete all Microsoft Edge’s data including local sign-ins, unsynced bookmarks, and settings to reset the default settings.
-
Confirm by tapping “Ok”.
A confirmation dialog should now be displayed, detailing the components that will be restored to their default state should you continue with the reset process. To complete the restoration process, tap “Ok“.
STEP 3: Use Malwarebytes for Android to remove malicious apps
In this final step, we will install Malwarebytes for Android to scan and remove malicious apps from your phone or tablet.
Malwarebytes for Android can check installed apps and accessible files for threats. The free version supports manual scanning. Review the results and confirm Android’s uninstall prompts for detected malicious apps; automatic and real-time protection features depend on the plan.
-
Download Malwarebytes for Android.
You can download Malwarebytes for Android by clicking the link below.
Get Malwarebytes for AndroidOpens Google Play in a new tab.Want real-time protection? See Malwarebytes Premium for AndroidMalwarebytes for AndroidManual malware scan; optional paid protection features -
Install Malwarebytes for Android on your phone.
In the Google Play Store, tap “Install” to install Malwarebytes for Android on your device.

When the installation process has finished, tap “Open” to begin using Malwarebytes for Android. You can also open Malwarebytes by tapping on its icon in your phone menu or home screen.

-
Follow the on-screen prompts to complete the setup process
When Malwarebytes will open, you will see the Malwarebytes Setup Wizard which will guide you through a series of permissions and other setup options.
Tap Get Started, or I have a Subscription if you already pay for the app. Review any plan or trial offer before accepting it.
Follow the setup prompts to reach the dashboard. The free version supports manual scans; real-time protection and scheduled scans depend on the plan. Choose only the optional features you want.
Malwarebytes for Android will now ask for a set of permissions that are required to scan your device and protect it from malware. Tap on “Give permission” to continue.
Tap on “Allow” to permit Malwarebytes to access the files on your phone. -
Run a scan with Malwarebytes for Android
On the current dashboard, find the Device section and tap Scan now.
Allow storage access when prompted so Malwarebytes can check files as well as apps. Let the scan finish and open its results. Keep the app updated through Google Play.
-
Wait for the Malwarebytes scan to complete.
Malwarebytes will now start scanning your phone for adware and other malicious apps. This process can take a few minutes, so we suggest you do something else and periodically check on the status of the scan to see when it is finished.

-
Review the results and uninstall detected malicious apps.
On the current results screen, tap the menu next to a detected app and choose Uninstall app, then confirm Android’s uninstall prompt. Do not choose Always allow for an app you have not verified.
-
Restart your phone.
Confirm that the selected apps were uninstalled. Restart if requested, then check whether the original problem has stopped. Keep the detection details and ask for help if an app cannot be removed or comes back.
Your phone or tablet should now be free of Pop-up Viruses and other malware.
If you are still having problems with your phone after completing these instructions, then please follow one of the steps:
- Restore your phone to factory settings by going to Settings > General management > Reset > Factory data reset.
- Ask for help in our Mobile Malware Removal Help & Support forum.
How to Prevent Unwanted Browser Pop-Ups and Ads in the Future
To avoid future infections, be cautious where you click and download from. Avoid free software bundles, ads, or pop-ups offering to scan your device or fix problems. Here are some other tips to prevent unwanted browser ads and pop-ups:
- Install browser pop-up blockers like AdGuard.
- Only download software from official company sites, never from ads.
- Hover over questionable links to inspect their domains before clicking.
- Clear cookies and site data regularly.
- Use antivirus, anti-malware, and anti-spyware software.
- Make sure your operating system and security software is up-to-date.
- Reset your browser if lots of ads or pop-ups suddenly appear.
Being vigilant about scans and malware removal will also prevent future infections. Schedule regular antivirus scans. If your browser is constantly redirected or if scans find repeat infections, do a full reset or reinstall.
With attention and the right tools, you can browse safely without bombardment from unwanted browser ads and pop-ups.
The Bottom Line
Unwanted browser ads, pop-ups, redirects, and notifications should raise red flags. They disrupt your browsing experience while attempting to get clicks, downloads, and access to personal data and systems. But you can spot and remove the adware causing pop-ups using the steps here.
Reset browsers to factory settings, delete unknown programs, run antivirus scans, and be wary of scammy ads. Prevention is also key – avoid clicking questionable links and downloads. With vigilance and some best practices, you can keep your devices free of intrusive, malicious ads.
Careful browsing means you can focus on the content you want, without unexpected interruptions from unwanted browser ads and pop-ups.
