

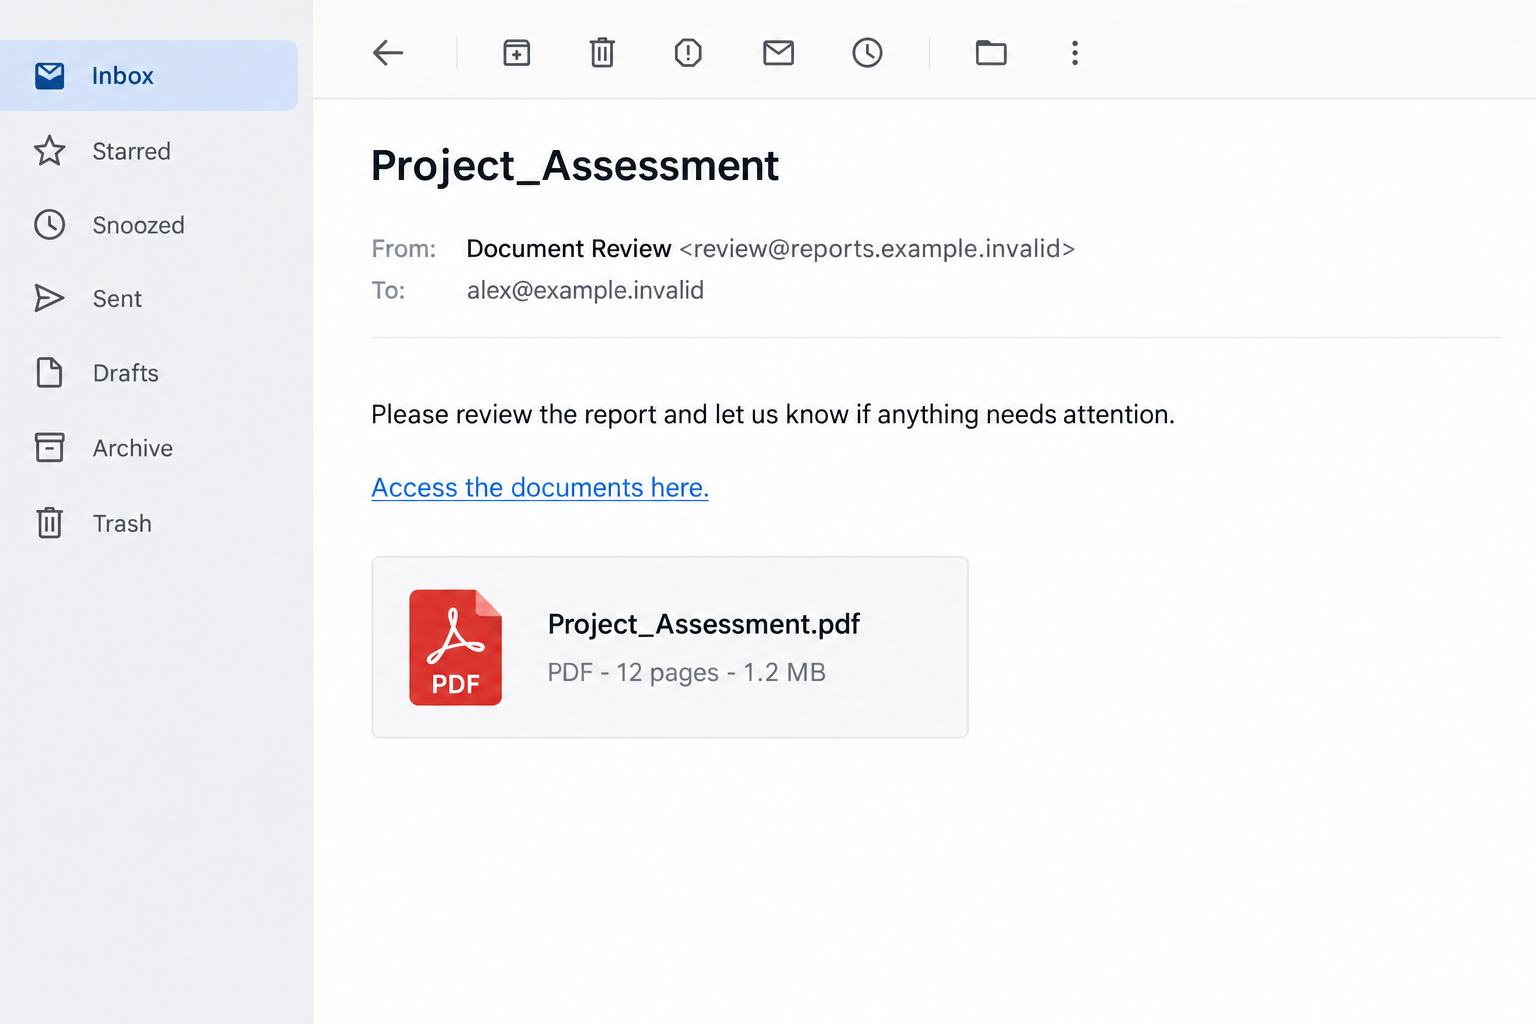
A short email asks you to review an assessment. Beneath the message is a tidy PDF tile, complete with a page count and file size.
It looks like a small task you could clear before your next meeting. First, check whether that apparent document is really what the message says it is.
Overview
The email looks like unfinished business
The Report Review email scam uses a vague request about an assessment to draw readers toward a document link. It does not explain the underlying project.
The reported message presents a PDF preview with 12 pages and a 1.2 MB size, but there is no actual attached file.
Those details make the invitation look specific. They describe a supposed object without establishing that the object exists or belongs to your work.
The lead image is an illustrative email with fictional sender information. It shows the attachment-style presentation, not a document received by a real employee.
The document link leads to a credential request
The reported destination, warm-satchel-873.harvis[.]page, was associated with an imitation email sign-in. It sought the mailbox password rather than presenting the promised report.
A fresh original capture reached only a waiting screen. It did not establish that the earlier credential form remains available, so no current login screenshot is claimed.
This is a phishing campaign, not a legitimate Google document request. Google branding in a copied form would not connect its operator to Google.
A document review and an email login are different decisions
Real files can be shared through secure portals. The warning is not that every document link is fake, but that this invitation lacks a verified sender and destination.
Before opening a report, you should be able to identify the project, the person sharing it, and the service handling access.
- The message offers little context about what the assessment covers.
- A PDF-looking tile inside an email can be ordinary message formatting.
- A file size printed by the sender does not prove a file was attached.
- Giving an unfamiliar page your mailbox secret can expose more than the proposed document.
The Attachment Tile Is the Most Important Visual Detail
Many readers have learned to be careful with executable attachments. A PDF tile feels more familiar and less disruptive.
This lure takes advantage of that expectation without needing a real PDF. A sender can place an icon, a filename, and a size inside the email body.
Your eyes recognize the pattern as a document. The mail application’s attachment handling may tell a different story.
Look for an actual attachment entry generated by your email client, not just a rectangle within the message. Its location and behavior depend on the application.
Do not open something simply to test that distinction. A genuine attachment can still be harmful, and a fake tile can still send you somewhere dangerous.
The useful question is whether the email accurately describes what you are being asked to access.
A genuine shared-document notification may use a button instead of an attachment. That is why the format alone cannot settle the matter.
The sender, project context, destination, and requested permission must agree. If they do not, ask the known sender through another route.
For example, an expected audit report should connect to the auditor you actually hired. An assessment with no known author deserves a pause.
You do not owe an unknown sender a quick review. A polite business tone is not a reason to provide account access.
How the Report Review Email Scam Works
Step 1: A vague assessment request creates curiosity and responsibility
The email does not need to explain much if the recipient is already juggling projects. The reader may supply the missing context themselves.
Perhaps a colleague mentioned an assessment last week. Perhaps a supplier is waiting on feedback. The unfamiliar message can borrow credibility from those real tasks.
That mental connection is not sender verification. Check whether you recognize the project and whether the supposed author has communicated through this route before.
A request to move something forward can also discourage scrutiny. You may worry about being the person holding up the process.
It is reasonable to ask for context before accessing a private document. A legitimate colleague can explain what they sent without needing your password.
Step 2: Document details make the link look like a file
A filename, page count, and size create an impression of a finished report. They make the message feel less like an unexplained web invitation.
But those details can be written into the email like any other sentence. They are not independent measurements made by your mail application.
Look at what the proposed action actually does. Does it download a file, open a recognized sharing service, or take you to an unrelated sign-in?
Inspect the link destination without activating it where possible. A filename ending in .pdf does not determine the destination of a separate hyperlink.
If the client cannot expose enough information safely, skip the link. Contact the known person through existing correspondence or another established channel.
Step 3: The browser moves from a promised report to account authentication
The change of task is easy to miss. You clicked to read something, but now the page wants the credentials protecting an entirely different resource.
Ask why the document requires your email account’s secret. A login to a genuine sharing service should occur on that service’s verified authentication route.
A page can display your email address without having legitimate access to the mailbox. The address may be carried in the link or entered earlier.
That personalization can make the form feel connected to your account. It should not override the browser address or your knowledge of the actual service.
If a sign-in is needed, return to the service’s known website independently. Locate the shared item there, or ask the sender to confirm its availability.
Step 4: A password entry puts the mailbox at risk
An attacker who receives the secret can attempt to use it outside the document page. The report is merely the reason you were persuaded to provide it.
A failed submission does not guarantee safety. The page may have collected input before showing an error or loading another screen.
Account protections may stop an attempted login. Even then, an exposed password should be replaced, especially if it was reused elsewhere.
If a subsequent prompt requested a one-time code, include that in your recovery report. It can change the urgency and the kinds of access needing review.
Do not infer that this particular campaign always asks for such codes. Respond to what your own encounter involved, not an assumed script.
Step 5: Compromised email can make later document requests more believable
Successful mailbox access may expose real correspondence. An attacker can learn project names, contact relationships, and the tone people use with one another.
That information can make the next fake request less vague. It may arrive inside a familiar conversation or appear to come from someone you trust.
A real person’s email account being abused is different from that person intentionally sending a scam. Avoid assigning blame before the access history is checked.
For work accounts, the security team may need to review related messages and affected contacts. Do not limit the response to deleting this one invitation.
The goal is to restore control of the account and prevent trusted relationships from being used for another round of deception.
Sender, Document, and Login Checks
Find the actual author before treating the assessment as yours
Look at the complete sender address, the reply address, and the surrounding conversation. A display name can conceal an unrelated account.
Ask a known colleague using details you already have. Avoid replying to the questionable message to request reassurance from its own sender.
A sensible confirmation identifies the report, its purpose, and the sharing method. It does not ask you to trust the same unexplained link again.
If there is no known author to contact, you can leave the document unopened. Curiosity is not a business requirement.
Check the service independently
A hosted page address does not automatically identify the person using the hosting platform. Criminals can abuse legitimate services without owning those services.
Do not accuse an entire provider because one reported page is malicious. Keep the concern attached to the specific destination and credential request.
An unavailable page is also not evidence that its visitors are safe. It may be offline, restricted, changed, or dependent on an invitation.
The waiting screen obtained here does not reproduce the earlier sign-in form. No password was entered and no private report was retrieved.
Treat provider branding as appearance, not permission
Familiar login colors and logos are easy to reproduce. The important question is whether the actual provider controls the authentication destination.
Google’s advice on deceptive email requests recommends checking the service directly when a message leads to a password prompt. That is safer than judging a copied design.
Your password manager can offer a useful clue by not recognizing the address. Do not force a saved secret into a new site without understanding the mismatch.
If the mailbox is employer-managed, let IT assess the authentication route. Do not approve a new application permission merely to get past an unexpected access screen.
What to Do if You Have Fallen Victim to This Scam
Leave the assessment page. Stop attempting to open the report, even if the screen claims a password was incorrect.
Record the destination already visible without following more redirects. If you only received the message, mark it as phishing and leave the proposed task unfinished.
Recover the mailbox if a password was supplied. Use the provider’s normal security settings on a device you trust.
Choose a new, unique secret. If sign-in no longer works, use the official recovery process rather than any contact advertised on the document page.
Review recent account access. Check unfamiliar devices, session activity, recovery contact changes, and connected applications.
Revoke access you did not authorize. Your administrator may need to handle session invalidation for a work account.
Inspect inbox rules and forwarding. An attacker may try to continue receiving correspondence or hide alerts after the password is replaced.
Also examine recent sent messages. Preserve suspicious records for support before removing settings or correspondence needed for an investigation.
Notify the genuine project contact and your security team. Explain that an assessment invitation led to an unverified sign-in.
If the account sent messages to others, warn the relevant recipients separately. Keep the alert practical without circulating an active phishing link unnecessarily.
Change reused credentials and strengthen sign-in protection. Start with accounts that rely on the mailbox for password resets.
Review multifactor methods and recovery options. If any codes or additional permissions were provided, tell support exactly which prompts you accepted.
Check downloaded content where necessary. A credential page and a malicious file are separate exposures. Record whether you downloaded or executed anything.
Malwarebytes can help assess an exposed personal device. AdGuard offers additional browsing protection, but neither replaces the mailbox recovery steps.
Respond promptly to financial consequences. If a related conversation led to payment, contact the bank and independently verify the intended recipient.
Retain the original message, account alerts, and transaction details. Beware of strangers offering guaranteed recovery of funds or private documents.
Is Your Device Infected? Run a Free Malware Scan
Slow performance, constant pop-ups, or strange behavior? These are classic signs of a malware infection. The fastest way to find out is to scan your device with Malwarebytes Free — one of the most trusted malware removal tools available.
The free version detects and removes the most common threats, including:
- Adware — the cause of those annoying pop-ups
- Browser hijackers — unwanted redirects and changed homepages
- Trojans and spyware — hidden programs stealing your data
- Potentially unwanted programs (PUPs) — software you never asked for
👉 Select your device below — Windows, Mac, or Android — then follow the simple steps to download Malwarebytes, scan your system, and remove any threats it finds. The scan usually takes 5 to 20 minutes.
Run a Malware Scan with Malwarebytes for Windows
Malwarebytes is one of the most popular and trusted anti-malware tools for Windows — and it’s completely free for removing infections. It catches threats that many antivirus programs miss, including adware, browser hijackers, and trojans. Follow the steps below to scan and clean your PC in just a few minutes.
Download Malwarebytes
Click the button below to download the latest version of Malwarebytes for Windows from the official source. The free version is all you need — it will scan your computer and remove adware, browser hijackers, and other malicious software at no cost.
Download MalwarebytesOfficial installer for Windows 11 and 10. Your download starts right away.Want real-time protection? See Malwarebytes Premium Malwarebytes Free for WindowsScans and removes malware at no cost
-
Install Malwarebytes
When the download finishes, open your Downloads folder and double-click the MBSetup file. If Windows shows a User Account Control pop-up, click “Yes” to allow the installation.

Follow the On-Screen Prompts to Install Malwarebytes
The setup wizard will walk you through a few quick screens:
-
Choose where you’re installing the program — “Personal Computer” or “Work Computer” — then click Next.

-
Malwarebytes will now install on your device. This usually takes under a minute.

-
When installation is complete, the “Welcome to Malwarebytes” screen will open automatically.

-
On the final screen, click Open Malwarebytes to launch the program.

-
Enable “Scan for Rootkits”
Before scanning, turn on rootkit detection so Malwarebytes can find even the most hidden threats. Click the Settings gear icon on the left side of the screen.

In the settings menu, find “Scan for rootkits” and click the toggle so it turns blue.

Done? Click “Dashboard” in the left pane to return to the main screen.
Start the Scan
Click the blue Scan button. Malwarebytes will automatically update its virus database and start checking your computer for malware.

-
Wait for the Scan to Finish
The scan checks your entire system for browser hijackers and other malicious programs, so it can take 5 to 20 minutes depending on your computer. Feel free to do something else — just check back occasionally to see the progress.

-
Quarantine the Detected Threats
When the scan is done, you’ll see a list of everything Malwarebytes found — malware, adware, and potentially unwanted programs. Click the “Quarantine” button to remove all of them at once.

Malwarebytes will now remove the malicious files and registry entries and move them safely into quarantine.

-
Restart Your Computer
Some threats can only be fully removed after a reboot. If Malwarebytes asks you to restart, click Yes. Once you’re logged back in, Malwarebytes has finished removing the threats it found.

That’s it — your Windows PC is now clean of trojans, adware, and other malware, and should be back to running smoothly.
If you are still having problems with your computer after completing these instructions, then please follow one of the steps:
- Run a computer scan with ESET Online Scanner
- Ask for help in our Windows Malware Removal Help & Support forum.
Run a Malware Scan with Malwarebytes for Mac
Malwarebytes for Mac is a free on-demand scanner that removes the malware other security software tends to miss — adware, browser hijackers, and unwanted programs included. Cleaning an infected Mac with Malwarebytes has always been completely free, and it’s our go-to recommendation. Follow the steps below to scan and clean your Mac in just a few minutes.
-
Download Malwarebytes for Mac
Click the button below to download the latest version of Malwarebytes for Mac.
Download MalwarebytesOfficial installer for macOS. Your download starts right away.Want real-time protection? See Malwarebytes PremiumMalwarebytes Free for MacScans and removes malware at no cost -
Open the Malwarebytes setup file
When the download finishes, open your Downloads folder and double-click the setup file to begin the installation.

-
Follow the On-Screen Prompts to Install Malwarebytes
The Malwarebytes for Mac Installer will guide you through a few quick screens. Click “Continue” and keep following the prompts until the installation completes.



When the installation is complete, Malwarebytes opens to the Welcome to Malwarebytes screen. Click “Get started“.
-
Select “Personal Computer” or “Work Computer”
Malwarebytes will ask what type of computer you’re installing it on. Click either Personal Computer or Work Computer, whichever applies.

-
Start the Scan
Click the “Scan” button. Malwarebytes will automatically update its detection database and begin checking your Mac for malware.

-
Wait for the Scan to Finish
Malwarebytes will scan your Mac for adware, browser hijackers, and other malicious programs. This can take a few minutes, so feel free to do something else — just check back occasionally to see the progress.

-
Quarantine the Detected Threats
When the scan is done, you’ll see a list of everything Malwarebytes found. Click the “Quarantine” button to remove all the threats at once.

-
Restart Your Mac
Malwarebytes will now remove all the malicious files it found. Some threats can only be fully removed after a reboot — if Malwarebytes asks you to restart, allow it. Once you’re logged back in, your Mac is clean.

That’s it — your Mac is now free of adware, rogue browser extensions, and other potentially harmful software.
If you are still experiencing problems while trying to remove a malicious program from your computer, please ask for help in our Mac Malware Removal Help & Support forum.
Run a Malware Scan with Malwarebytes for Android
Malwarebytes for Android automatically detects and removes dangerous threats like malware and ransomware so you don’t have to worry about your most-used device being compromised. Aggressive detection of adware and potentially unwanted programs keeps your Android phone or tablet running smooth.
-
Download Malwarebytes for Android.
You can download Malwarebytes for Android by clicking the link below.
Get Malwarebytes for AndroidOpens Google Play in a new tab.Want real-time protection? See Malwarebytes Premium for AndroidMalwarebytes for AndroidScans your phone and removes malware at no cost -
Install Malwarebytes for Android on your phone.
In the Google Play Store, tap “Install” to install Malwarebytes for Android on your device.

When the installation process has finished, tap “Open” to begin using Malwarebytes for Android. You can also open Malwarebytes by tapping on its icon in your phone menu or home screen.

-
Follow the on-screen prompts to complete the setup process
When Malwarebytes will open, you will see the Malwarebytes Setup Wizard which will guide you through a series of permissions and other setup options.
This is the first of two screens that explain the difference between the Premium and Free versions. Swipe this screen to continue.
Tap on “Got it” to proceed to the next step.
Malwarebytes for Android will now ask for a set of permissions that are required to scan your device and protect it from malware. Tap on “Give permission” to continue.
Tap on “Allow” to permit Malwarebytes to access the files on your phone.
-
Update database and run a scan with Malwarebytes for Android
You will now be prompted to update the Malwarebytes database and run a full system scan.

Click on “Update database” to update the Malwarebytes for Android definitions to the latest version, then click on “Run full scan” to perform a system scan.

-
Wait for the Malwarebytes scan to complete.
Malwarebytes will now start scanning your phone for adware and other malicious apps. This process can take a few minutes, so we suggest you do something else and periodically check on the status of the scan to see when it is finished.

-
Click on “Remove Selected”.
When the scan has been completed, you will be presented with a screen showing the malware infections that Malwarebytes for Android has detected. To remove the malicious apps that Malwarebytes has found, tap on the “Remove Selected” button.

-
Restart your phone.
Malwarebytes for Android will now remove all the malicious apps that it has found. To complete the malware removal process, Malwarebytes may ask you to restart your device.
That’s it — your Android phone is now clean — no more malicious apps, adware, or browser redirects.
If you are still having problems with your phone after completing these instructions, then please follow one of the steps:
- Restore your phone to factory settings by going to Settings > General management > Reset > Factory data reset.
- Ask for help in our Mobile Malware Removal Help & Support forum.
Stay Protected: Block Ads and Malicious Sites
Now that your device is clean, keep it that way. Most infections start with a malicious ad or a fake download button — so blocking them at the source is your best defense.
We recommend AdGuard, which blocks malicious ads, phishing pages, and dangerous redirects before they can reach you.
👉 Download AdGuard and browse safely
A Safer Way to Handle Unexpected Shared Reports
For repeated business exchanges, agree on a sharing channel ahead of time. That gives employees something concrete to compare with unexpected invitations.
A supplier’s new portal may be legitimate, but the change should be confirmed through an existing relationship. The first notification should not authenticate the entire service.
If a colleague confirms they sent the file, ask where to find it inside the established platform. Do not assume confirmation makes every redirected login safe.
For sensitive reports, verify the intended recipients before uploading material elsewhere. A fake invitation can also tempt someone to reply with confidential documents.
At work, avoid downloading unfamiliar attachments to personal devices as a workaround. That may move the risk outside the organization’s protection and reporting processes.
If the document is not urgent, leave it pending until the sender is available. A real review task can tolerate a reasonable identity check.
When a page asks for broader permissions than the task needs, pause again. Permission to read email is not merely permission to view one report.
You can ask for an alternative approved delivery method. A genuine author should be interested in getting the report to you safely, not forcing one unexplained sign-in.
Keep the habit simple: confirm the person, confirm the service, and understand the requested access. Each answers a different question.
No single icon, attachment label, or familiar phrase answers all three. That is the weakness this particular email tries to hide.
Frequently Asked Questions
Is the Report Review assessment email a real PDF notification?
The described campaign is phishing. Its attachment-style presentation does not establish that a real report was provided by someone you know.
Why does the message show a page count and file size?
Those details make the tile resemble a document preview. Text inside an email can display them without attaching or measuring any actual file.
Does a Google-looking password form belong to Google?
Not necessarily. Verify the authentication address and service independently. A copied appearance does not establish ownership or authorization.
What if I opened the page but never entered a password?
Close it and check for downloads or permissions you accepted. Opening a page is different from providing credentials, and does not automatically establish account takeover.
Should I wait for suspicious account activity before changing an exposed password?
No. Replace the exposed credential promptly and review access. Lack of visible misuse does not establish that the secret remained private.
How should a company respond if an employee submitted credentials?
Have the security team secure access, inspect sessions and mailbox settings, and assess affected communications. Keep the response proportionate to what was actually disclosed.
The Bottom Line
Do not give the Report Review invitation your mailbox password. Confirm the author and locate any genuine assessment through an established sharing service.
If the fake document page already received a secret, recover the account now. Review continuing access and notify the people whose conversations may have been exposed.








