

A proposal arrives through what looks like Zoho’s document-sharing service. It has a PDF filename, a file size and a familiar invitation to view it.
Before opening the proposal, check the small details that connect this notice to the person you expected to hear from.
Overview
A business proposal provides the reason to click
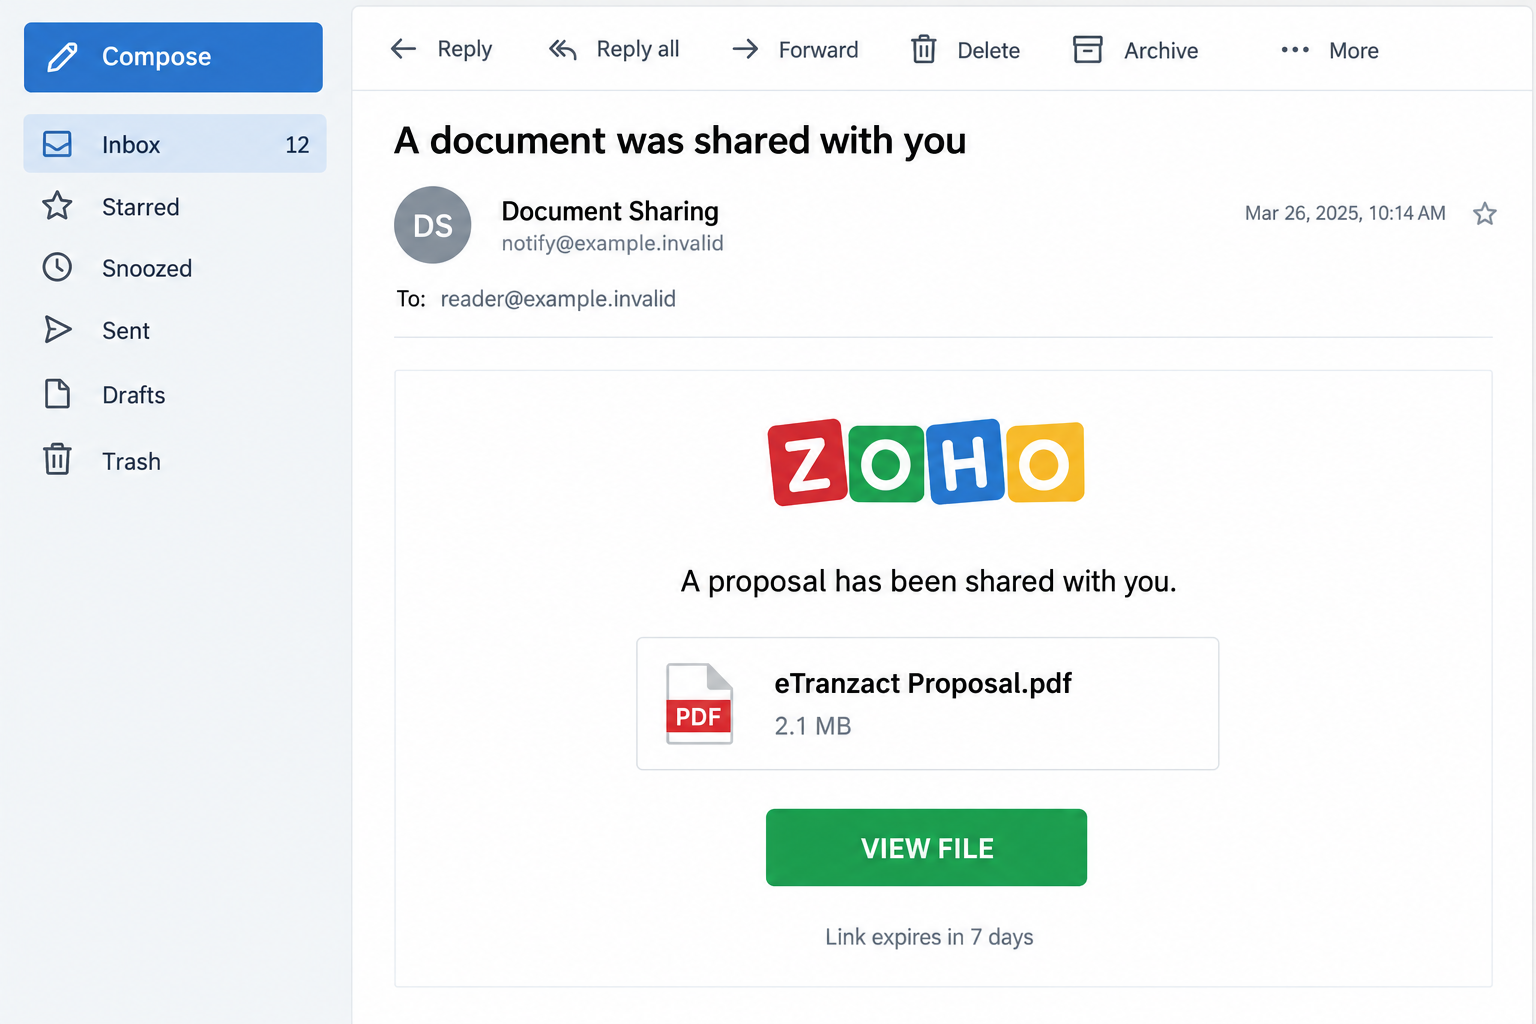
The Zoho file shared with you email scam presents a document called eTranzact Proposal.pdf. The reported notice encourages the recipient to open it through a viewing button.
A seven-day expiration suggests an ordinary sharing limit. The associated destination, verify.zohoapps[.]ru, is identified with a counterfeit sign-in seeking email addresses and passwords.
Zoho is being impersonated. The file’s reference to eTranzact also does not establish that this organization sent the message or participates in the deception.
The invitation should be checked against a real conversation and a verified sender. A professionally named PDF does not supply either connection.
Real sharing features make the imitation plausible
Zoho genuinely offers business collaboration and external file sharing. Expiration dates, access restrictions and recipient verification can all occur in legitimate workflows.
That means neither an expiring link nor a request to identify yourself proves fraud on its own. The destination and the actual sharing relationship matter.
- The expected document name is eTranzact Proposal.pdf.
- The reported presentation includes a 2.1 MB file size.
- The invitation uses a View File action and a seven-day limit.
- The suspicious destination is not authenticated merely by containing the word Zoho.
Do not sign into a separate form just to discover whether someone intended to send the proposal. Confirm the invitation before providing account access.
What can be checked without using the false login
The reported destination currently returned a connection-error screen during an original capture. A functioning credential form was not available to inspect independently.
The email illustration is an invented example with fictional addresses and dates. It shows the lure without claiming to reproduce a recovered recipient message.
No malicious PDF payload is established here. The visible filename is part of a credential-phishing pitch, not proof that an attached PDF exploited a computer.
If you already followed the link, your next action depends on what you supplied or allowed. A password submission matters even when no document ever appeared.
Check the Conversation Behind the Proposal
A real proposal normally has context. You may have requested pricing, discussed a project or agreed that someone would send a document.
Start there rather than with the brand on the email. Who should have shared the file, and what business were you conducting?
Contact that person using an existing conversation or a number you already know. Ask whether they shared this particular filename through this particular service.
Do not use a fresh reply address from the suspicious notice to verify the notice. That simply asks the unknown sender to endorse its own request.
If you did not expect a proposal, there is no need to log in to find out whether it might interest you. Request an explanation first.
A familiar colleague’s name is helpful context, but accounts can be compromised. Ask for confirmation through a second channel if the destination or request looks unusual.
For procurement teams, compare the proposal with the supplier record. A copied commercial name should not introduce an unverified account into the purchasing workflow.
Keep any later payment instructions separate from this sharing invitation. Confirming a genuine document does not automatically authenticate a new bank account printed inside it.
How the Zoho File Shared With You Email Scam Works
Step 1: Package the Message as a Routine Sharing Event
The email does not need a dramatic threat. It gives you an ordinary office task: look at a file another organization supposedly shared.
The PDF name supplies a subject, while the file size supplies texture. Together they encourage you to imagine a real document waiting behind the button.
Those details can be written into an email without hosting any genuine proposal. They describe what the sender wants you to expect, not what has been authenticated.
A copied corporate address or footer can reinforce the same impression. Public company information is easy to reproduce and does not prove control of a sharing service.
Read the invitation in relation to your work. An unexpected proposal from an unknown sender needs more checking than a document agreed upon in a verified conversation.
If another employee normally handles the relationship, ask them before interacting. Do not distribute the button across the office as a way to identify its intended recipient.
Step 2: Make the Link Feel Both Temporary and Familiar
The seven-day expiry is a useful piece of persuasion. It suggests that the opportunity to read the file may disappear if you leave it too long.
Unlike a countdown lasting seconds, a week can look reasonable. That makes it fit a professional sharing system rather than an obvious pressure tactic.
Zoho’s external-sharing documentation describes legitimate controls such as expiration and restricted access. Scammers can borrow that vocabulary without using those genuine controls.
View File is simply the visible action label. It does not tell you which server will receive the browser request or any information entered afterward.
Check the link destination if your email client exposes it safely. If it is unclear, leave the message and confirm the file with its supposed owner.
A deadline in an unverified email does not outweigh the time needed for that check. A real collaborator can explain or renew a legitimate invitation.
Step 3: Substitute Account Verification for Document Viewing
The reported flow sends the recipient toward a false login. At this point, a request to read a proposal becomes a request for a reusable secret.
The hostname verify.zohoapps[.]ru contains a recognizable product name, but the underlying registered domain is zohoapps.ru. That spelling is not evidence of Zoho ownership.
This is a warning about that reported destination, not about every address with a .ru ending. Geographic labels do not identify the individual operating a page.
A sign-in form can copy colors, wording and a logo. What matters is whether your credentials go to the genuine provider you intended to use.
Do not experiment by entering your real password and watching the result. A blank screen or error after submission cannot establish that the information stayed private.
If the form asked for your usual mailbox credentials, treat that mailbox as the exposed account. Do not assume Zoho-branded imagery means only a Zoho account is affected.
Step 4: Reuse the Access Beyond the Missing PDF
A stolen email login may reveal business correspondence, password-reset messages and contact lists. The practical risk can be larger than the document named in the invitation.
Someone with mailbox access could send a believable follow-up from the real account. A colleague might then trust the sender without noticing that control has changed.
Existing proposal or payment conversations are particularly valuable because the intruder does not need to invent a completely new relationship.
These are possible consequences of successful access, not proof that every recipient experienced them. Check actual account activity before describing the incident’s reach.
Repeated passwords create another route. A secret supplied for one account may also work for a different service if you reused it.
Software scanning cannot close a cloud session or remove a mailbox rule. If the main exposure was credentials, account recovery belongs at the center of your response.
Three Things a Genuine Shared File Does Not Prove
A recognizable filename does not identify its author
A proposal can borrow an organization’s name without coming from that organization. Confirm the person responsible and the commercial purpose before treating it as business correspondence.
Likewise, a PDF icon is not evidence that the next click will download a PDF. It may be nothing more than artwork attached to an external link.
If a real file was downloaded, preserve its name and source for your security team. Do not launch it again to see whether the logo matches.
A successful sign-in does not validate the invitation
Even genuine collaboration services can host misleading content. Verify the document owner and the requested action rather than treating a familiar platform as a blanket endorsement.
The reverse also matters: legitimate external sharing can request identity verification. Inspect the exact service and request instead of assuming every access screen is fraudulent.
Your usual account bookmark offers a useful reference point. An unfamiliar login path introduced solely by this email should not receive the benefit of the doubt.
A working inbox does not rule out quiet access
An intruder may prefer that the owner continues using email normally. Immediate lockout is not required for information gathering or message manipulation.
Review unfamiliar sessions, forwarding and connected applications after a disclosure. Zoho users can follow its official session-management guidance.
If your account belongs to another provider, use that provider’s controls. The exposed service determines the recovery process, not the branding on the phishing page.
If the Proposal Really Was Expected
Ask the verified sender to identify the project and the intended recipient. A genuine business discussion should exist independently of the sharing notice.
If access expired, request a fresh invitation through the established relationship. There is no reason to revive a suspicious link simply because it resembles the expected document.
When different organizations use different collaboration tools, agree on the service before supplying credentials. Do not assume the document owner needs the password to your unrelated mailbox.
A legitimate owner may be able to explain an access error or change permissions. That explanation should come from the person you verified, not an unknown support account.
For confidential proposals, check the intended sharing restrictions too. Moving a sensitive file to a public link to solve a sign-in problem can create another exposure.
If the sender reports their own account compromise, stop using the original thread for approvals. Establish a clean channel before resuming the commercial conversation.
Keep the legitimate proposal process and phishing report distinct. You can still obtain a real document without trusting the counterfeit invitation or delaying account protection.
What to Do if You Have Fallen Victim to This Scam
Stop trying to retrieve the proposal. Close the page and report the notice through your mail client or workplace process.
Keep the original email if it is needed for investigation. Avoid forwarding a live invitation to friends or coworkers with a request to test it.
Tell the actual sender or account administrator. Use contact details from your established relationship, not the sharing notice.
Name the PDF and explain the suspicious destination. If an authentic account sent the invitation, its owner may need to investigate their own access.
Replace the password you disclosed. Do this through the correct provider from a device you trust. Change reused passwords on other services as well.
Include every password you tried on the false page when assessing exposure. A rejected first attempt may still have reached the page’s operator.
Review sessions and account changes. End unfamiliar sessions, check recovery information and inspect mailbox rules or connected applications.
Ask your administrator about suspicious messages sent after the disclosure. Protecting the account may require more than making the old password unusable.
Investigate downloads or installed helpers if there were any. Tell your security team which file ran, which extension was added or what permission was accepted.
Malwarebytes can help assess unwanted software. AdGuard may reduce deceptive advertising exposure, but neither restores a password’s secrecy or closes a remote account session.
The scan instructions below apply to device concerns. They are not a substitute for securing the account used on the counterfeit form.
Follow the business consequences. Verify invoices, supplier changes or reset requests that may have been visible during any unauthorized access.
Notify affected contacts if your account distributed false instructions. Keep incident notes and refuse paid recovery offers from anyone who approaches you unexpectedly.
Is Your Device Infected? Run a Free Malware Scan
Slow performance, constant pop-ups, or strange behavior? These are classic signs of a malware infection. The fastest way to find out is to scan your device with Malwarebytes Free — one of the most trusted malware removal tools available.
The free version detects and removes the most common threats, including:
- Adware — the cause of those annoying pop-ups
- Browser hijackers — unwanted redirects and changed homepages
- Trojans and spyware — hidden programs stealing your data
- Potentially unwanted programs (PUPs) — software you never asked for
👉 Select your device below — Windows, Mac, or Android — then follow the simple steps to download Malwarebytes, scan your system, and remove any threats it finds. The scan usually takes 5 to 20 minutes.
Run a Malware Scan with Malwarebytes for Windows
Malwarebytes is one of the most popular and trusted anti-malware tools for Windows — and it’s completely free for removing infections. It catches threats that many antivirus programs miss, including adware, browser hijackers, and trojans. Follow the steps below to scan and clean your PC in just a few minutes.
Download Malwarebytes
Click the button below to download the latest version of Malwarebytes for Windows from the official source. The free version is all you need — it will scan your computer and remove adware, browser hijackers, and other malicious software at no cost.
Download MalwarebytesOfficial installer for Windows 11 and 10. Your download starts right away.Want real-time protection? See Malwarebytes Premium Malwarebytes Free for WindowsScans and removes malware at no cost
-
Install Malwarebytes
When the download finishes, open your Downloads folder and double-click the MBSetup file. If Windows shows a User Account Control pop-up, click “Yes” to allow the installation.

Follow the On-Screen Prompts to Install Malwarebytes
The setup wizard will walk you through a few quick screens:
-
Choose where you’re installing the program — “Personal Computer” or “Work Computer” — then click Next.

-
Malwarebytes will now install on your device. This usually takes under a minute.

-
When installation is complete, the “Welcome to Malwarebytes” screen will open automatically.

-
On the final screen, click Open Malwarebytes to launch the program.

-
Enable “Scan for Rootkits”
Before scanning, turn on rootkit detection so Malwarebytes can find even the most hidden threats. Click the Settings gear icon on the left side of the screen.

In the settings menu, find “Scan for rootkits” and click the toggle so it turns blue.

Done? Click “Dashboard” in the left pane to return to the main screen.
Start the Scan
Click the blue Scan button. Malwarebytes will automatically update its virus database and start checking your computer for malware.

-
Wait for the Scan to Finish
The scan checks your entire system for browser hijackers and other malicious programs, so it can take 5 to 20 minutes depending on your computer. Feel free to do something else — just check back occasionally to see the progress.

-
Quarantine the Detected Threats
When the scan is done, you’ll see a list of everything Malwarebytes found — malware, adware, and potentially unwanted programs. Click the “Quarantine” button to remove all of them at once.

Malwarebytes will now remove the malicious files and registry entries and move them safely into quarantine.

-
Restart Your Computer
Some threats can only be fully removed after a reboot. If Malwarebytes asks you to restart, click Yes. Once you’re logged back in, Malwarebytes has finished removing the threats it found.

That’s it — your Windows PC is now clean of trojans, adware, and other malware, and should be back to running smoothly.
If you are still having problems with your computer after completing these instructions, then please follow one of the steps:
- Run a computer scan with ESET Online Scanner
- Ask for help in our Windows Malware Removal Help & Support forum.
Run a Malware Scan with Malwarebytes for Mac
Malwarebytes for Mac is a free on-demand scanner that removes the malware other security software tends to miss — adware, browser hijackers, and unwanted programs included. Cleaning an infected Mac with Malwarebytes has always been completely free, and it’s our go-to recommendation. Follow the steps below to scan and clean your Mac in just a few minutes.
-
Download Malwarebytes for Mac
Click the button below to download the latest version of Malwarebytes for Mac.
Download MalwarebytesOfficial installer for macOS. Your download starts right away.Want real-time protection? See Malwarebytes PremiumMalwarebytes Free for MacScans and removes malware at no cost -
Open the Malwarebytes setup file
When the download finishes, open your Downloads folder and double-click the setup file to begin the installation.

-
Follow the On-Screen Prompts to Install Malwarebytes
The Malwarebytes for Mac Installer will guide you through a few quick screens. Click “Continue” and keep following the prompts until the installation completes.



When the installation is complete, Malwarebytes opens to the Welcome to Malwarebytes screen. Click “Get started“.
-
Select “Personal Computer” or “Work Computer”
Malwarebytes will ask what type of computer you’re installing it on. Click either Personal Computer or Work Computer, whichever applies.

-
Start the Scan
Click the “Scan” button. Malwarebytes will automatically update its detection database and begin checking your Mac for malware.

-
Wait for the Scan to Finish
Malwarebytes will scan your Mac for adware, browser hijackers, and other malicious programs. This can take a few minutes, so feel free to do something else — just check back occasionally to see the progress.

-
Quarantine the Detected Threats
When the scan is done, you’ll see a list of everything Malwarebytes found. Click the “Quarantine” button to remove all the threats at once.

-
Restart Your Mac
Malwarebytes will now remove all the malicious files it found. Some threats can only be fully removed after a reboot — if Malwarebytes asks you to restart, allow it. Once you’re logged back in, your Mac is clean.

That’s it — your Mac is now free of adware, rogue browser extensions, and other potentially harmful software.
If you are still experiencing problems while trying to remove a malicious program from your computer, please ask for help in our Mac Malware Removal Help & Support forum.
Run a Malware Scan with Malwarebytes for Android
Malwarebytes for Android automatically detects and removes dangerous threats like malware and ransomware so you don’t have to worry about your most-used device being compromised. Aggressive detection of adware and potentially unwanted programs keeps your Android phone or tablet running smooth.
-
Download Malwarebytes for Android.
You can download Malwarebytes for Android by clicking the link below.
Get Malwarebytes for AndroidOpens Google Play in a new tab.Want real-time protection? See Malwarebytes Premium for AndroidMalwarebytes for AndroidScans your phone and removes malware at no cost -
Install Malwarebytes for Android on your phone.
In the Google Play Store, tap “Install” to install Malwarebytes for Android on your device.

When the installation process has finished, tap “Open” to begin using Malwarebytes for Android. You can also open Malwarebytes by tapping on its icon in your phone menu or home screen.

-
Follow the on-screen prompts to complete the setup process
When Malwarebytes will open, you will see the Malwarebytes Setup Wizard which will guide you through a series of permissions and other setup options.
This is the first of two screens that explain the difference between the Premium and Free versions. Swipe this screen to continue.
Tap on “Got it” to proceed to the next step.
Malwarebytes for Android will now ask for a set of permissions that are required to scan your device and protect it from malware. Tap on “Give permission” to continue.
Tap on “Allow” to permit Malwarebytes to access the files on your phone.
-
Update database and run a scan with Malwarebytes for Android
You will now be prompted to update the Malwarebytes database and run a full system scan.

Click on “Update database” to update the Malwarebytes for Android definitions to the latest version, then click on “Run full scan” to perform a system scan.

-
Wait for the Malwarebytes scan to complete.
Malwarebytes will now start scanning your phone for adware and other malicious apps. This process can take a few minutes, so we suggest you do something else and periodically check on the status of the scan to see when it is finished.

-
Click on “Remove Selected”.
When the scan has been completed, you will be presented with a screen showing the malware infections that Malwarebytes for Android has detected. To remove the malicious apps that Malwarebytes has found, tap on the “Remove Selected” button.

-
Restart your phone.
Malwarebytes for Android will now remove all the malicious apps that it has found. To complete the malware removal process, Malwarebytes may ask you to restart your device.
That’s it — your Android phone is now clean — no more malicious apps, adware, or browser redirects.
If you are still having problems with your phone after completing these instructions, then please follow one of the steps:
- Restore your phone to factory settings by going to Settings > General management > Reset > Factory data reset.
- Ask for help in our Mobile Malware Removal Help & Support forum.
Stay Protected: Block Ads and Malicious Sites
Now that your device is clean, keep it that way. Most infections start with a malicious ad or a fake download button — so blocking them at the source is your best defense.
We recommend AdGuard, which blocks malicious ads, phishing pages, and dangerous redirects before they can reach you.
👉 Download AdGuard and browse safely
Frequently Asked Questions
Is this an official Zoho sharing notice?
The notice described here is a phishing imitation. Ask the intended document owner to confirm the sharing event through an existing, trusted communication channel.
Is eTranzact Proposal.pdf itself confirmed malware?
No malicious PDF payload is established in this case. The filename is used to encourage a click toward a credential-harvesting site.
Does a seven-day link expiry prove the message is fake?
No. Genuine sharing services support expiration. The suspicious context and destination matter more than the presence of a feature that legitimate services also use.
Why is verify.zohoapps[.]ru a concern?
It is the reported phishing destination. A domain containing Zoho’s name does not demonstrate that Zoho operates or authorizes it.
What if I entered a Microsoft or Gmail password instead?
Secure that actual account. A false page can collect credentials for another service regardless of the provider name displayed in its design.
Should I scan after reading the email only?
Reading this message alone does not show device infection. Account actions follow credential disclosure; device investigation follows relevant downloads, installations, permissions or suspicious behavior.
The Bottom Line
Do not use this Zoho-style sharing invitation to enter your email password. Verify the proposal with its real owner before trusting the document or sign-in route.
If credentials were submitted, secure the affected service promptly and inspect its sessions. Handle downloaded software separately, without waiting for a missing PDF to explain the incident.

Join the discussion
0 commentsShare your experience or ask a question about this article.
Discussion
Start the conversation
Have a question or something useful to share? Add the first comment.