

“Vista Security Cleaner Pro” is a computer virus (Rogue.FakeRean-Braviax), which pretends to be a legitimate security program and claims that malware has been detected on your computer. If you try to remove these infections, Vista Security Cleaner Pro will state that you need to buy its full version before being able to do so.
Apart from the bogus scan results, Vista Security Cleaner Pro will display other fake security alerts that are designed to make you think your data is at risk or that your computer is severely infected.These messages include:
Privacy threat!
Spyware intrusion detected. Your system is infected. System integrity is at risk. Private data can be stolen by third parties, including credit card details and passwords. Click here to perform a security repair.System hijack!
System security threat was detected. Viruses and/or spyware may be damaging your system now. Prevent infection and data loss or stealing by running a free security scan.System danger!
Your system security is in danger. Privacy threats detected. Spyware, keyloggers or Trojans may be working in the background right now. Perform an in-depth scan and removal now, click here.
In reality, none of the reported issues are real, and are only used to scare you into buying Vista Security Cleaner Pro and stealing your personal financial information.
As part of its self-defense mechanism,Vista Security Cleaner Pro has disabled the Windows system utilities, including the Windows Task Manager and Registry Editor, and will block you from running certain programs that could lead to its removal.
This rogue antivirus has modified your Windows files associations and now whenever you are trying to open or install a program, Vista Security Cleaner Pro will block the program from starting, and instead will display a bogus notification in which it will report that the file is infected.
Vista Security Cleaner Pro Firewall Alert
Vista Security Cleaner Pro has blocked a program from accessing the internet
Internet Explorer is infected with Trojan-BNK.Win32.Keylogger.gen
Private data can be stolen by third parties, including credit card details and passwords.
If your computer is infected with Vista Security Cleaner Pro,then you are seeing these screens:
![[Image: Vista Security Cleaner Pro virus]](https://malwaretips.com/blogs/wp-content/uploads/mwt-media/5a/5a7f007311d56611898e74aadf502bcb03616ecac2a911b38f9daa507449ecfb/131e3fb2330c12f441c582fb07b75fcc7edfcc4b0ede115e79597c566e718d0b-734.webp "Vista Security Cleaner Pro virus")
![[Image: Vista Security Cleaner Pro]](https://malwaretips.com/blogs/wp-content/uploads/mwt-media/24/24ee2ce55e67678eb9bad416b906e1b42071c38a7205653c1bc32826d730284f/9c410e3bd69e230327c9e0d980ad27a1496f712f1ce590379101dac5dfc89751-734.webp "Vista Security Cleaner Pro")
Vista Security Cleaner Pro is a scam, and you should ignore any alerts that this malicious software might generate.
Under no circumstance should you buy this rogue security software as this could lead to identity theft,and if you have, you should contact your bank and dispute the charge stating that the program is a scam and a computer virus.
Registration codes for Vista Security Cleaner Pro
As an optional step,you can use the following license key to register Vista Security Cleaner Pro and stop the fake alerts.
Vista Security Cleaner Pro REG Key:
9443-077673-5028
3425-814615-3990
2233-298080-3424
1147-175591-6550
Please keep in mind that entering the above registration code will NOT remove Vista Security Cleaner Pro from your computer , instead it will just stop the fake alerts so that you’ll be able to complete our removal guide more easily.
Vista Security Cleaner Pro – Virus Removal Instructions
STEP 1: Remove Vista Security Cleaner Pro malicious files with Malwarebytes Anti-Malware
Malwarebytes Chameleon technologies will allow us to install and run a Malwarebytes Anti-Malware scan without being blocked by Vista Security Cleaner Pro.
- Download Malwarebytes Chameleon from the below link, and extract it to a folder in a convenient location.
Download Malwarebytes ChameleonOpens the download page in a new tab.
![[Image: Extract Malwarebytes Chameleon utility]](https://malwaretips.com/blogs/wp-content/uploads/mwt-media/b2/b265e12a96e5ac88c372b34158e04f937bacfee747f63c719f50a4771b7048e8/9809c2be34df15eae377a9982d27eae3d60d2cc1b556e7f1f9fa6be62f380051-374.webp "Extract Malwarebytes Chameleon utility")
- Make certain that your infected computer is connected to the internet and then open the Malwarebytes Chameleon folder, and double-click on the svchost.exe file.
![[Image: Double click on svchost.exe]](https://malwaretips.com/blogs/wp-content/uploads/mwt-media/d6/d67768b1c785b16a82c92c81bcce063bb5b8ad9c8f1e7edb48a80040f7e803a3/b05e0bf111c8d18f1c641cfb91f746b45de4454ba605ef516ccfa0ed7cdc5c99-662.webp "Double click on svchost.exe")
IF Malwarebytes Anti-Malware will not start, double-click on the other renamed files until you find one will work, which will be indicated by a black DOS/command prompt window. - Follow the onscreen instructions to press a key to continue and Chameleon will proceed to download and install Malwarebytes Anti-Malware for you.
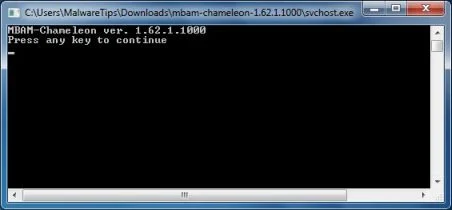
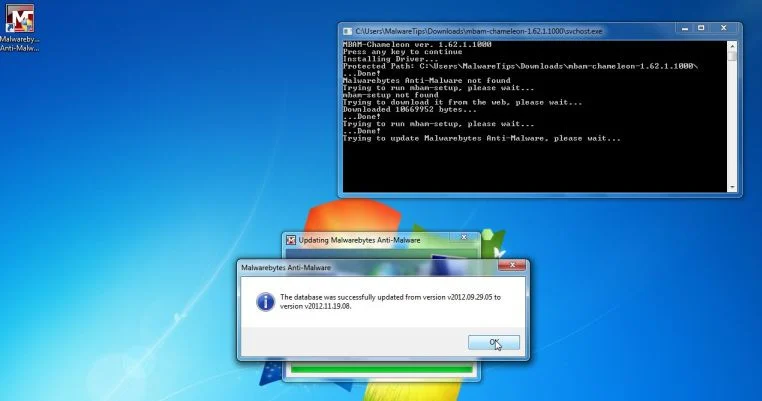
- Once it has done this, it will update Malwarebytes Anti-Malware, and you’ll need to click OK when it says that the database was updated successfully.
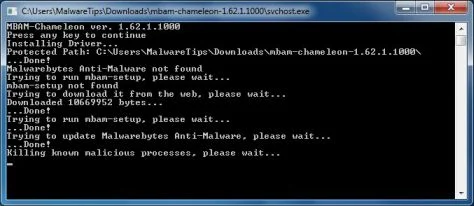
- Malwarebytes Anti-Malware will now attempt to kill all the malicious process associated with Vista Security Cleaner Pro.Please keep in mind that this process can take up to 10 minutes, so please be patient.
- Next, Malwarebytes Anti-Malware will automatically open and perform a Quick scan for Vista Security Cleaner Pro malicious files as shown below.
![[Image: Malwarebytes Anti-Malware scanning for Vista Security Cleaner Pro]](https://malwaretips.com/blogs/wp-content/uploads/mwt-media/f6/f6ecfba43df64204df40586070483f260cb91fa07d5cc90cb4c3a588d159ff30/5b6b2687853201a40d29fe27e142cc66b0852745bbad3900a21030a10399cb4c-521.webp "Malwarebytes Anti-Malware scanning for Vista Security Cleaner Pro")
- Upon completion of the scan, click on Show Result
![[Image: Malwarebytes Anti-Malware scan results]](https://malwaretips.com/blogs/wp-content/uploads/mwt-media/84/84c62dd46289424dbc686abc53672cb0810111920c8c0bbd69e973844d0a9ab0/a4c04aa700e641f47afec9965f79ff346740668e5952955ccbe5b4c3658b5897-521.webp "Malwarebytes when the system scan has completed")
- You will now be presented with a screen showing you the malware infections that Malwarebytes Anti-Malware has detected.
Make sure that everything is Checked (ticked),then click on the Remove Selected button.
![[Image:Malwarebytes removing virus]](https://malwaretips.com/blogs/wp-content/uploads/mwt-media/d8/d86b6a8bac0e4ece9fd2d259a83db71487943f6b04b567edb0e9adcc3200f492/4eb94651b0e34cc99689c56dc71cd0a49444498ed05c5803ea55fda1cfee1b1f-521.webp "Click on Remove Selected to get rid of Vista Security Cleaner Pro")
- After your computer restarts, open Malwarebytes Anti-Malware and perform a Full System scan to verify that there are no remaining threats
STEP 2: Remove Vista Security Cleaner Pro rootkit with HitmanPro
In some cases,Vista Security Cleaner Pro will also install a rootkit on victims computer.To remove this rootkit we will use HitmanPro.
- Download HitmanPro from the below link,then double-click on it to start this program.
Download HitmanProOfficial Sophos download. Free scan, free 30-day trial to remove threats.
IF you are experiencing problems while trying to start HitmanPro, you can use the Force Breach mode.To start HitmanPro in Force Breach mode, hold down the left CTRL key when you start HitmanPro and all non-essential processes are terminated, including the malware process. (How to start HitmanPro in Force Breach mode – Video) - HitmanPro will start and you’ll need to follow the prompts (by clicking on the Next button) to start a system scan with this program.
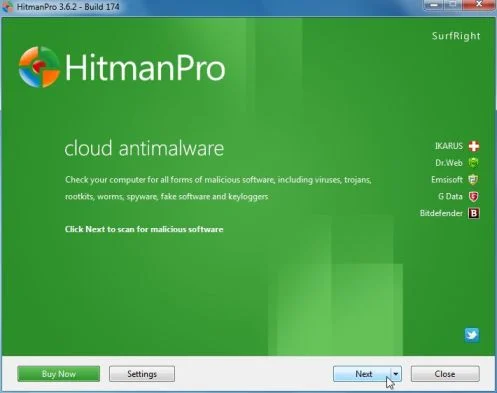
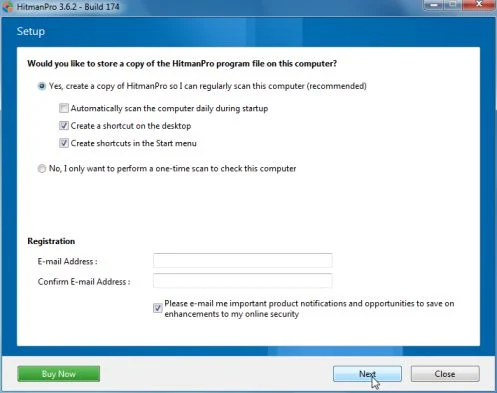
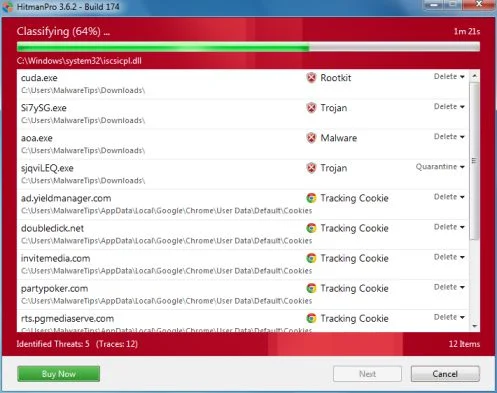
- HitmanPro will start scanning your computer for Vista Security Cleaner Pro malicious files as seen in the image below.
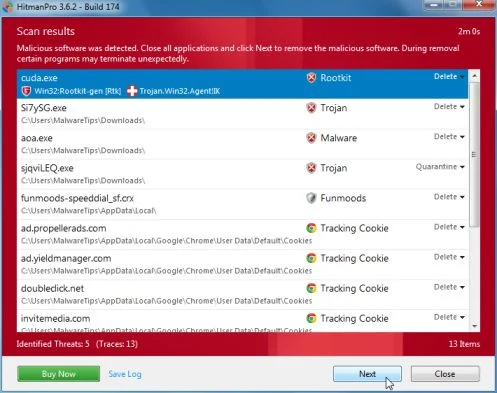
- Once the scan is complete,you’ll see a screen which will display all the infected files that this utility has detected, and you’ll need to click on Next to remove this malicious files.
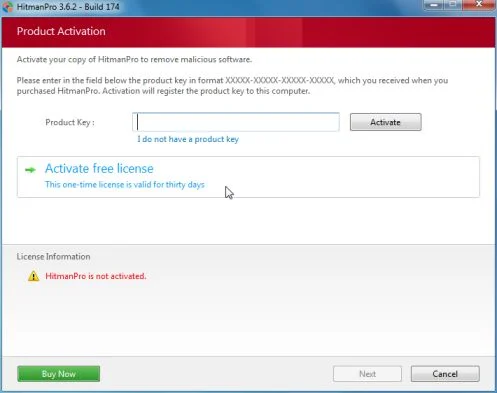
- Click Activate free license to start the free 30 days trial and remove all the malicious files from your computer.
STEP 3: Double check for any left over infections with Emsisoft Emergency Kit
- You can download Emsisoft Emergency Kit from the below link,then extract it to a folder in a convenient location.
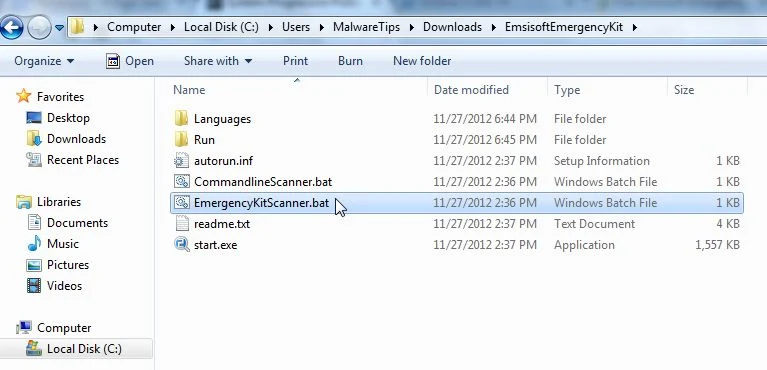
Download Emsisoft Emergency KitOpens the download page in a new tab. - Open the Emsisoft Emergency Kit folder and double click EmergencyKitScanner.bat, then allow this program to update itself.
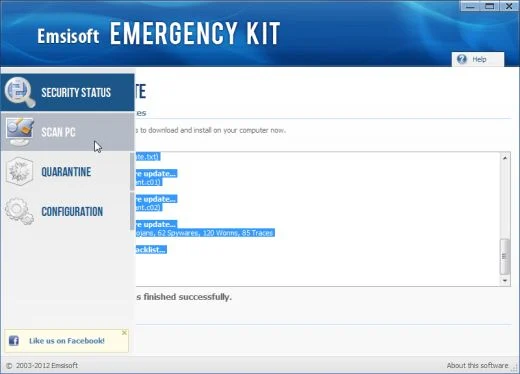
- After the Emsisoft Emergency Kit has update has completed,click on the Menu tab,then select Scan PC.
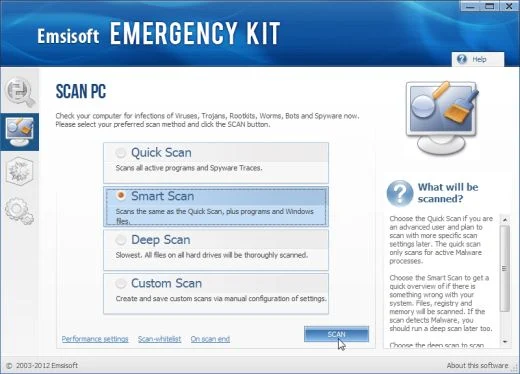
- Select Smart scan and click on the SCAN button to search for Vista Security Cleaner Pro malicious files.
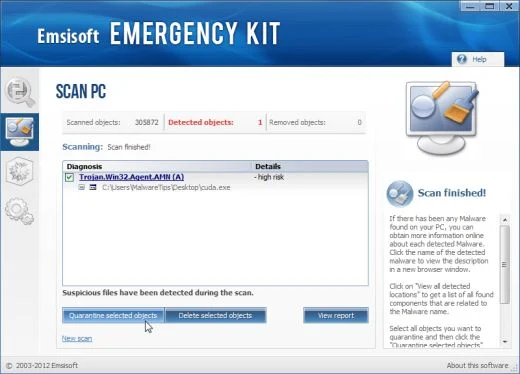
- When the scan will be completed,you will be presented with a screen reporting which malicious files has Emsisoft detected on your computer, and you’ll need to click on Quarantine selected objects to remove them.

Join the discussion
0 commentsShare your experience or ask a question about this article.
Discussion
Start the conversation
Have a question or something useful to share? Add the first comment.