

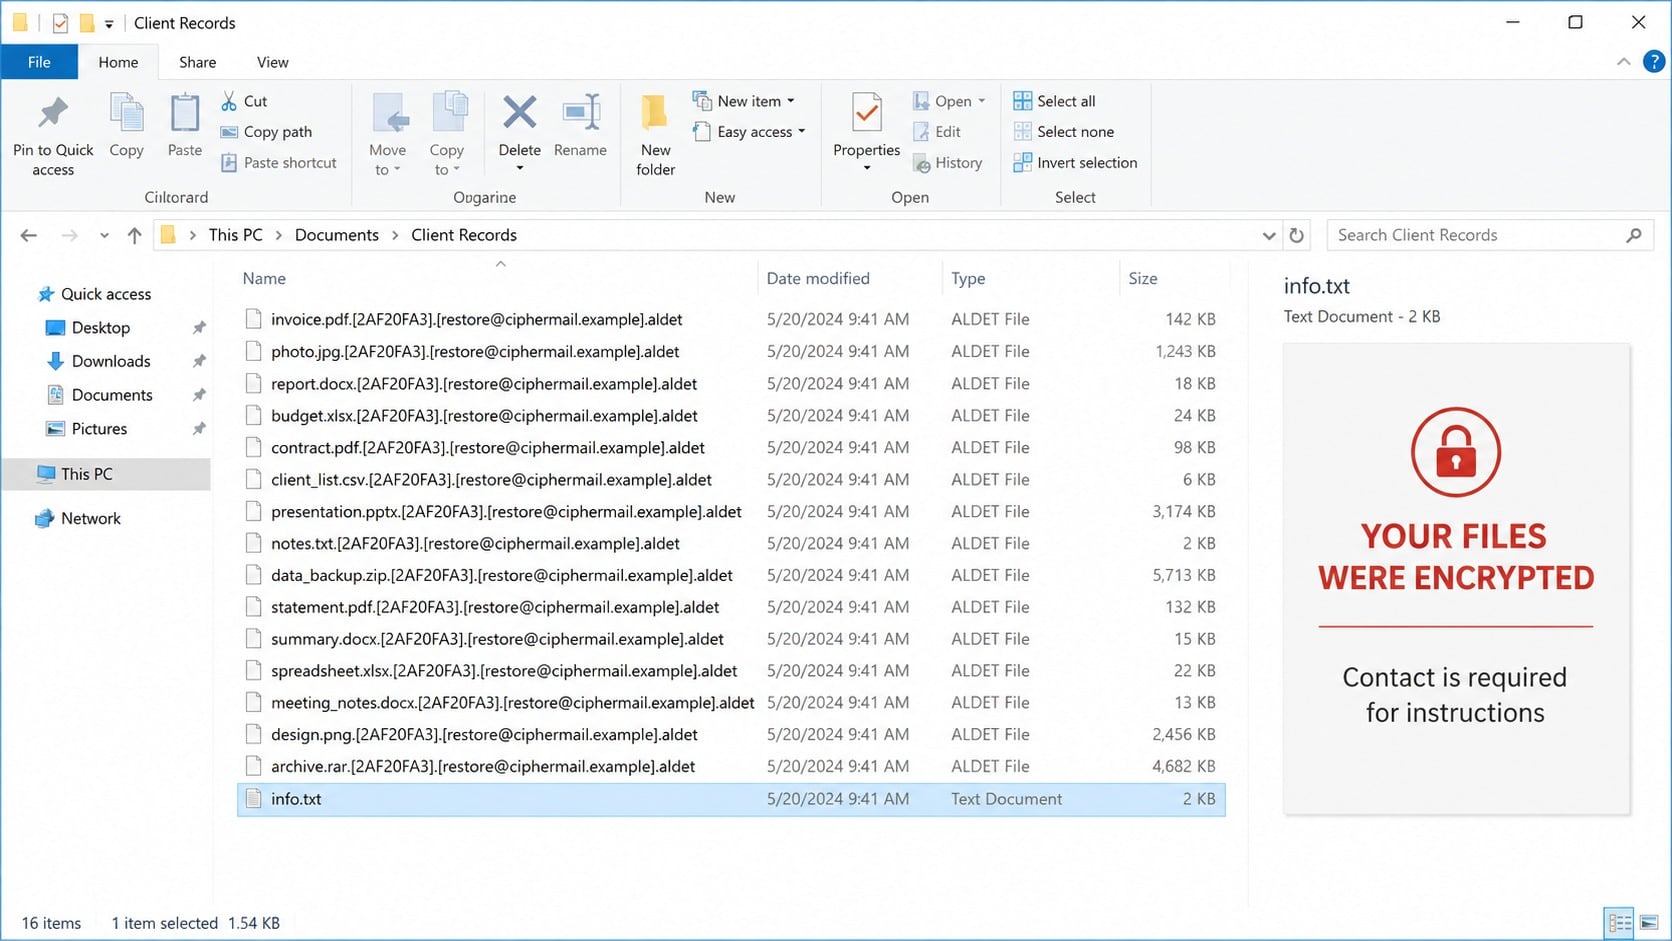
The desktop wallpaper changes first for some victims. Then filenames stretch across the folder, carrying brackets, an unfamiliar address, and the ending .aldet.
Those visible details can feel chaotic, but they form a useful fingerprint. Careful containment begins by preserving that fingerprint instead of following the attacker’s instructions.
Overview
Aldet builds victim details into every encrypted filename
Aldet is file-encrypting ransomware discovered during analysis of recent malware submissions. It renames locked data with a victim identifier, attacker contact, and .aldet extension.
The original name remains visible before the added material. A document may become report.docx.[victim ID].[contact].aldet after its contents are encrypted.
This compound pattern distinguishes Aldet from lockers that append only one short extension. It also gives responders several artifacts to record before cleanup begins.
Neither the contact string nor victim identifier acts as a recovery key. Removing those additions only changes the displayed name, leaving the encrypted contents untouched.
A ransom note and changed wallpaper announce the attack
The examined sample dropped a text ransom note and replaced the desktop background with a message stating that files were encrypted and contact was required.
The note instructed victims to write to an Outlook address and supplied a short victim ID. These details connect the message with renamed files on that machine.
A wallpaper message can make the attack appear complete and controlled. In reality, malicious processes, launch points, stolen credentials, or earlier loaders may remain present.
The contact address is not customer support. It belongs to the extortion path and offers no independent proof that a functional decryptor will be supplied.
Safe recovery begins away from the ransom conversation
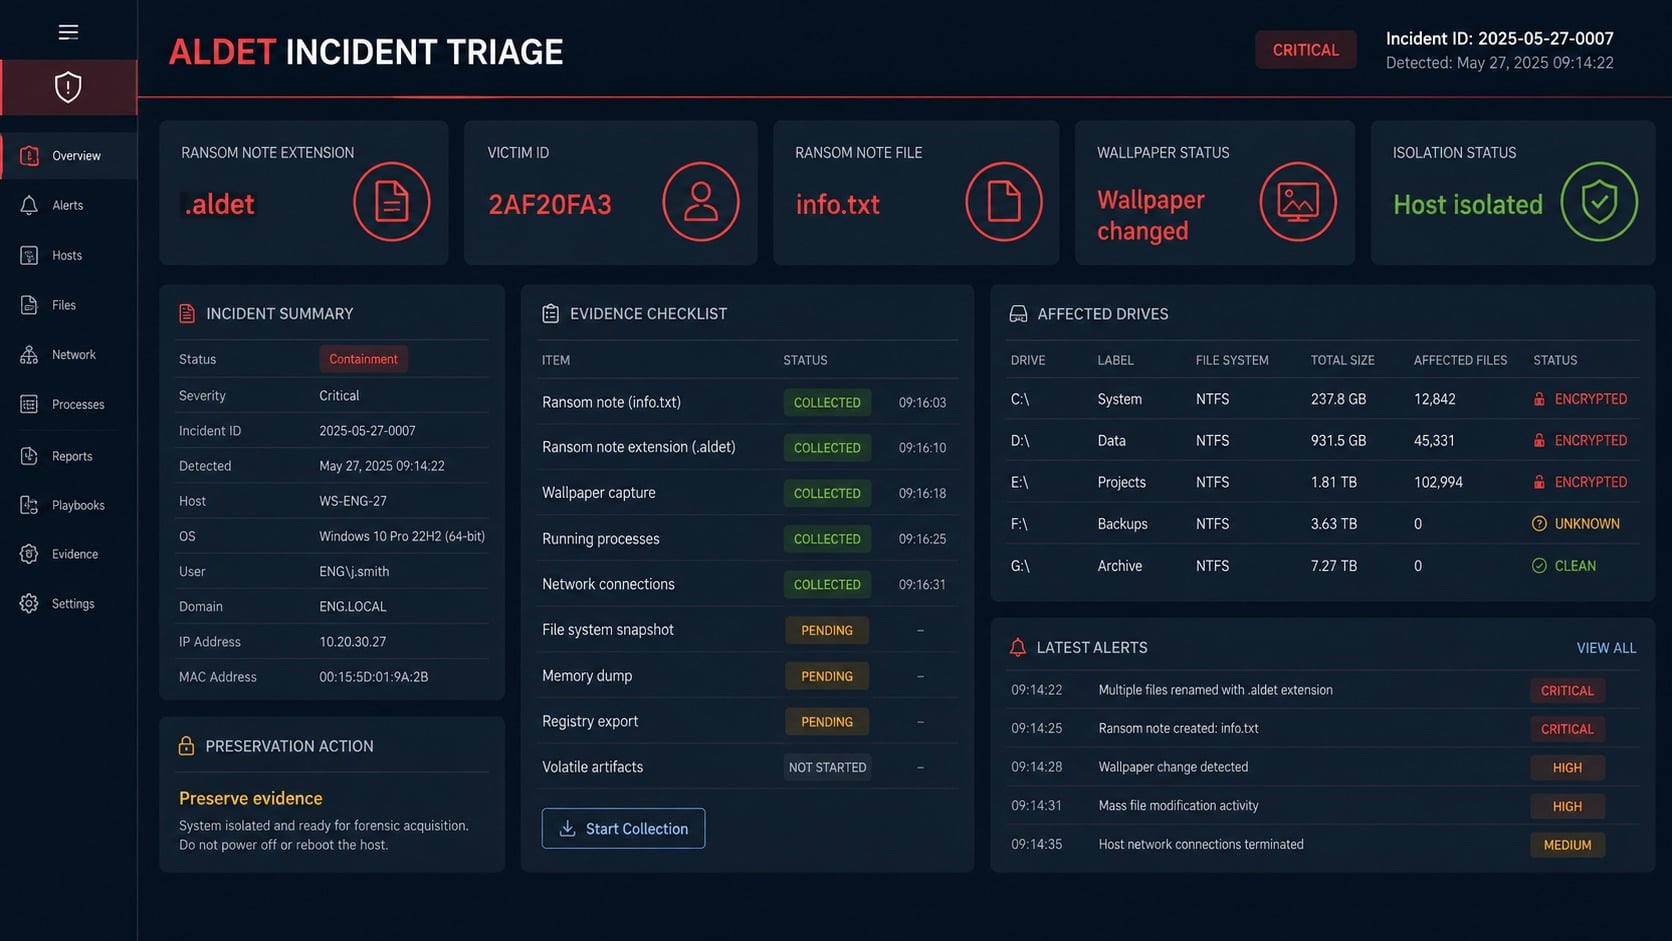
Immediate priorities are network isolation, backup protection, evidence preservation, credential review, and malware removal. File restoration follows only when the environment is clean.
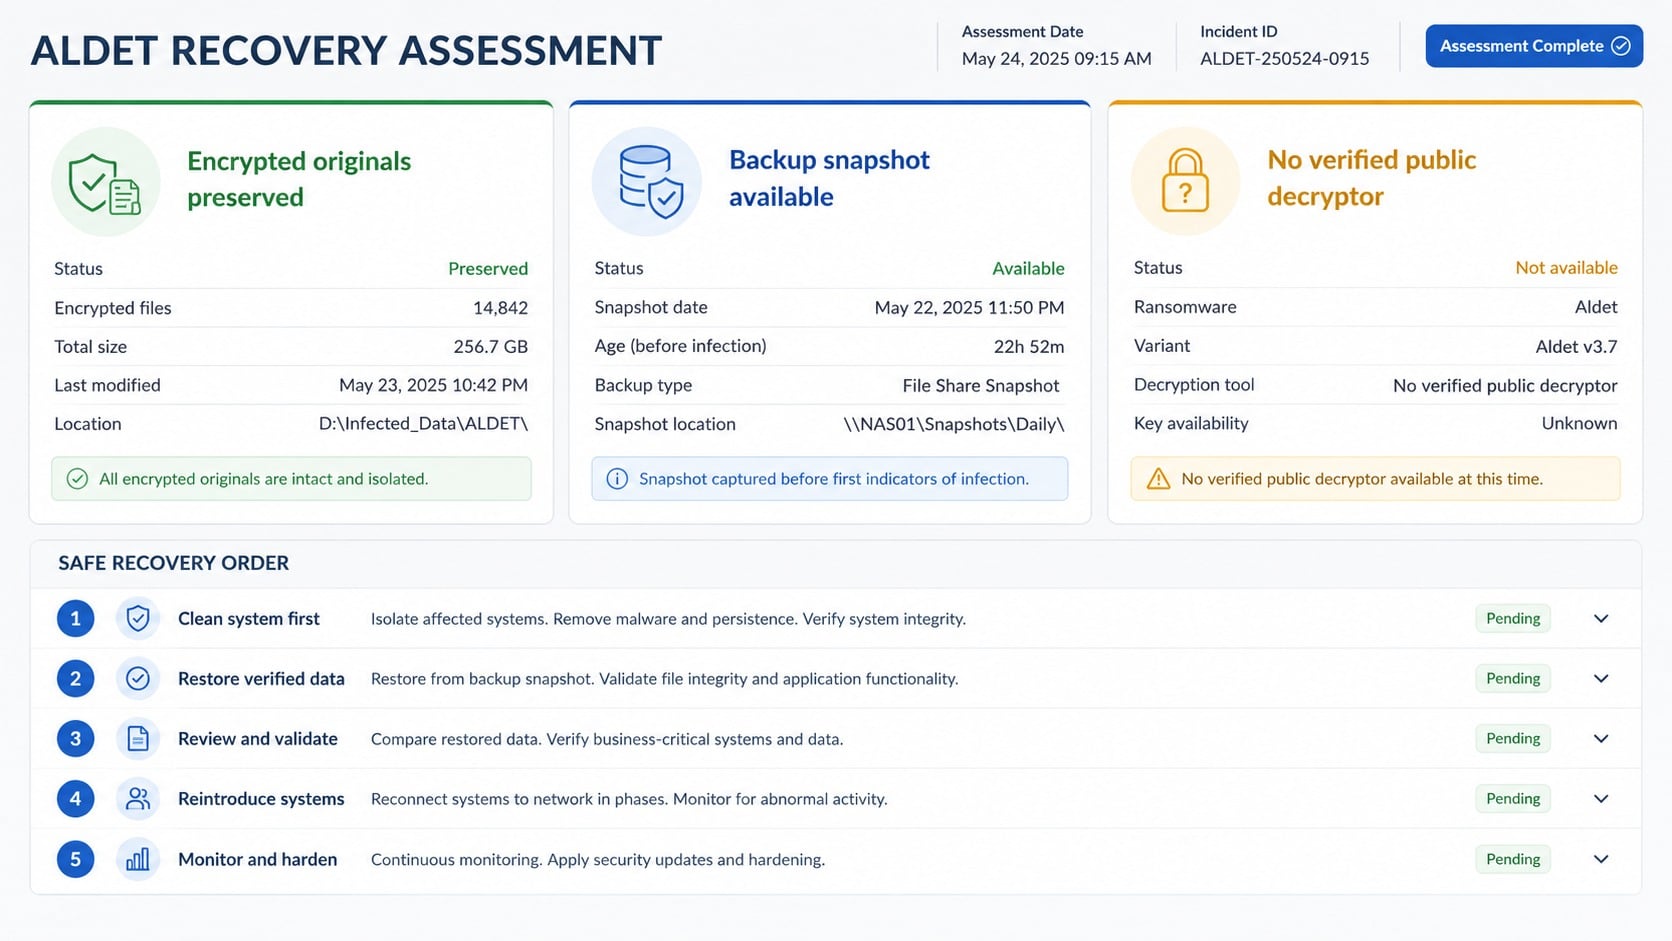
A public decryptor was not confirmed during this review. Availability can change, so recognized recovery projects should be checked using the exact variant evidence.
Offline backups and unaffected snapshots provide the most dependable recovery route. Connected backups may have been encrypted or deleted if Aldet could reach them.
Organizations must investigate the entry point and affected accounts. Treating the visible locker alone can leave the door open for another encryption event.
- Locked filenames end with a compound .aldet pattern.
- A unique victim ID appears inside the new name.
- An attacker email address is embedded beside that identifier.
- A text note gives contact instructions.
- The desktop wallpaper is replaced with an encryption warning.
- Removing Aldet does not automatically restore encrypted data.
File examples should be copied exactly into the incident record. Brackets, punctuation, capitalization, and the complete final extension can help match related samples.
Do not email confidential files as a decryption test. The recipient is an unknown criminal who can retain, inspect, publish, or misuse anything supplied.
Do not reinstall immediately on a business endpoint without preserving evidence. Volatile information and logs may reveal how the attacker entered or whether other systems remain exposed.
How the Aldet Ransomware Attack Works
Step 1: An ordinary-looking file provides initial access
The ransomware may be delivered through phishing attachments, cracked software, fake updates, malicious advertisements, untrusted download sites, peer-to-peer networks, or another Trojan.
Aldet’s visible symptoms do not establish one universal delivery route. Each incident needs a timeline built from that computer’s mail, downloads, logs, and processes.
Common lures use invoices, tax documents, shipping notices, installers, or compressed archives. Their names create a reason to open the file before inspecting its true type.
Businesses should also examine remote access, exposed services, compromised accounts, and shared administration tools. An attacker may deploy ransomware after entering by another method.
Step 2: The payload gains enough permission to modify data
When the file runs, Aldet can act with the current user’s access. Administrator privileges may allow changes across more folders, services, and attached storage.
The executable does not need a large visible window. Encryption can begin while the victim sees a document error or believes an installer closed unexpectedly.
Security exclusions requested by cracks or unofficial installers deserve special attention. They can create an unmonitored location where ransomware and supporting tools operate.
Record the earliest suspicious process and parent application. That link can show whether the incident began in email, a browser, an archive utility, or remote software.
Step 3: Files and reachable storage are enumerated
The malware searches for useful documents, photographs, archives, databases, and project files. Writable folders provide the attacker with the greatest leverage over the victim.
Network shares, mapped drives, removable storage, and cloud-synchronized folders can be affected when they remain accessible under the compromised account.
System components may be skipped so Windows continues operating. A responsive desktop merely lets the ransom demand remain visible and communication stay possible.
Permissions shape the damage. A standard account with limited share access may restrict spread, while a domain administrator or backup operator can expose far more.
Step 4: Encryption creates the compound .aldet filenames
Aldet changes file contents and then appends the victim ID, contact address, and .aldet. The added text makes each damaged item recognizable.
Original extensions remain inside the longer name. That does not mean Word, Excel, or image software can decode the altered contents beneath the label.
Bulk renaming removes useful indicators and may cause conflicting filenames. Preserve originals and conduct recovery experiments on separate copies kept outside the infected system.
Modification timestamps can help estimate when encryption began and which locations were reached first. Compare them across local disks and shared folders.
Step 5: The note and wallpaper create a single contact path
After locking files, the malware displays a wallpaper warning and drops written instructions. Both direct attention toward the attacker-controlled email address.
The victim ID allows the operator to distinguish incoming messages. It may connect the victim to a key record, but the criminal alone controls that claim.
Email correspondence can expose the victim’s identity, urgency, organization, and willingness to pay. Replies may also introduce new files presented as decryptors or proofs.
Do not open any tool received from the contact on a production computer. It could contain additional malware, destroy evidence, or fail after payment.
Step 6: Payment is presented as the only practical choice
Ransomware notes usually dismiss third-party help and emphasize exclusive access to a private key. That language is sales pressure written by the attacker.
No contract, escrow, identity verification, or chargeback protects a cryptocurrency payment. A successful transfer proves only that funds reached the supplied wallet.
Attackers can demand more for additional systems, corrupted files, delayed contact, or alleged processing fees. The first payment does not cap later demands.
Even working decryption may leave renamed files, damaged databases, missing metadata, and interrupted applications. Restoration still requires testing and careful validation.
Step 7: Unresolved access can enable a second incident
Encryption may be the final stage of a longer compromise. Credentials, remote sessions, scripts, or backdoors established earlier can survive a superficial cleanup.
If restored systems reconnect before those paths are removed, the operator may return. Backups can also be targeted once normal access is restored.
Reset affected credentials from a clean environment and review privileged groups, remote tools, mailbox rules, VPN sessions, and service accounts for unexpected changes.
Monitor after recovery for new file changes, failed logins, unfamiliar processes, and outbound connections. Returning to normal operation should be gradual and observable.
Filename, Note, Contact, and Backup Checks
Document several complete encrypted names
Record examples from different folders and file types. Include the original extension, bracketed victim ID, contact string, and final .aldet ending.
Check whether every encrypted file uses the same ID and address. Differences can indicate multiple runs, mixed variants, or data copied from another incident.
Do not expose confidential filenames publicly when requesting help. A sanitized name and non-sensitive sample may provide enough evidence for identification.
Keep encrypted originals read-only when possible. Future recovery research may depend on exact header structure, file size, and untouched encrypted bytes.
Preserve the note and wallpaper
Copy the text note and capture the changed wallpaper. Record the path, creation time, contact address, victim ID, wording, and any payment instructions.
The wallpaper image file may reside in a temporary or user folder. Its location and creation time can support the broader execution timeline.
Never assume an address is legitimate because it uses a major email provider. Free mailbox services do not verify or guarantee the promises sent through them.
Report the abusive address with preserved evidence after containment. Do not rely on provider removal as a substitute for cleaning affected systems.
Assess accounts and neighboring systems
Review sign-ins for email, VPN, remote desktop, cloud administration, storage, and backup services. Search for access occurring before the first encrypted timestamp.
Examine other endpoints for the ransom note, compound extension, matching processes, scheduled tasks, or new administrator accounts. Absence of renamed files is not proof.
Disable compromised credentials and issue replacements from a clean system. Protect emergency administrator accounts and verify that recovery channels still belong to authorized staff.
For personal computers, secure email, banking, shopping, cloud, and social accounts used recently. Password reuse expands one system compromise across unrelated services.
Validate recovery before reconnecting
Inventory offline backups, server snapshots, cloud versions, and unaffected copies. Confirm that each candidate predates initial access, not only the visible encryption event.
Run Malwarebytes and another reputable scanner on the affected endpoint. AdGuard can help block malicious advertisements, but it cannot restore .aldet data.
Build or clean the destination before restoring files. Scan restored data, test representative applications, and verify databases before returning the system to production.
Retain a separate copy of encrypted originals. A future decryptor may become available, while premature deletion removes that possibility permanently.
Check whether backup catalogues changed around the incident. Attackers sometimes delete indexes or retention records even when protected data blocks remain recoverable.
Rehearse the restore on an isolated network first. That trial reveals missing dependencies, compromised service accounts, and applications that require coordinated database recovery.
Compare restored file counts with pre-incident inventories. Successful copying alone does not prove that every folder, permission, and business record returned correctly.
Keep emergency administrative credentials separate from routine accounts. Aldet’s reach may reflect excessive privileges that should not be recreated after rebuilding.
Review endpoint alerts that occurred before mass renaming. A blocked script or unusual child process can identify the delivery chain more accurately than guesswork.
Document exceptions where recovery remains incomplete. Honest gaps help owners prioritize manual reconstruction and prevent an apparently green dashboard from hiding missing data.
Record every exception.
What to Do if Aldet Ransomware Infected Your Computer
- Cut network access. Disconnect wired and wireless connections, shared drives, synchronization clients, and removable storage without attaching any clean backup.
- Preserve the visible evidence. Save the note, wallpaper, complete filenames, victim ID, contact address, timestamps, security alerts, and suspicious download information.
- Protect backup systems. Restrict the compromised account, preserve immutable copies, and verify that backup servers or cloud repositories were not altered.
- Escalate appropriately. Contact security staff, management, legal counsel, insurers, or a qualified incident responder before destructive cleanup on business systems.
- Reset exposed credentials. Use a clean device to change email, administrator, VPN, cloud, and backup passwords, then revoke existing sessions and tokens.
- Remove active malware. Scan with Malwarebytes and another trusted tool, investigate persistence, and rebuild Windows when system trust remains uncertain. Enable AdGuard after recovery to reduce risky advertising exposure.
- Check legitimate recovery paths. Search recognized decryptor projects, validate offline backups, inspect version history, and test only copies of encrypted data.
- Restore in a clean environment. Recover critical systems by priority, verify data integrity, and reconnect them gradually while monitoring for renewed activity.
- Report extortion details. Submit the contact address, note, wallet information, and relevant indicators to authorities and affected service providers.
- Avoid follow-up recovery traps. Reject unsolicited decryptor offers, guaranteed results, advance crypto charges, and requests for remote access from unverifiable operators.
Is Your Device Infected? Run a Free Malware Scan
Slow performance, constant pop-ups, or strange behavior? These are classic signs of a malware infection. The fastest way to find out is to scan your device with Malwarebytes Free — one of the most trusted malware removal tools available.
The free version detects and removes the most common threats, including:
- Adware — the cause of those annoying pop-ups
- Browser hijackers — unwanted redirects and changed homepages
- Trojans and spyware — hidden programs stealing your data
- Potentially unwanted programs (PUPs) — software you never asked for
👉 Select your device below — Windows, Mac, or Android — then follow the simple steps to download Malwarebytes, scan your system, and remove any threats it finds. The scan usually takes 5 to 20 minutes.
Run a Malware Scan with Malwarebytes for Windows
Malwarebytes is one of the most popular and trusted anti-malware tools for Windows — and it’s completely free for removing infections. It catches threats that many antivirus programs miss, including adware, browser hijackers, and trojans. Follow the steps below to scan and clean your PC in just a few minutes.
Download Malwarebytes
Click the button below to download the latest version of Malwarebytes for Windows from the official source. The free version is all you need — it will scan your computer and remove adware, browser hijackers, and other malicious software at no cost.
Download MalwarebytesOfficial installer for Windows 11 and 10. Your download starts right away.Want real-time protection? See Malwarebytes Premium Malwarebytes Free for WindowsScans and removes malware at no cost
-
Install Malwarebytes
When the download finishes, open your Downloads folder and double-click the MBSetup file. If Windows shows a User Account Control pop-up, click “Yes” to allow the installation.

Follow the On-Screen Prompts to Install Malwarebytes
The setup wizard will walk you through a few quick screens:
-
Choose where you’re installing the program — “Personal Computer” or “Work Computer” — then click Next.

-
Malwarebytes will now install on your device. This usually takes under a minute.

-
When installation is complete, the “Welcome to Malwarebytes” screen will open automatically.

-
On the final screen, click Open Malwarebytes to launch the program.

-
Enable “Scan for Rootkits”
Before scanning, turn on rootkit detection so Malwarebytes can find even the most hidden threats. Click the Settings gear icon on the left side of the screen.

In the settings menu, find “Scan for rootkits” and click the toggle so it turns blue.

Done? Click “Dashboard” in the left pane to return to the main screen.
Start the Scan
Click the blue Scan button. Malwarebytes will automatically update its virus database and start checking your computer for malware.

-
Wait for the Scan to Finish
The scan checks your entire system for browser hijackers and other malicious programs, so it can take 5 to 20 minutes depending on your computer. Feel free to do something else — just check back occasionally to see the progress.

-
Quarantine the Detected Threats
When the scan is done, you’ll see a list of everything Malwarebytes found — malware, adware, and potentially unwanted programs. Click the “Quarantine” button to remove all of them at once.

Malwarebytes will now remove the malicious files and registry entries and move them safely into quarantine.

-
Restart Your Computer
Some threats can only be fully removed after a reboot. If Malwarebytes asks you to restart, click Yes. Once you’re logged back in, Malwarebytes has finished removing the threats it found.

That’s it — your Windows PC is now clean of trojans, adware, and other malware, and should be back to running smoothly.
If you are still having problems with your computer after completing these instructions, then please follow one of the steps:
- Run a computer scan with ESET Online Scanner
- Ask for help in our Windows Malware Removal Help & Support forum.
Run a Malware Scan with Malwarebytes for Mac
Malwarebytes for Mac is a free on-demand scanner that removes the malware other security software tends to miss — adware, browser hijackers, and unwanted programs included. Cleaning an infected Mac with Malwarebytes has always been completely free, and it’s our go-to recommendation. Follow the steps below to scan and clean your Mac in just a few minutes.
-
Download Malwarebytes for Mac
Click the button below to download the latest version of Malwarebytes for Mac.
Download MalwarebytesOfficial installer for macOS. Your download starts right away.Want real-time protection? See Malwarebytes PremiumMalwarebytes Free for MacScans and removes malware at no cost -
Open the Malwarebytes setup file
When the download finishes, open your Downloads folder and double-click the setup file to begin the installation.

-
Follow the On-Screen Prompts to Install Malwarebytes
The Malwarebytes for Mac Installer will guide you through a few quick screens. Click “Continue” and keep following the prompts until the installation completes.



When the installation is complete, Malwarebytes opens to the Welcome to Malwarebytes screen. Click “Get started“.
-
Select “Personal Computer” or “Work Computer”
Malwarebytes will ask what type of computer you’re installing it on. Click either Personal Computer or Work Computer, whichever applies.

-
Start the Scan
Click the “Scan” button. Malwarebytes will automatically update its detection database and begin checking your Mac for malware.

-
Wait for the Scan to Finish
Malwarebytes will scan your Mac for adware, browser hijackers, and other malicious programs. This can take a few minutes, so feel free to do something else — just check back occasionally to see the progress.

-
Quarantine the Detected Threats
When the scan is done, you’ll see a list of everything Malwarebytes found. Click the “Quarantine” button to remove all the threats at once.

-
Restart Your Mac
Malwarebytes will now remove all the malicious files it found. Some threats can only be fully removed after a reboot — if Malwarebytes asks you to restart, allow it. Once you’re logged back in, your Mac is clean.

That’s it — your Mac is now free of adware, rogue browser extensions, and other potentially harmful software.
If you are still experiencing problems while trying to remove a malicious program from your computer, please ask for help in our Mac Malware Removal Help & Support forum.
Run a Malware Scan with Malwarebytes for Android
Malwarebytes for Android automatically detects and removes dangerous threats like malware and ransomware so you don’t have to worry about your most-used device being compromised. Aggressive detection of adware and potentially unwanted programs keeps your Android phone or tablet running smooth.
-
Download Malwarebytes for Android.
You can download Malwarebytes for Android by clicking the link below.
Get Malwarebytes for AndroidOpens Google Play in a new tab.Want real-time protection? See Malwarebytes Premium for AndroidMalwarebytes for AndroidScans your phone and removes malware at no cost -
Install Malwarebytes for Android on your phone.
In the Google Play Store, tap “Install” to install Malwarebytes for Android on your device.

When the installation process has finished, tap “Open” to begin using Malwarebytes for Android. You can also open Malwarebytes by tapping on its icon in your phone menu or home screen.

-
Follow the on-screen prompts to complete the setup process
When Malwarebytes will open, you will see the Malwarebytes Setup Wizard which will guide you through a series of permissions and other setup options.
This is the first of two screens that explain the difference between the Premium and Free versions. Swipe this screen to continue.
Tap on “Got it” to proceed to the next step.
Malwarebytes for Android will now ask for a set of permissions that are required to scan your device and protect it from malware. Tap on “Give permission” to continue.
Tap on “Allow” to permit Malwarebytes to access the files on your phone.
-
Update database and run a scan with Malwarebytes for Android
You will now be prompted to update the Malwarebytes database and run a full system scan.

Click on “Update database” to update the Malwarebytes for Android definitions to the latest version, then click on “Run full scan” to perform a system scan.

-
Wait for the Malwarebytes scan to complete.
Malwarebytes will now start scanning your phone for adware and other malicious apps. This process can take a few minutes, so we suggest you do something else and periodically check on the status of the scan to see when it is finished.

-
Click on “Remove Selected”.
When the scan has been completed, you will be presented with a screen showing the malware infections that Malwarebytes for Android has detected. To remove the malicious apps that Malwarebytes has found, tap on the “Remove Selected” button.

-
Restart your phone.
Malwarebytes for Android will now remove all the malicious apps that it has found. To complete the malware removal process, Malwarebytes may ask you to restart your device.
That’s it — your Android phone is now clean — no more malicious apps, adware, or browser redirects.
If you are still having problems with your phone after completing these instructions, then please follow one of the steps:
- Restore your phone to factory settings by going to Settings > General management > Reset > Factory data reset.
- Ask for help in our Mobile Malware Removal Help & Support forum.
Stay Protected: Block Ads and Malicious Sites
Now that your device is clean, keep it that way. Most infections start with a malicious ad or a fake download button — so blocking them at the source is your best defense.
We recommend AdGuard, which blocks malicious ads, phishing pages, and dangerous redirects before they can reach you.
👉 Download AdGuard and browse safely
Frequently Asked Questions
Can I recover files by deleting the .aldet ending?
No. The longer filename is only a visible marker. The underlying content remains encrypted and requires a compatible decryption path.
Why does every filename contain an email address?
Aldet embeds the operator’s contact beside the victim ID to direct affected users into the ransom conversation and associate messages with individual infections.
Is there a free Aldet decryptor?
No verified public decryptor was confirmed during this review. Check recognized recovery projects periodically using copies and the exact variant indicators.
Will removing Aldet restore my documents?
No. Removal prevents further malicious activity. Previously encrypted files still require clean backups, a compatible decryptor, or another validated recovery source.
Should I keep the ransom note?
Yes. Preserve it as evidence. Its victim ID, contact details, wording, and timestamps can assist identification, reporting, and incident correlation.
Can I reconnect a backup after one clean scan?
Wait until the environment is trusted. One scan may miss persistence or a separate loader, so verify cleanup before exposing any healthy backup.
The Bottom Line
Aldet ransomware marks encrypted files with a victim ID, contact address, and .aldet, then reinforces its demand through a note and changed desktop wallpaper.
Preserve those clues, isolate affected systems, remove unresolved access, and restore only from validated sources. The attacker-controlled inbox should never become your recovery plan.

Join the discussion
0 commentsShare your experience or ask a question about this article.
Your progress
Did these steps help?
Let us know how the guide worked for you.
Describe what you see and the step you reached. Keep passwords and other private information out.
Discussion
Start the conversation
Have a question or something useful to share? Add the first comment.