


As Apple products have increased in popularity over the years, they have unfortunately become a huge target for scammers and cybercriminals. One common tactic used is fake security alerts purporting to be from “AppleCare” warning of issues detected on the victim’s device. These fraudulent pop-ups are carefully designed to trick unsuspecting users into installing malware, paying for unnecessary services, or sharing sensitive information.
This detailed guide will examine exactly how these “AppleCare Security Alert” scams work, providing tips to avoid becoming a victim.


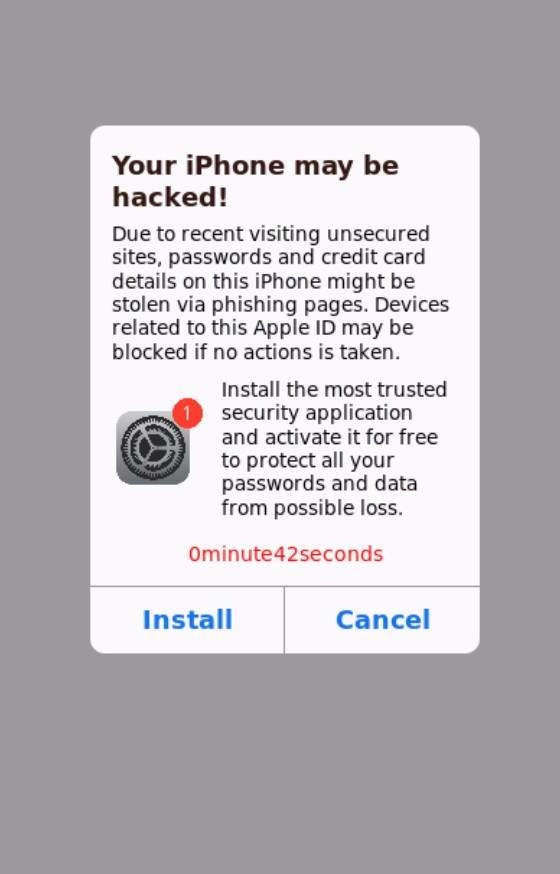
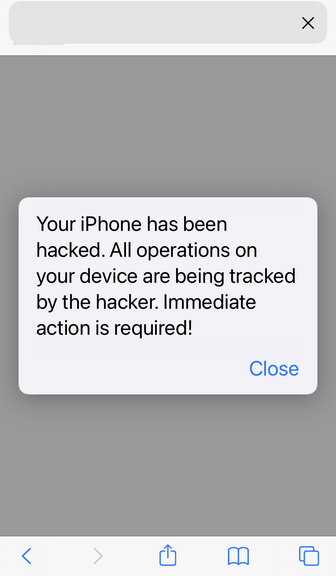
Overview of Fake “AppleCare Security Alert” Scams
Cybercriminals are constantly evolving their techniques to distribute malware and generate illicit revenue. Pop-up alerts impersonating legitimate software or security companies have proven an effective approach to exploit public trust in brands like Apple.
Common Elements of Fake Alerts
These scam pop-up alerts often share similar traits and deceptive messaging:
- Apple branding and logos providing an air of authority
- Dire warnings of security threats like malware or harmful software
- Claims of compromised banking/personal data requiring immediate action
- Push for the victim to click links to address supposed threats
- Offers for security software or unnecessary support services
How Victims End Up Seeing the Alerts
Most victims encounter these fake AppleCare security alerts through tainted websites, ads, or unconventional software downloads. Possible infection vectors include:
- Malicious Pop-up/Pop Under Ads: Advertisements styled as system warnings lead to phony alerts when clicked.
- Compromised Sites: Legitimate sites hacked to show visitors fake security alerts.
- Typosquatting Sites: Deceptively named sites show the pop-ups via browser redirects.
- Pirated Software Downloads: Cracked apps/games contain code to trigger fake warnings.
Understanding the Scammer’s End Goal
Scammers have two primary objectives with the alerts:
- Install Malware & Spyware: When users click links in the pop-ups, it downloads Trojans, keyloggers, botnet software and other threats.
- Defraud Victims via Tech Support Scams: Pop-ups urge calling fraudulent “AppleCare” numbers, which charge exorbitant fees to fix made-up issues.
In both cases, the pop-ups instill urgency in victims and leverage Apple’s brand recognition for increased manipulation.
By weaponizing public trust in Apple and lack of cybersecurity awareness, scammers can increase infection rates and maximize monetization from fraud campaigns.
Inside the Scammers’ Infrastructure
Perpetrating these fake AppleCare cons involves an extensive infrastructure:
- Blackhat SEO Teams: Maximizes visibility of scam sites on Google via link manipulation schemes.
- Malvertising Platforms: Runs tainted ads leading to phony AppleCare alerts.
- Exploit Kits: Identifies and utilizes browser/OS vulnerabilities to install malware.
- Rogue Call Centers: Defrauds users out of money after they call the numbers in alerts.
- Money Muling Services: Launders illicit earnings extracted from victims.
With deep resources backing them, scammers are able to scam countless users through scalable fraud operations.
Prolific Examples of Fake Alert Variants
Cybersecurity researchers have documented numerous variants of these Apple-themed scams in the wild:
- “AppleCare Critical Alert”
- “Apple Support Warning Alert”
- “Apple ID Verification Alert”
- “Account Suspended for Unusual Activity”
- “Factory Reset Recommended by AppleCare”
And many other forms of fake diagnostics and account suspension alerts from “The Apple Corporation”.
By regularly creating new iterations of the con, scammers stay ahead of blacklists and user awareness regarding specific titles. And with custom code and infrastructure for serving pop-ups, they can AB test different phrasing to maximize conversion rates.
How the Fake “AppleCare Security Alert” Scam Works
Now that we’ve covered the common traits and overview of these Apple phishing tactics, let’s walk through the scam sequence victims experience:
Step 1: Victim Visits a Tainted Site
The path to encountering fake AppleCare alerts starts with landing on a compromised or deliberately fraudulent website:
- Compromised Site – A hacked WordPress site or outdated vBulletin forum silently redirects visitors to the scam pop-up.
- Typosquatting Site – A site with a deceptive URL (apple-support.com) displays the alert.
- Pirated Software Portal – Downloaders of cracked software unknowingly install malware that triggers pop-up alerts.
In addition to websites, malvertising and tainted browser extensions can also redirect users to the scam alerts.
Step 2: Victim Gets Redirected to the Fake Alert
Once on a site participating in the scam, visitors get redirected to the fraudulent AppleCare alert through two primary methods:
- Browser Redirects – JavaScript tells the browser to silently load the phony Apple site.
- Pop Under Windows – Separate browser windows with fake alerts appear over the existing content.
Often times, multiple redirect and pop under layers are stacked to prevent the user from hitting the browser back button and exiting out.
Step 3: Victim Views Alarming Fake Alert
At this point, the fake security alert purporting to be from Apple Support or AppleCare is directly in front of the user:
- Apple Logos & Branding – Images like the Apple logo and Apple Support graphics visually legitimize the alert.
- Threat Detection Claims – The pop-up states advanced algorithms have discovered malware, viruses or harmful software on their device.
- Data/Privacy Risk Warning – It emphasizes financial and personal data is likely compromised without immediate action.
- Social Engineering Tactics – The alert instills fear and urgency with warnings in red lettering and threatening language.
With official branding and terrifying warnings shown directly in the browser, many users are tricked into thinking the alert is legitimate.
Step 4: Call-to-Action to Address Supposed Threat
After confronting victims with warnings crafted to instill maximum fear, the fake AppleCare alerts present the urgent call-to-action:
- Click Here to Remove Risks: Buttons lead to sites offering supposed security software for maintaining protection. In actuality, clicking downloads info-stealing malware directly onto the user’s device.
- Call Apple Support Immediately: Phone numbers listed connect to fraudulent call centers that charge money to “fix” non-existent issues.
At this stage, the scammers don’t care if you click links or call – each path leads to monetization from either installing malware or fraudulent tech support charges.
Step 5: User Deceived into Taking Action
Sadly, many users scroll past security warnings and alerts without proper scrutiny. In this stressed state brought upon by the fake alert:
- Clicking Links – Downloads malware such as spyware and remote access Trojans onto the device directly from the scammers’ site.
- Calling Numbers – Call centers collect payments of $200-$500 through untraceable methods to “resolve” made up security issues.
In both outcomes, scammers secure their malicious payloads on devices or generate fraudulent fees from duped victims.
Identifying Fake AppleCare Security Alert Websites
Scammers build sophisticated websites impersonating Apple’s support and account-related pages. But upon closer inspection, scam sites reveal themselves through unnatural URLs, poor designs, and outdated branding.
Follow these best practices to avoid being deceived:
Scrutinize the Website Address for Oddities
Fake sites often have peculiarities such as:
- Misspelled URLs (ex: apple-care.com, applsupport.com)
- New top-level domains like .review or .tech
- Vanity URLs masking shady intention (applecare-official.com)
- Addresses with long strings of random characters
Verify site URLs against Apple’s list of official domains before entering any info.
Compare Branding Against Apple’s Legitimate Designs
While camouflaging as Apple sites, fakes tend to show subtle differences:
- Slightly different shades in branding colors
- Lower resolution Apple logo images
- Altered visual fonts for text
- Stylistic disparities in page layouts
Study Apple’s website to grow familiar with authentic designs before assessing third-party branding critically.
Check for Poor Writing Quality and Grammatical Errors
Scam sites often have mistakes revealing non-native developers:
- Awkward phrasing in security warnings
- Bad grammar with wrong verb tenses
- Repeated misspellings of product names
While Apple’s writing is polished, fraudsters often rush copy to launch schemes quicker.
Identifying these suspicious site traits takes scrutiny but prevents falling victim to Apple-themed online frauds. Use an ad blocker and antivirus software as added precautions before visiting random URLs. And if something seems deceitful, trust your instincts to navigate away and avoid potential data loss threats. Staying vigilant is crucial.
What To Do If You Get Targeted by a Fake Security Alert Scam
If you encounter a pop-up closely resembling the flow outlined before, here are tips on assessing potential threats and next steps if compromised:
Carefully Analyze the Alert
Before reacting to the alarming claims, scrutinize the pop-up:
- Does branding match Apple’s sites? Fakes use slightly different colors, fonts, etc.
- Are there grammar/spelling errors demonstrating a rush job?
- Any urgent push to click links or make calls without researching claims?
Cross-check any diagnostic report names/numbers shown against official Apple literature.
DO NOT – Click Any Links, Call Numbers, or Input Data
Fake alerts try prompting immediate visits to scam sites or tech support numbers. Stop and investigate claims rather than clicking or calling from pop-ups:
- Links lead directly to malware. This bypasses security warnings in the browser.
- Numbers route to fraudulent overseas call centers eager to swindle.
- Entering any requested information will expose you to future exploitation.
If something seems suspicious, close pop-up windows without further interaction.
DO – Visit Apple Directly to Verify Warnings
Rather than trusting unsolicited alerts, go directly to Apple’s site or authorized partners to scrutinize claims:
- Check Activity Monitor on your Mac for odd processes indicative of malware.
- Scan devices with legitimate antivirus software like Bitdefender or Malwarebytes.
- Initiate Apple’s official diagnostics to assess supposed issues reported. Examples include Apple Hardware Test and Apple Diagnostics tools.
If scanning tools reveal no problems, the alerts were fake and should be dismissed as phishing attempts.
Secure Accounts/Devices If Compromised
If scans confirm malware or fraud after engaging pop-ups, take actions to limit damage:
- Reset all account passwords securely if any were exposed to scammers. Enable two-factor authentication wherever possible.
- Backup essential data and perform a clean OS reinstall if necessary to remove malware.
- Monitor financial statements closely for signs of fraud stemming from the incident.
- Contact banks/credit agencies on any compromised financial accounts or identities.
Though falling victim is discouraging, moving swiftly to contain threats is crucial to prevent further issues.
How to Remove Unwanted Apps and Malware
If a pop-up scam tricked you into downloading an unwanted program — or you suspect your device is infected — follow the free, step-by-step removal guide below to find and remove it.
Please follow the steps in order. If you get stuck or have doubts at any point, stop and ask for help in our free support forum — our team will guide you personally.
 Remove Unwanted Apps and Malware from Windows
-
 Remove Unwanted Apps and Malware from Mac
 Remove Unwanted Apps and Malware from Android
- Remove Unwanted Apps and Malware from iPhone and iPad
Remove Unwanted Apps and Malware from Windows
- STEP 1: Uninstall malicious programs from Windows
- STEP 2: Reset browsers back to default settings
- STEP 3: Use Malwarebytes Anti-Malware to remove malware and unwanted programs
- STEP 4: Use HitmanPro to scan your computer for badware
- STEP 5: Use AdwCleaner to remove adware and malicious browser policies
STEP 1: Uninstall malicious programs from Windows
In this first step, we will manually check if any unknown or malicious programs are installed on the computer. Sometimes adware and browser hijackers can have a usable Uninstall entry that can be used to remove them.
-
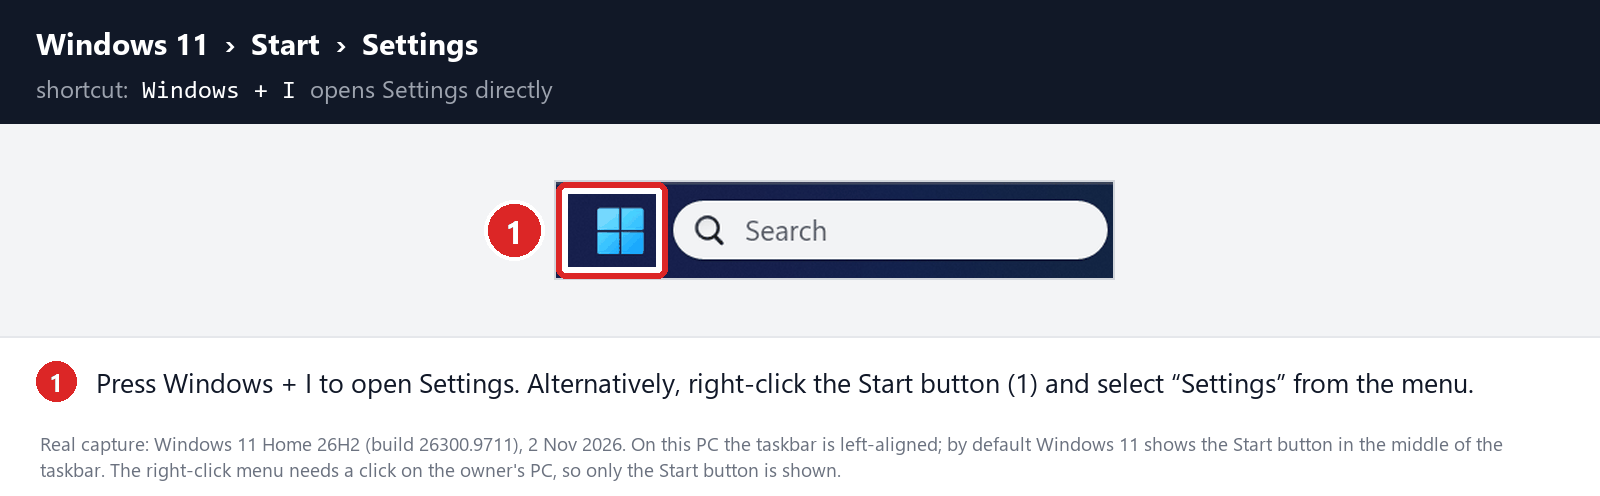
Open the Settings app
Press Windows + I on your keyboard to open Settings. Alternatively, right-click the Start button and select “Settings” from the menu.
-
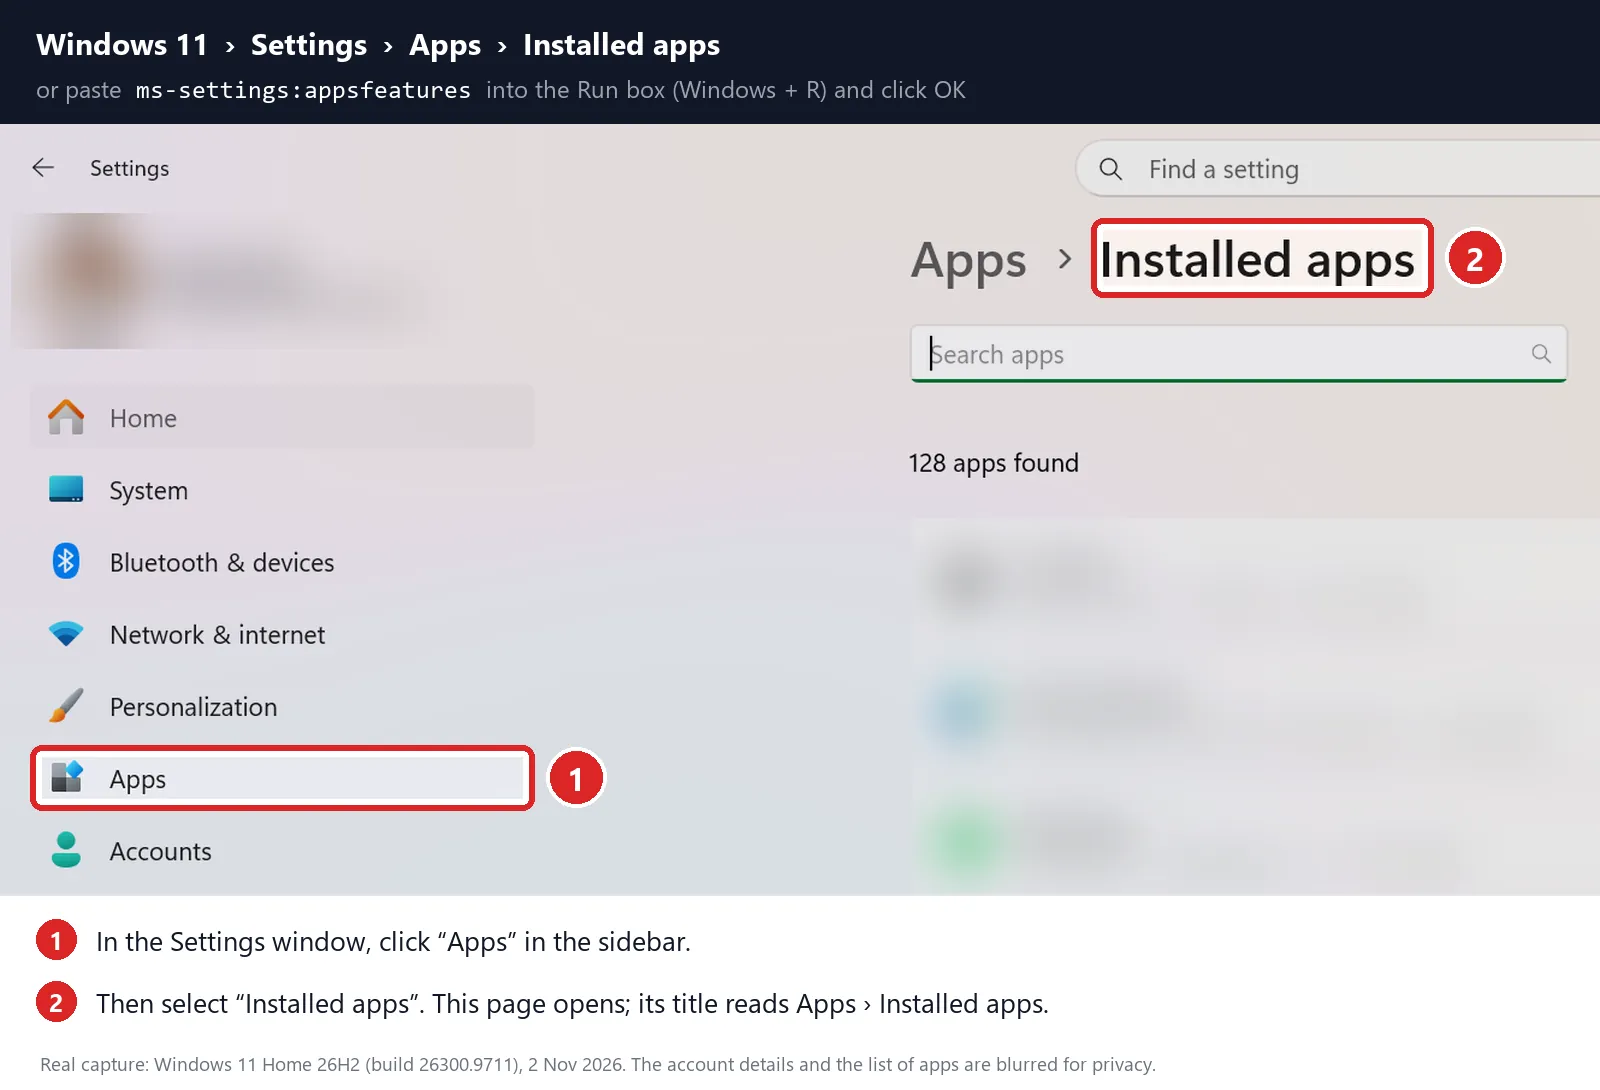
Go to “Installed apps”
In the Settings window, click “Apps” in the sidebar, then select “Installed apps“.
-
Find and uninstall the malicious program
Scroll through the list of installed apps and look for anything suspicious — a program you don’t remember installing, or one with a strange or generic name.
Quick tip: click “Sort by” and choose “Date installed“. Malware is usually one of the most recently installed programs, so it will appear near the top.
When you find the malicious program, click the three dots next to it and select “Uninstall“.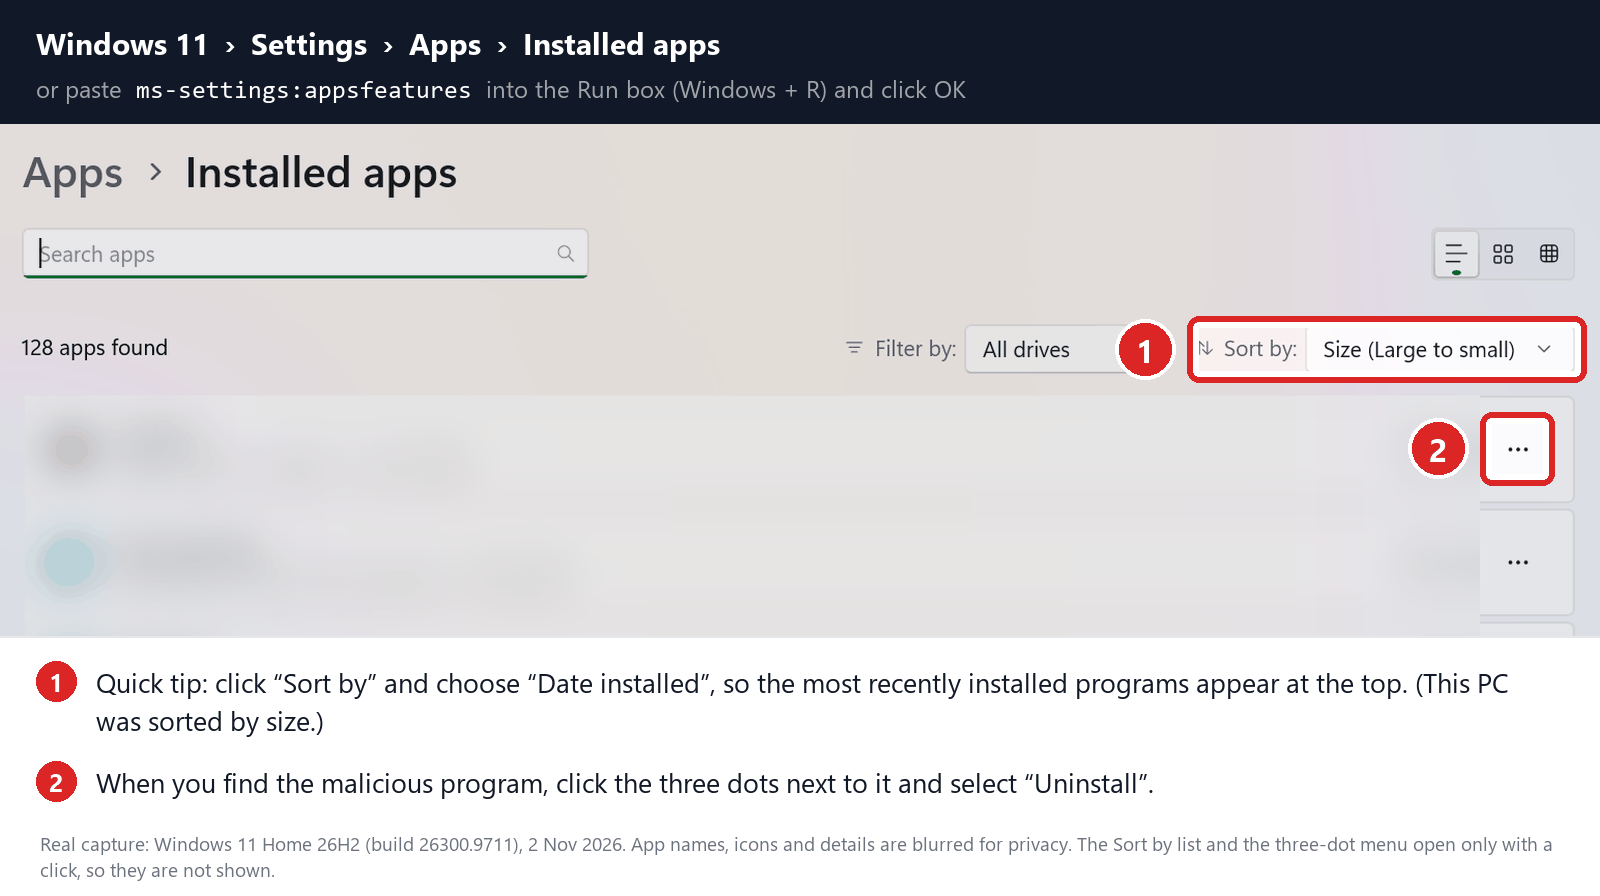 Didn’t find any suspicious programs? That’s fine — not all infections install visible apps. Just continue with the next step in this guide.
-
Complete the uninstall
Confirm by clicking Uninstall in the message box, then follow the remaining prompts.
Read each prompt carefully — some malicious programs use confusing wording or pre-ticked boxes hoping you’ll click through without looking.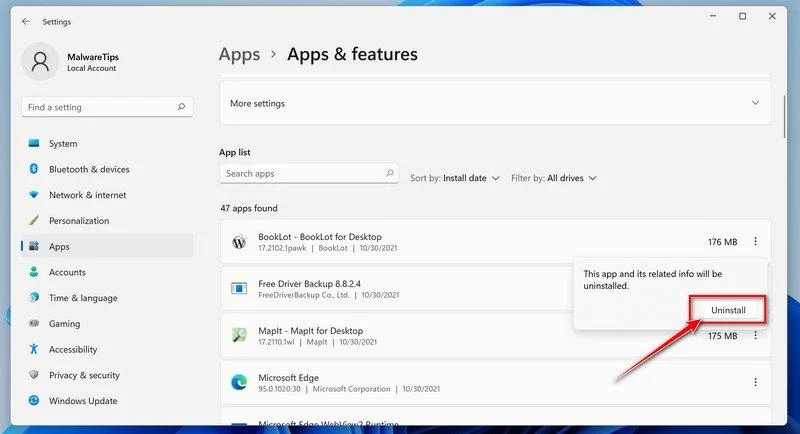
-
Open the Settings app
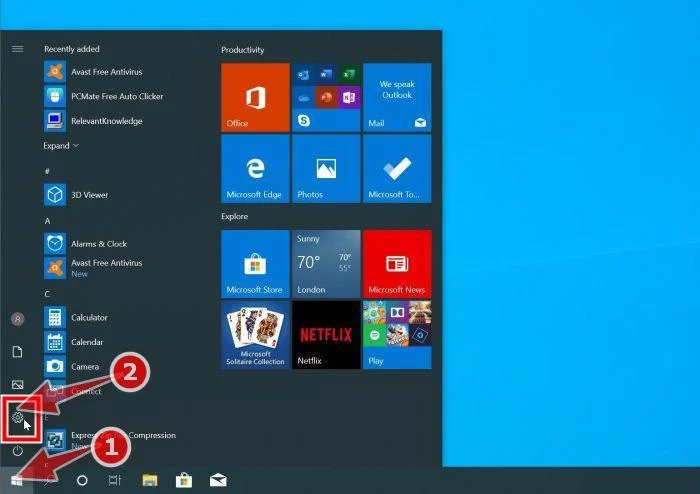
Press Windows + I on your keyboard to open Settings. Alternatively, click the Start button on the taskbar and select “Settings” (the gear icon).
-
Click on “Apps”
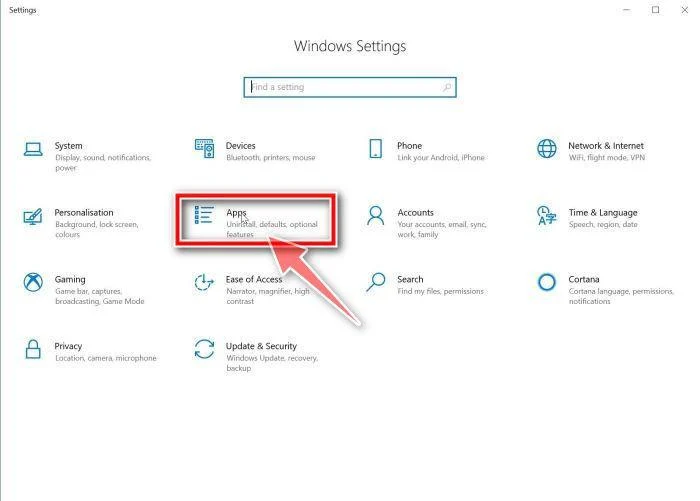
In the “Windows Settings” window, click “Apps“. The “Apps & Features” section should open by default — if it doesn’t, select it from the list on the left.
-
Find and uninstall the malicious program
Scroll through the list of installed apps and look for anything suspicious — a program you don’t remember installing, or one with a strange or generic name.
Quick tip: click “Sort by” and choose “Install date“. Malware is usually one of the most recently installed programs, so it will appear near the top.
When you find the malicious program, click on it and select “Uninstall“.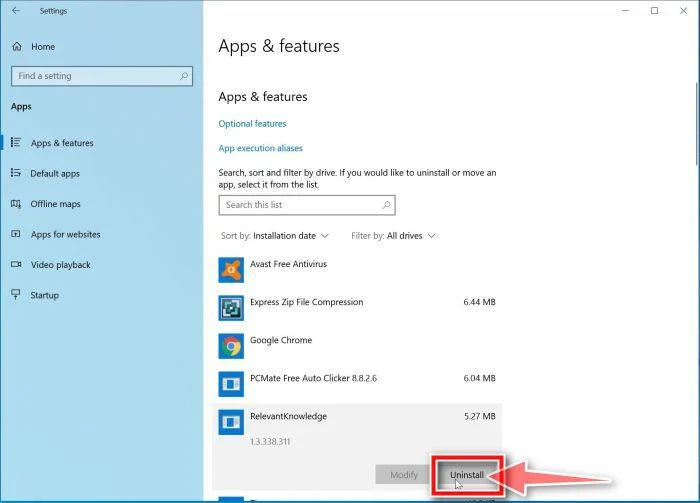 Didn’t find any suspicious programs? That’s fine — not all infections install visible apps. Just continue with the next step in this guide.
-
Complete the uninstall
Confirm by clicking Uninstall in the message box, then follow the remaining prompts.
Read each prompt carefully — some malicious programs use confusing wording or pre-ticked boxes hoping you’ll click through without looking.
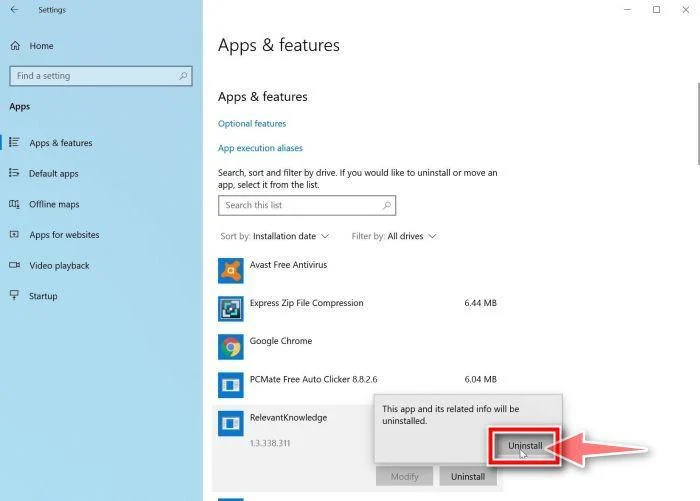
With the malicious programs removed, you’re ready for the next step in this guide.
STEP 2: Reset browsers back to default settings
In this step, we will remove spam notifications, malicious extensions, and change to default any settings that might have been changed by malware.
Please note that a Chrome or Edge reset turns off all your extensions, and a Firefox refresh removes them. Your bookmarks and favorites stay intact. For each browser that you have installed on your computer, please click on the browsers tab below and follow the displayed steps to reset that browser.
Reset Chrome for Windows to default settings
We will now reset your Chrome browser settings to their original defaults. This will reset your startup page, new tab page, search engine, and pinned tabs. It will also disable all extensions and clear temporary data like cookies. Your favorites, history, and saved passwords will not be cleared.
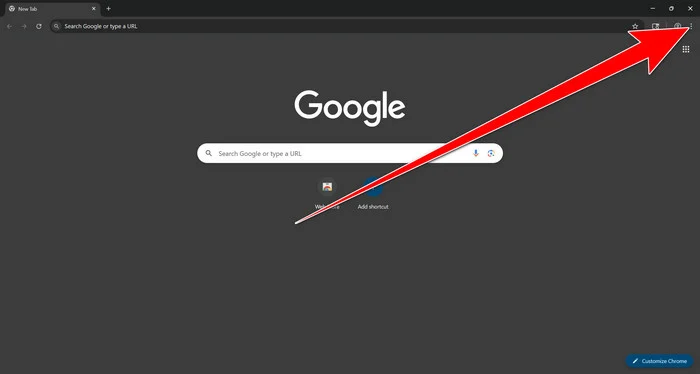
Open the Chrome menu
Open Google Chrome and click the three-dot (⋮) icon in the top-right corner.
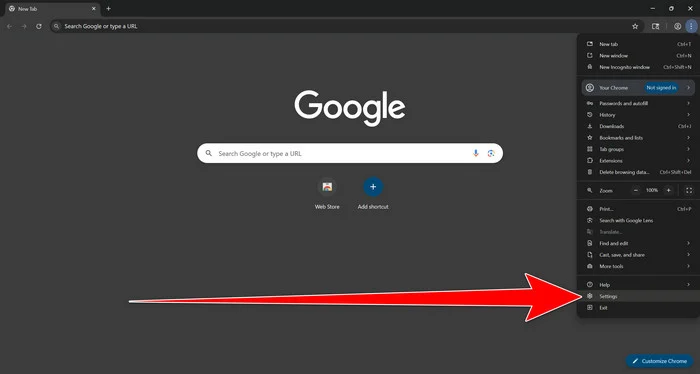
Open Chrome Settings
Select Settings from the Chrome menu.
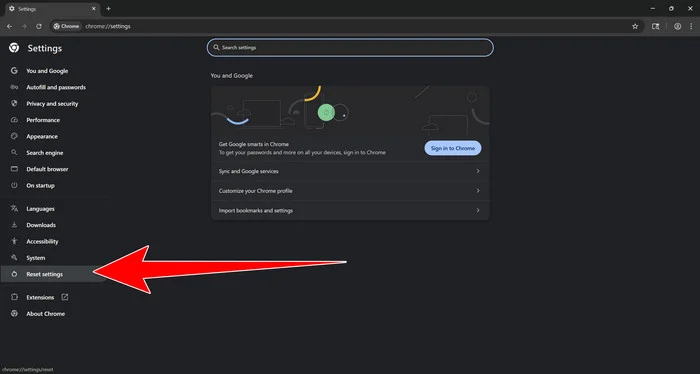
Select “Reset settings”
Look at the menu on the left side of the Settings page. Scroll down and click Reset settings.
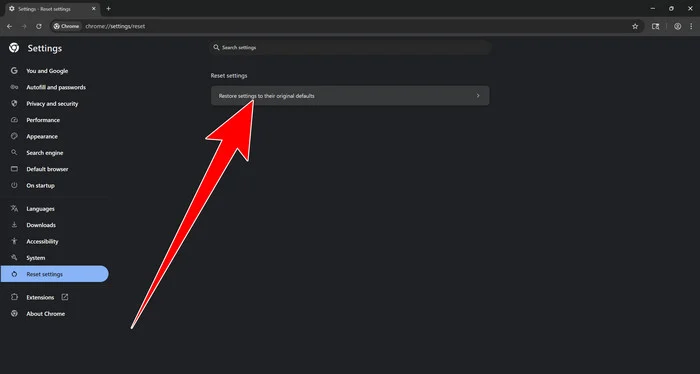
Restore Chrome’s original settings
Click Restore settings to their original defaults.
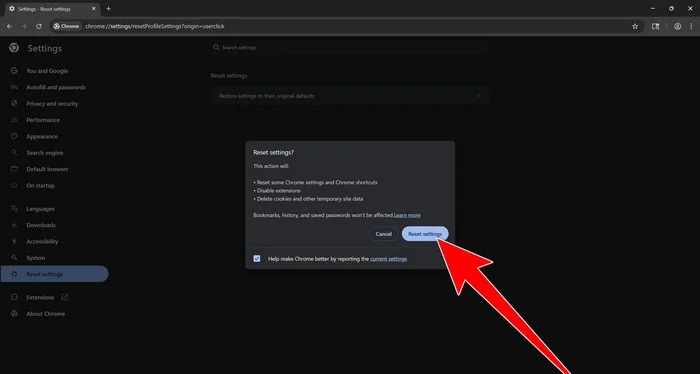
Confirm the Chrome reset
A confirmation window will appear. Click Reset settings.
This will:
- Restore the default search engine, homepage, and new tab page
- Reset startup pages and pinned tabs
- Reset site permissions, such as notifications and pop-ups
- Disable installed extensions
- Clear temporary cookies and website data
Don’t worry: Chrome will not delete your bookmarks, browsing history, or saved passwords. If you’re signed in to Chrome, the reset applies on all devices where you’re signed in.
Restart Chrome and perform a test search. If your searches now open normally in Google, you can stop here.
If searches are still redirected through shady domains complete the additional step below.
Remove persistent search hijacker data
Only complete this step if the redirect continues after resetting Chrome.
Some browser hijackers hide inside Chrome’s local search-engine database. A standard Chrome reset may not remove this database, which is why searches can continue to pass through shady sites.
The following procedure creates a backup of the affected database and allows Chrome to build a new, clean version. This is safer and less disruptive than deleting the entire Chrome profile.
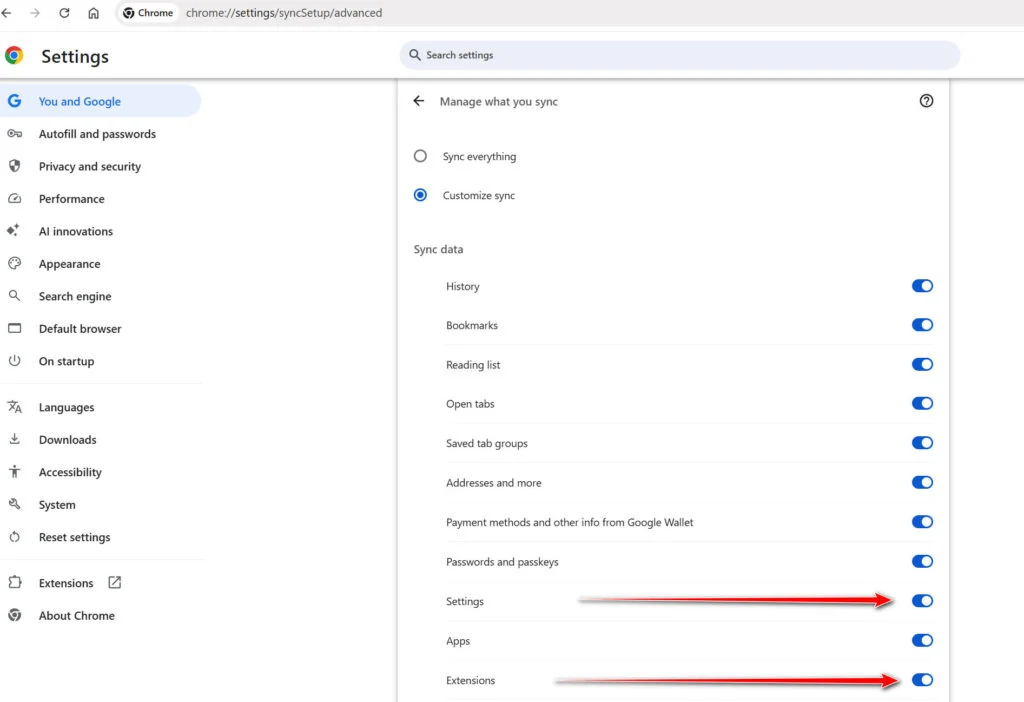
First, prevent Chrome Sync from restoring the hijacked settings:
- Open a new Chrome tab.
- Copy the following address, paste it into Chrome’s address bar, and press Enter:
chrome://settings/syncSetup/advanced - Under Manage what you sync, select Customize sync.
- Turn off Settings and Extensions.
- You can leave Bookmarks and Passwords enabled so your important data remains synchronized.
Note: Some newer Chrome versions may automatically redirect this address to the Google Account settings page. If that happens, locate the list of synchronized Chrome data and turn off Settings and Extensions there.
Now save anything you are working on and close every Chrome window.
Run the cleanup command:
- Press the Windows key on your keyboard.
- Type PowerShell.
- Open Windows PowerShell. Administrator access is not required.
- Copy the entire command shown below.
- Right-click inside the PowerShell window to paste the command, then press Enter.
- If Windows warns you about pasting multiple lines, select the option to continue.
$stamp = Get-Date -Format "yyyyMMdd-HHmmss"

Get-Process chrome -ErrorAction SilentlyContinue |
 Stop-Process -Force

$root = "$env:LOCALAPPDATA\Google\Chrome\User Data"

if (Test-Path $root) {
 $profiles = Get-ChildItem $root -Directory |
 Where-Object {
 $_.Name -eq "Default" -or
 $_.Name -match "^Profile \d+$"
 }

 foreach ($profile in $profiles) {
 foreach ($name in @(
 "Web Data",
 "Web Data-journal",
 "Web Data-wal",
 "Web Data-shm"
 )) {
 $file = Join-Path $profile.FullName $name

 if (Test-Path $file) {
 $backup = "$file.search-hijacker-backup-$stamp"
 Move-Item -LiteralPath $file -Destination $backup
 Write-Host "Backup created: $backup"
 }
 }
 }
}

Write-Host ""
Write-Host "Chrome search data has been cleaned."
Write-Host "You can now reopen Chrome."
Wait until PowerShell displays the following message:
Chrome search data has been cleaned.
You can now reopen Chrome.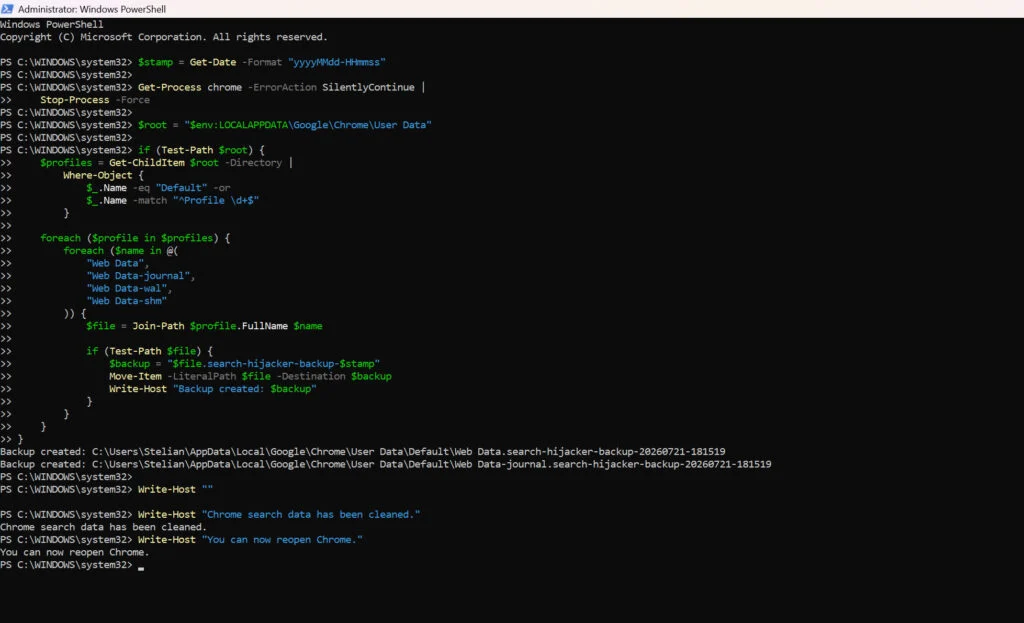
Close PowerShell and reopen Google Chrome. Chrome will automatically create a clean search database for every local profile.
Next, copy the following address, paste it into Chrome’s address bar, and press Enter:
chrome://settings/searchEngines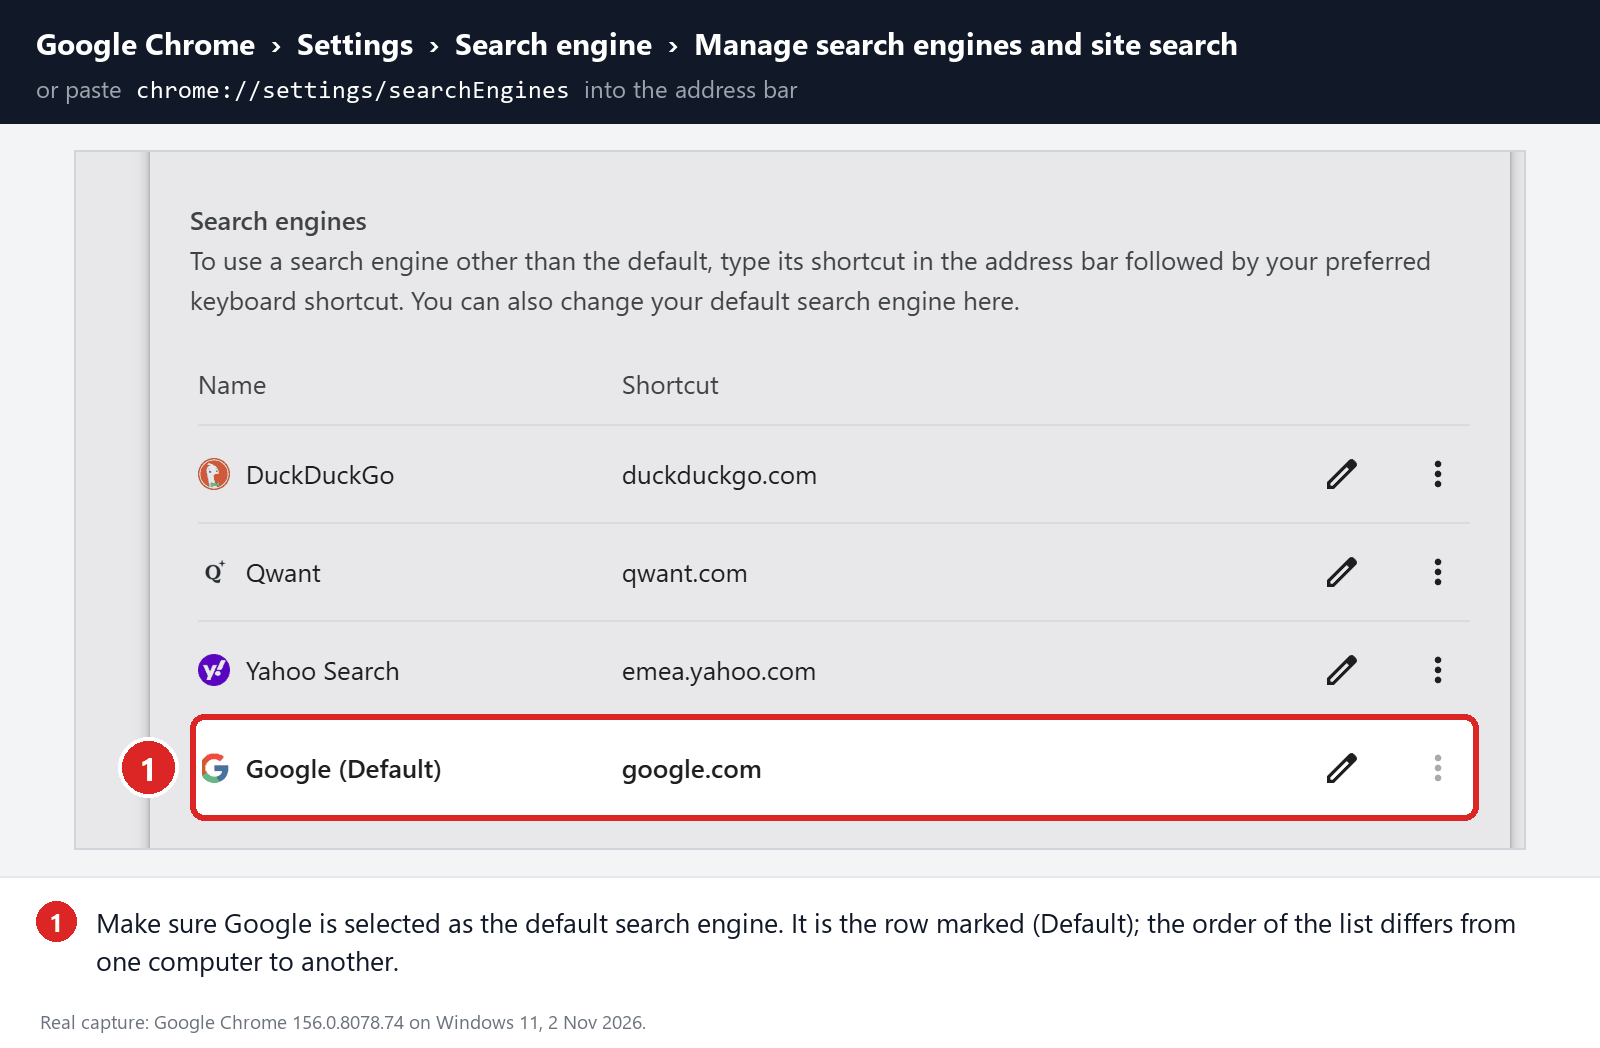
Make sure Google is selected as the default search engine. Test several searches from the address bar and confirm that they no longer pass through shady search engines.
Your important Chrome data is protected: the PowerShell cleanup does not remove bookmarks, saved passwords, browsing history, cookies, or installed extensions. However, it may reset locally stored Autofill addresses, payment cards saved only on this computer, and form suggestions.
The original search database is not deleted. PowerShell renames it and adds
search-hijacker-backupto its filename so it can be recovered if necessary.Keep Settings and Extensions synchronization disabled while testing Chrome. Do not enable every extension at once. Enable only the extensions you recognize, one at a time, and test Chrome after each one.
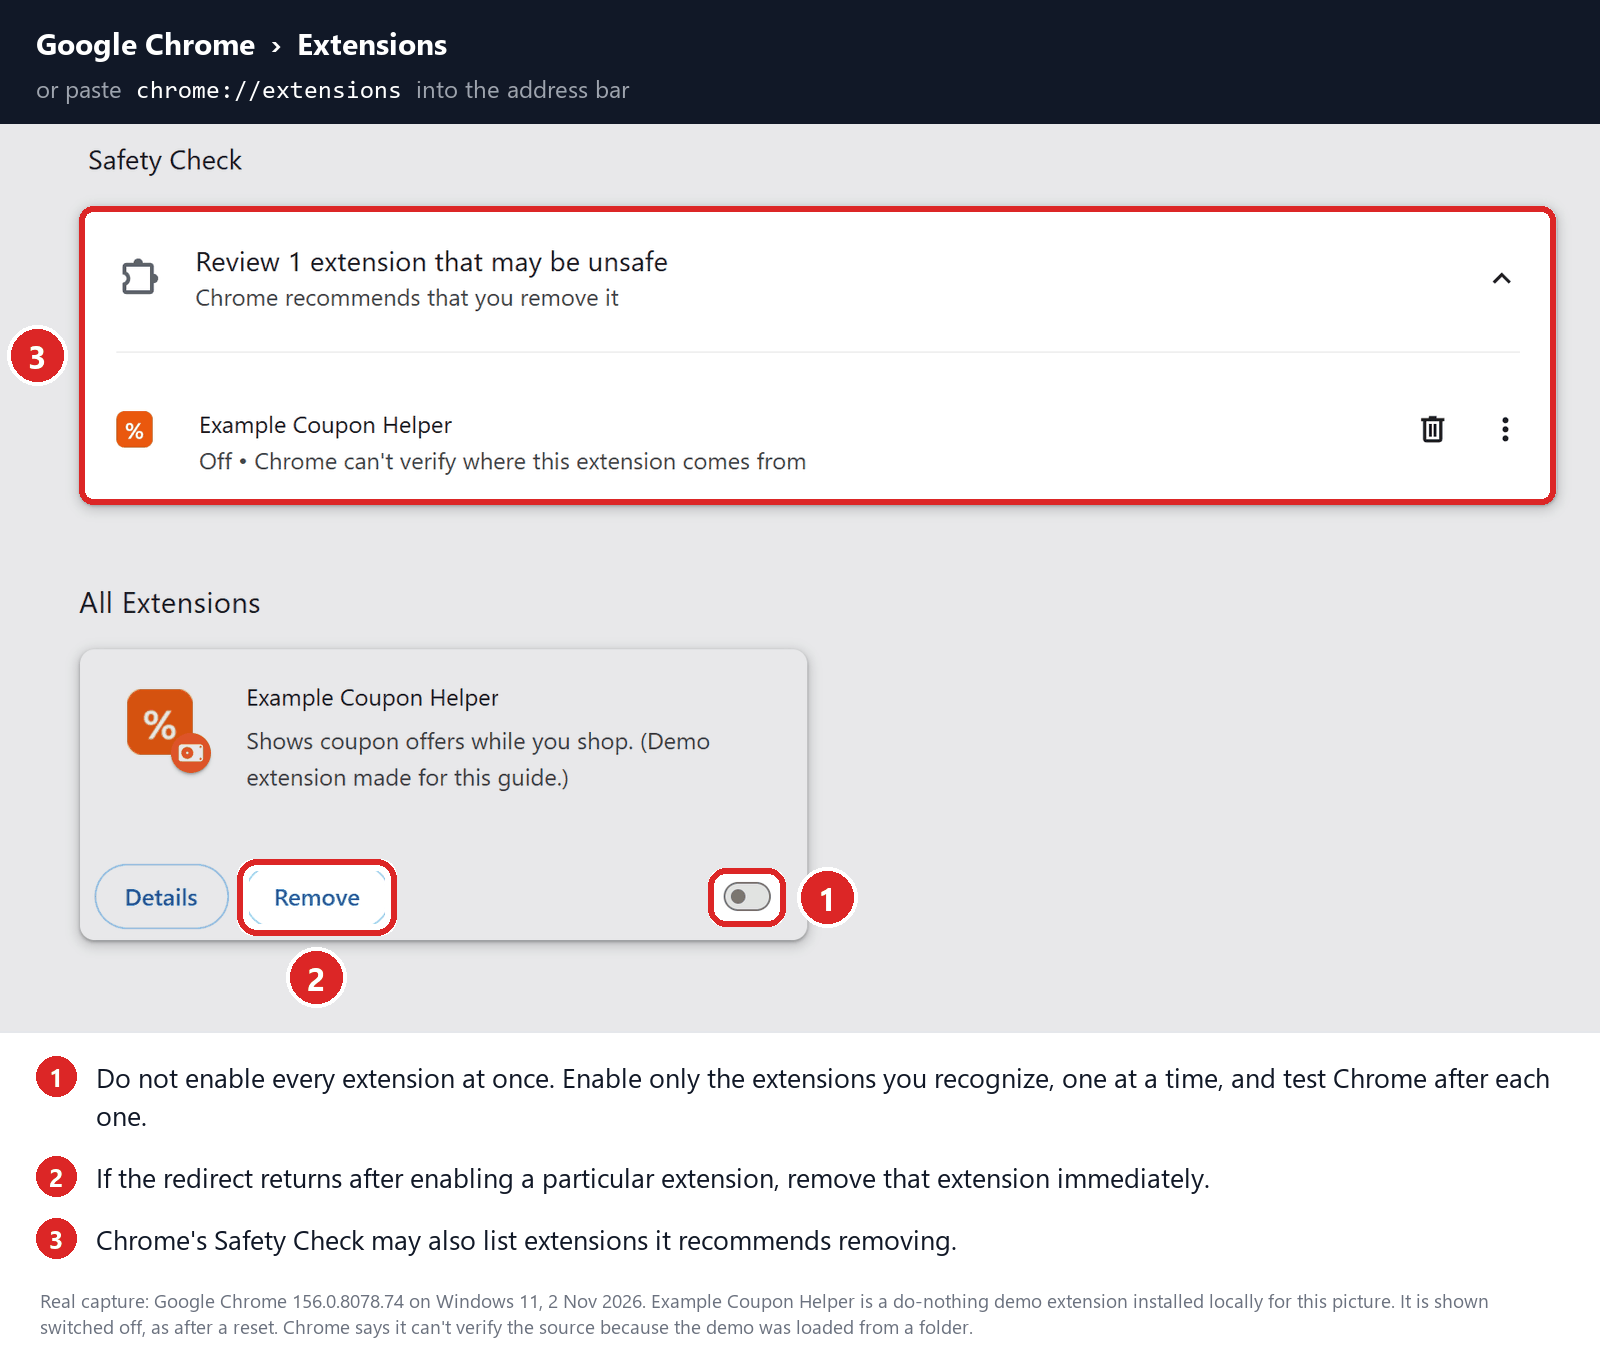
If the redirect returns after enabling a particular extension, remove that extension immediately.
Reset Firefox for Windows to default settings
We will now reset your Firefox browser settings to their default. The reset feature fixes many issues by restoring Firefox to its factory default state while saving your essential information like bookmarks, passwords, web form auto-fill information, browsing history, and open tabs.
-
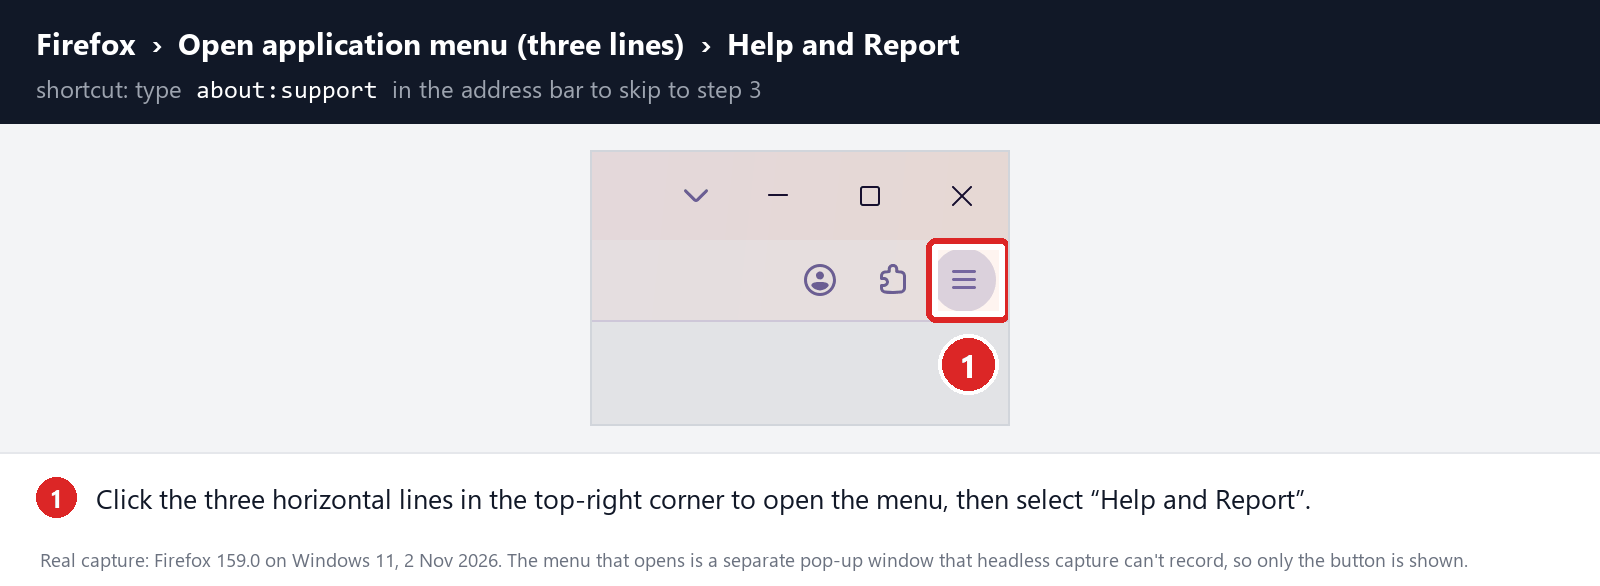
Open the Firefox menu and click “Help and Report”
Click the three horizontal lines in the top-right corner of Firefox to open the main menu, then select “Help and Report“.
-
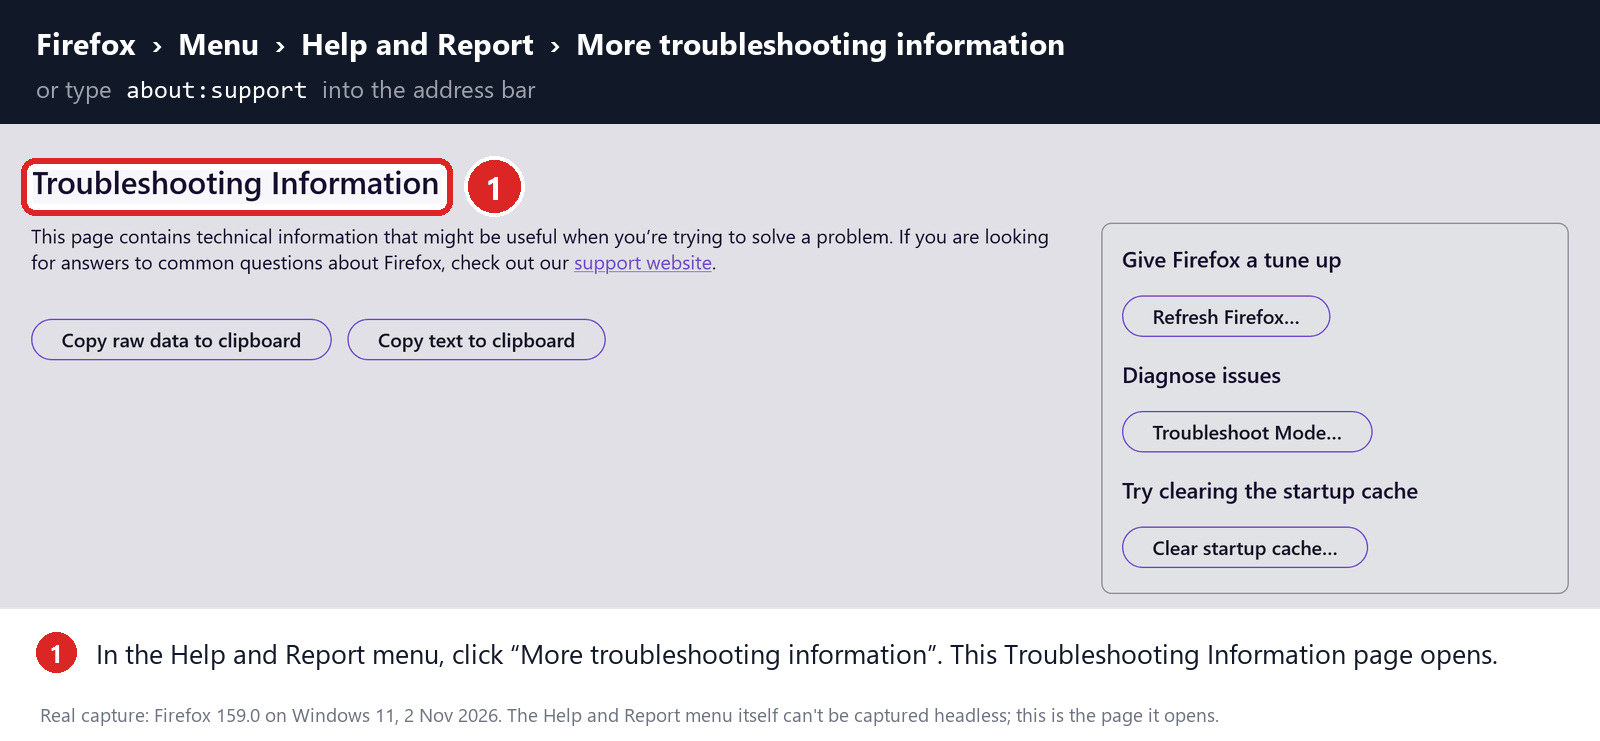
Click “More troubleshooting information”
In the Help and Report menu, click “More troubleshooting information“.
-
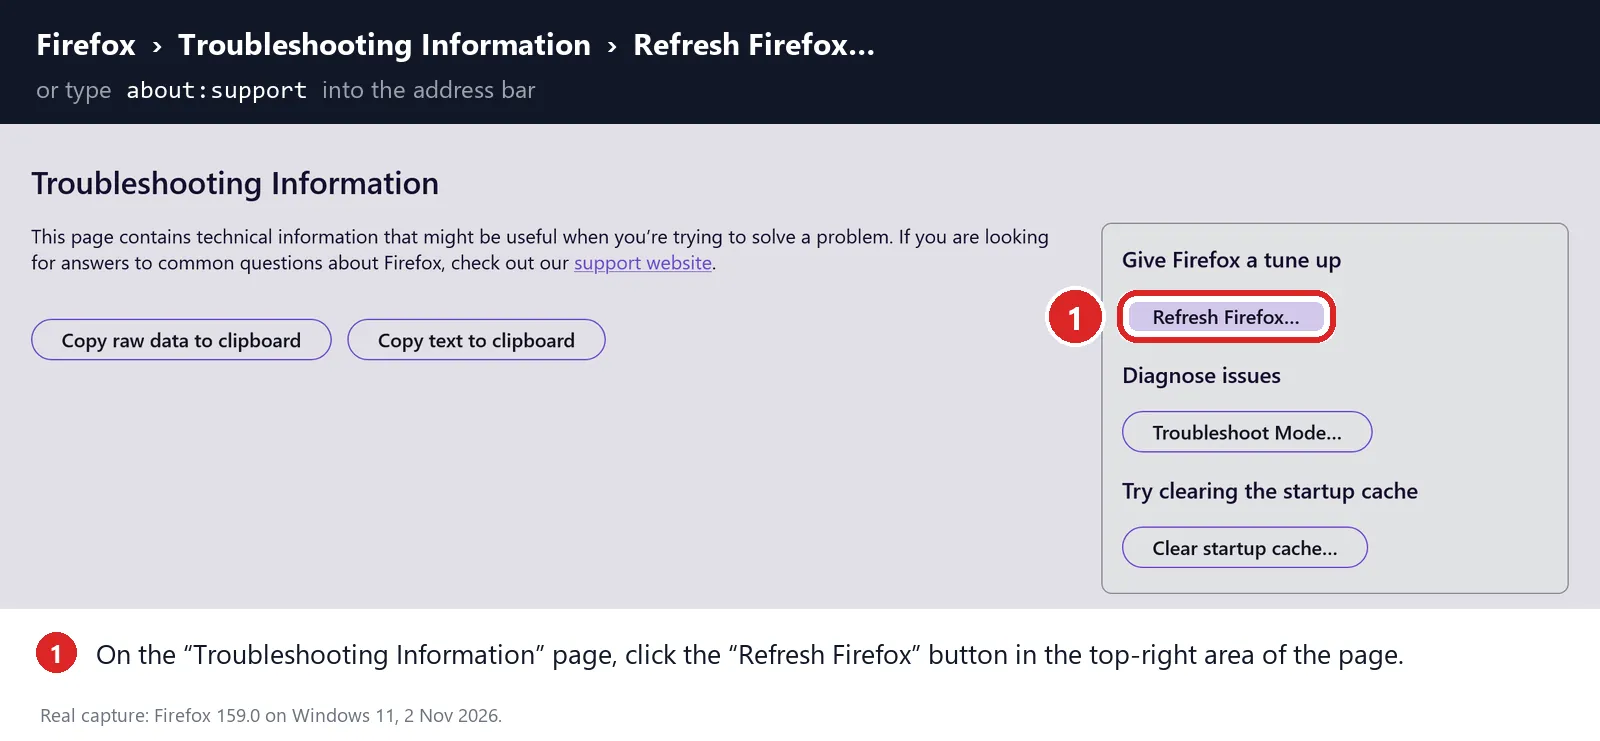
Click “Refresh Firefox”
On the “Troubleshooting Information” page, click the “Refresh Firefox” button in the “Give Firefox a tune up” box in the top-right area of the page.
-
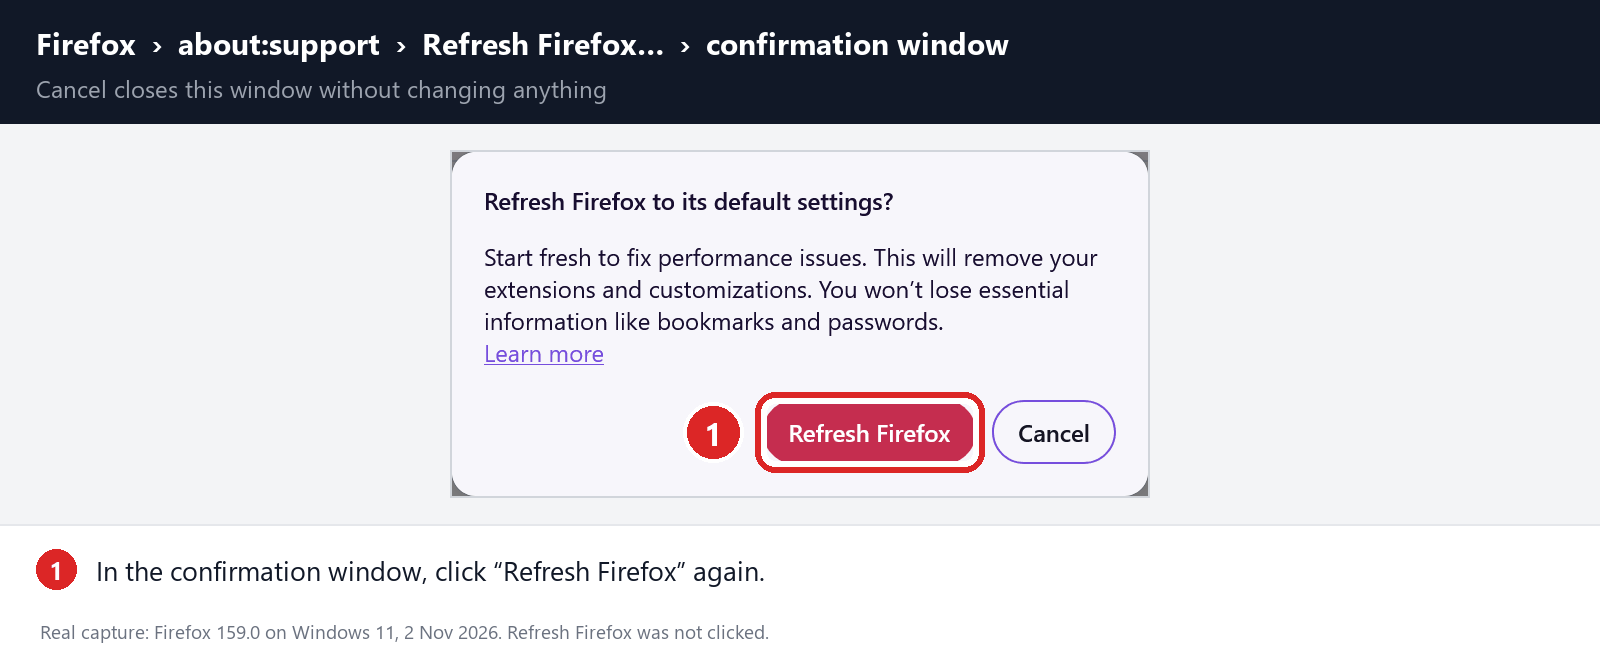
Confirm the refresh
In the confirmation window, click “Refresh Firefox” again. This removes extensions, themes, and customized settings — the usual hiding places for browser hijackers — while keeping your bookmarks, history, and saved passwords safe.
-
Click “Finish”
Firefox will close, reset itself to default settings, and reopen with a window listing the information that was restored. Click “Finish“. Then test Firefox before you add back any extensions.
About the “Old Firefox Data” folder: Firefox saves a copy of your old profile on your desktop. If something you need is missing after the reset, you can recover it from this folder. Otherwise, delete the folder — it contains sensitive data like passwords and cookies, and may also still hold the malicious files you just removed.
Reset Microsoft Edge to default settings
We will now reset your Microsoft Edge browser settings to their default. This will reset your startup page, new tab page, search engine, and pinned tabs. It will also disable all extensions and clear temporary data like cookies. Your favorites, history, and saved passwords will not be cleared.
Updated for Microsoft Edge on Windows 10 and Windows 11 — July 2026.
-
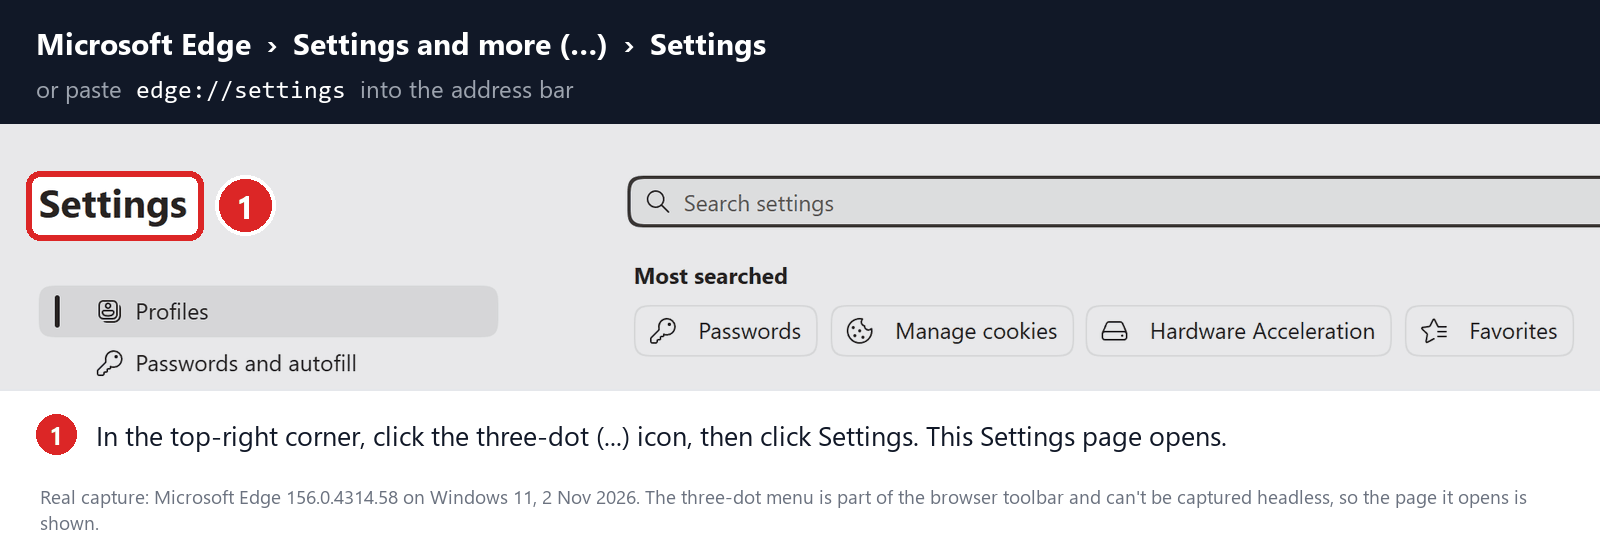
Open the Edge menu and click “Settings”
Open Microsoft Edge. In the top-right corner, click the three-dot (…) icon, then click Settings.
-
Prevent the unwanted settings from returning through Edge Sync
If you are signed in to Microsoft Edge, a bad setting or extension may be stored in your Microsoft account and return after the reset.
Copy the following address, paste it into the Edge address bar, and press Enter:
edge://settings/profiles/syncOn the Sync page, turn off these two options:
- Settings
- Extensions
You can leave Favorites and Passwords turned on.
If Edge says that sync is already off, simply continue to the next step.
Important: Edge Sync settings are separate for each profile. If you use more than one Edge profile, switch to each affected profile and repeat this step.
You do not need to sign out of your Microsoft account or delete the Edge profile.
-
Open “Reset settings”
In the left sidebar, click Reset settings.
You can also open the reset page directly. Copy the following address, paste it into the Edge address bar, and press Enter:
edge://settings/reset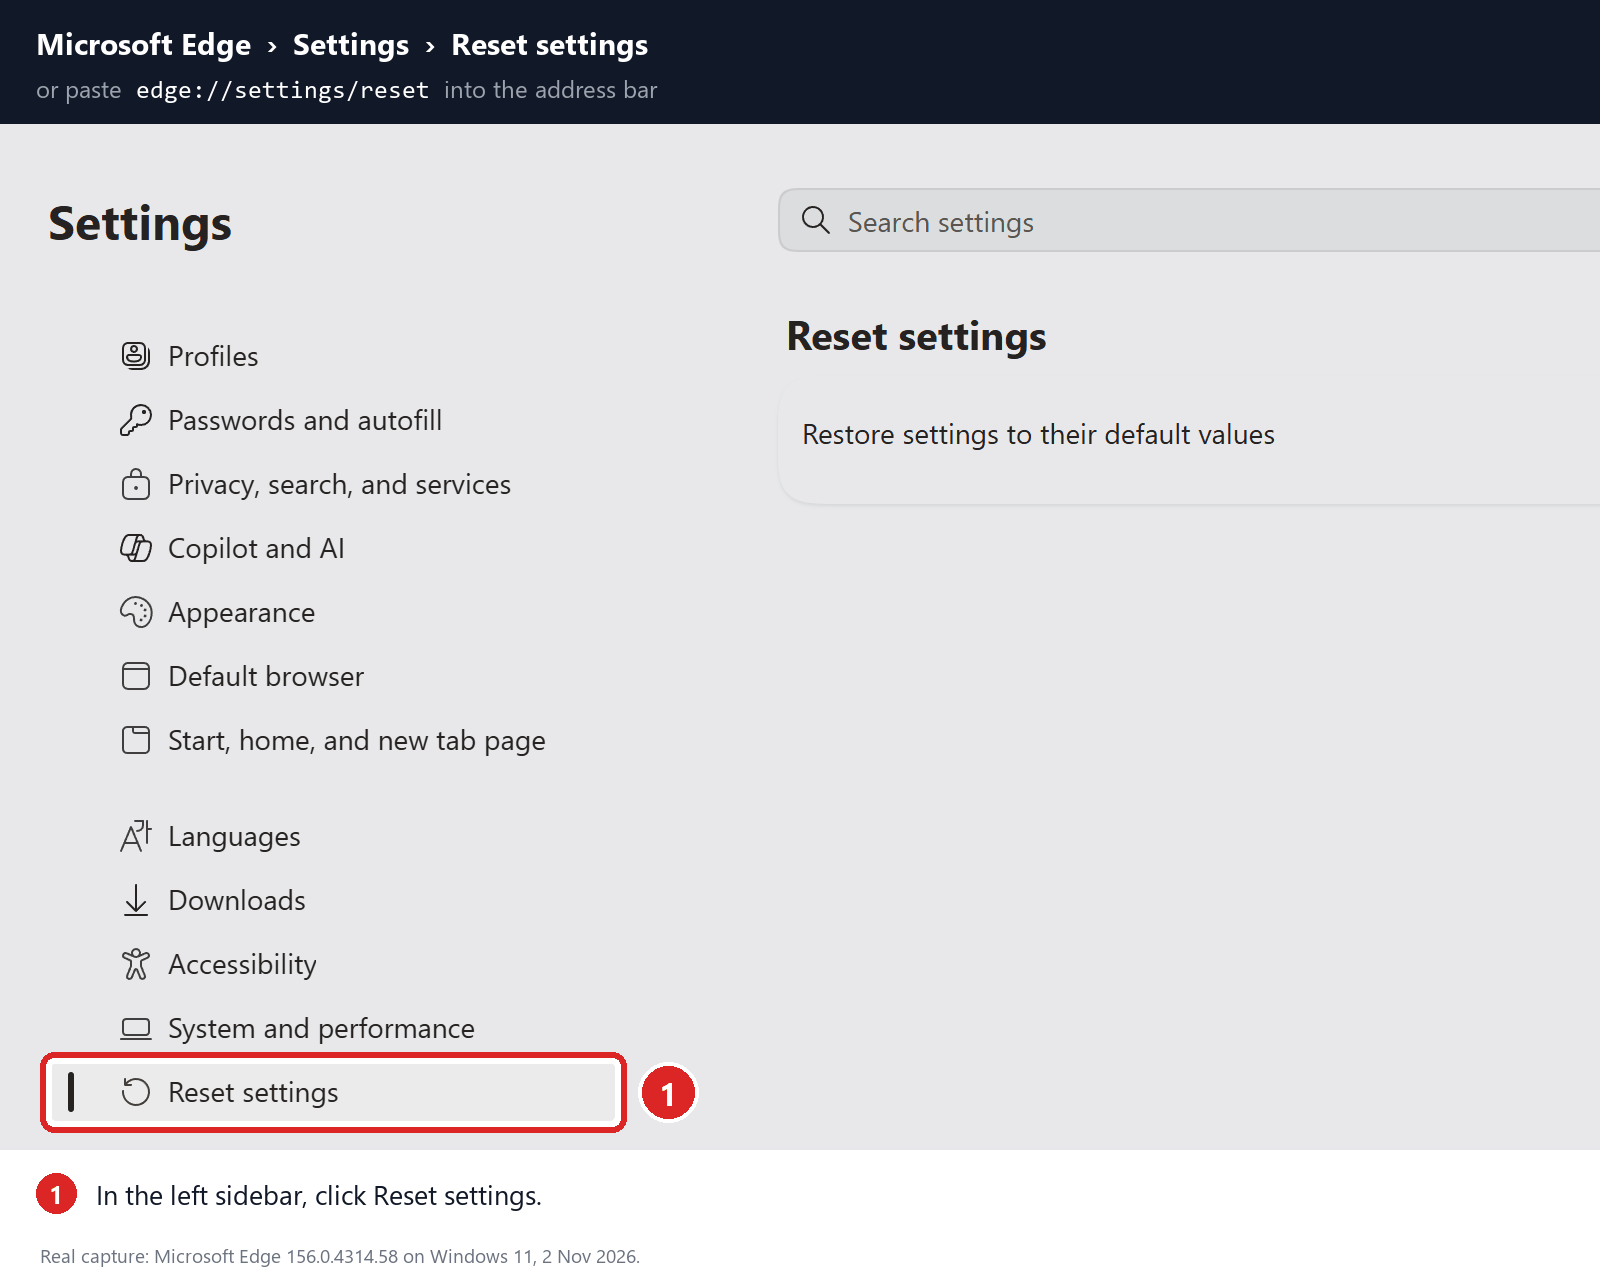
-
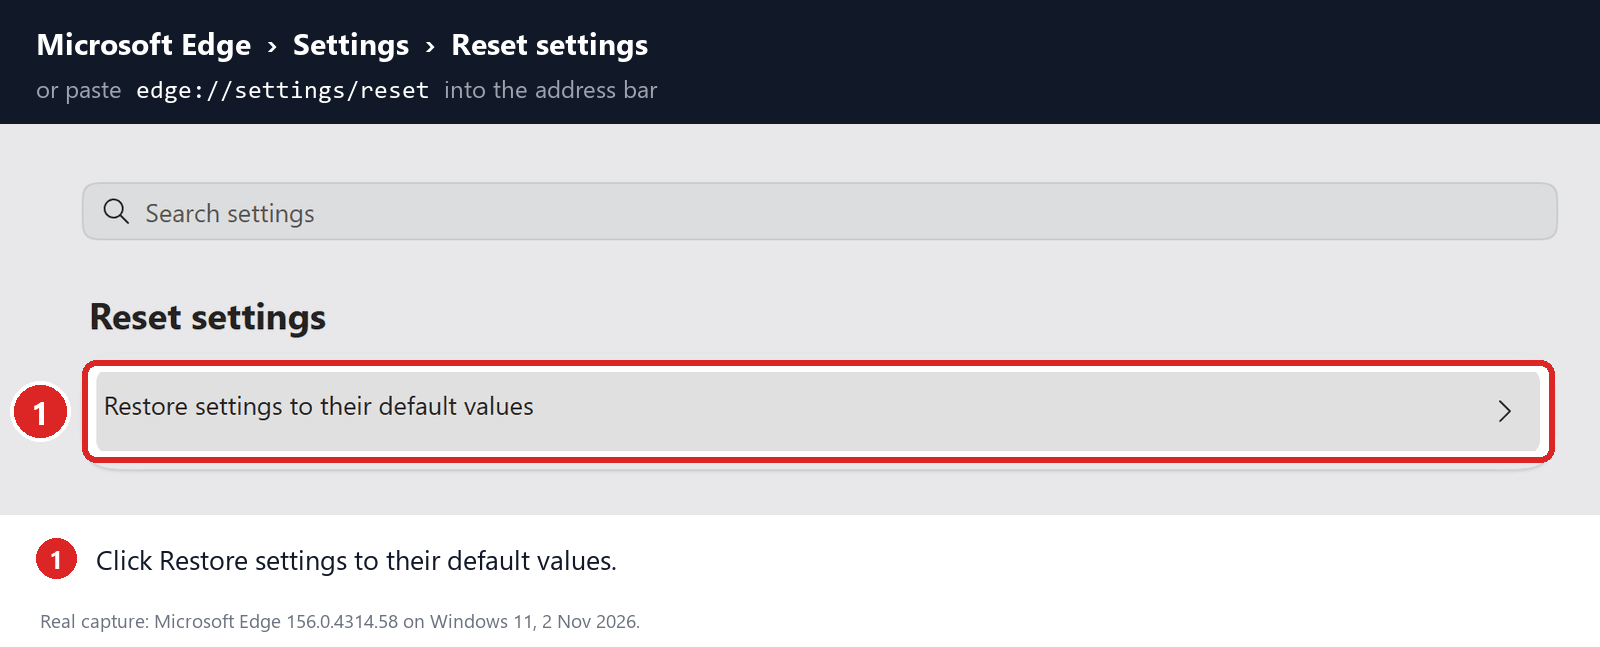
Click “Restore settings to their default values”
Click Restore settings to their default values.
-
Confirm the reset
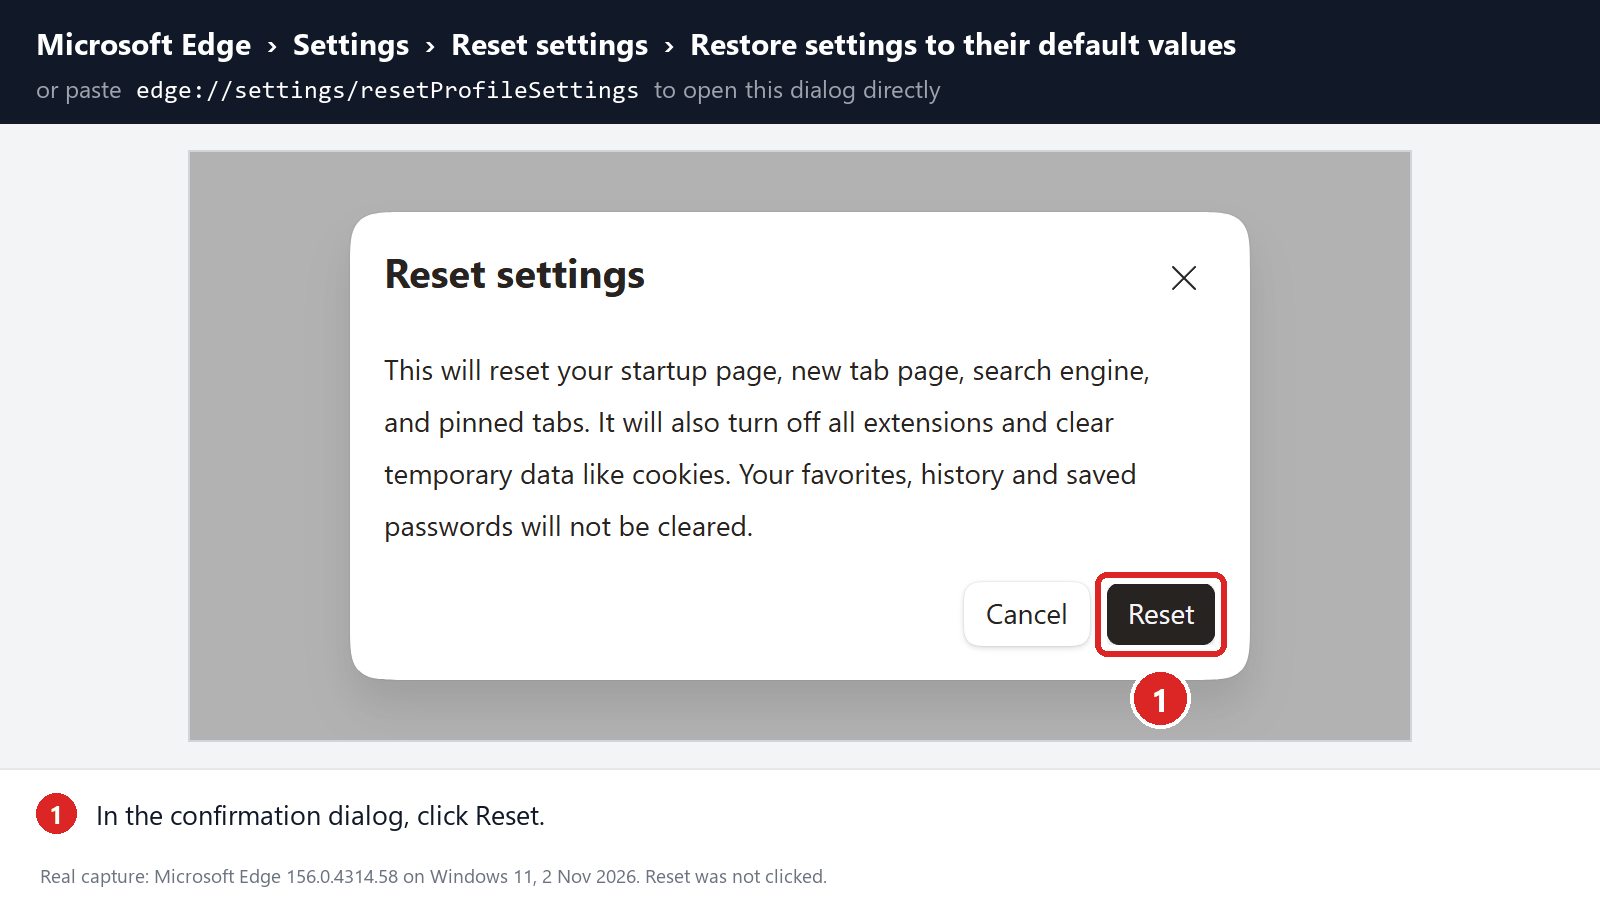
In the confirmation dialog, click Reset.
This resets the startup page, new tab page, search engine, and pinned tabs. It also disables all extensions and clears temporary site data, such as cookies.
Don’t worry: your favorites, browsing history, and saved passwords will not be deleted.
-
Check your extensions before turning them back on
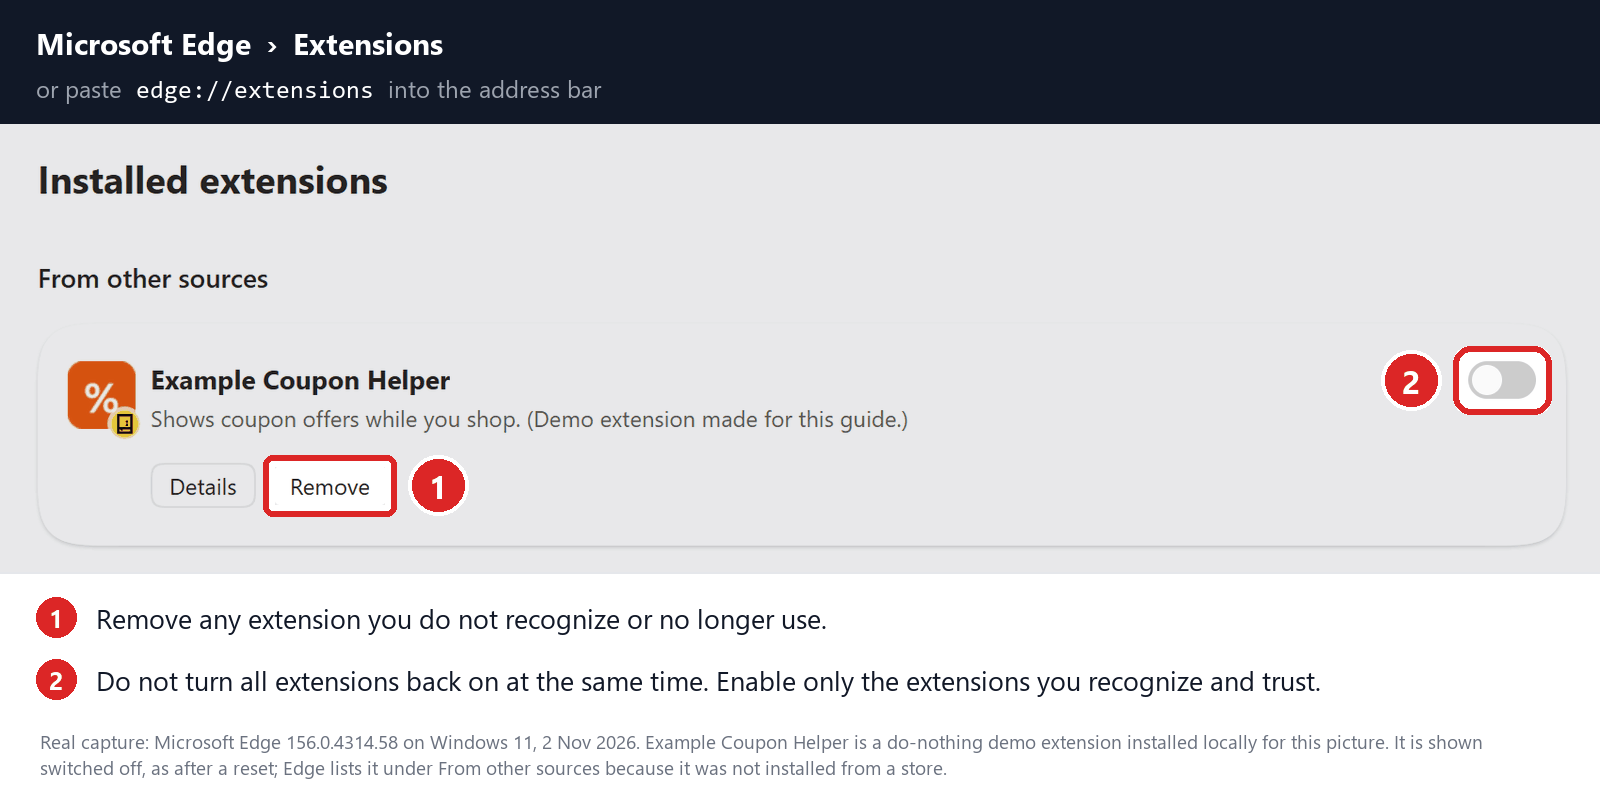
Copy the following address, paste it into the Edge address bar, and press Enter:
edge://extensionsRemove any extension you do not recognize or no longer use. Pay particular attention to extensions related to search, coupons, shopping, PDF conversion, browser protection, new tabs, or video downloading.
Do not turn all extensions back on at the same time. Enable only the extensions you recognize and trust.
-
Select a trusted search engine
Copy the following address, paste it into the Edge address bar, and press Enter:
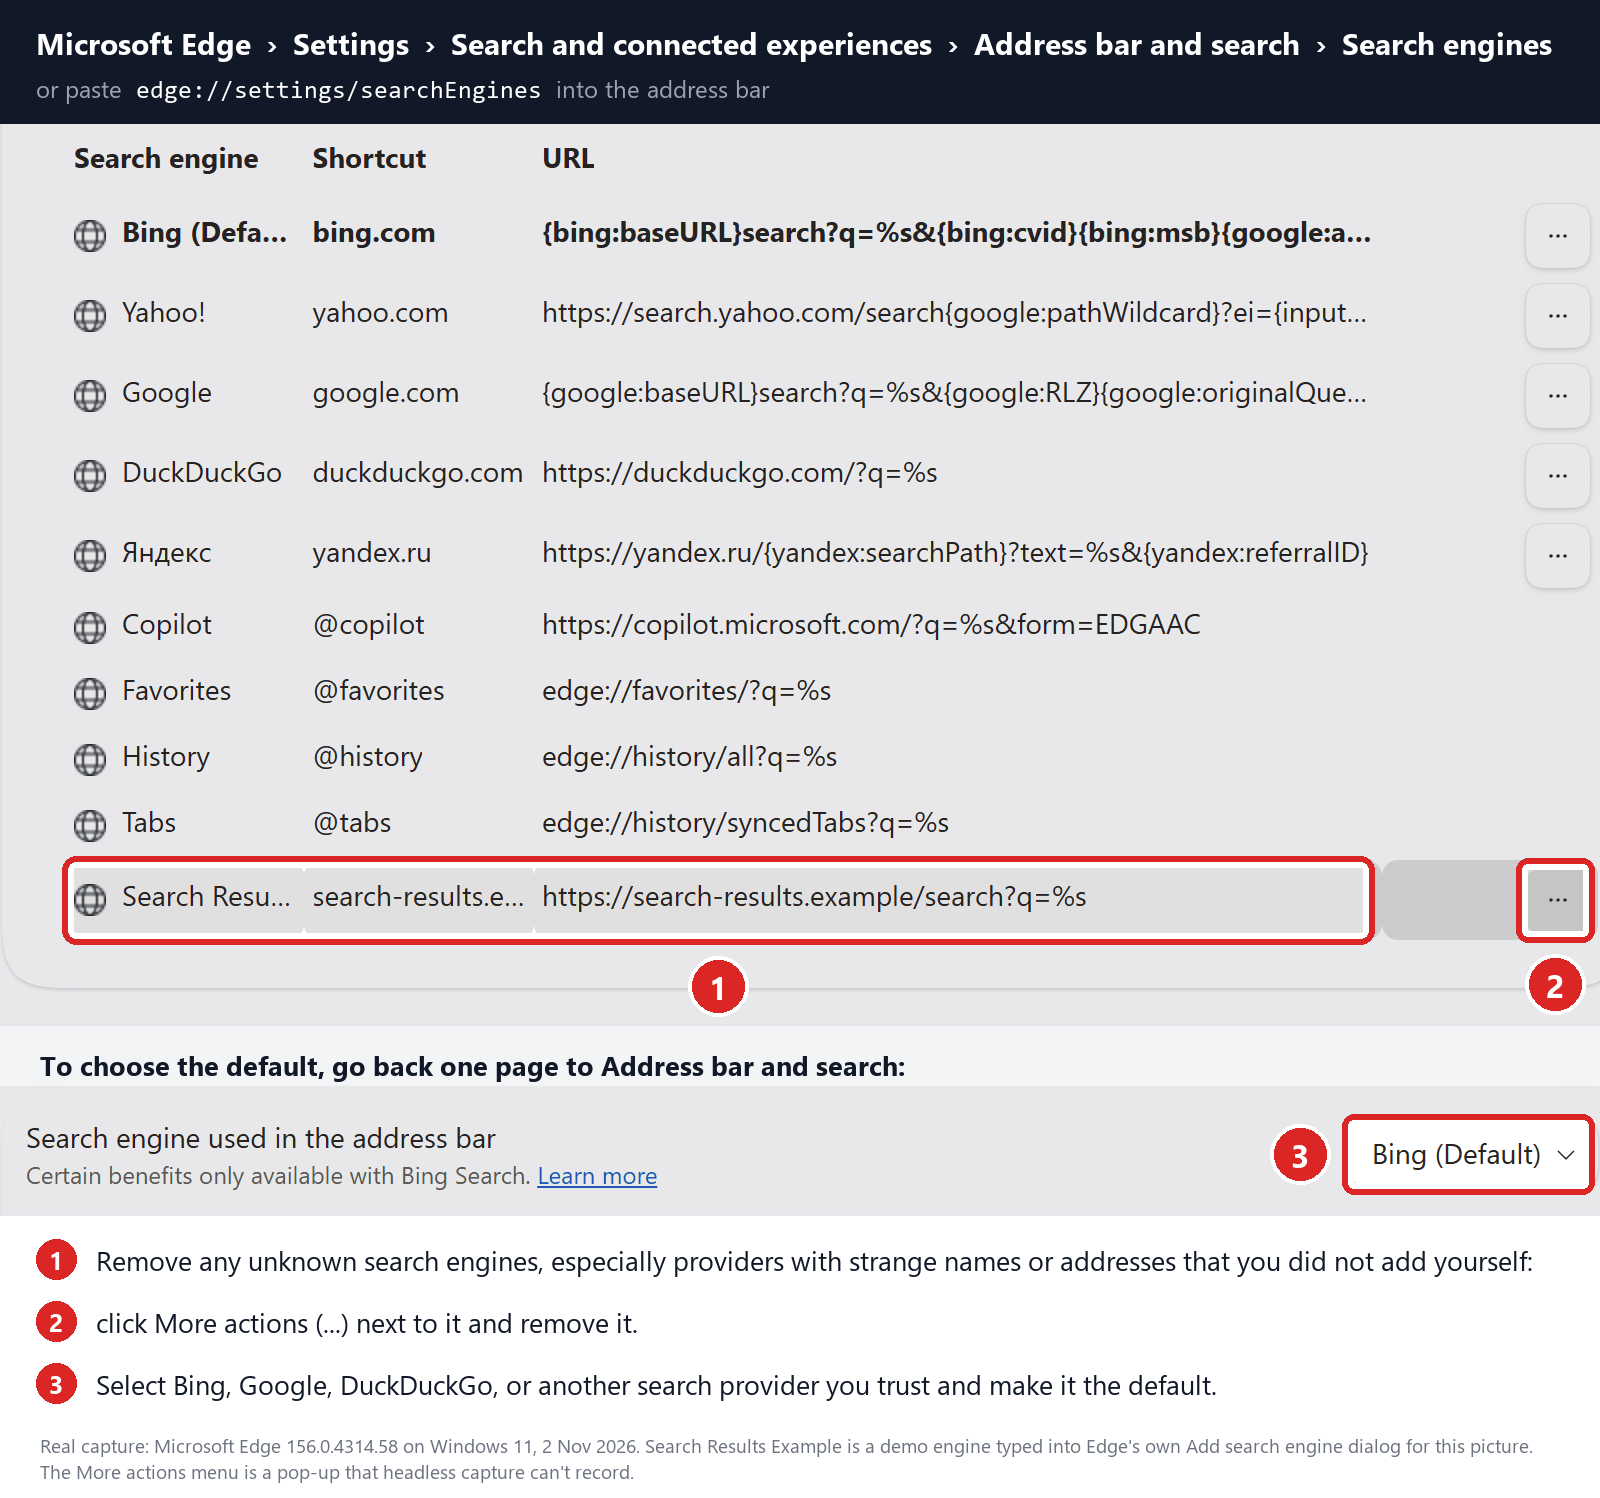
edge://settings/searchEnginesSelect Bing, Google, DuckDuckGo, or another search provider you trust and make it the default. This address opens the list of search engines; the default is set one page back, on Address bar and search, under Search engine used in the address bar.
Remove any unknown search engines from the list, especially providers with strange names or addresses that you did not add yourself: click More actions (…) next to the engine and remove it.
Restart Edge and perform a search from the address bar. If searches are no longer redirected, you can stop here.
-
If the redirect remains, clean the corrupted search data without deleting the Edge profile
Use this additional step only if Edge continues to redirect searches after the normal reset.
This command cleans the search-engine database from every local Edge profile while keeping your favorites, saved passwords, browsing history, cookies, and profiles.
Before continuing: save anything you are working on because the command will close Microsoft Edge.
- Open the Windows Start menu.
- Type PowerShell.
- Open Windows PowerShell. Administrator access is not required.
- Copy the entire command below.
- Paste it into PowerShell and press Enter.
$stamp = Get-Date -Format "yyyyMMdd-HHmmss"
$root = Join-Path $env:LOCALAPPDATA "Microsoft\Edge\User Data"

Get-Process -Name msedge -ErrorAction SilentlyContinue |
    Stop-Process -Force -ErrorAction SilentlyContinue

Start-Sleep -Seconds 2

if (-not (Test-Path -LiteralPath $root)) {
    Write-Host "The Microsoft Edge profile folder was not found:"
    Write-Host $root
    return
}

$profiles = Get-ChildItem -LiteralPath $root -Directory |
    Where-Object {
        $_.Name -eq "Default" -or
        $_.Name -match "^Profile \d+$"
    }

$movedFiles = 0

foreach ($profile in $profiles) {
    foreach ($name in @(
        "Web Data",
        "Web Data-journal",
        "Web Data-wal",
        "Web Data-shm"
    )) {
        $file = Join-Path $profile.FullName $name

        if (Test-Path -LiteralPath $file) {
            $backup = "$file.search-reset-backup-$stamp"

            try {
                Move-Item -LiteralPath $file -Destination $backup -ErrorAction Stop
                Write-Host "Cleaned: $($profile.Name)\$name"
                $movedFiles++
            }
            catch {
                Write-Warning "Could not clean: $file"
            }
        }
    }
}

Write-Host ""

if ($movedFiles -gt 0) {
    Write-Host "Microsoft Edge search data has been cleaned." -ForegroundColor Green
    Write-Host "You can now reopen Microsoft Edge."
}
else {
    Write-Host "No Edge search database files were found." -ForegroundColor Yellow
}
The command does not permanently delete the original files. It renames them as backup files, and Edge creates a clean search database when it starts again.
Note: this additional cleanup may also reset saved form-fill suggestions, saved addresses, payment cards saved only on this computer, and manually added search engines. It does not delete favorites, passwords, or browsing history.
-
Reopen Edge and test the browser
Open Microsoft Edge again, visit edge://settings/searchEngines, and select your preferred search engine (one page back, on Address bar and search, under Search engine used in the address bar).
Perform several searches from the address bar to confirm that the redirect is gone.
Keep synchronization for Settings and Extensions turned off until you are certain that the computer and extensions are clean. If you enable them again, turn them on one at a time and test Edge after each change.
-
If Edge still redirects your searches
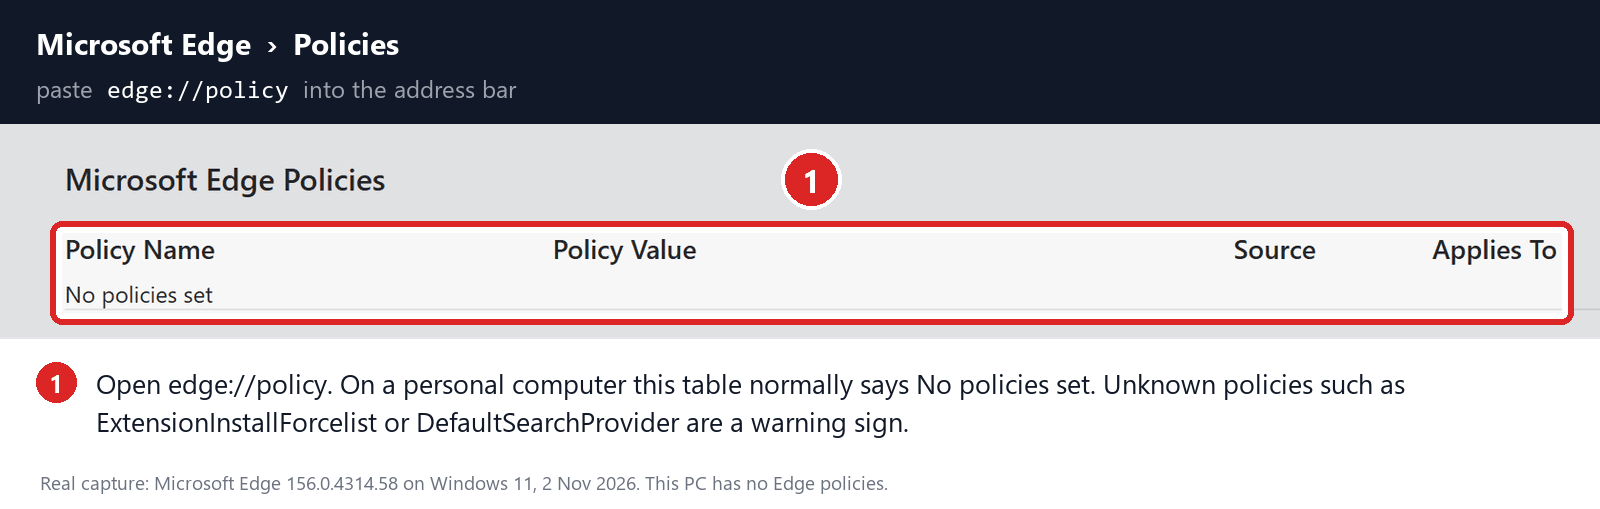
Open edge://policy. If this is your personal computer and Edge displays unknown policies such as ExtensionInstallForcelist or DefaultSearchProvider, the hijacker may be installed outside the browser profile.
In that situation, continue with the next malware-removal steps and run a complete antivirus scan. If the computer belongs to a company or school, contact its IT administrator before changing any policies.
STEP 3: Use Malwarebytes Anti-Malware to remove malware and unwanted programs
In this third step, we will install Malwarebytes to scan and remove any infections, adware, or potentially unwanted programs that may be present on your computer.
Malwarebytes is one of the most popular and trusted anti-malware tools for Windows — and it’s completely free for removing infections. It catches threats that many antivirus programs miss, including adware, browser hijackers, and trojans. Follow the steps below to scan your PC and remove what Malwarebytes finds.
Download Malwarebytes
Click the button below to download the latest version of Malwarebytes for Windows from the official source. The free version is all you need — it will scan your computer and remove adware, browser hijackers, and other malicious software at no cost.
Download MalwarebytesOfficial installer for Windows 11 and 10. Your download starts right away.Want real-time protection? See Malwarebytes Premium Malwarebytes Free for WindowsScans and removes malware at no cost
-
Install Malwarebytes
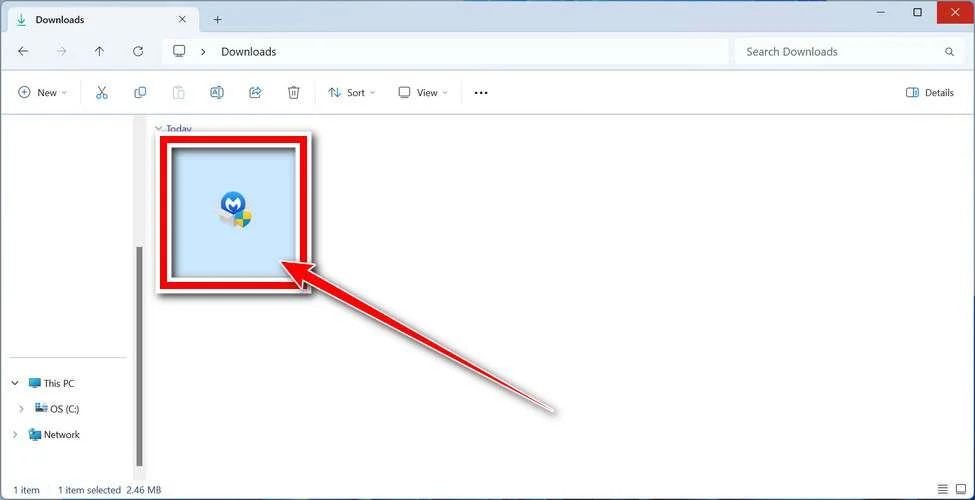
When the download finishes, open your Downloads folder and double-click the MBSetup file. If Windows shows a User Account Control pop-up, click “Yes” to allow the installation.
Follow the On-Screen Prompts to Install Malwarebytes
The setup wizard will walk you through a few quick screens:
-
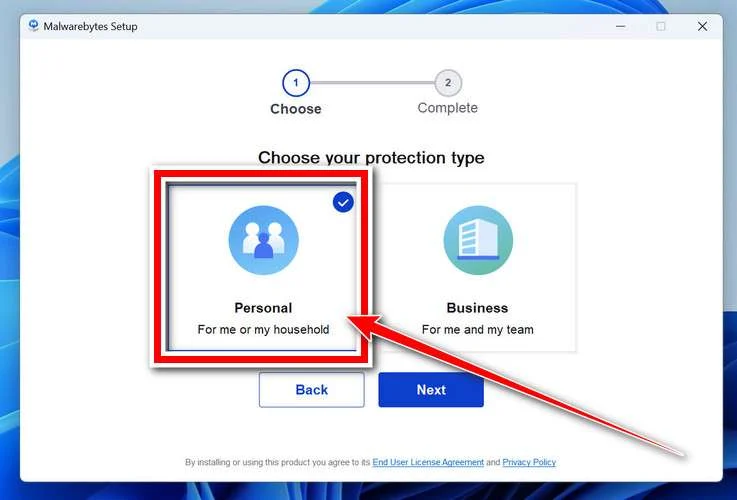
Choose where you’re installing the program — “Personal Computer” or “Work Computer” — then click Next.
-
Malwarebytes will now install on your device. This usually takes under a minute.
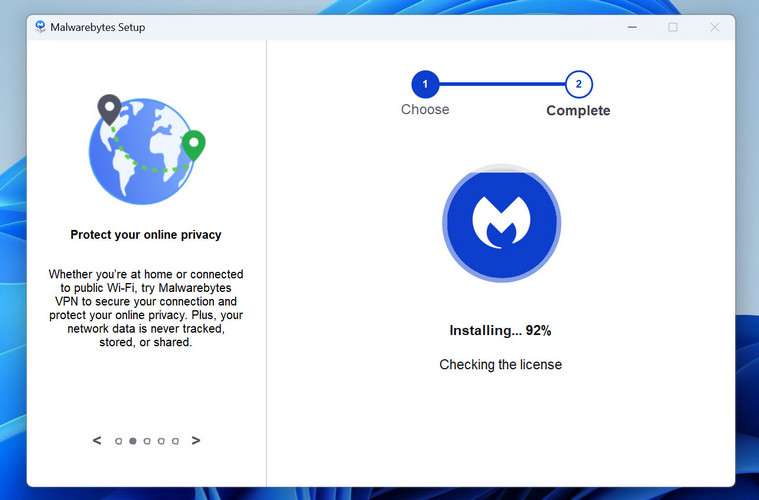
-
When installation is complete, the “Welcome to Malwarebytes” screen will open automatically.
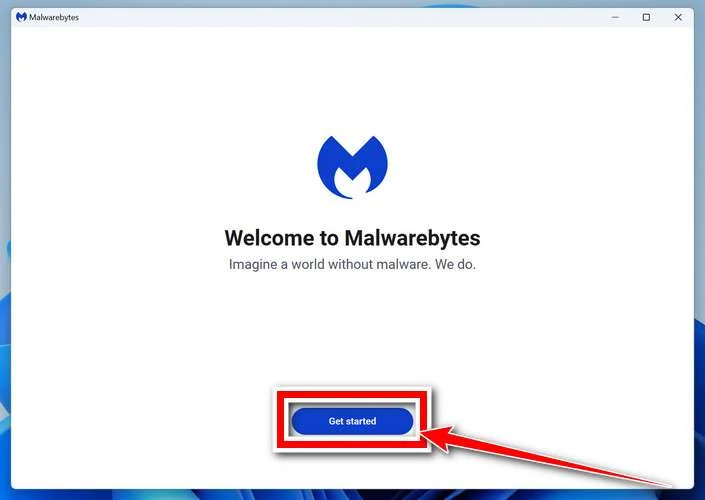
-
On the final screen, click Open Malwarebytes to launch the program.
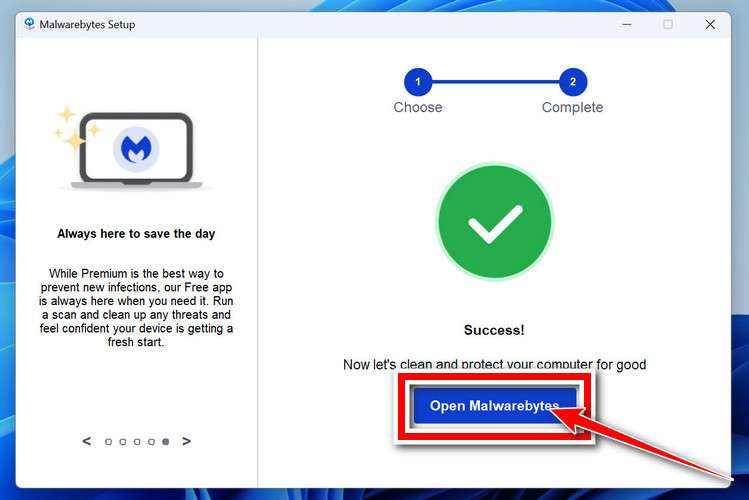
-
Optional: Check for rootkits with a Custom Scan
You don’t need to change any settings for a normal scan. The standard Threat Scan in the next step is enough for most problems, so you can go straight to it.
If you also want to check for rootkits, use a Custom Scan. In current versions of Malwarebytes, rootkit scanning is only available there:
- On the Scanner tile, click the three-dot menu and select Advanced Scan.
- Choose Custom Scan. In its options, check Scan for rootkits.
- Select your system drive (usually C:\) as the location to scan, then start the scan. It takes longer than a Threat Scan.
- When it finishes, review and quarantine the results as described in the steps below.
Rootkit scanning isn’t available on Windows devices with ARM processors.
Start the Scan
Click the blue Scan button. Malwarebytes will automatically update its virus database and start checking your computer for malware.
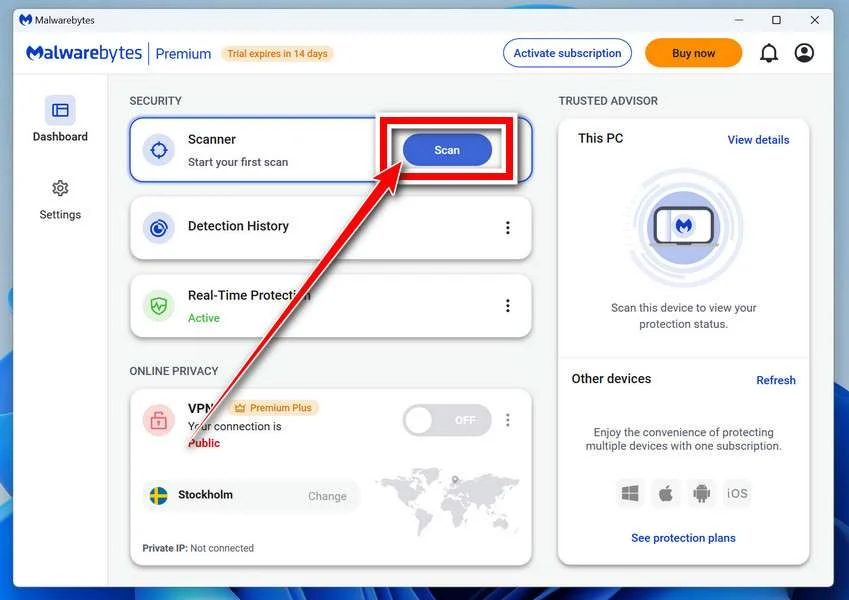
-
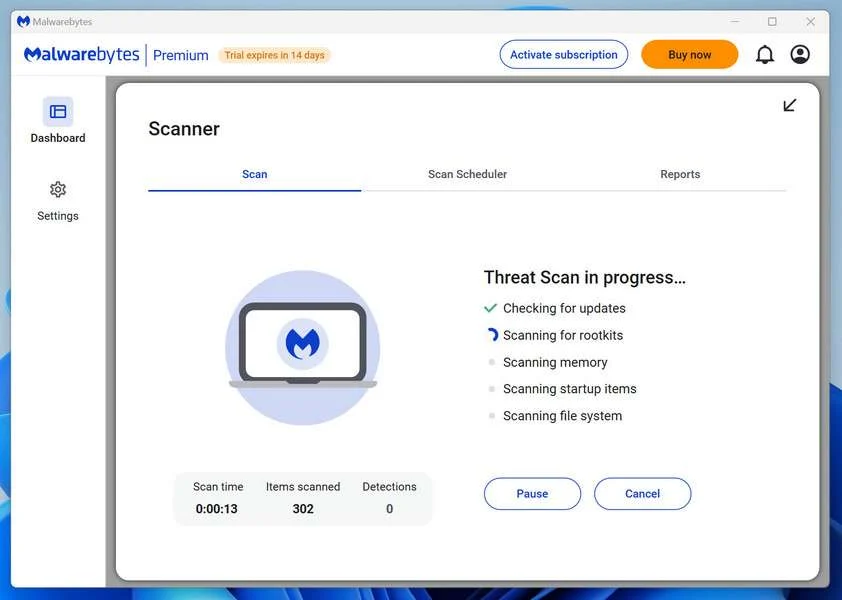
Wait for the Scan to Finish
The scan checks your entire system for browser hijackers and other malicious programs, so it can take 5 to 20 minutes depending on your computer. Feel free to do something else — just check back occasionally to see the progress.
-
Quarantine the Detected Threats
When the scan is done, you’ll see a list of everything Malwarebytes found — malware, adware, and potentially unwanted programs. Click the “Quarantine” button to remove all of them at once.
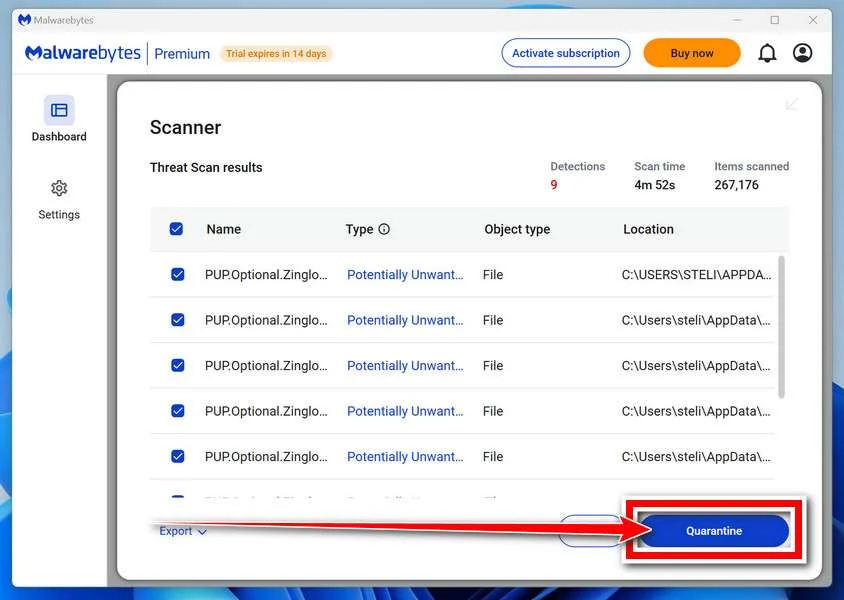
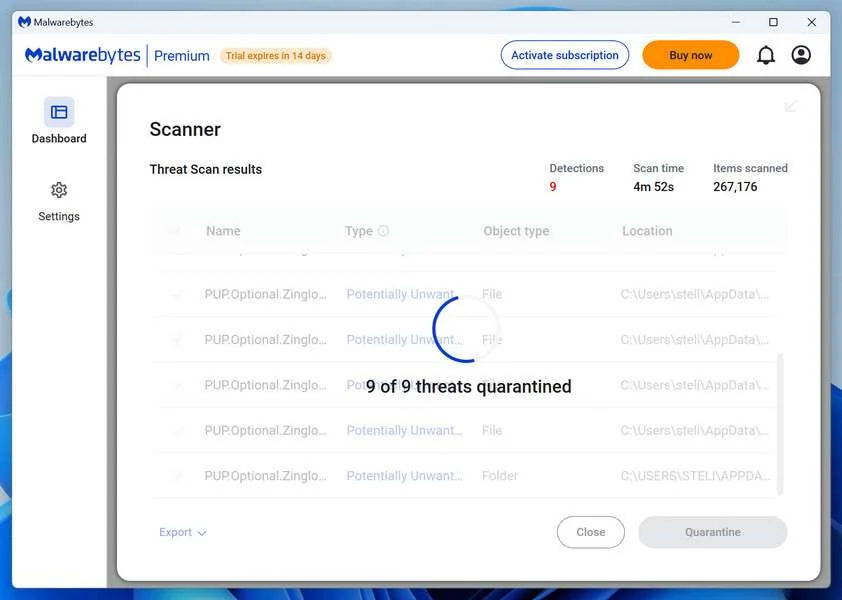
Malwarebytes will now remove the malicious files and registry entries and move them safely into quarantine.
-
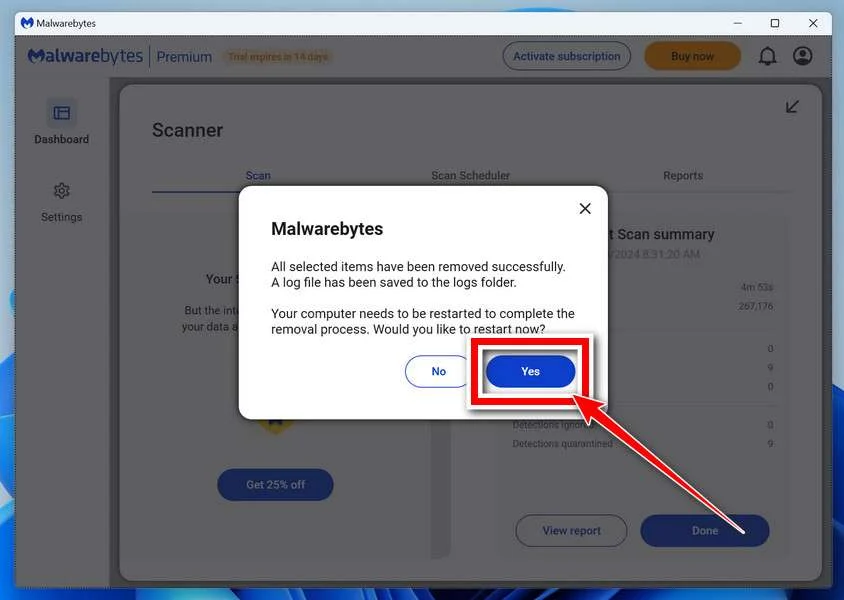
Restart Your Computer
Some threats can only be fully removed after a reboot. If Malwarebytes asks you to restart, click Yes. Once you’re logged back in, Malwarebytes has finished removing the threats it found.
STEP 4: Use HitmanPro to scan your computer for badware
In this next step, we will scan the computer with HitmanPro to check for any other malicious programs that may be installed on your device.
HitmanPro is a second-opinion scanner — it’s designed to catch what your main antivirus might have missed. Instead of relying on a single detection engine, it checks the behavior of files in the locations where malware usually hides. Anything suspicious is checked online, where it’s analyzed by several antivirus engines in HitmanPro’s Scan Cloud.
Good news: scanning is completely free, with no limits. You only need a license when it’s time to remove what was found — and even then, you can activate a free one-time 30-day trial to remove what it finds at no cost. The trial works once per computer. After that, removal needs a paid license, and the purchase screen shows the current price.
-
Download HitmanPro
Click the button below to download HitmanPro. Remember — the scan is free, so you have nothing to lose by checking your PC.
Download HitmanProFree scan. Removing threats needs the free 30-day trial. Opens the official HitmanPro page in a new tab. HitmanProSecond-opinion malware scanner from Sophos
-
Install HitmanPro
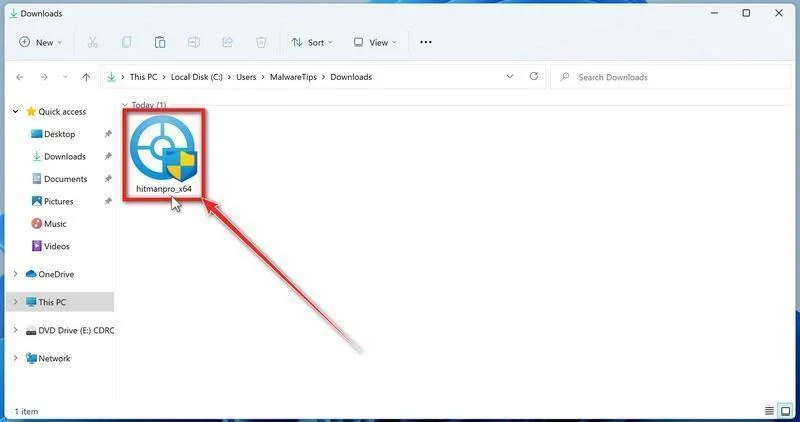
When the download finishes, open your Downloads folder and double-click the file “hitmanpro_x64.exe”. (On 32-bit Windows 10, the file is named “hitmanpro.exe”.)
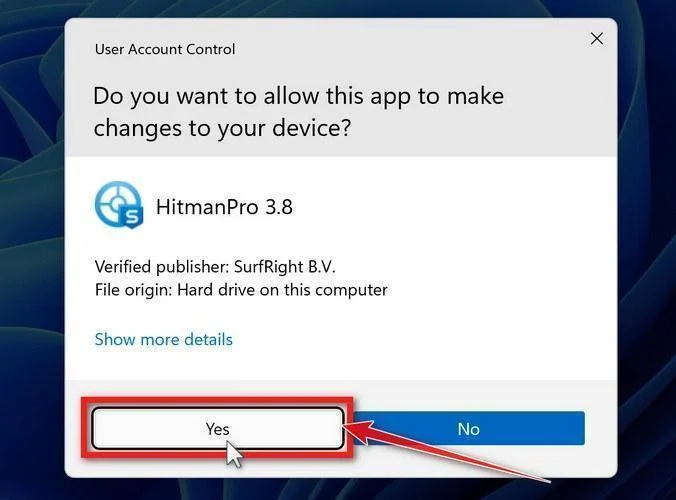
If a User Account Control pop-up asks whether HitmanPro can make changes to your device, click “Yes” to continue.
-
Follow the On-Screen Prompts
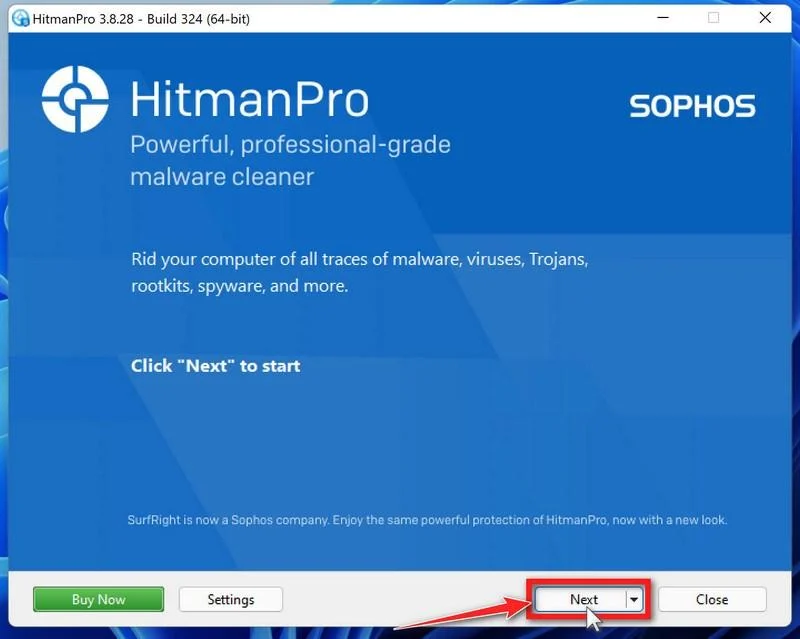
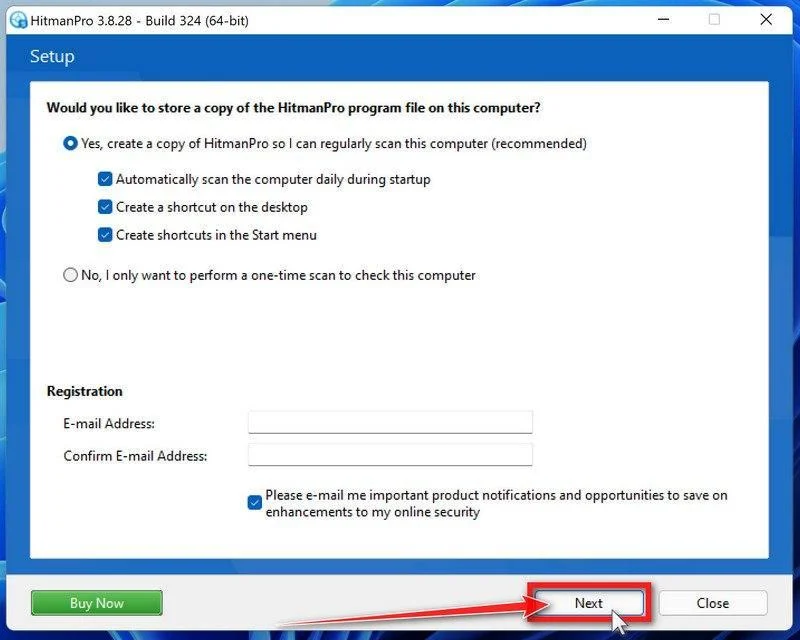
On the HitmanPro start screen, click “Next” to begin the system scan. No lengthy setup required — it goes straight to work.
-
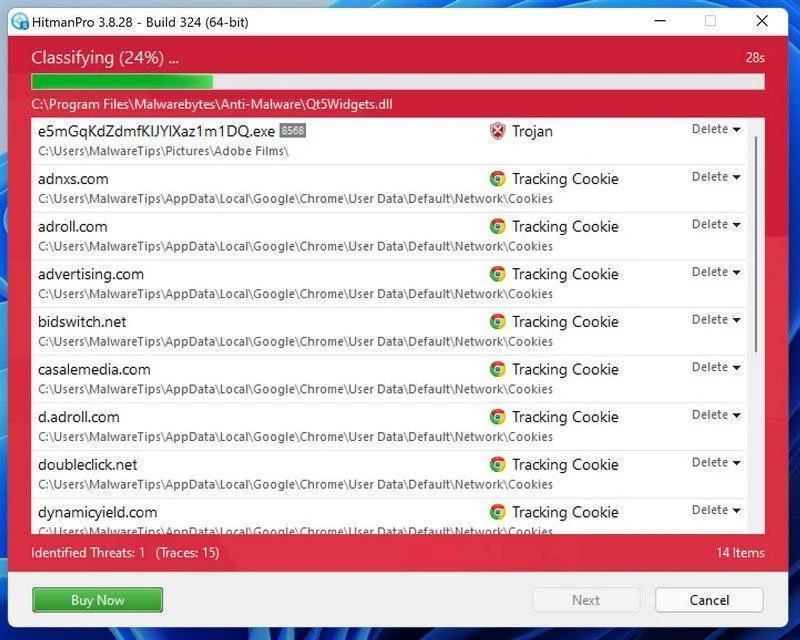
Wait for the Scan to Finish
HitmanPro will now check your computer for malicious programs. This usually takes just a few minutes thanks to its cloud-based scanning.
-
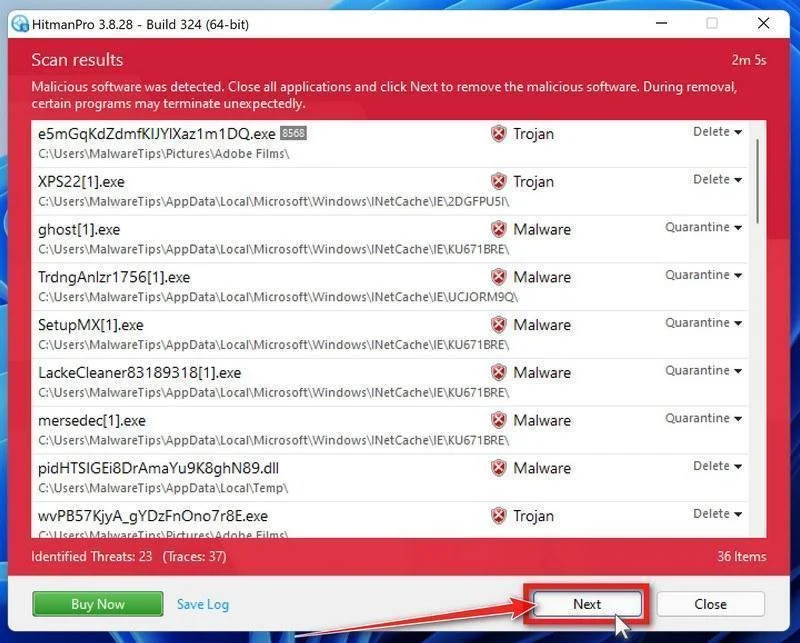
Review the Results and Click “Next”
When the scan is done, HitmanPro will show you everything it found. Click “Next” to remove the detected threats.
-
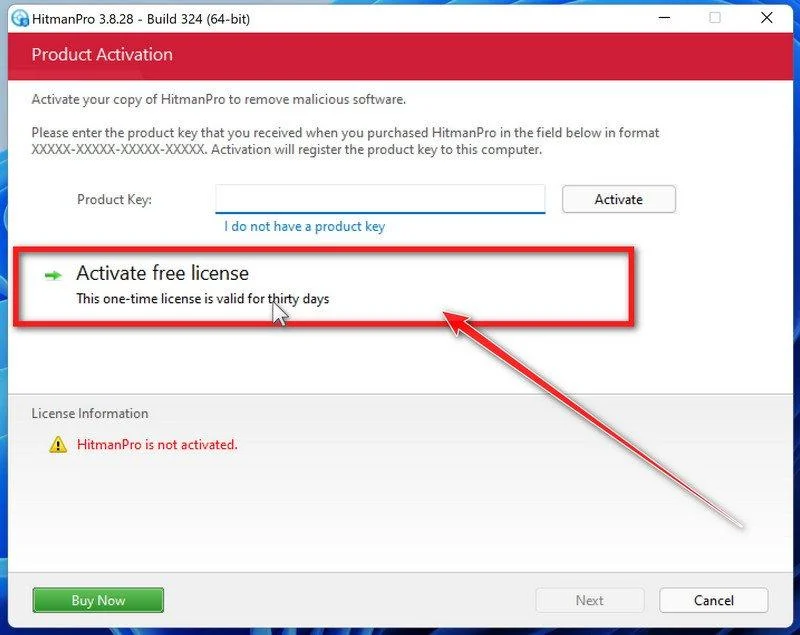
Click “Activate Free License”
To remove the malicious files, click the “Activate free license” button. This starts your free 30-day trial — no payment details needed — and unlocks the full cleanup.
When the removal is complete, HitmanPro will show a summary of everything it cleaned. Click Next, then click Reboot if prompted. If there’s no reboot prompt, click Close. Then check whether the problems you noticed have stopped. If they come back, save the HitmanPro log and ask for help in our forum.
STEP 5: Use AdwCleaner to remove adware and malicious browser policies
In this final step, we will use AdwCleaner to remove the malicious browser policies that were set by browser hijackers on your computer and delete malicious browser extensions.
AdwCleaner is a free on-demand scanner that specializes in adware, browser hijackers, and unwanted toolbars — the exact threats that mainstream antivirus programs often miss. It also includes tools that repair the damage malware leaves behind, like hijacked browser settings and malicious policies. It’s a quick scan that’s well worth running.
-
Download AdwCleaner
Click the button below to download AdwCleaner — it’s free, portable, and requires no installation.
Download AdwCleanerOpens the official download page in a new tab. Malwarebytes AdwCleanerRemoves adware and unwanted programs at no cost
-
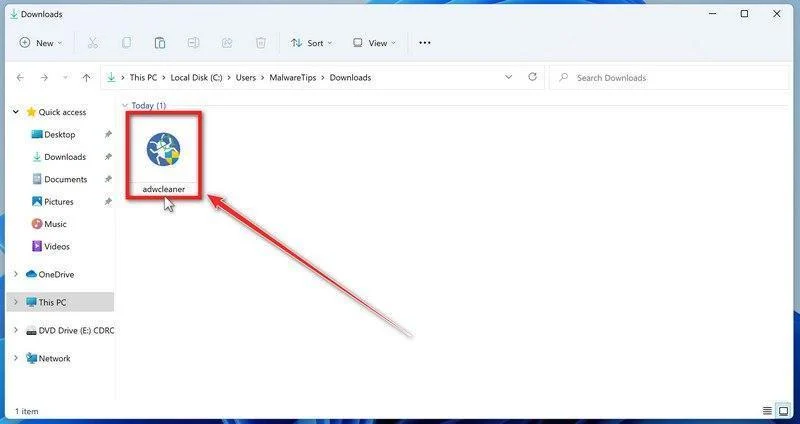
Run AdwCleaner
Open your Downloads folder and double-click the file named “adwcleaner.exe“. There’s no installation — the program starts right away.
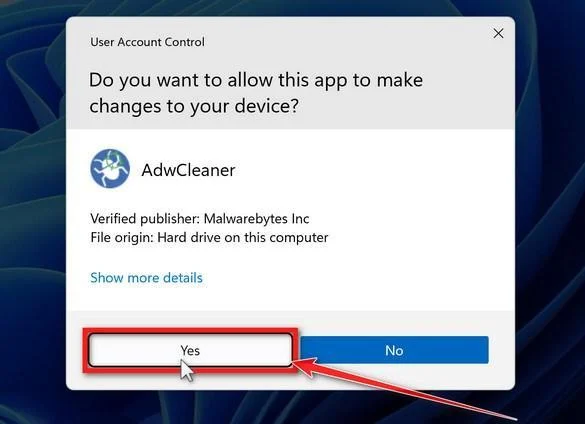
If Windows asks whether you want to allow AdwCleaner to run, click “Yes“. When the license agreement appears, click I agree to continue.
-
Leave “Reset Chrome policies” off unless you need it
AdwCleaner can reset Chrome policies, the settings that malware sometimes uses to lock your browser so you can’t change it back. This option removes every Chrome policy, including legitimate ones set by an employer, a school, or parental-control software, so leave it off for a normal scan.
AdwCleaner applies this option only if you run Basic Repair at the end of the cleanup. Malwarebytes advises running Basic Repair only when a support agent asks you to, and it also runs every other repair action that is turned on in the same list. If this is your own personal PC and chrome://policy in Chrome lists policies you didn’t set, ask for help in our forum instead. On a work or school computer, ask the IT administrator.
-
Start the Scan
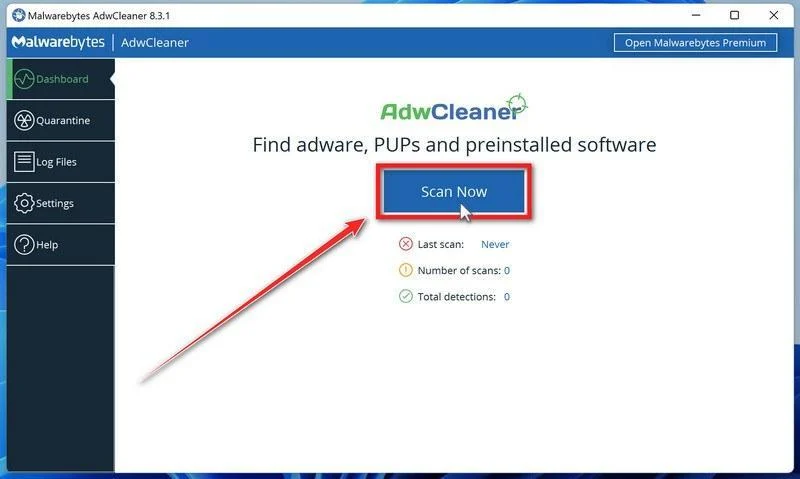
Click “Dashboard” on the left side of the window, then click the “Scan Now” button.
-
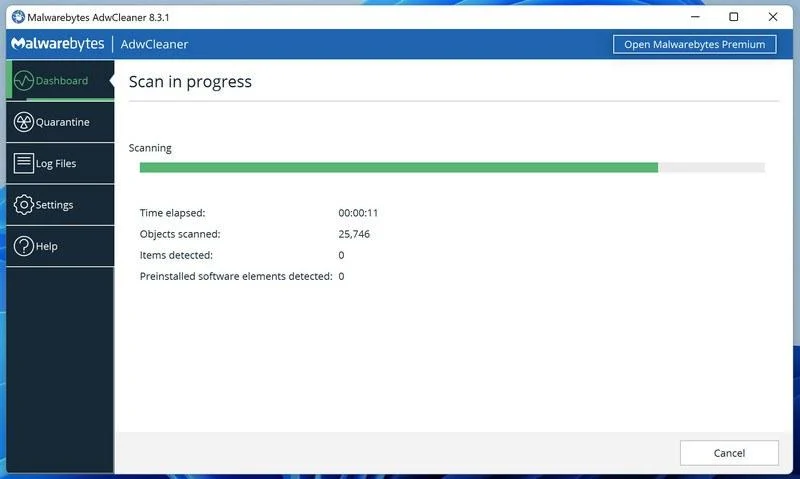
Wait for the Scan to Finish
AdwCleaner will now check your computer for adware and other malware. This usually takes only a few minutes — it’s one of the fastest scanners around.
-
Quarantine the Detected Threats
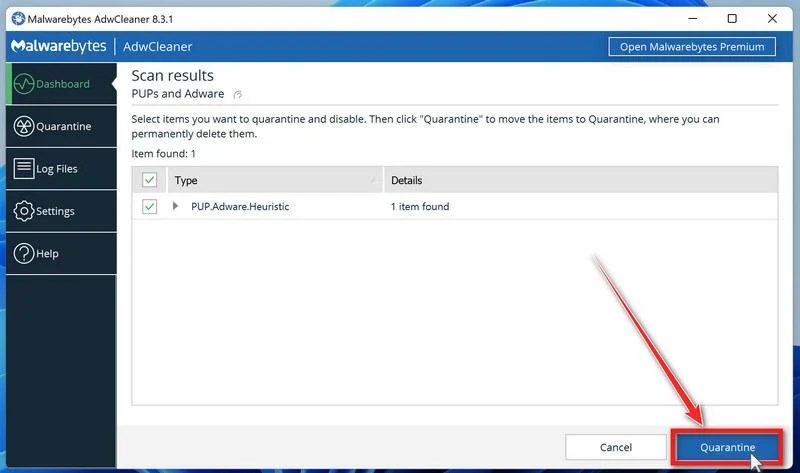
When the scan finishes, AdwCleaner lists everything it found. Review the list and uncheck any program you installed on purpose and want to keep, then click Next. If AdwCleaner also found preinstalled software, it shows that list next. Review it the same way, then click “Quarantine“. Older versions show the Quarantine button on the first list, as in the image below.
-
Click “Continue” to Finish the Cleanup
Save any open work first — AdwCleaner needs to close your open programs before it can clean. When you’re ready, click the “Continue” button.
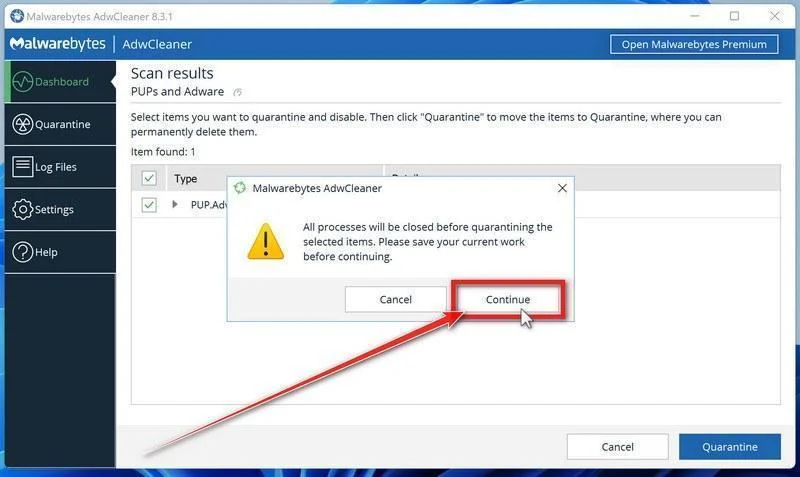
AdwCleaner will now move the selected items to quarantine. If it asks you to restart your PC, allow it. When you’re back in Windows, AdwCleaner may offer a Basic Repair. Click Skip Basic Repair. Malwarebytes recommends running Basic Repair only when a support agent asks you to. Then check whether the problems you noticed have stopped.
When you’ve finished these steps, check whether the problems you noticed have stopped. If they continue, see the options below.
If you are still having problems with your computer after completing these instructions, then please follow one of the steps:
- Run a computer scan with ESET Online Scanner
- Ask for help in our Windows Malware Removal Help & Support forum.
Remove Unwanted Apps and Malware from Mac
- STEP 1: Remove malicious profiles
- STEP 2: Delete malicious apps
- STEP 3: Reset browsers back to default settings
- STEP 4: Run a scan with Malwarebytes for Mac to remove malware
STEP 1: Remove malicious profiles
Profiles are used by IT admins in businesses to control the behavior of their Macs. These profiles can configure a Mac to do many different things, some of which are not otherwise possible.
When it comes to home users, adware and browser hijackers are using the configuration profile to prevent users from removing malicious programs from the computer. This also prevents the user from changing that behavior in the browser’s settings.
In this first step, we will check your computer to see if any configuration profiles are installed. To do this, follow the below steps:
-
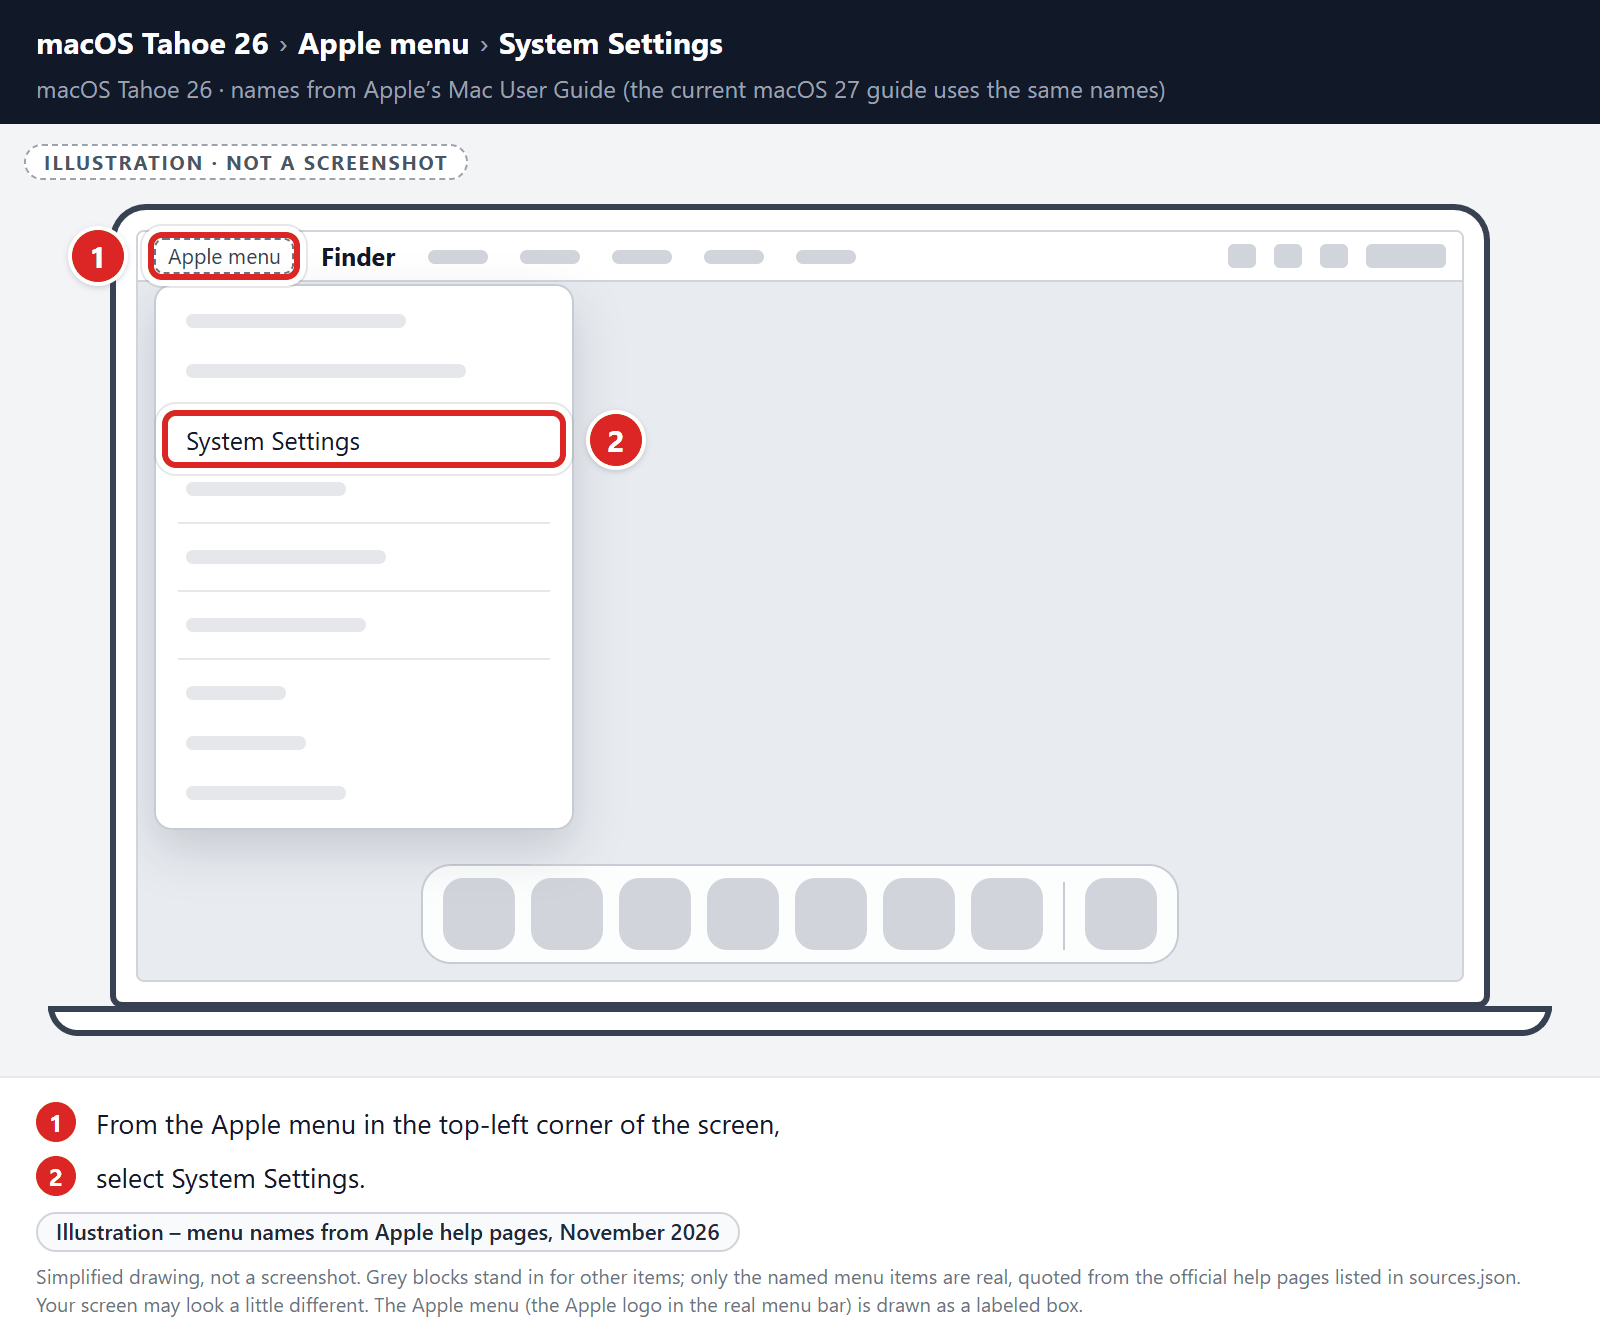
Open “System Settings”
From the Apple menu () in the top-left corner of the screen, select System Settings. (On macOS Monterey and earlier, this is called System Preferences.)
-
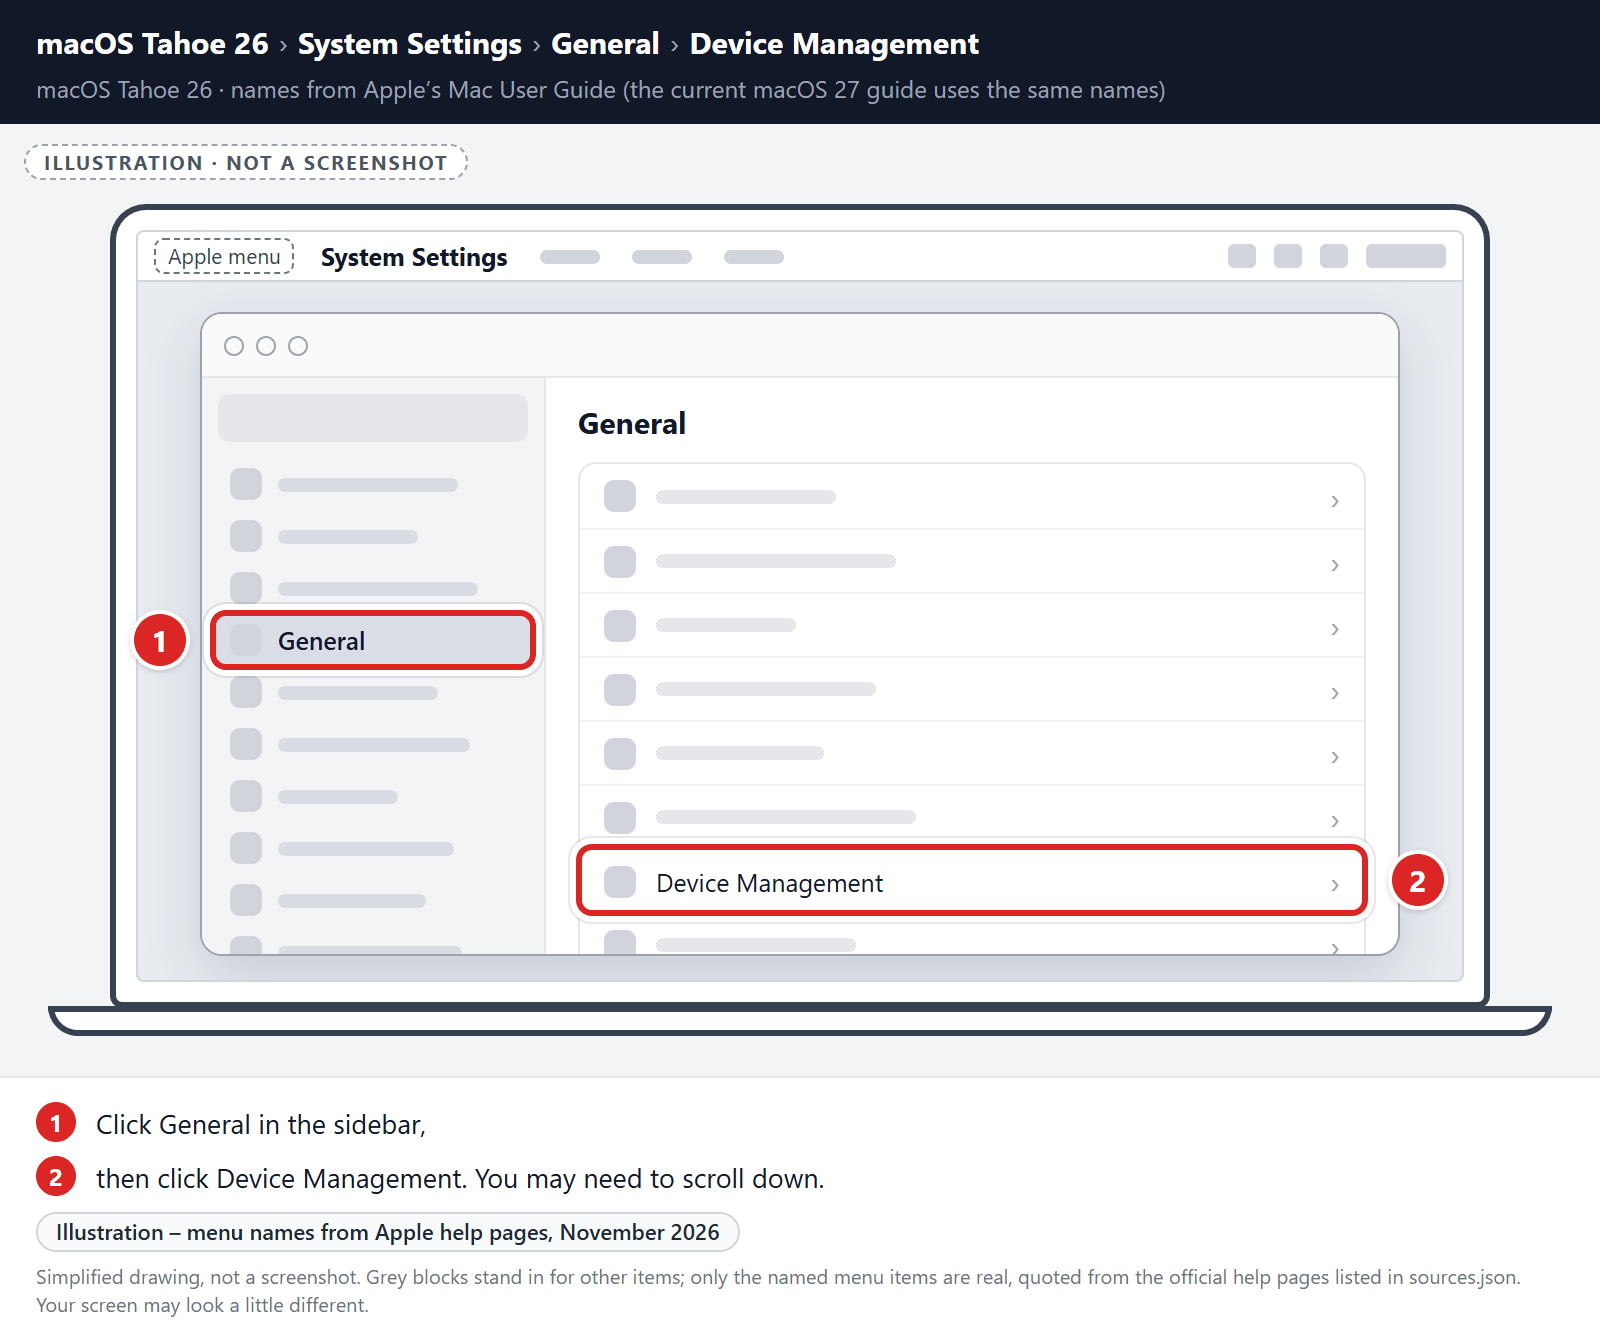
Look for “Profiles”
Where you find configuration profiles depends on your version of macOS:
macOS Sequoia (15) and later: click General in the sidebar, then click Device Management. You may need to scroll down.
macOS Ventura (13) and Sonoma (14): click Privacy & Security in the sidebar, then click Profiles near the bottom.
macOS Monterey (12) and earlier: in System Preferences, click Profiles.
You can also type “Profiles” in the search box.
No profiles listed, or no Profiles section at all? That means no configuration profiles are installed on your Mac, which is completely normal. Skip ahead to the next step of this guide. -
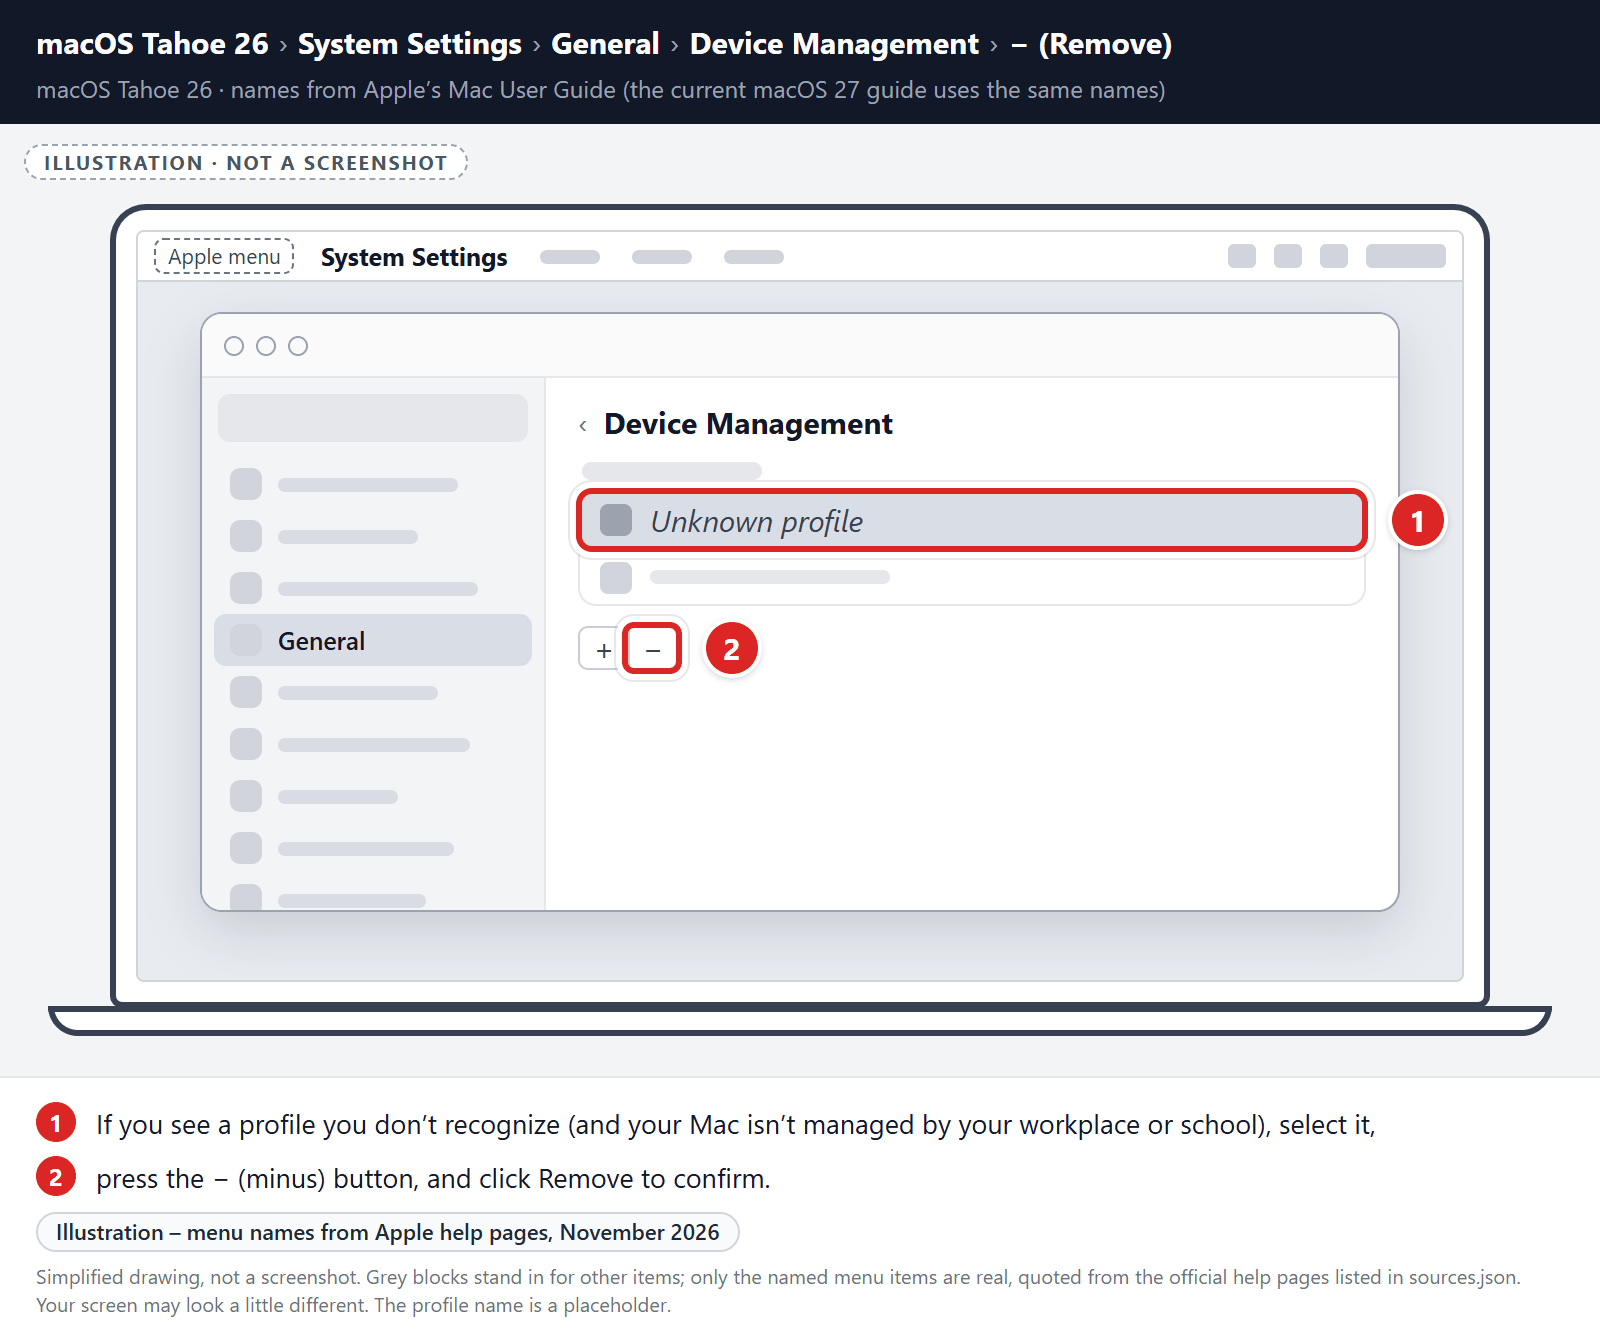
Remove the malicious profiles
Malware uses configuration profiles to lock your browser settings — forcing a fake search engine or homepage on you and preventing you from changing it back. If you see a profile you don’t recognize (and your Mac isn’t managed by your workplace or school), select it, press the − (minus) button, and click Remove to confirm.
STEP 2: Delete malicious apps
In this second step, we will try to identify and remove any malicious apps and files that might be installed on your computer. Sometimes redirects or adware programs can have usable Uninstall entries that can be used to remove these programs.
-
Quit the malicious programs
Check the Apple menu bar in the top-right corner of your screen. If you see an icon you don’t recognize, click it and select Quit. This stops the malware from running so it can’t interfere while we remove it.
-
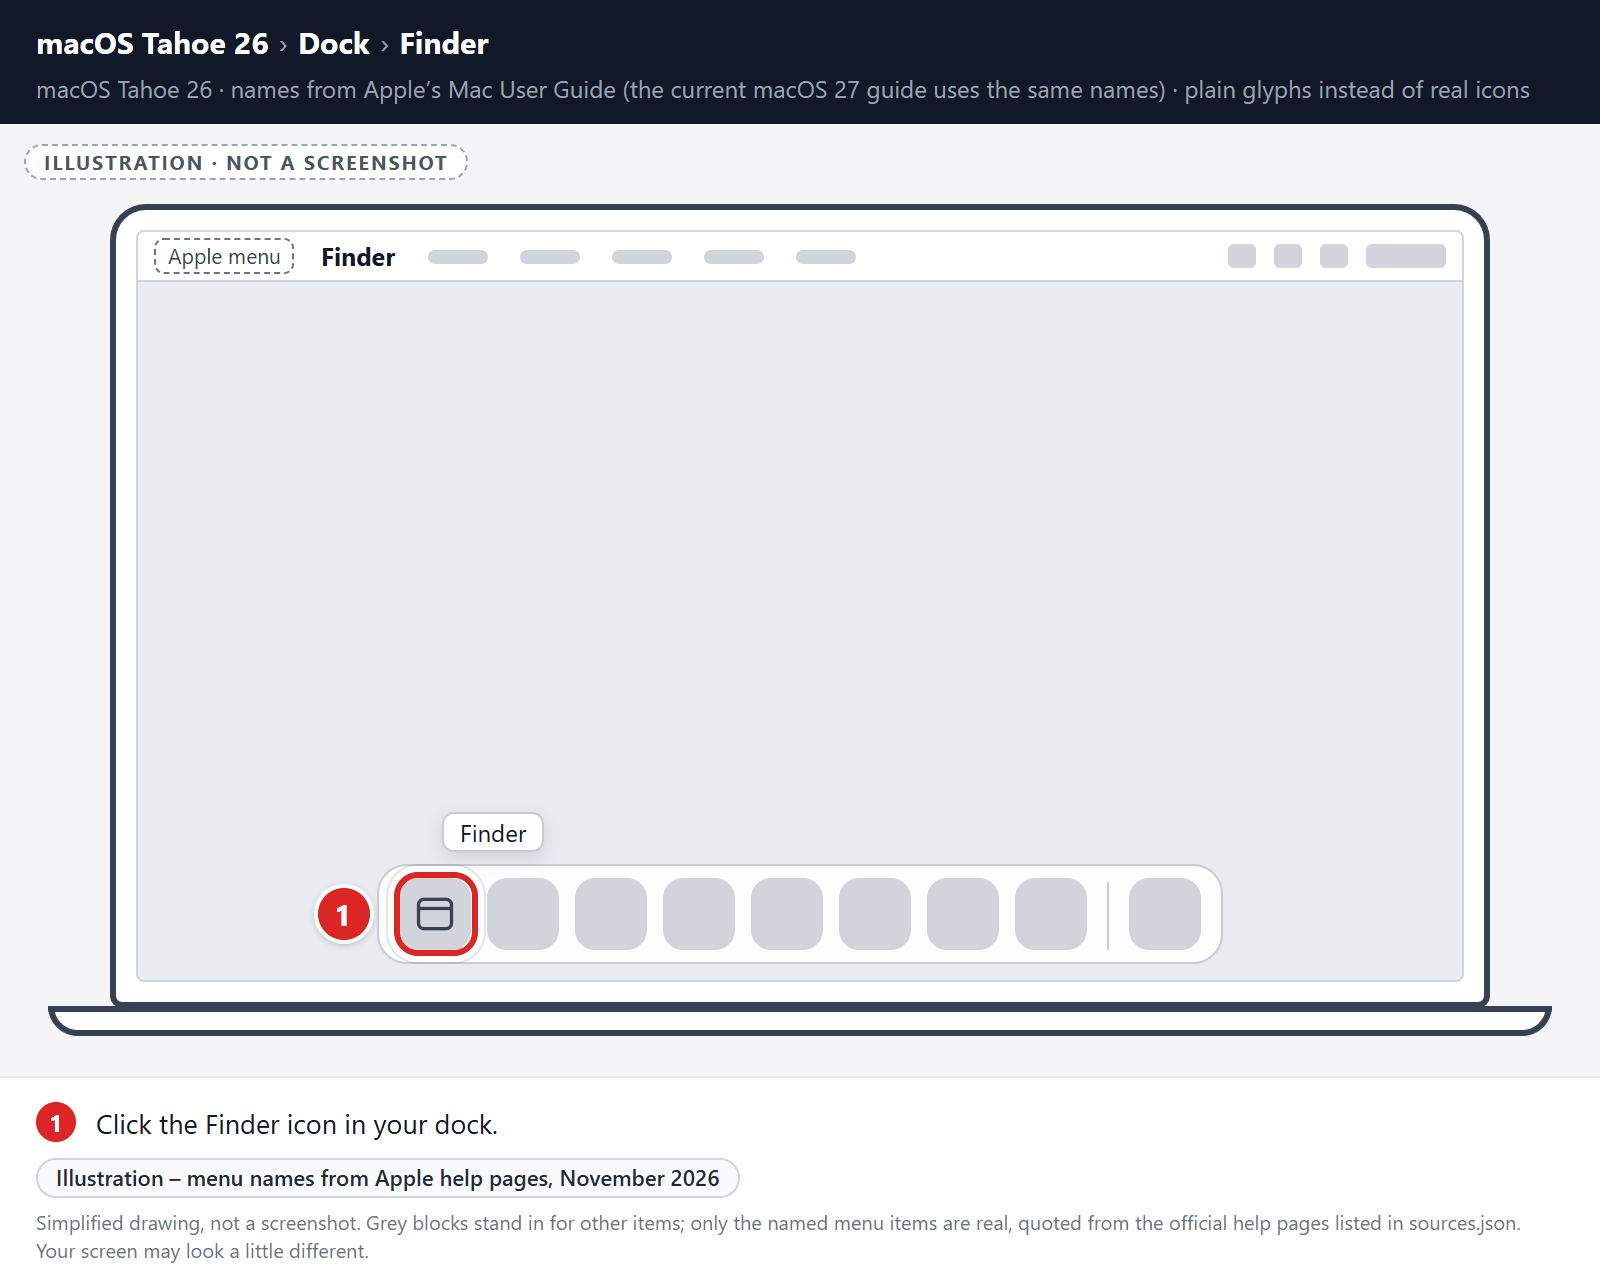
Open “Finder”
Click the Finder icon in your dock.
-
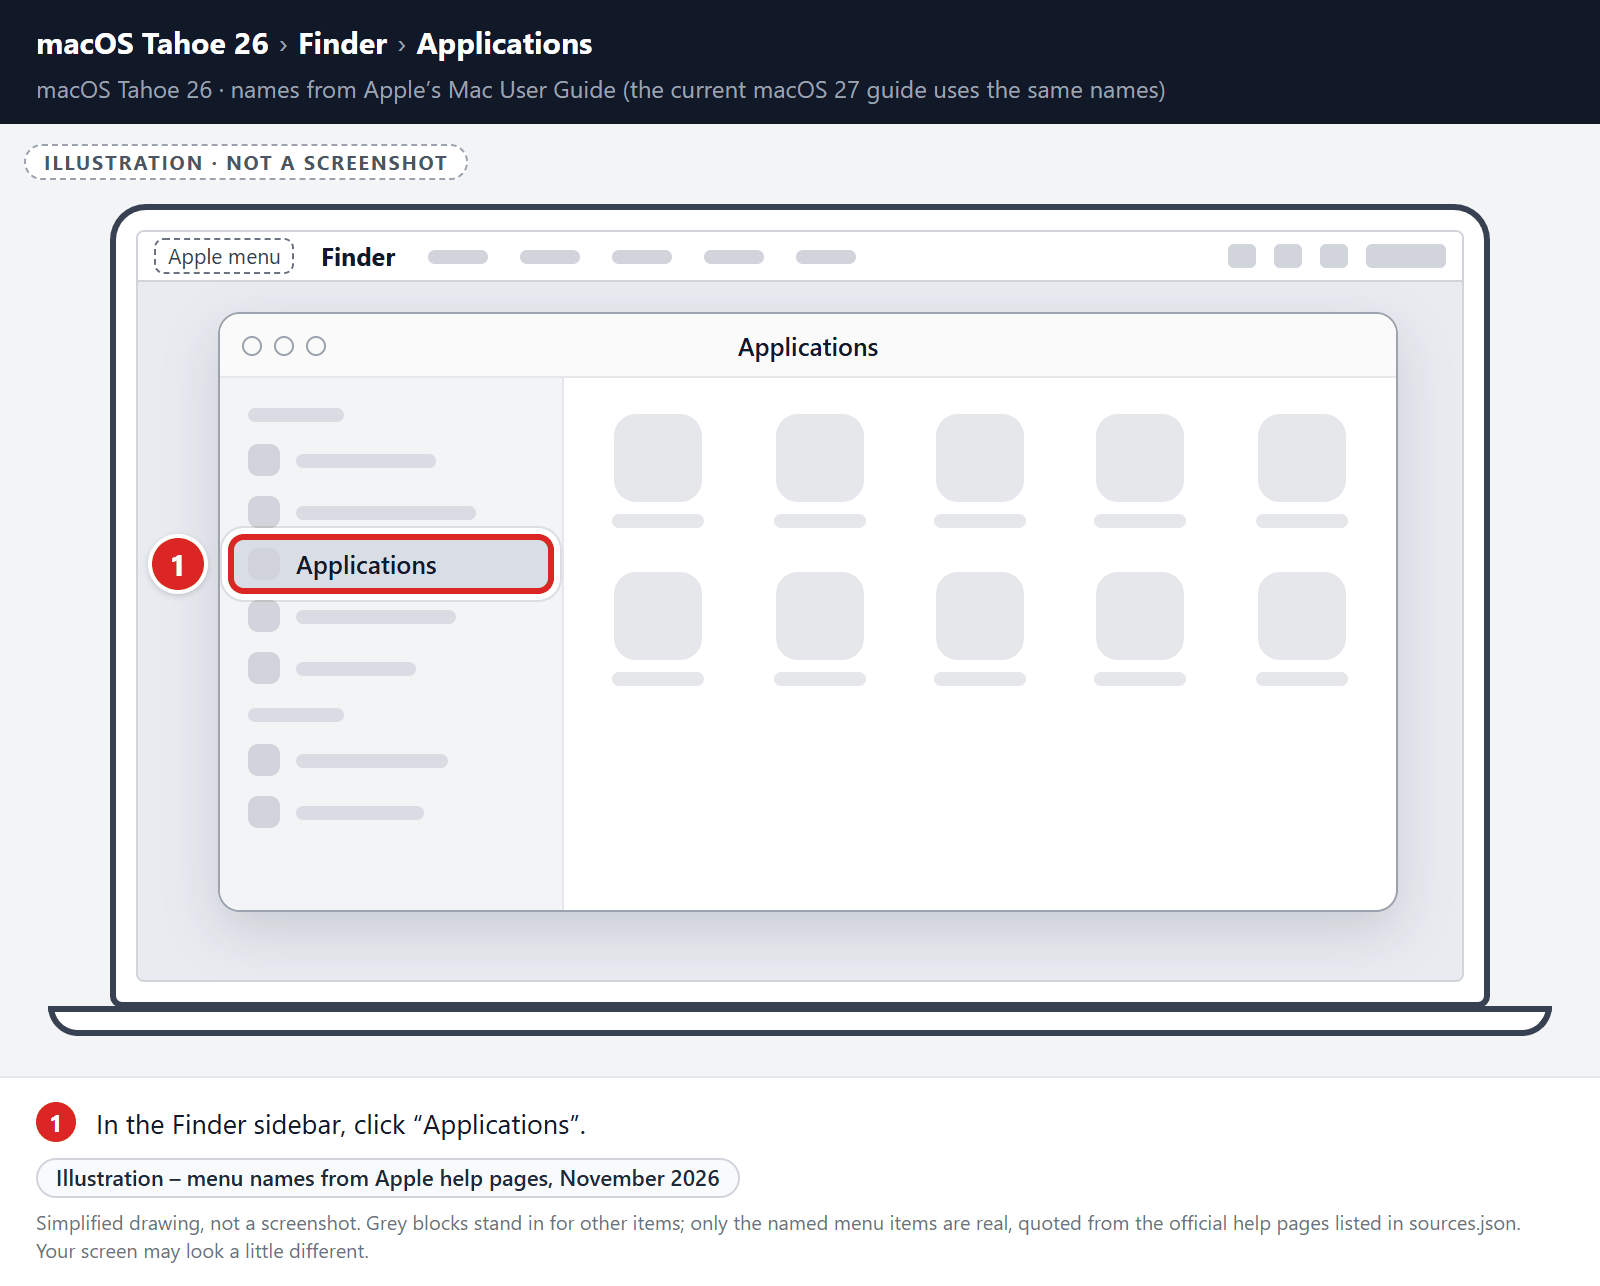
Click on “Applications”
In the Finder sidebar, click “Applications“.
-
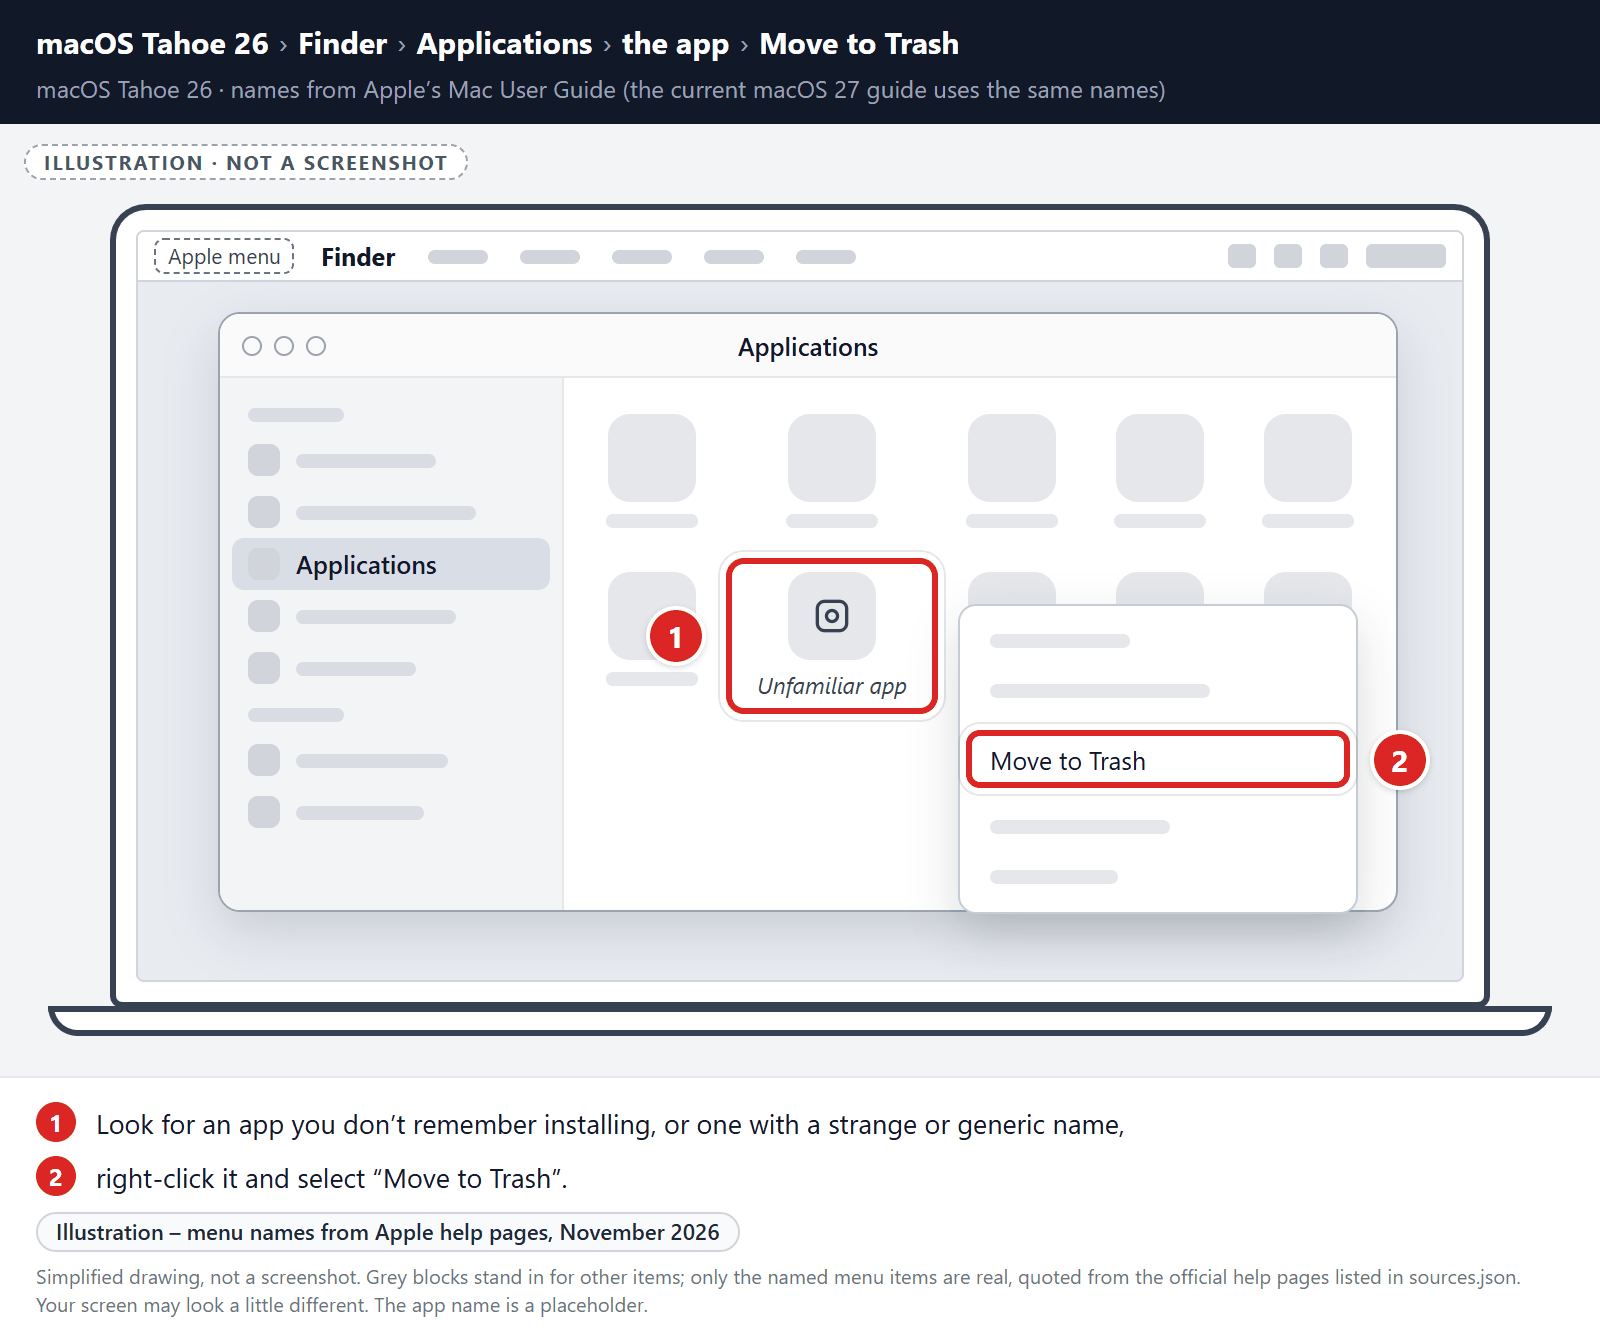
Find and remove the malicious app
Scroll through the list of installed apps and look for anything suspicious — an app you don’t remember installing, or one with a strange or generic name. When you find it, right-click it and select “Move to Trash“.
Some known malicious programs to look for: SearchMine, TakeFresh, TopResults, FeedBack, ApplicationEvents, GeneralOpen, PowerLog, MessengerNow, ImagePrime, GeneralNetSearch, Reading Cursors, GlobalTechSearch, PDFOnline-express, See Scenic Elf, MatchKnowledge, Easy Speedtest, and WebDiscover. The names change constantly, though — so treat any app you can’t account for as suspect.
-
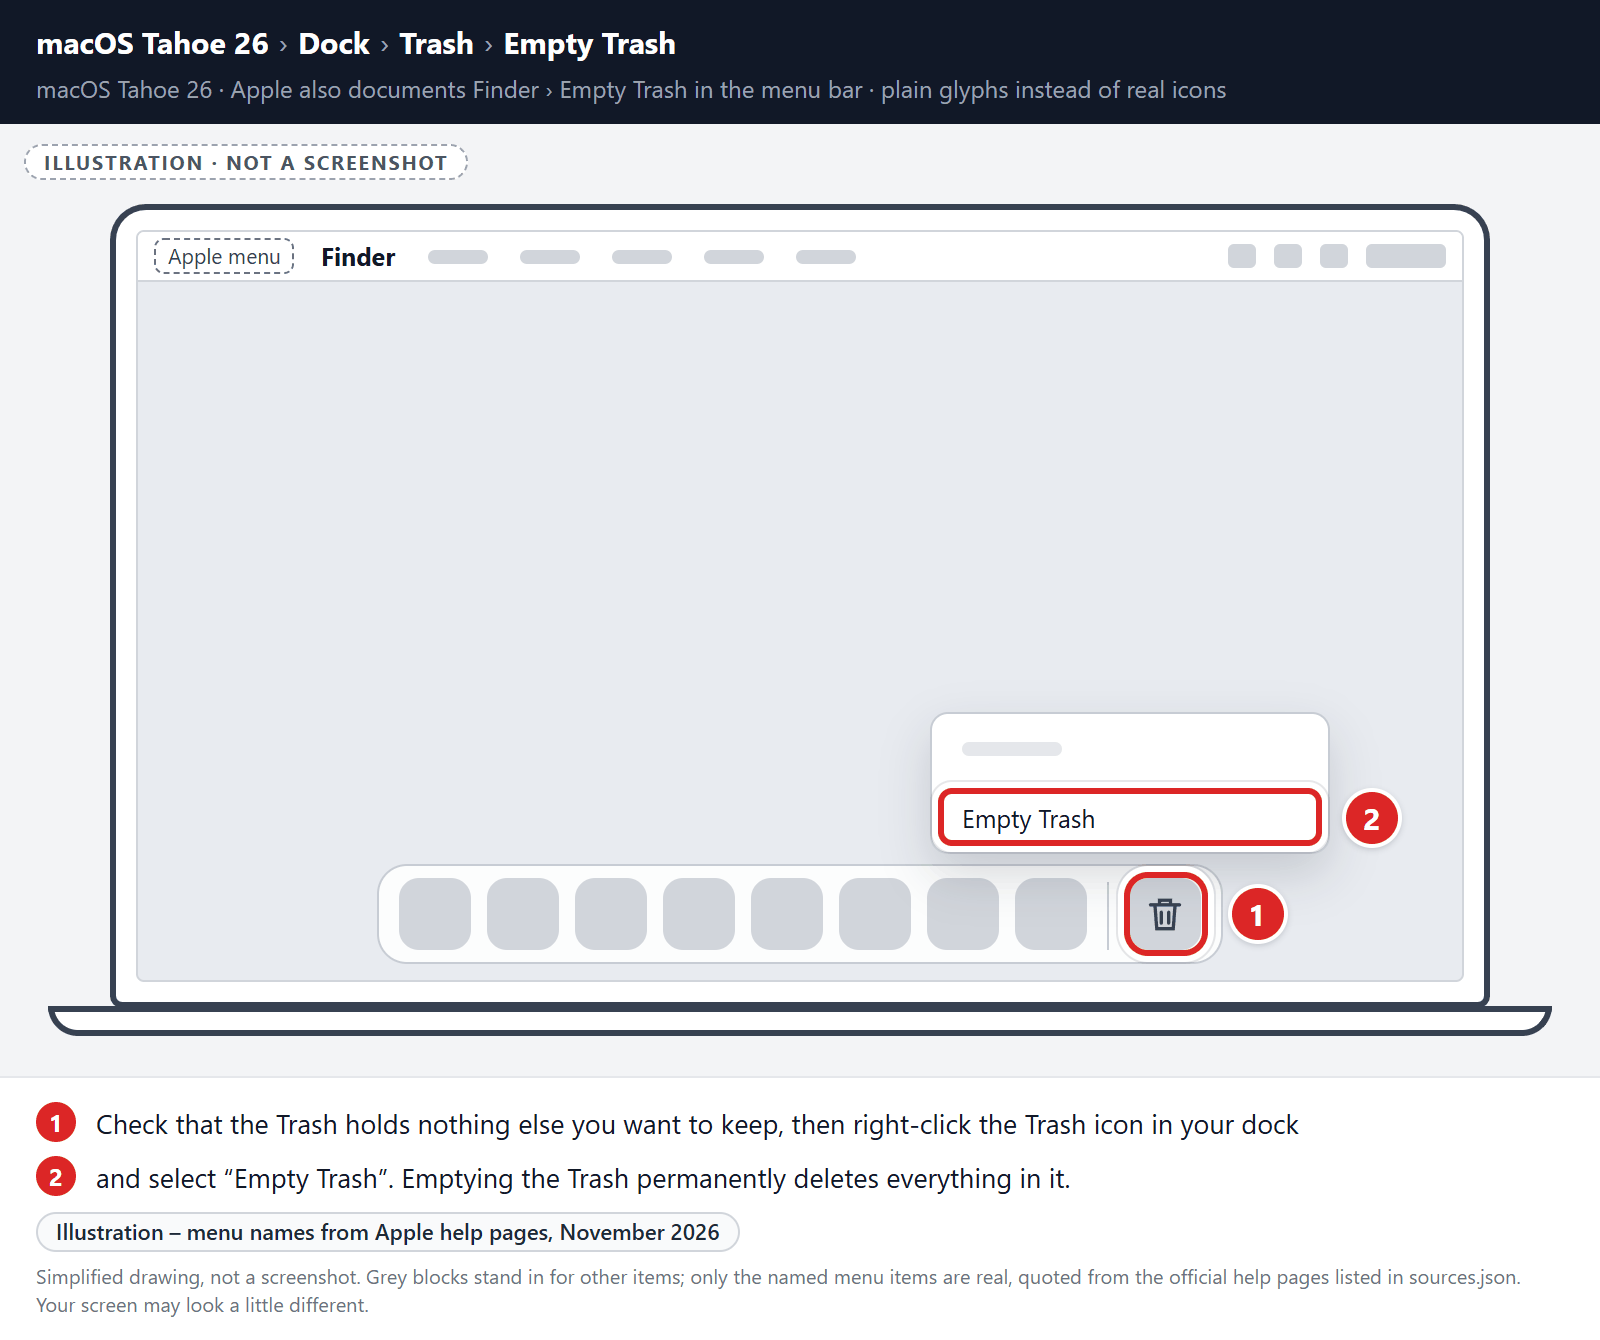
Empty the Trash
Before you empty the Trash, check that it doesn’t hold anything else you want to keep, because emptying it permanently deletes everything in it. Then right-click the Trash icon in your dock and select “Empty Trash“.
Check login items and background apps
Malware often sets itself to start automatically. Open the Apple menu > System Settings, click General, then click Login Items & Extensions (called Login Items in macOS Ventura and Sonoma). Look for apps you don’t recognize in the list of items that open at login and in the list of apps allowed to run in the background. Select an unwanted item and click the Remove (−) button, or turn off its switch.
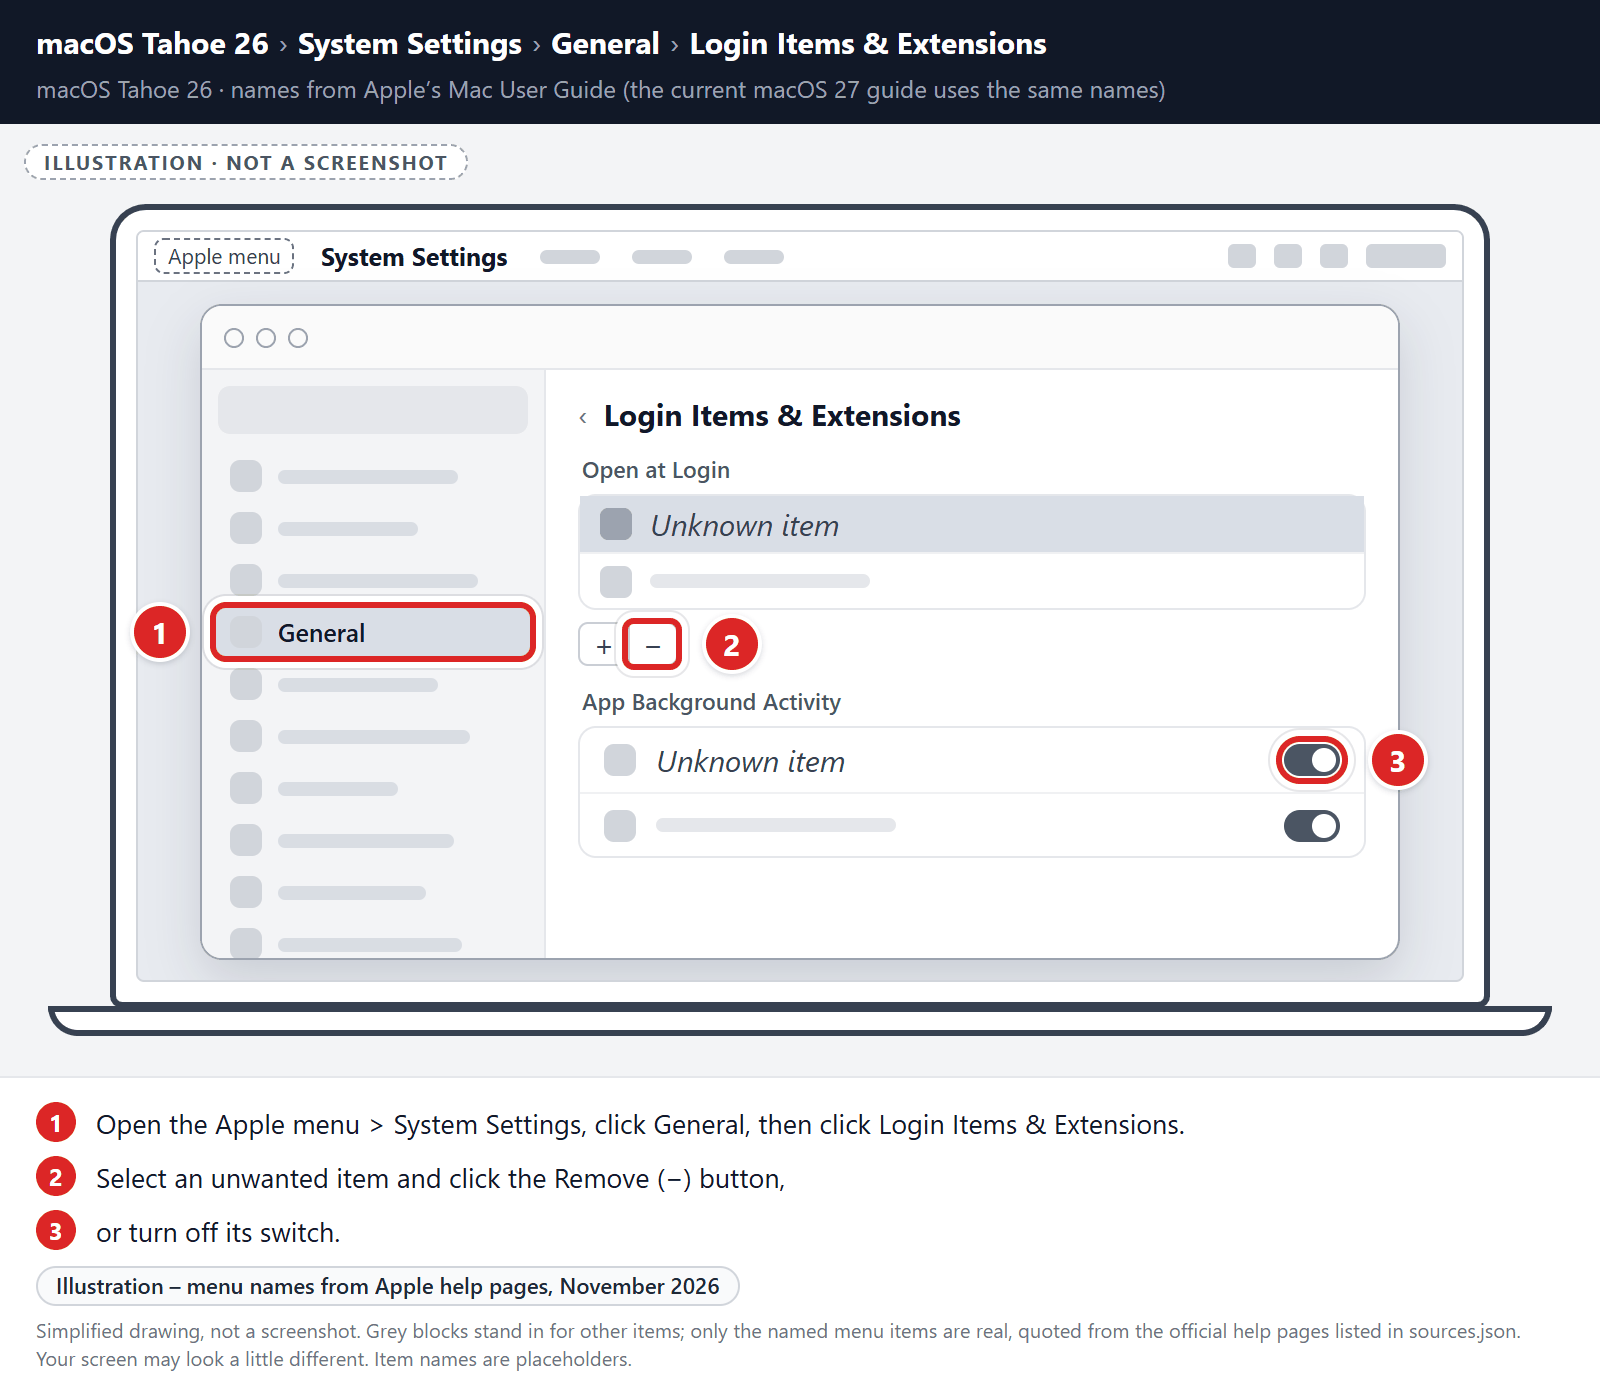
This check doesn’t delete any files. Note the names you find, because they help you spot related files in the next step.
Find and remove the malicious files
Malware on Mac uses launch agents and launch daemons — small files that automatically restart the malware every time you boot your Mac. We’ll check the four folders where they hide:
- Click the desktop to make sure you’re in Finder, then open the “Go” menu and click “Go to Folder“.
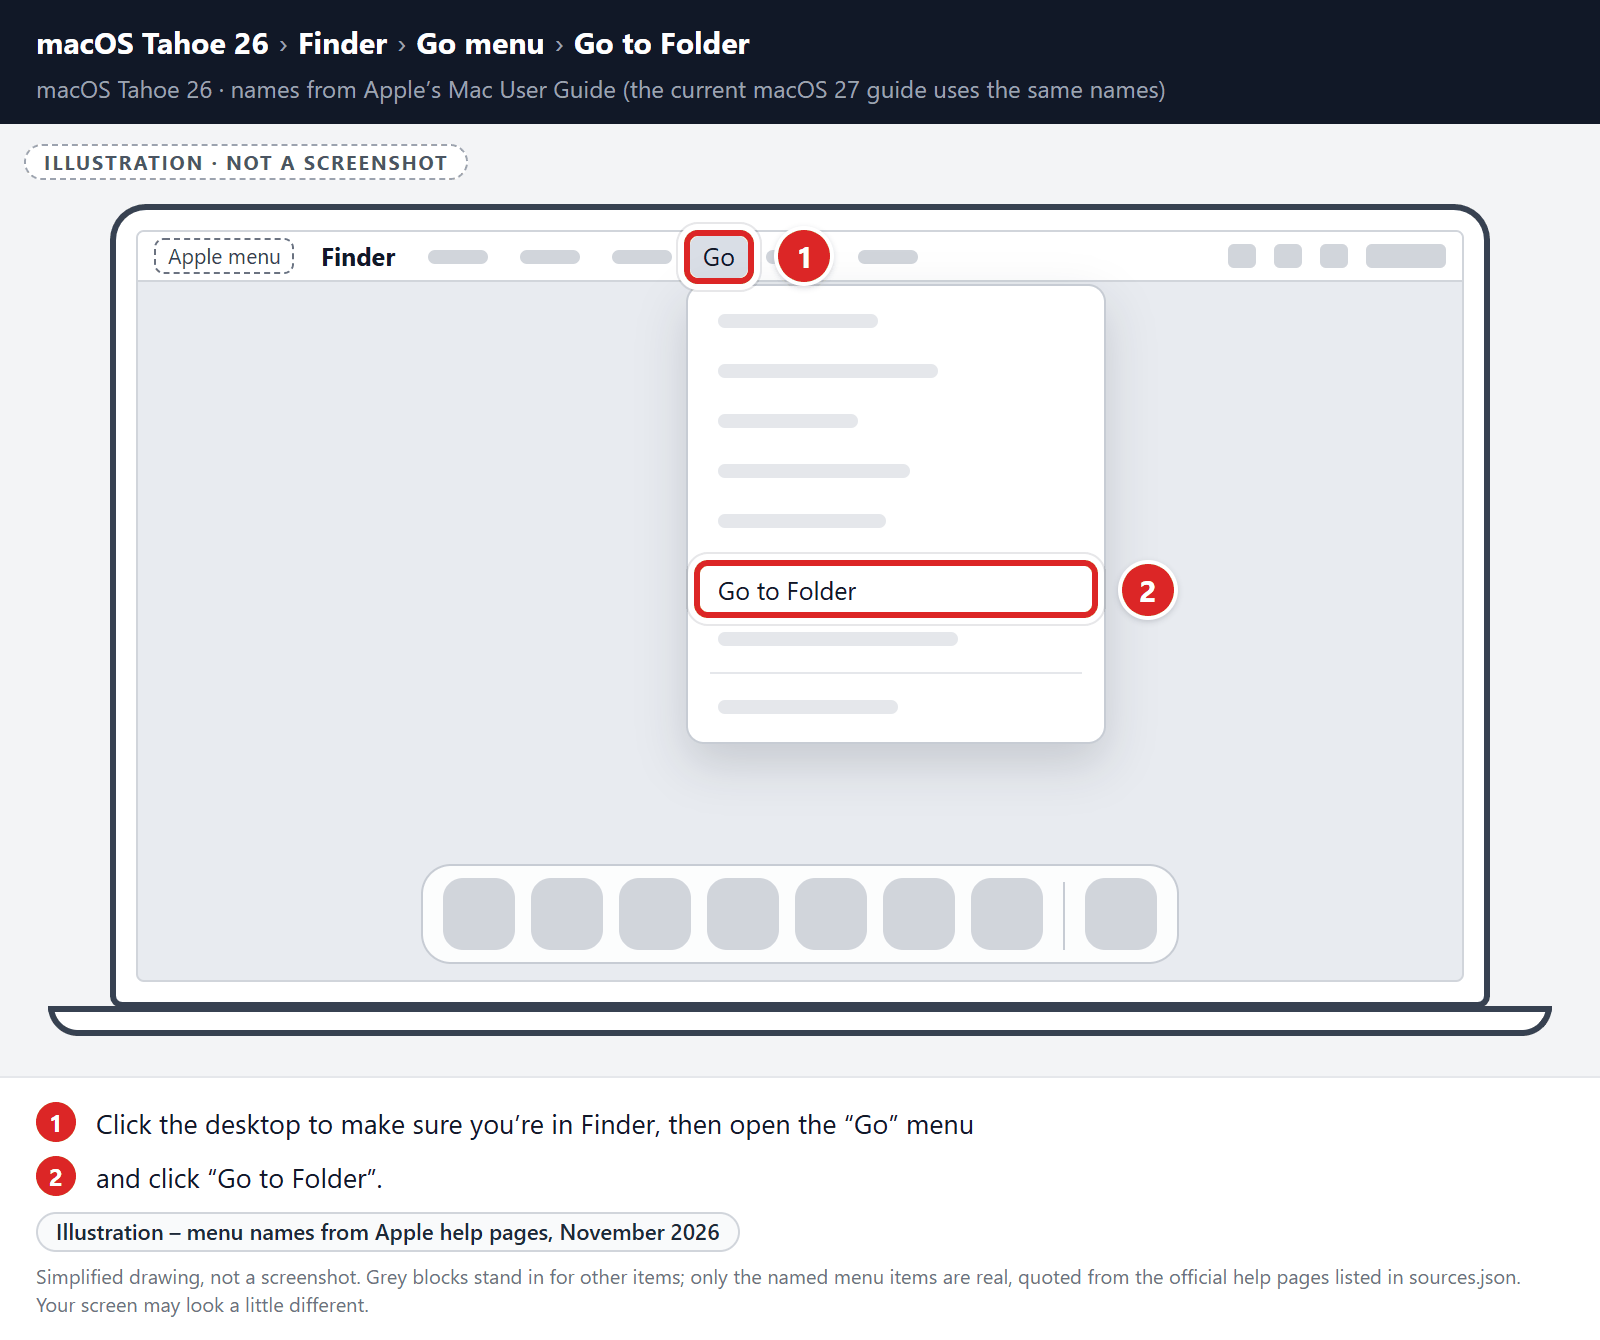
- Copy and paste each of the paths below into the window, one at a time, then double-click the matching folder that appears:
- /Library/LaunchAgents
- ~/Library/LaunchAgents
- /Library/Application Support
- /Library/LaunchDaemons
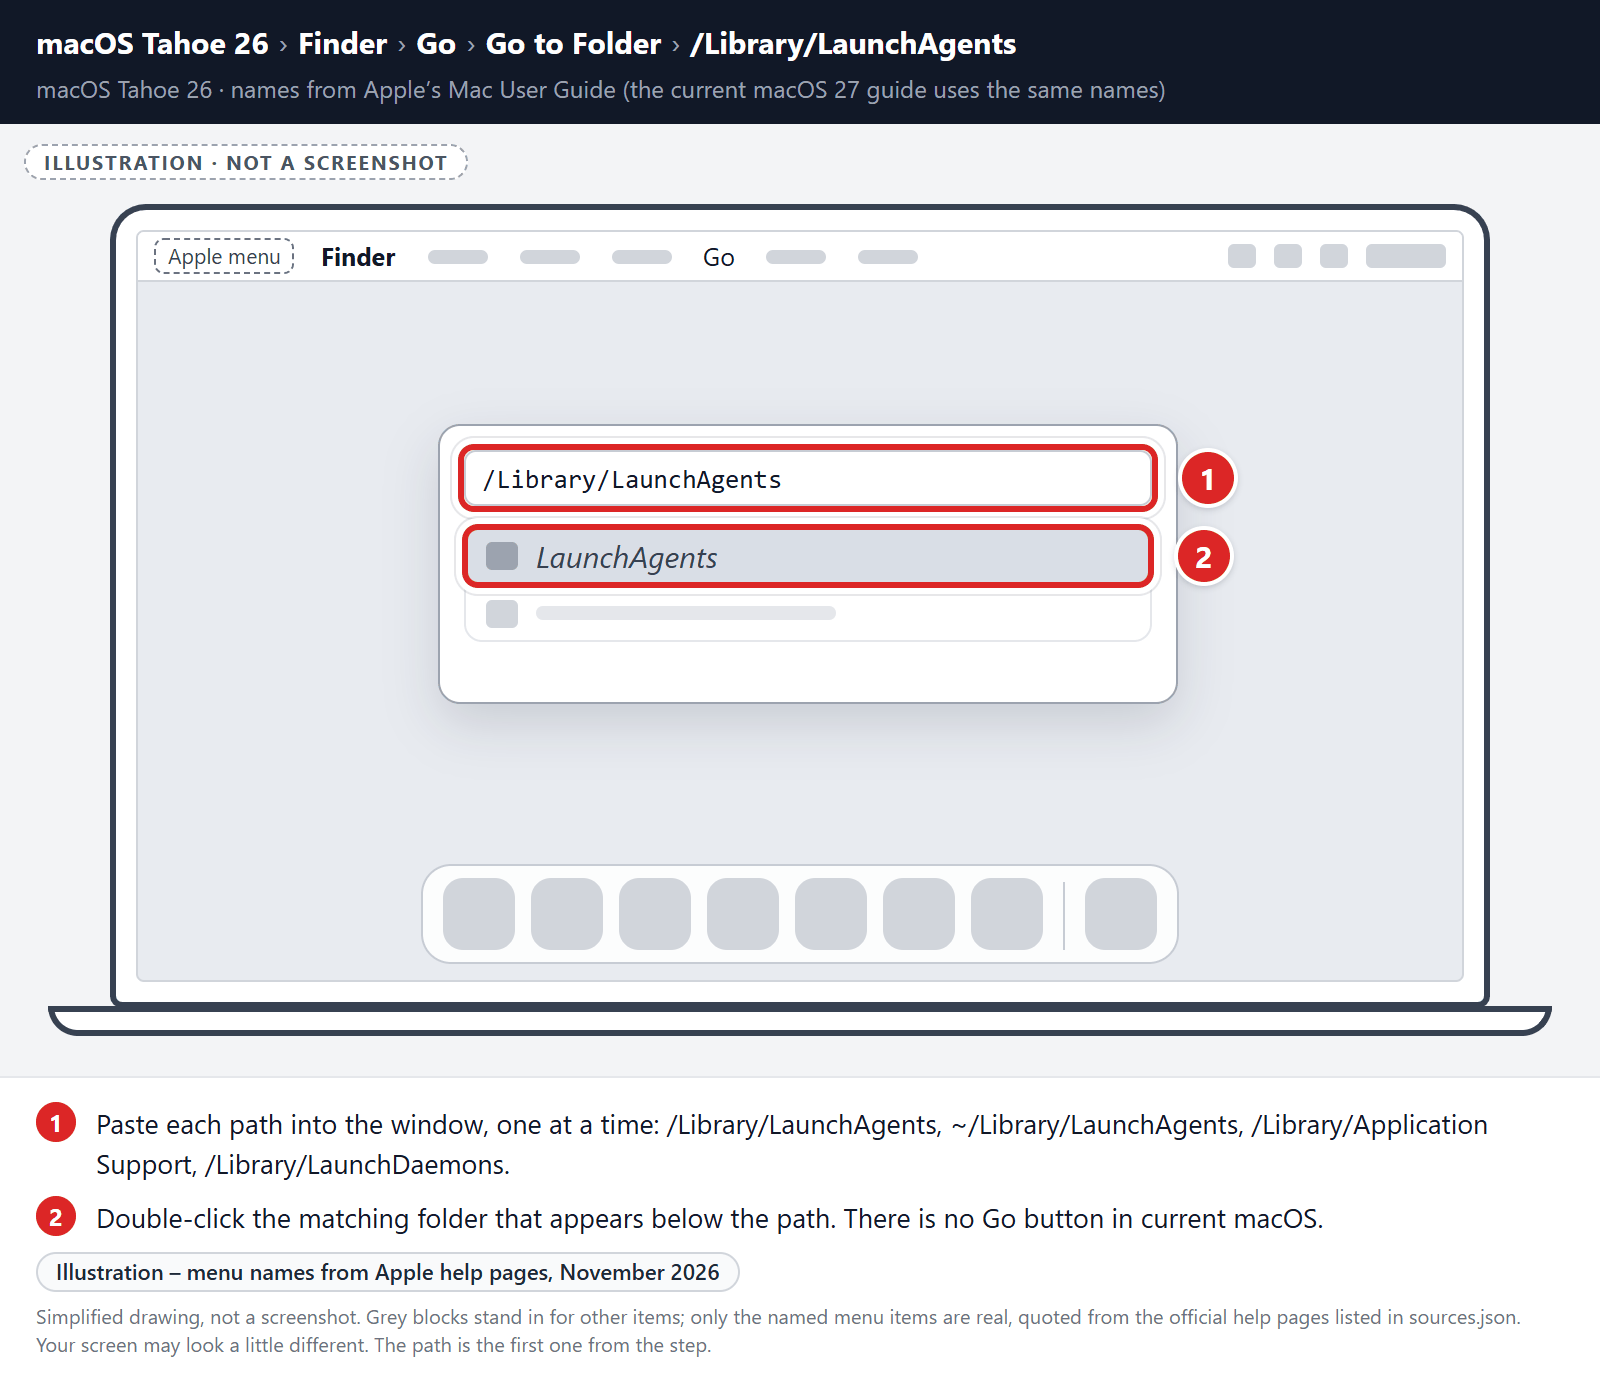
- In each folder, look for suspicious .plist files — typically named after the malware or with odd, random-looking names. Examples seen in past infections include “installmac.AppRemoval.plist”, “myppes.download.plist”, “mykotlerino.ltvbit.plist”, and “com.myppes.net-preferences.plist”. A name alone is not proof. For example, “com.adobe.fpsaud.plist” belongs to Adobe’s own Flash Player updater. When you find a malicious file, move it to the Trash — then empty the Trash again when you’re done.
Be careful: these folders also contain files belonging to legitimate apps — especially /Library/Application Support, where programs like Adobe, Google, and Microsoft store their data. Only delete files you’re confident are malicious. If you’re unsure about a file, search its exact name online first, or leave it in place and continue with the Malwarebytes scan later in this guide.
- Click the desktop to make sure you’re in Finder, then open the “Go” menu and click “Go to Folder“.
STEP 3: Reset browsers back to default settings
In this third step, we will remove spam push notifications and malicious extensions, and change to default any settings that might have been changed by malware.
For each browser that you have installed on your computer, please click on the tab below and follow the displayed steps to reset that browser.
Remove malicious extensions and settings from Safari
To remove malware from Safari we will check if there are any malicious extensions installed on your browser and what settings have been changed by this malicious program.
-
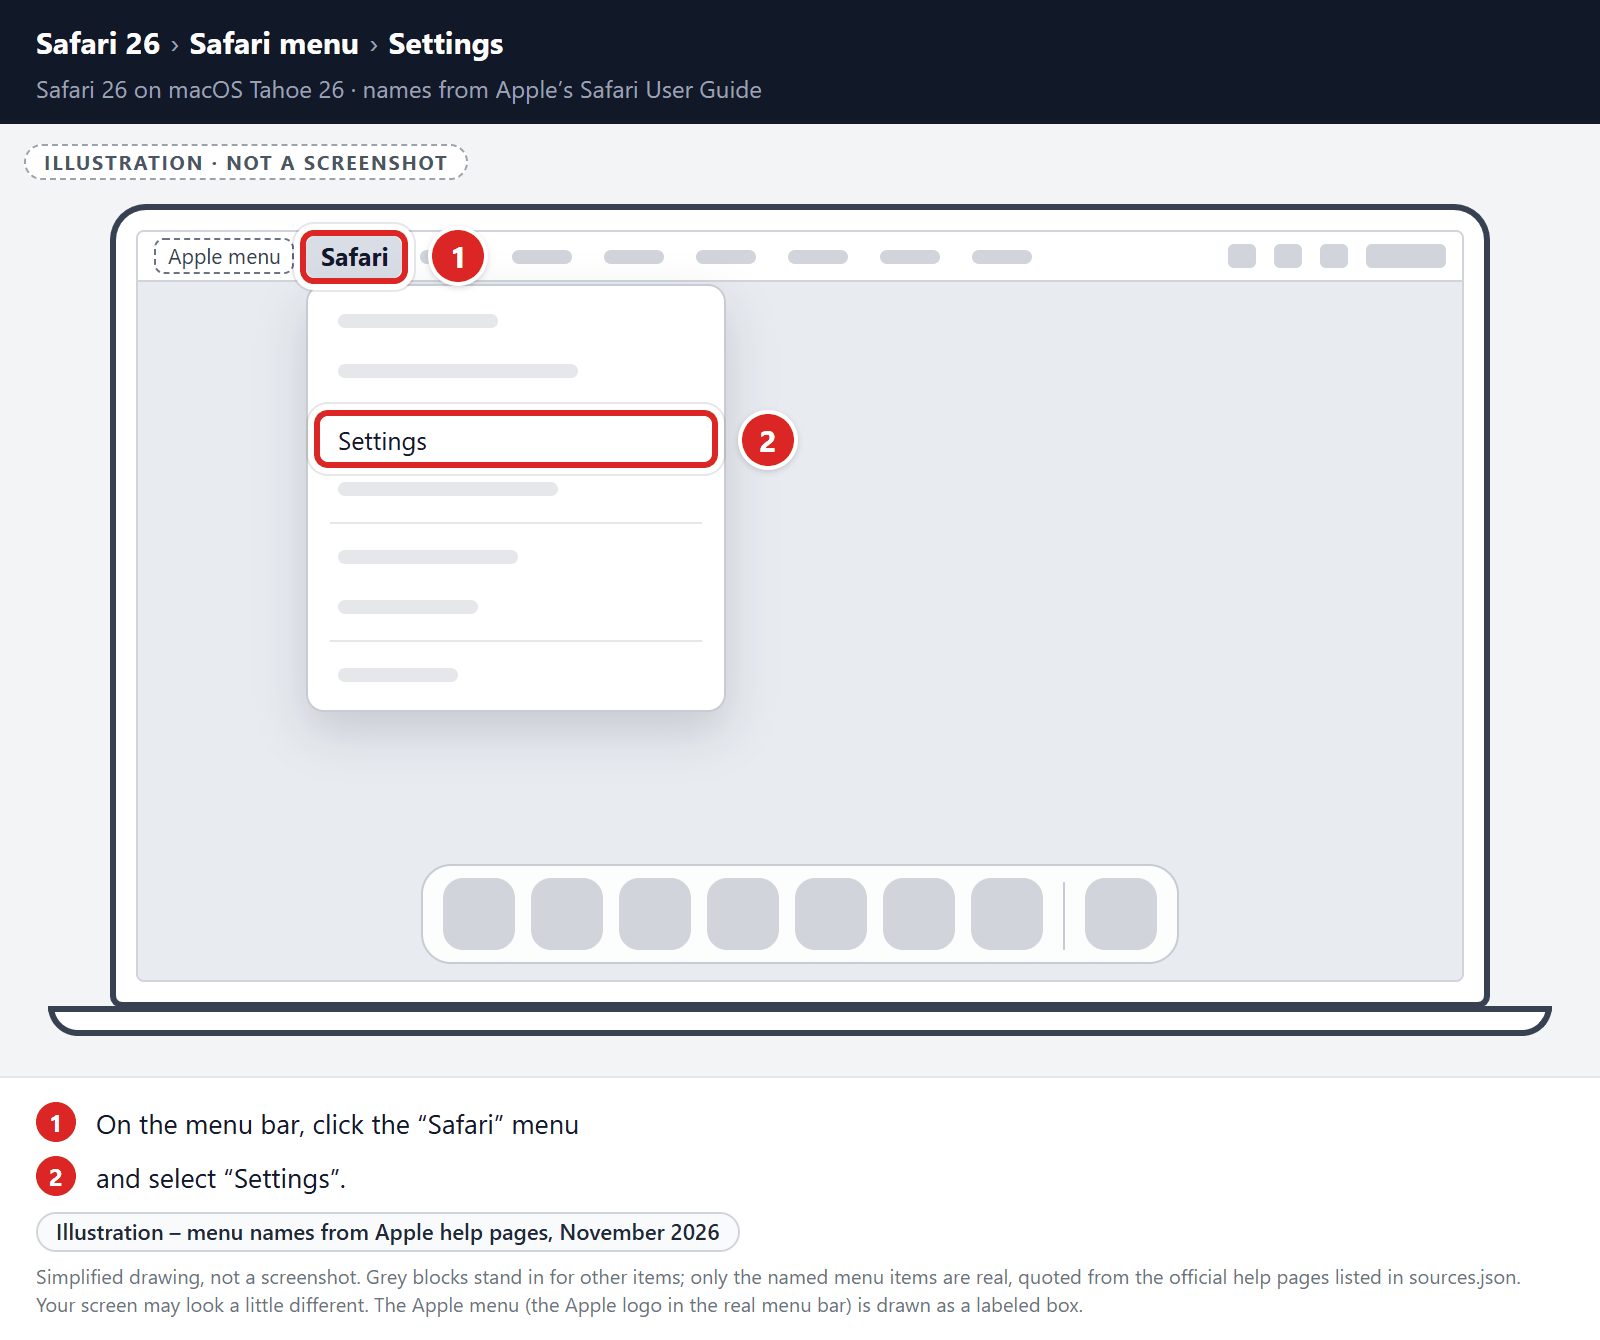
Go to Safari’s “Settings”.
On the menu bar, click the “Safari” menu and select “Settings”. In older versions of Safari, this menu item is called “Preferences”.
-
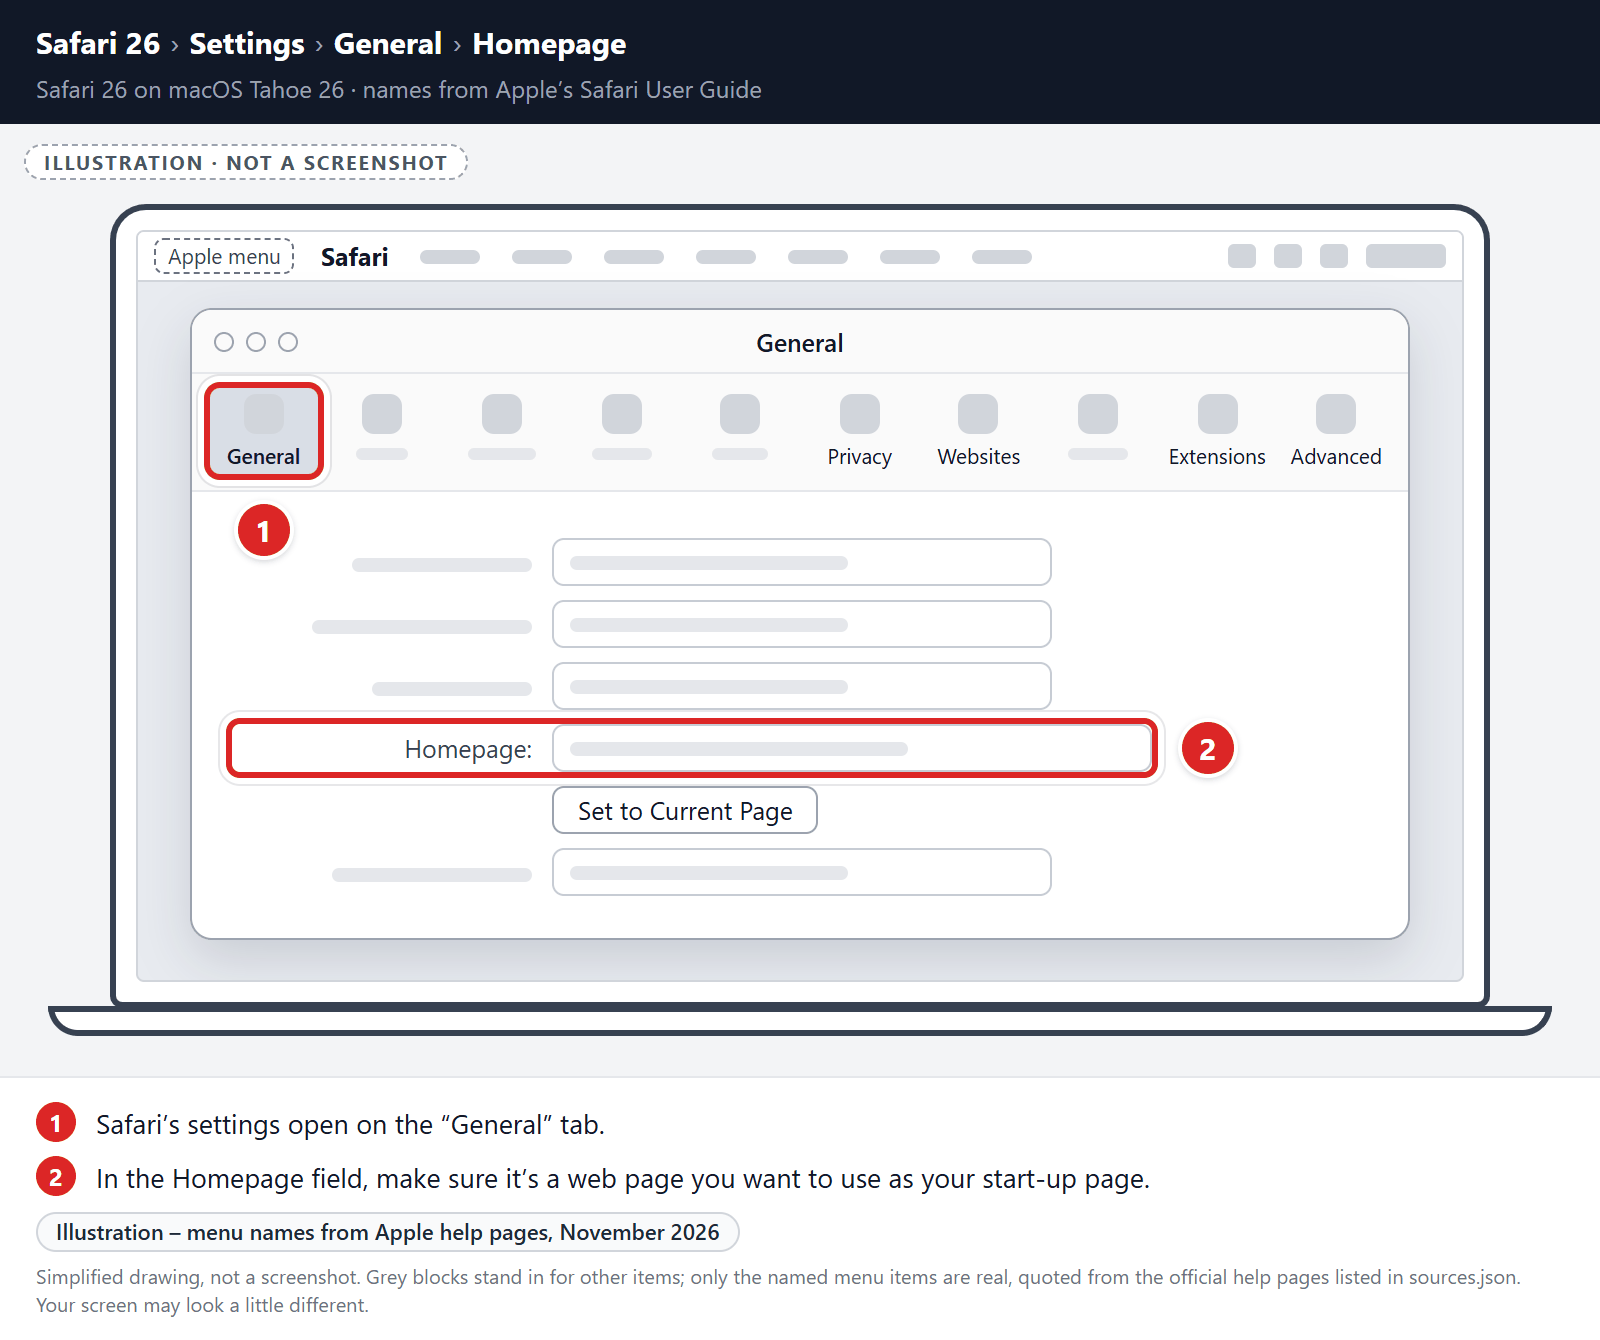
Check Homepage.
This will open a new window with your Safari settings, opened to the “General” tab. Some browser hijackers may change your default homepage, so in the Homepage field make sure it’s a web page you want to use as your start-up page.
-
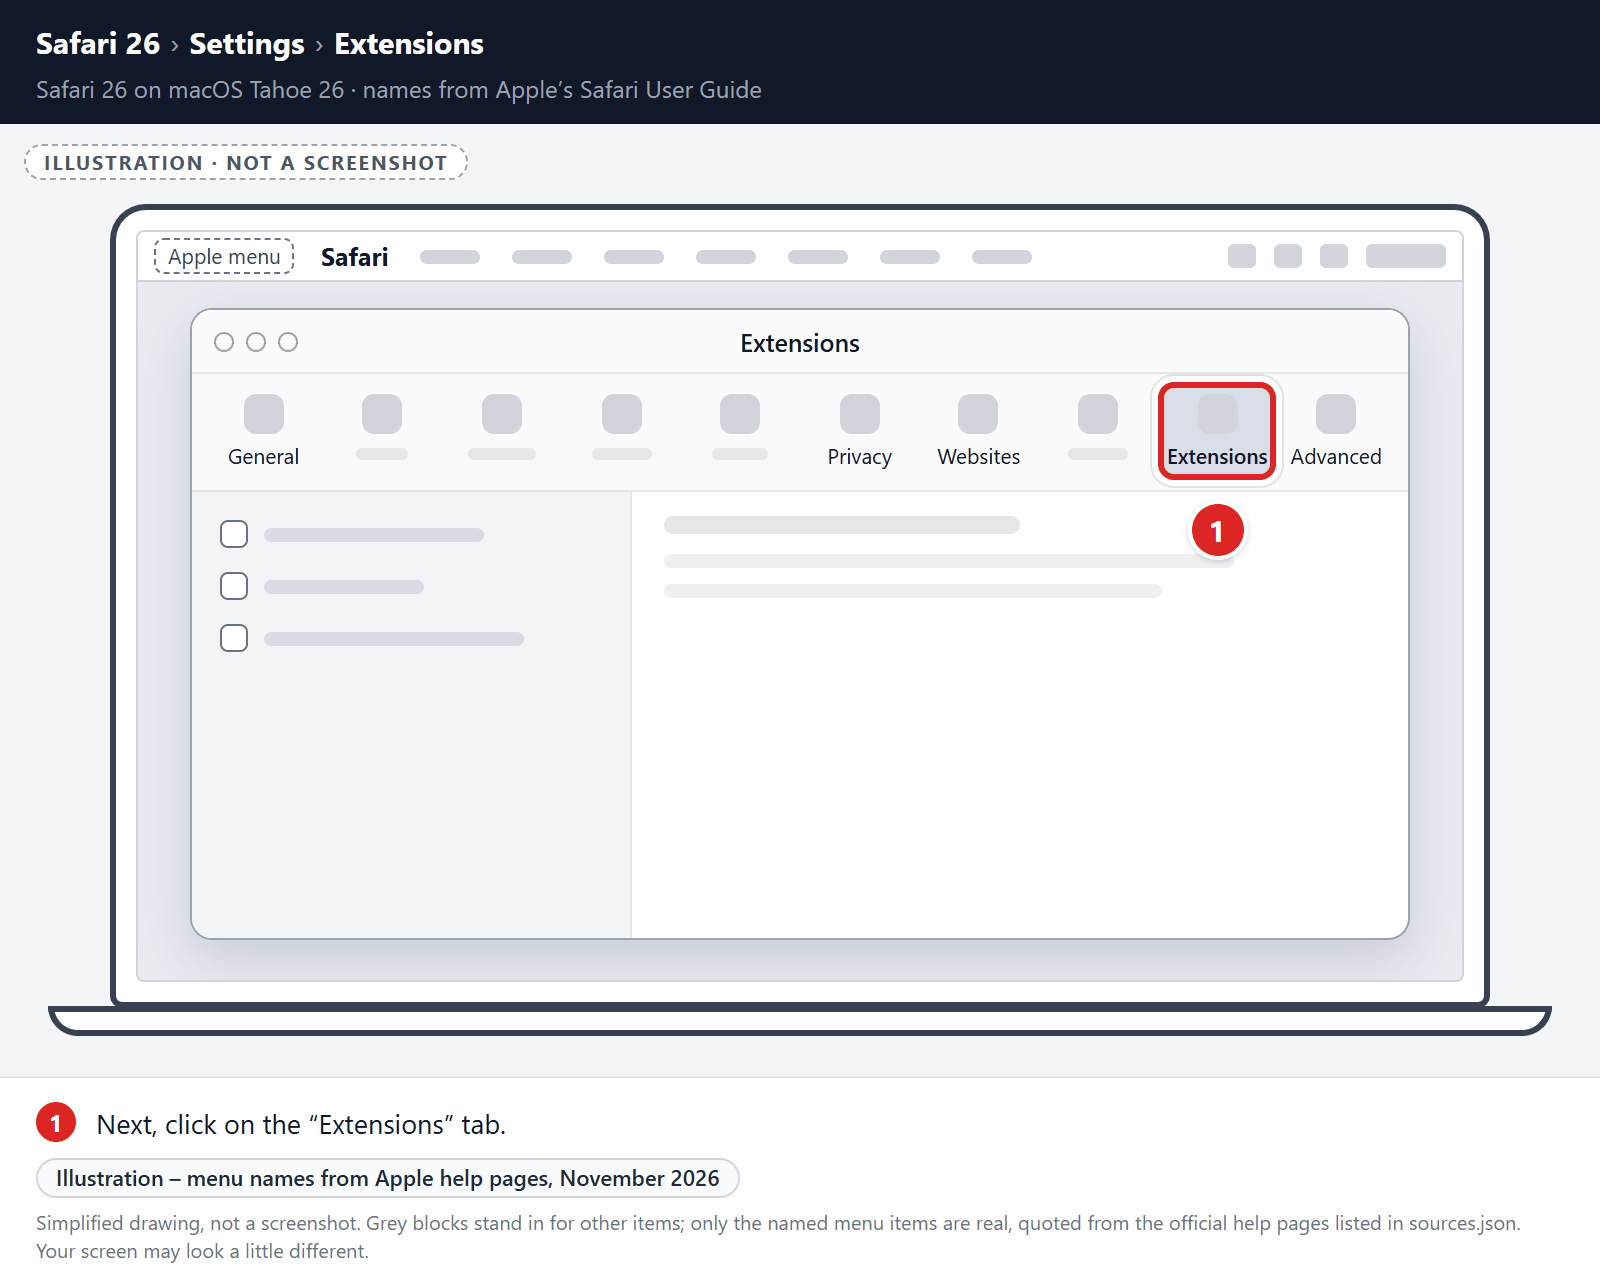
Click “Extensions”
Next, click on the “Extensions” tab.
-
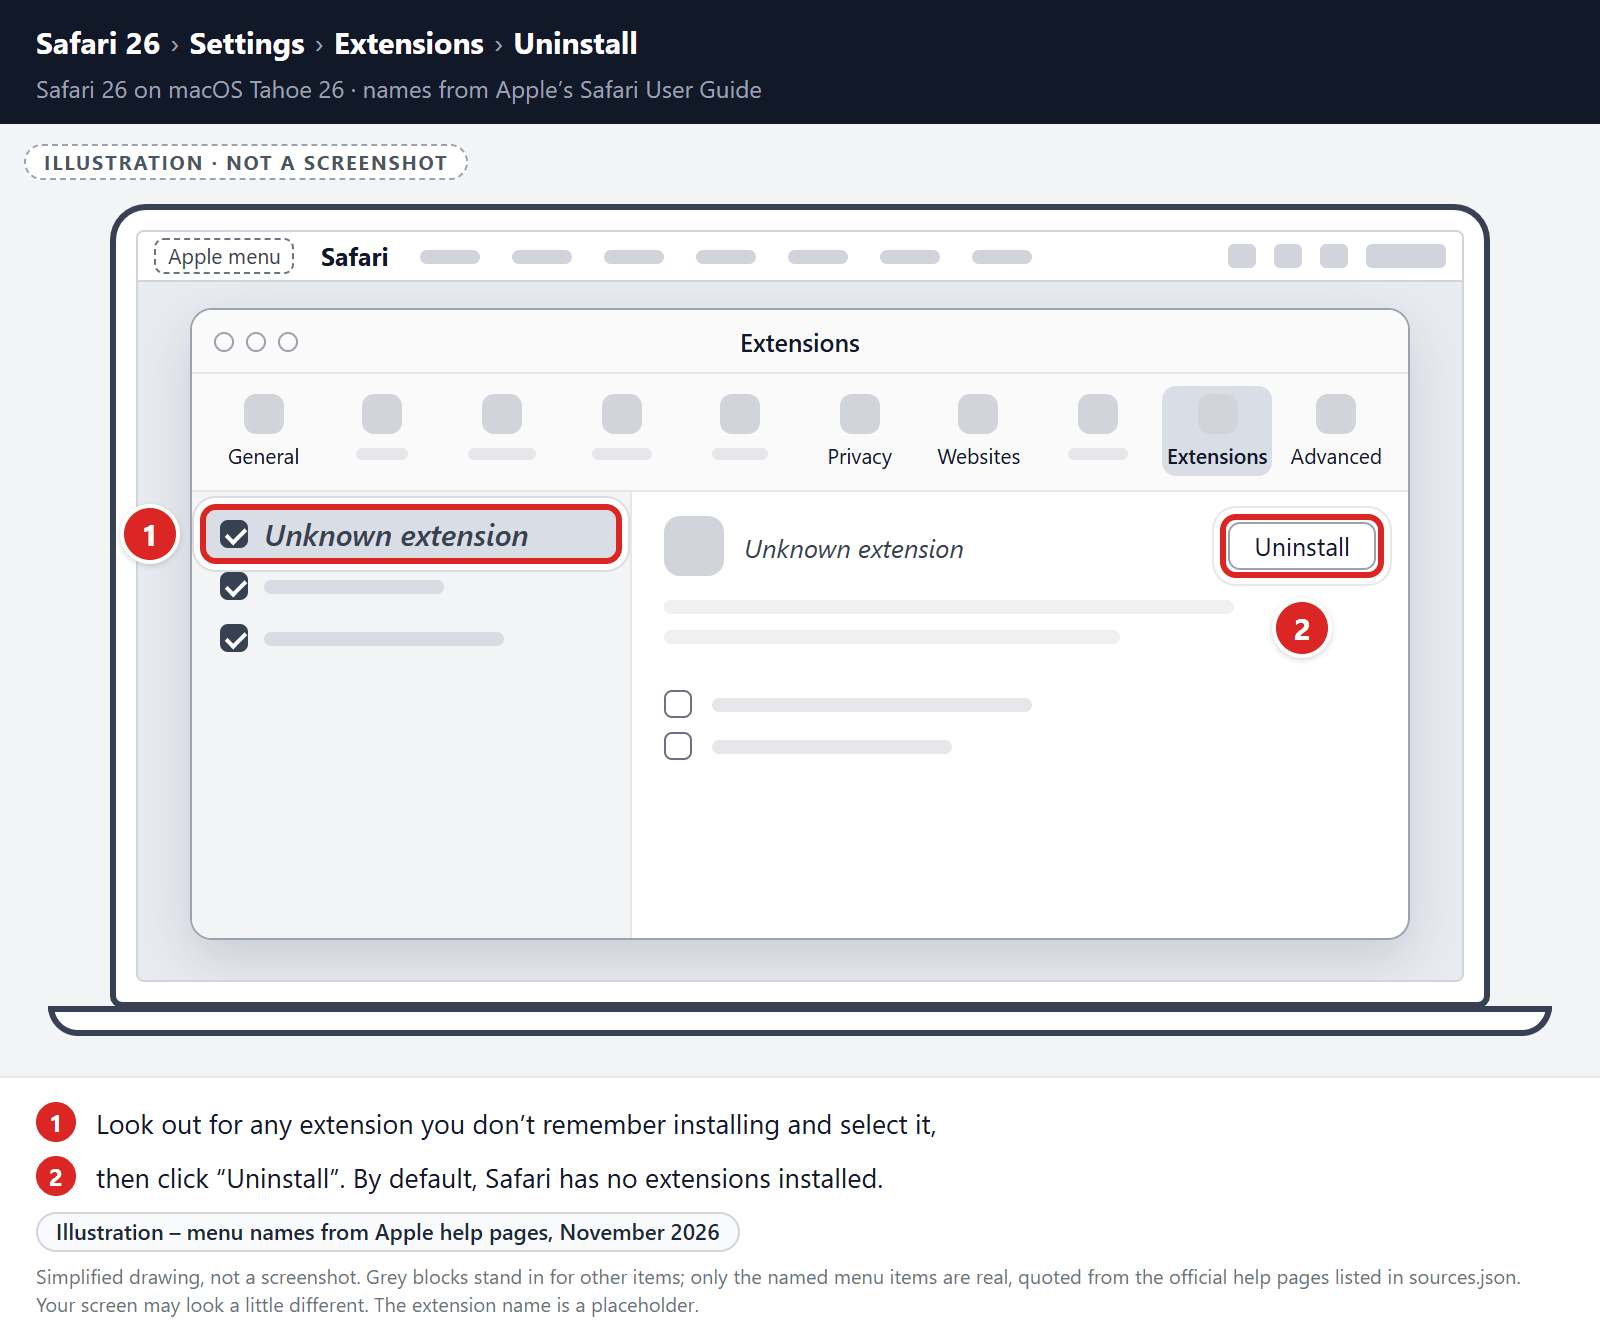
Find and uninstall malicious extensions.
The “Extensions” screen will be displayed with a list of all the extensions installed on Safari. Look out for any suspicious browser extension that could be behind all the drama – anything you don’t remember downloading or that doesn’t sound like a genuine extension. By default, there are no extensions installed on Safari so it’s safe to remove an extension
-
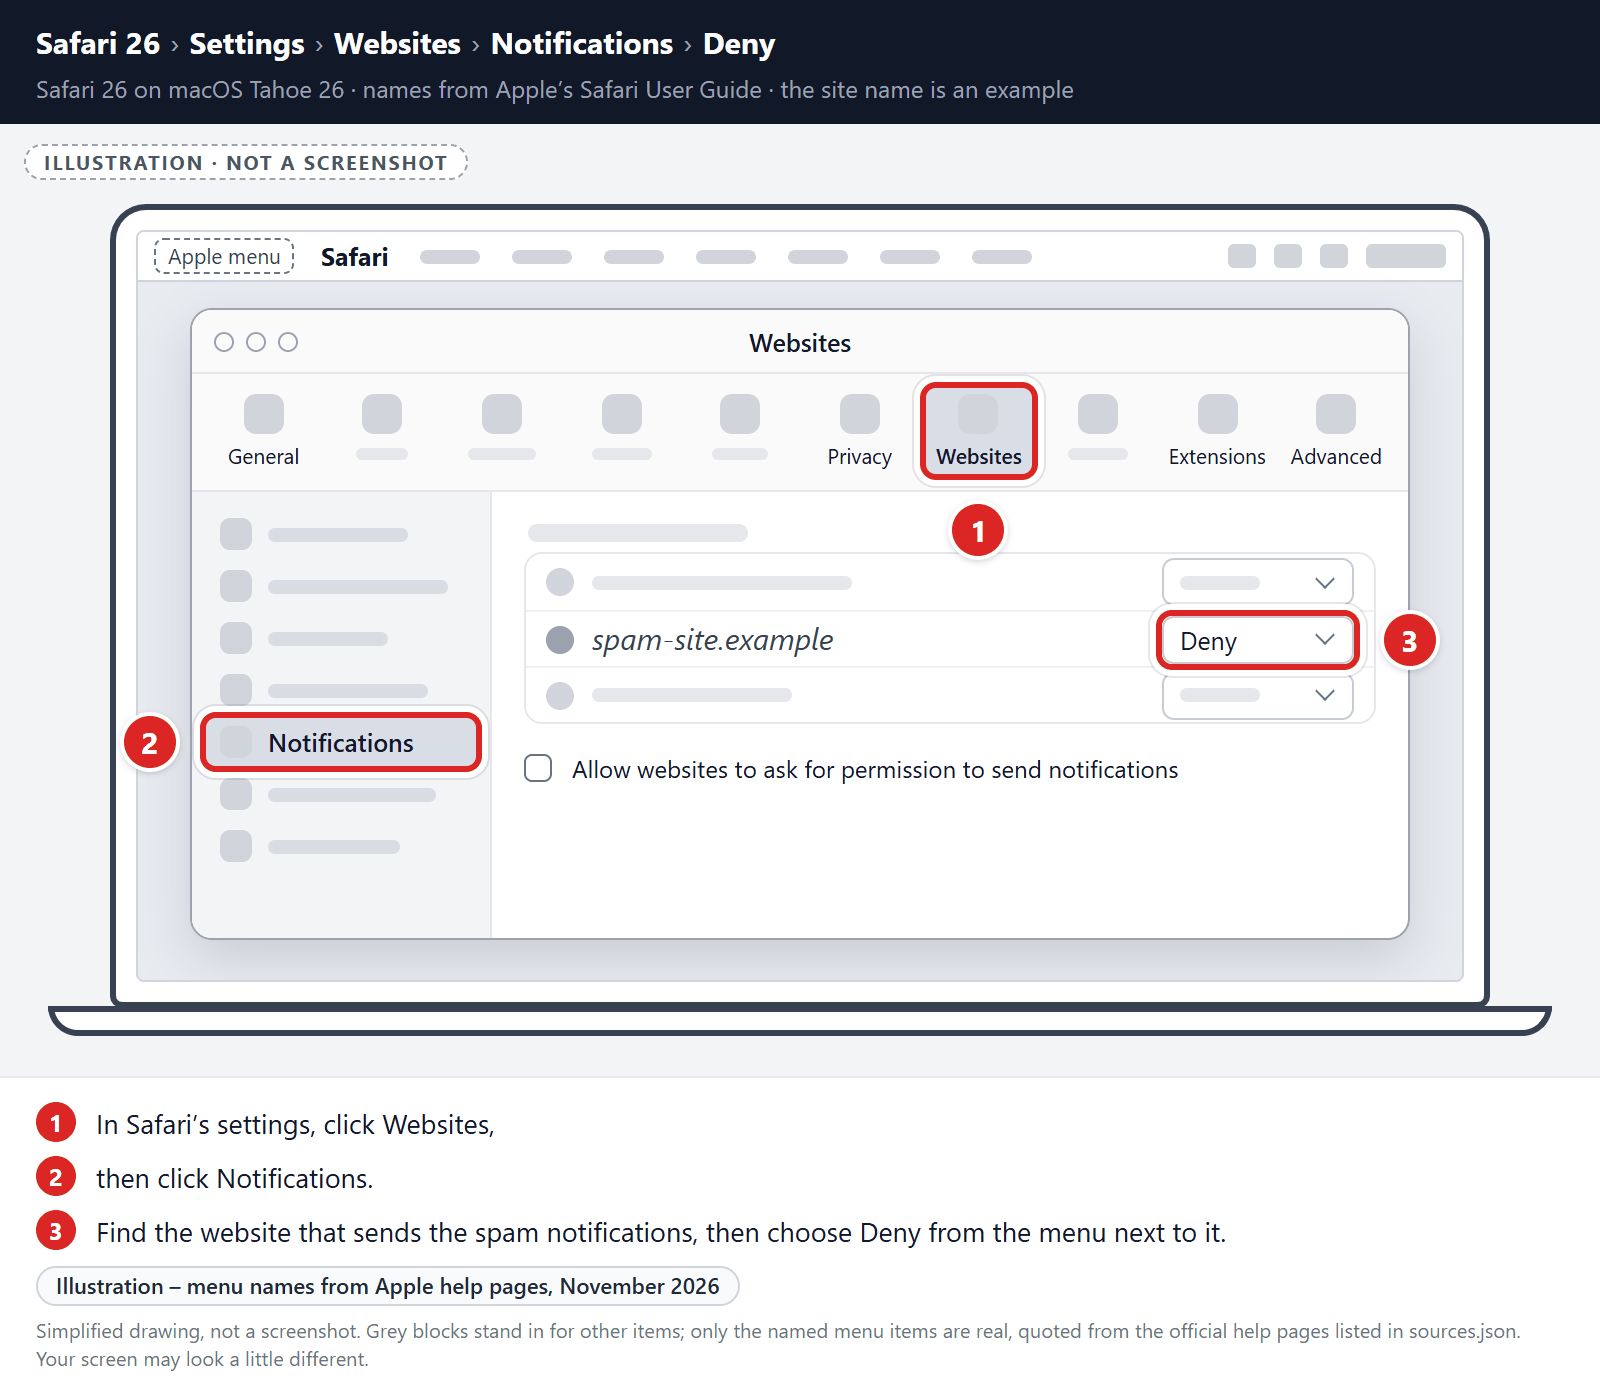
Remove spam notifications ads
In Safari’s settings, click Websites, then click Notifications. Find the website that sends the spam notifications, then choose Deny from the menu next to it.
To stop other websites from asking, you can also deselect “Allow websites to ask for permission to send notifications“. This only blocks new requests. It doesn’t turn off websites you already allowed, so deny those websites as well.
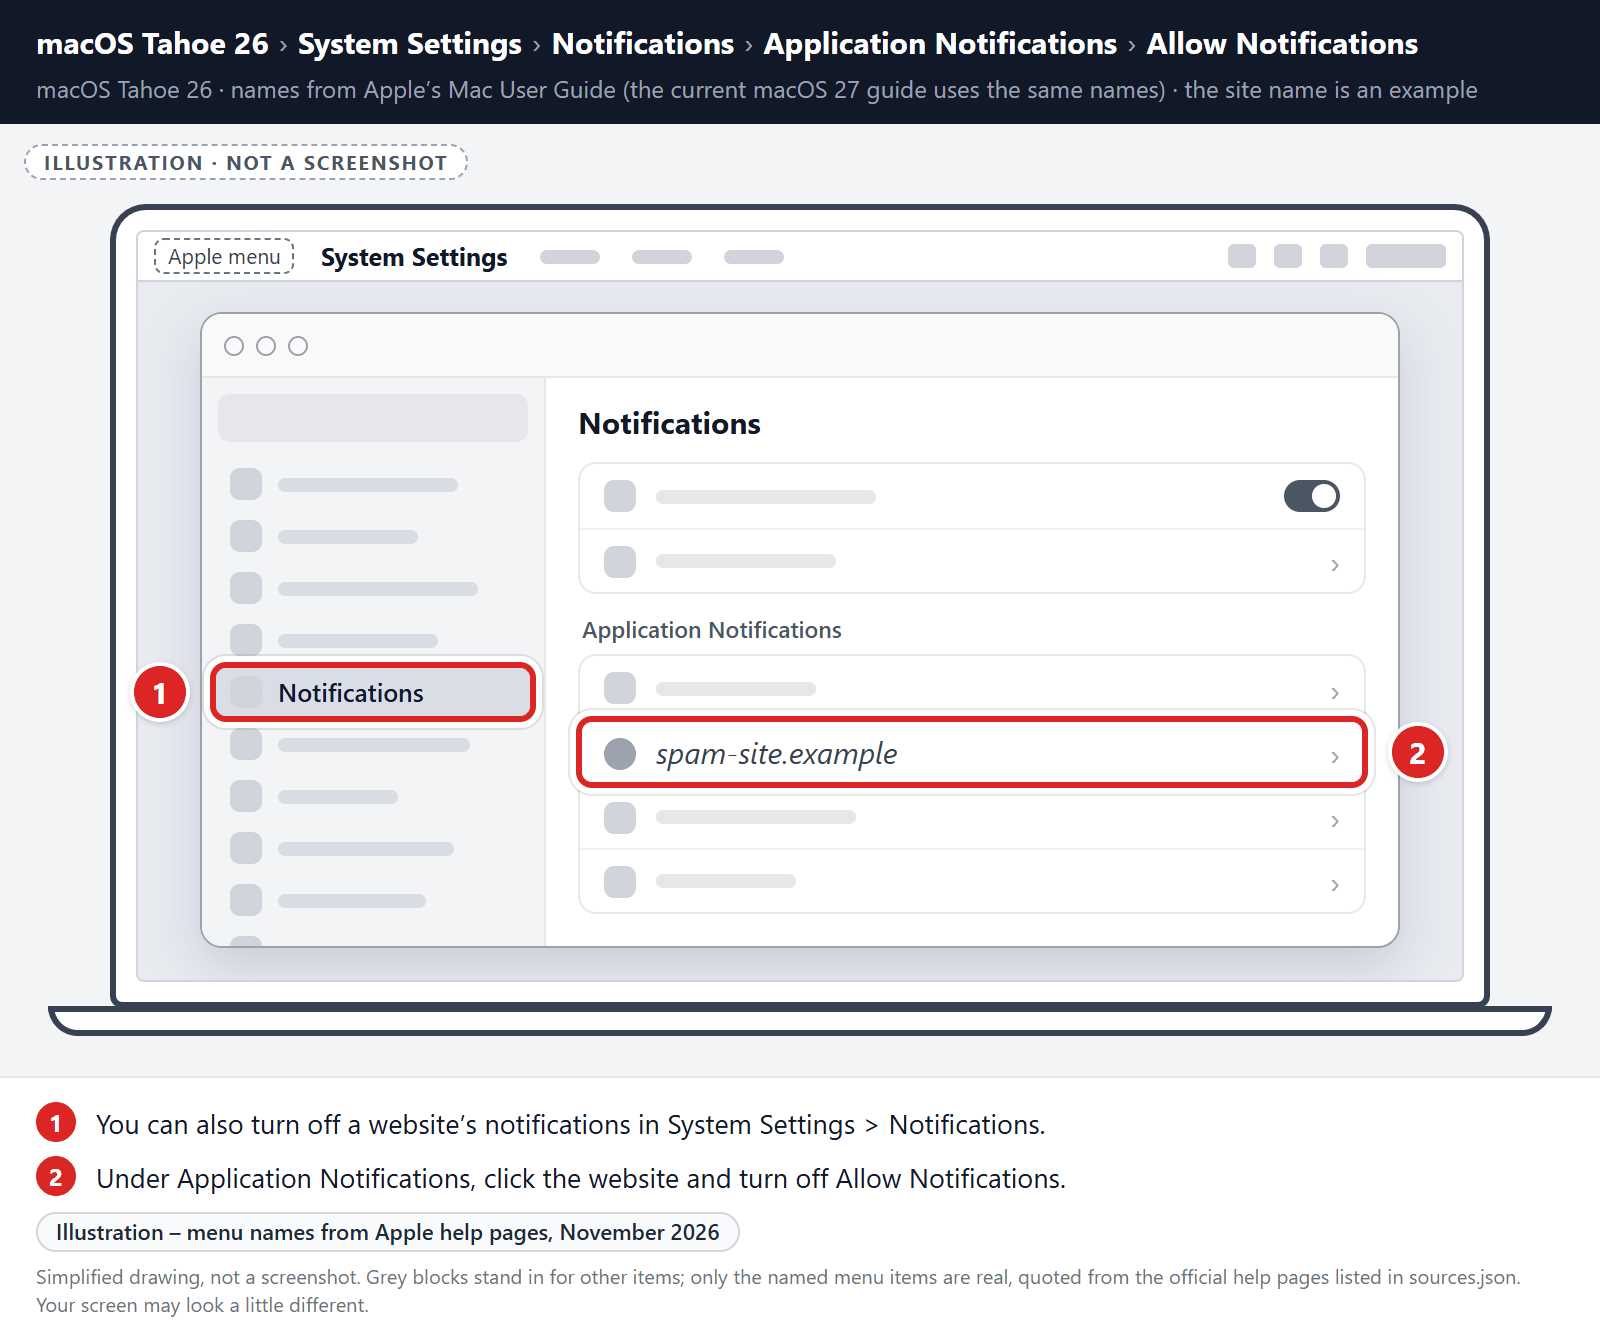
You can also turn off a website’s notifications in System Settings > Notifications. Under Application Notifications, click the website and turn off Allow Notifications.
-
Remove the data stored by the unwanted website.
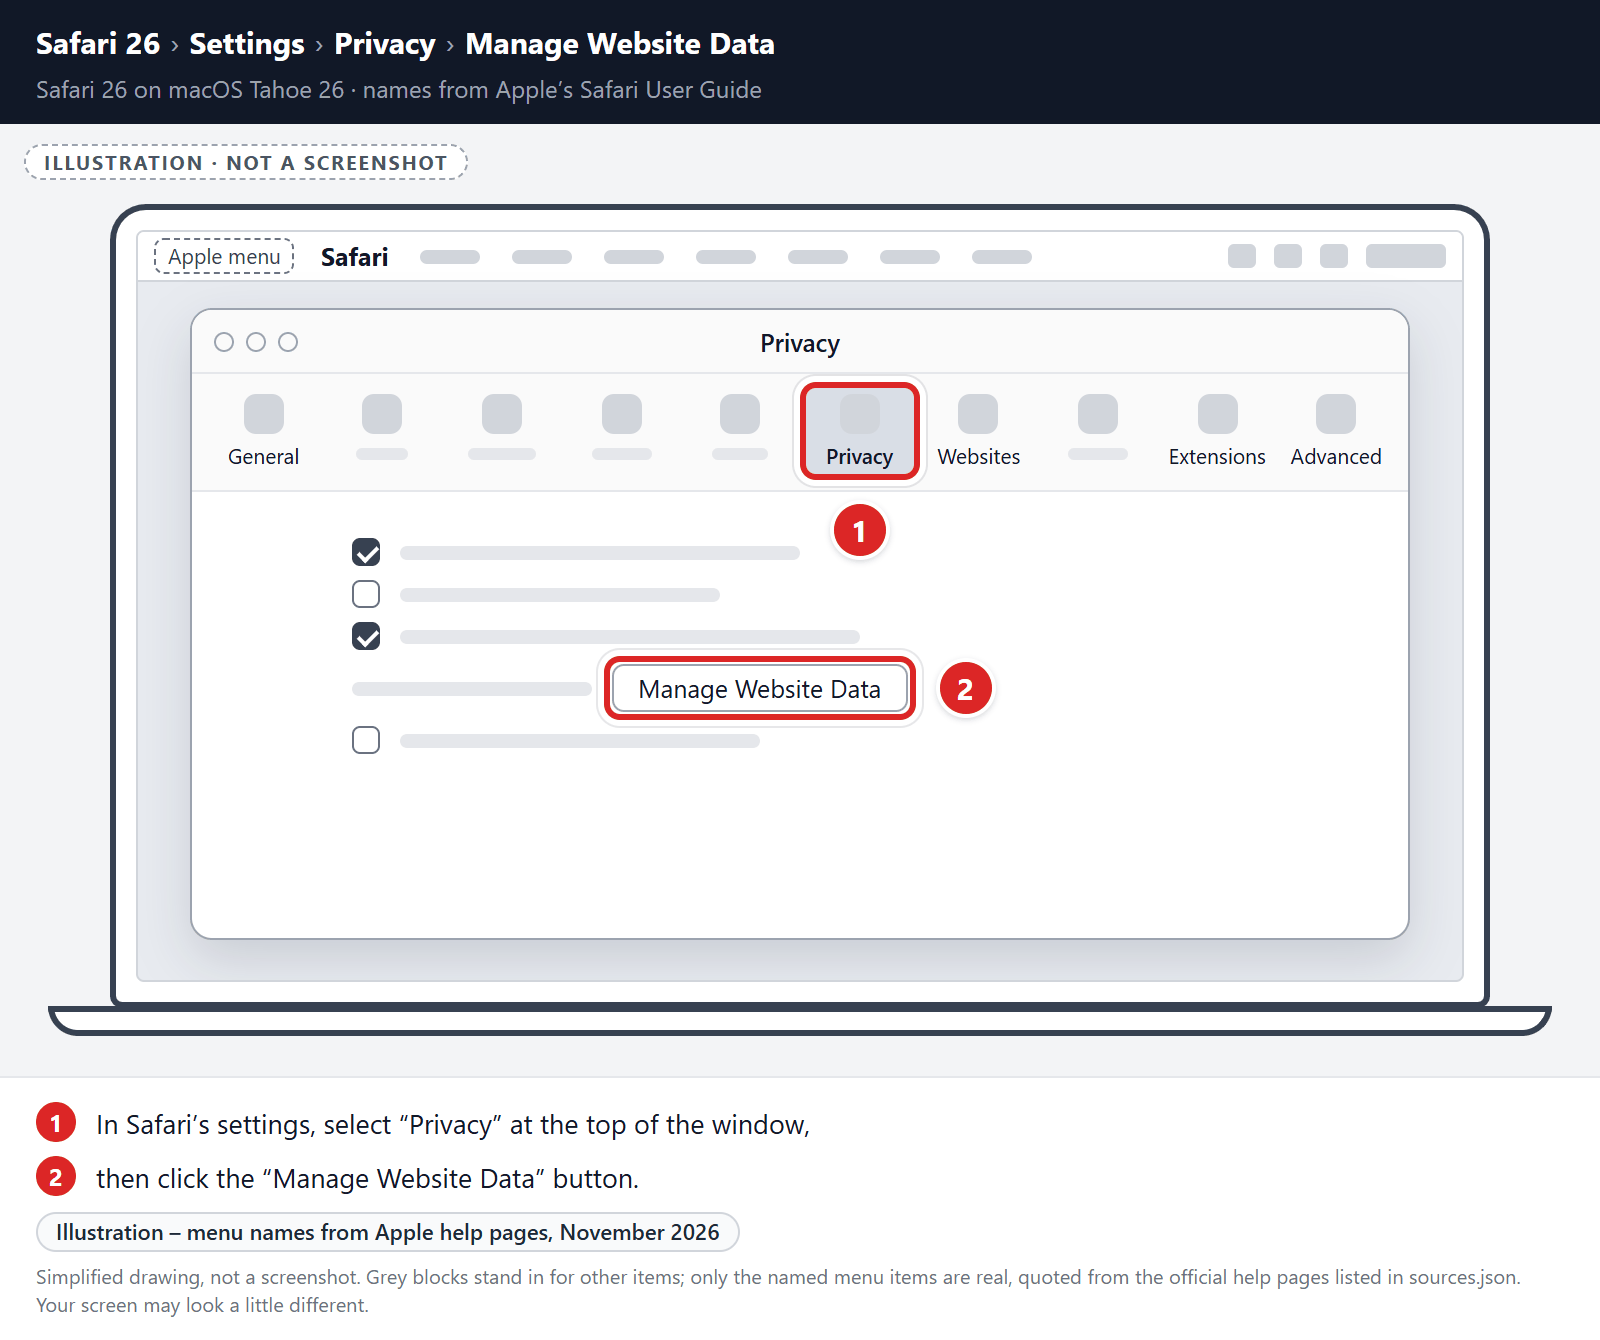
In the Safari menu, choose “Settings…”, select “Privacy” at the top of the new window that appears, and then click the “Manage Website Data” button.
In the next dialog box, search for or select the website that showed the spam or redirects, then click “Remove“. Click Done when you’re finished.
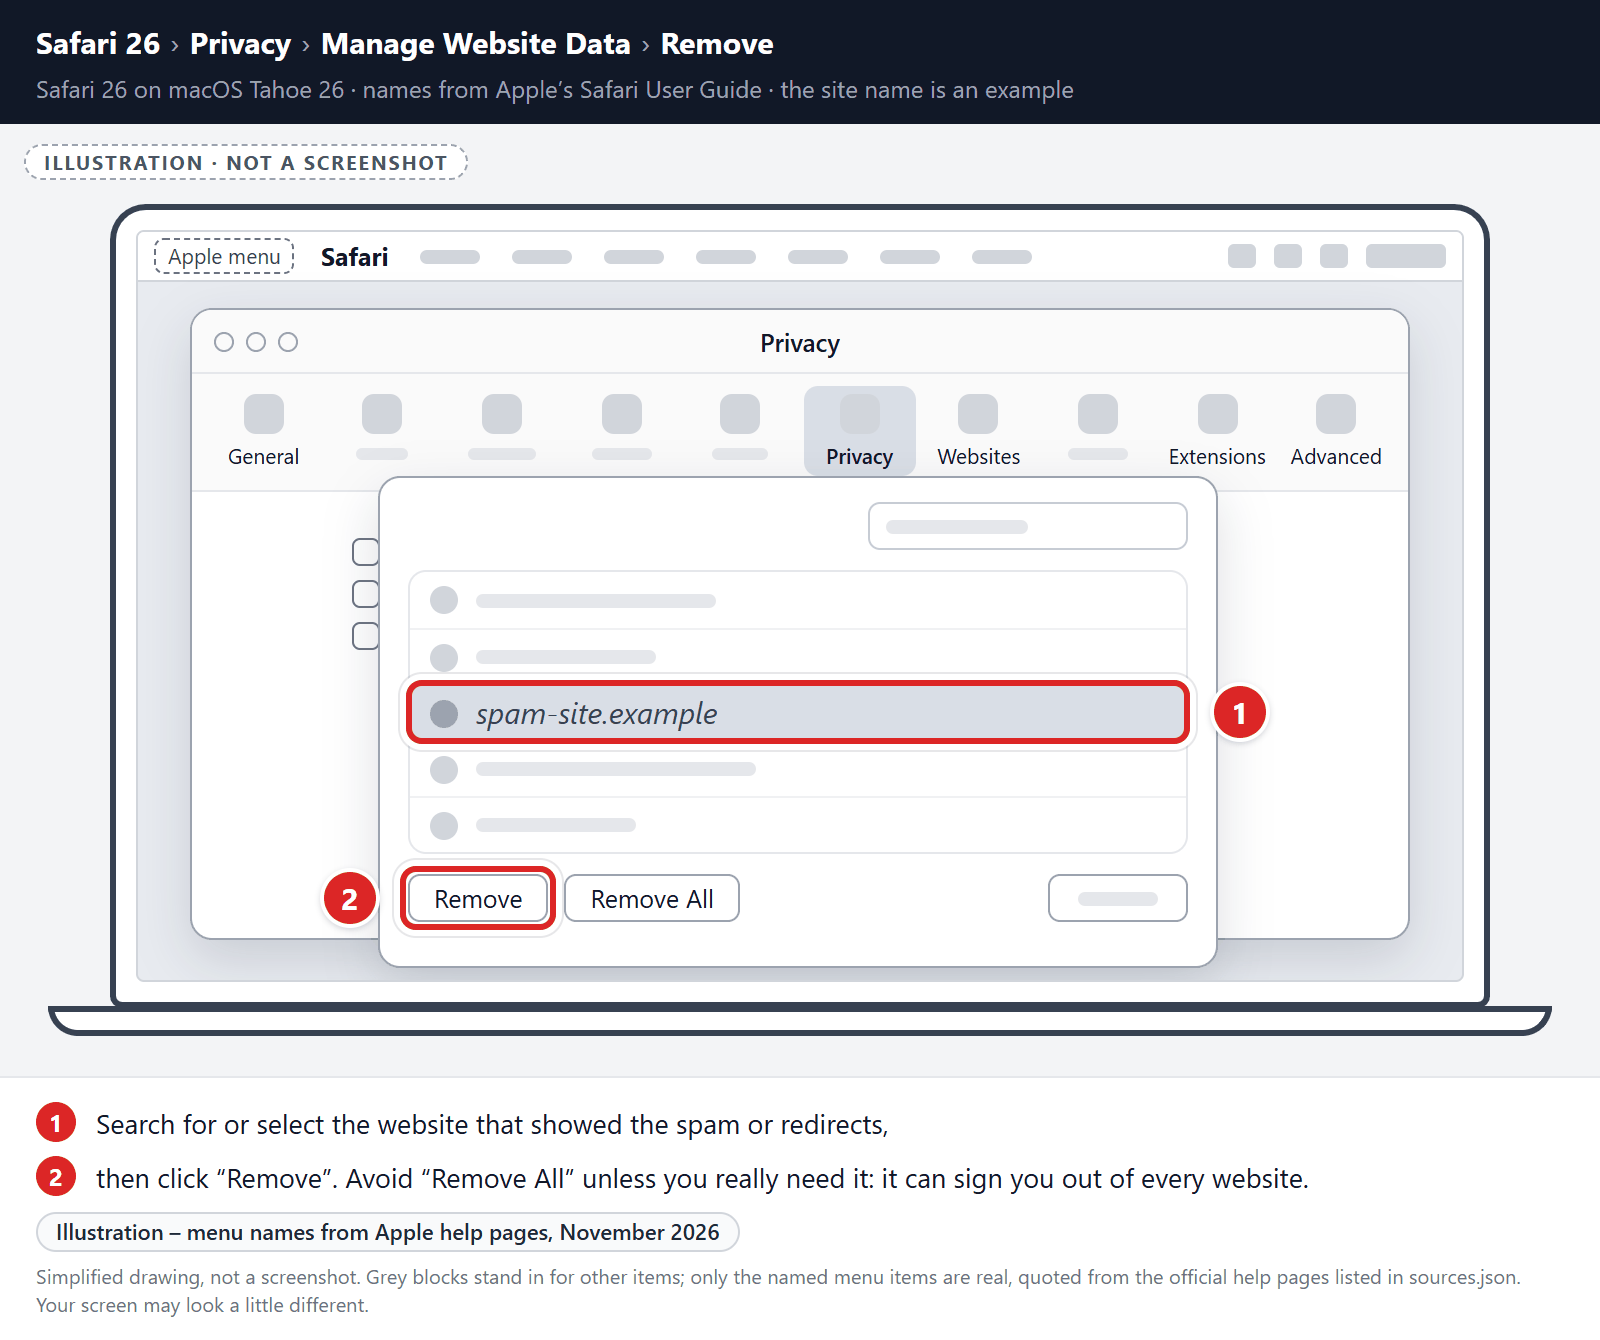
Avoid “Remove All” unless you really need it. It deletes the data of every website and can sign you out of all of them.
-
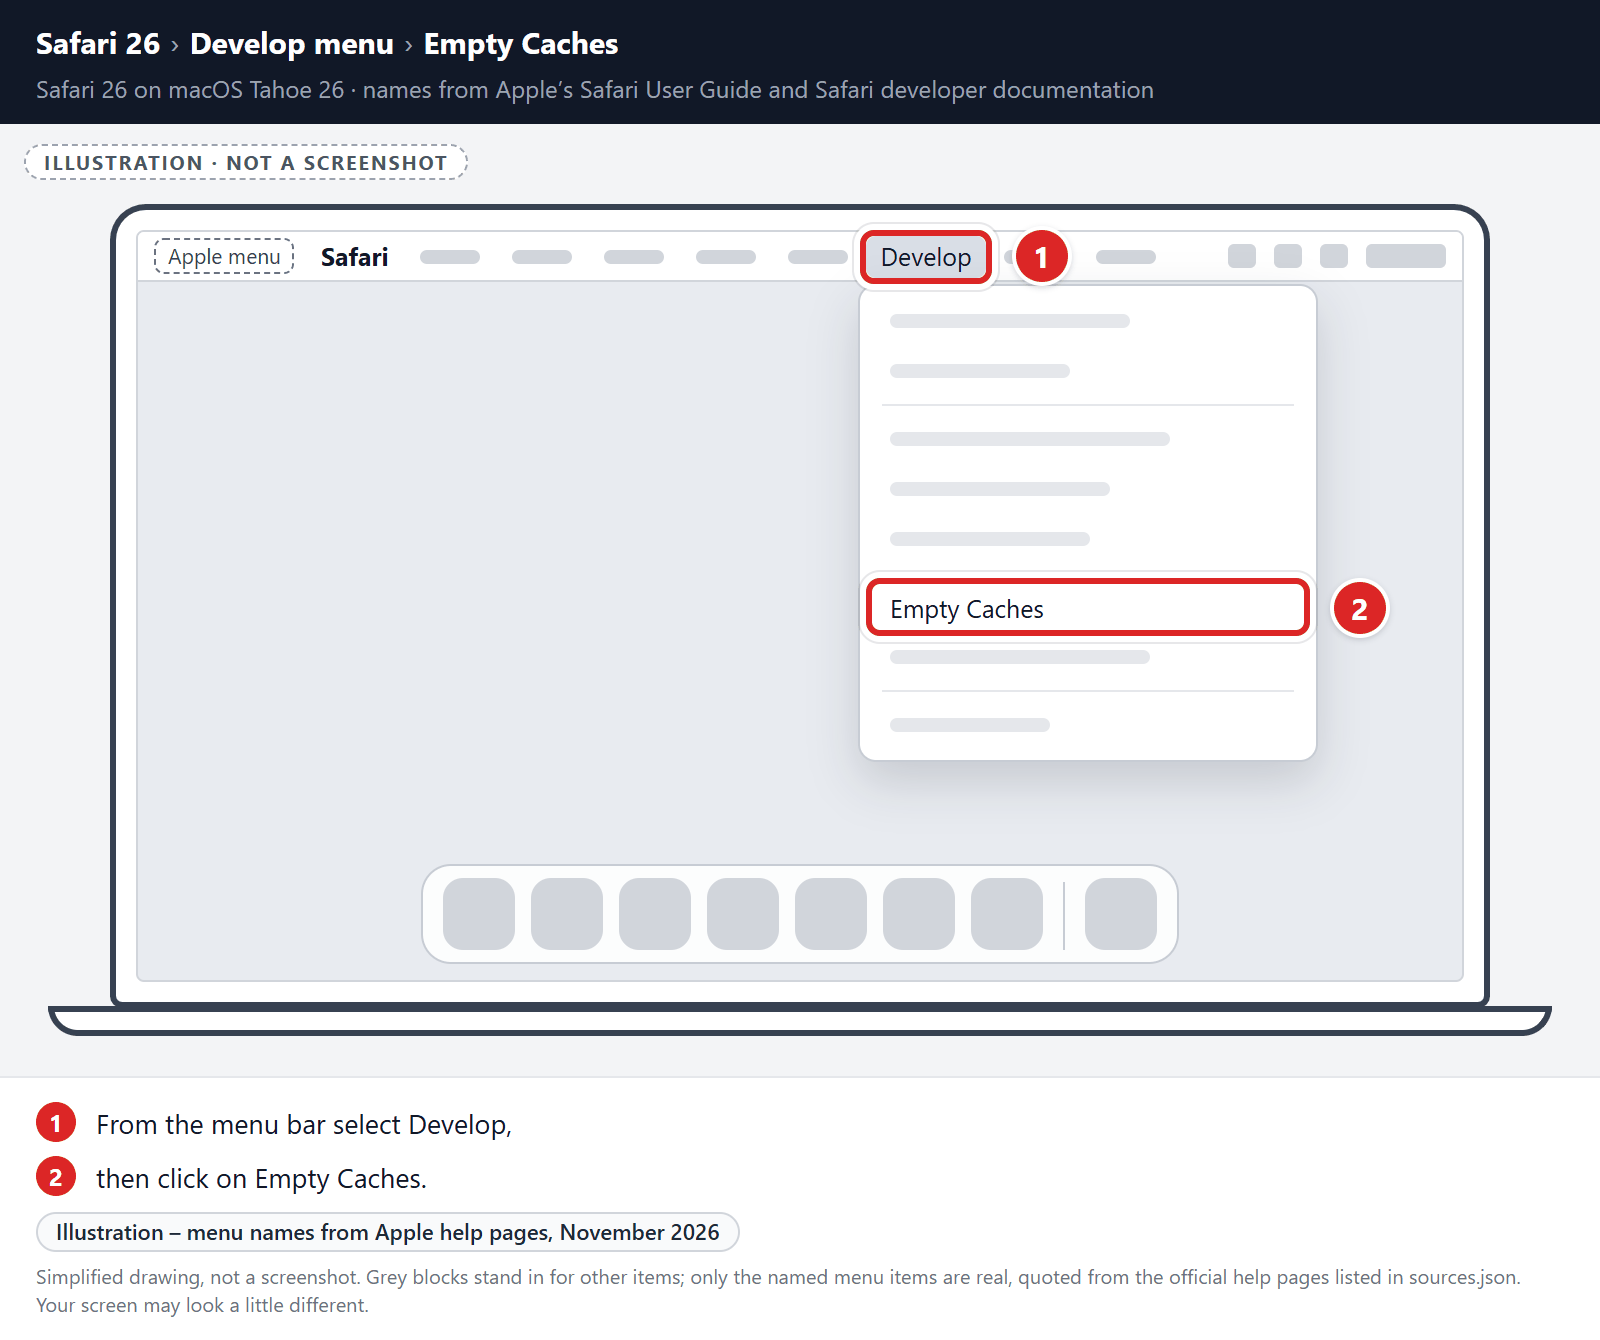
Empty Safari Caches.
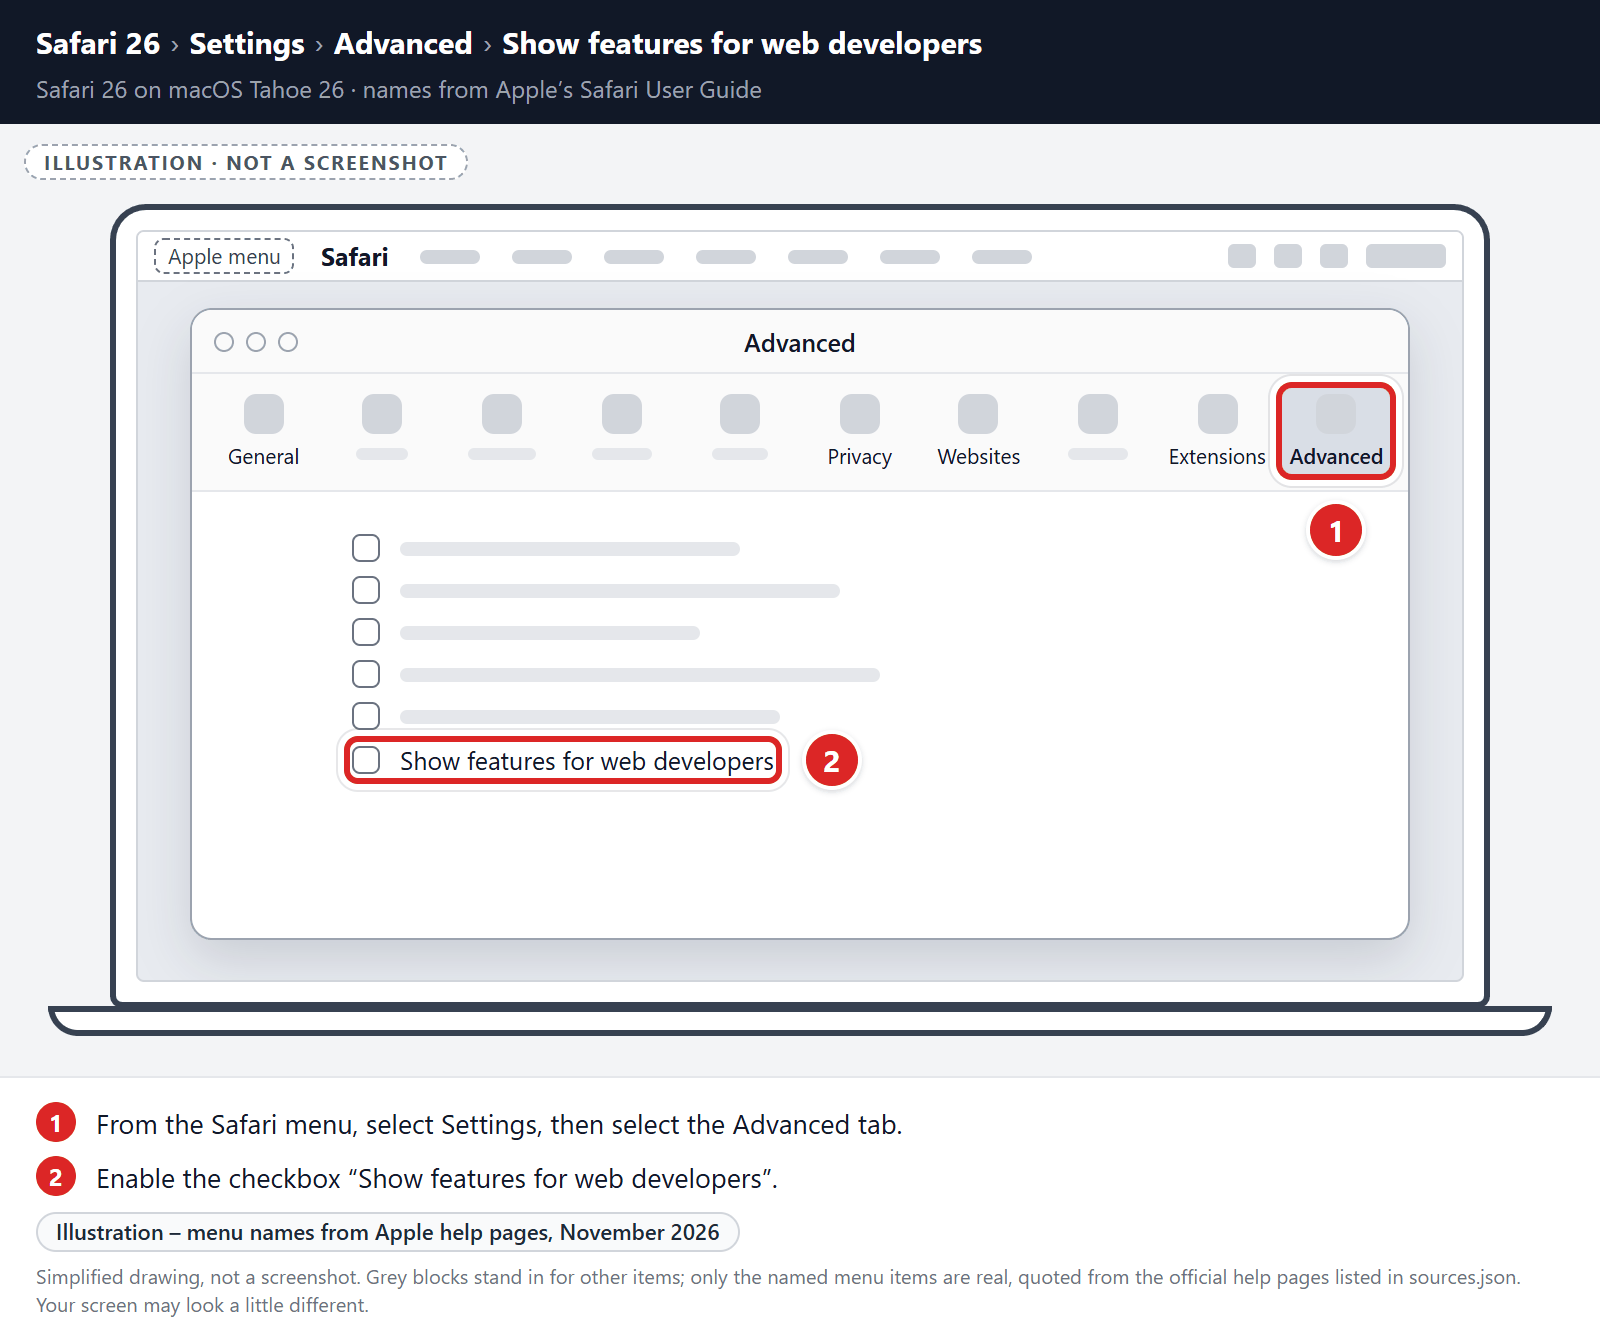
From your Safari menu bar, click Safari and select Settings, then select the Advanced tab. Enable the checkbox “Show features for web developers“. In older versions of Safari, this checkbox is called “Show Develop menu in menu bar”.
From the menu bar select Develop, then click on Empty Caches as seen in the image below.
Remove malware from Chrome for Mac
To remove malware from Chrome for Mac we will reset the browser settings to their defaults. This restores the default search engine, homepage, new tab page, and pinned tabs. It also resets site permissions, clears cookies and site data, and turns off your extensions and themes. Your bookmarks and saved passwords are not deleted. If you’re signed in to Chrome, the reset applies on all devices where you’re signed in.
-
Click on the three dots at the top right and go to Settings.
Click on Chrome’s main menu button, represented by three dots at the top right corner. Now click on the menu option labeled Settings, which will open the basic settings screen, as shown by the numbered box in the picture below.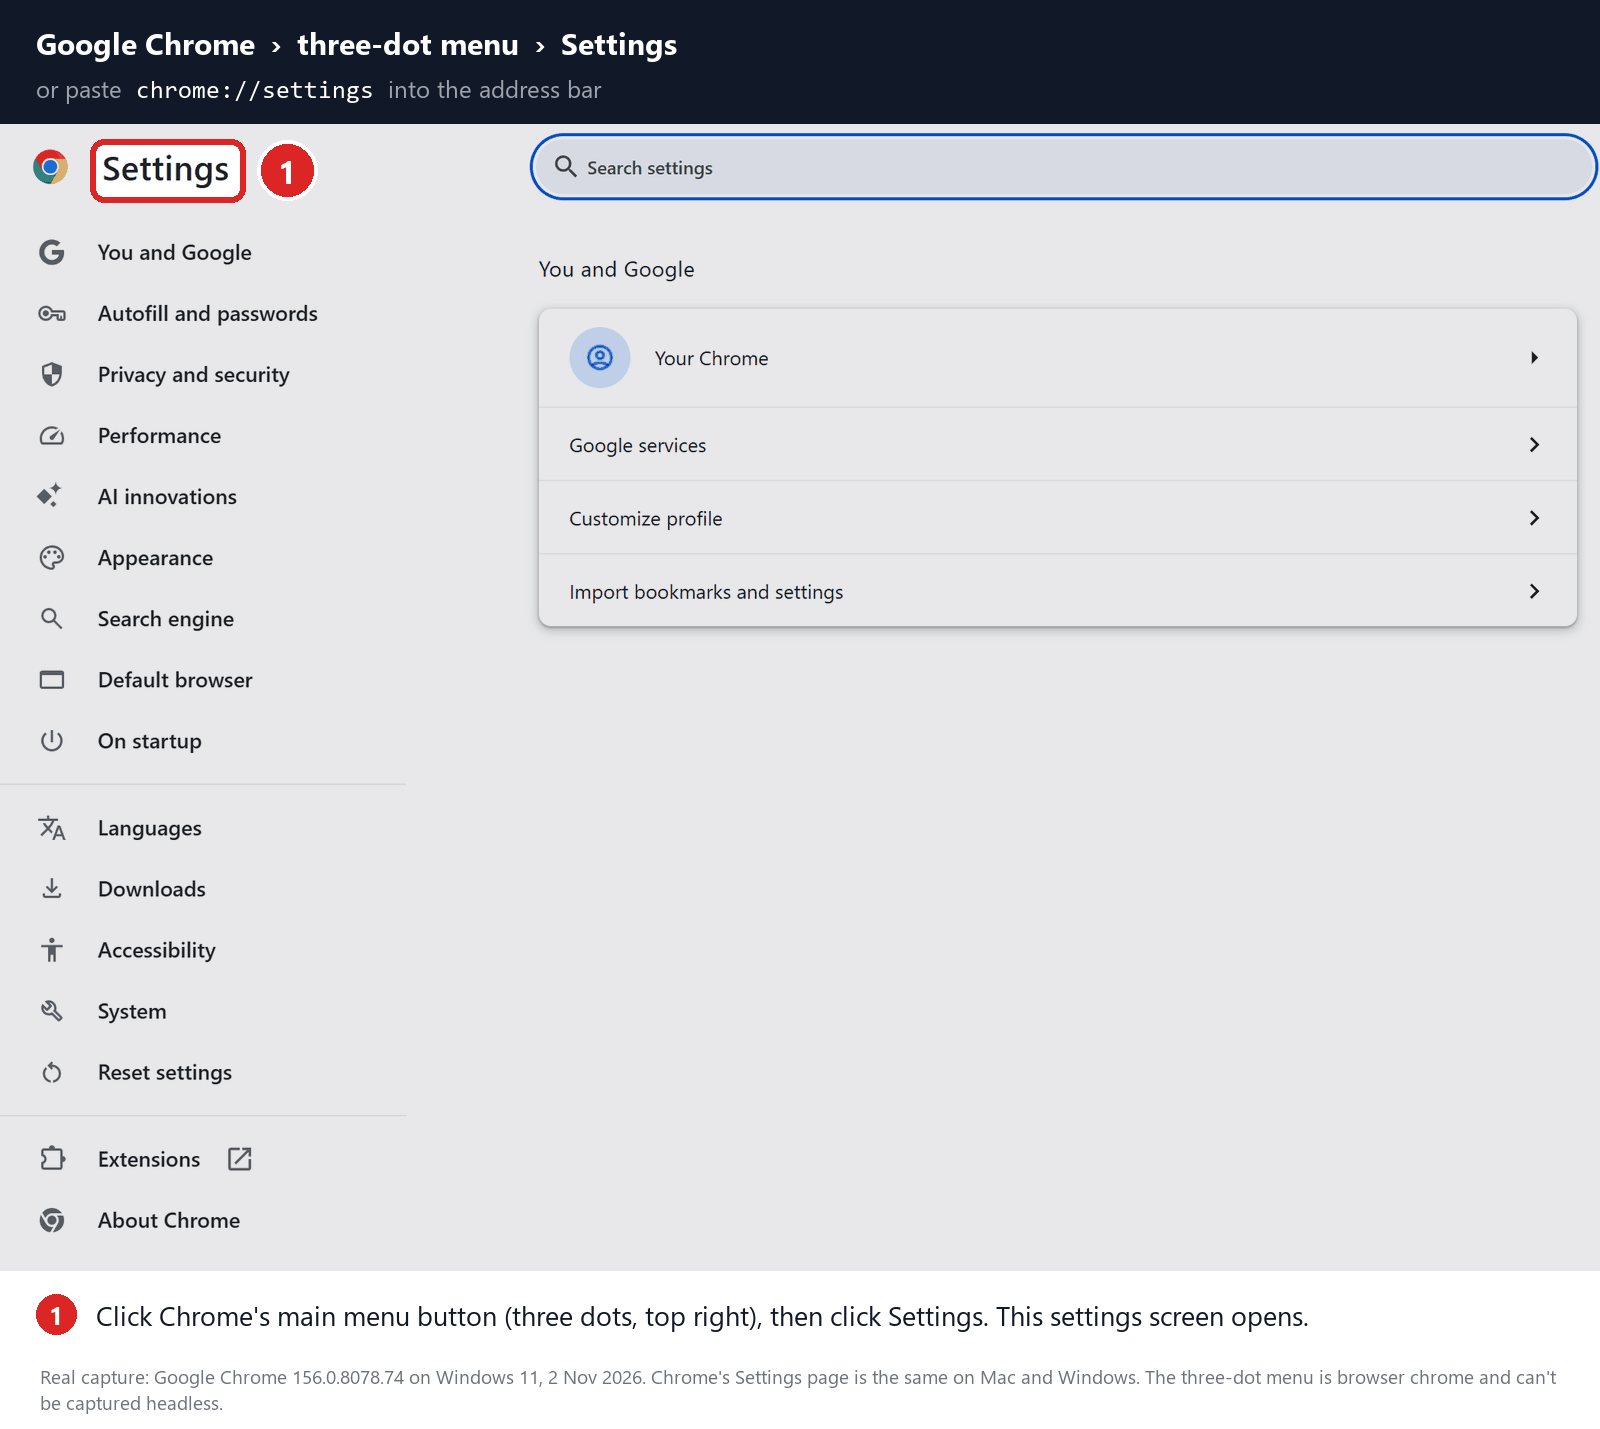
-
In the left sidebar, click on the “Reset settings” option.
In the left sidebar, click on “Reset settings“.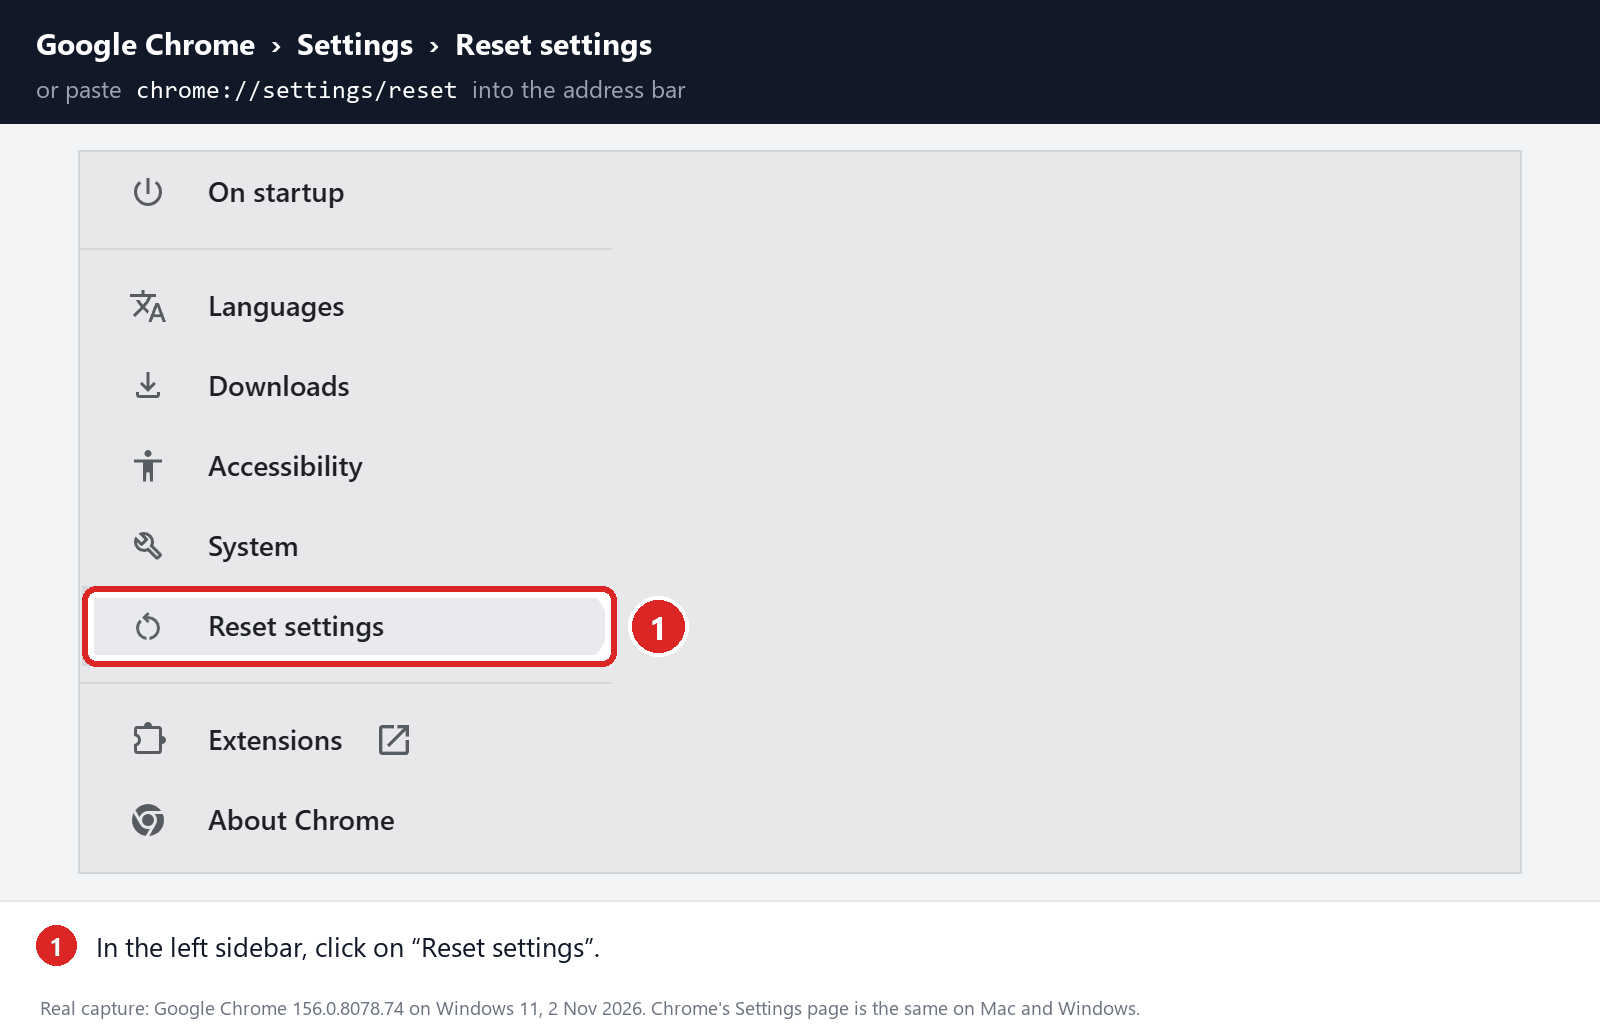
-
Click “Restore settings to their original defaults”.
Now click on “Restore settings to their original defaults” as shown in the image below.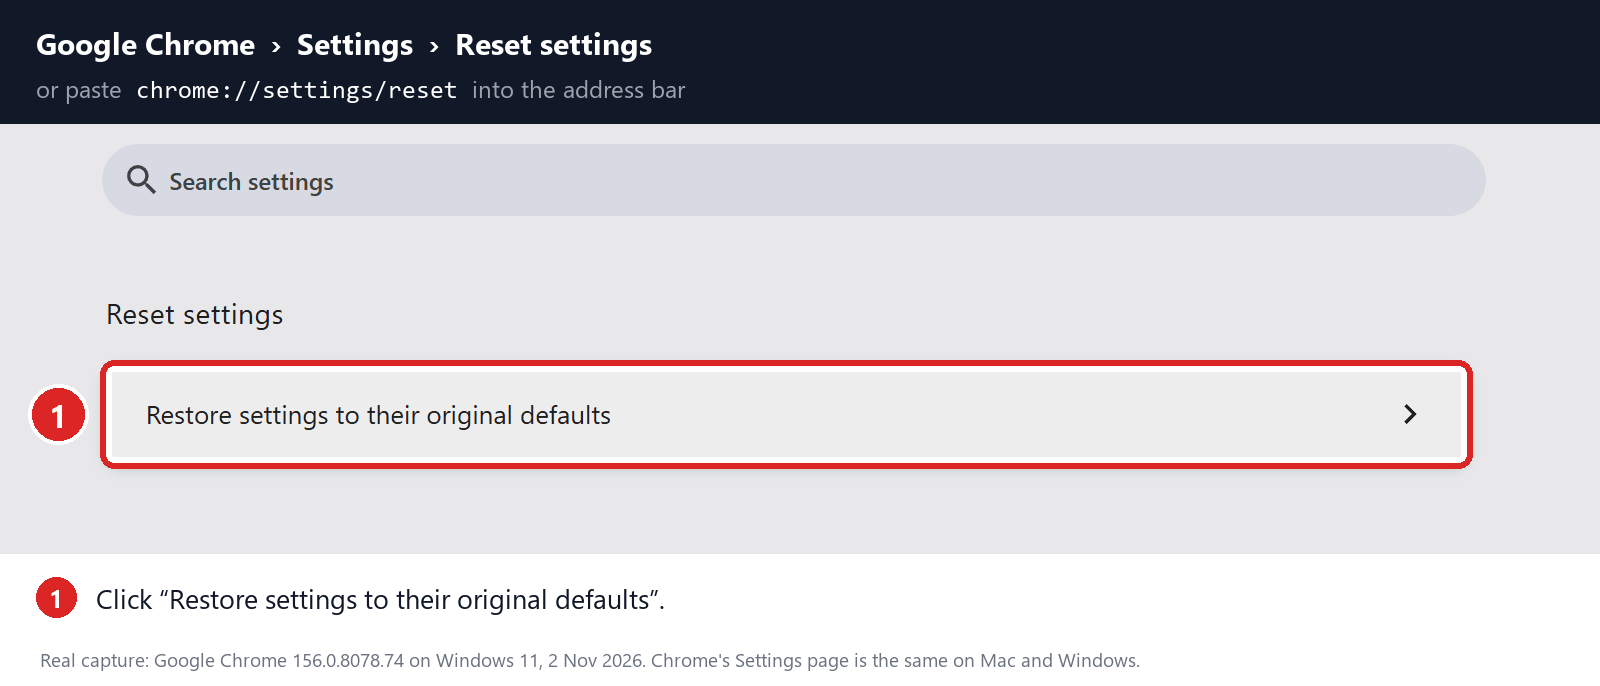
-
Click “Reset settings” button.
A confirmation dialog should now be displayed, detailing the components that will be restored to their default state should you continue with the reset process. To complete the restoration process, click on the “Reset settings” button.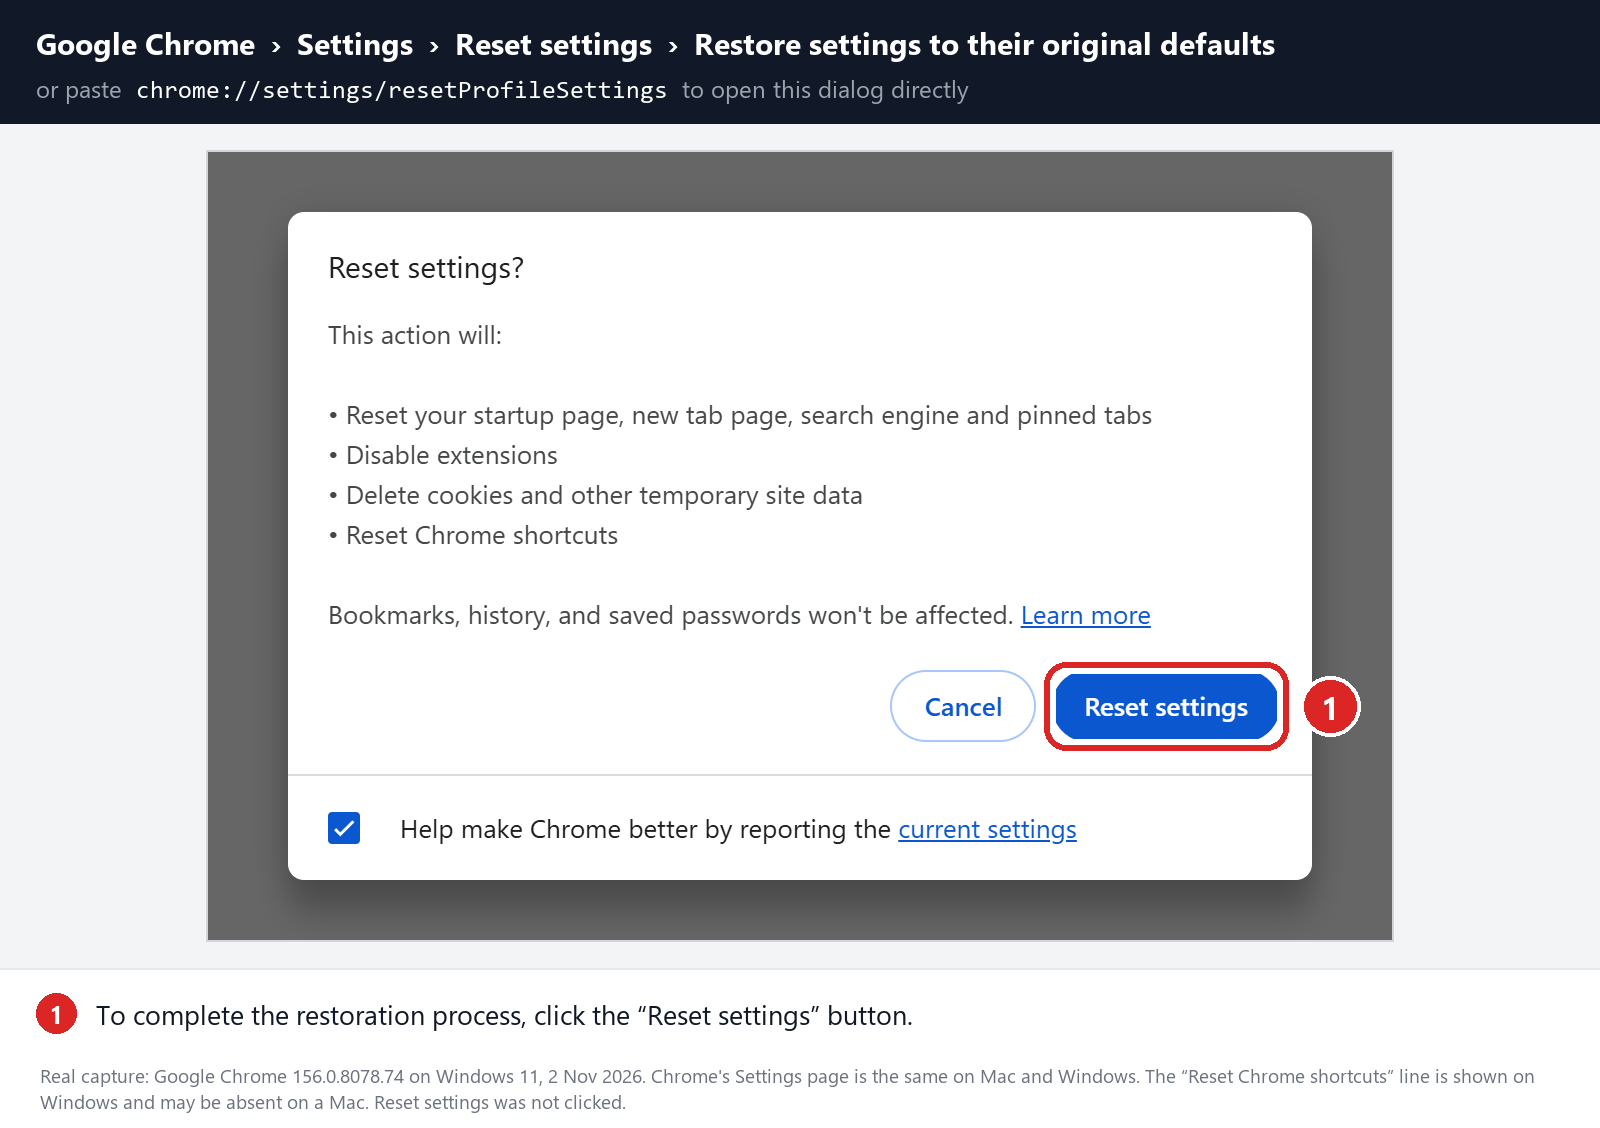
-
(Optional) Stop sync from bringing the problem back.
If a malicious extension or setting comes back after the reset, Chrome sync may be restoring it from your Google Account. Open Chrome Settings > You and Google. If you see Sync and Google services > Manage what you sync, choose Customize sync and turn off Settings and Extensions. In newer versions of Chrome, click your account name, then Choose what to save in your Google Account, and turn off the same two items. Then remove the unwanted extension again.Don’t use the “Delete data” or “Clear data” option on your Google Account’s Chrome data page to fix this. It deletes the Chrome data saved in your Google Account, such as synced bookmarks, passwords, and history, and you don’t need it to remove an extension.
Remove malware from Firefox for Mac
To remove malware from Firefox for Mac we will reset the browser settings to its default. The reset feature fixes many issues by restoring Firefox to its factory default state while saving your essential information like bookmarks, passwords, web form auto-fill information, browsing history, and open tabs.
-
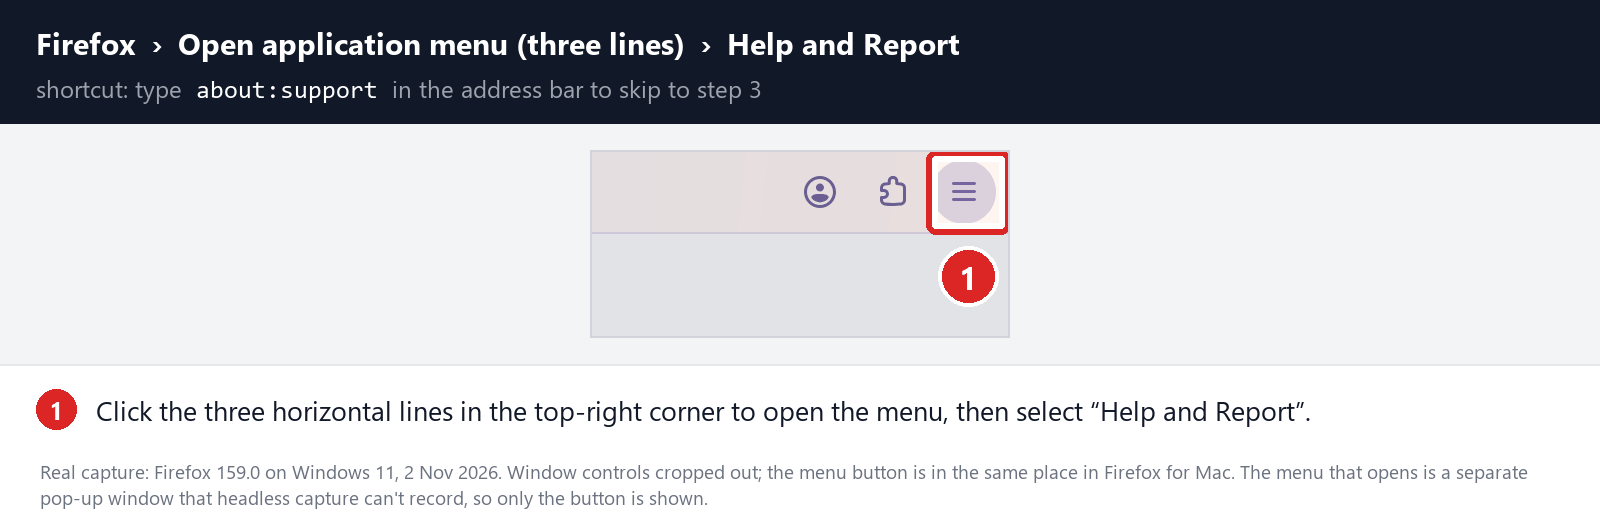
Go to the “Help and Report” menu.
Click on Firefox’s main menu button, represented by three horizontal lines. When the drop-down menu appears, select the option labeled “Help and Report“.
-
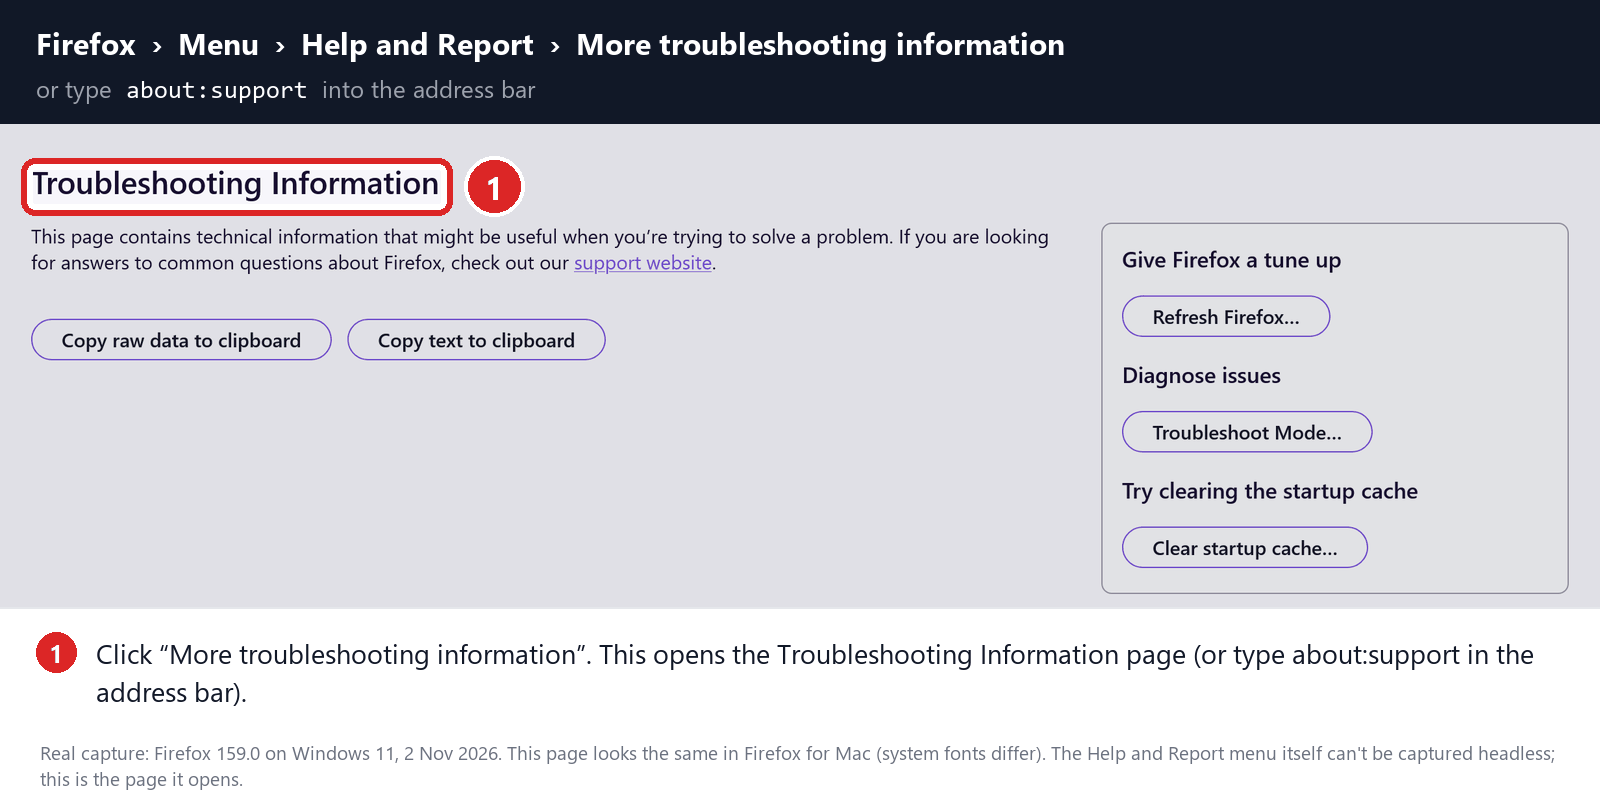
Click “More troubleshooting information”.
Next click on the “More troubleshooting information” option. This opens the Troubleshooting Information page, as shown by the numbered box in the image below. You can also open it by typing about:support in the address bar.
-
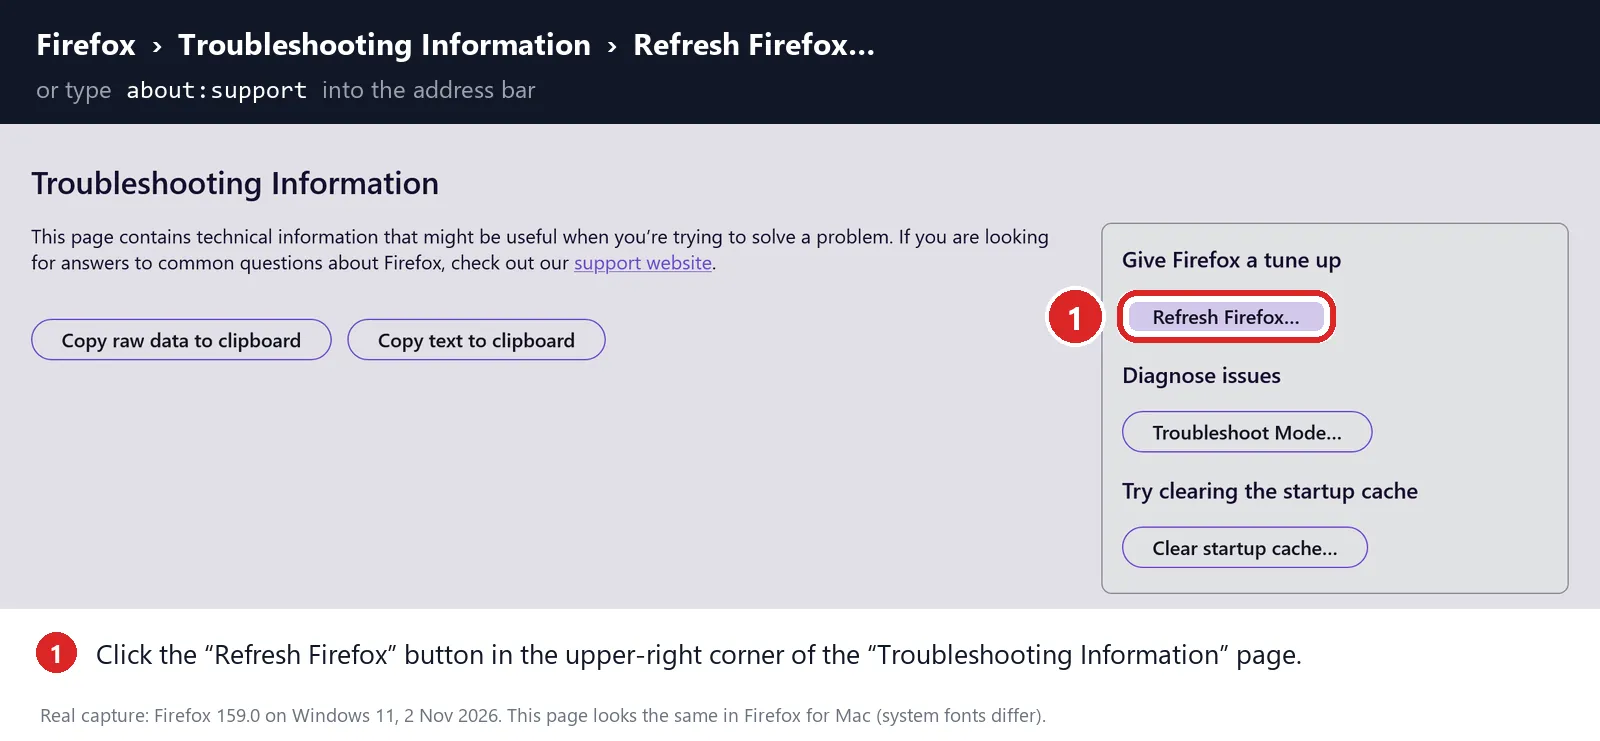
Click on “Refresh Firefox”
Click the “Refresh Firefox” button in the “Give Firefox a tune up” box in the upper-right corner of the “Troubleshooting Information” page.
-
Confirm.
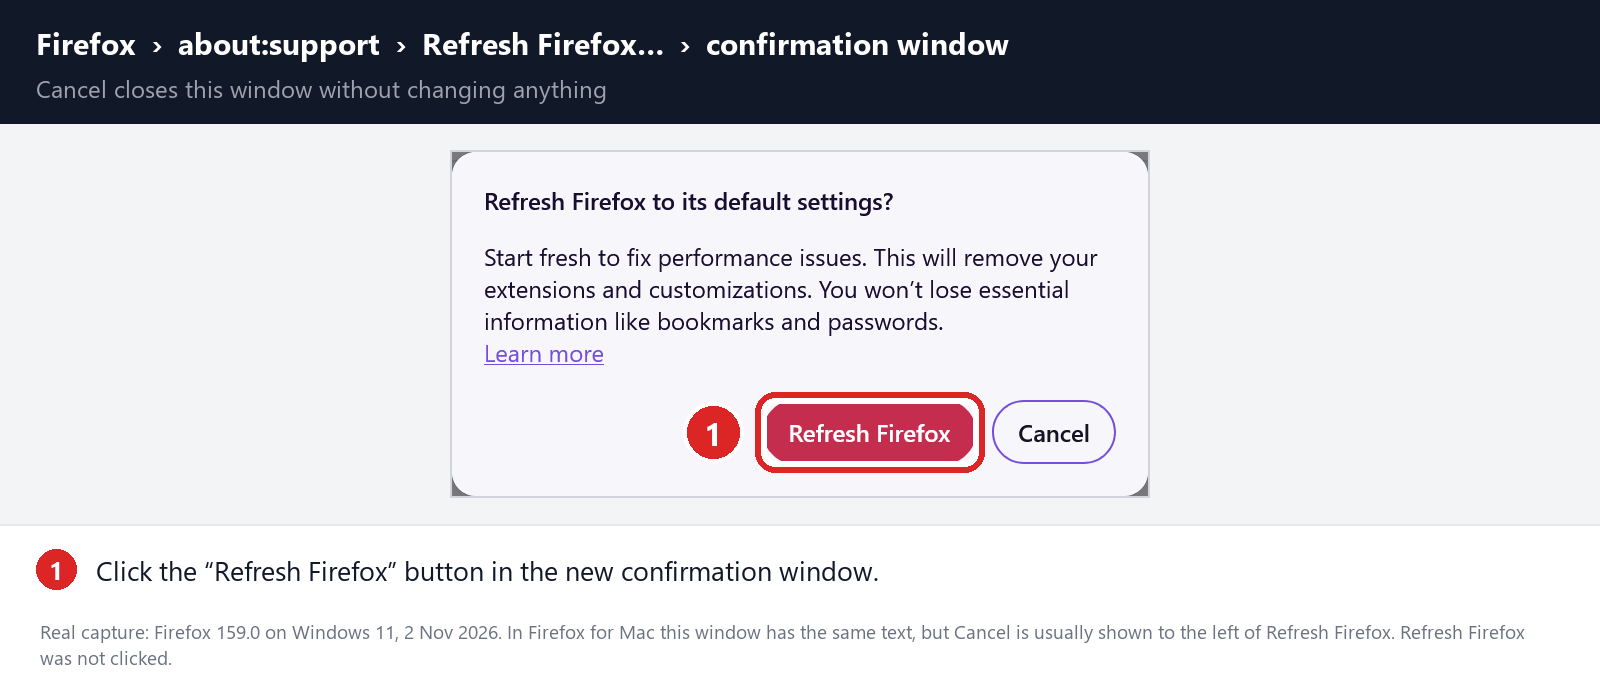
To continue, click on the “Refresh Firefox” button in the new confirmation window that opens.
-
Click on “Finish”.
Firefox will close itself and will revert to its default settings. When it’s done, a window will list the information that was imported. Click on the “Finish“.
STEP 4: Run a scan with Malwarebytes for Mac to remove malware
In this final step, we will scan the computer with Malwarebytes for Mac to find and remove any malicious programs that might be installed on your Mac.
Malwarebytes for Mac is a free on-demand scanner that removes the malware other security software tends to miss — adware, browser hijackers, and unwanted programs included. Cleaning an infected Mac with Malwarebytes has always been completely free, and it’s our go-to recommendation. Follow the steps below to scan your Mac and remove what Malwarebytes finds.
-
Download Malwarebytes for Mac
Click the button below to download the latest version of Malwarebytes for Mac.
Download MalwarebytesOfficial installer for macOS. Your download starts right away.Want real-time protection? See Malwarebytes PremiumMalwarebytes Free for MacScans and removes malware at no cost -
Open the Malwarebytes setup file
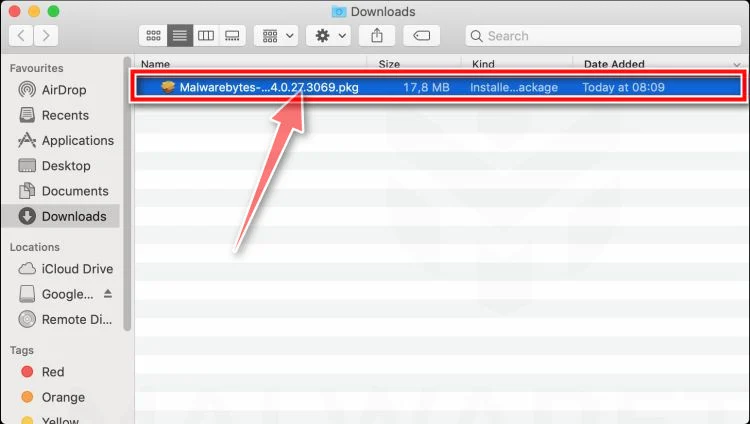
When the download finishes, open your Downloads folder and double-click the setup file to begin the installation.
-
Follow the On-Screen Prompts to Install Malwarebytes
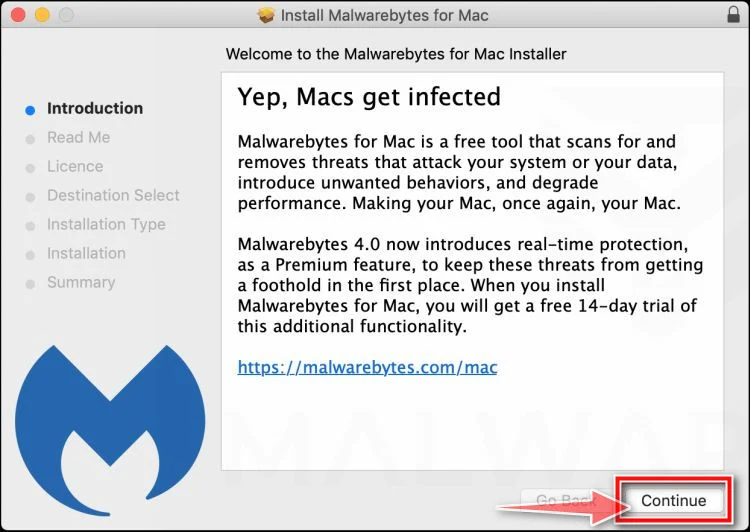
The Malwarebytes for Mac Installer will guide you through a few quick screens. Click “Continue” and keep following the prompts until the installation completes.
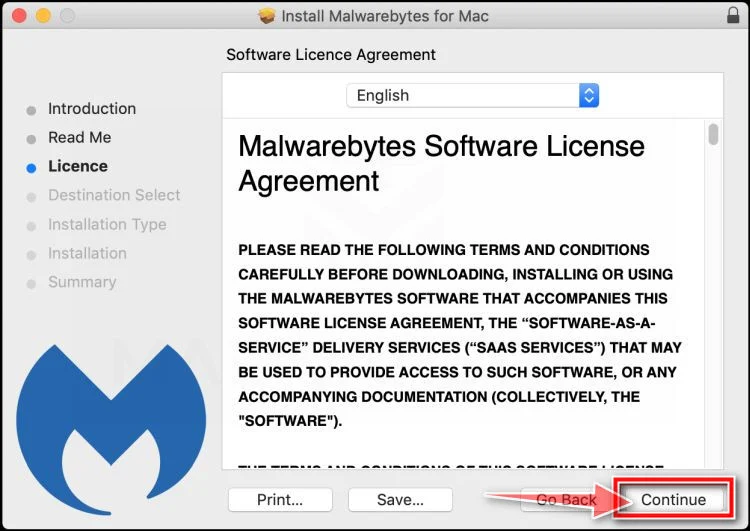
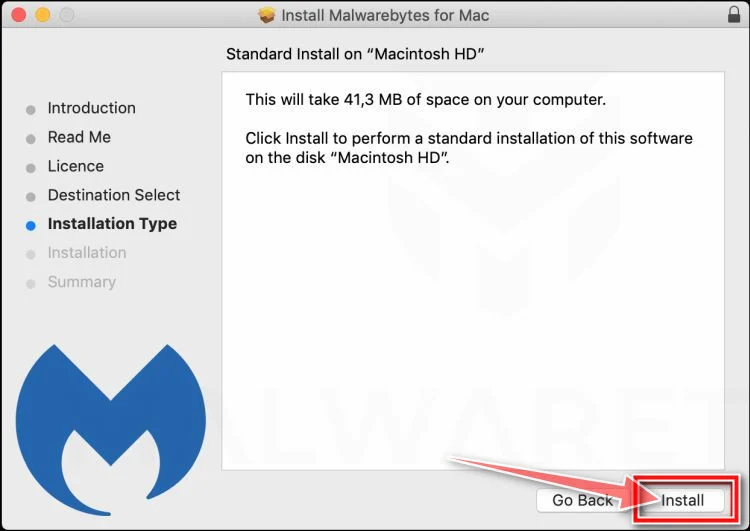
When the installation is complete, Malwarebytes opens to the Welcome to Malwarebytes screen. Click “Get started“.
Malwarebytes needs Full Disk Access to check your whole Mac. When it asks, open System Settings > Privacy & Security > Full Disk Access, turn on Malwarebytes (it may be listed as Malwarebytes Protection), and confirm with your password or Touch ID. Then return to Malwarebytes. On macOS Monterey and earlier, this setting is in System Preferences > Security & Privacy > Privacy.
-
Select “Personal Computer” or “Work Computer”
Malwarebytes will ask what type of computer you’re installing it on. Click either Personal Computer or Work Computer, whichever applies.
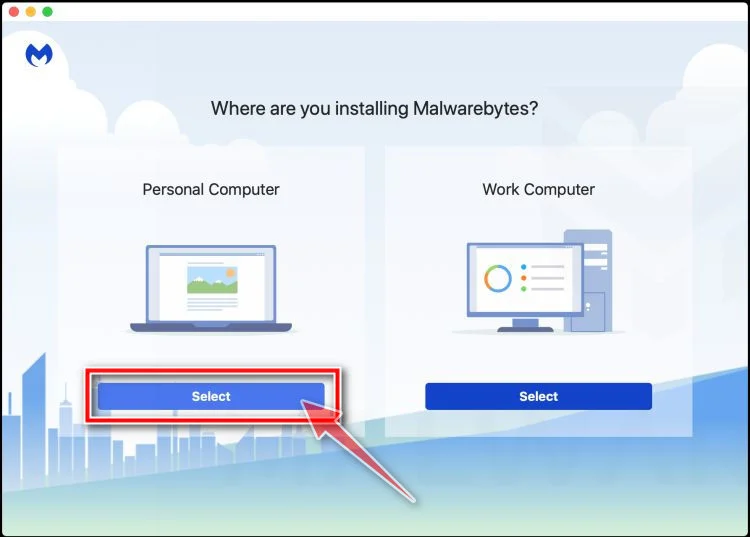
-
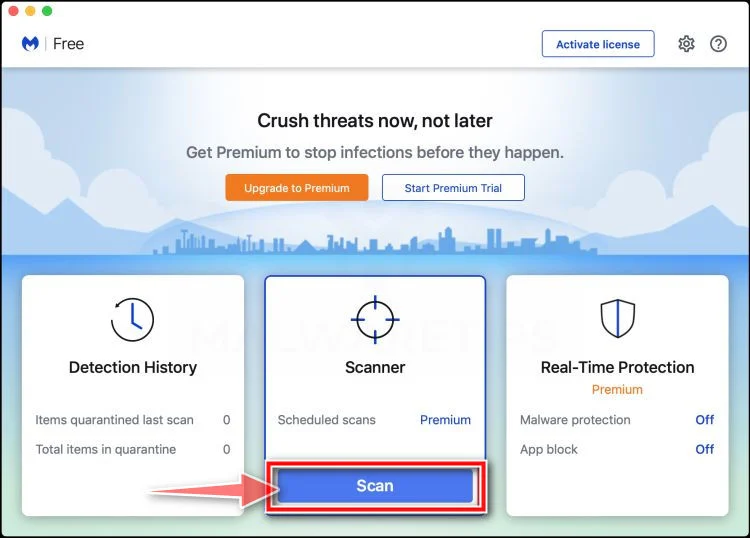
Start the Scan
Click the “Scan” button. Malwarebytes will automatically update its detection database and begin checking your Mac for malware.
-
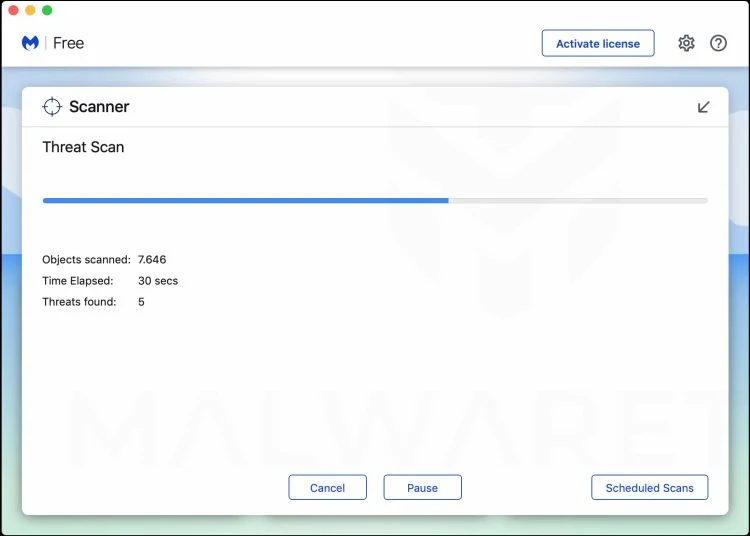
Wait for the Scan to Finish
Malwarebytes will scan your Mac for adware, browser hijackers, and other malicious programs. This can take a few minutes, so feel free to do something else — just check back occasionally to see the progress.
-
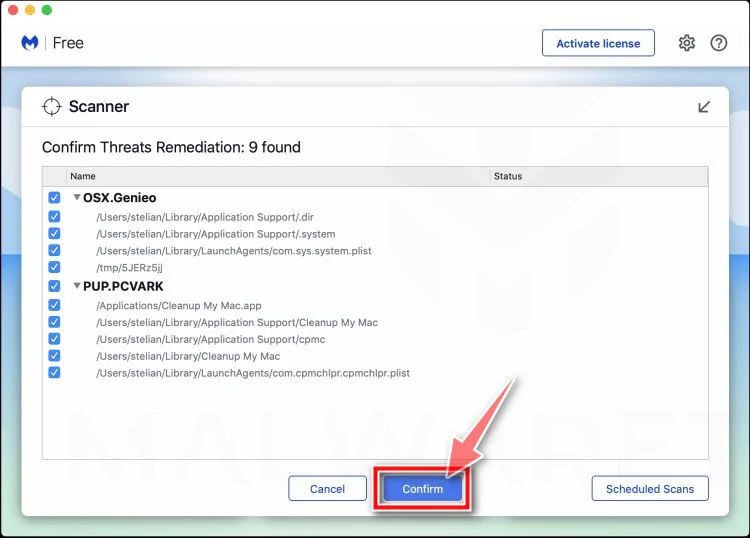
Quarantine the Detected Threats
When the scan is done, you’ll see a list of everything Malwarebytes found. Click the “Quarantine” button to remove all the threats at once.
-
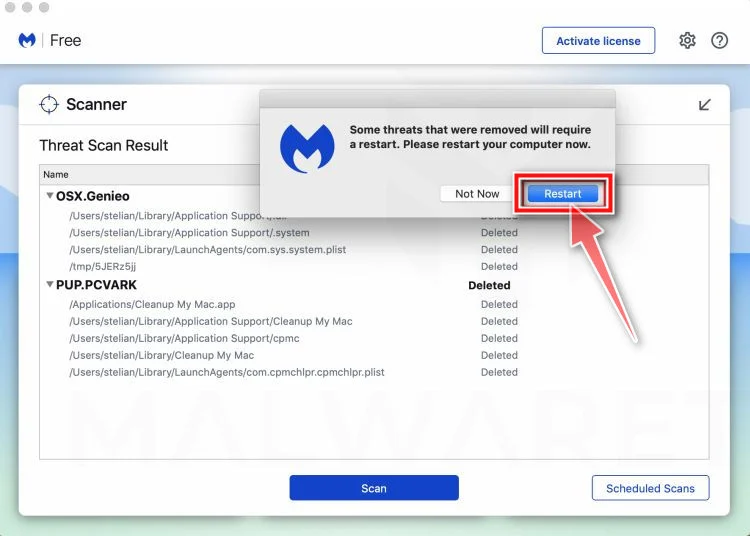
Restart Your Mac
Malwarebytes will now remove all the malicious files it found. Some threats can only be fully removed after a reboot — if Malwarebytes asks you to restart, allow it. Once you’re logged back in, check whether the problems you noticed have stopped. If they come back, save the scan report and ask for help in our forum.
When you’ve finished these steps, check whether the problems you noticed have stopped. If they continue, see the options below.
If you are still experiencing problems while trying to remove a malicious program from your computer, please ask for help in our Mac Malware Removal Help & Support forum.
Remove Unwanted Apps and Malware from Android
- STEP 1: Uninstall malicious apps
- STEP 2: Stop spam notifications and redirects in your browser
- STEP 3: Use Malwarebytes for Android to remove malicious apps
STEP 1: Uninstall malicious apps
In this first step, we will check if any malicious apps are installed on your phone. Sometimes browser hijackers or adware apps can have usable Uninstall entries that can be used to remove these apps.
-
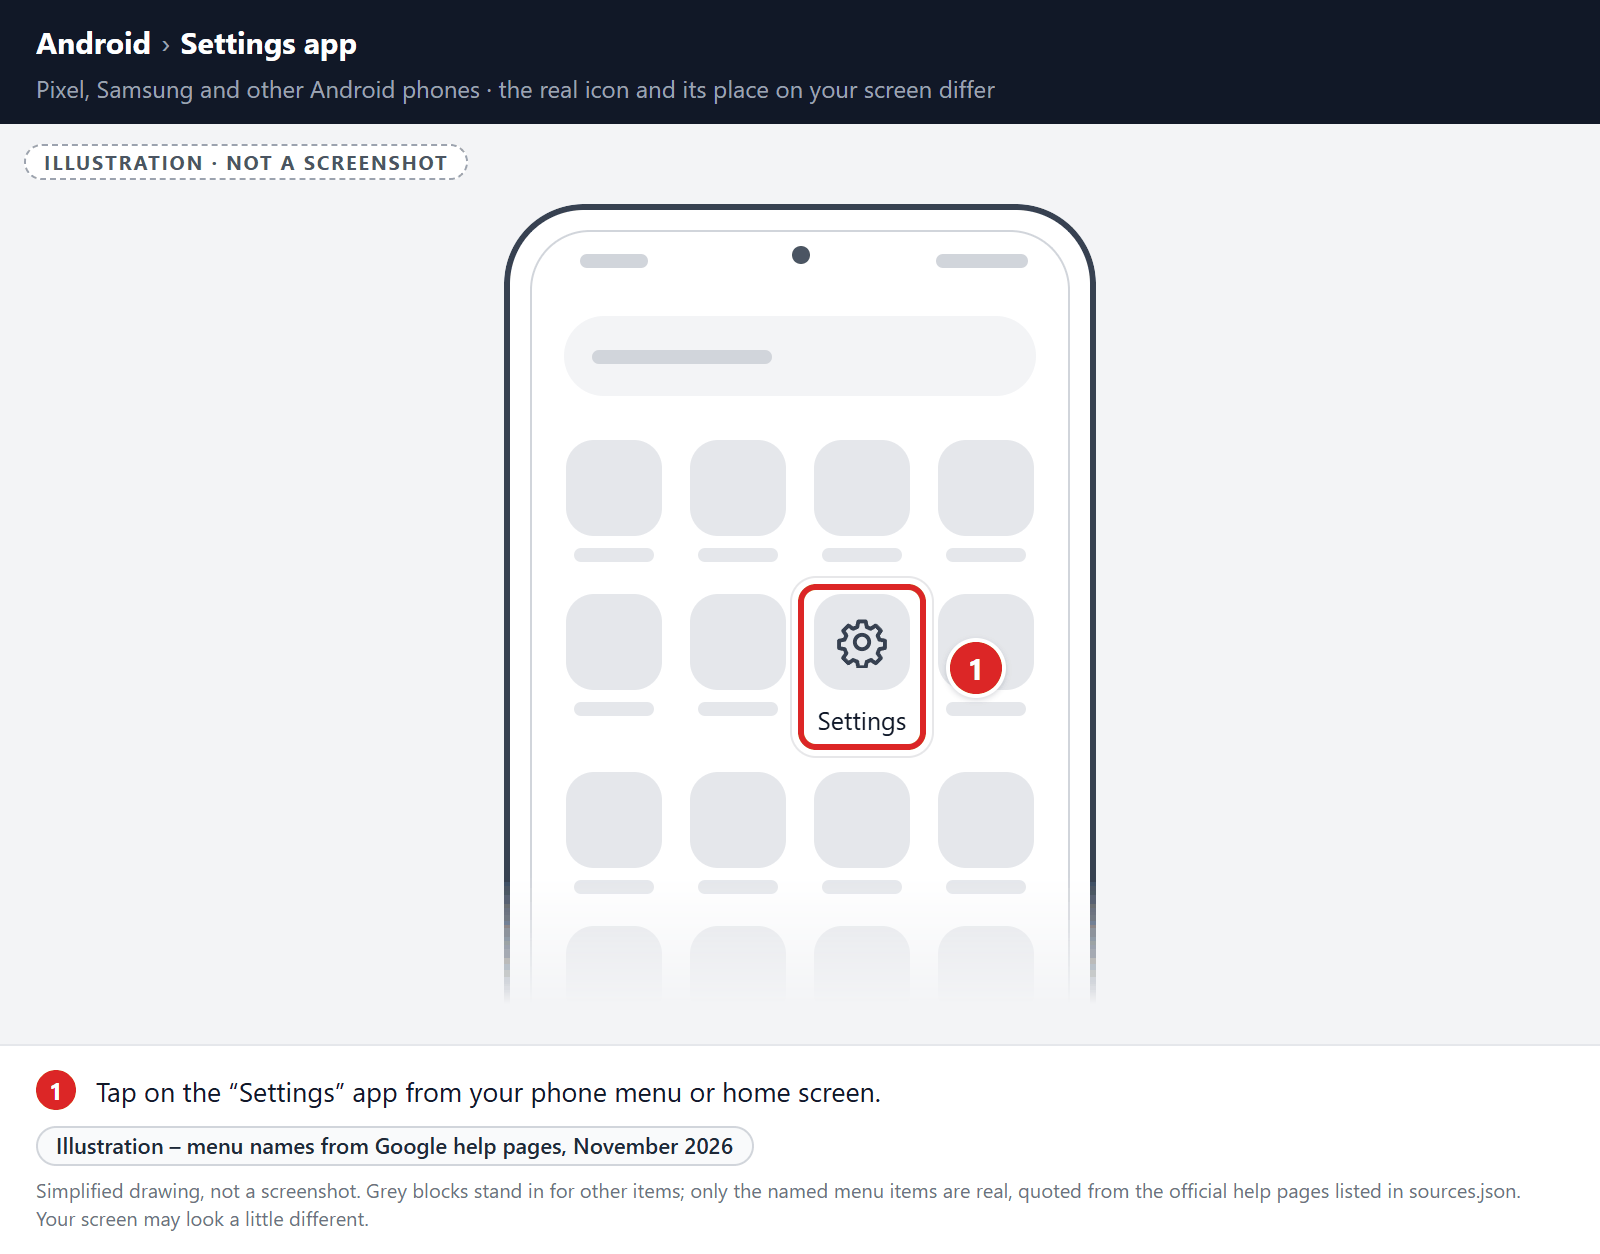
Open the “Settings” menu.
Tap on the “Settings” app from your phone menu or home screen.
-
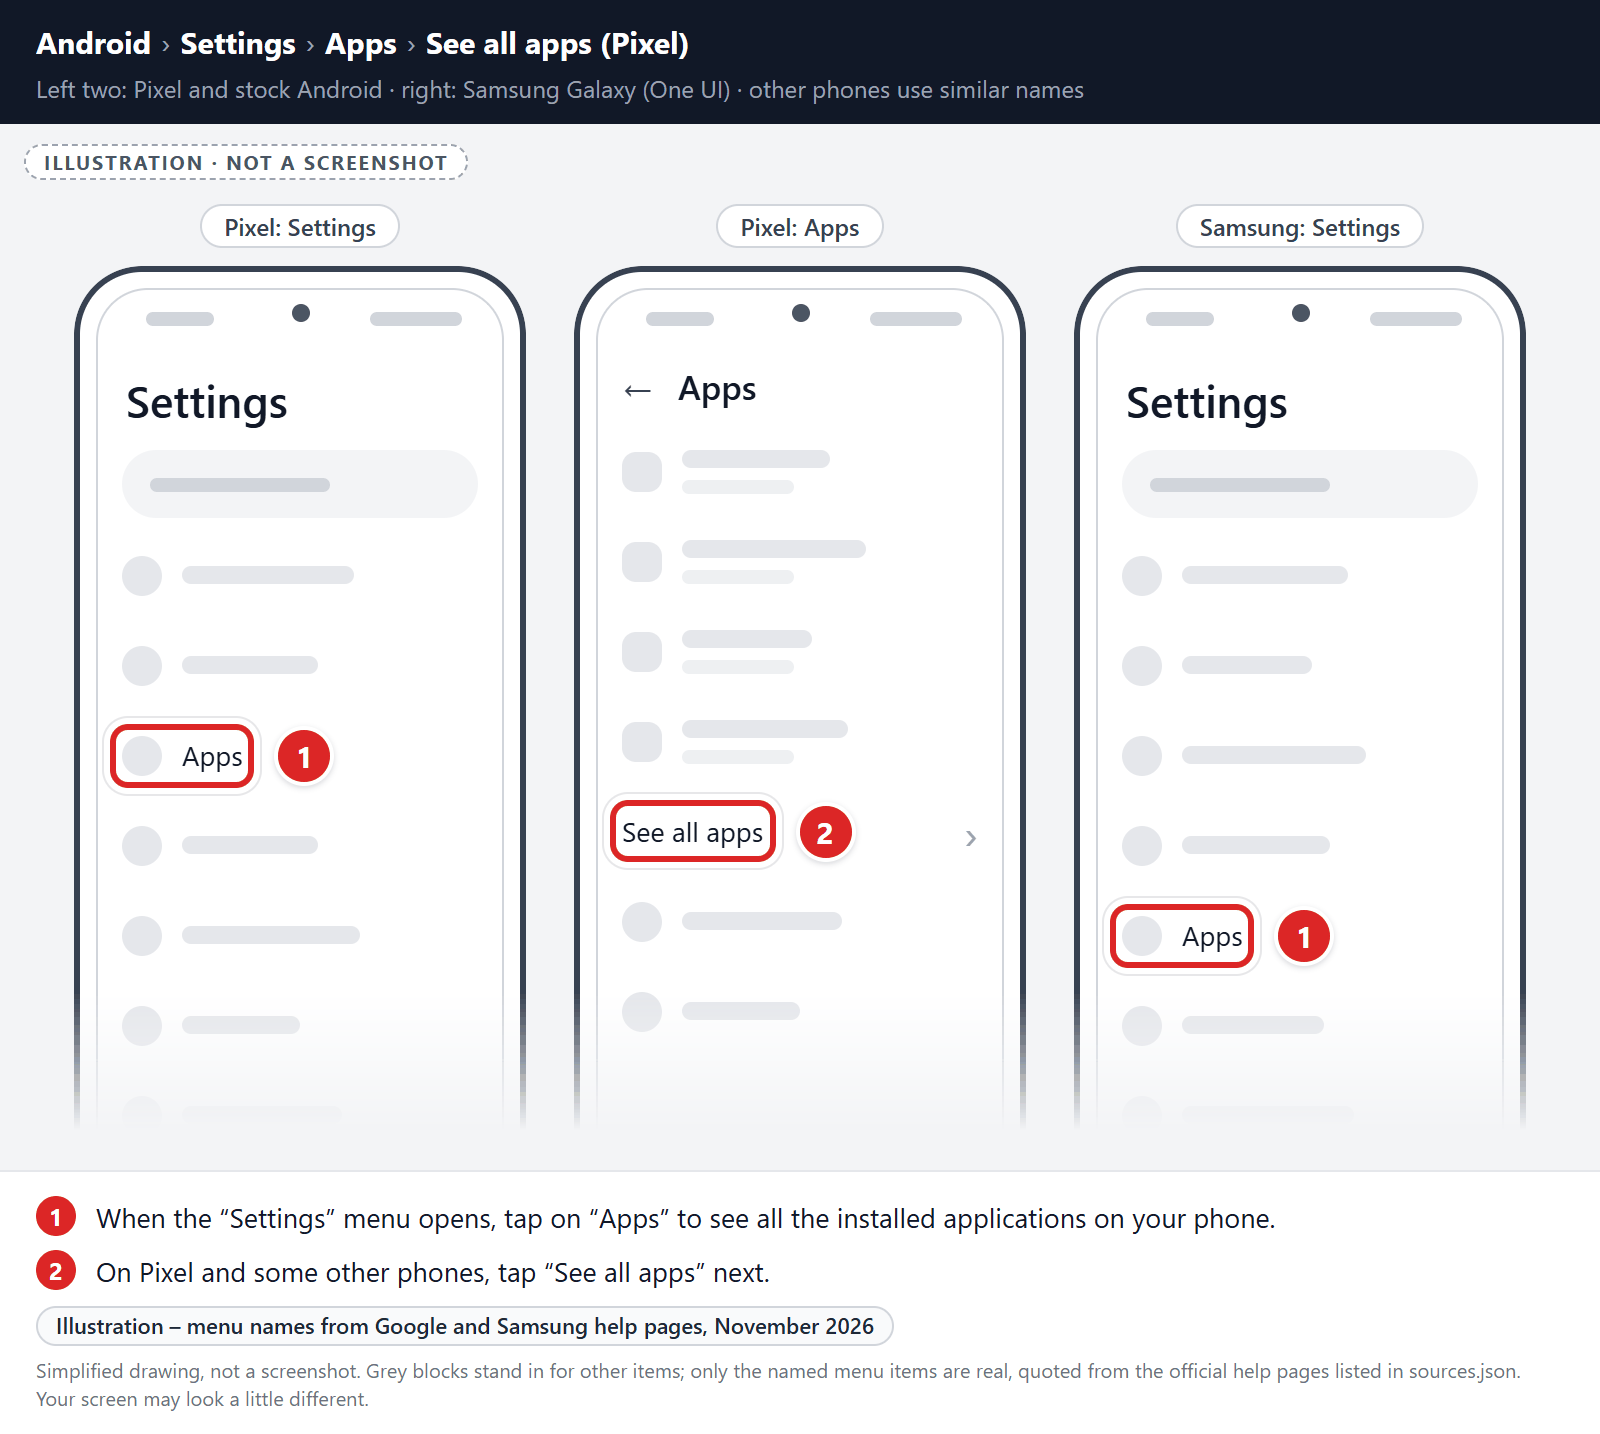
Tap on “Apps”.
When the “Settings” menu opens, tap on “Apps” to see all the installed applications on your phone. On Pixel and some other phones, tap “See all apps” next.
-
Find the malicious app.
The “Apps” screen will be displayed with a list of all the applications that are installed on your phone. Scroll through the list and look out for any suspicious app that could be behind all the drama – anything you don’t remember downloading or that doesn’t sound like a genuine program.
Most often, cyber criminals hide malware inside video or photo editing apps, weather apps, and camera apps.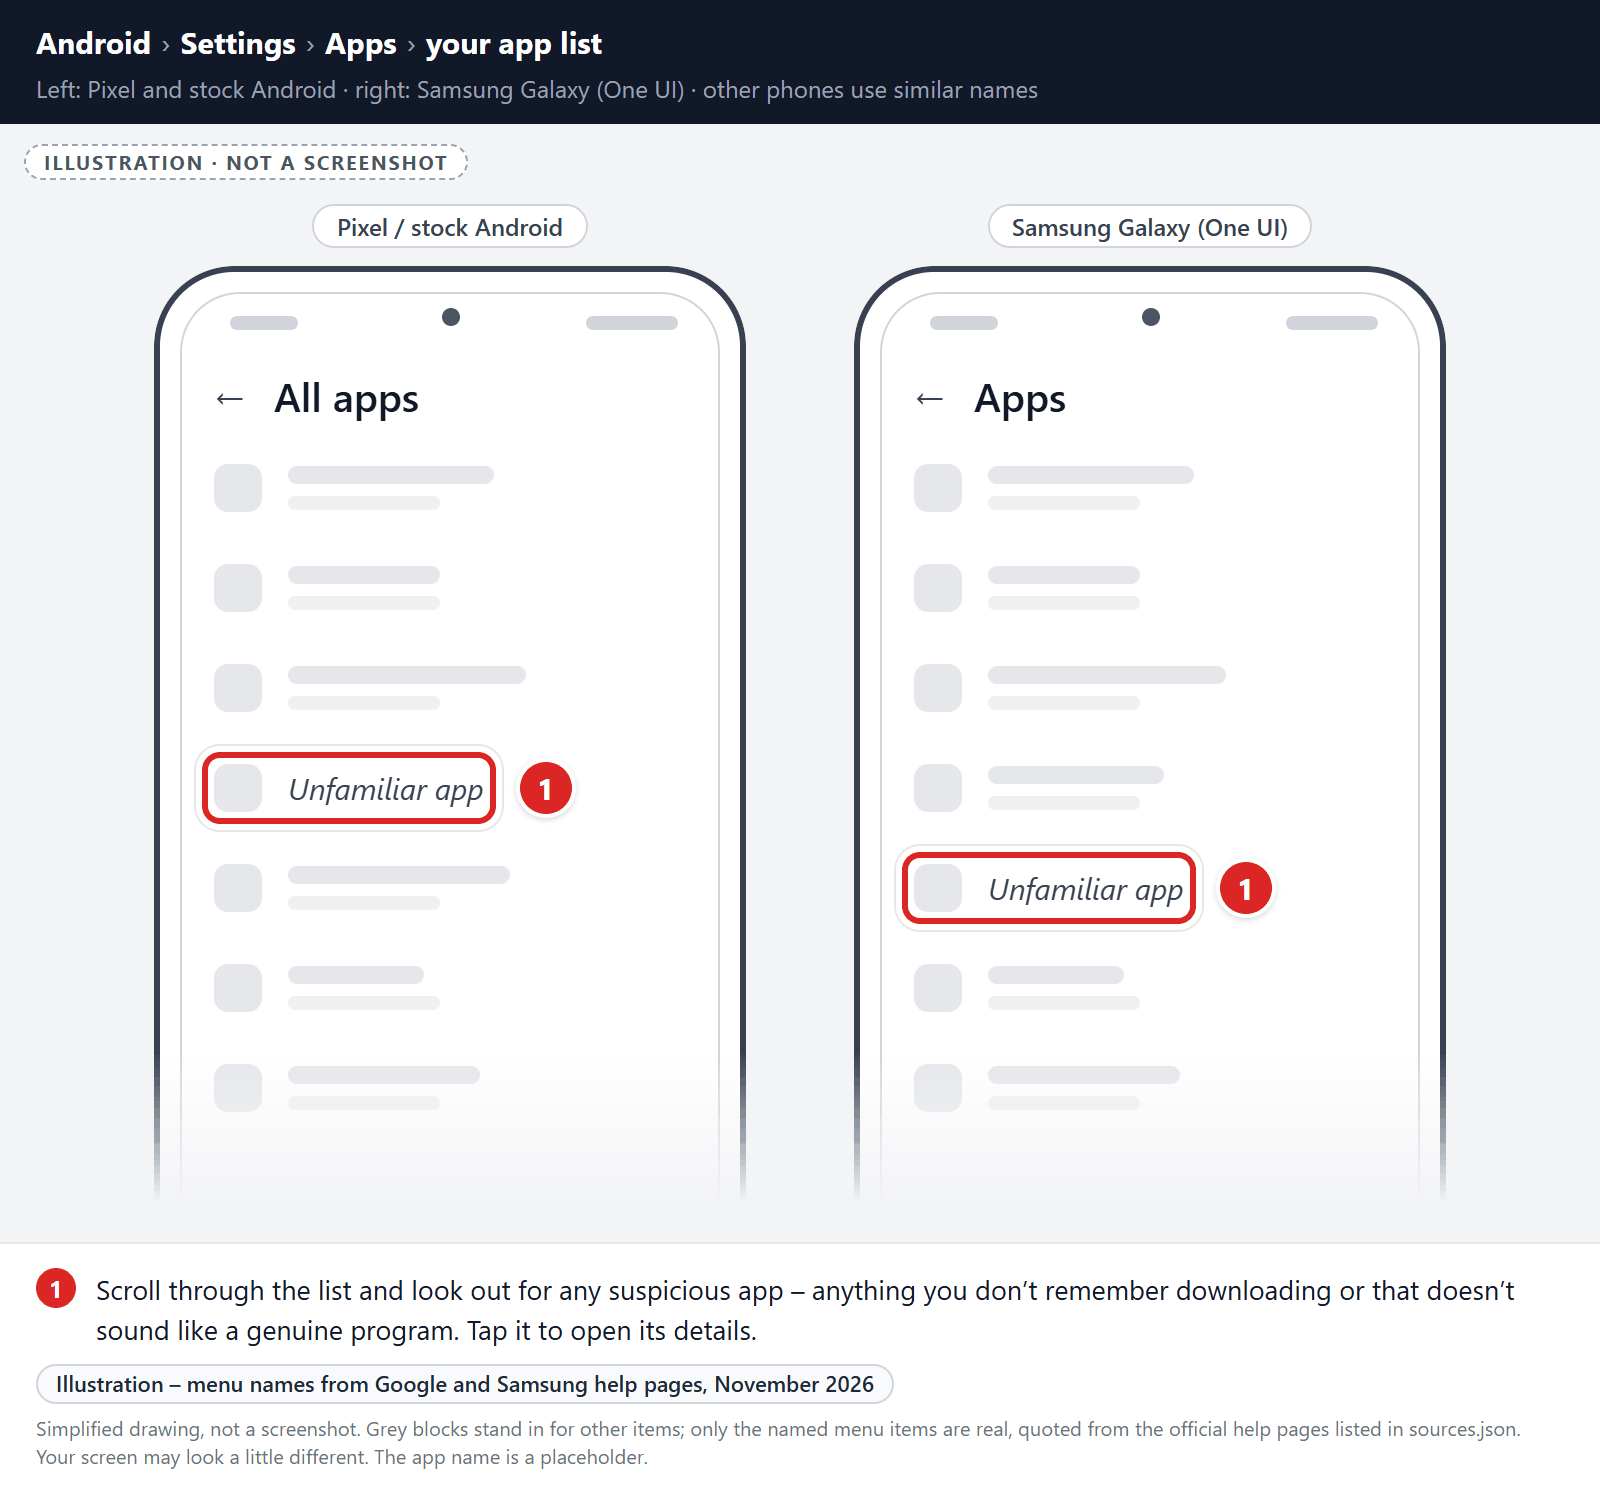
-
Uninstall the malicious app
When you find a suspicious or malicious app, tap on it to uninstall it. This won’t start the app but will open up the app details screen. If the app is currently running press the “Force stop” button, then tap on “Uninstall”.
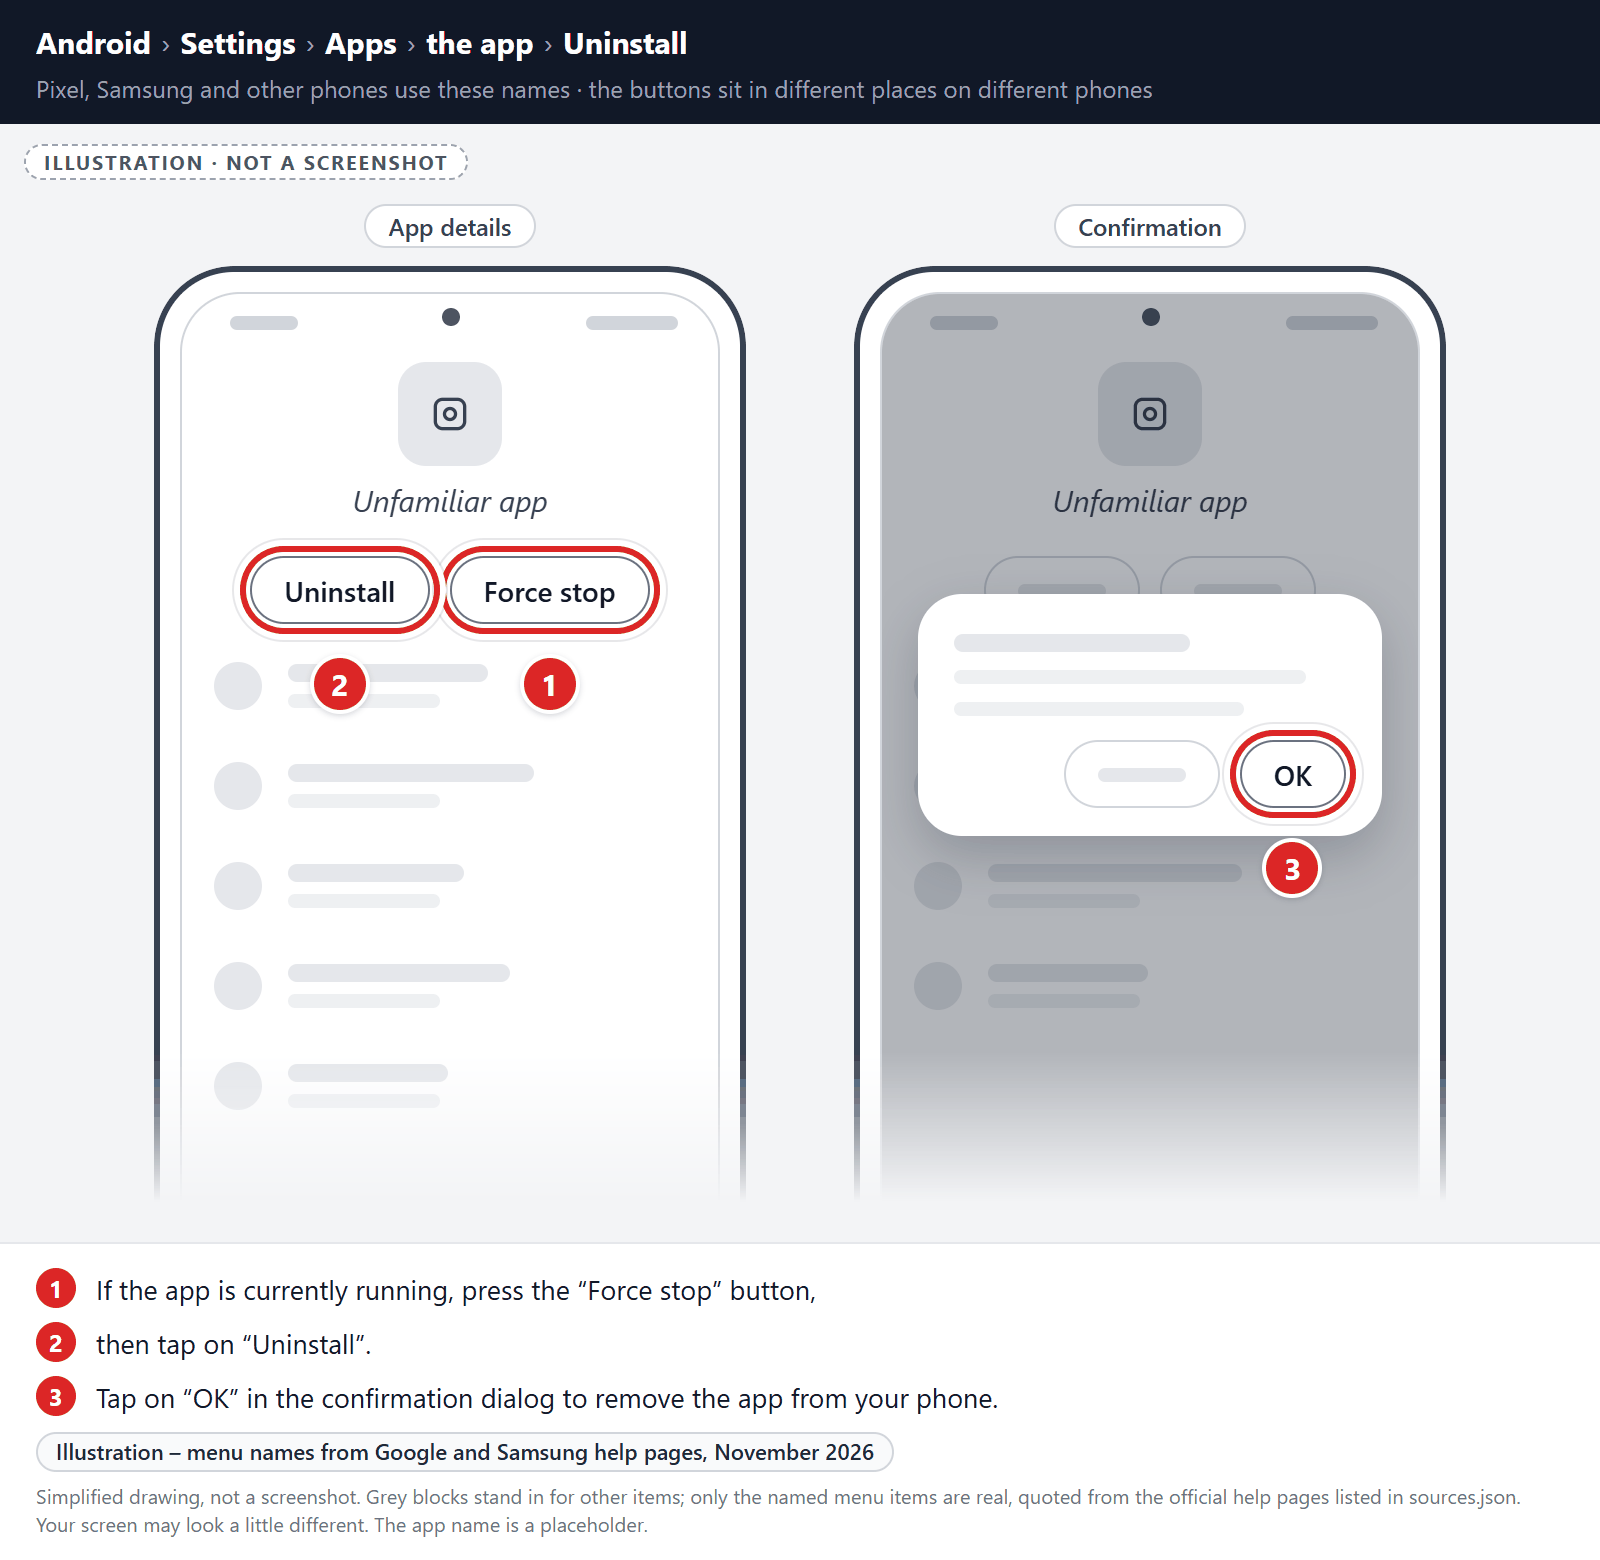
A confirmation dialog should be displayed to confirm you want to uninstall the app, tap on “OK” to remove the malicious app from your phone.
STEP 2: Stop spam notifications and redirects in your browser
In this second step, we will stop spam notifications in your browser. If unwanted pages or redirects still appear after that, we will reset the browser by clearing its app storage. That is a last resort, because it can delete data that isn’t synced.
Android browsers don’t have a single “reset settings” button like browsers on a computer, but they do let you control what each website is allowed to do. Start with the least disruptive fix: block the spam site’s notifications in the browser’s settings. In Chrome, you can also delete cookies and site data: tap More (three dots) > Delete browsing data.
Clear the browser’s app storage only if unwanted pages or redirects keep coming back. It works like a full reset, but it also deletes data that isn’t synced, so treat it as a last resort.
Remove malware from Chrome for Android
First, block the spam site’s notifications:
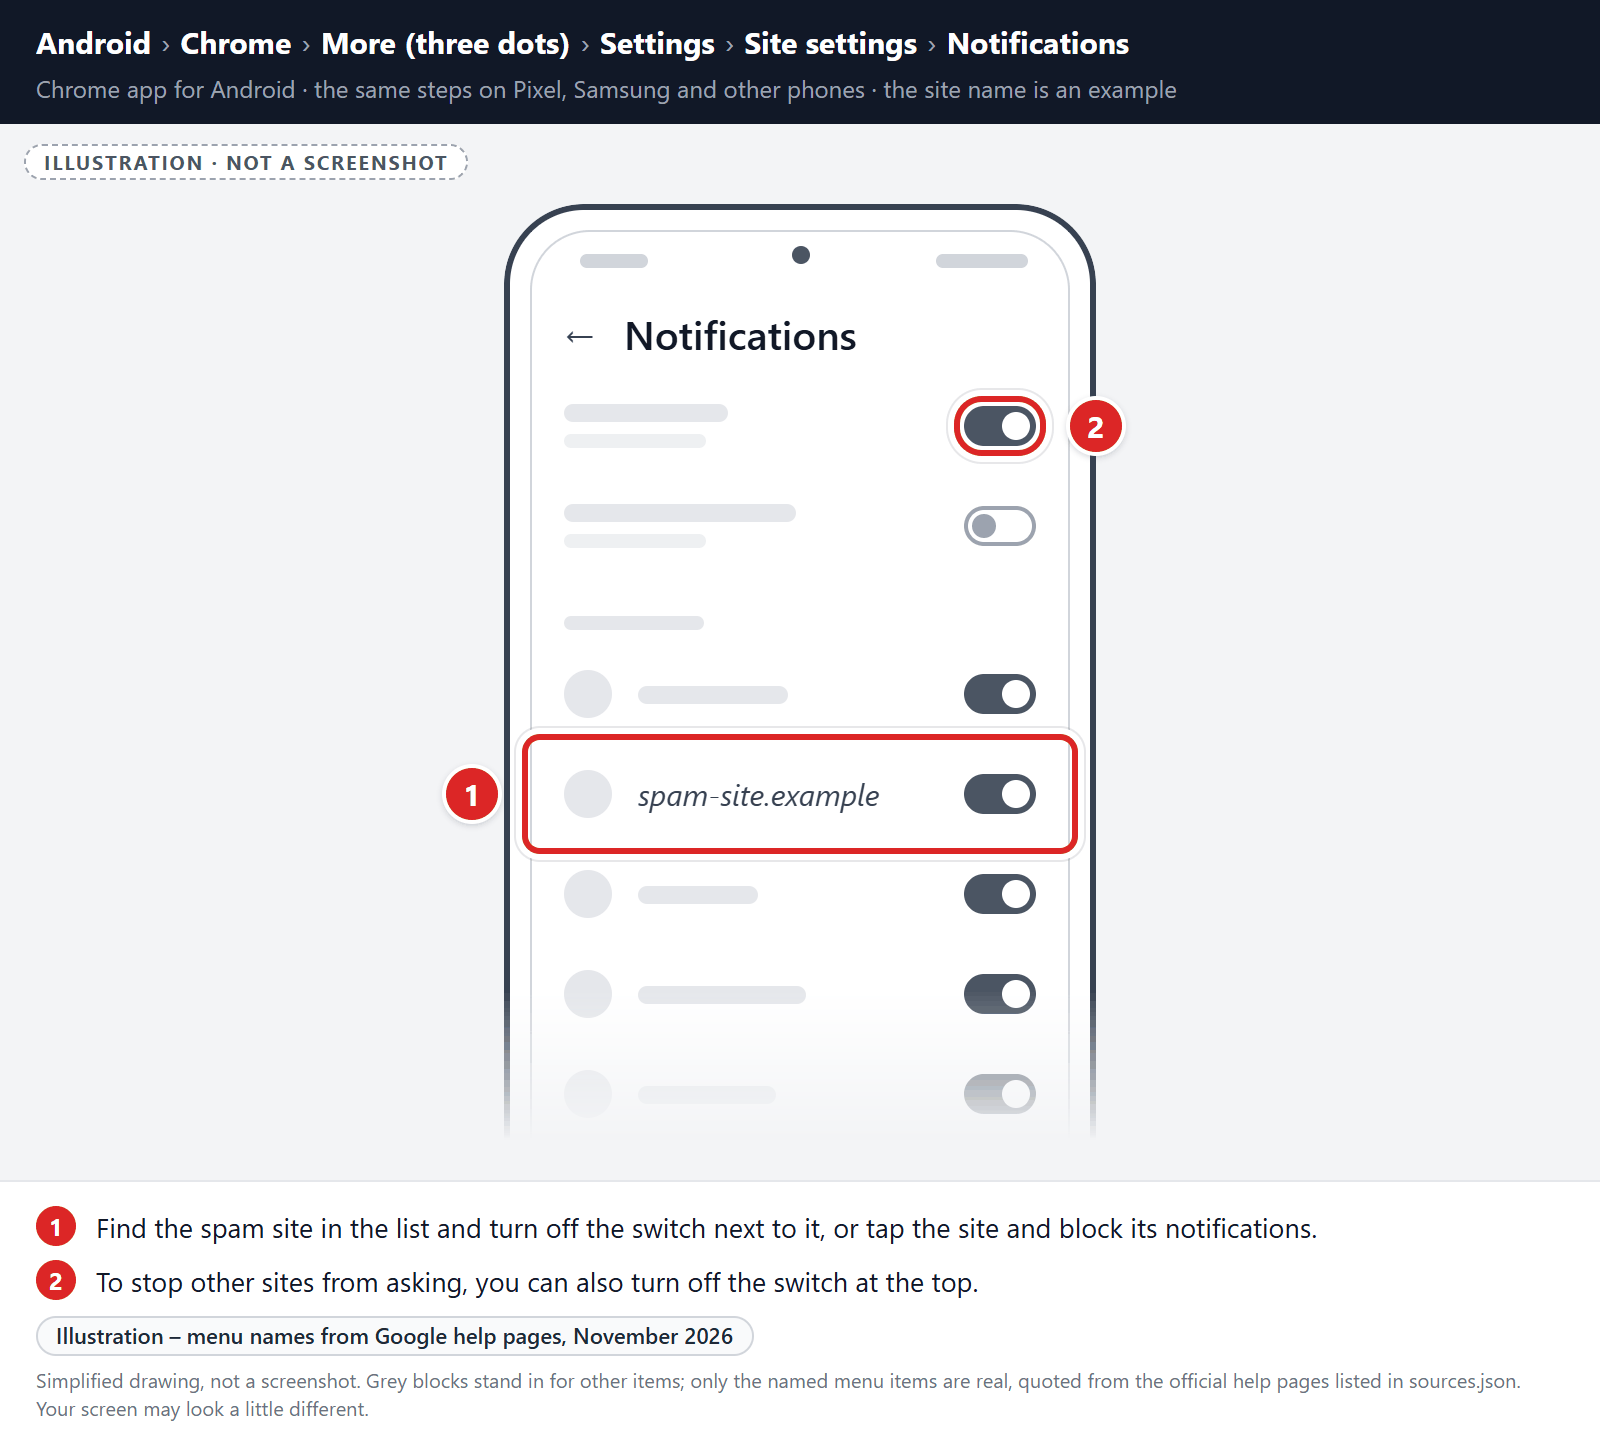
- Open Chrome, tap the More button (three dots) in the top-right corner, and tap Settings.
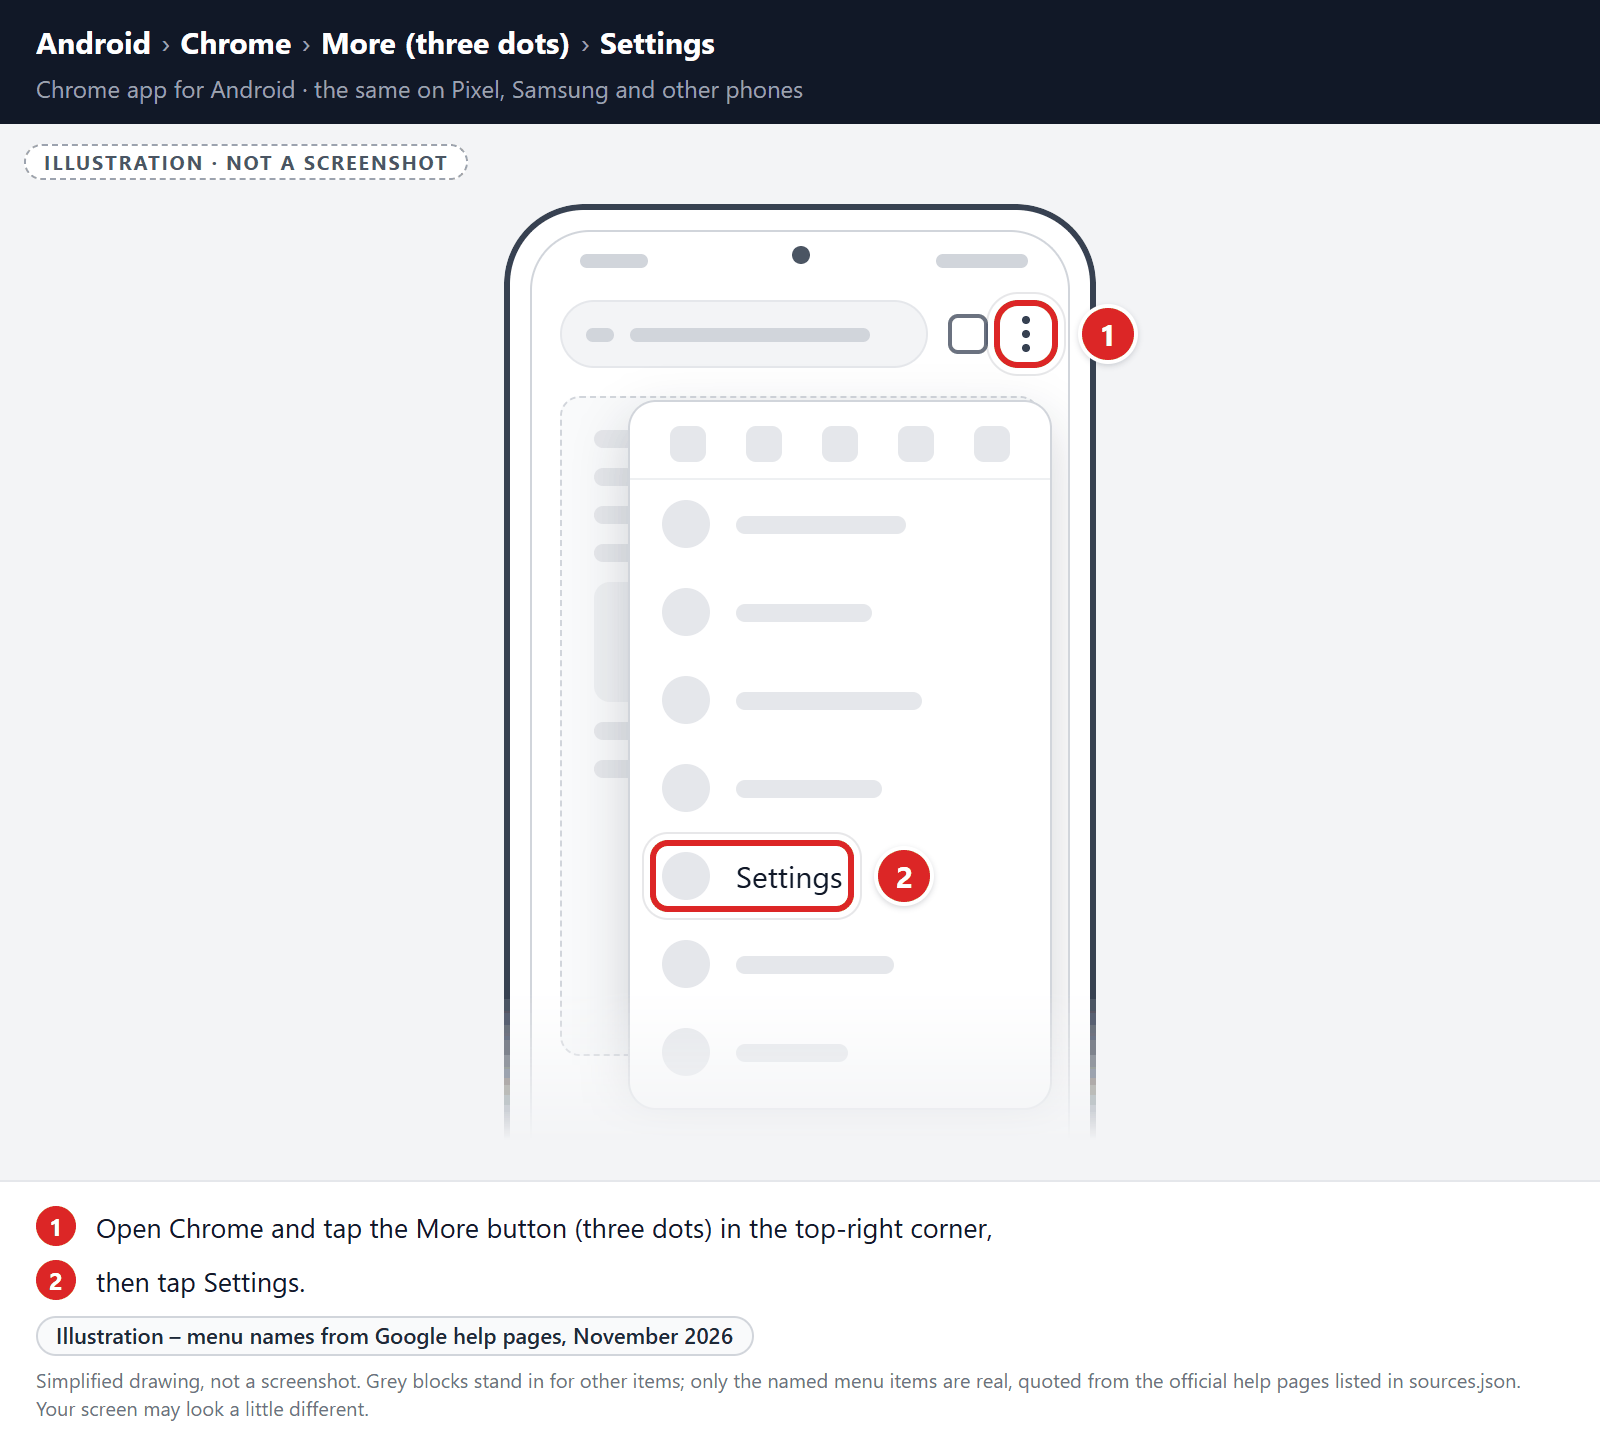
- Tap Site settings, then tap Notifications.
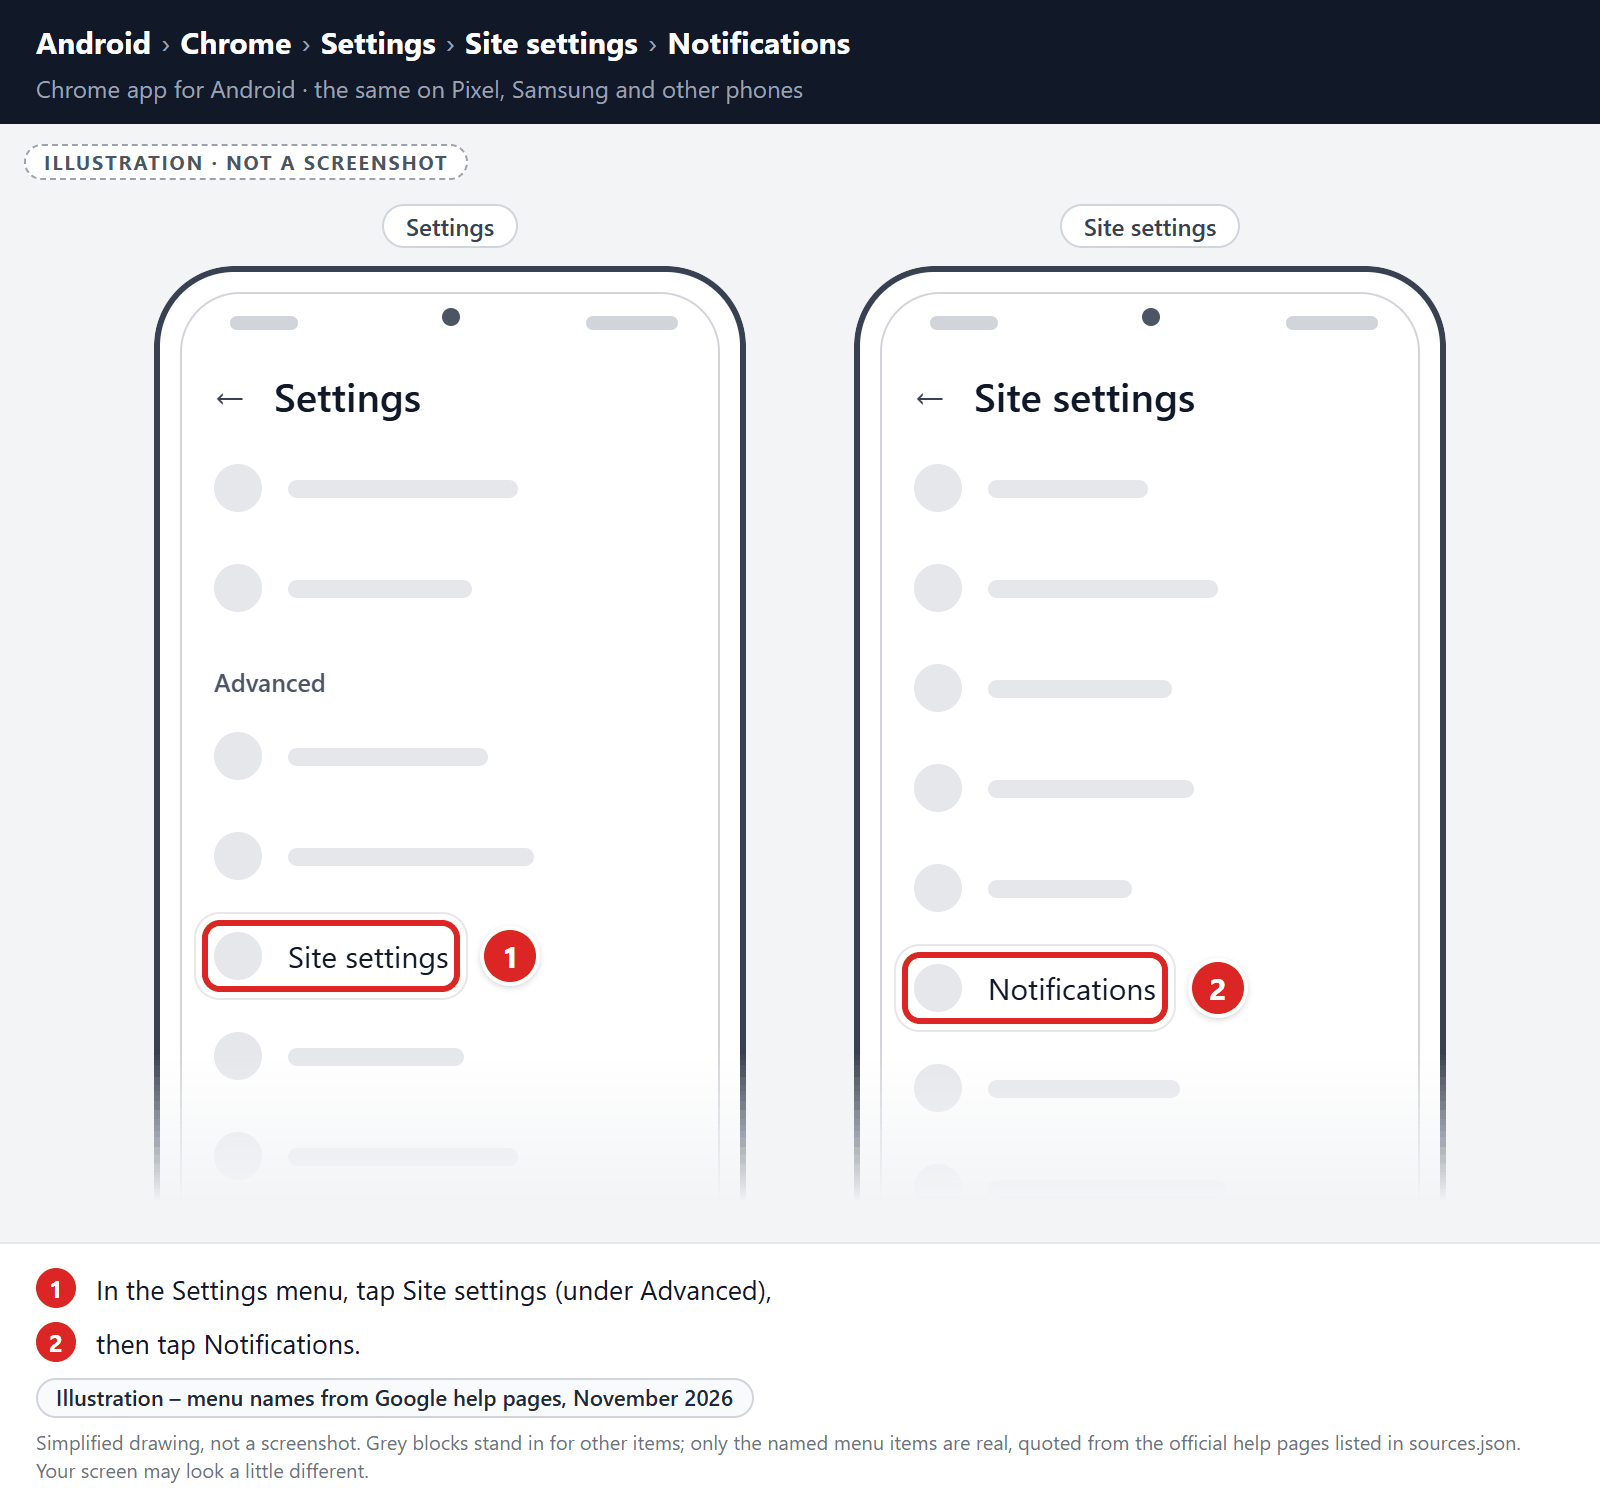
- Find the spam site in the list and turn off the switch next to it, or tap the site and block its notifications. To stop other sites from asking, you can also turn off the switch at the top.
If unwanted pages or redirects keep appearing, clear Chrome’s storage (last resort):
-
Open the “Settings” menu.
Tap on the “Settings” app from your phone menu or home screen.
-
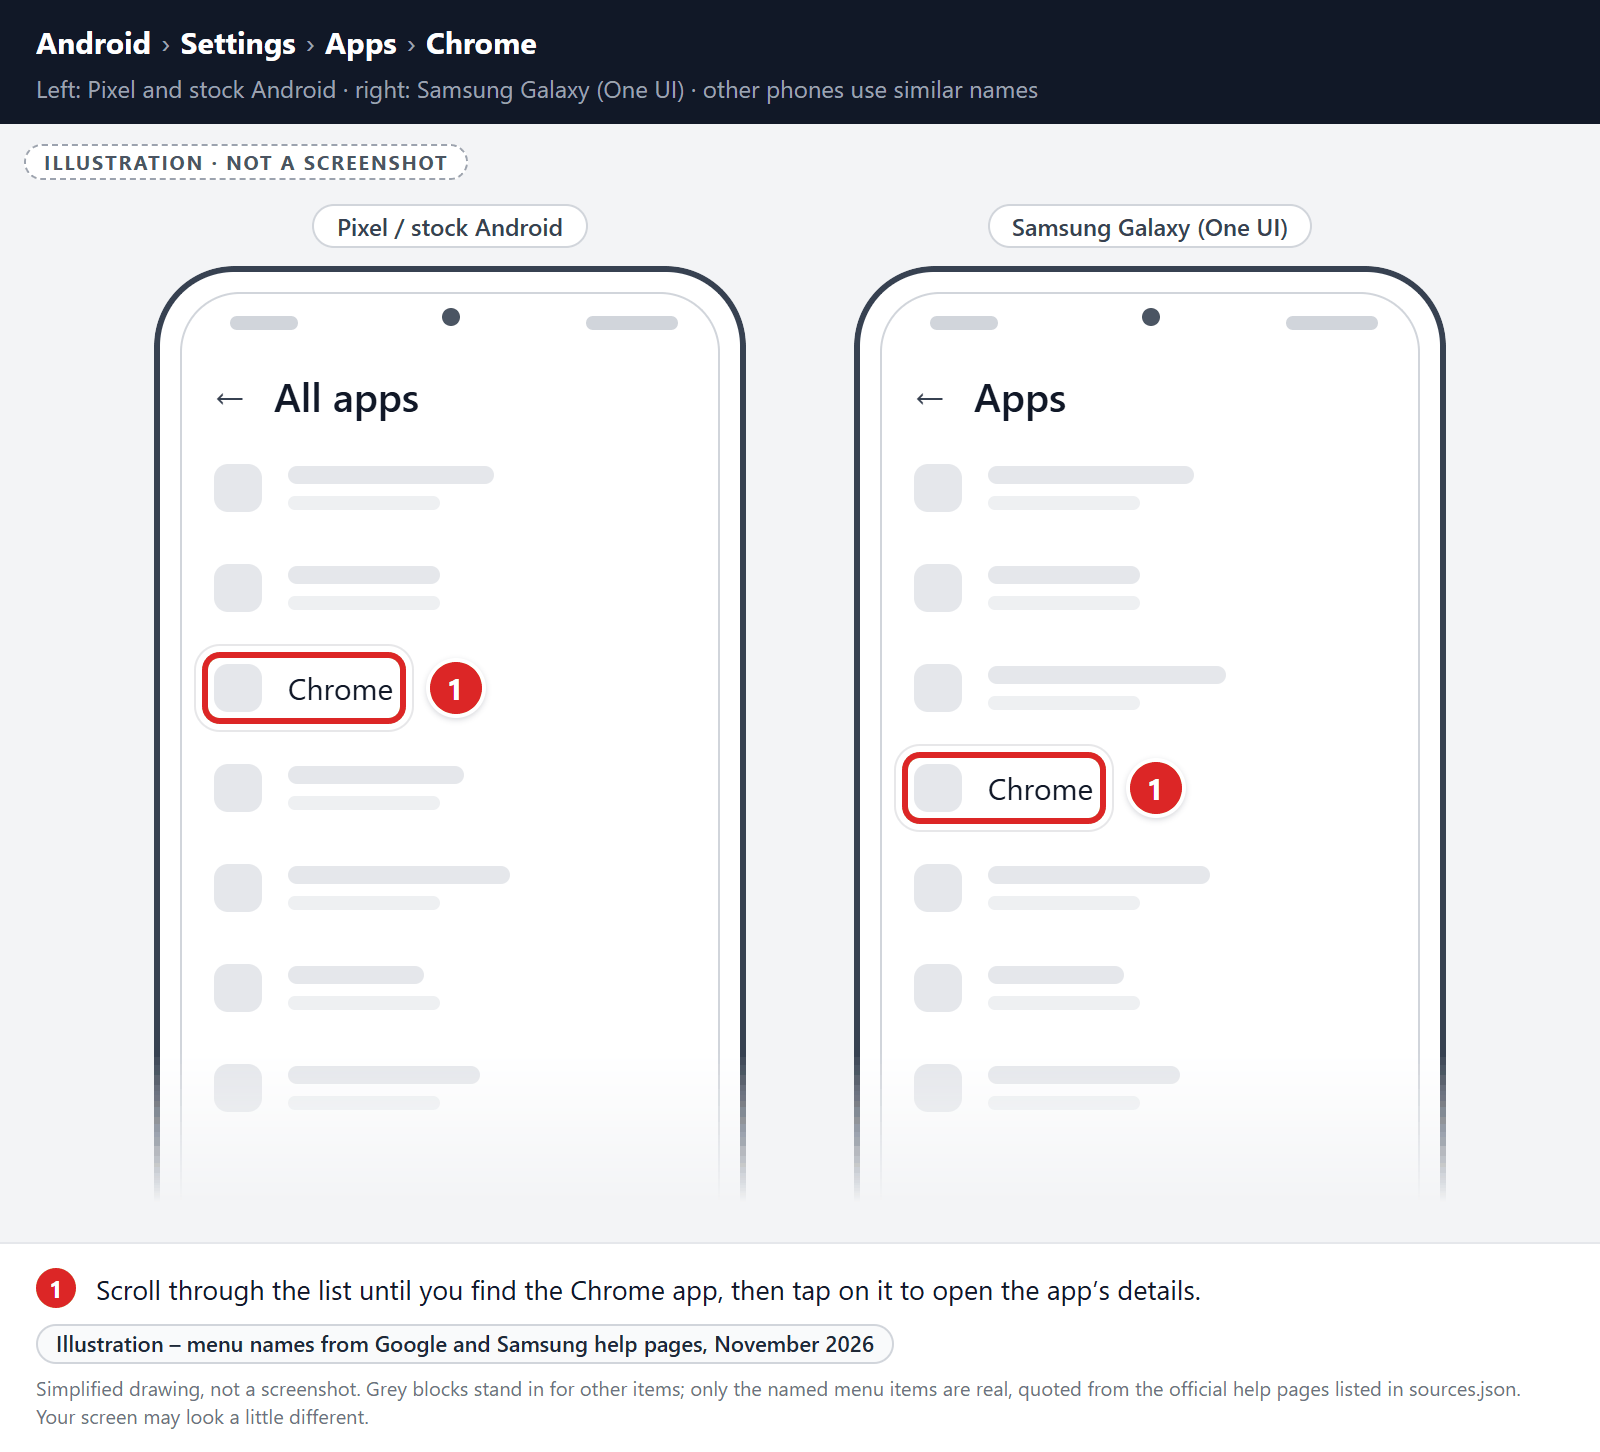
Tap on “Apps”.
When the “Settings” menu opens, tap on “Apps” to see all the installed applications on your phone.
-
Find and tap on Chrome.
The “Apps” screen will be displayed with a list of all the apps installed on your phone. Scroll through the list until you find the Chrome app, then tap on it to open the app’s details.
-
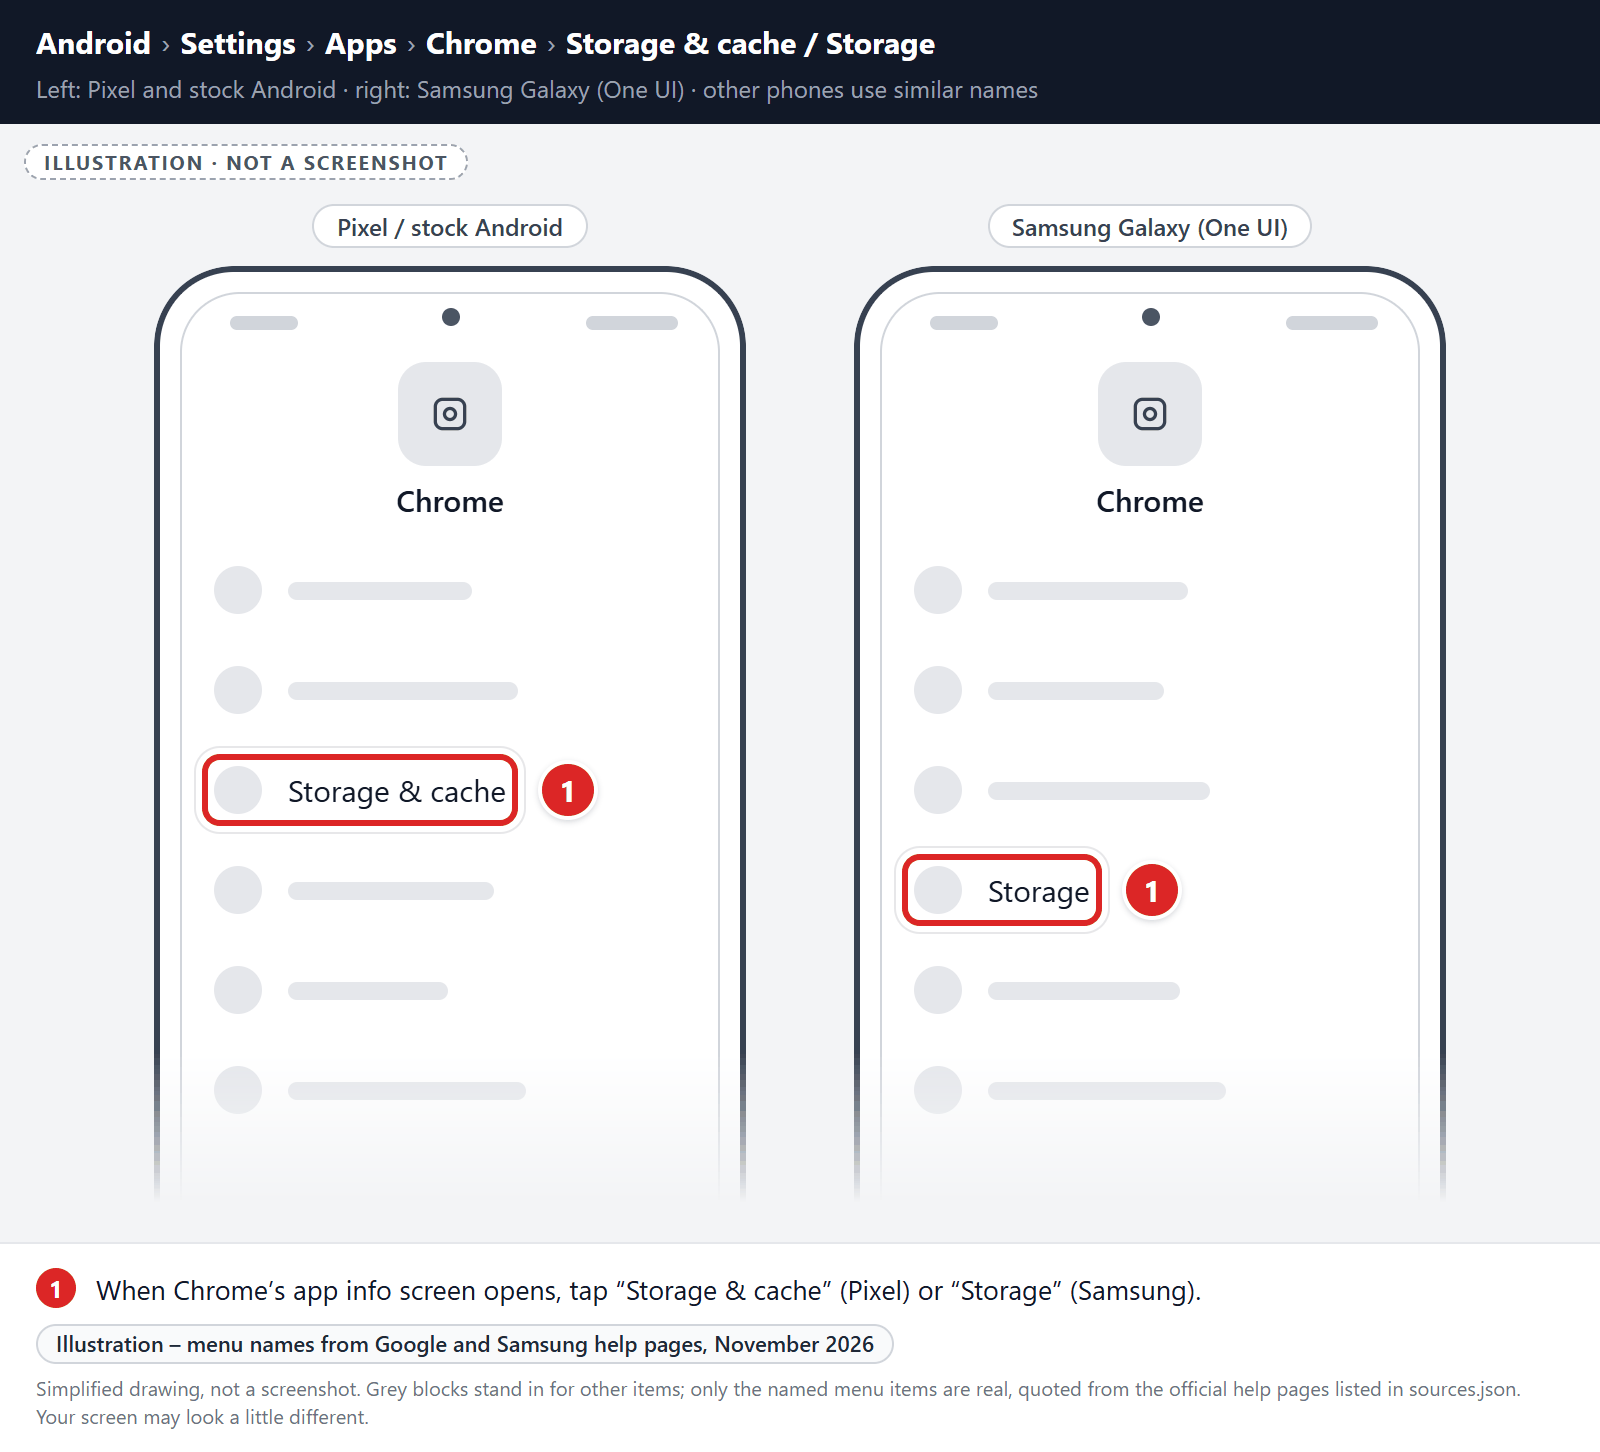
Tap “Storage”.
When Chrome’s app info menu is displayed, tap on “Storage” (on Pixel phones, “Storage & cache“).
-
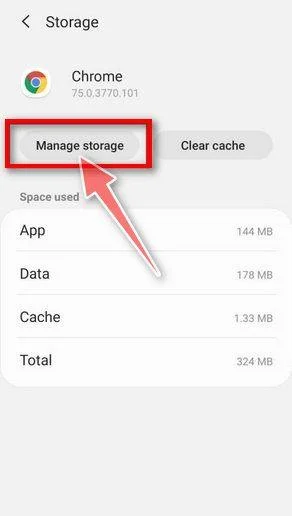
Tap “Manage Space”.
Under the storage settings, tap “Manage space” (called “Manage storage” on some phones). Don’t tap “Clear cache”, because it doesn’t reset Chrome.
-
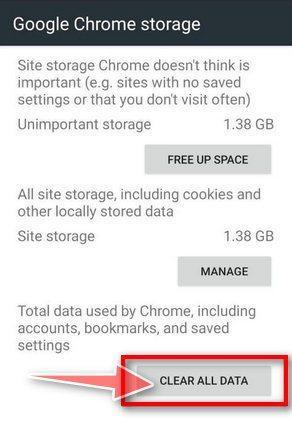
Tap “Clear all data”.
Tap “Clear all data” to delete all Chrome’s data including accounts, bookmarks, and your settings to reset the default settings.
-
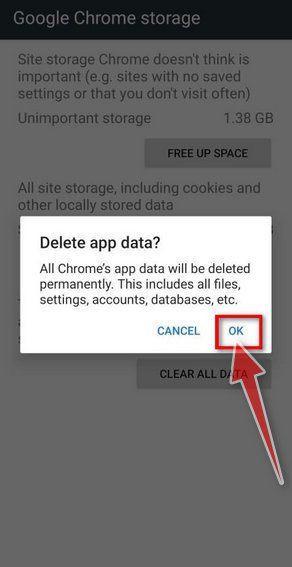
Confirm by tapping “Ok”.
A confirmation dialog should now be displayed, detailing the components that will be restored to their default state should you continue with the reset process. To complete the restoration process, tap “Ok“.
Remove malware from Firefox for Android
First, block the spam site’s notifications:
- Open Firefox, tap the menu button (three dots), and tap Settings.
- Tap Site permissions, then tap Exceptions.
- Tap the spam site, then set Notification to Blocked.
- Optional: to stop other sites from asking, go back to Site permissions, tap Notification, and choose Blocked.
If unwanted pages or redirects keep appearing, clear Firefox’s storage (last resort):
-
Open the “Settings” menu.
Tap on the “Settings” app from your phone menu or home screen.
-
Tap on “Apps”.
When the “Settings” menu opens, tap on “Apps” to see all the installed applications on your phone.
-
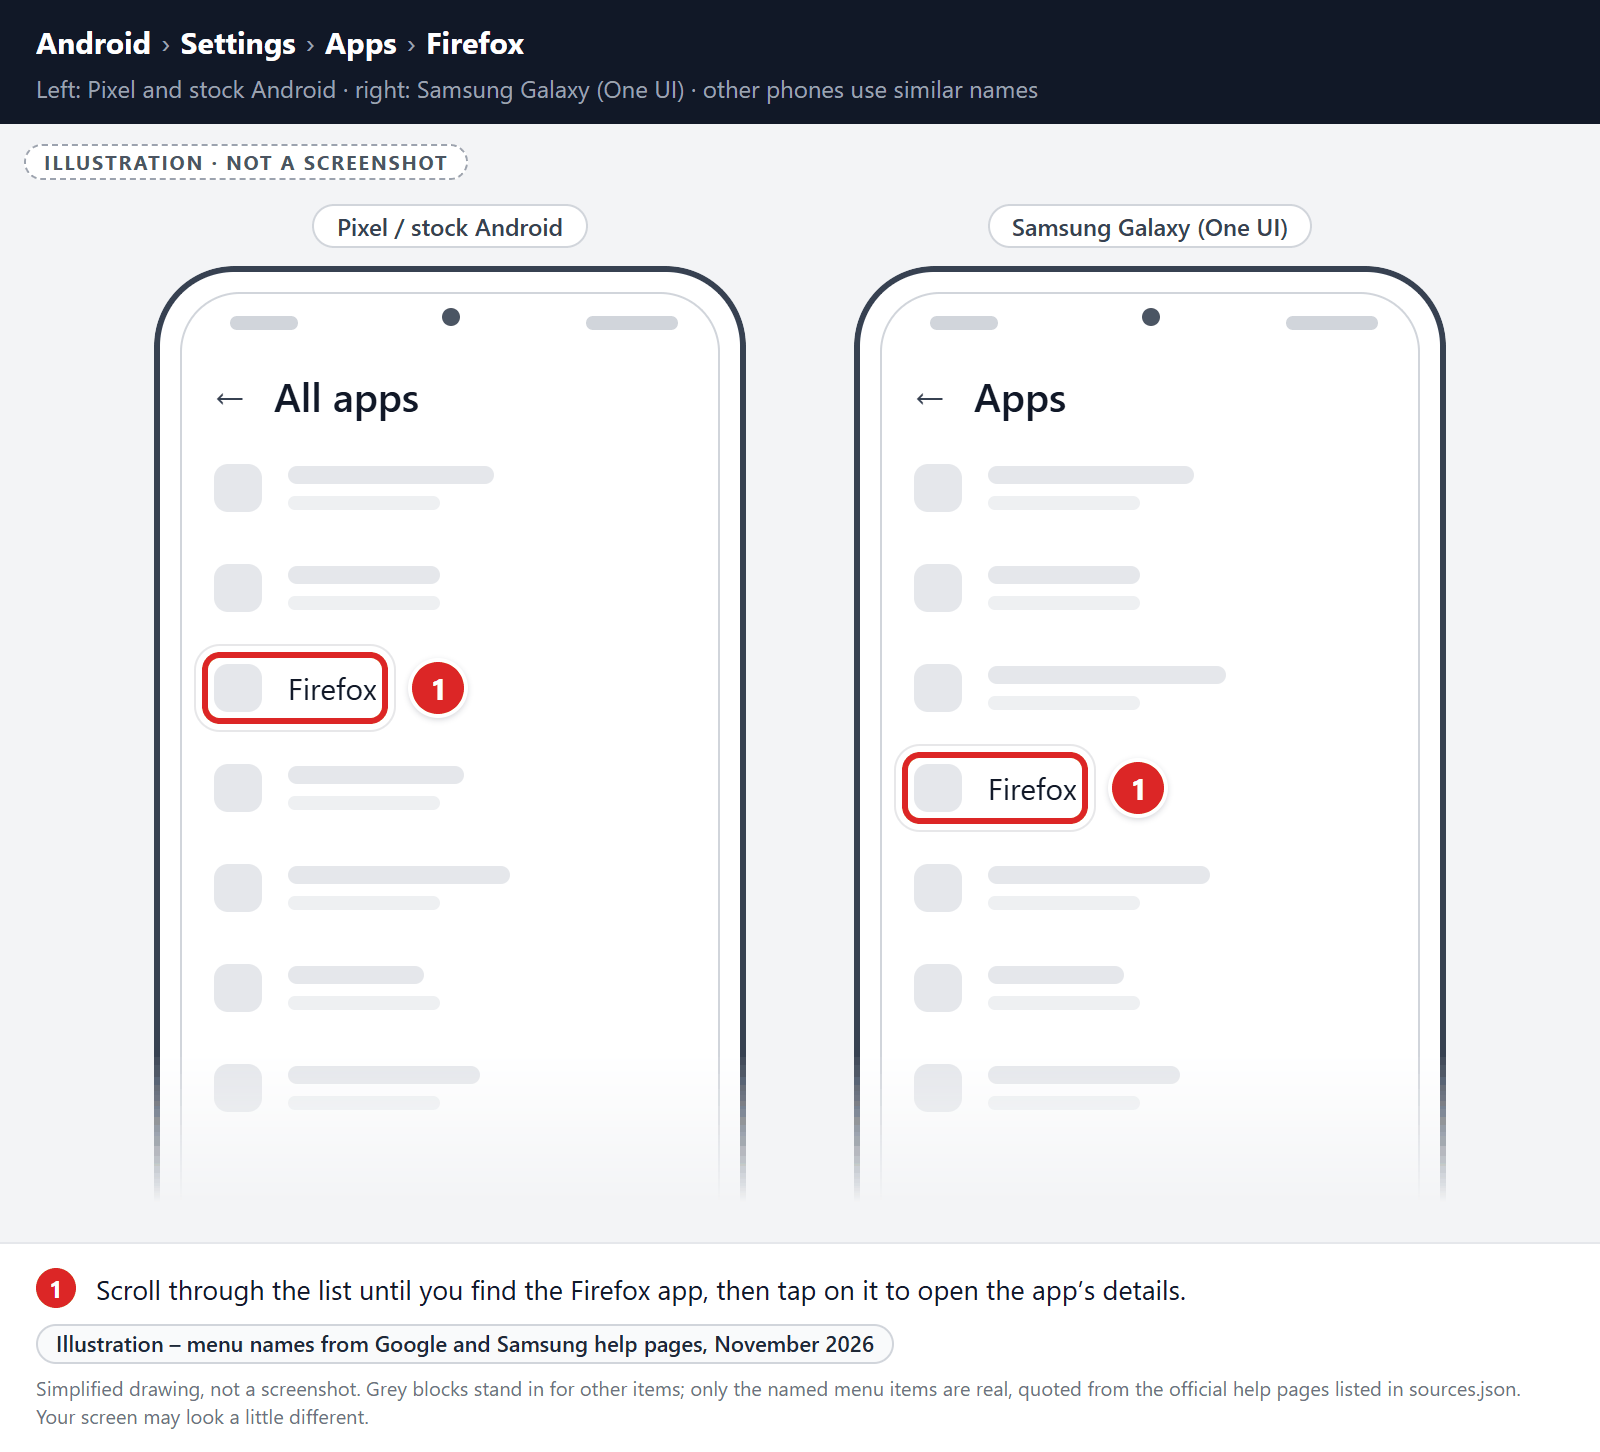
Find and tap on Firefox.
The “Apps” screen will be displayed with a list of all the apps installed on your phone. Scroll through the list until you find the Firefox app, then tap on it to open the app’s details.
-
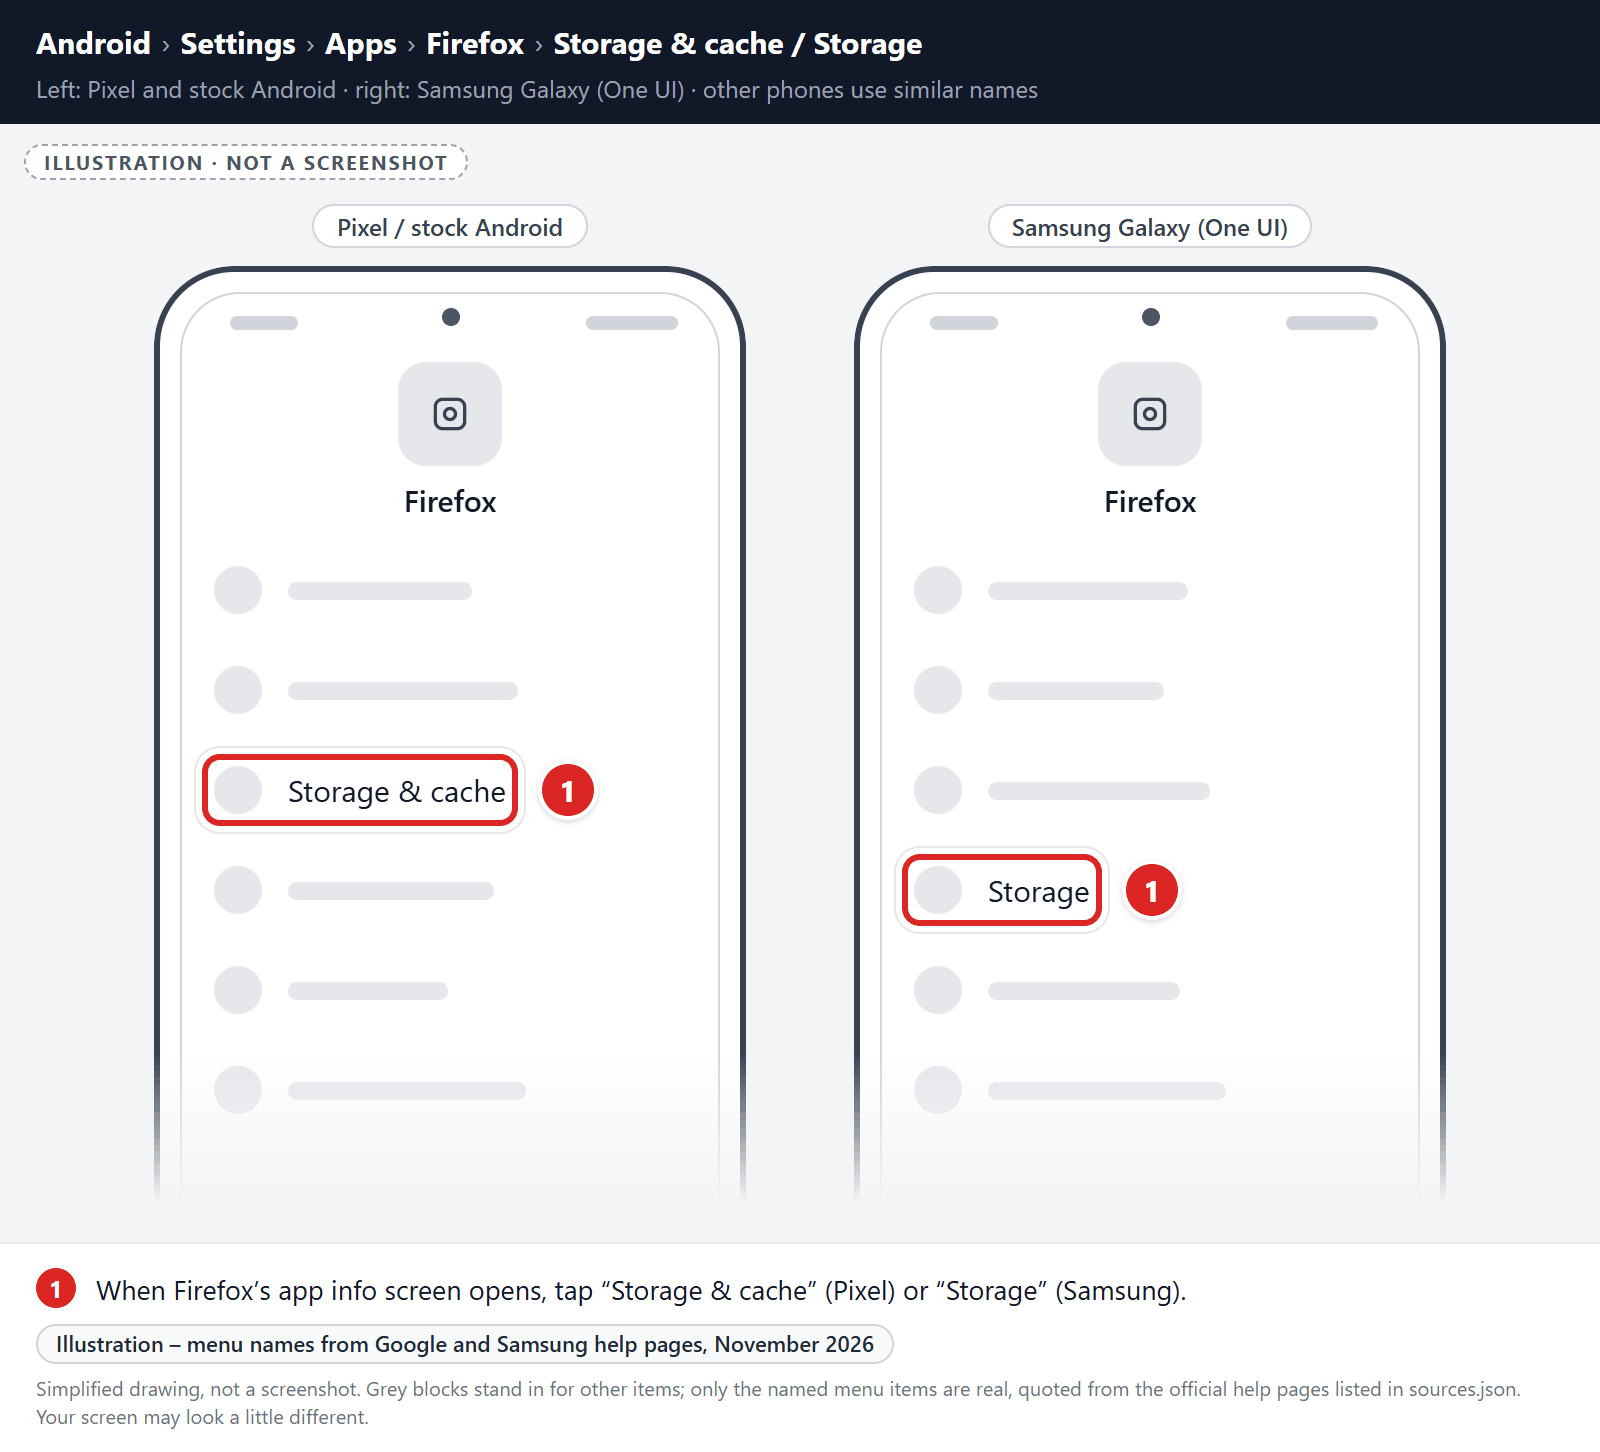
Tap “Storage”.
When Firefox’s app info menu is displayed, tap on “Storage” (on Pixel phones, “Storage & cache“).
-
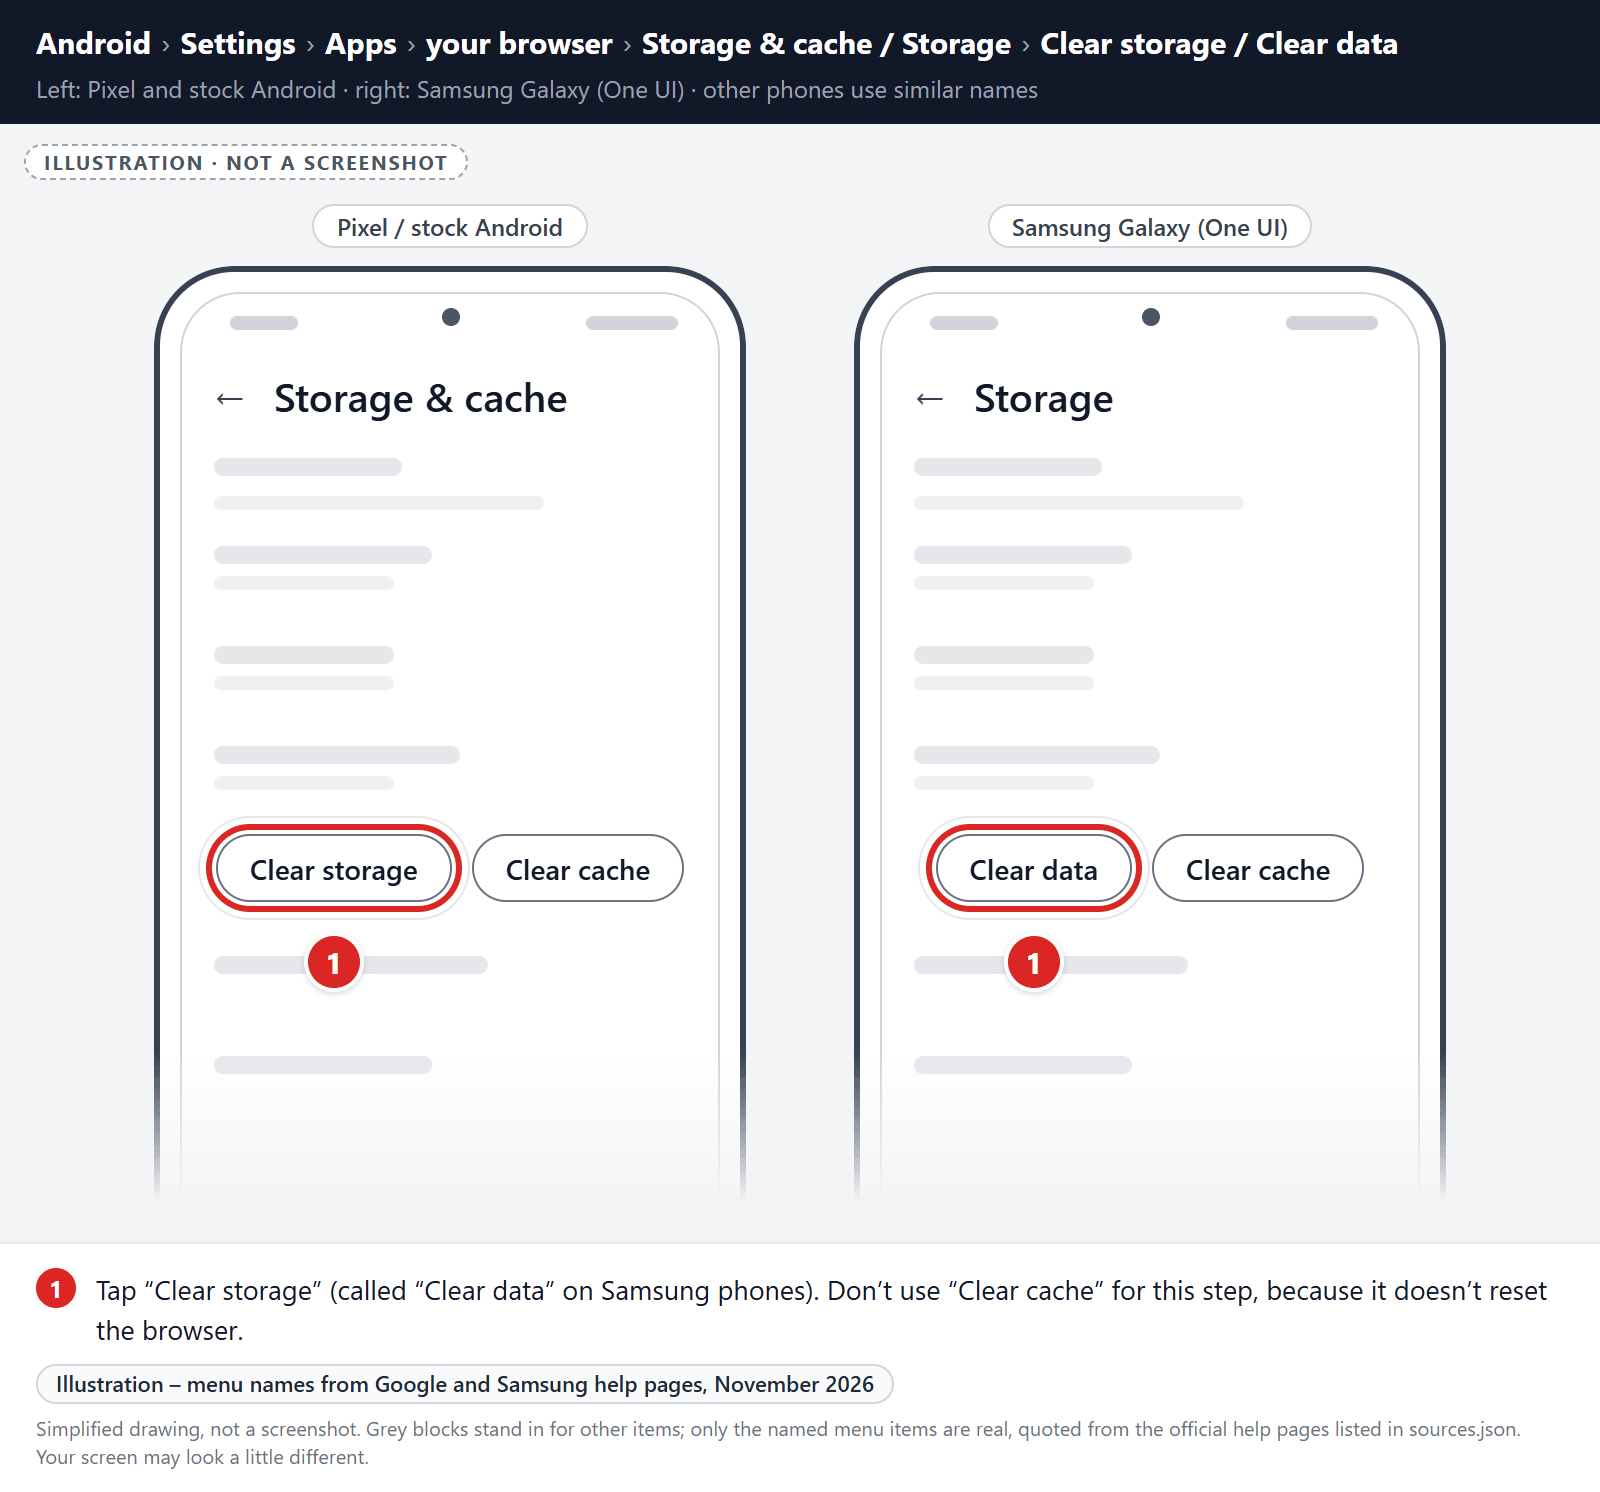
Tap “Clear storage” or “Clear data”.
Tap “Clear storage” (called “Clear data” on Samsung phones). If you see “Manage space” or “Manage storage” instead, tap it, then tap “Clear all data“. Don’t use “Clear cache” for this step, because it doesn’t reset the browser.
-
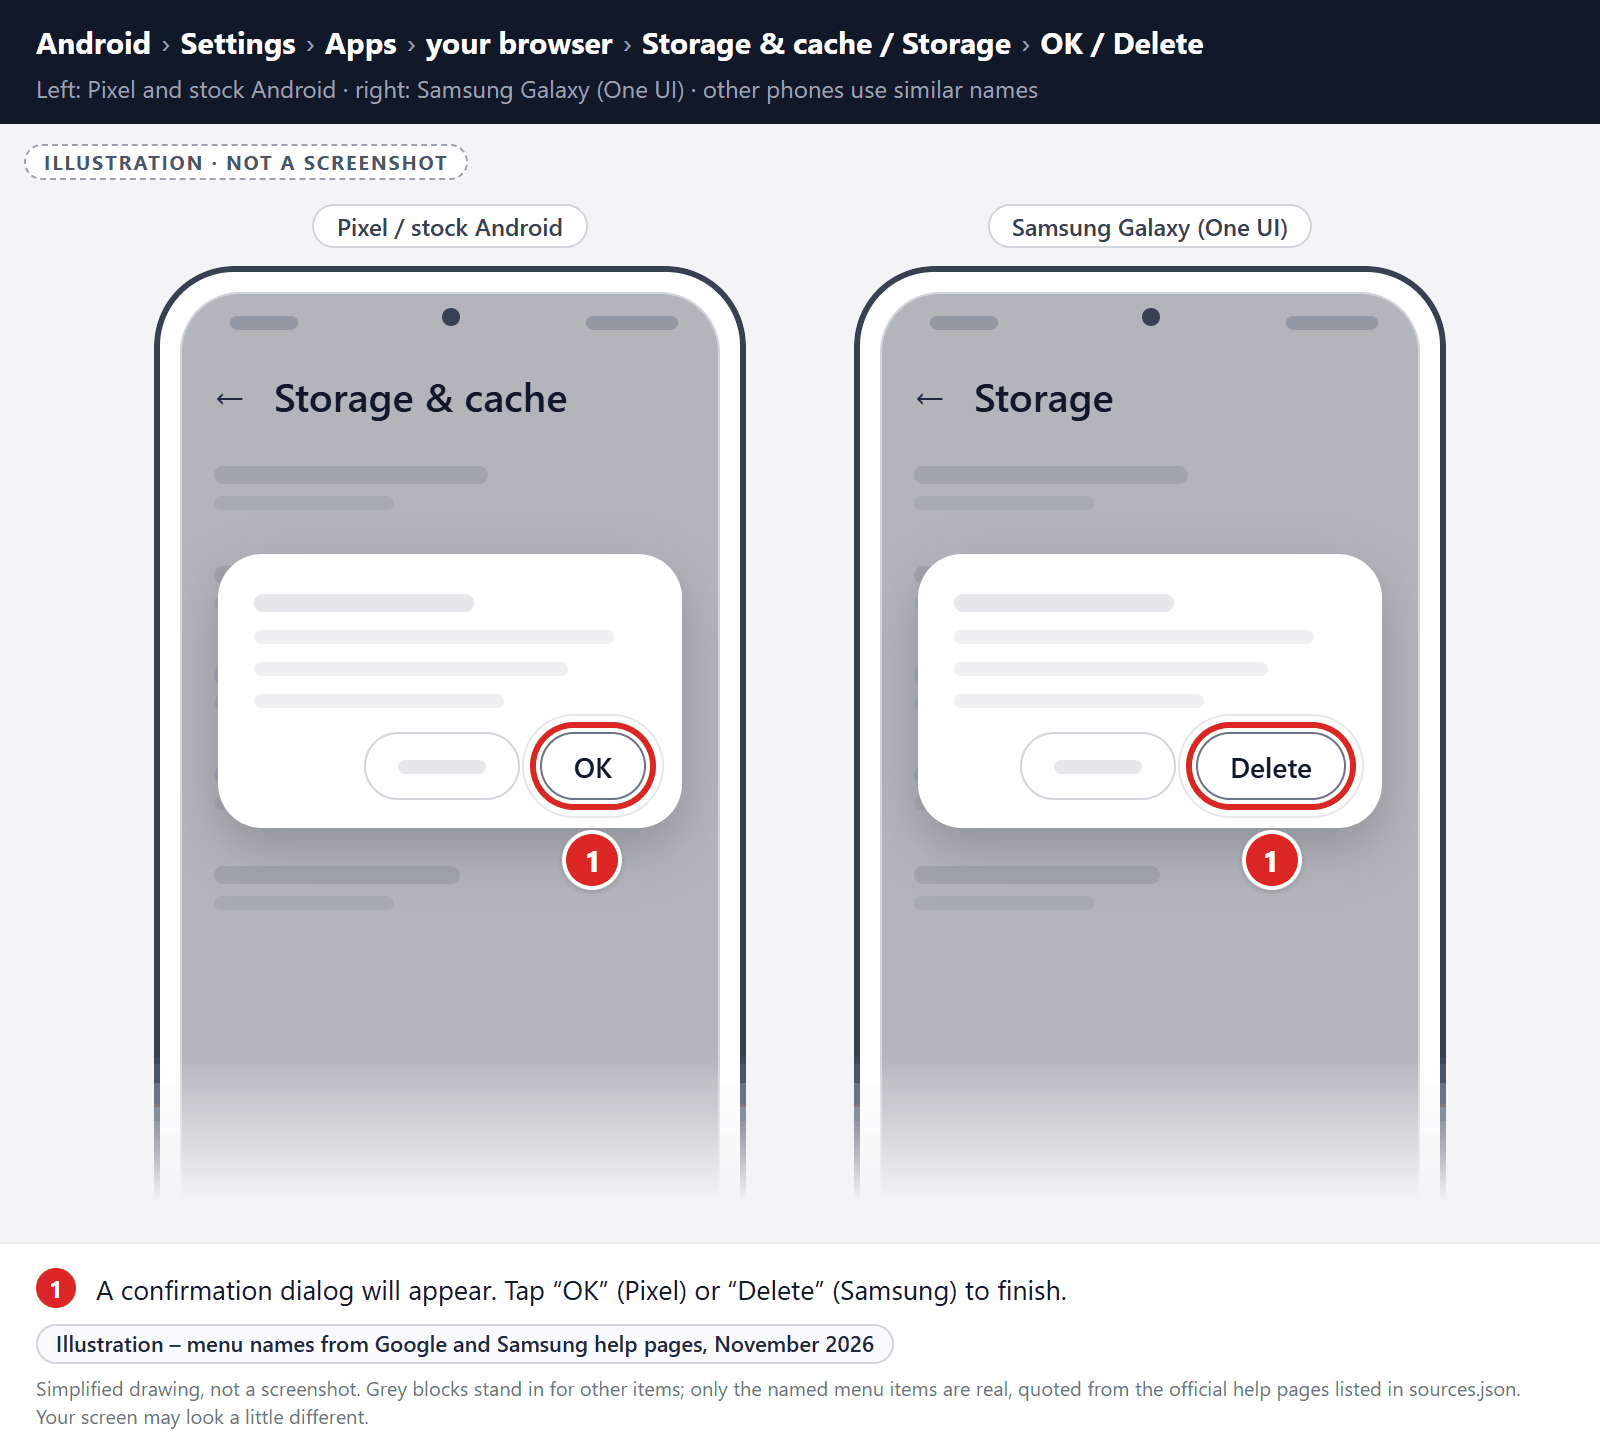
Confirm by tapping “OK”.
A confirmation dialog will appear. Tap “OK” or “Delete” to finish. When you open Firefox again, sign back in and turn sync back on if you use it.
Remove malware from the Opera browser
First, block the spam site’s notifications:
- Open Opera, open the Opera menu, and tap Settings.
- Tap Site settings, then tap Notifications.
- Find the spam site and block it. Don’t just remove it from the list, because a removed site can ask again.
If unwanted pages or redirects keep appearing, clear Opera’s storage (last resort):
-
Open the “Settings” menu.
Tap on the “Settings” app from your phone menu or home screen.
-
Tap on “Apps”.
When the “Settings” menu opens, tap on “Apps” to see all the installed applications on your phone.
-
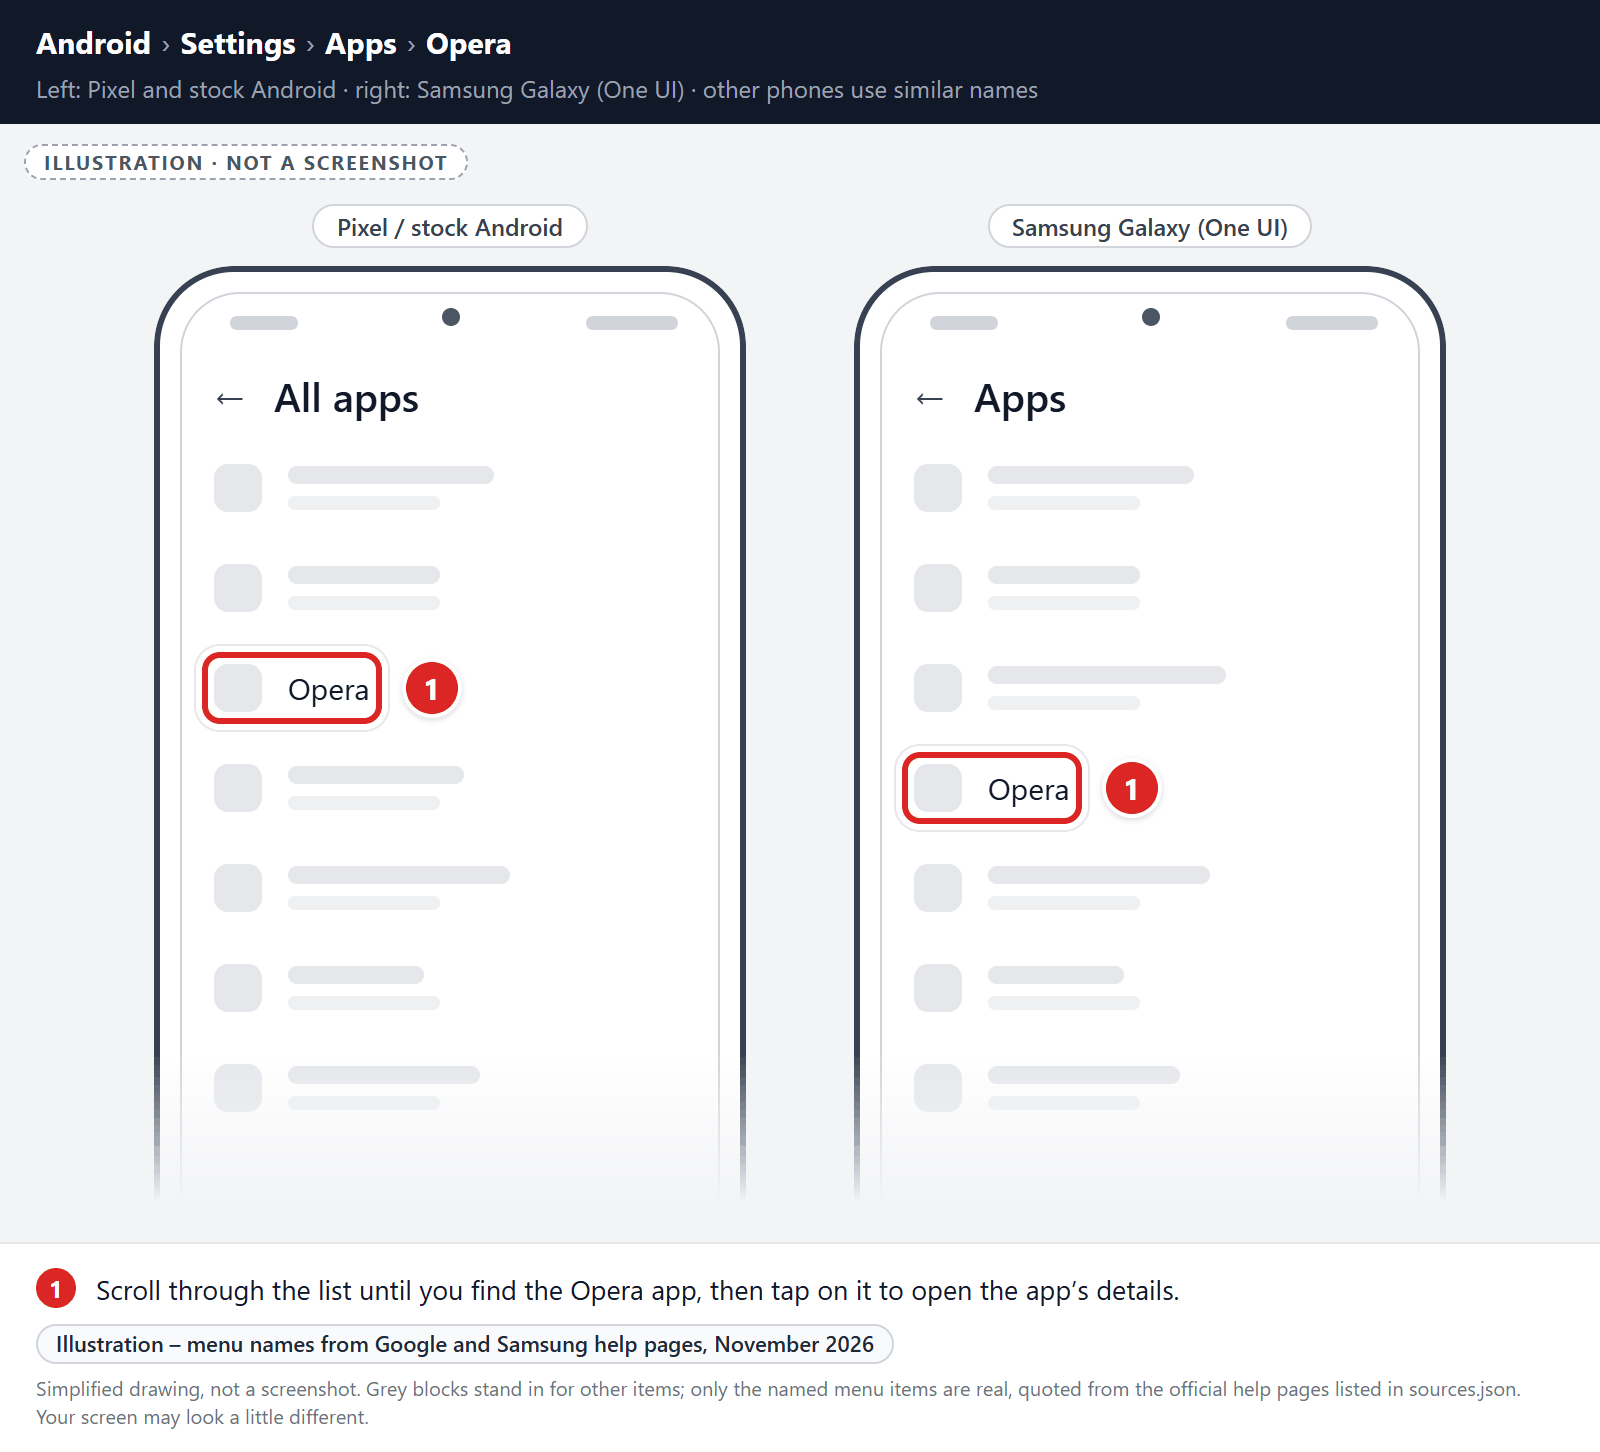
Find and tap on Opera.
The “Apps” screen will be displayed with a list of all the apps installed on your phone. Scroll through the list until you find the Opera app, then tap on it to open the app’s details.
-
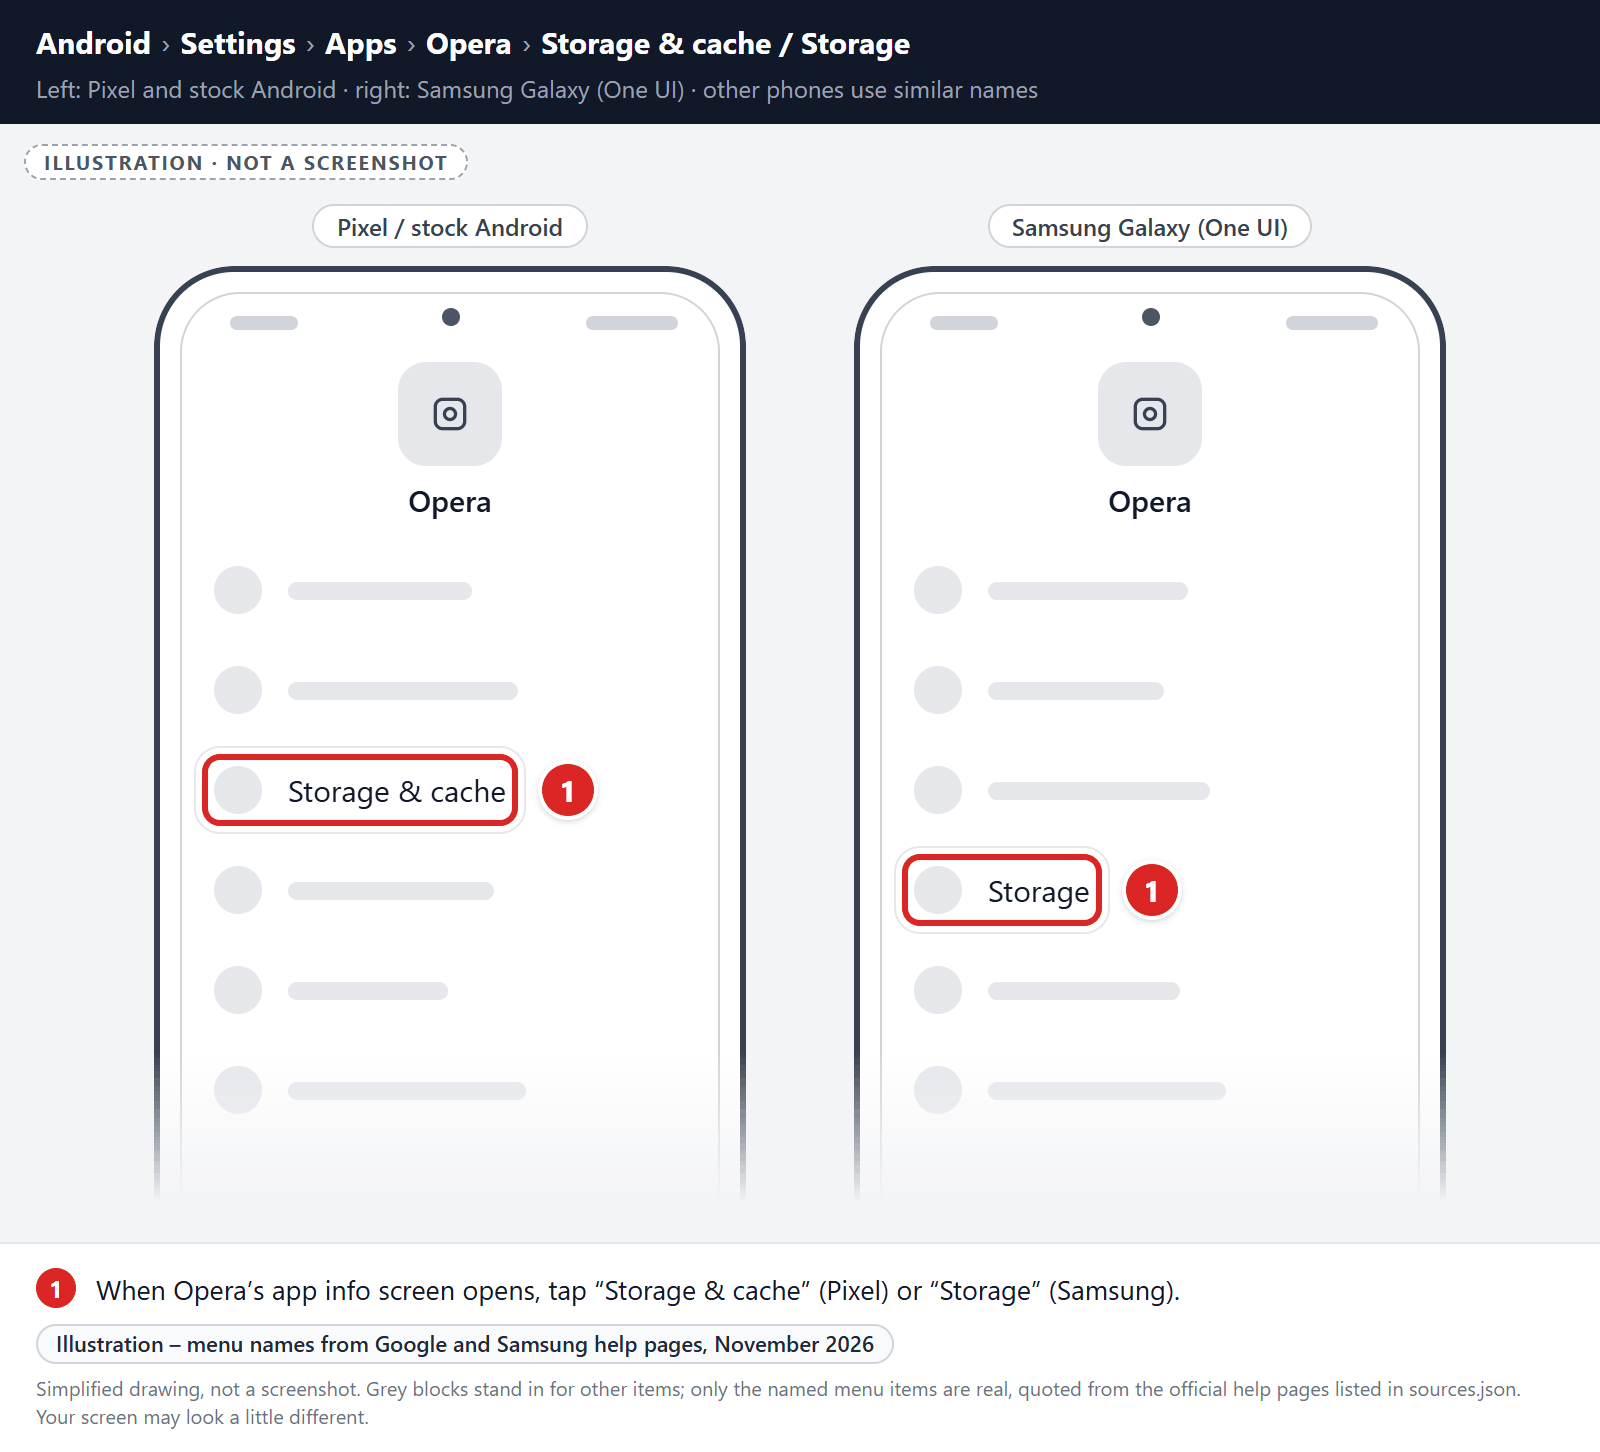
Tap “Storage”.
When Opera’s app info menu is displayed, tap on “Storage” (on Pixel phones, “Storage & cache“).
-
Tap “Clear storage” or “Clear data”.
Tap “Clear storage” (called “Clear data” on Samsung phones). If you see “Manage space” or “Manage storage” instead, tap it, then tap “Clear all data“. Don’t use “Clear cache” for this step, because it doesn’t reset the browser.
-
Confirm by tapping “OK”.
A confirmation dialog will appear. Tap “OK” or “Delete” to finish. When you open Opera again, sign back in and turn sync back on if you use it.
Remove malware from Samsung Internet
First, block the spam site’s notifications:
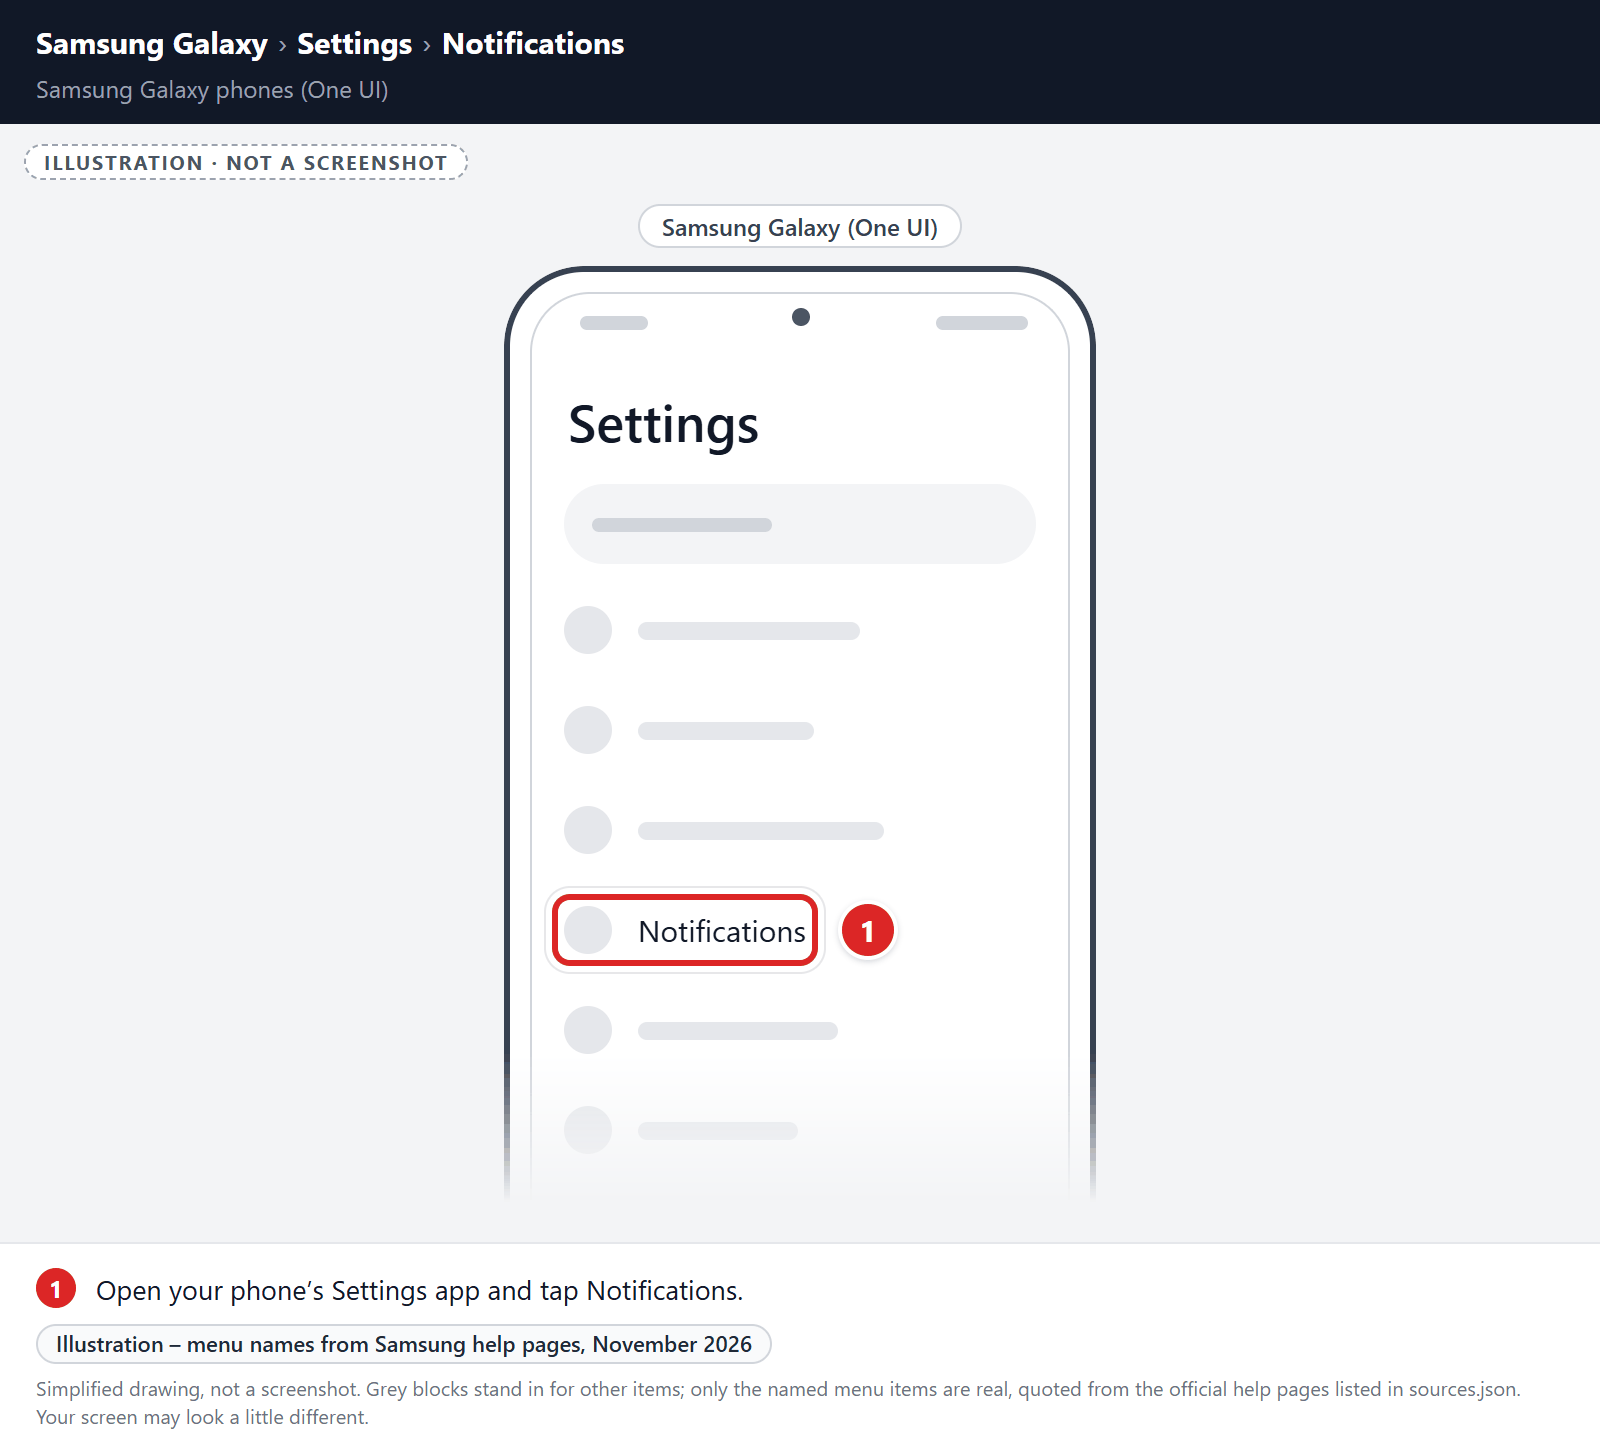
- Open your phone’s Settings app and tap Notifications.
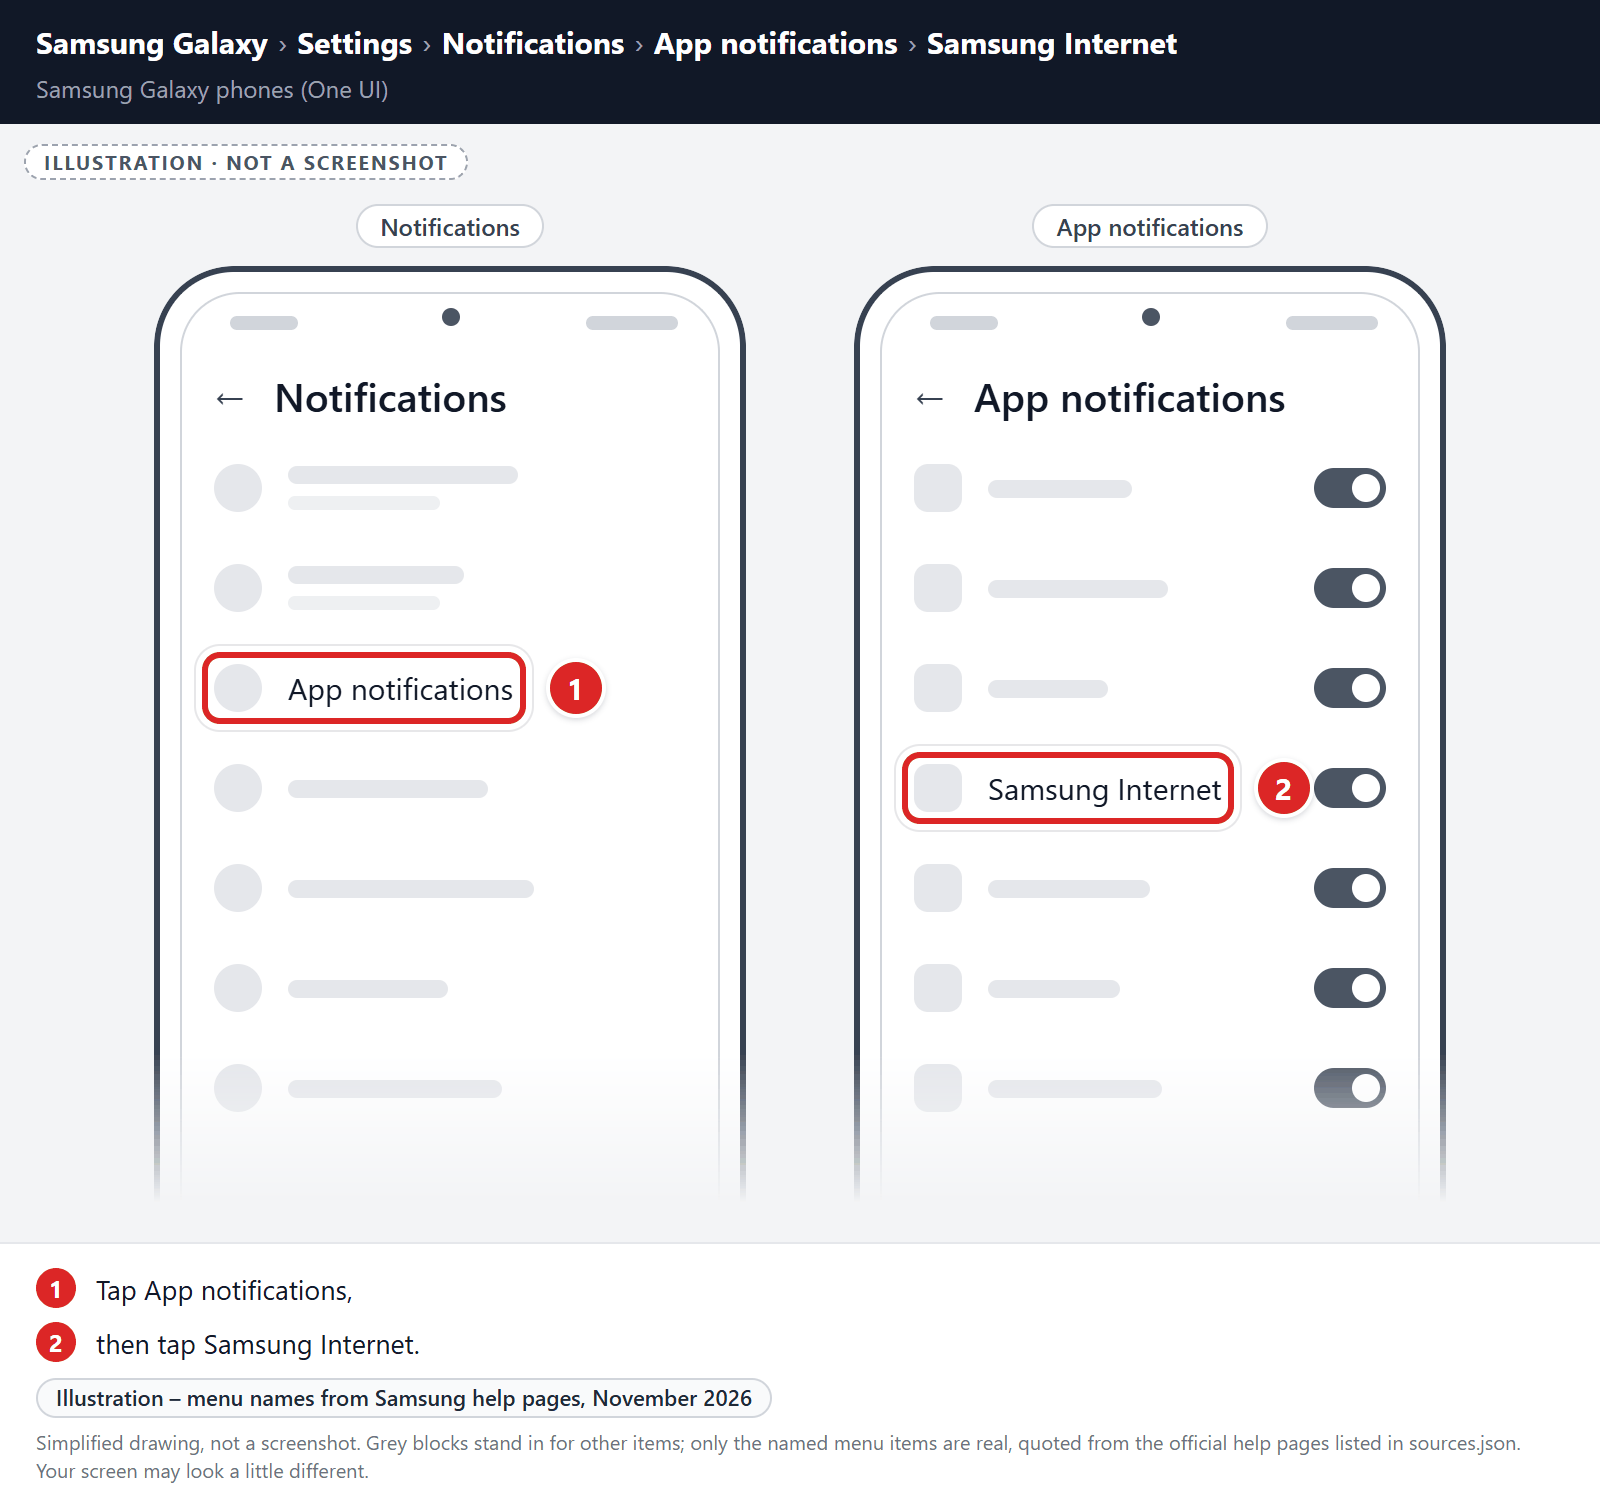
- Tap App notifications, then tap Samsung Internet.
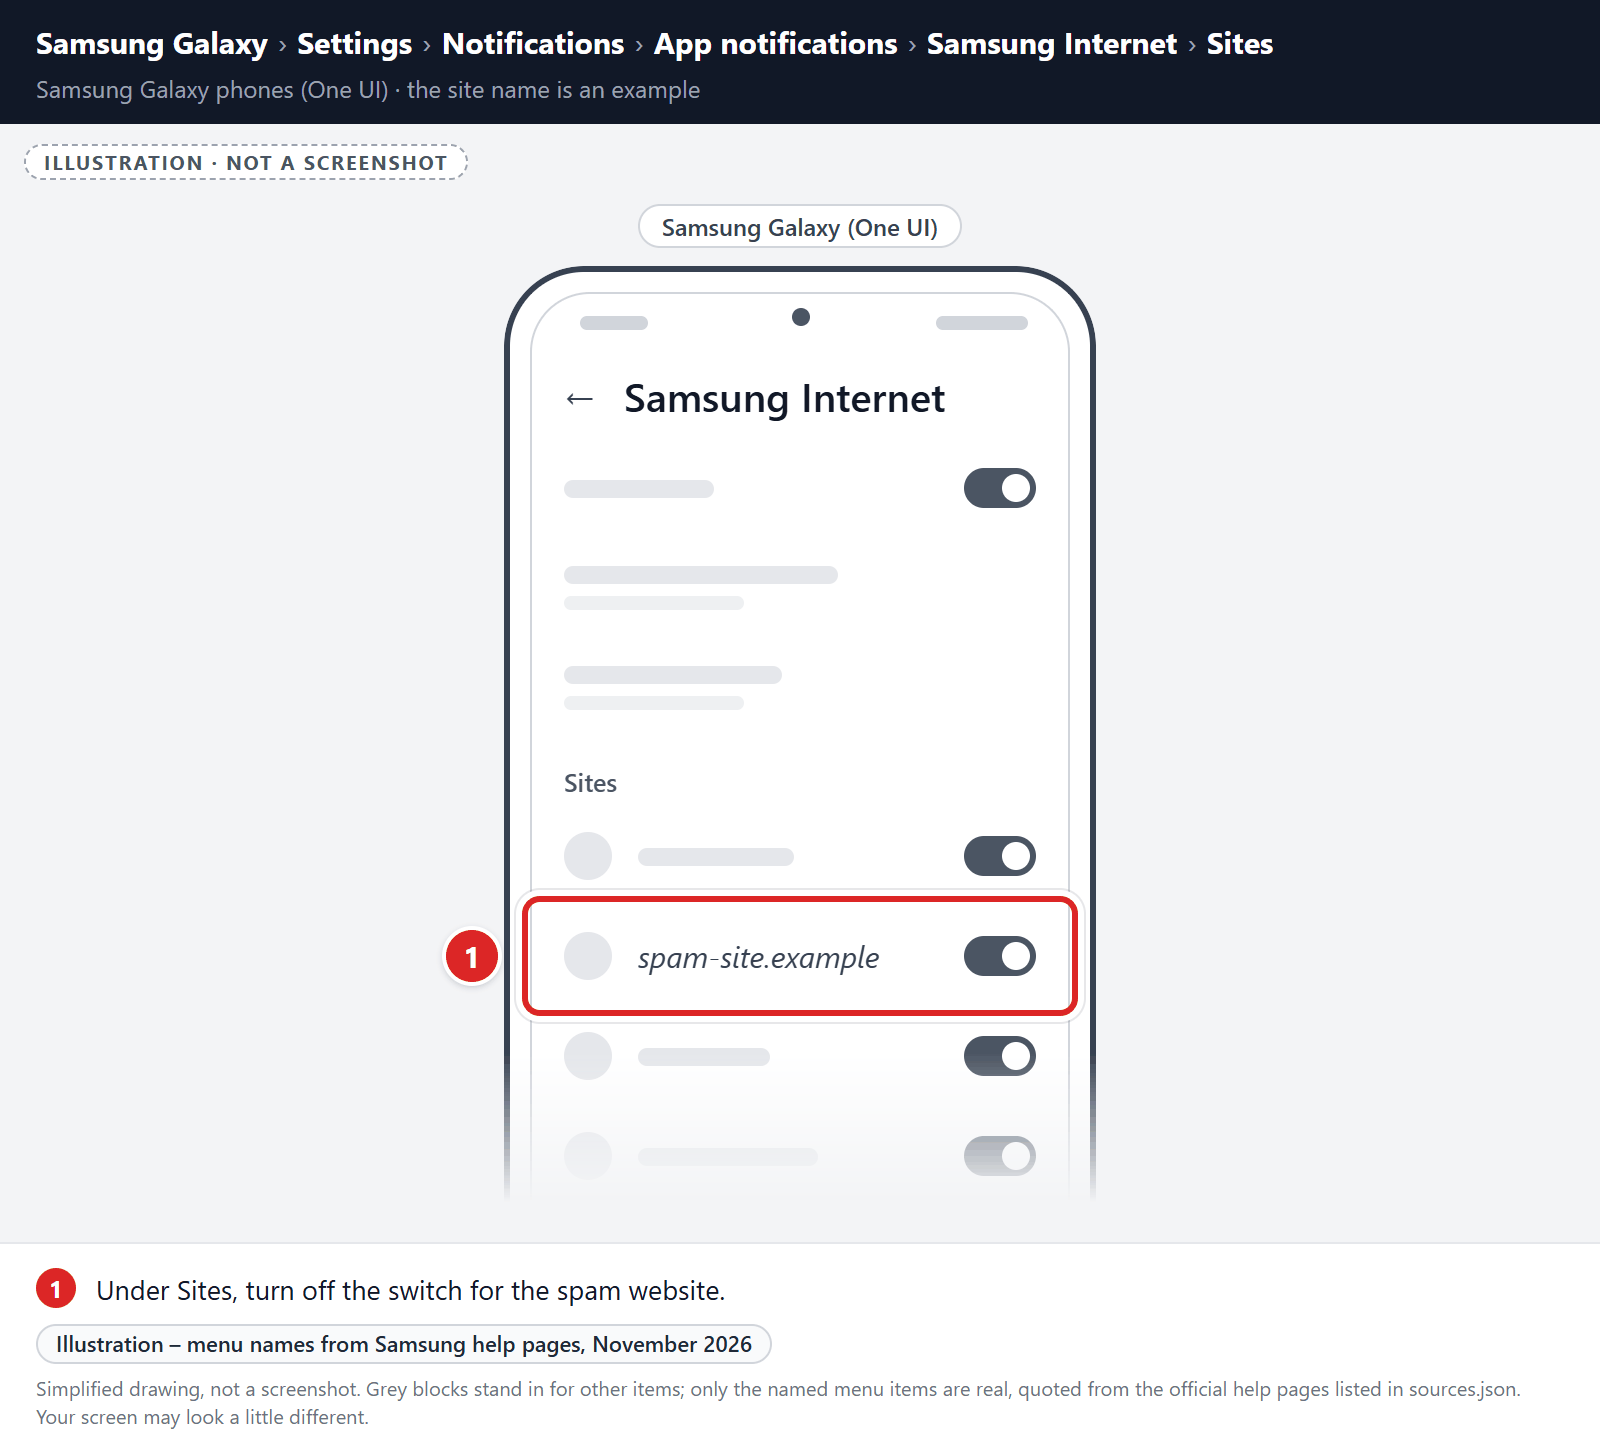
- Under Sites, turn off the switch for the spam website.
If unwanted pages or redirects keep appearing, clear Samsung Internet’s storage (last resort):
-
Open the “Settings” menu.
Tap on the “Settings” app from your phone menu or home screen.
-
Tap on “Apps”.
When the “Settings” menu opens, tap on “Apps” to see all the installed applications on your phone.
-
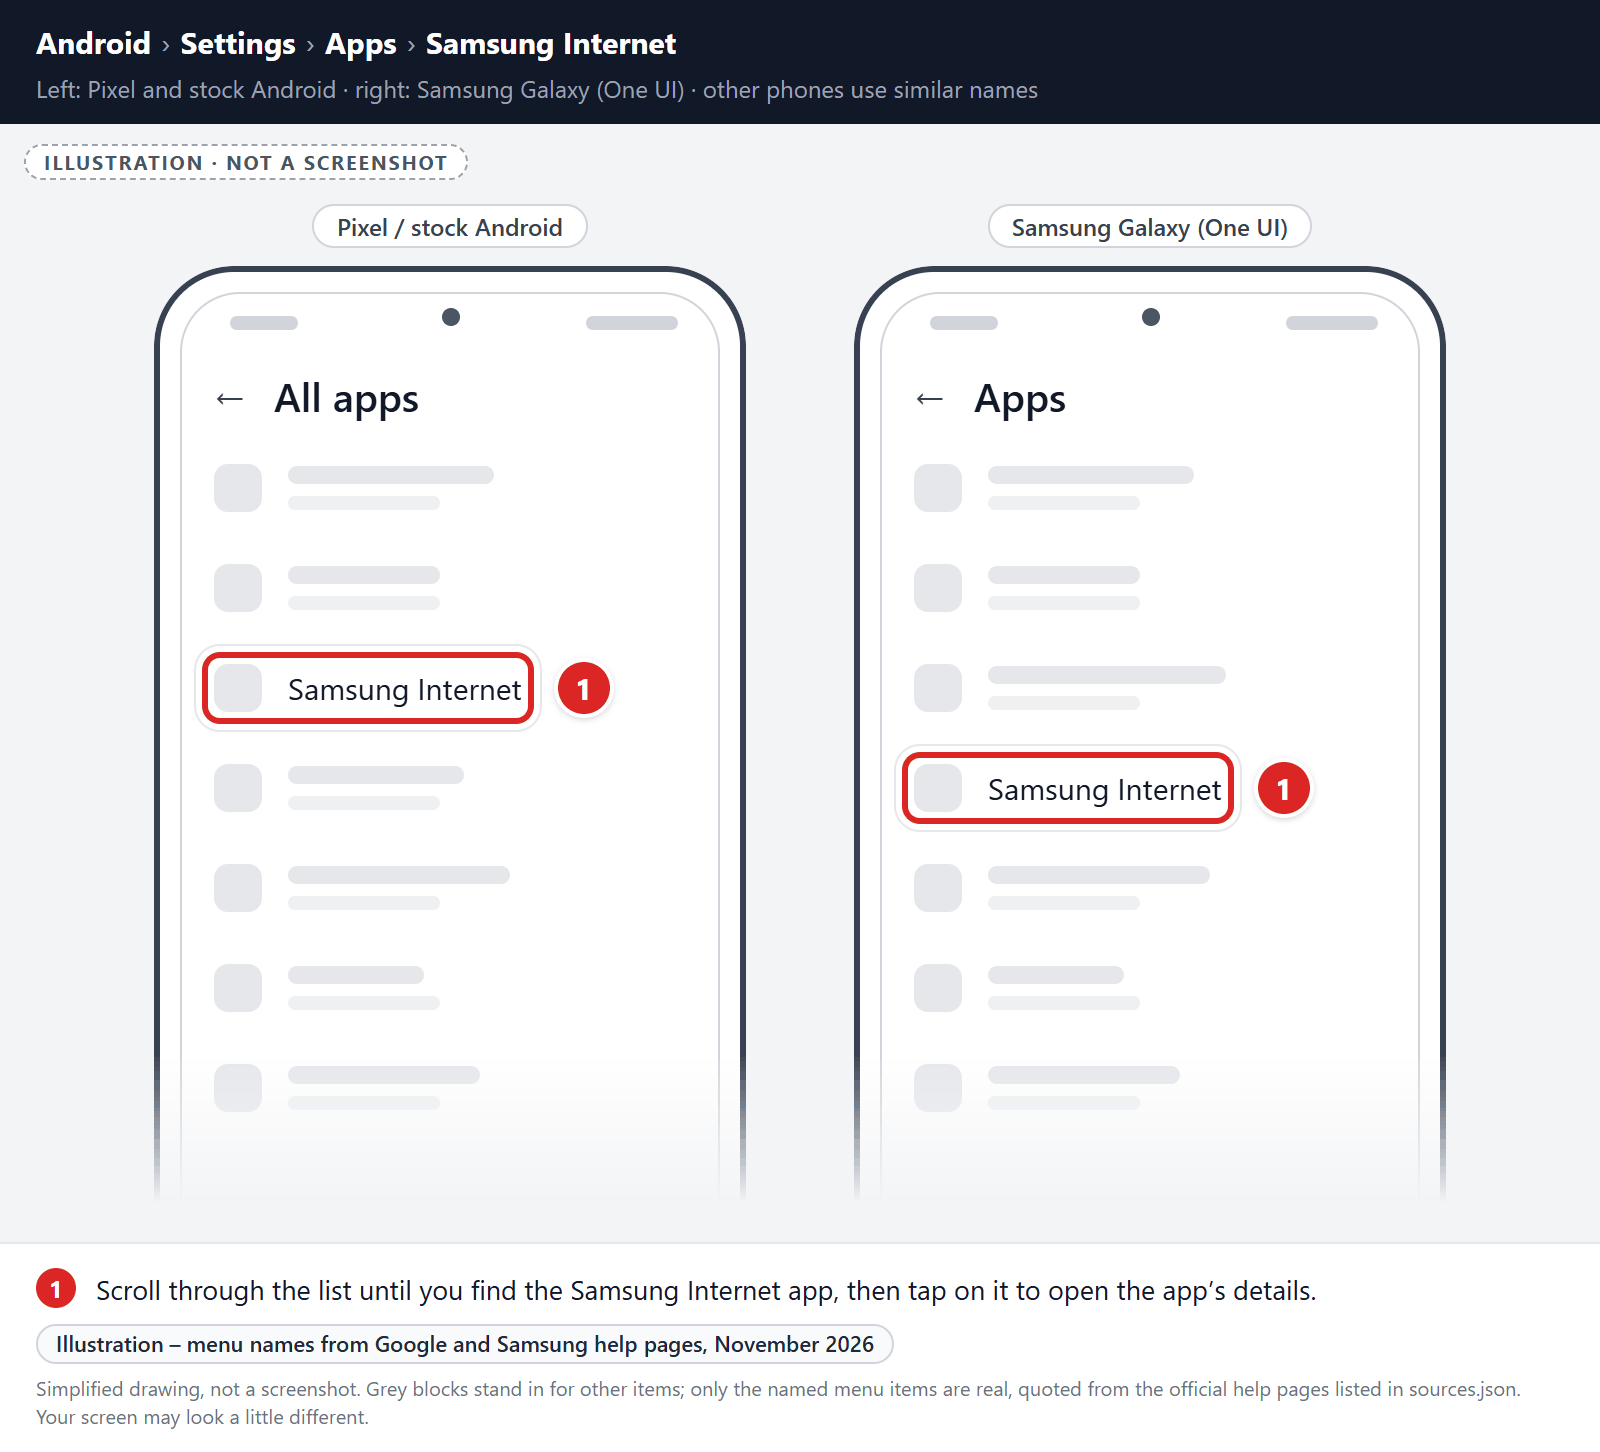
Find and tap on Samsung Internet.
The “Apps” screen will be displayed with a list of all the apps installed on your phone. Scroll through the list until you find the Samsung Internet app, then tap on it to open the app’s details.
-
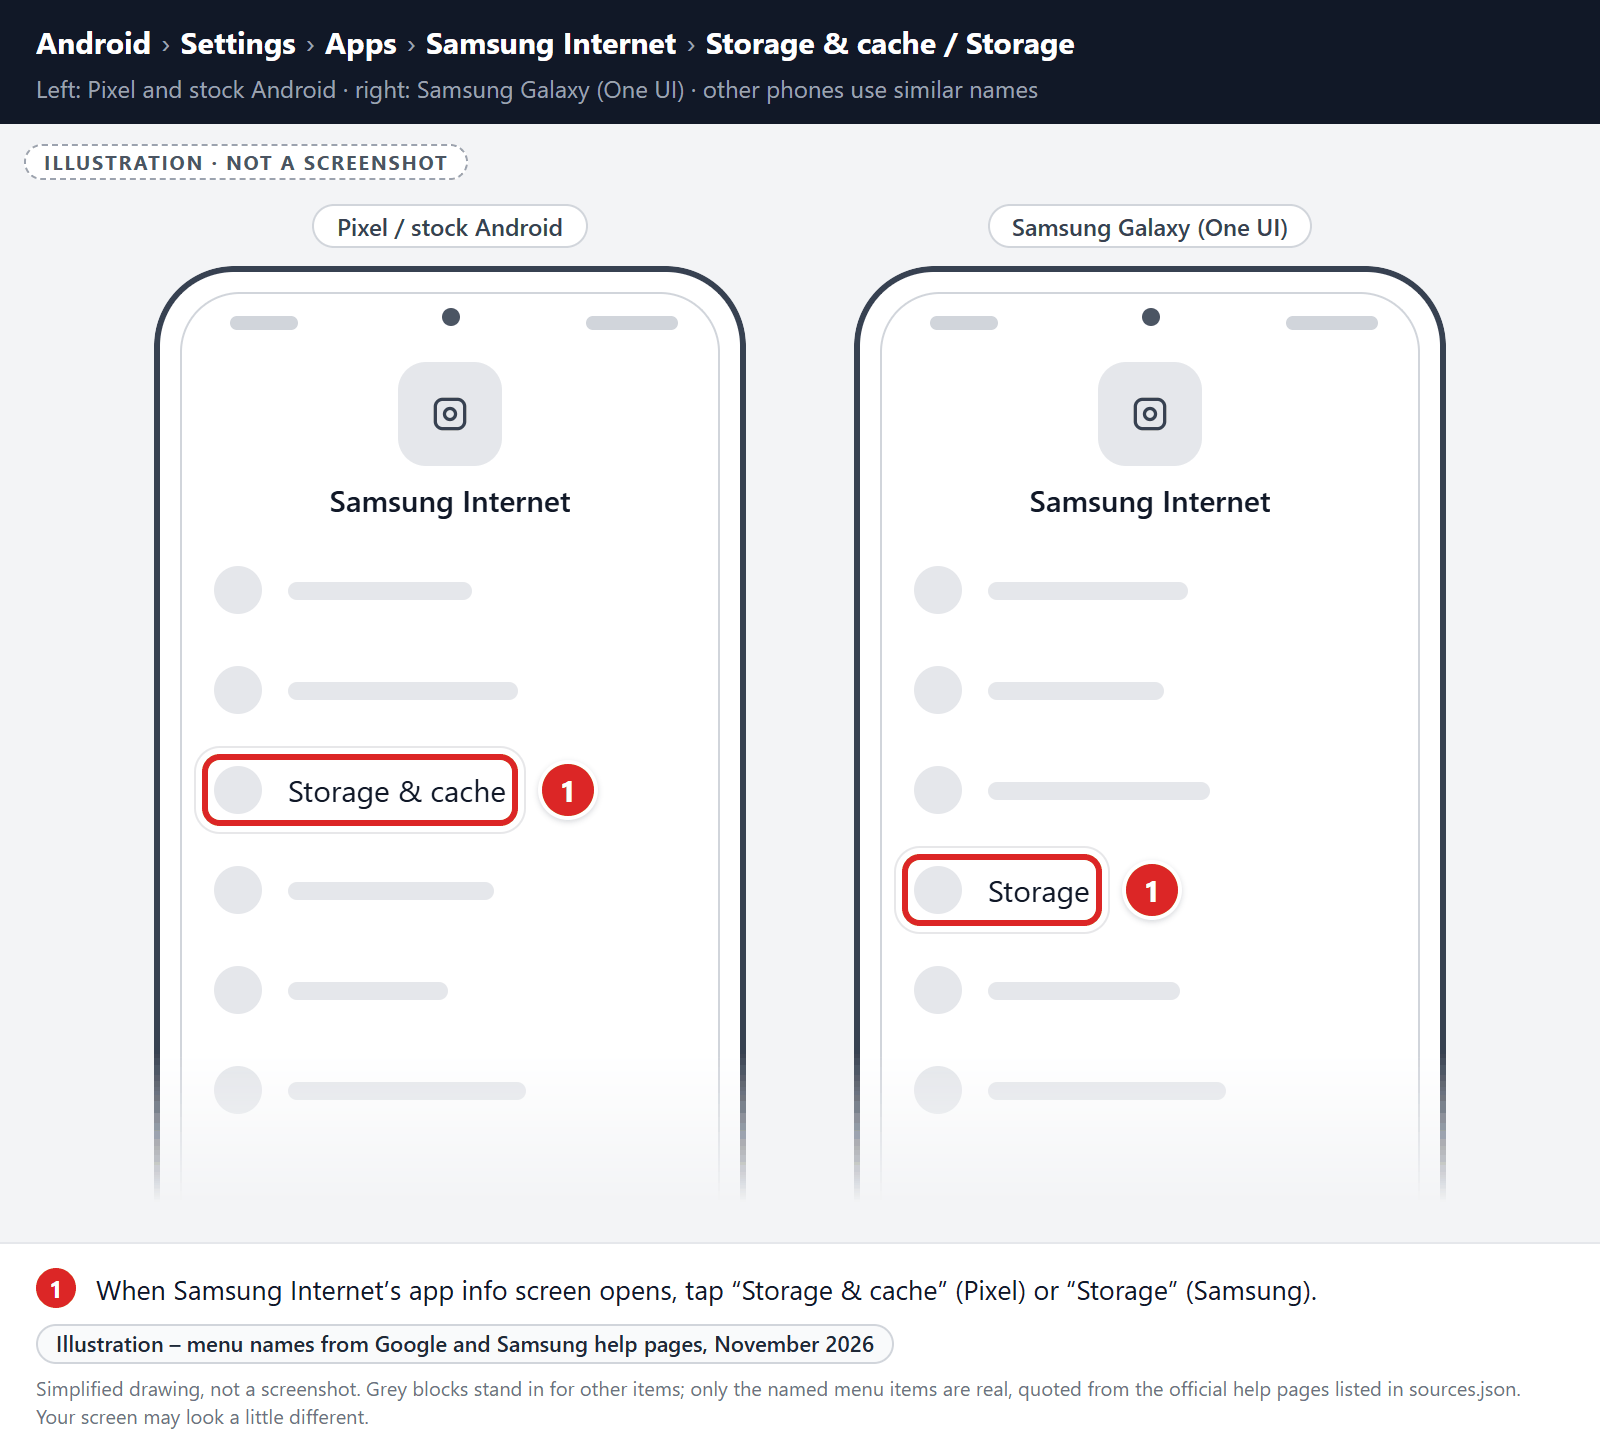
Tap “Storage”.
When Samsung Internet’s app info menu is displayed, tap on “Storage” (on Pixel phones, “Storage & cache“).
-
Tap “Clear storage” or “Clear data”.
Tap “Clear storage” (called “Clear data” on Samsung phones). If you see “Manage space” or “Manage storage” instead, tap it, then tap “Clear all data“. Don’t use “Clear cache” for this step, because it doesn’t reset the browser.
-
Confirm by tapping “OK”.
A confirmation dialog will appear. Tap “OK” or “Delete” to finish. When you open Samsung Internet again, sign back in and turn sync back on if you use it.
Remove malware from Microsoft Edge for Android
First, block the spam site’s notifications:
- Open Microsoft Edge, tap the menu button (three dots) at the bottom of the screen, and tap Settings.
- Tap Site permissions, then tap Notifications. In some versions, Site permissions is inside Privacy and security.
- Find the spam site in the list of allowed sites and switch it to Block.
If unwanted pages or redirects keep appearing, clear Microsoft Edge’s storage (last resort):
-
Open the “Settings” menu.
Tap on the “Settings” app from your phone menu or home screen.
-
Tap on “Apps”.
When the “Settings” menu opens, tap on “Apps” to see all the installed applications on your phone.
-
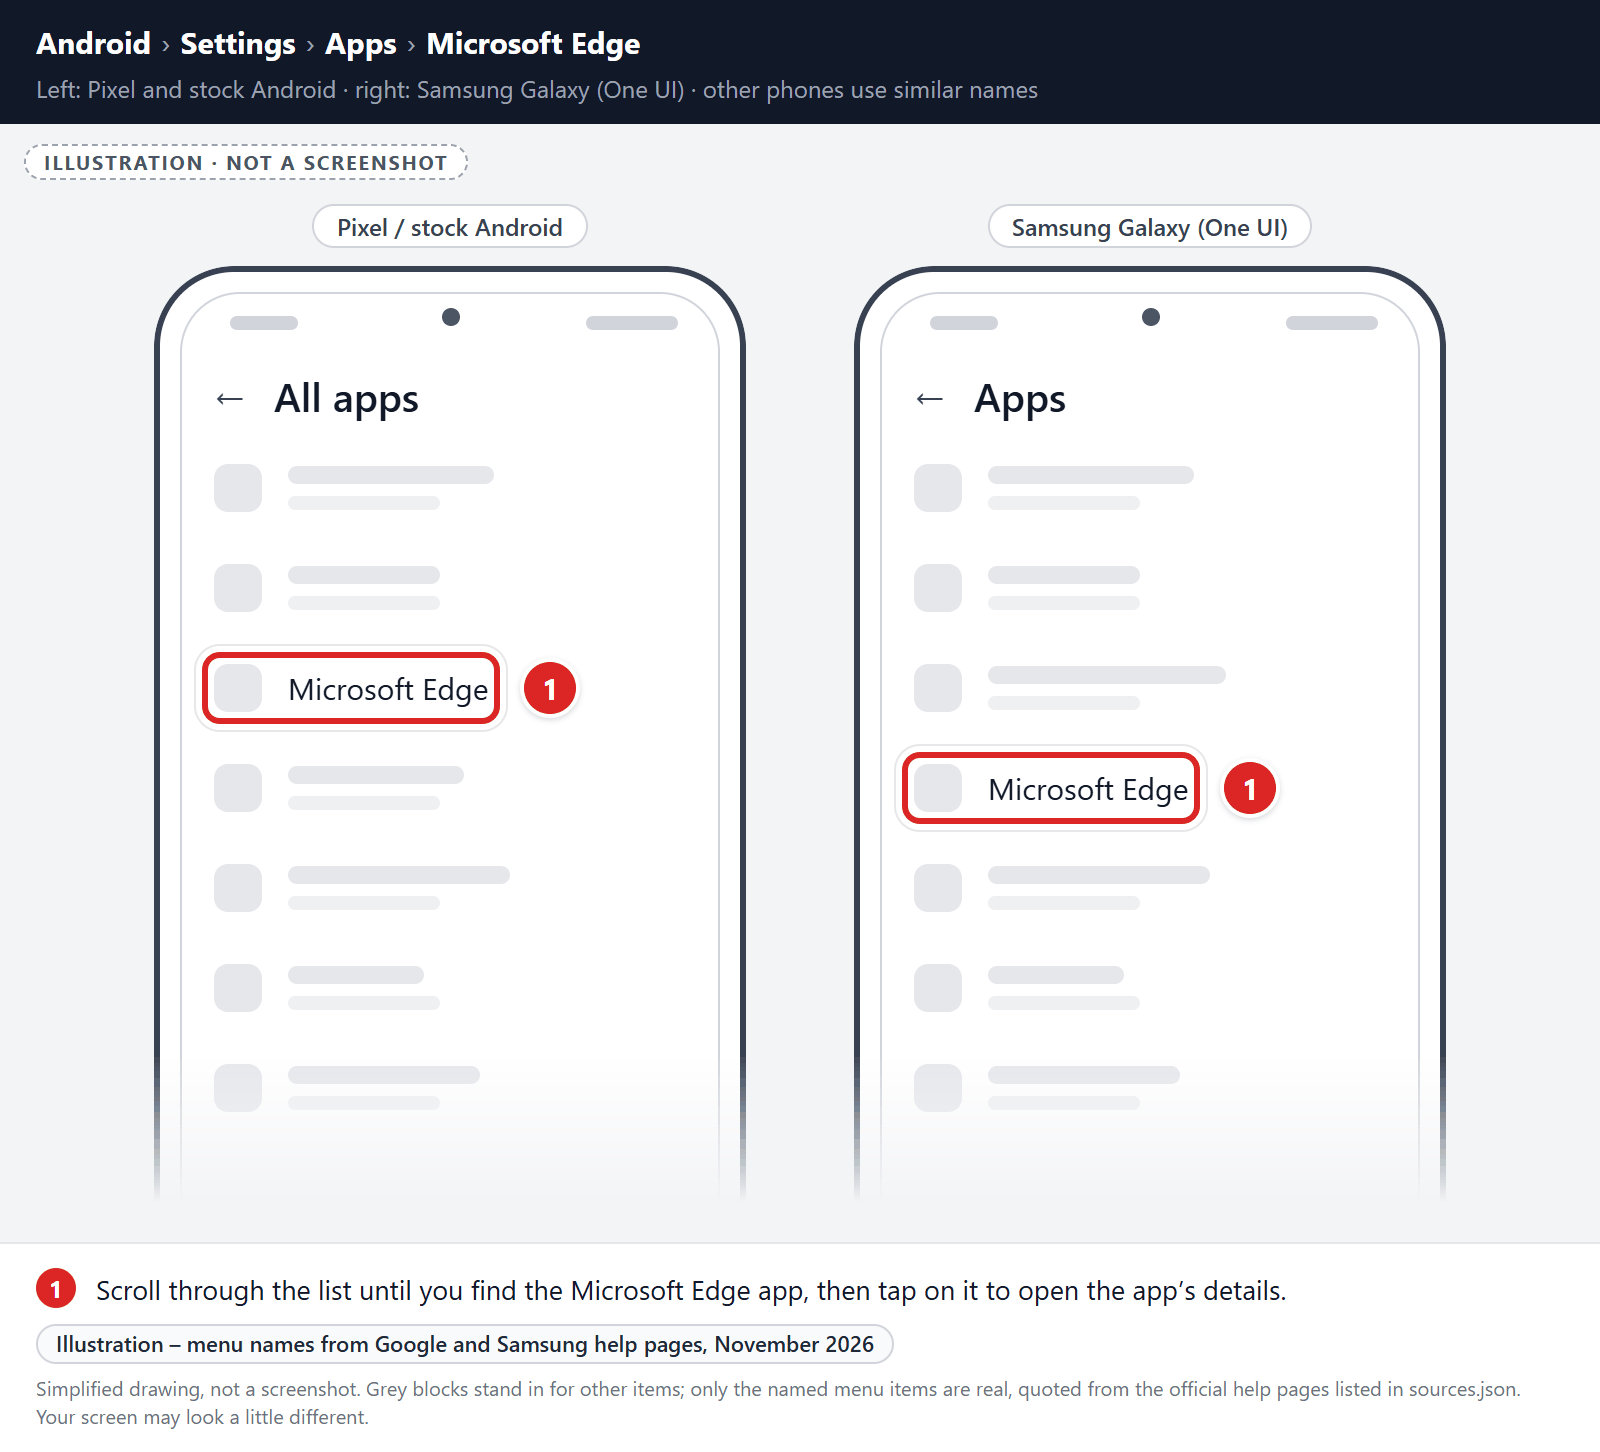
Find and tap on Microsoft Edge.
The “Apps” screen will be displayed with a list of all the apps installed on your phone. Scroll through the list until you find the Microsoft Edge app, then tap on it to open the app’s details.
-
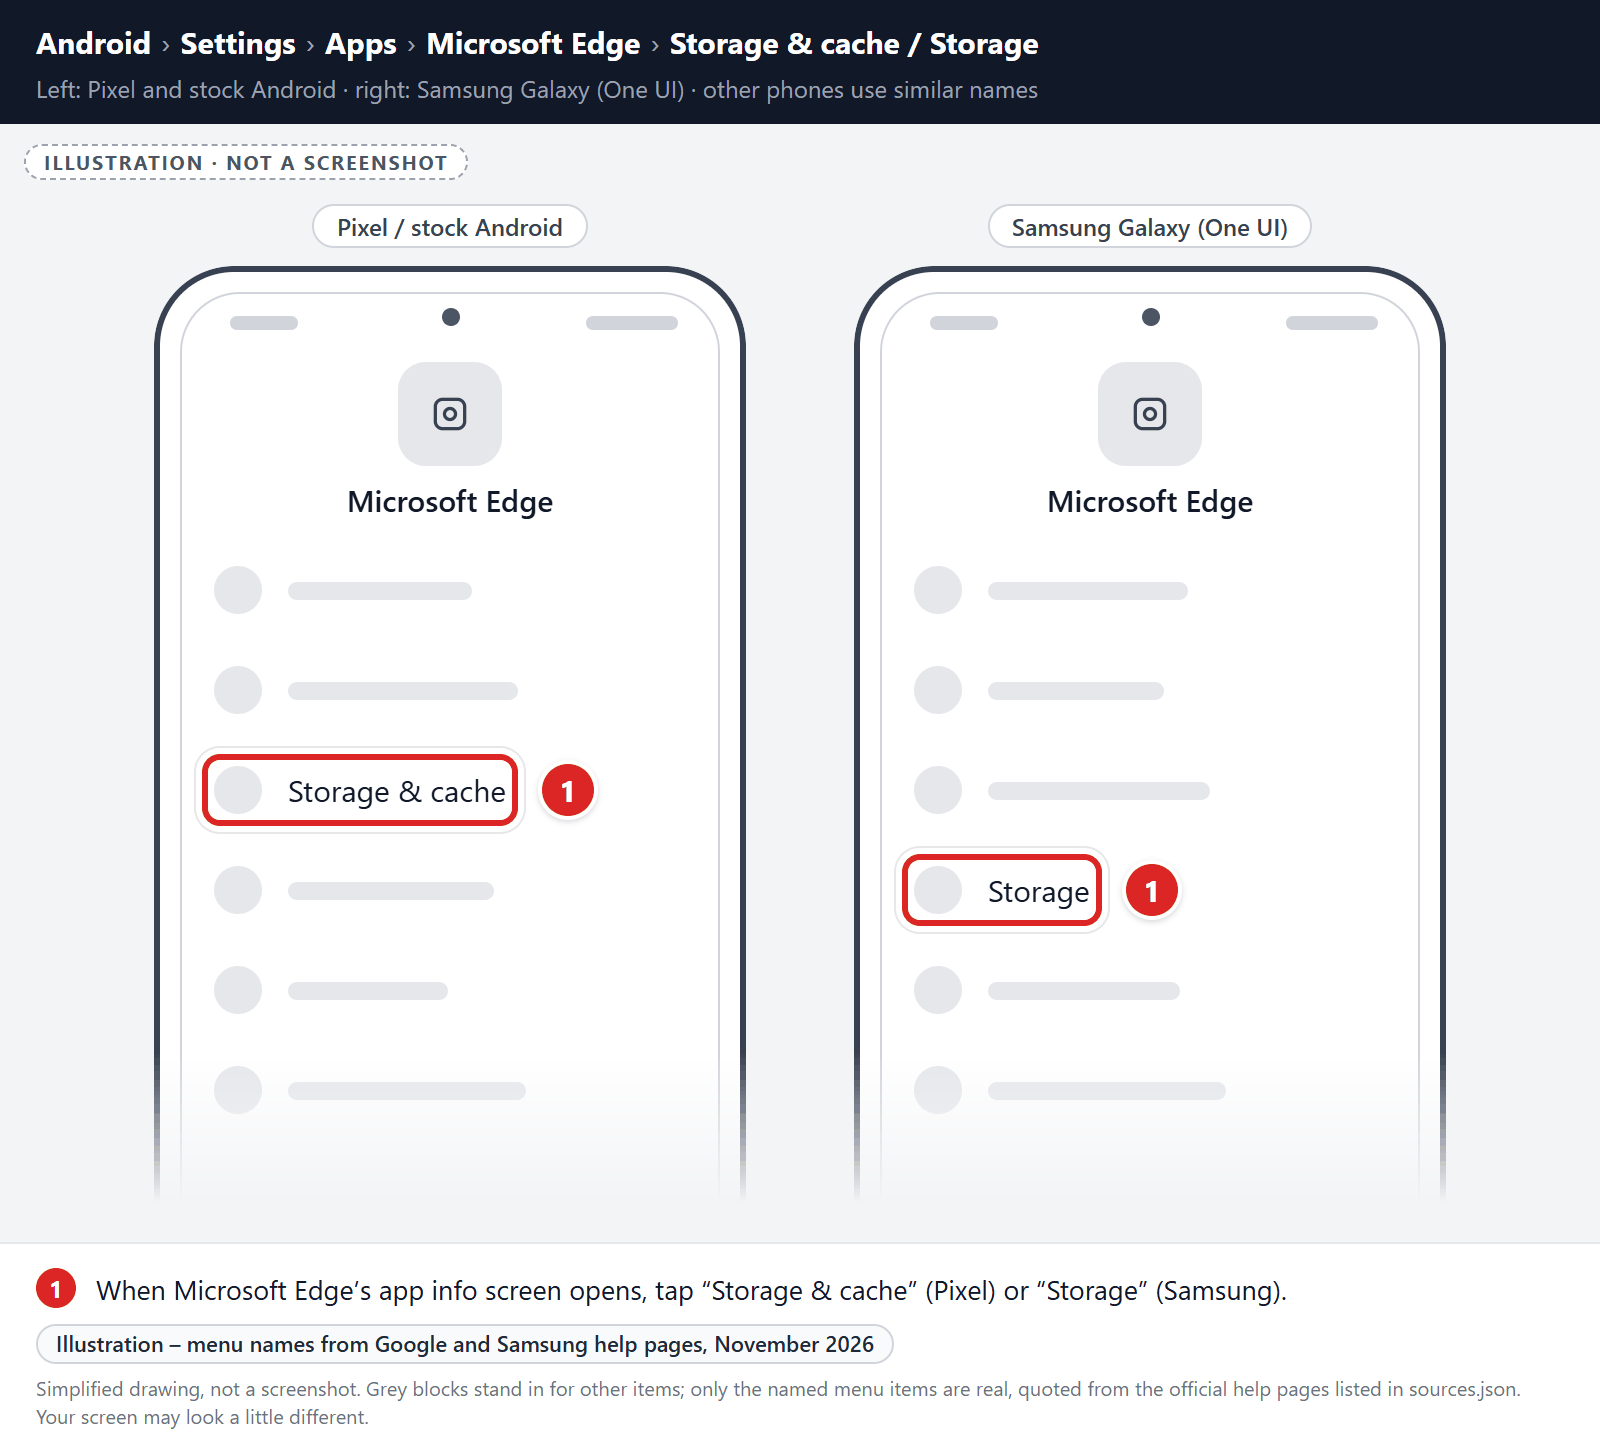
Tap “Storage”.
When the Microsoft Edge’s app info menu is displayed, tap on “Storage” (on Pixel phones, “Storage & cache“).
-
Tap “Clear storage” or “Clear data”.
Tap “Clear storage” (called “Clear data” on Samsung phones). If you see “Manage space” or “Manage storage” instead, tap it, then tap “Clear all data“. Don’t use “Clear cache” for this step, because it doesn’t reset the browser.
-
Confirm by tapping “OK”.
A confirmation dialog will appear. Tap “OK” or “Delete” to finish. When you open Microsoft Edge again, sign back in and turn sync back on if you use it.
STEP 3: Use Malwarebytes for Android to remove malicious apps
In this final step, we will install Malwarebytes for Android to scan and remove malicious apps from your phone or tablet.
Malwarebytes for Android scans your phone or tablet for malware, adware, and potentially unwanted apps. The free version scans only when you start a scan. Real-time protection, which checks apps automatically, is part of the paid Premium version.
-
Download Malwarebytes for Android.
You can download Malwarebytes for Android by clicking the link below.
Get Malwarebytes for AndroidOpens Google Play in a new tab.Want real-time protection? See Malwarebytes Premium for AndroidMalwarebytes for AndroidScans your phone and removes malware at no cost -
Install Malwarebytes for Android on your phone.
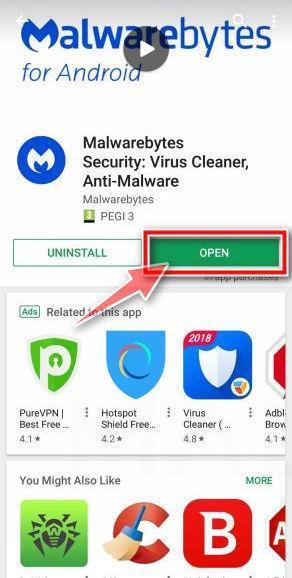
In the Google Play Store, tap “Install” to install Malwarebytes for Android on your device.
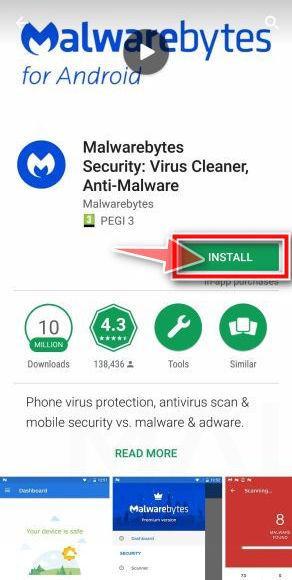
When the installation process has finished, tap “Open” to begin using Malwarebytes for Android. You can also open Malwarebytes by tapping on its icon in your phone menu or home screen.
-
Follow the on-screen prompts to complete the setup process
When Malwarebytes opens, it walks you through a short setup. Tap Get started and follow the prompts. If you see an offer for a trial or a paid plan, read it before you accept. You can skip it and keep using the free scanner.
Malwarebytes will ask for permission to access the files on your phone so it can scan them. Tap Allow, or turn on the permission in the Android screen that opens, then return to Malwarebytes.
-
Run a scan with Malwarebytes for Android
On the main screen, tap Scan now. In some versions, you open the menu, tap Scanner, and then tap Run a scan.
-
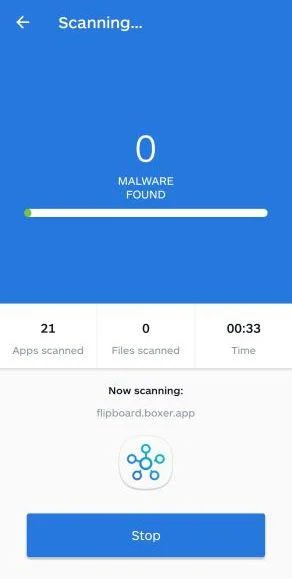
Wait for the Malwarebytes scan to complete.
Malwarebytes will now start scanning your phone for adware and other malicious apps. This process can take a few minutes, so we suggest you do something else and periodically check on the status of the scan to see when it is finished.
-
Remove the detected apps.
When the scan has been completed, you will see a list of the threats that Malwarebytes for Android has detected. Next to each detected item, tap the menu icon (three dots), then choose to uninstall the app or delete the file. Android then asks you to confirm. Tap OK or Uninstall to remove the app.
-
Restart your phone.
When the detected apps are removed, restart your phone if Malwarebytes asks you to. Then check whether the problems you noticed have stopped.
When you’ve finished these steps, check whether the problems you noticed have stopped. If they continue, see the options below.
If you are still having problems with your phone after completing these instructions, then please follow one of the steps:
- Ask for help in our Mobile Malware Removal Help & Support forum.
- Only as a last resort, reset your phone to factory settings. Read the warning below first.
- Back up your photos, videos, files, and messages, for example to your Google account or a computer.
- Make sure you know your Google account email and password. The phone asks for them after the reset. If you changed the password recently, Google recommends waiting 24 hours before you reset.
- On a Samsung phone, also make sure you know your Samsung account password.
- If you use an authenticator app for two-step verification, move your accounts to another device or save your backup codes first.
Remove Unwanted Apps and Malware from iPhone and iPad
STEP 1: Clean your browser
First, we’ll clean Safari using the built-in “Clear History and Website Data” feature. This removes your browsing history, cookies, and cached data — including the stored data that scam sites use to keep showing you pop-ups and redirects. Don’t worry: this won’t delete your photos, apps, or saved passwords, but it will sign you out of websites. To keep other sites signed in, you can remove only the scam site’s data instead: go to Settings > Apps > Safari > Advanced > Website Data, swipe left on the site, and tap Delete.
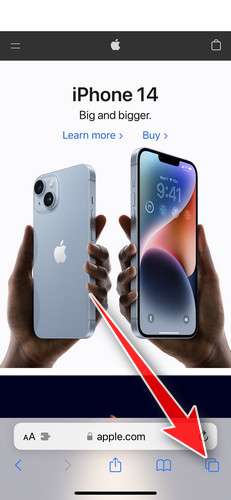
- Don’t tap anything inside the scam page or pop-up — the buttons are designed to trick you. Instead, tap the tabs icon in the lower-right corner of Safari, as shown below.
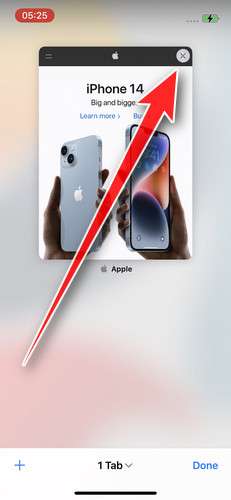
- Tap the X on the malicious tab (or swipe it up) to close it safely.
- Open the Settings app.
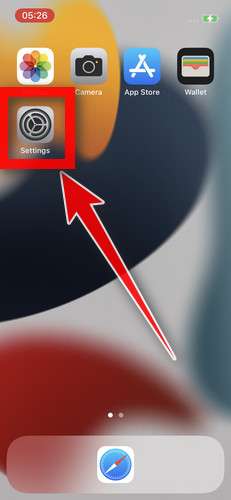
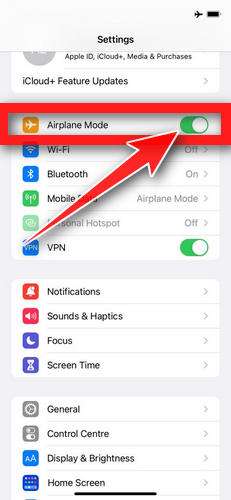
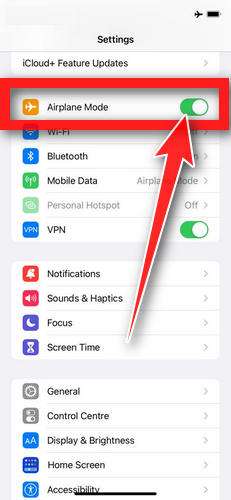
- Turn on Airplane Mode. This temporarily disconnects your iPhone from the internet, so the scam site can’t load anything while we clean up. We’ll turn it back off at the end.
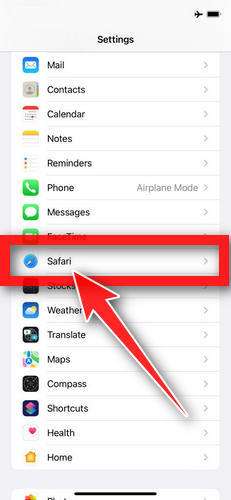
- Scroll down and tap Apps, then tap Safari. On iOS 17 and earlier, Safari is listed directly in Settings.
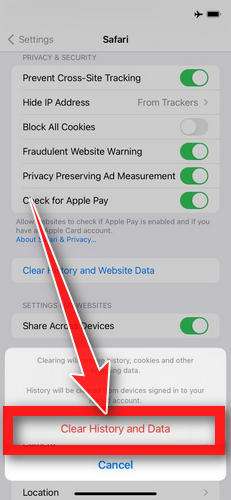
- Tap Clear History and Website Data.
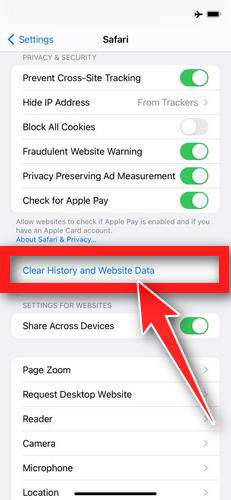
- If you’re asked to choose a timeframe, choose All history, then tap Clear History. On older iOS versions, tap “Clear History and Data” in the pop-up.
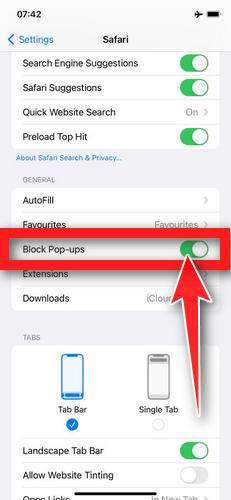
- While you’re still in Safari settings, turn on Block Pop-ups and Fraudulent Website Warning. These two switches stop most scam pages before they can even load.
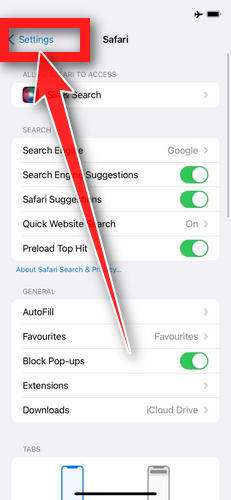
- Tap Settings in the upper-left corner to return to the main Settings menu.
- Turn Airplane Mode back off to reconnect your iPhone to the internet.
STEP 2: Delete unwanted apps
Next, we’ll remove any suspicious apps from your iPhone. If a shady website redirected you to the App Store and you installed an app — or you spot an app you don’t remember downloading — delete it now:
-
On the home screen, tap and hold the unwanted app’s icon until the icons start to wiggle.
-
Tap the minus (–) badge in the corner of the app icon, then tap Delete App. (On older iOS versions, this badge appears as an “X”.)
-
Confirm by tapping “Delete“.
Now reopen Safari and check whether the pop-ups have stopped.
To stop these scam pages from coming back, we recommend installing an ad blocker like AdGuard. It blocks the malicious ads and redirects that cause these pop-ups in the first place.
Still having issues after completing these steps? Try one of the following:
- Run a scan with Malwarebytes for iOS
- Ask for help in our free Mobile Malware Removal Help & Support forum — our team will assist you personally.
When you’ve finished these steps, check whether the pop-ups or other problems have stopped.
Frequently Asked Questions on Fake AppleCare Security Alert Scams
What are the fake AppleCare security alerts?
The fake AppleCare security alerts are fraudulent pop-up messages that appear on web browsers. These scam alerts display Apple logos and branding to pose as legitimate warnings from Apple support teams. They use alarming messages about threats or compromised data to trick users into calling fake Apple support numbers or clicking links resulting in malware being installed.
How do you identify these fake AppleCare alerts?
While appearing realistic, a closer look reveals subtle signs of phishing. Improper grammar/spelling, slightly incorrect branding colors/fonts, urgent calls-to-action, requests for personal information, and threats not cited by real diagnostic tools help uncover fake alerts. Any unsolicited pop-up demanding immediate clicks or calls should raise skepticism.
Why were these Apple support scams created?
Cybercriminals use the strong public trust in the Apple brand to add legitimacy to social engineering scams. By claiming to be Apple support teams identifying issues, they know users are more likely to follow prompts in the alerts. Scammers then install malware or charge fraudulent fees to “fix” made up problems.
What types of data or threats can these pop-up scams expose you to?
By clicking links or calling numbers in fake AppleCare alerts, you risk:
- Downloading malware – spyware, keyloggers, remote access Trojans, etc.
- Providing personal information exposing you to identity fraud
- Allowing scammers remote access to your device and accounts
- Wasting money on unnecessary or fraudulent “support services”
If I interacted with a fake AppleCare alert, what should I do now?
If you called their number or clicked any links, take these steps immediately:
- Reset all account passwords securely and enable two-factor authentication
- Run trusted antivirus scans to check for and contain potential malware
- Place fraud alerts and monitor financial statements closely for misuse of exposed data
- Perform a clean OS reinstall if scans reveal infections persist
Taking swift action can help limit damages from any potential account compromise or malware infection.
How can I prevent encountering more fake AppleCare alerts?
Exercising caution around third-party alerts and using comprehensive security tools gives the best protection:
- Use ad blockers and disable pop-ups in browsers
- Install robust antivirus software like Norton Security or TotalAV
- Be wary of unsolicited warnings demanding immediate action
- Verify any claims directly through official Apple support channels
Staying vigilant when browsing and not blindly trusting alerts with Apple branding helps users steer clear of tech support payment scams.
What should I do if I spot a fake AppleCare alert?
If you identify a deceptive AppleCare themed pop-up or tech support scam, make sure to:
- Report the site, links, and phone numbers to Apple Support
- Notify cybersecurity teams at Google Safe Browsing and VirusTotal
- Warn social media contacts not to trust requests coming from the scam
Proactive reporting helps curb these fraud campaigns and protects other users from compromise going forward.
The Bottom Line on Fake “AppleCare Security Alerts”
Cybercriminals are ramping up highly convincing support scam tactics involving Apple as it continues leading in sales and customer satisfaction. Luring visitors from across the web via tainted sites and ads, fake “AppleCare Security Alert” pop-ups leverage public trust in the revered brand to dupe victims into downloading malware or sharing sensitive personal information.
With compelling graphics, professional formatting, and urgent warnings, these support scam pop-ups play to user fears of compromised security to deliver convincing social engineering tactics. Yet careful scrutiny of language, branding, links, and overall legitimacy can reveal red flags before falling victim. And learning to visit trusted diagnostic sources like Activity Monitor instead of trusting third-party alerts proves critical.
Nonetheless, increased user education is desperately needed, as these fake pop-ups manage to deceive countless users into compromising devices or losing money to overseas fraudsters. But by spotlighting the real infrastructure and con artist techniques powering this prolific scam, we can empower the public to evade these prevalent phishing techniques – and preferably disable the shady actors in the process through diligent reporting.
Stay vigilant out there and think twice before trusting any out-of-context security alerts bearing the Apple name. Lean on official tools and diagnostics before ever clicking links or calling numbers promoted through unsolicited pop-up activity. In taking sensible precautions and learning to identify subtle scam hallmarks, Apple fans can enjoy their devices while steering clear of cybercriminal ploys.

Join the discussion
0 commentsShare your experience or ask a question about this article.
Discussion
Start the conversation
Have a question or something useful to share? Add the first comment.