

AutoUpdater.exe is a file that you may come across on your computer, and it often raises questions about its purpose and whether it is safe to keep or remove. In this article, we will delve into the details of AutoUpdater.exe, discuss whether you should remove it, and determine if it is malware or not.
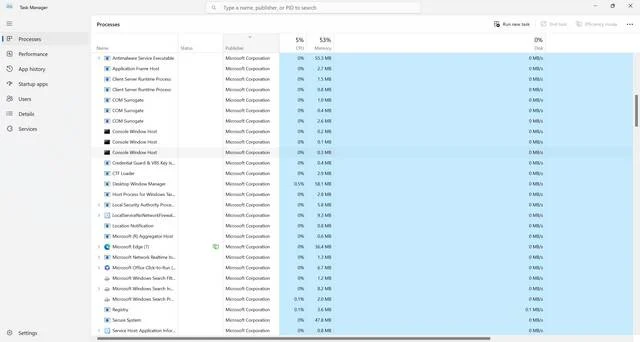
What is AutoUpdater.exe?
AutoUpdater.exe is a legitimate executable file that is commonly associated with software update mechanisms. It is often found in the installation folders of various applications, especially those that require regular updates to ensure optimal performance and security.
When you install a program that utilizes AutoUpdater.exe, it enables the software to automatically check for updates and download them if available. This feature saves users the hassle of manually searching for updates and ensures that they are using the latest version of the software.
Should I Remove AutoUpdater.exe?
Whether you should remove AutoUpdater.exe depends on the specific circumstances and your preferences. Here are a few factors to consider:
1. Legitimate Software:
If AutoUpdater.exe is associated with a legitimate software application that you use and trust, it is generally recommended to keep it. Removing AutoUpdater.exe may prevent the software from receiving important updates, which could lead to security vulnerabilities or performance issues.
2. Suspicious Behavior:
If you notice any suspicious behavior related to AutoUpdater.exe, such as excessive resource usage, unexpected network activity, or frequent crashes, it could indicate a potential problem. In such cases, it is advisable to investigate further and consider removing the file if it is confirmed to be malicious.
3. Malware Detection:
If your antivirus software or malware scanner identifies AutoUpdater.exe as malware, it is crucial to take immediate action. Follow the recommendations provided by your security software, which may include quarantining or removing the file.
4. Unnecessary Updates:
In some cases, you may find that certain software applications constantly prompt for updates, causing interruptions and consuming system resources. If you find these updates unnecessary or disruptive, you can consider disabling or removing AutoUpdater.exe for that specific software.
Is AutoUpdater.exe Malware?
AutoUpdater.exe itself is not inherently malware. It is a legitimate file used by many software applications to facilitate automatic updates. However, like any executable file, it can be exploited by malicious actors to deliver malware or perform malicious activities.
It is essential to differentiate between the legitimate AutoUpdater.exe and potential malware that may disguise itself as AutoUpdater.exe. Malware can use similar names or locations to deceive users and avoid detection. Therefore, it is crucial to verify the file’s authenticity and ensure it is from a trusted source.
If you suspect that AutoUpdater.exe on your system is malware, it is recommended to perform a thorough scan using reliable antivirus software. Malwarebytes Free is a reputable antivirus tool that can help detect and remove malware effectively.
Is Your Device Infected? Run a Free Malware Scan
Slow performance, constant pop-ups, or strange behavior? These are classic signs of a malware infection. The fastest way to find out is to scan your device with Malwarebytes Free — one of the most trusted malware removal tools available.
The free version detects and removes the most common threats, including:
- Adware — the cause of those annoying pop-ups
- Browser hijackers — unwanted redirects and changed homepages
- Trojans and spyware — hidden programs stealing your data
- Potentially unwanted programs (PUPs) — software you never asked for
👉 Select your device below — Windows, Mac, or Android — then follow the simple steps to download Malwarebytes, scan your system, and remove any threats it finds. The scan usually takes 5 to 20 minutes.
Run a Malware Scan with Malwarebytes for Windows
Malwarebytes is one of the most popular and trusted anti-malware tools for Windows — and it’s completely free for removing infections. It catches threats that many antivirus programs miss, including adware, browser hijackers, and trojans. Follow the steps below to scan and clean your PC in just a few minutes.
Download Malwarebytes
Click the button below to download the latest version of Malwarebytes for Windows from the official source. The free version is all you need — it will scan your computer and remove adware, browser hijackers, and other malicious software at no cost.
Download MalwarebytesOfficial installer for Windows 11 and 10. Your download starts right away.Want real-time protection? See Malwarebytes Premium Malwarebytes Free for WindowsScans and removes malware at no cost
-
Install Malwarebytes
When the download finishes, open your Downloads folder and double-click the MBSetup file. If Windows shows a User Account Control pop-up, click “Yes” to allow the installation.
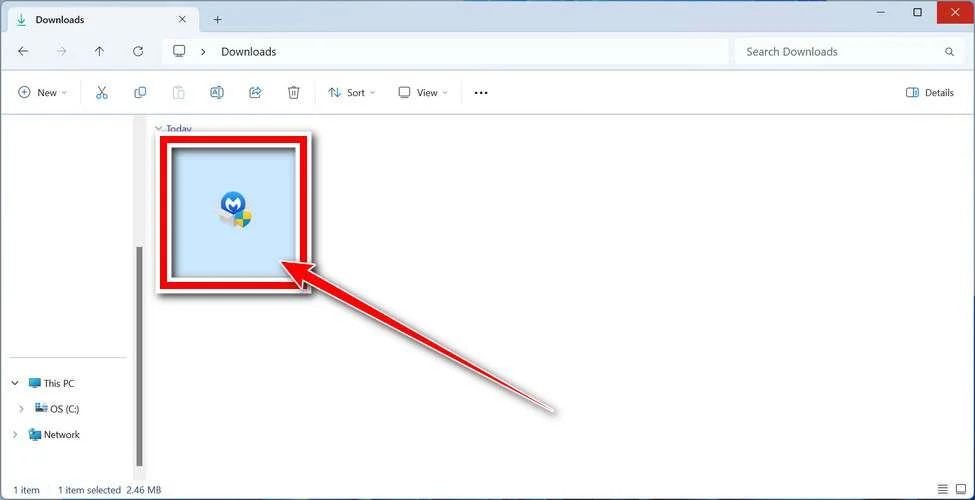
Follow the On-Screen Prompts to Install Malwarebytes
The setup wizard will walk you through a few quick screens:
-
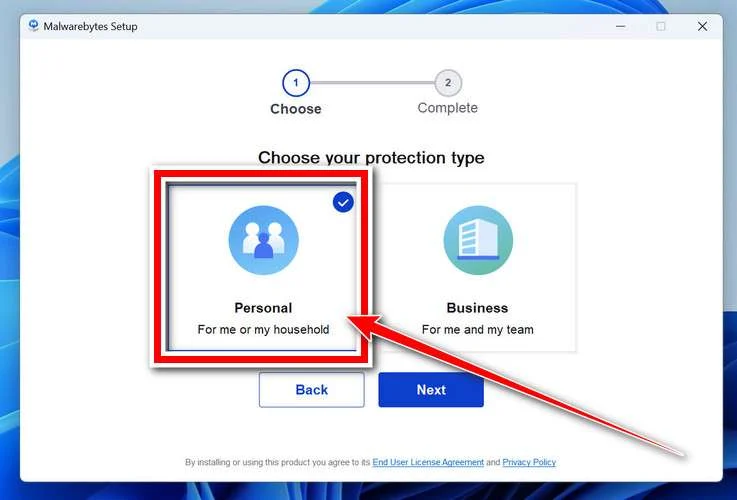
Choose where you’re installing the program — “Personal Computer” or “Work Computer” — then click Next.
-
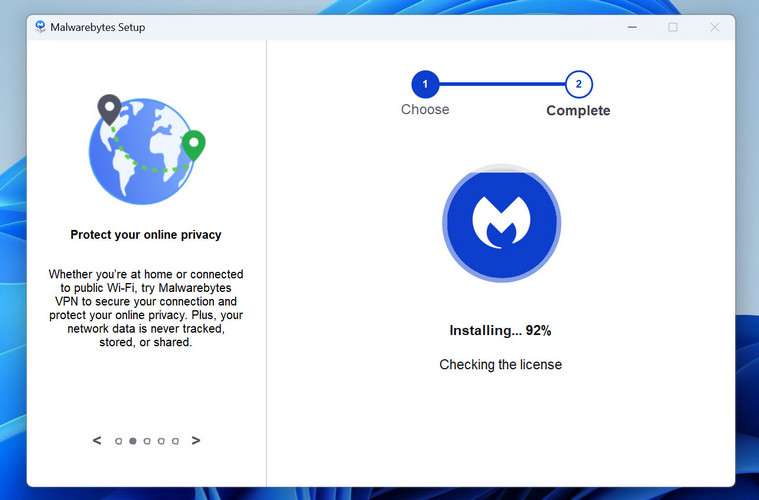
Malwarebytes will now install on your device. This usually takes under a minute.
-
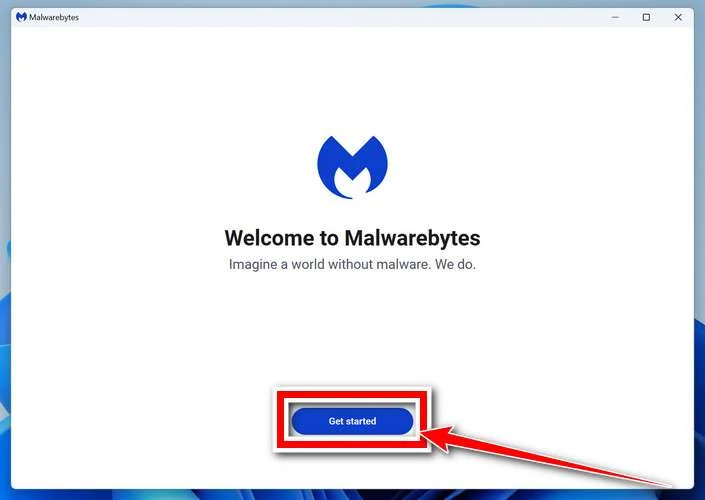
When installation is complete, the “Welcome to Malwarebytes” screen will open automatically.
-
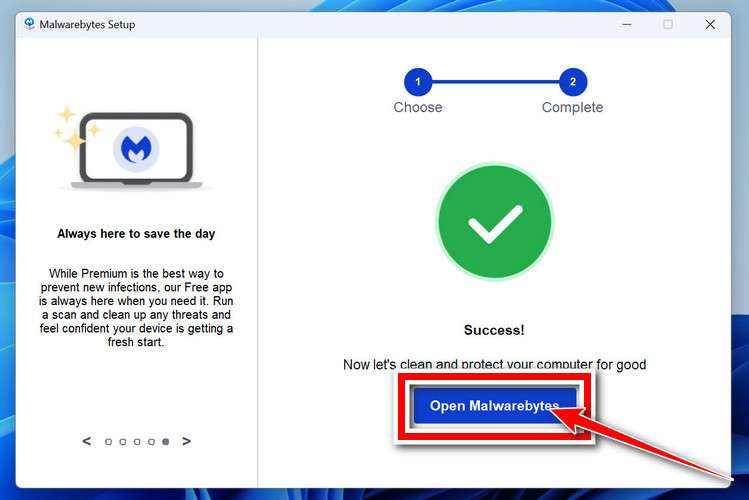
On the final screen, click Open Malwarebytes to launch the program.
-
Enable “Scan for Rootkits”
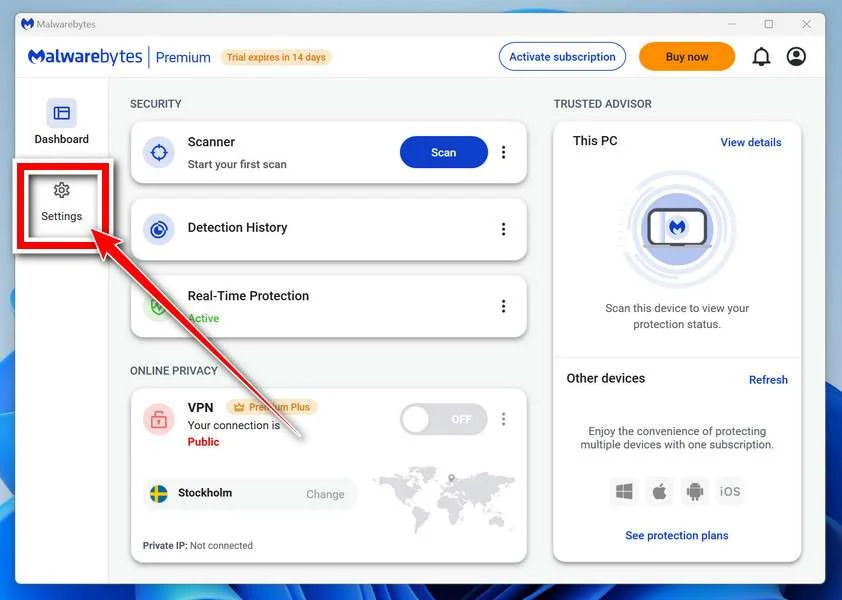
Before scanning, turn on rootkit detection so Malwarebytes can find even the most hidden threats. Click the Settings gear icon on the left side of the screen.
In the settings menu, find “Scan for rootkits” and click the toggle so it turns blue.
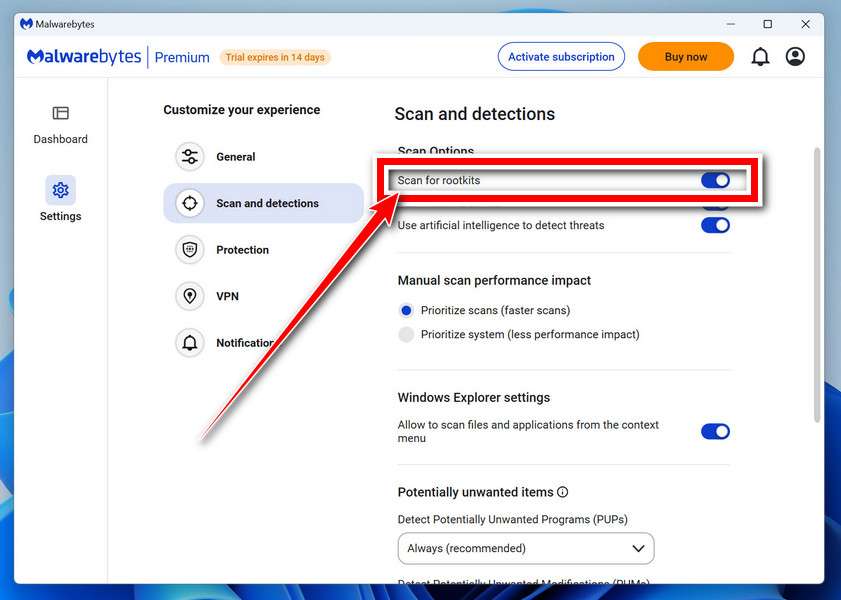
Done? Click “Dashboard” in the left pane to return to the main screen.
Start the Scan
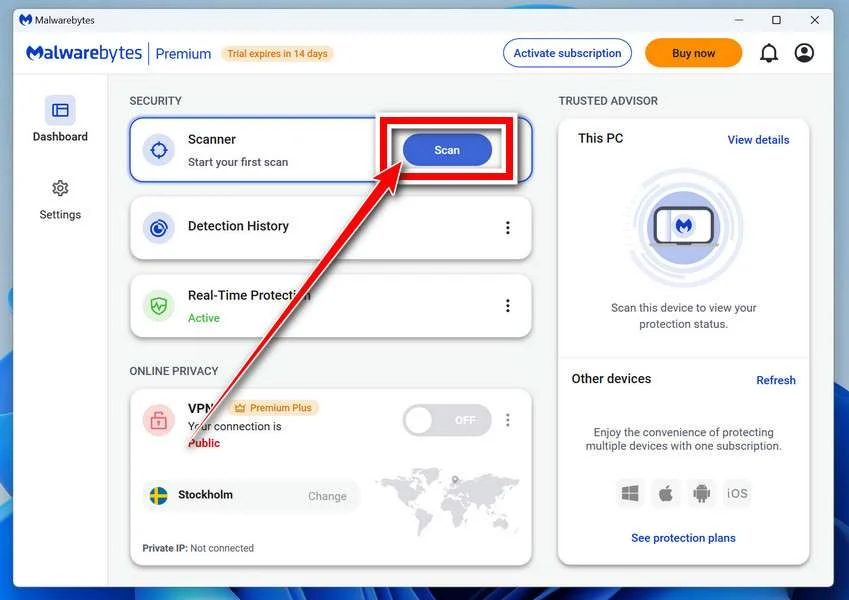
Click the blue Scan button. Malwarebytes will automatically update its virus database and start checking your computer for malware.
-
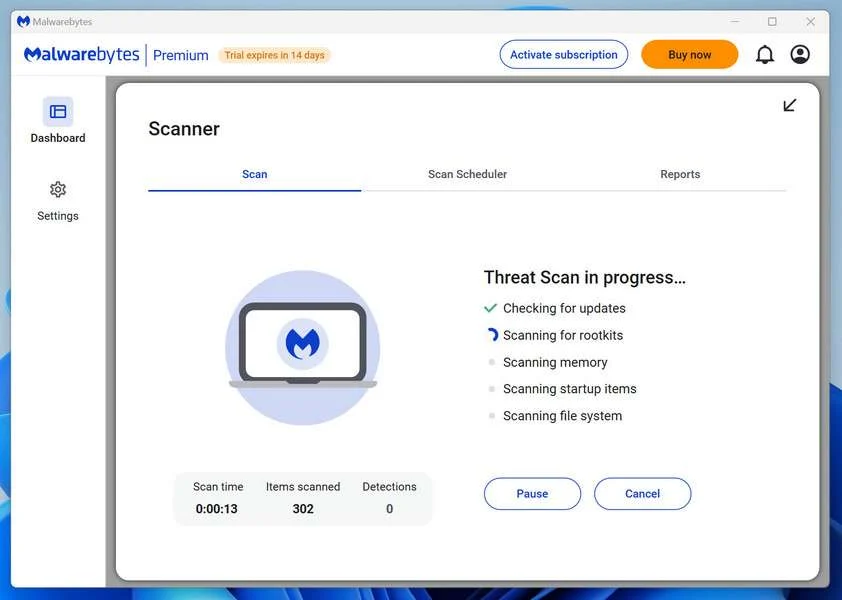
Wait for the Scan to Finish
The scan checks your entire system for browser hijackers and other malicious programs, so it can take 5 to 20 minutes depending on your computer. Feel free to do something else — just check back occasionally to see the progress.
-
Quarantine the Detected Threats
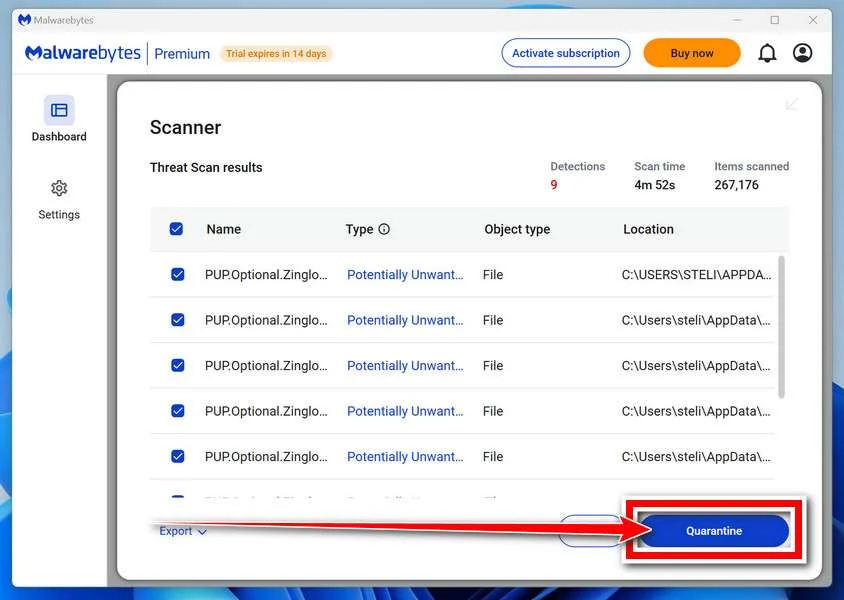
When the scan is done, you’ll see a list of everything Malwarebytes found — malware, adware, and potentially unwanted programs. Click the “Quarantine” button to remove all of them at once.
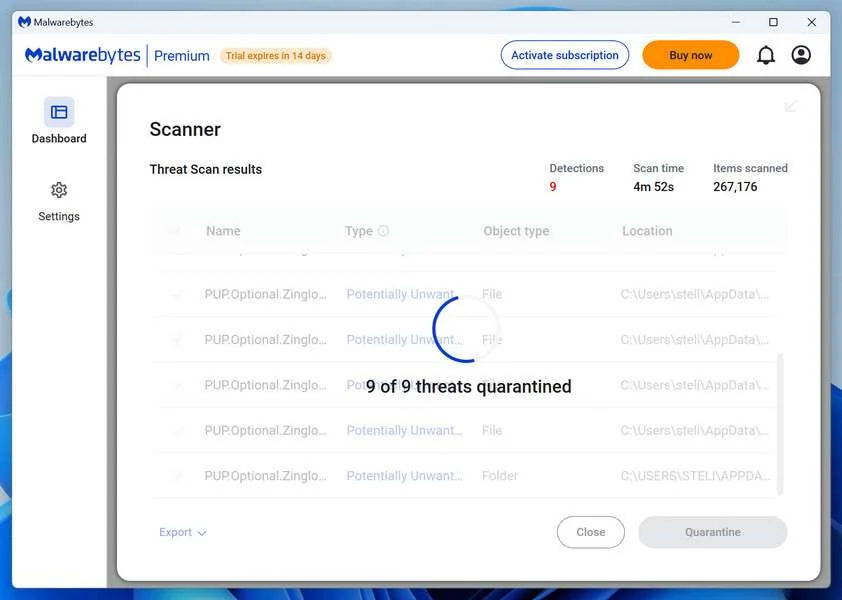
Malwarebytes will now remove the malicious files and registry entries and move them safely into quarantine.
-
Restart Your Computer
Some threats can only be fully removed after a reboot. If Malwarebytes asks you to restart, click Yes. Once you’re logged back in, Malwarebytes has finished removing the threats it found.
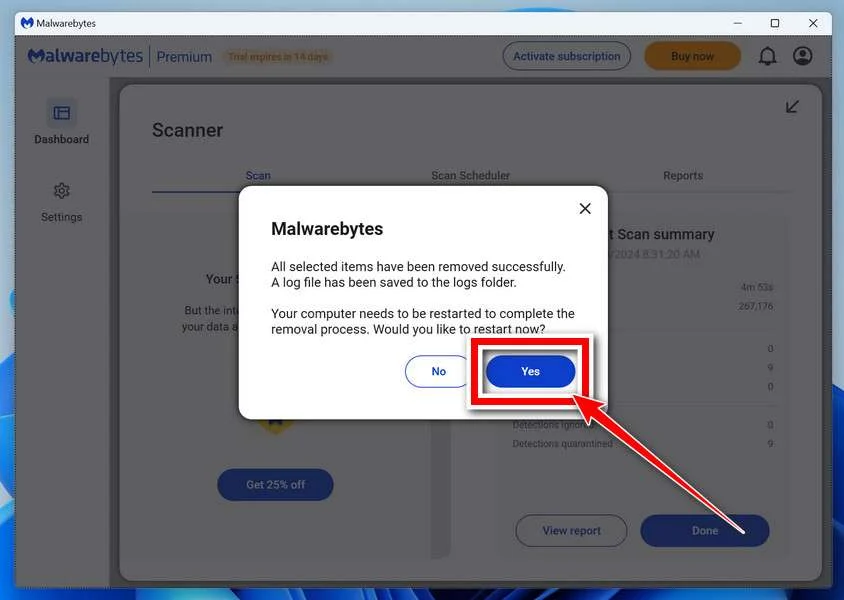
That’s it — your Windows PC is now clean of trojans, adware, and other malware, and should be back to running smoothly.
If you are still having problems with your computer after completing these instructions, then please follow one of the steps:
- Run a computer scan with ESET Online Scanner
- Ask for help in our Windows Malware Removal Help & Support forum.
Run a Malware Scan with Malwarebytes for Mac
Malwarebytes for Mac is a free on-demand scanner that removes the malware other security software tends to miss — adware, browser hijackers, and unwanted programs included. Cleaning an infected Mac with Malwarebytes has always been completely free, and it’s our go-to recommendation. Follow the steps below to scan and clean your Mac in just a few minutes.
-
Download Malwarebytes for Mac
Click the button below to download the latest version of Malwarebytes for Mac.
Download MalwarebytesOfficial installer for macOS. Your download starts right away.Want real-time protection? See Malwarebytes PremiumMalwarebytes Free for MacScans and removes malware at no cost -
Open the Malwarebytes setup file
When the download finishes, open your Downloads folder and double-click the setup file to begin the installation.
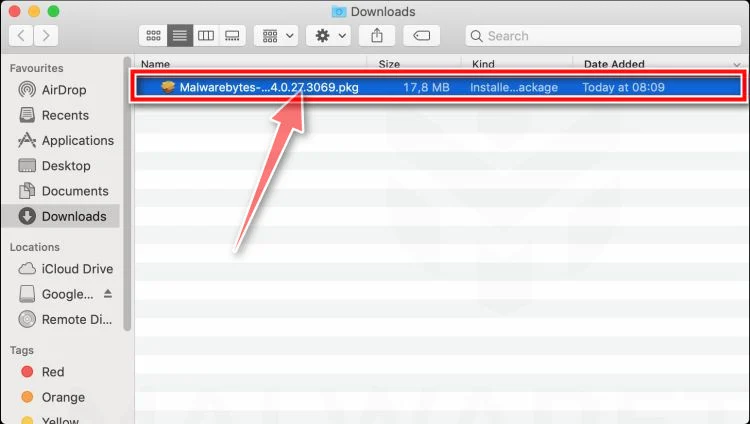
-
Follow the On-Screen Prompts to Install Malwarebytes
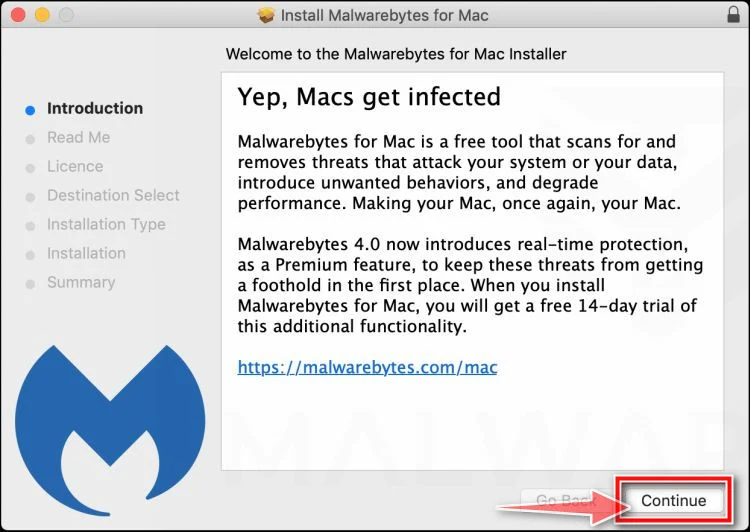
The Malwarebytes for Mac Installer will guide you through a few quick screens. Click “Continue” and keep following the prompts until the installation completes.
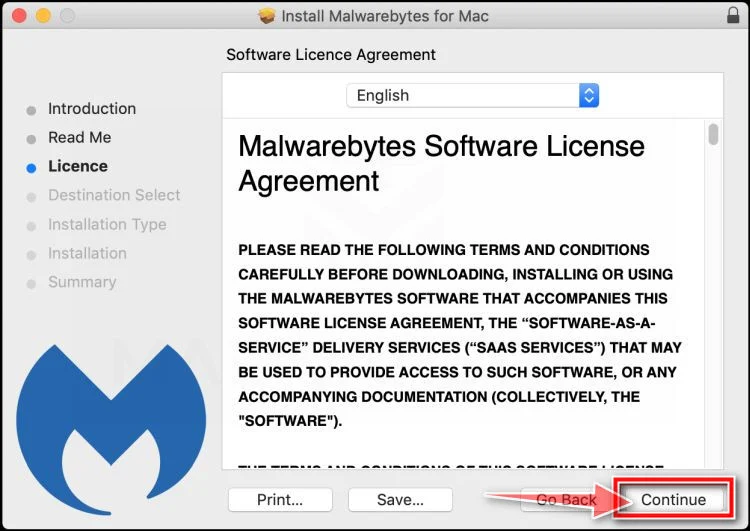
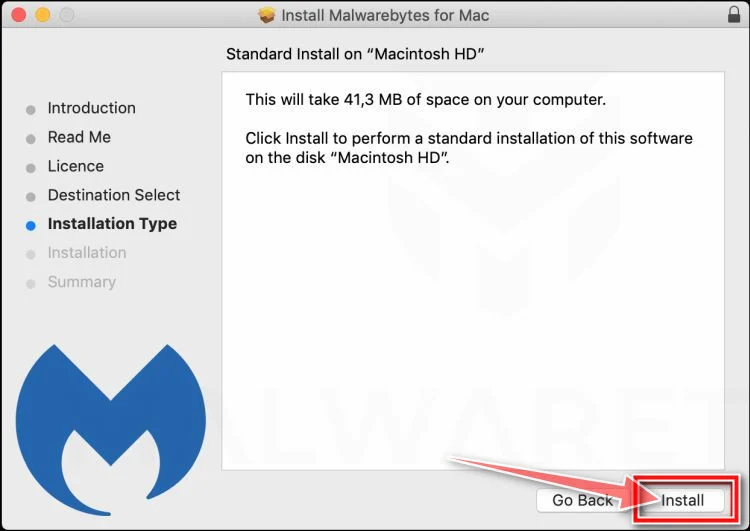
When the installation is complete, Malwarebytes opens to the Welcome to Malwarebytes screen. Click “Get started“.
-
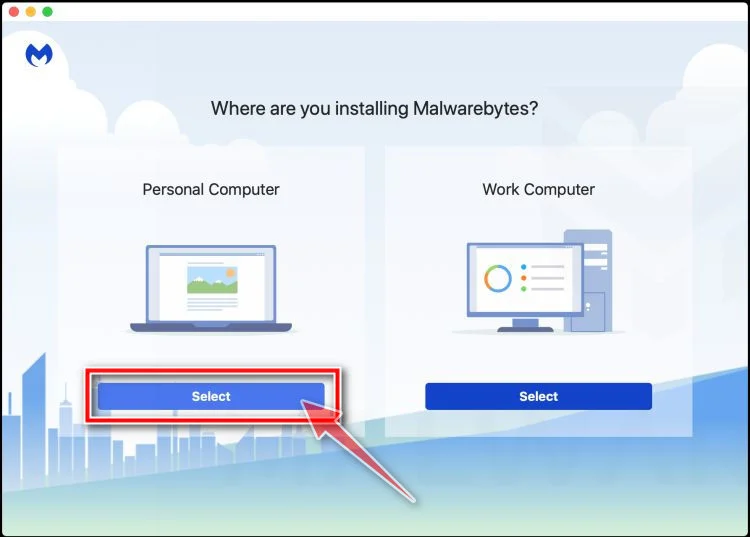
Select “Personal Computer” or “Work Computer”
Malwarebytes will ask what type of computer you’re installing it on. Click either Personal Computer or Work Computer, whichever applies.
-
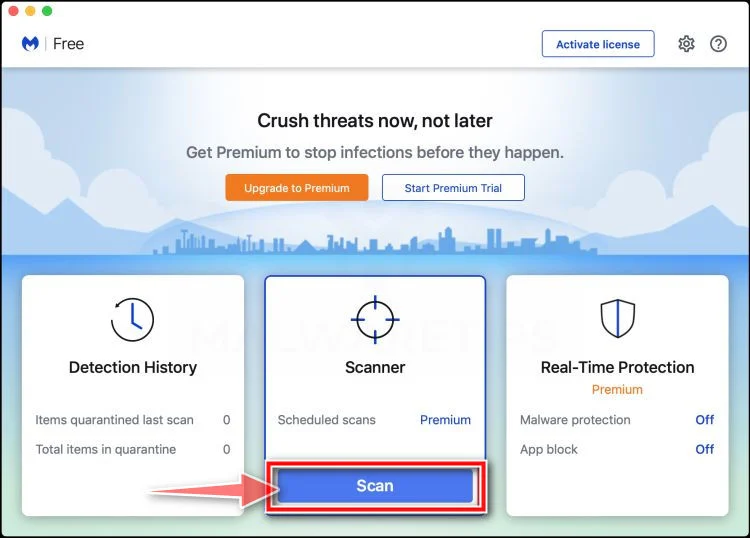
Start the Scan
Click the “Scan” button. Malwarebytes will automatically update its detection database and begin checking your Mac for malware.
-
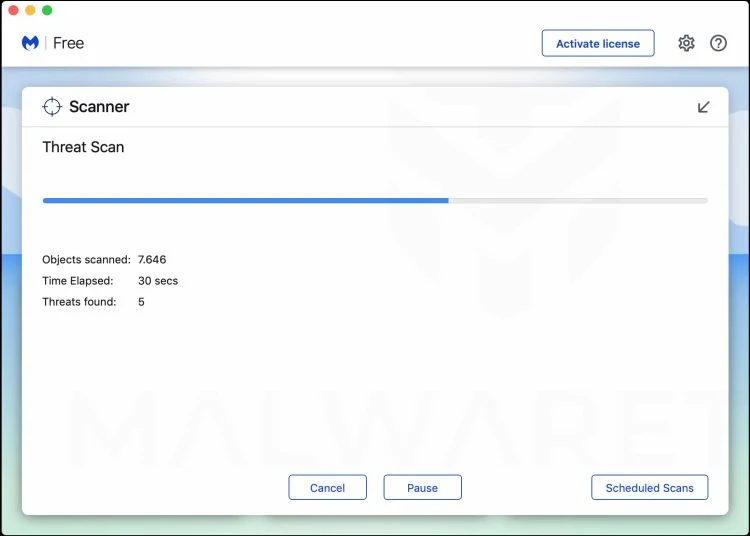
Wait for the Scan to Finish
Malwarebytes will scan your Mac for adware, browser hijackers, and other malicious programs. This can take a few minutes, so feel free to do something else — just check back occasionally to see the progress.
-
Quarantine the Detected Threats
When the scan is done, you’ll see a list of everything Malwarebytes found. Click the “Quarantine” button to remove all the threats at once.
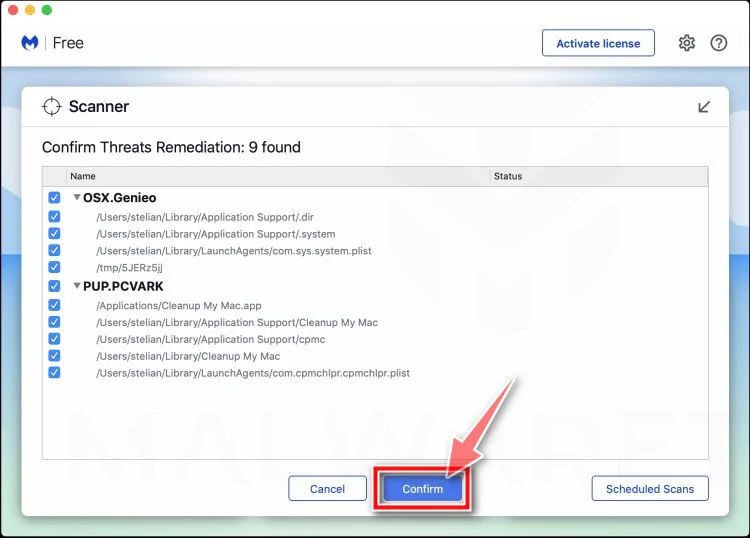
-
Restart Your Mac
Malwarebytes will now remove all the malicious files it found. Some threats can only be fully removed after a reboot — if Malwarebytes asks you to restart, allow it. Once you’re logged back in, your Mac is clean.
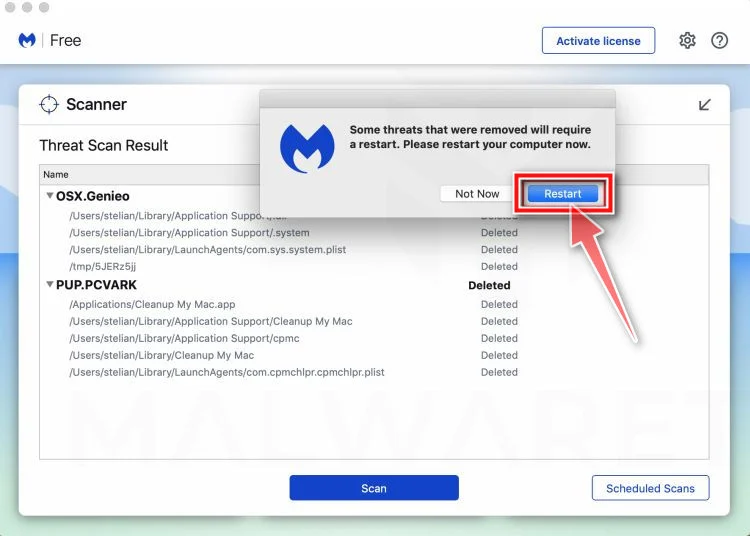
That’s it — your Mac is now free of adware, rogue browser extensions, and other potentially harmful software.
If you are still experiencing problems while trying to remove a malicious program from your computer, please ask for help in our Mac Malware Removal Help & Support forum.
Run a Malware Scan with Malwarebytes for Android
Malwarebytes for Android automatically detects and removes dangerous threats like malware and ransomware so you don’t have to worry about your most-used device being compromised. Aggressive detection of adware and potentially unwanted programs keeps your Android phone or tablet running smooth.
-
Download Malwarebytes for Android.
You can download Malwarebytes for Android by clicking the link below.
Get Malwarebytes for AndroidOpens Google Play in a new tab.Want real-time protection? See Malwarebytes Premium for AndroidMalwarebytes for AndroidScans your phone and removes malware at no cost -
Install Malwarebytes for Android on your phone.
In the Google Play Store, tap “Install” to install Malwarebytes for Android on your device.
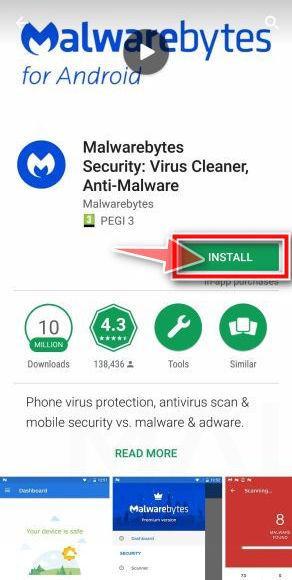
When the installation process has finished, tap “Open” to begin using Malwarebytes for Android. You can also open Malwarebytes by tapping on its icon in your phone menu or home screen.
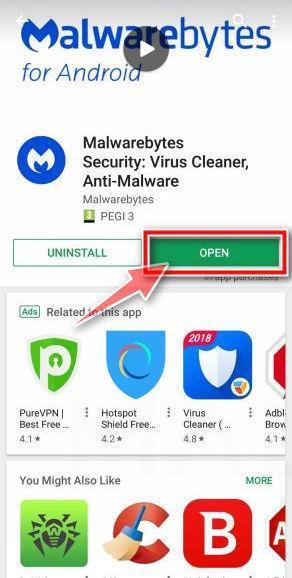
-
Follow the on-screen prompts to complete the setup process
When Malwarebytes will open, you will see the Malwarebytes Setup Wizard which will guide you through a series of permissions and other setup options.
This is the first of two screens that explain the difference between the Premium and Free versions. Swipe this screen to continue.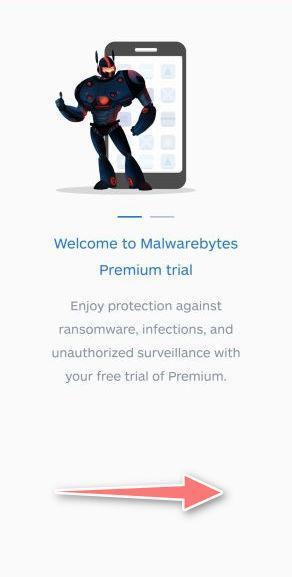
Tap on “Got it” to proceed to the next step.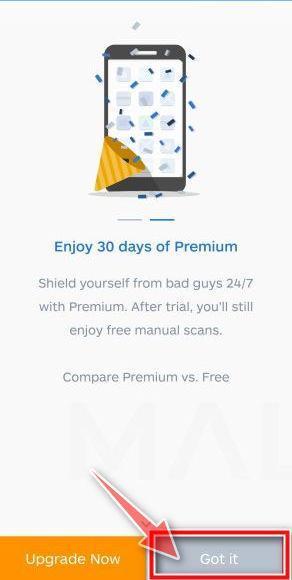
Malwarebytes for Android will now ask for a set of permissions that are required to scan your device and protect it from malware. Tap on “Give permission” to continue.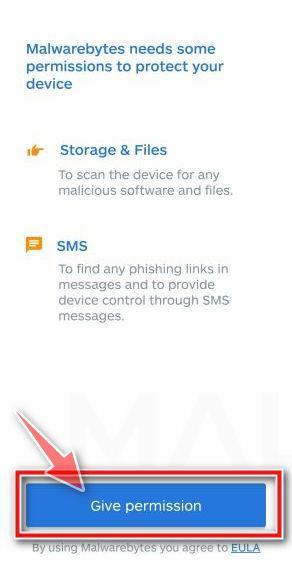
Tap on “Allow” to permit Malwarebytes to access the files on your phone.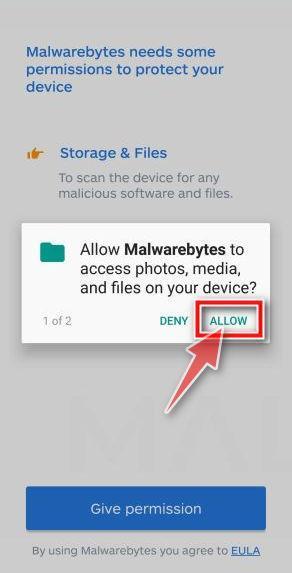
-
Update database and run a scan with Malwarebytes for Android
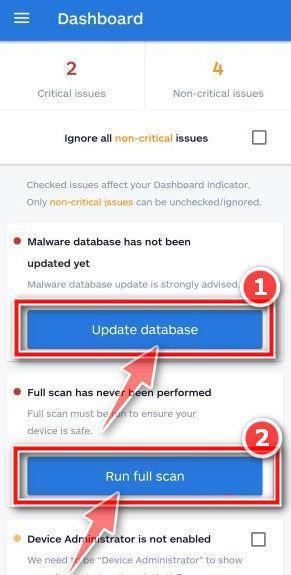
You will now be prompted to update the Malwarebytes database and run a full system scan.
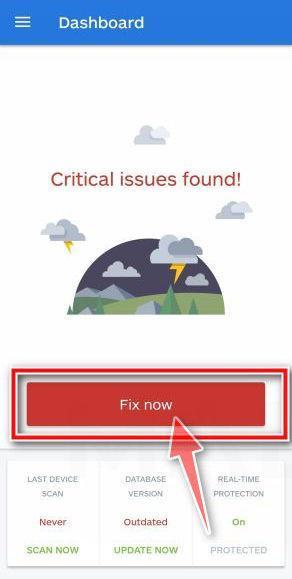
Click on “Update database” to update the Malwarebytes for Android definitions to the latest version, then click on “Run full scan” to perform a system scan.
-
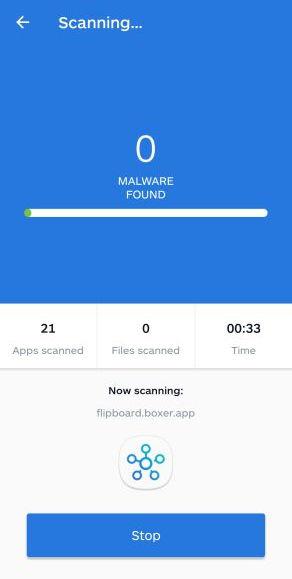
Wait for the Malwarebytes scan to complete.
Malwarebytes will now start scanning your phone for adware and other malicious apps. This process can take a few minutes, so we suggest you do something else and periodically check on the status of the scan to see when it is finished.
-
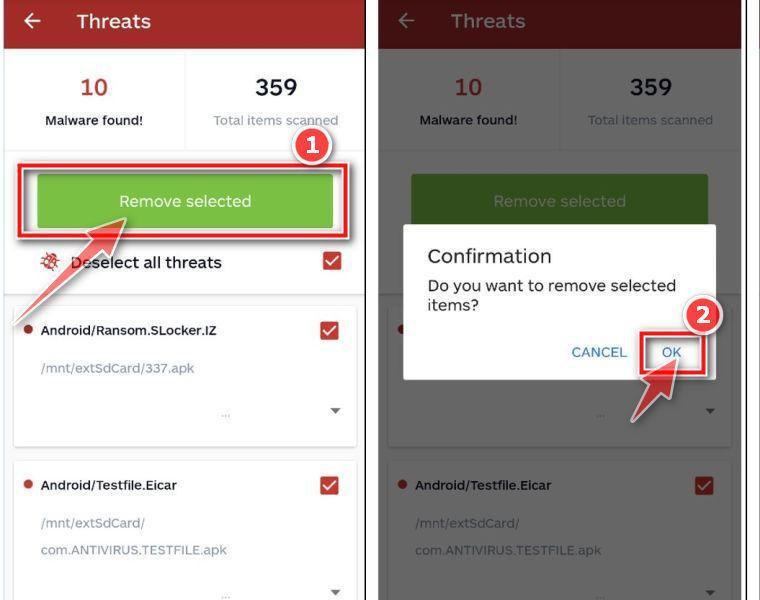
Click on “Remove Selected”.
When the scan has been completed, you will be presented with a screen showing the malware infections that Malwarebytes for Android has detected. To remove the malicious apps that Malwarebytes has found, tap on the “Remove Selected” button.
-
Restart your phone.
Malwarebytes for Android will now remove all the malicious apps that it has found. To complete the malware removal process, Malwarebytes may ask you to restart your device.
That’s it — your Android phone is now clean — no more malicious apps, adware, or browser redirects.
If you are still having problems with your phone after completing these instructions, then please follow one of the steps:
- Restore your phone to factory settings by going to Settings > General management > Reset > Factory data reset.
- Ask for help in our Mobile Malware Removal Help & Support forum.
Stay Protected: Block Ads and Malicious Sites
Now that your device is clean, keep it that way. Most infections start with a malicious ad or a fake download button — so blocking them at the source is your best defense.
We recommend AdGuard, which blocks malicious ads, phishing pages, and dangerous redirects before they can reach you.
👉 Download AdGuard and browse safely
Conclusion
AutoUpdater.exe is a legitimate executable file commonly associated with software update mechanisms. It enables automatic updates for various applications, ensuring users have the latest versions with improved security and performance.
Whether you should remove AutoUpdater.exe depends on the specific circumstances. If it is associated with a trusted software application, it is generally recommended to keep it. However, if you notice suspicious behavior or it is identified as malware, taking appropriate action, such as removing or quarantining the file, is crucial.
Remember to exercise caution when dealing with executable files and always verify their authenticity. Regularly scanning your system with reliable antivirus software, such as Malwarebytes Free, can help ensure the safety and security of your computer.

Join the discussion
0 commentsShare your experience or ask a question about this article.
Discussion
Start the conversation
Have a question or something useful to share? Add the first comment.