Beware! Fake Geek Squad Emails Trying to Steal Your Info
Written by: Stelian
Published on:
Geek Squad, a subsidiary of Best Buy that offers various tech services and support, has become the latest well-known brand targeted by scammers. There have been reports of fake Geek Squad emails making the rounds that aim to trick recipients into contacting scammers and potentially handing over sensitive personal and financial information.
This article will break down exactly how the Geek Squad email scam works, provide tips on how to spot fraudulent emails, and outline what you should do if you receive one or already fell victim. After reading, you’ll have all the information needed to steer clear of this scam.
How the Geek Squad Email Scam Works
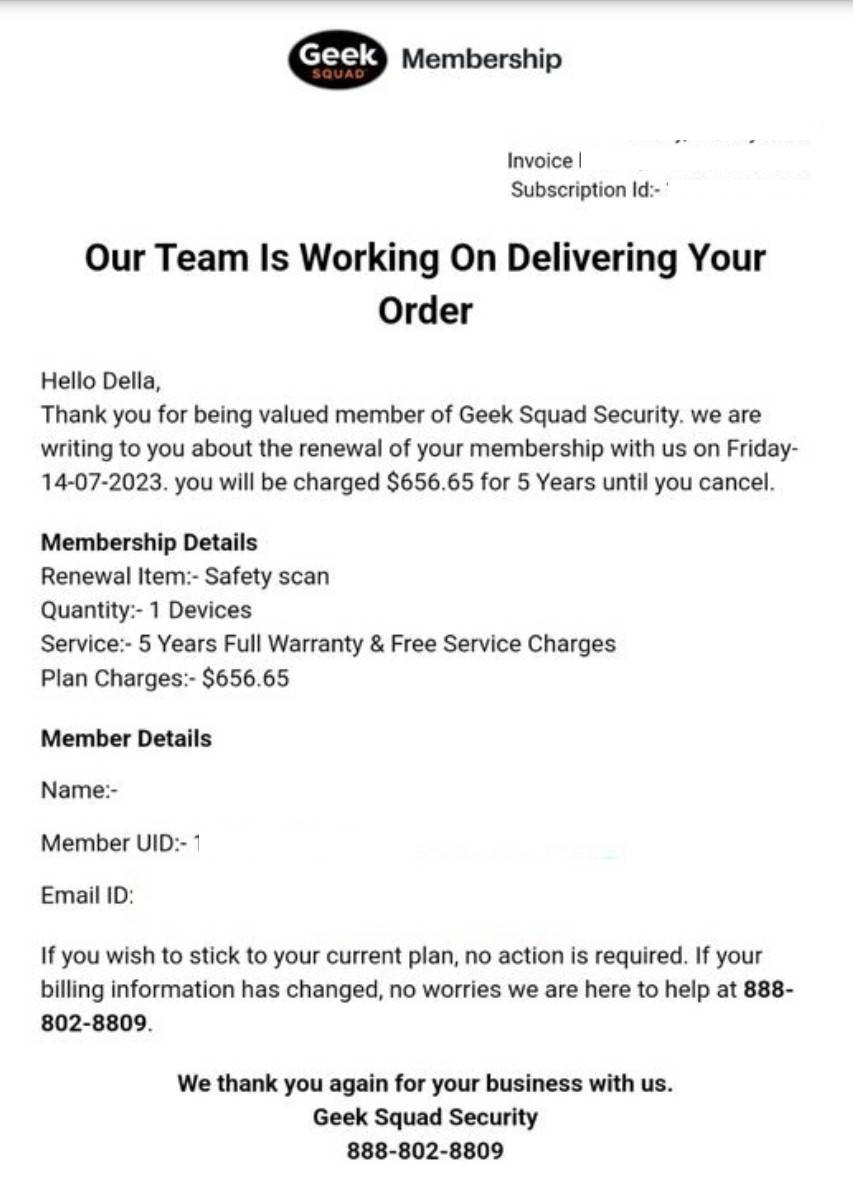
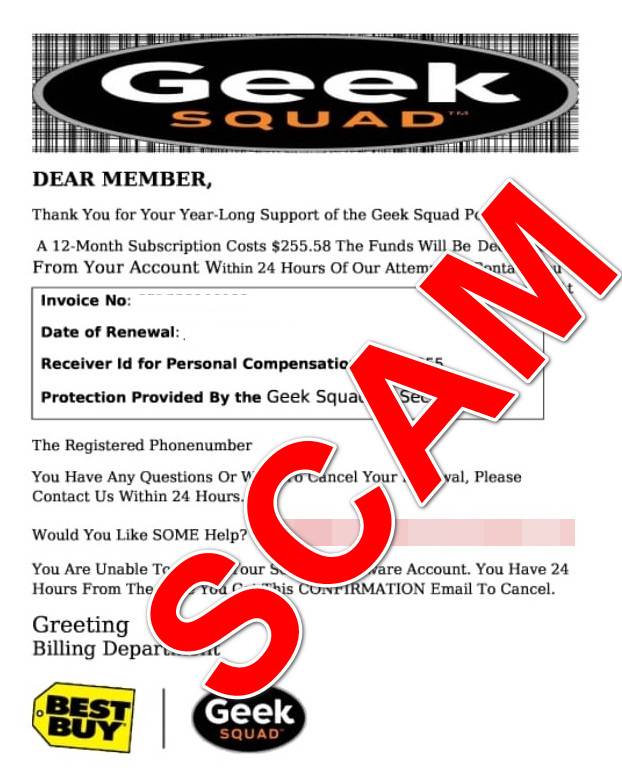
The fake Geek Squad emails follow a similar formula to other tech support scams. They claim that the recipient’s Geek Squad subscription has been automatically renewed and that a charge of $499.99 has been made to their account.
A fake invoice number, renewal date, service name like “Geek Total Protection,” and phone number to call are also included. The email urges the recipient to call the provided number right away if they did not authorize the charge.
The goal is to scare recipients into calling the number, at which point the scammers posing as Geek Squad agents attempt to obtain personal and financial information or charge a “cancellation” fee. They may also try to get remote access to the victim’s computer under the guise of providing support services.
Once scammers have access to someone’s devices, accounts, or payment methods, they can steal money, identities, download malware, and cause tremendous financial and personal damage.
How to Spot Geek Squad Scam Emails
While the scam emails pretend to come from Geek Squad, there are various red flags that can help you determine their fraudulent nature:
Grammatical errors/typos/strange phrasing: Scam emails often contain numerous typos, grammar mistakes, and odd phrasings. Legit companies carefully proofread communication.
Requests sensitive information: Geek Squad would never ask for personal details like credit card information over email. Be wary of any requests for sensitive data.
Threatening urgent action: Scare tactics demanding immediate action are common in phishing emails. Geek Squad would not threaten or rush customers.
Unusual links/attachments: Do not click links or download attachments from unsolicited emails, as they can lead to malware.
Generic greetings: Phishing emails rarely use your name. Greetings like “Dear customer” signal an impersonal scam.
Spoofed sender address: Check that the email address matches Geek Squad’s actual domain name, like @geeksquad.com. Scammers often slightly alter addresses.
Request for payment: No legitimate company demands payment solely through an unsolicited email. Delete messages asking for direct payments.
Spelling/consistency errors in company name: The scam emails may spell “Geek Squad” incorrectly at times or have other mismatched details.
What to Do If You Receive a Geek Squad Scam Email
If you receive an email you suspect to be a Geek Squad phishing scam, do not call the phone number listed. This will only lead to potential fraud. Instead, take the following steps:
Do not reply: Don’t engage with the scammers at all. Replying alerts them your email is active, leading to more spam.
Send to spam: Mark the message as spam so your email provider can block future scam messages.
Forward to Geek Squad: Forward the scam email to Geek Squad at phishing@geeksquad.com to alert them of the fraudulent activity.
Report the scam: Notify the FTC about the phishing attempt at https://reportfraud.ftc.gov/#/. The more reports received, the easier it will be to combat these scams.
Update passwords: Change passwords on your Best Buy and Geek Squad accounts as a precaution. Avoid reusing passwords across accounts.
Beware of other contact methods: Scammers may attempt to reach you via phone, text, social media, etc. Use the same precautions across communication channels.
Following these steps can help protect yourself and others from falling victim to tech support scams impersonating trusted brands. You successfully avoided the scam by not contacting the scammers!
What to Do If You Already Contacted the Scammers
If you, unfortunately, called the phone number on one of these fraudulent emails and provided any personal information or payments, remain calm and take these steps immediately:
Contact your bank/credit card company: Alert your financial institutions that you shared account details with scammers so they can monitor for fraudulent activity. Consider canceling those cards.
Change all passwords: Log into your accounts and reset passwords, starting with any related to the information compromised. Make them long and complex.
Place fraud alert: Contact one of the three credit bureaus to place a free 90-day fraud alert on your credit file to help prevent identity theft.
Monitor accounts closely: Keep a very close eye on all your financial accounts and statements to spot any suspicious activity right away.
File an FTC complaint: Submit a complaint to the FTC detailing what information was lost at https://reportfraud.ftc.gov.
Local authorities: File a report with your local police department about falling victim to fraud. This creates an official record that can help in resolving issues later.
Geek Squad: Contact Geek Squad directly to report the incident and ensure they are aware of scammers impersonating the brand.
The quicker you act, the better chance you have of limiting damages from any lost personal data or fraudulent activity that may occur. Stay vigilant, and learn how to identify scam emails moving forward to avoid this happening again.
Why the Geek Squad Scam Works
There are several reasons why many people fall for the Geek Squad phishing scam:
Familiarity with brand: Geek Squad is a well-known, trusted tech brand. People are more likely to trust an email seemingly from them.
Fear of unknown charge: The fear of being charged almost $500 out of the blue scares people into hastily contacting the scammers.
No awareness of scam: If people are unaware of this phishing scam, they will assume the email is legitimate.
Good urgent call-to-action: The scam email provides a clear call-to-action with a phone number, making it easy (and tempting) for victims to call right away.
Professional design: The emails often appear well-designed and official, adding to their credibility.
No knowledge of scam signs: Recipients who don’t know what to watch for to identify scam emails can easily be deceived.
The scammers behind these phishing attempts rely on these human vulnerabilities to trick people. Being aware of the psychological tricks they use can help you recognize and avoid scams.
Is Your Device Infected? Run a Free Malware Scan
Slow performance, constant pop-ups, or strange behavior? These are classic signs of a malware infection. The fastest way to find out is to scan your device with Malwarebytes Anti-Malware Free — one of the most trusted malware removal tools available.
The free version detects and removes the most common threats, including:
Adware — the cause of those annoying pop-ups
Browser hijackers — unwanted redirects and changed homepages
Trojans and spyware — hidden programs stealing your data
Potentially unwanted programs (PUPs) — software you never asked for
👉 Select your device below — Windows, Mac, or Android — then follow the simple steps to download Malwarebytes, scan your system, and remove any threats it finds. The whole process takes about 5 minutes.
Malwarebytes for WindowsMalwarebytes for MacMalwarebytes for Android
Run a Malware Scan with Malwarebytes for Windows
Malwarebytes is one of the most popular and trusted anti-malware tools for Windows — and it’s completely free for removing infections. It catches threats that many antivirus programs miss, including adware, browser hijackers, and trojans. Follow the steps below to scan and clean your PC in just a few minutes.
Download Malwarebytes
Click the button below to download the latest version of Malwarebytes for Windows from the official source. The free version is all you need — it will scan your computer and remove adware, browser hijackers, and other malicious software at no cost.
(The link opens in a new page where your download will start)
Install Malwarebytes
When the download finishes, open your Downloads folder and double-click the MBSetup file. If Windows shows a User Account Control pop-up, click “Yes” to allow the installation.
Follow the On-Screen Prompts to Install Malwarebytes
The setup wizard will walk you through a few quick screens:
Choose where you’re installing the program — “Personal Computer” or “Work Computer” — then click Next.
Malwarebytes will now install on your device. This usually takes under a minute.
When installation is complete, the “Welcome to Malwarebytes” screen will open automatically.
On the final screen, click Open Malwarebytes to launch the program.
Enable “Scan for Rootkits”
Before scanning, turn on rootkit detection so Malwarebytes can find even the most hidden threats. Click the Settings gear icon on the left side of the screen.
In the settings menu, find “Scan for rootkits” and click the toggle so it turns blue.
Done? Click “Dashboard” in the left pane to return to the main screen.
Start the Scan
Click the blue Scan button. Malwarebytes will automatically update its virus database and start checking your computer for malware.
Wait for the Scan to Finish
The scan checks your entire system for browser hijackers and other malicious programs, so it can take several minutes. Feel free to do something else — just check back occasionally to see the progress.
Quarantine the Detected Threats
When the scan is done, you’ll see a list of everything Malwarebytes found — malware, adware, and potentially unwanted programs. Click the “Quarantine” button to remove all of them at once.
Malwarebytes will now remove the malicious files and registry entries and move them safely into quarantine.
Restart Your Computer
Some threats can only be fully removed after a reboot. If Malwarebytes asks you to restart, click Yes. Once you’re logged back in, your PC is clean and you can continue with the next steps in this guide.
When the scan finishes, click Quarantine to remove everything Malwarebytes found. That’s it — your Windows PC is now clean of trojans, adware, and other malware, and should be back to running smoothly.
If your current antivirus allowed this malicious program on your computer, you may want to consider purchasing Malwarebytes Premium to protect against these types of threats in the future. If you are still having problems with your computer after completing these instructions, then please follow one of the steps:
Malwarebytes for Mac is a free on-demand scanner that removes the malware other security software tends to miss — adware, browser hijackers, and unwanted programs included. Cleaning an infected Mac with Malwarebytes has always been completely free, and it’s our go-to recommendation. Follow the steps below to scan and clean your Mac in just a few minutes.
Download Malwarebytes for Mac
Click the button below to download the latest version of Malwarebytes for Mac.
When the download finishes, open your Downloads folder and double-click the setup file to begin the installation.
Follow the On-Screen Prompts to Install Malwarebytes
The Malwarebytes for Mac Installer will guide you through a few quick screens. Click “Continue” and keep following the prompts until the installation completes.
When the installation is complete, Malwarebytes opens to the Welcome to Malwarebytes screen. Click “Get started“.
Select “Personal Computer” or “Work Computer”
Malwarebytes will ask what type of computer you’re installing it on. Click either Personal Computer or Work Computer, whichever applies.
Start the Scan
Click the “Scan” button. Malwarebytes will automatically update its detection database and begin checking your Mac for malware.
Wait for the Scan to Finish
Malwarebytes will scan your Mac for adware, browser hijackers, and other malicious programs. This can take a few minutes, so feel free to do something else — just check back occasionally to see the progress.
Quarantine the Detected Threats
When the scan is done, you’ll see a list of everything Malwarebytes found. Click the “Quarantine” button to remove all the threats at once.
Restart Your Mac
Malwarebytes will now remove all the malicious files it found. Some threats can only be fully removed after a reboot — if Malwarebytes asks you to restart, allow it. Once you’re logged back in, your Mac is clean.
Once the scan is done, remove every threat it detected. Your Mac is now free of adware, rogue browser extensions, and other potentially harmful software.
If your current antivirus allowed a malicious program on your computer, you might want to consider purchasing the full-featured version of Malwarebytes Anti-Malware to protect against these types of threats in the future. If you are still experiencing problems while trying to remove a malicious program from your computer, please ask for help in our Mac Malware Removal Help & Support forum.
Run a Malware Scan with Malwarebytes for Android
Malwarebytes for Android automatically detects and removes dangerous threats like malware and ransomware so you don’t have to worry about your most-used device being compromised. Aggressive detection of adware and potentially unwanted programs keeps your Android phone or tablet running smooth.
Download Malwarebytes for Android.
You can download Malwarebytes for Android by clicking the link below.
In the Google Play Store, tap “Install” to install Malwarebytes for Android on your device.
When the installation process has finished, tap “Open” to begin using Malwarebytes for Android. You can also open Malwarebytes by tapping on its icon in your phone menu or home screen.
Follow the on-screen prompts to complete the setup process
When Malwarebytes will open, you will see the Malwarebytes Setup Wizard which will guide you through a series of permissions and other setup options. This is the first of two screens that explain the difference between the Premium and Free versions. Swipe this screen to continue. Tap on “Got it” to proceed to the next step. Malwarebytes for Android will now ask for a set of permissions that are required to scan your device and protect it from malware. Tap on “Give permission” to continue. Tap on “Allow” to permit Malwarebytes to access the files on your phone.
Update database and run a scan with Malwarebytes for Android
You will now be prompted to update the Malwarebytes database and run a full system scan.
Click on “Update database” to update the Malwarebytes for Android definitions to the latest version, then click on “Run full scan” to perform a system scan.
Wait for the Malwarebytes scan to complete.
Malwarebytes will now start scanning your phone for adware and other malicious apps. This process can take a few minutes, so we suggest you do something else and periodically check on the status of the scan to see when it is finished.
Click on “Remove Selected”.
When the scan has been completed, you will be presented with a screen showing the malware infections that Malwarebytes for Android has detected. To remove the malicious apps that Malwarebytes has found, tap on the “Remove Selected” button.
Restart your phone.
Malwarebytes for Android will now remove all the malicious apps that it has found. To complete the malware removal process, Malwarebytes may ask you to restart your device.
After the scan, tap Remove Selected to delete all detected threats. Your Android phone is now clean — no more malicious apps, adware, or browser redirects.
If your current antivirus allowed a malicious app on your phone, you may want to consider purchasing the full-featured version of Malwarebytes to protect against these types of threats in the future. If you are still having problems with your phone after completing these instructions, then please follow one of the steps:
Restore your phone to factory settings by going to Settings > General management > Reset > Factory data reset.
Now that your device is clean, keep it that way. Most infections start with a malicious ad or a fake download button — so blocking them at the source is your best defense.
We recommend AdGuard, which blocks malicious ads, phishing pages, and dangerous redirects before they can reach you.
While this article focuses specifically on the Geek Squad scam, variations of tech support scams impersonating major companies are unfortunately common. Here are tips to avoid all forms of tech scams:
Be wary of unsolicited contact: Legitimate tech companies will not contact you out of the blue requesting personal information or money. Delete any random calls/emails/messages claiming to offer “support.”
Don’t panic: Scams try to incite fear or urgency to get you to act rashly. Stay calm, and don’t fall for high-pressure scam tactics.
Never allow remote access: No company needs remote access to your devices to provide support. This is always a scam attempt to steal data or install malware.
Hang up and call back: If you answer a suspicious tech support call, hang up and call back using the company’s official number to verify validity.
Know billing practices: Familiarize yourself with how major tech companies handle billing. Unusual payment requests are always a red flag.
Use strong passwords: Having complex passwords on all devices and accounts protects you in case scammers breach any credentials.
Keep software updated: Maintain up-to-date antivirus software and operating system updates to avoid vulnerabilities scammers can exploit.
The more knowledge you have about legitimate tech support practices, the less likely you’ll fall prey to scams impersonating leading tech brands.
Conclusion
The Geek Squad email phishing scam targeting Best Buy customers is designed to trick people into handing over money or sensitive information under false pretenses. By learning the tactics used in these fraudulent emails, you can easily identify and avoid this specific scam. But tech support scams impersonating trusted companies are constantly evolving, so maintaining awareness of the latest schemes and using best security practices is the ultimate way to protect yourself.
If you receive an unsolicited contact from a tech company requesting immediate payment or access to your devices, pause and verify it through official channels before taking any action. Avoid becoming fearful or rushed into making a mistake. With caution and awareness, you can steer clear of tech support scams and keep your information safe.
10 Rules to Avoid Online Scams
Here are 10 practical safety rules to help you avoid malware, online shopping scams, crypto scams, and other online fraud. Each tip includes a quick “if you already got hit” action.
Stop and verify before you click, log in, download, or pay.
Most scams win by creating urgency. Verify using a trusted method: type the website address yourself, use the official app, or call a known number (not the one in the message).
If you already clicked: close the page, do not enter passwords, and run a malware scan.
Keep your operating system, browser, and apps updated.
Updates patch security holes used by malware and malicious ads. Turn on automatic updates where possible.
If you saw a scary “update now” pop-up: close it and update only through your device settings or the official app store.
Use layered protection: antivirus plus an ad blocker.
Antivirus helps block malware. An ad blocker reduces scam redirects, phishing pages, and malvertising.
If your browser is acting weird: remove unknown extensions, reset the browser, then run a full scan.
Install apps, software, and extensions only from official sources.
Avoid cracked software, “keygens,” and random downloads. During installs, choose Custom/Advanced and decline bundled offers you do not recognize.
If you already installed something suspicious: uninstall it, restart, and scan again.
Treat links and attachments as untrusted by default.
Phishing often impersonates delivery services, banks, and popular brands. If it is unexpected, do not open attachments or log in through the message.
If you entered credentials: change the password immediately and enable 2FA.
Shop safely: research the store, then pay with protection.
Be cautious with brand-new stores, “closing sale” stories, and prices that make no sense. Prefer credit cards or PayPal for dispute options. Avoid wire transfers, gift cards, and crypto payments.
If you already paid: contact your card issuer or PayPal quickly to dispute the transaction.
Crypto rule: never pay a “fee” to withdraw or recover money.
Common patterns include fake profits, then “tax,” “gas,” or “verification” fees. Another is a “recovery agent” who demands upfront crypto.
If you already sent crypto: stop paying, save evidence (wallet addresses, TXIDs, chats), and report the scam to the platform used.
Secure your accounts with unique passwords and 2FA (start with email).
Use a password manager and unique passwords for every account. Enable 2FA using an authenticator app when possible.
If you suspect an account takeover: change passwords, sign out of all devices, and review recent logins and recovery settings.
Back up important files and keep one backup offline.
Backups protect you from ransomware and device failure. Keep at least one backup on an external drive that is not always connected.
If you suspect infection: do not connect backup drives until the system is clean.
If you think you are a victim: stop losses, document evidence, and escalate fast.
Move quickly. Speed matters for disputes, account recovery, and limiting damage.
Stop payments and contact: do not send more money or respond to the scammer.
Call your bank or card issuer: block transactions, replace the card if needed, and start a dispute or chargeback.
Secure your email first: change the email password, enable 2FA, and remove unfamiliar recovery options.
Secure other accounts: change passwords, enable 2FA, and log out of all sessions.
Scan your device: remove suspicious apps or extensions, then run a full malware scan.
Save evidence: screenshots, emails, order pages, tracking pages, wallet addresses, TXIDs, and chat logs.
Report it: to the payment provider, marketplace, social platform, exchange, or wallet service involved.
These rules are intentionally simple. Most online losses happen when decisions are rushed. Slow down, verify independently, and use payment methods and account controls that give you recourse.
Stelian leverages over a decade of cybersecurity expertise to lead malware analysis and removal, uncover scams, and educate people. His experience provides insightful analysis and valuable perspective.