


An incoming payment notice can be welcome news during a busy working day. An option to receive the money sooner makes it even more tempting.
Before selecting that option, check what the message actually establishes. A payment-looking email and a payment in your account are two very different things.
Overview
A false payment notice offers a convenient shortcut
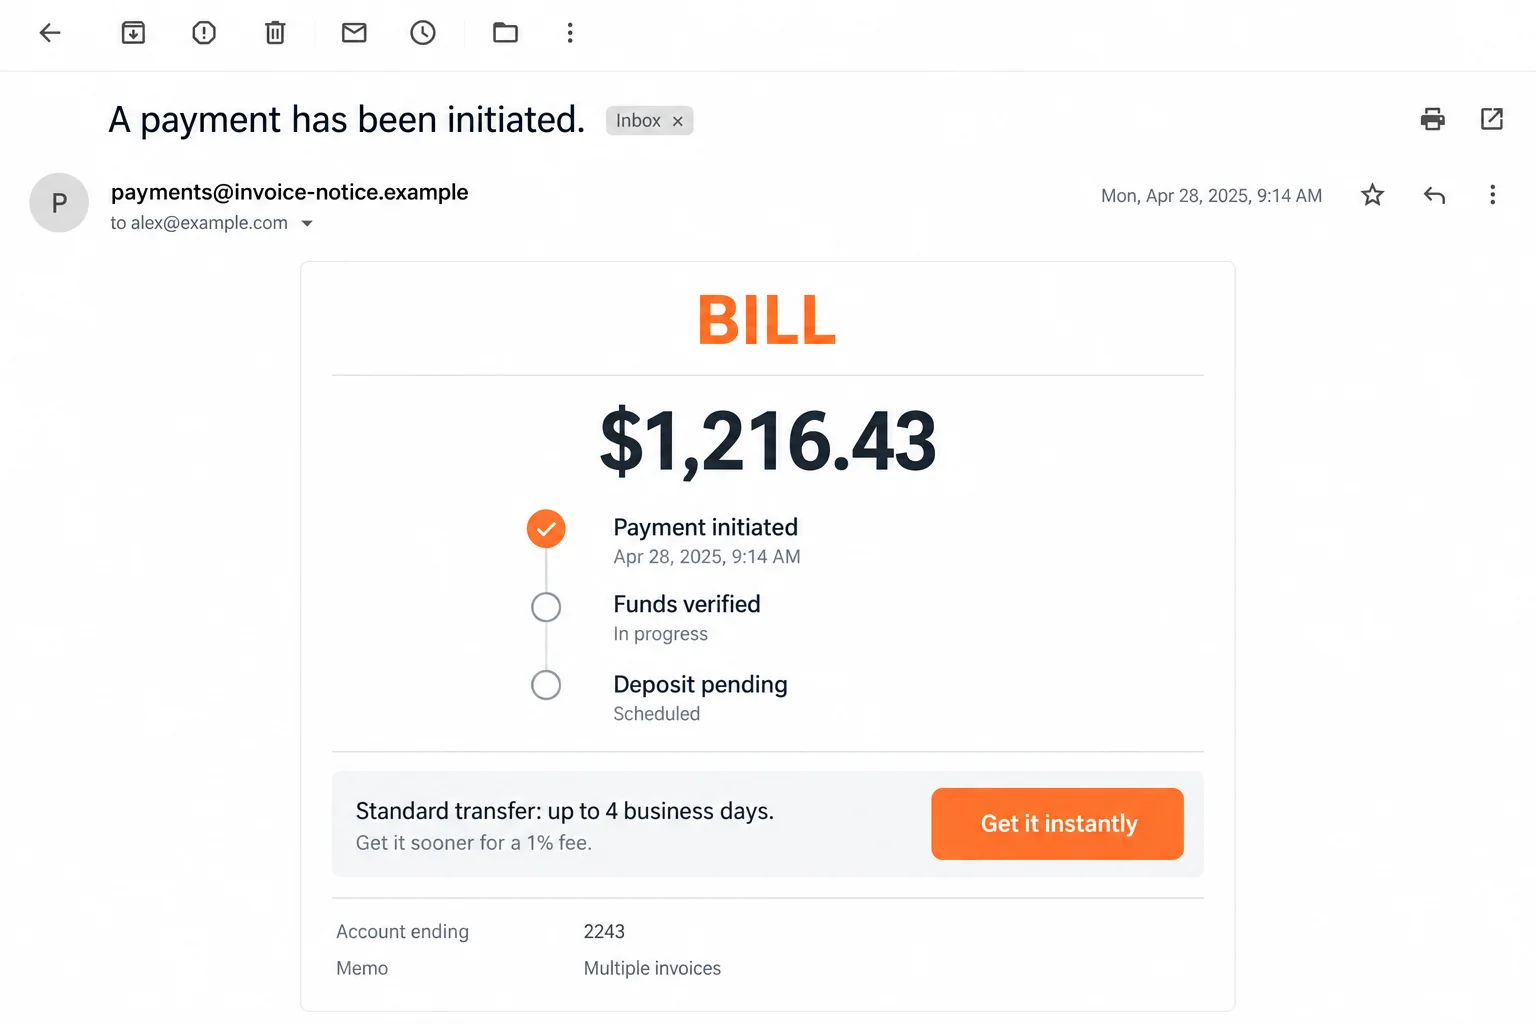
The BILL initiated payment email scam claims that $1,216.43 is on its way. It borrows the identity of the legitimate business-payments company.
The reported message presents a standard wait of up to four business days, alongside immediate access for a 1% fee.
That is the bait. The message does not establish that a customer sent you money or that the advertised shortcut belongs to BILL.
The destination was unavailable, so the exact collection form is unknown
The linked website was down when the campaign was reported. Phishing is the suspected purpose, but a working collection page was not demonstrated.
There is no confirmed record here of a specific login form, fee collection, or malware download. Don’t test the button with real information to fill that gap.
You can still reject the false notice without inventing its final screen. Don’t enter financial or account information to test where the button leads.
Verify the payment outside the email’s story
Use your established business records, genuine account access, and a known contact for the alleged payer. The email’s own progress labels are not independent evidence.
- Match the claimed payment to a real customer and outstanding invoices.
- Open your normal payment account independently, not through the notice.
- Don’t provide credentials just to investigate an unexpected payment.
- Keep any exposed bank details separate from the promised incoming funds.
- Report account compromise through genuine BILL support where applicable.
Why an Incoming Payment Is a Useful Disguise
Most people recognize a suspicious demand to pay an unfamiliar invoice. A message saying someone has paid you can meet less resistance.
You may be checking receivables, waiting for a customer, or trying to reconcile several small invoices. The notification seems to help with work already on your desk.
Would paying a little be worth getting the funds today? That’s an ordinary business decision, but it assumes the money and the offer are real.
A 1% figure can look small beside the displayed payment. But the percentage does not tell you who receives your information or whether any incoming funds exist.
Legitimate financial services can charge for speed or additional features. A paid transfer option is not, by itself, proof that a message is fraudulent.
Equally, copying a plausible feature doesn’t make a false email genuine. Assess the sender, destination, and actual payment record together.
If your business uses several payment platforms, don’t assume an unfamiliar notice is simply another customer’s preferred service. Confirm the customer and transaction first.
You should be able to investigate an alleged receivable without surrendering access to your email account or opening a stranger’s attachment.
How the BILL Initiated Payment Email Scam Works
Step 1: A precise amount makes the notice look tied to real business
The email announces a payment using a specific figure rather than a round-number prize. That detail can make it resemble an ordinary settlement notification.
A recipient may begin searching their memory for an invoice close to that amount. Once something seems to fit, they may stop questioning the notice.
A numerical coincidence isn’t enough. Check the customer, invoice identifiers, timing, and payment method through records your business already trusts.
If a company name is included, contact that customer using stored details. Don’t substitute a new number printed only in the disputed notification.
No evidence establishes how the recipient list was assembled in this campaign. Don’t assume receiving it proves that your accounting system was breached.
At the same time, an accurately named customer would still warrant verification. Familiar business details can be copied or obtained without authorizing the message.
Step 2: Payment-status language creates the impression of progress
The reported notice uses status wording and familiar account details to make the transfer appear orderly. A masked account reference lends a further administrative touch.
Those labels are text in an email. They are not a bank ledger, payment-provider audit trail, or confirmation from the person supposedly paying you.
A vague reference to several invoices can also be convenient for the sender. It may discourage checking one exact invoice against a customer-approved payment.
Don’t fill in the missing detail yourself. If you cannot match the remittance to real records, leave it unconfirmed while you investigate independently.
The notice’s historical arrival date is not a current payment deadline. A circulated old message can still be misleading without representing a fresh transfer.
Likewise, a reference number printed in the email does not become genuine merely because it looks long or technical. Ask the real provider to assess it.
Step 3: Faster access becomes the reason to follow the button
The ordinary wait is placed beside an attractive shortcut. You are encouraged to choose how quickly to receive money before establishing that money was sent.
The button’s wording makes the action sound like a service preference. That is very different from how you would assess a stranger asking for financial access.
Pause before selecting it. Open the genuine account yourself and look for an actual transaction and any options available within that verified session.
Do not treat a familiar-looking redirect or login as retroactive proof of the email. A genuine destination reached later cannot authenticate every earlier page.
If your normal account has no matching record, don’t repeatedly try the emailed route. Ask genuine support or the established payer for clarification.
There is no need to make a small payment to test the feature. An invented incoming transfer should not become an actual outgoing loss.
Step 4: Any sensitive request must be judged on its own merits
The reported destination was unavailable, so its exact request cannot be described as observed. Possible phishing outcomes depend on what a recipient actually encounters.
A mailbox login would expose a different account from a BILL login. A card form, bank-linking request, or identity upload would create different risks again.
Do not bundle them together as a generic verification step. Identify which service is being accessed and why the action is necessary.
Someone who entered information should record the fields they remember. A page error or failed sign-in is not assurance that nothing was collected.
If no information was entered and nothing was installed, say so. Receiving the message alone does not prove theft, infection, or access to business accounts.
The response should follow the real exposure, not the sender’s promise. Secure the affected account or payment method without chasing the alleged incoming funds.
Reconcile the Payment Before You Act on It
Begin with your invoice system or other established records. Identify whether your business is actually owed the amount the email announces.
If several invoices could add up to it, ask the real customer which items their payment covers. Don’t let the notice create its own reconciliation.
Keep the customer’s confirmation separate from settlement status. They may have initiated a genuine payment that still needs checking through the proper provider.
Open the provider using your existing app, bookmark, or independently verified website. Do not copy a login address from the disputed message.
Review the actual account record for matching details. Where something is unclear, obtain help through the provider’s real support process.
If the customer says no payment was sent, don’t ask the email sender to explain the discrepancy. Preserve the notice and treat it as suspicious.
If the customer confirms a different amount or method, document that difference. It may resolve an innocent accounting question or help identify a false notification.
Don’t mark an invoice paid solely because the email displays completed steps. That can create a separate bookkeeping problem even if no credentials were disclosed.
Do not send a refund for an alleged overpayment without checking genuine settlement. The sender’s screenshot is not evidence that excess money reached you.
These checks protect the business relationship too. You can ask a customer for confirmation without accusing them of fraud or forwarding a dangerous link.
Use BILL’s Genuine Security and Support Routes
The BILL Security Center provides phishing-reporting instructions and warns against replying to suspicious messages or opening their links and attachments.
It also describes account safeguards such as multifactor authentication and role-based access. Those protections are useful, but they don’t authenticate an unexpected email.
If your account is involved, return to those genuine channels. An email using the company’s name does not make its own help contact trustworthy.
BILL’s official contact page points users toward assistance with missing, delayed, or rejected payments and account issues.
Ask about the actual transaction, not whether the email’s button looks normal. A precise account question is more useful than comparing colors or fonts.
If you use American Express Vendor Pay, its BILL-hosted phishing guidance explains warning signs and the reporting route for that service.
Apply the guidance to the service you really use. Don’t assume a list of example addresses for one product covers every legitimate communication worldwide.
None of these checks requires sending a complete bank statement to an unverified correspondent. Share sensitive records only through an appropriate genuine support process.
What to Do if You Have Fallen Victim to This Scam
Stop the instant-payment interaction. Leave the linked page and retain the message. Don’t try another card, password, or button because the first attempt failed.
Write down whether you only opened the email, followed the link, entered information, approved a request, or installed anything. Avoid guessing about steps you didn’t take.
Confirm the business transaction separately. Check the real invoice and payment records. Contact the alleged payer through details already stored in your business records.
If a genuine payment exists, manage it through the actual provider. Its existence does not automatically make this particular notice or shortcut safe.
Secure whichever login was disclosed. Change that account’s password through its genuine website and contact support about unfamiliar sessions, settings, or recovery changes.
If it was your business mailbox, tell the administrator. Ask about message rules and related account access rather than only changing the payment-platform password.
Notify the financial provider about exposed payment details. Explain any card submission, bank-linking action, transfer, or code approval. Provide real transaction references where available.
Ask what protective action or dispute process applies. Do not assume a 1% advertised fee limits the possible exposure to that percentage.
Alert the appropriate people inside the business. Tell the account owner, finance team, or security contact what happened. Pause reliance on the disputed notice.
Review relevant payment-setting or contact changes through authorized staff. Don’t make broad changes to customer records just because the email claimed a transfer was pending.
Report the impersonation using verified instructions. Obtain BILL’s current reporting address from its Security Center. Use your email provider’s phishing-report option as well.
Include the original message where appropriate, but keep passwords and live codes out of your report. Preserve any support reference for later follow-up.
Investigate unwanted software if that exposure occurred. If you installed a suspicious attachment, extension, or remote tool, involve IT and use updated protection such as Malwarebytes.
AdGuard can reduce some misleading advertising, not validate a payment. A clean scan does not recover disclosed credentials, repair bookkeeping, or reverse an actual transfer.
Is Your Device Infected? Run a Free Malware Scan
Slow performance, constant pop-ups, or strange behavior? These are classic signs of a malware infection. A quick way to check is to scan your device with Malwarebytes Free, one of the most trusted malware removal tools available. If you only visited a scam page and didn’t download or install anything, this scan is optional.
The free version detects and removes the most common threats, including:
- Adware — the cause of those annoying pop-ups
- Browser hijackers — unwanted redirects and changed homepages
- Trojans and spyware — hidden programs stealing your data
- Potentially unwanted programs (PUPs) — software you never asked for
👉 Select your device below — Windows, Mac, or Android — then follow the simple steps to download Malwarebytes, scan your system, and remove any threats it finds. The scan usually takes 5 to 20 minutes.
Run a Malware Scan with Malwarebytes for Windows
Malwarebytes is one of the most popular and trusted anti-malware tools for Windows — and it’s completely free for removing infections. It catches threats that many antivirus programs miss, including adware, browser hijackers, and trojans. Follow the steps below to scan your PC and remove what Malwarebytes finds.
Download Malwarebytes
Click the button below to download the latest version of Malwarebytes for Windows from the official source. The free version is all you need — it will scan your computer and remove adware, browser hijackers, and other malicious software at no cost.
Download MalwarebytesOfficial installer for Windows 11 and 10. Your download starts right away.Want real-time protection? See Malwarebytes Premium Malwarebytes Free for WindowsScans and removes malware at no cost
-
Install Malwarebytes
When the download finishes, open your Downloads folder and double-click the MBSetup file. If Windows shows a User Account Control pop-up, click “Yes” to allow the installation.
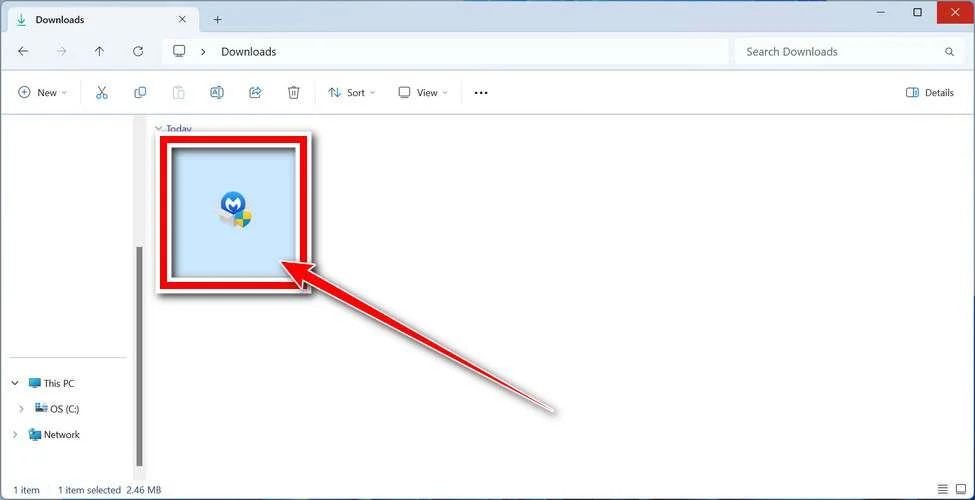
Follow the On-Screen Prompts to Install Malwarebytes
The setup wizard will walk you through a few quick screens:
-
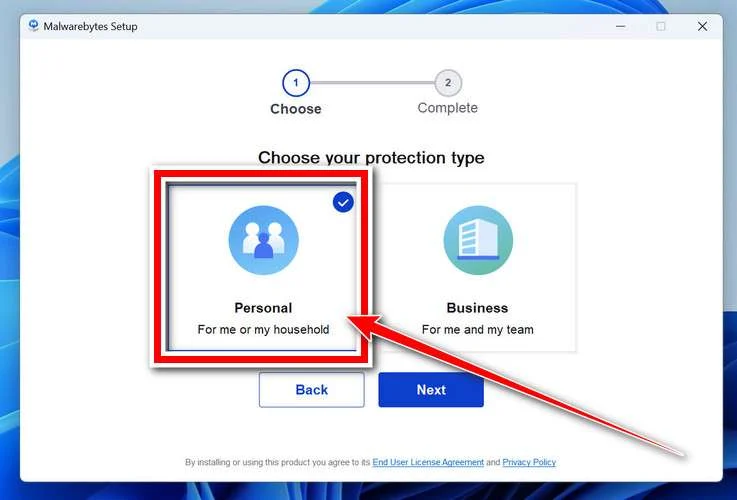
Choose where you’re installing the program — “Personal Computer” or “Work Computer” — then click Next.
-
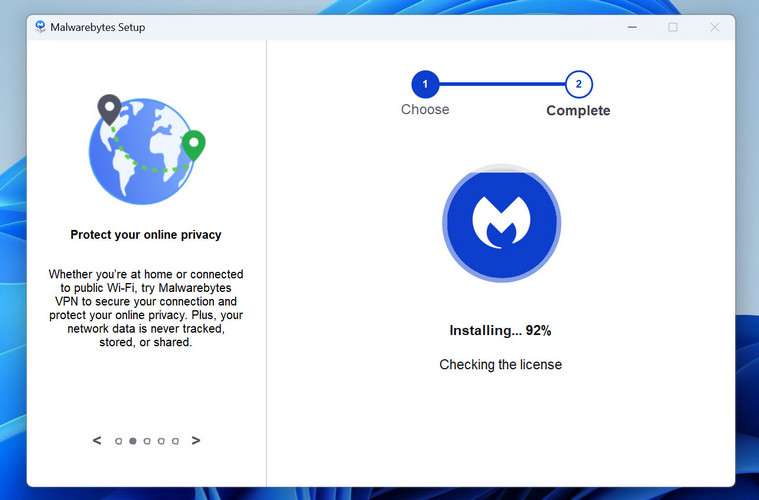
Malwarebytes will now install on your device. This usually takes under a minute.
-
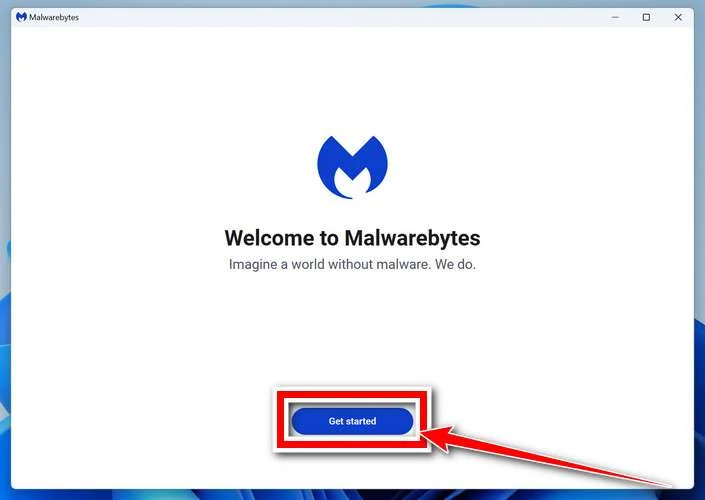
When installation is complete, the “Welcome to Malwarebytes” screen will open automatically.
-
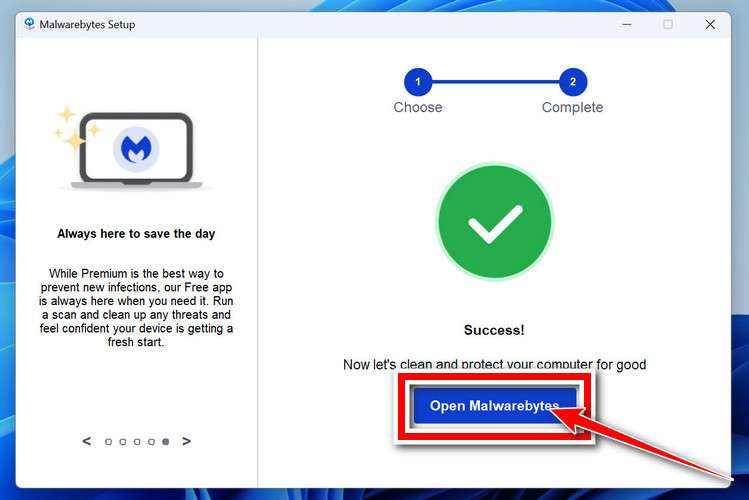
On the final screen, click Open Malwarebytes to launch the program.
-
Optional: Check for rootkits with a Custom Scan
You don’t need to change any settings for a normal scan. The standard Threat Scan in the next step is enough for most problems, so you can go straight to it.
If you also want to check for rootkits, use a Custom Scan. In current versions of Malwarebytes, rootkit scanning is only available there:
- On the Scanner tile, click the three-dot menu and select Advanced Scan.
- Choose Custom Scan. In its options, check Scan for rootkits.
- Select your system drive (usually C:\) as the location to scan, then start the scan. It takes longer than a Threat Scan.
- When it finishes, review and quarantine the results as described in the steps below.
Rootkit scanning isn’t available on Windows devices with ARM processors.
Start the Scan
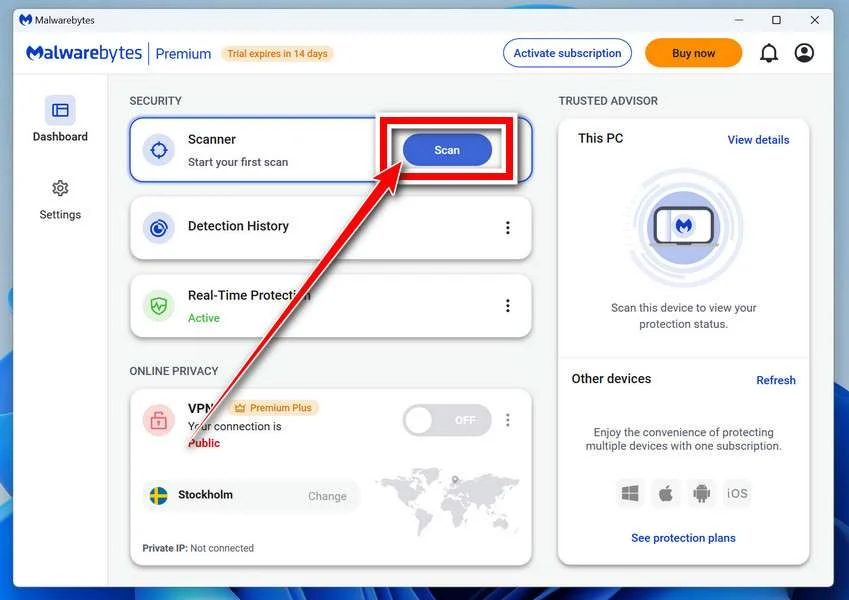
Click the blue Scan button. Malwarebytes will automatically update its virus database and start checking your computer for malware.
-
Wait for the Scan to Finish
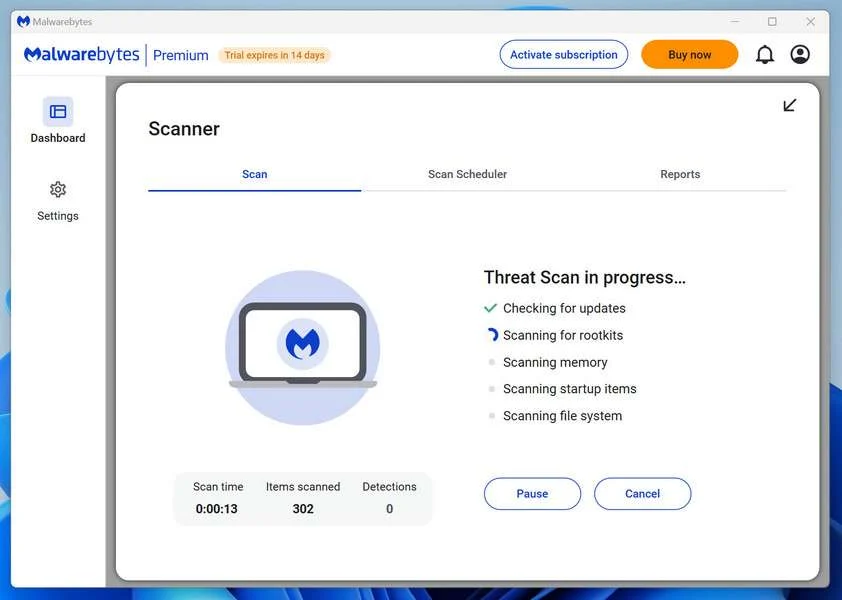
The scan checks your entire system for browser hijackers and other malicious programs, so it can take 5 to 20 minutes depending on your computer. Feel free to do something else — just check back occasionally to see the progress.
-
Quarantine the Detected Threats
When the scan is done, you’ll see a list of everything Malwarebytes found — malware, adware, and potentially unwanted programs. Click the “Quarantine” button to remove all of them at once.
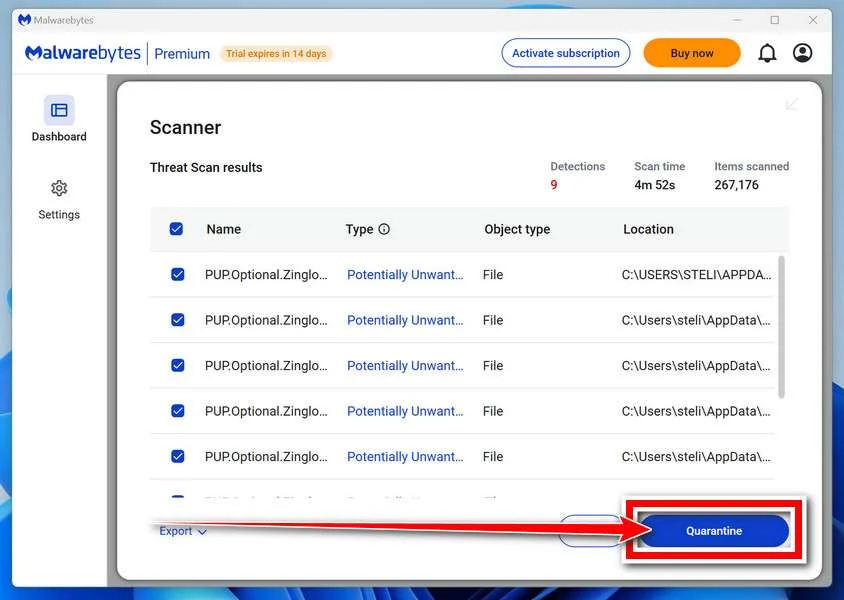
Malwarebytes will now remove the malicious files and registry entries and move them safely into quarantine.
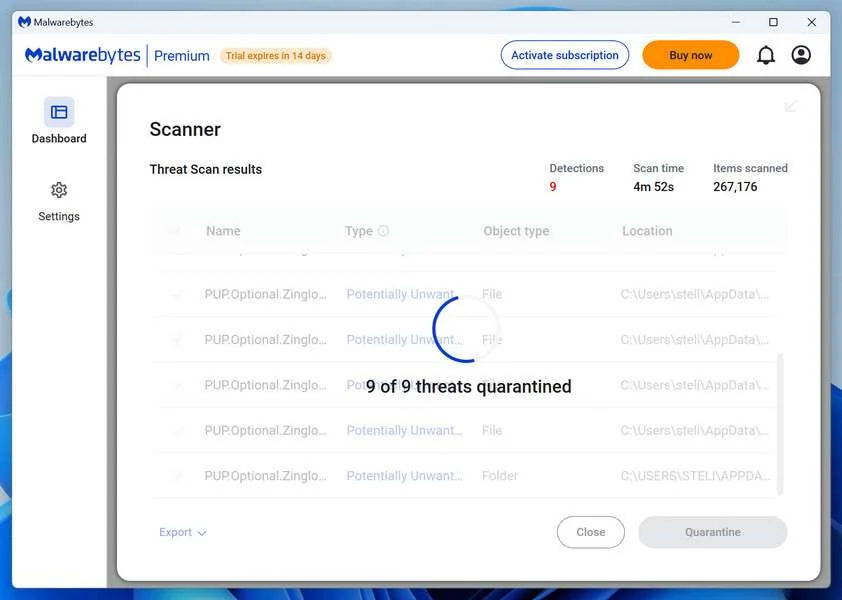
-
Restart Your Computer
Some threats can only be fully removed after a reboot. If Malwarebytes asks you to restart, click Yes. Once you’re logged back in, Malwarebytes has finished removing the threats it found.
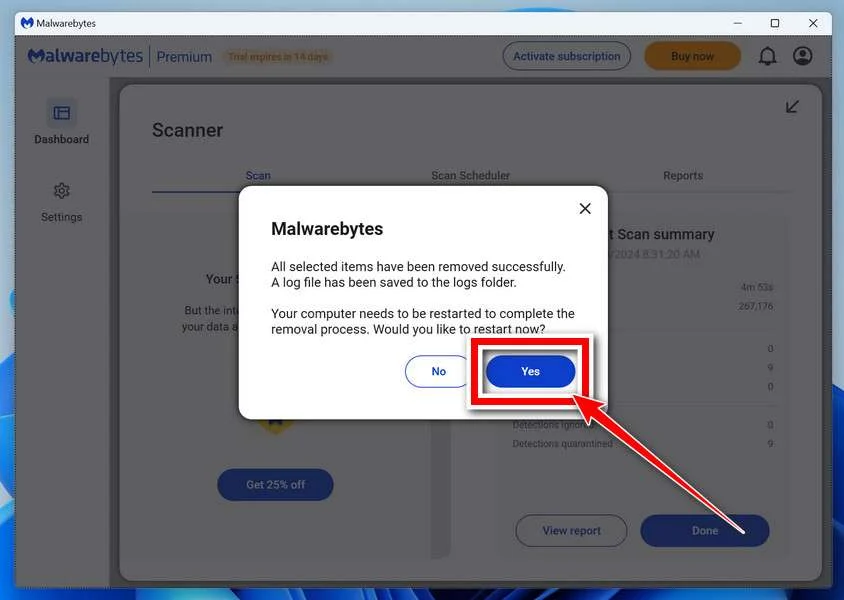
When the scan is done, check whether the problems you noticed have stopped. If they continue, see the options below.
If you are still having problems with your computer after completing these instructions, then please follow one of the steps:
- Run a computer scan with ESET Online Scanner
- Ask for help in our Windows Malware Removal Help & Support forum.
Run a Malware Scan with Malwarebytes for Mac
Malwarebytes for Mac is a free on-demand scanner that removes the malware other security software tends to miss — adware, browser hijackers, and unwanted programs included. Cleaning an infected Mac with Malwarebytes has always been completely free, and it’s our go-to recommendation. Follow the steps below to scan your Mac and remove what Malwarebytes finds.
-
Download Malwarebytes for Mac
Click the button below to download the latest version of Malwarebytes for Mac.
Download MalwarebytesOfficial installer for macOS. Your download starts right away.Want real-time protection? See Malwarebytes PremiumMalwarebytes Free for MacScans and removes malware at no cost -
Open the Malwarebytes setup file
When the download finishes, open your Downloads folder and double-click the setup file to begin the installation.
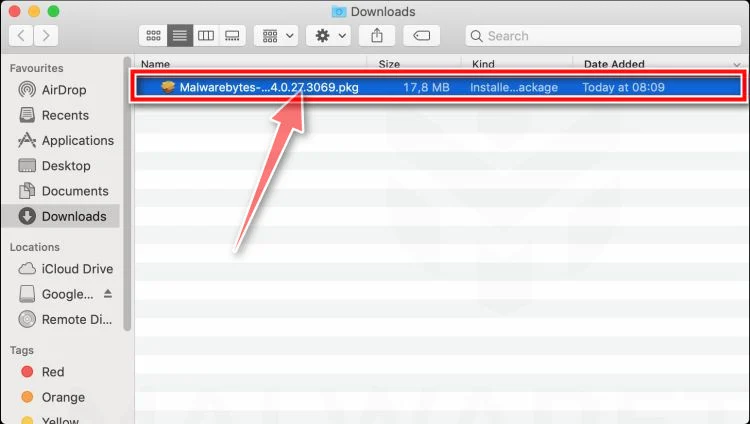
-
Follow the On-Screen Prompts to Install Malwarebytes
The Malwarebytes for Mac Installer will guide you through a few quick screens. Click “Continue” and keep following the prompts until the installation completes.
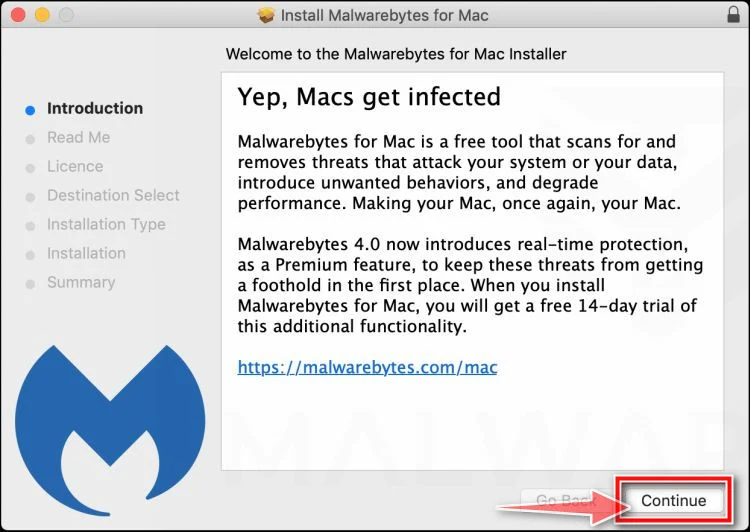
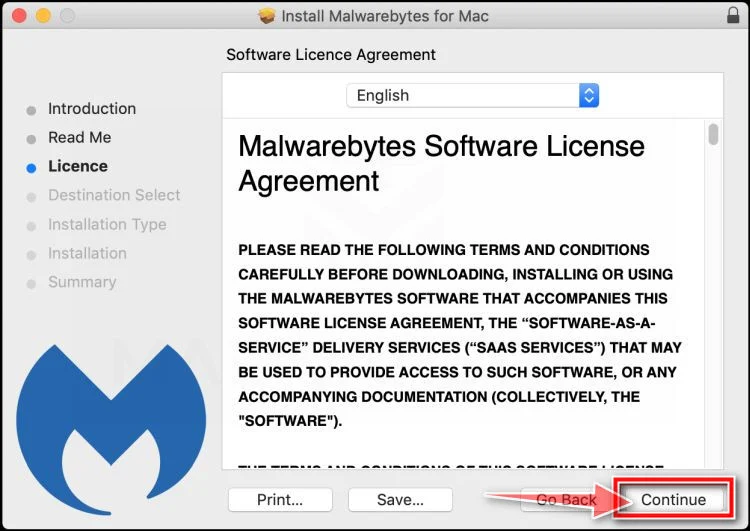
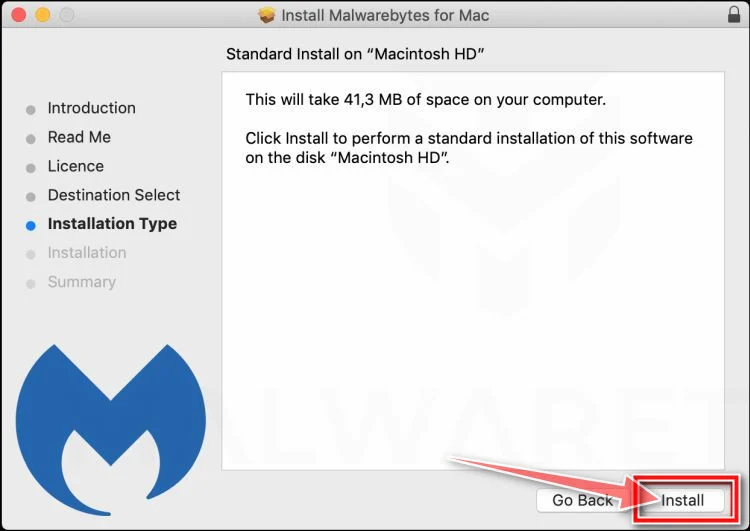
When the installation is complete, Malwarebytes opens to the Welcome to Malwarebytes screen. Click “Get started“.
Malwarebytes needs Full Disk Access to check your whole Mac. When it asks, open System Settings > Privacy & Security > Full Disk Access, turn on Malwarebytes (it may be listed as Malwarebytes Protection), and confirm with your password or Touch ID. Then return to Malwarebytes. On macOS Monterey and earlier, this setting is in System Preferences > Security & Privacy > Privacy.
-
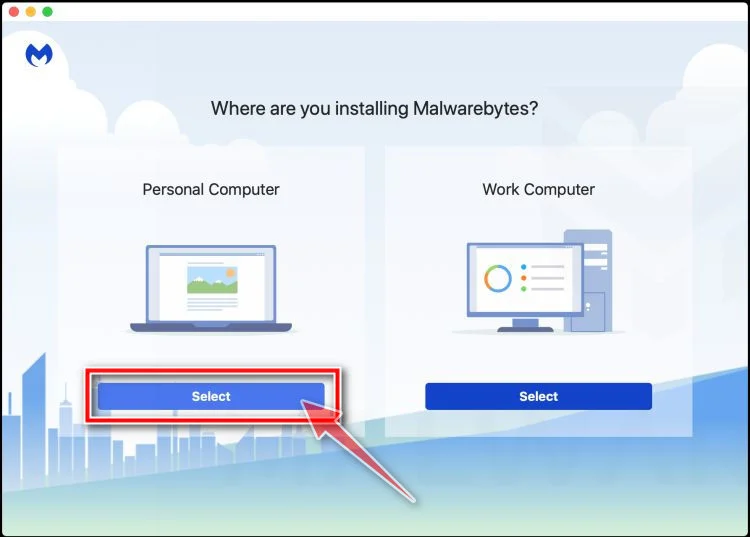
Select “Personal Computer” or “Work Computer”
Malwarebytes will ask what type of computer you’re installing it on. Click either Personal Computer or Work Computer, whichever applies.
-
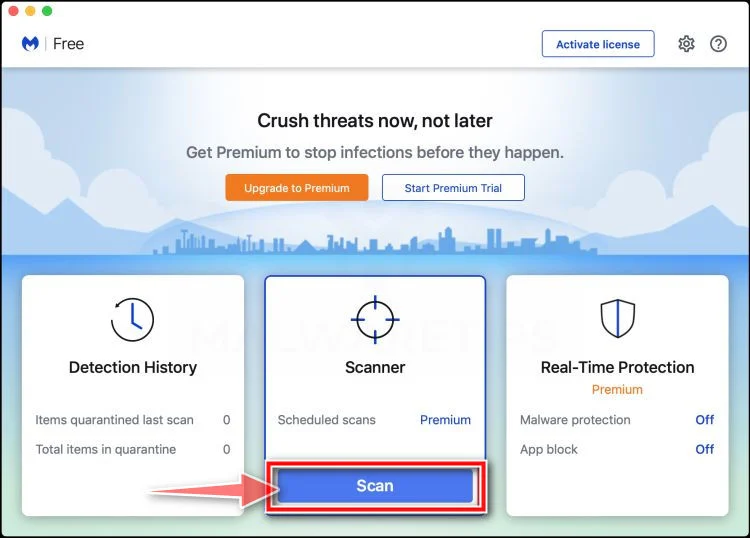
Start the Scan
Click the “Scan” button. Malwarebytes will automatically update its detection database and begin checking your Mac for malware.
-
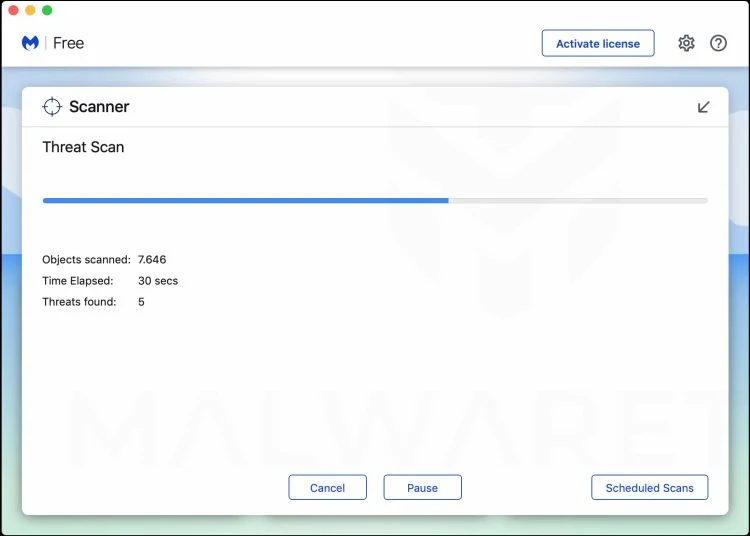
Wait for the Scan to Finish
Malwarebytes will scan your Mac for adware, browser hijackers, and other malicious programs. This can take a few minutes, so feel free to do something else — just check back occasionally to see the progress.
-
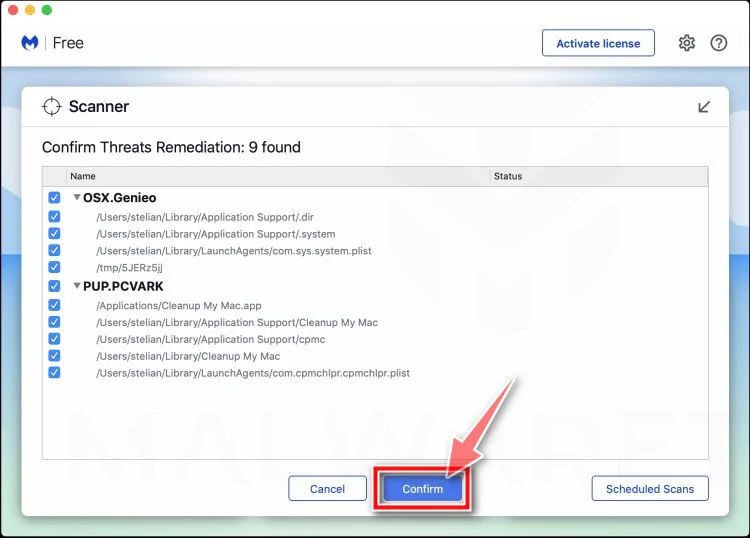
Quarantine the Detected Threats
When the scan is done, you’ll see a list of everything Malwarebytes found. Click the “Quarantine” button to remove all the threats at once.
-
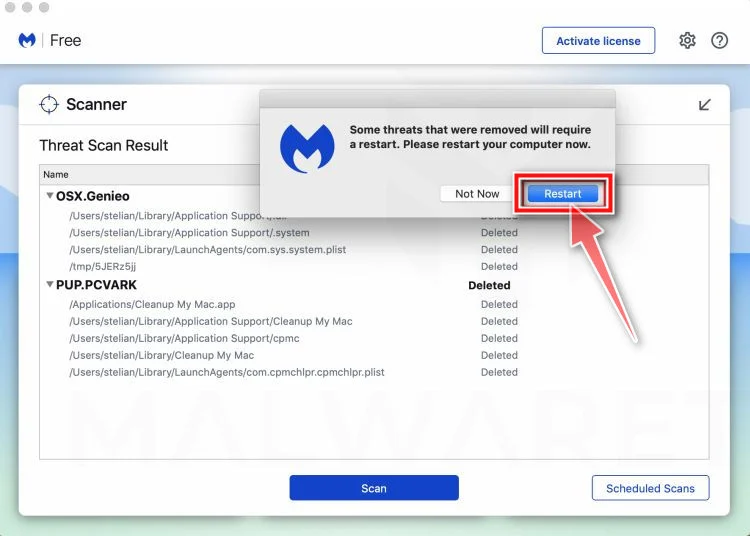
Restart Your Mac
Malwarebytes will now remove all the malicious files it found. Some threats can only be fully removed after a reboot — if Malwarebytes asks you to restart, allow it. Once you’re logged back in, check whether the problems you noticed have stopped. If they come back, save the scan report and ask for help in our forum.
If the problems you noticed continue after the scan, see the options below.
If you are still experiencing problems while trying to remove a malicious program from your computer, please ask for help in our Mac Malware Removal Help & Support forum.
Run a Malware Scan with Malwarebytes for Android
Malwarebytes for Android scans your phone or tablet for malware, adware, and potentially unwanted apps. The free version scans only when you start a scan. Real-time protection, which checks apps automatically, is part of the paid Premium version.
-
Download Malwarebytes for Android.
You can download Malwarebytes for Android by clicking the link below.
Get Malwarebytes for AndroidOpens Google Play in a new tab.Want real-time protection? See Malwarebytes Premium for AndroidMalwarebytes for AndroidScans your phone and removes malware at no cost -
Install Malwarebytes for Android on your phone.
In the Google Play Store, tap “Install” to install Malwarebytes for Android on your device.
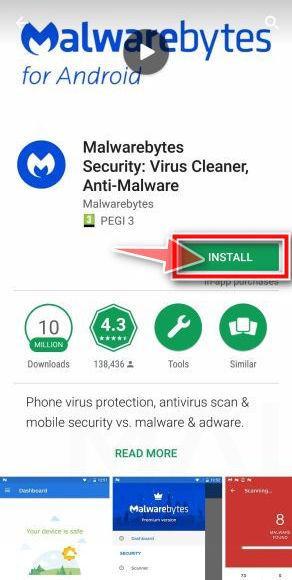
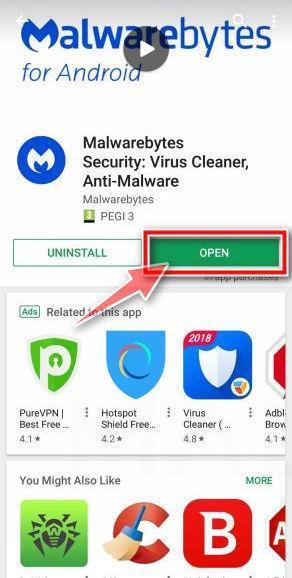
When the installation process has finished, tap “Open” to begin using Malwarebytes for Android. You can also open Malwarebytes by tapping on its icon in your phone menu or home screen.
-
Follow the on-screen prompts to complete the setup process
When Malwarebytes opens, it walks you through a short setup. Tap Get started and follow the prompts. If you see an offer for a trial or a paid plan, read it before you accept. You can skip it and keep using the free scanner.
Malwarebytes will ask for permission to access the files on your phone so it can scan them. Tap Allow, or turn on the permission in the Android screen that opens, then return to Malwarebytes.
-
Run a scan with Malwarebytes for Android
On the main screen, tap Scan now. In some versions, you open the menu, tap Scanner, and then tap Run a scan.
-
Wait for the Malwarebytes scan to complete.
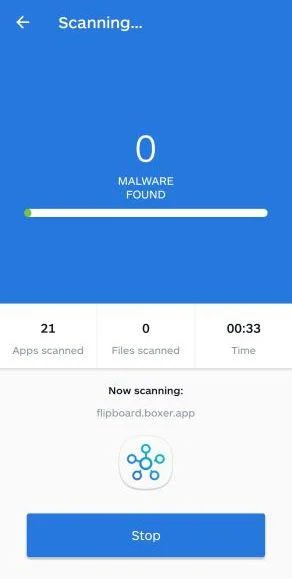
Malwarebytes will now start scanning your phone for adware and other malicious apps. This process can take a few minutes, so we suggest you do something else and periodically check on the status of the scan to see when it is finished.
-
Remove the detected apps.
When the scan has been completed, you will see a list of the threats that Malwarebytes for Android has detected. Next to each detected item, tap the menu icon (three dots), then choose to uninstall the app or delete the file. Android then asks you to confirm. Tap OK or Uninstall to remove the app.
-
Restart your phone.
When the detected apps are removed, restart your phone if Malwarebytes asks you to. Then check whether the problems you noticed have stopped.
If the problems you noticed continue after the scan, see the options below.
If you are still having problems with your phone after completing these instructions, then please follow one of the steps:
- Ask for help in our Mobile Malware Removal Help & Support forum.
- Only as a last resort, reset your phone to factory settings. Read the warning below first.
- Back up your photos, videos, files, and messages, for example to your Google account or a computer.
- Make sure you know your Google account email and password. The phone asks for them after the reset. If you changed the password recently, Google recommends waiting 24 hours before you reset.
- On a Samsung phone, also make sure you know your Samsung account password.
- If you use an authenticator app for two-step verification, move your accounts to another device or save your backup codes first.
Stay Protected: Block Ads and Malicious Sites
No scan can prove a device is completely clean, so it helps to block threats before they reach you. Most infections start with a malicious ad or a fake download button — so blocking them at the source is your best defense.
We recommend AdGuard, which blocks malicious ads, phishing pages, and dangerous redirects before they can reach you.
👉 Download AdGuard and browse safely
Keep a False Receivable From Becoming a Wider Business Problem
An incident report should say whether the business actually lost money or only received a false notice. Both deserve attention, but they are not the same outcome.
If an employee clicked without disclosing anything, encourage prompt reporting. A punitive reaction can make the next person hide a more serious exposure.
If credentials were supplied, investigate their account’s real permissions. A read-only user and a payment approver can create different levels of risk.
Preserve relevant approvals and account records before making corrective changes. Authorized staff should be able to explain what changed and why.
When notifying customers, avoid sending the suspicious button onward. Describe the message and tell them which established contact route to use.
Finally, check that an invoice wasn’t mistakenly closed or an expected payment overlooked. Restoring accurate records is part of recovery, even when no unauthorized transaction occurred.
Frequently Asked Questions
Is the $1,216.43 payment in this email genuine?
The reported imitation notice makes a false payment claim. It does not establish that funds were sent to you.
Check your actual account and the supposed payer before relying on it.
Does a 1% instant-transfer fee always mean fraud?
No. Legitimate services can have paid convenience options. The issue is whether the notification and destination are genuine, not merely whether a fee exists.
Use the provider’s independently opened account to examine any real offer and applicable terms.
What did the linked phishing page collect?
The destination was unavailable during the reported investigation. A specific working form or set of collected fields was not established.
If you encountered a page, document what you actually entered and tell the affected provider.
Does a masked account number authenticate the notice?
No. A partial number or long payment reference can be copied or fabricated. It is not an independent transaction record.
Match the payment through genuine business and provider records instead.
Do I need to change my password after merely receiving it?
Receipt alone is not evidence that your password was exposed. Change and investigate affected credentials if you disclosed them or observe relevant compromise.
Report the false message without assuming every account needs the same response.
Can I safely ask the sender whether the payment is real?
Don’t use the disputed sender to validate its own story. Contact the established payer or genuine service independently.
There is no need to provide an account login to ask whether a customer paid an invoice.
The Bottom Line
The fake BILL notice turns an alleged incoming payment into a reason to follow an unverified shortcut. Check the receivable before considering how quickly to collect it.
If information was already disclosed, secure the actual account or payment method involved. Don’t let a fictional $1,216.43 distract from the real exposure.

Join the discussion
0 commentsShare your experience or ask a question about this article.
Discussion
Start the conversation
Have a question or something useful to share? Add the first comment.