

File Recovery is a malicious program that will display fake alerts, claiming that several hard drive errors and computer issues were detected on your machine.
In reality, none of the reported issues are real, and are only used to scare you into purchasing File Recovery and stealing your personal financial information.
Apart from the bogus alerts and warning,this rogue software has changed your desktop background to a solid black color,has hidden your files and folders and it’s causing browser redirects.
As part of its self-defense mechanism,File Recovery has disabled the Windows system utilities, including Task Manager and Windows Registry and is block you from running certain programs that could lead to its removal.
If your computer is infected with File Recovery virus,then you are seeing this images:
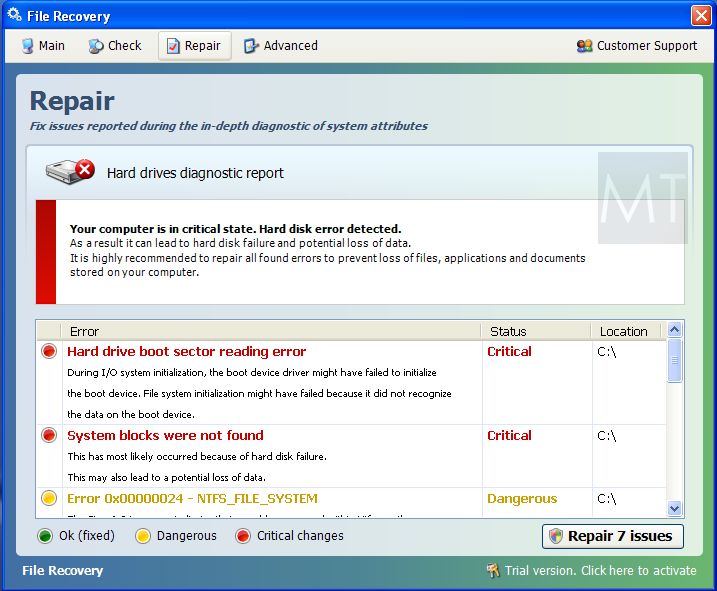
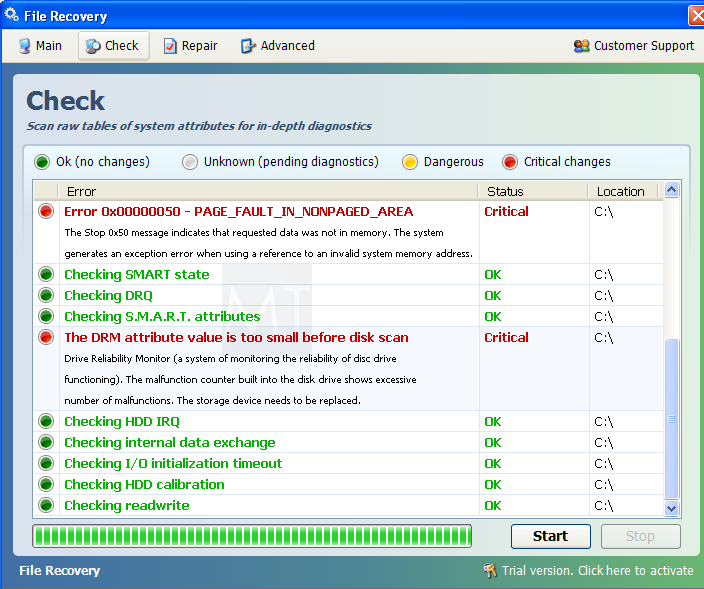
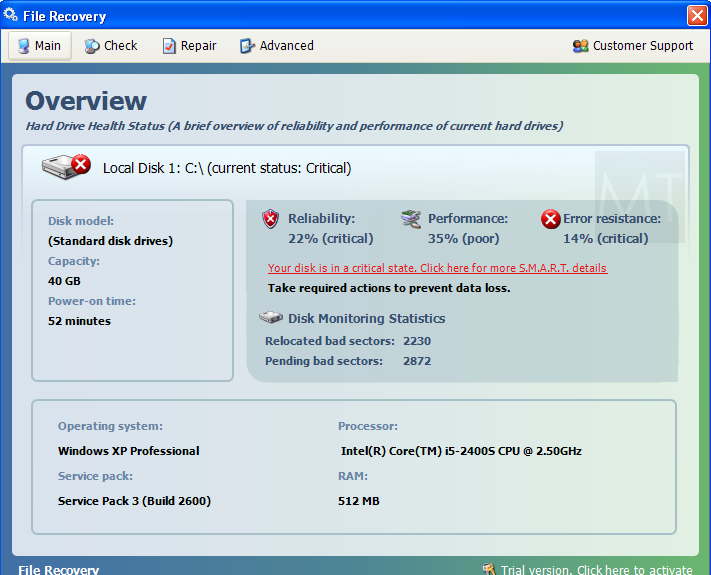
We strongly advise you to follow our File Recovery virus removal guide and ignore any alerts that this malicious software might generate.
Under no circumstance should you buy this rogue security software as this could lead to identity theft,and if you have, you should contact your credit card company and dispute the charge stating that the program is a scam and a computer virus.
Registration codes for File Recovery
As an optional step,you can use the following license key to register File Recovery virus and stop the fake alerts.
File Recovery activation code: 56723489134092874867245789235982
Please keep in mind that entering the above registration code will NOT remove File Recovery from your computer , instead it will just stop the fake alerts so that you’ll be able to complete our removal guide more easily.
File Recovery Removal Instructions
STEP 1 : Start your computer in Safe Mode with Networking
- Remove all floppy disks, CDs, and DVDs from your computer, and then restart your computer.
- Press and hold the F8 key as your computer restarts.Please keep in mind that you need to press the F8 key before the Windows start-up logo appears.
Note: With some computers, if you press and hold a key as the computer is booting you will get a stuck key message. If this occurs, instead of pressing and holding the “F8 key”, tap the “F8 key” continuously until you get the Advanced Boot Options screen. - On the Advanced Boot Options screen, use the arrow keys to highlight Safe Mode with Networking , and then press ENTER.
![[Image: Safemode.jpg]](data:image/gif;base64,R0lGODlhAQABAAAAACH5BAEKAAEALAAAAAABAAEAAAICTAEAOw== "Safe Mode with Networking screen")
![[Image: Safemode.jpg]](http://malwaretips.com/images/removalguide/safemode.jpg "Safe Mode with Networking screen")
STEP 2: Remove File Recovery malicious proxy server
File Recovery may add a proxy server which prevents the user from accessing the internet,follow the below instructions to remove the proxy.
- Start the Internet Explorer browser and if you are using Internet Explorer 9 ,click on the gear icon (Tools for Internet Explorer 8 users) ,then select Internet Options.
- Go to the tab Connections.At the bottom, click on LAN settings.
- Uncheck the option Use a proxy server for your LAN. This should remove the malicious proxy server and allow you to use the internet again.
![[Image: IE gear icon]](http://malwaretips.com/images/removalguide/icongear.jpg "Gear Icon") (Tools for Internet Explorer 8 users) ,then select Internet Options.
(Tools for Internet Explorer 8 users) ,then select Internet Options.![[Image: Internet-options-IE.png]](http://malwaretips.com/images/removalguide/ie1.png "Internet Options in IE")
![[Image: Remove-proxy-server2.png]](http://malwaretips.com/images/removalguide/ie2.png "Connections tab in Internet Explorer")
![[Image: Remove-proxy-server3.png]](http://malwaretips.com/images/removalguide/ie3.png "Uncheck the option Use a proxy server for your LAN")
If you are a Firefox users, go to Firefox(upper left corner) → Options → Advanced tab → Network → Settings → Select No Proxy
STEP 3: Run RKill to terminate known malware processes associated with File Recovery.
RKill is a program that will attempt to terminate all malicious processes associated with File Recovery virus,so that we will be able to perform the next step without being interrupted by this malicious software.
Because this utility will only stop File Recovery running process, and does not delete any files, after running it you should not reboot your computer as any malware processes that are configured to start automatically will just be started again.
- While your computer is in Safe Mode with Networking ,please download the latest official version of RKill.Please note that we will use a renamed version of RKILL so that File Recovery won’t block this utility from running.
RKILL DOWNLOAD LINK (This link will automatically download RKILL renamed as iExplore.exe) - Double-click on the iExplore.exe icon in order to automatically attempt to stop any processes associated with File Recovery.
- RKill will now start working in the background, please be patient while the program looks for various malware programs and tries to terminate them.
IF you are having problems starting or running RKill, you can download any other renamed versions of RKill from here. - When Rkill has completed its task, it will generate a log. You can then proceed with the rest of the guide.
![[Image: run-rkill-1.png]](http://malwaretips.com/images/removalguide/rkill1.png "RKILL ICON")
![[Image: run-rkill-2.png]](http://malwaretips.com/images/removalguide/rkill2.png "RKILL Command prompt")
![[Image: File Recovery virus rkill3.jpg]](http://malwaretips.com/images/removalguide/rkill3.png "RKILL LOG")
WARNING: Do not reboot your computer after running RKill as the malware process will start again , preventing you from properly performing the next step.
STEP 4: Remove File Recovery malicious files with Malwarebytes Anti-Malware FREE
- Download the latest official version of Malwarebytes Anti-Malware FREE.
MALWAREBYTES ANTI-MALWARE DOWNLOAD LINK (This link will open a download page in a new window from where you can download Malwarebytes Anti-Malware Free) - Start the Malwarebytes’ Anti-Malware installation process by double clicking on mbam-setup file.
- When the installation begins, keep following the prompts in order to continue with the setup process. Do not make any changes to default settings and when the program has finished installing, make sure you leave both the Update Malwarebytes’ Anti-Malware and Launch Malwarebytes’ Anti-Malware checked. Then click on the Finish button. If Malwarebytes’ prompts you to reboot, please do not do so.
- Malwarebytes Anti-Malware will now start and you’ll be prompted to start a trial period , please select ‘Decline‘ as we just want to use the on-demand scanner.
- On the Scanner tab,select Perform full scan and then click on the Scanbutton to start scanning your computer.
- Malwarebytes’ Anti-Malware will now start scanning your computer for File Recovery malicious files as shown below.
- When the scan is finished a message box will appear, click OK to continue.
- You will now be presented with a screen showing you the malware infections that Malwarebytes’ Anti-Malware has detected.Please note that the infections found may be different than what is shown in the image.Make sure that everything is Checked (ticked) and click on the Remove Selected button.
- Malwarebytes’ Anti-Malware will now start removing the malicious files.After completing this task it will display a message stating that it needs to reboot,please allow this request and then let your PC boot in Normal mode.
![[Image: Malwarebytes Installer]](http://malwaretips.com/images/removalguide/malwarebytes-setup.png "Malwarebytes Anti-Malware Installer")
![[Image: Finishing Malwarebytes installation]](http://malwaretips.com/images/removalguide/update-malwarebytes.png "Malwarebytes last setup screen")
![[Image: Decline Malwarebytes trial]](http://malwaretips.com/images/removalguide/malwarebytes-trial.png "Decline trial period in Malwarebytes Anti-Malware")
![[Image: Starting a full system sca]](http://malwaretips.com/images/removalguide/start-scan-malwarebytes.png "Perform a Full System Scan with Malwarebytes Anti-Malware")
![[Image: Malwarebytes scanning for malicious files]](http://malwaretips.com/images/removalguide/scan-malwarebytes.png "Malwarebytes Anti-Malware scanning for File Recovery virus")
![[Image: Malwarebytes scan results]](http://malwaretips.com/images/removalguide/results-malwarebytes.png "Malwarebytes when the system scan has finished")
![[Image: Infections found by Malwarebytes]](http://malwaretips.com/images/removalguide/detection-malwarebytes.png "Removing the infections found by Malwarebytes")
STEP 5: Double check your system for any left over infections with HitmanPro
- This step can be performed in Normal Mode ,so please download the latest official version of HitmanPro.
HITMANPRO DOWNLOAD LINK (This link will open a download page in a new window from where you can download HitmanPro) - Double click on the previously downloaded fileto start the HitmanPro installation.
IF you are experiencing problems while trying to starting HitmanPro, you can use the “Force Breach” mode.To start this program in Force Breach mode, hold down the left CTRL-key when you start HitmanPro and all non-essential processes are terminated, including the malware process. (How to start HitmanPro in Force Breach mode – Video) - Click on Next to install HitmanPro on your system.
- The setup screen is displayed, from which you can decide whether you wish to install HitmanPro on your machine or just perform a one-time scan, select a option then click on Next to start a system scan.
- HitmanPro will start scanning your system for malicious files as seen in the image below.
- Once the scan is complete,you’ll see a screen which will display all the malicious files that the program has found.Click on Next to remove this malicious files.
- Click Activate free license to start the free 30 days trial and remove the malicious files.
- HitmanPro will now start removing the infected objects.If this program will ask you to restart your computer,please allow this request.
![[Image: HitmanPro Icon]](http://malwaretips.com/images/removalguide/hpro1.png "HitmanPro Installer")
![[Image: Starting HitmanPro]](http://malwaretips.com/images/removalguide/hitmanpro36-start.png "HitmanPro installation process")
![[Image: HitmanPro installation screen]](http://malwaretips.com/images/removalguide/hitmanpro36-installation.png "HitmanPro setup options")
![[Image: HitmanPron scanning for File Recovery virus]](http://malwaretips.com/images/removalguide/hitmanpro36-scan.png "HitmanPro while scanning for File Recovery virus virus")
![[Image: HitmanPro scan results]](http://malwaretips.com/images/removalguide/hitmanpro36-results.png "HitmanPro displaying scan results")
![[Image: Activate HitmanPro license]](http://malwaretips.com/images/removalguide/hitmanpro36-activation.png "Activate the HitmanPro free 30 days trial to remove any detected infections")
STEP 6 : Restore your shortcuts and remove any left over malicious registry keys
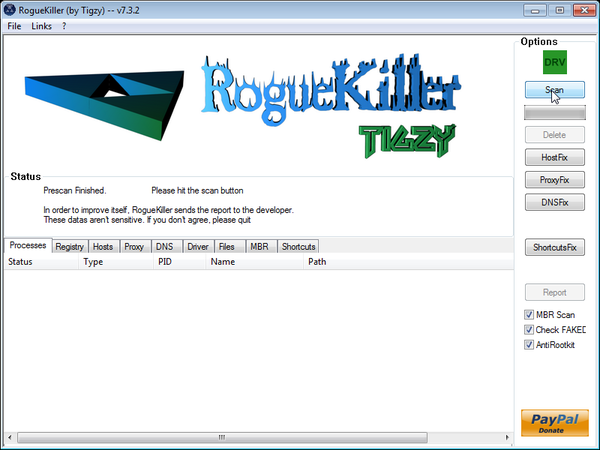
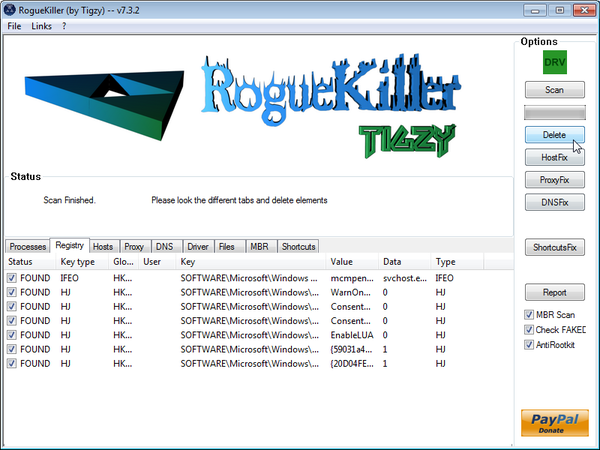
File Recovery has moved your shortcuts files in the Temporary Internet folder and added some malicious registry keys to your Windows installation , to restore your files we will need to perform a scan with RogueKiller.
- Please download the latest official version of RogueKiller.
ROGUEKILLER DOWNLOAD LINK (This link will automatically download RogueKiller on your computer) - Double click on RogueKiller.exe to start this utility and then wait for the Prescan to complete.This should take only a few seconds and then you can click the Start button to perform a system scan.
- After the scan has completed, press the Delete button to remove any malicious registry keys.
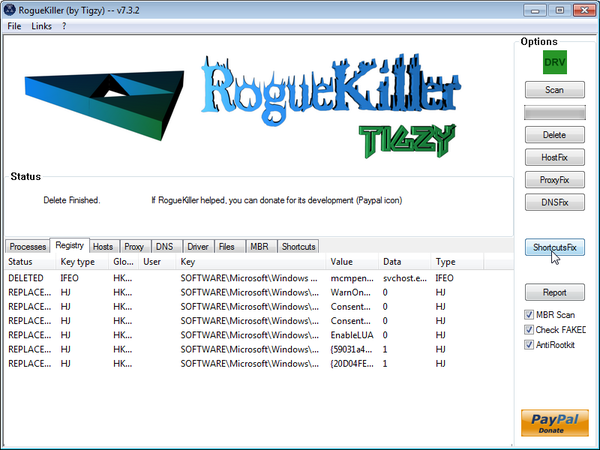
- Next we will need to restore your shortcuts, so click on the ShortcutsFix button and allow the program to run.
STEP 7: Unhide your files and folders
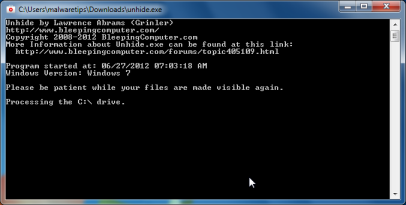
File Recovery modifies your file system in such a way that all files and folders become hidden, to restore the default settings , you’ll need to run the below program.
- Download the Unhide utility, to unhide your files and folders.
UNHIDE.EXE DOWNLOAD LINK (This link will automatically download the Unhide utility on your computer) - Double-click on the Unhide.exe icon on your desktop and allow the program to run.The whole process should not take more than 10 minutes to complete,and at the end this utility will generate a report.
STEP 8: Get your desktop look back!
File Recovery changes your desktop background to a solid black color,to change it back to default one follow the below instruction.
- Windows XP : Click on the Start button and then select Control Panel. When the Control Panel opens, please click on the Display icon. From this screen you can now change your Theme and desktop background.
- Windows 7 and Vista : Click on the Start button and then select Control Panel. When the Control Panel opens, please click on the Appearance and Personalization category. Then select Change the Theme or Change Desktop Background to revert back to your original Theme and colors.









Hi, I’m a brazilian girl, with the same problem, and so happy because you help me!!! Thanks so much!!!
Outstanding tutorial both in level of detail and completeness. You saved me a massive headache…thanks a ton!
Thank you! This has been a huge help. The only thing I will add is that the version that I got shut down my internet. I checked another site and was able to use the RogueKiller to get it working again by using FixProxy, FixHost, and FixDNS. I wasn’t able to use the HitmanPro without the internet, and HitmanPro was essential to removing the virus (for me at least). Thought I would share incase anyone else is having that problem!
You have no idea how much trouble you saved me, the only changes are that I went ahead and bought hitman pro. The only thing missing was how to restore the paths on the start menu. After cleaning up everything I still couldn’t see anything on my menu. The virus had put all the start up menu paths in a temporary folder, the steps listed by you were perfect and in addition to the steps below I was good as new
The location of lost shortcuts / icons are:
Windows XP – “C:\Documents and Settings\%username%\Local Settings\Temp\SMTMP”
Windows Vista/7 – “C:\Users\%username%\AppData\Local\Temp\SMTMP”
Inside that folder there are 3 folders named 1, 2 and 4.
Folder “1″ has all the Program icons.
Folder “2″ has all the Quick Launch Icons.
Folder “4″ has all the Desktop icons.
Restore the content in folder 1 to:
Windows XP: C:\Documents and Settings\All Users\Start Menu
Windows Vista and Windows 7: C:\ProgramData\Microsoft\Windows\Start Menu
Restore the content in folder 2 to:
Windows XP: C:\Documents and Settings\\Application Data\Microsoft\Internet Explorer\Quick Launch\
Windows Vista and Windows 7: C:\Users\\AppData\Roaming\Microsoft\Internet Explorer\Quick Launch\
Restore the content of folder 4 to:
Windows XP: C:\Documents and Settings\All Users\Desktop
Windows Vista and Windows 7: C:\Users\Public\Desktop
You are a livesaver!! Amazing tutorial. Just fixed my computer. Thanks so much!
Shoutout from Singapore:
Amazing tutorial, every single step extremely clear and easy to execute. Considering that I am clueless with computers, you are a lifesaver.
Two weeks ago I got the SMART virus then yesterday the ‘File Recovery’ virus. Both times the advice given here fixed my computer.
Thank you soooo much. GREAT site.
You are a genius – and a Godsend. Thank you so much for your detailed and simple to follow instructions. I spent all day yesterday dealing with this virus. My computer guru was busy on another project so we were left to fix this ourselves. If not for your guide, we would have been up the proverbial creek. Much appreciated! (You are now my Go-To guide for any computer issue. I will tell everyone that I know to visit this site.)
Wow! What a life saver! Took a minute to clear things up, but your advice was right on the money…thanks would have been dead in the water without you.
this shit happened to me and it also deleted (or appeared to do so from all files are currently missing). anyone know the company name that supports this virus so i know who to hunt down and remove the limbs? erm i mean sue.
Fixed my problem! Thank God you’re the #1 result on Google!
thank you so much!
I just helped a friend recover her PC from this virus. Worked very well. Thanks!
Thanks a ton! This is a particularly nasty one but your easy instructions enabled me to slay it!
I was hit with this ridiculus virus this morning, it took a while but your instructions and software suggestions brought back my computer.
THANK YOU x 1000!
Stay safe Devin!:)
Thanks… You saved my computer!
Very good, detailed instructions and a lot of work must have gone into preparing them!!
I had the bad luck of somehow getting this fake “file recovery” tool, despite having on-access protection turned on, in Avira. :-( It’s not even clear how it all happened. I suspect internet browsing but how??
Unfortunately, I may have got a more malicious version or had multiple infections because when I tried to run the suggested tools, either the installation was thwarted or the operation was tempered with (“access is denied”), so I did not get anywhere with them. Even websites that contain relevant information were redirected on the infected PC. After spending a whole weekend reading security forums and downloading and trying various tools, checking things like the host file, I had some partial success but my system is now totally untrustworthy and I will have to reinstall everything, starting with reformatting the HD.
The sad thing is that “file recovery” being ransomware, expecting a payment, it would be possible to follow the money trail it’s just that the relevant agencies and government organizations are incompetent, corrupt, could not give a hoot and unwilling to cooperate with other countries.
I appreciate all the work the security companies are doing but by definition, they are always a step behind and shall I say they have a bit of conflict of interest. If they do too good a job, they reduce their own business.
Whew! It took a couple of days but I think I’m fixed now. I will probably still do an orderly system reinstallation soon but I did not want to do the data migration earlier, in case I just spread the infection.
I had a whole soup of problems in addition to File Recovery, including a boot kit and a root kit, my internet searches redirected, anti malware products blocked, icons disappearing from the task bar, some menu items hidden, slow PC, unable to do an orderly shutdown, problems with USB sticks, and the list just goes on and on. The only thing I did not have is the black desktop. Yippee!
To Stelian’s credit, this is the most comprehensive guide I’ve found to date, to zap File Recovery and all the other crap and bring the system back to as it was before, as much as possible. I must have trawled through 100 pages in search of a fix and downloaded software after software. More time was spent on doing background checks before I downloaded something to poke around my Registry, MBR etc.
I think all the scans and manual operations did enough to get things going. An important step was to run ‘attrib -h /s /d’ on C:\ after which I could install/run all the programs in the article above, without trouble. It’s worth running all of them because they all picked up on things the previous tool missed or was not designed to look for.
In the end I’m now so happy I either bought a license or made a donation for the most effective tools.
…and yes, somebody should wring the neck of whoever designed “File Recovery” and it’s ilk.
Thanks again Stelian and Malwaretips!! You saved my sanity. :-)
thanks!You are 100% Awesome!
A very comprehensive and easy to follow process to remove the File_Recovery virus from your computer. You folks are AWESOME! Thank you so very much. It took a few hours, but now everything on my computer is back to the way it was before this malicious attack.
I was ready to format my computer then I found this website… I can only say :THANK YOU!
You guys are the BEST!!!
A big thank you, only lots a couple of hours when I thought it would be days.
thanks again
clive
Thanks a million for this fix. It’s nice to know there are people out there like you. More power to you. Your generosity has restored some of my faith in human nature. Thanks again!!