

A nearly full inbox can explain missing messages, failed attachments, and sudden service problems. A warning showing 98% usage therefore feels immediately believable.
The numbers in this notice look precise, but precision is not the same as proof. The safest clues appear outside the storage meter.
Overview
A Mailbox Supposedly Using 4.90 GB
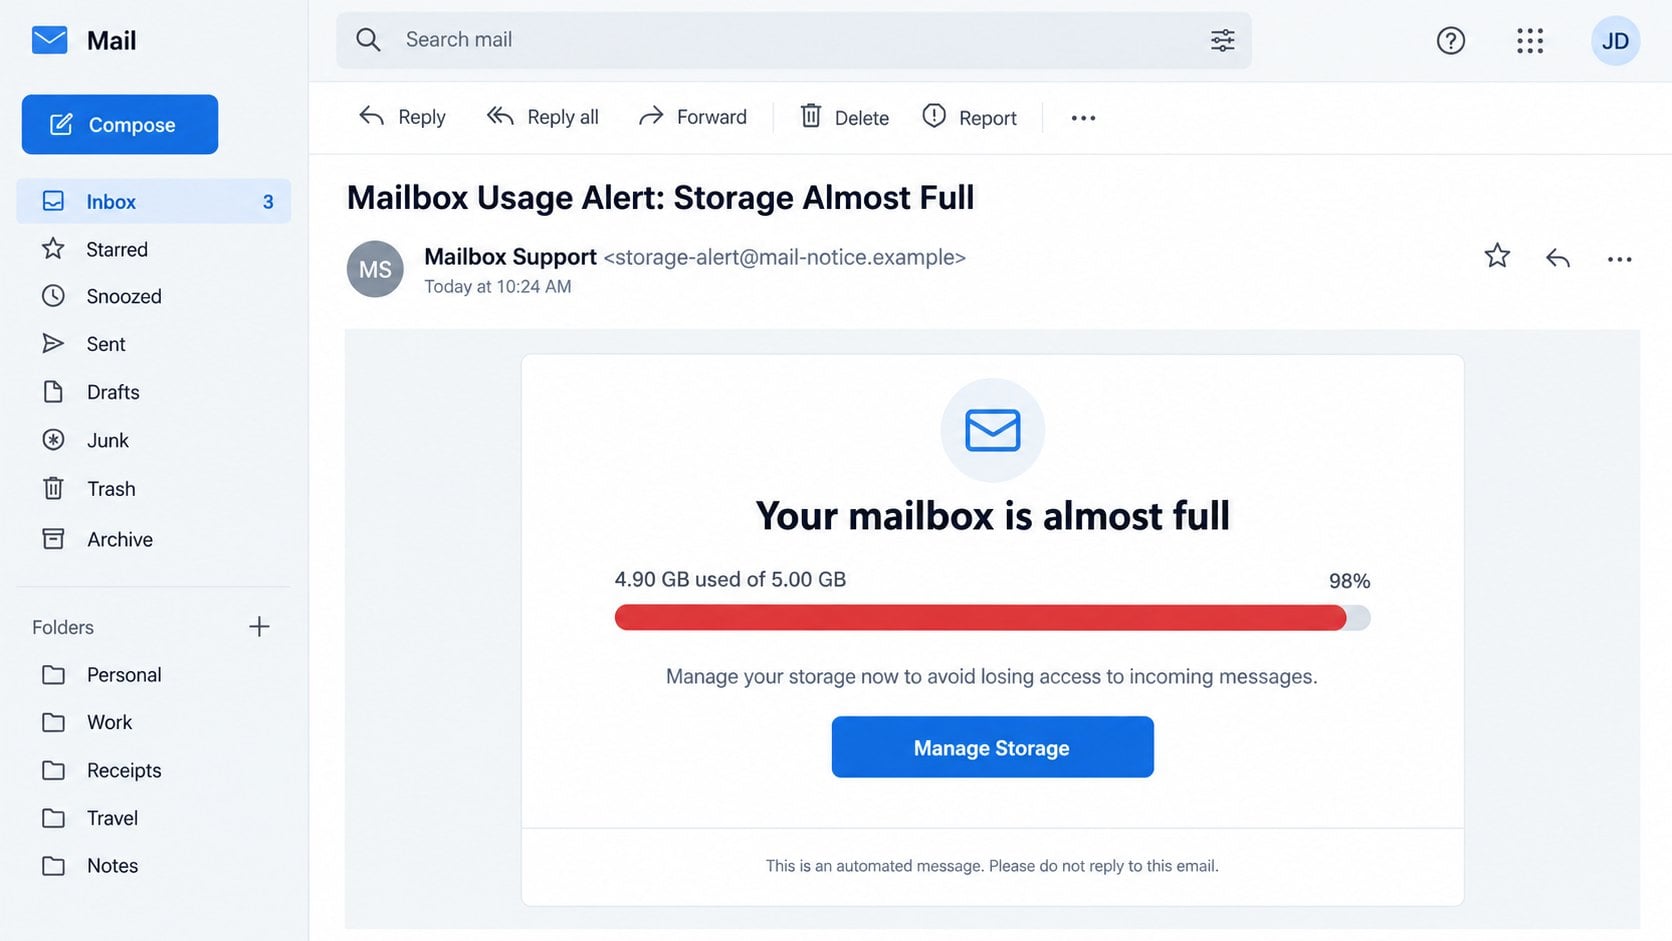
The Mailbox Usage Alert email scam claims the recipient has consumed 4.90 GB of a 5.00 GB storage allowance.
That calculation produces an alarming 98% usage bar. Only a small margin appears to remain before the mailbox reaches its supposed limit.
The message warns that incoming email may stop or access may be lost. A “Manage Storage” button promises a quick way to avoid disruption.
No reliable account data supports the meter. The sender uses plausible numbers because a measured warning feels more personal than a generic threat.
The Storage Manager Is a Password Trap
The button opens a site unrelated to the recipient’s genuine provider. The observed campaign used a content-delivery development host for its landing page.
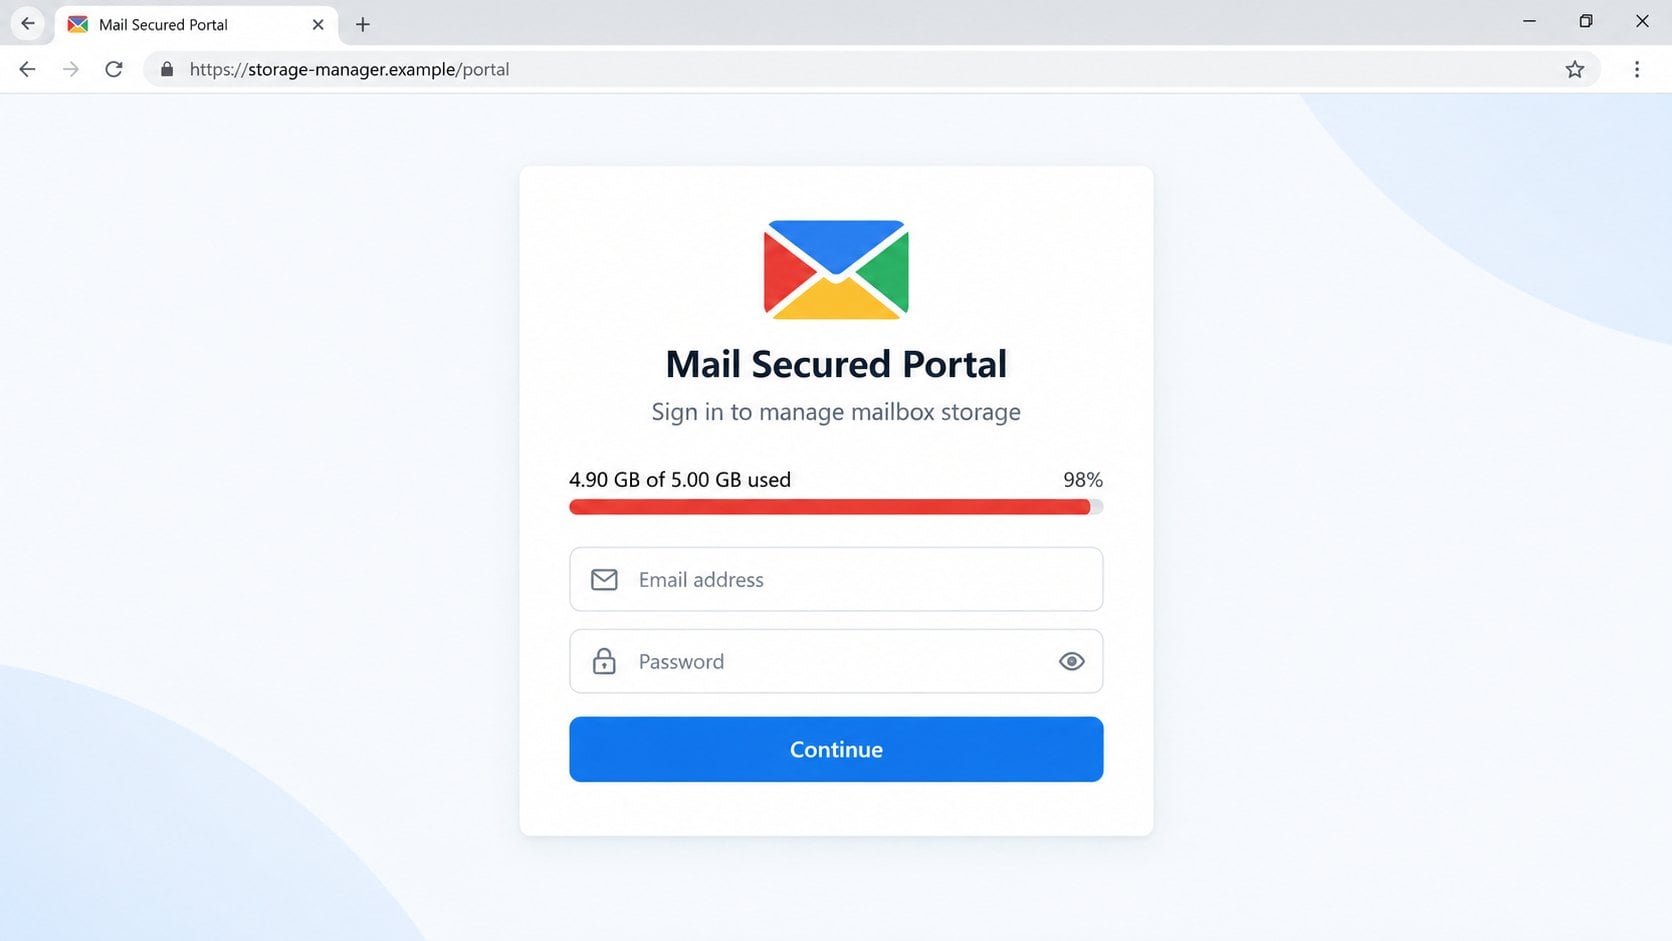
That page identifies the provider from the victim’s address and changes its appearance accordingly. It can then imitate a familiar sign-in experience.
- The email invents a 4.90 GB usage total.
- A red bar displays 98% capacity.
- The sender does not identify a real provider.
- The Manage Storage button hides an external host.
- The landing page adapts to the entered address.
- A provider-themed form requests the mailbox password.
- No storage management occurs after submission.
In one observed version, the counterfeit form called itself a “Gmail Secured Portal.” Google and other legitimate providers are not associated with the campaign.
What the Scammer Wants
The form is designed to harvest an email address and password. Those credentials can give an attacker access to the real inbox.
From there, the intruder may intercept password resets, search private conversations, collect documents, or impersonate the account owner.
Reused passwords create additional exposure. Automated tools can test the same combination against social, retail, financial, and cloud services.
This is a credential-phishing campaign disguised as a quota warning. The storage problem is the pretext, not a genuine technical diagnosis.
How the Mailbox Usage Alert Email Scam Works
Step 1: A Precise Quota Warning Arrives Unexpectedly
The lure begins with a statement that the inbox has reached 4.90 GB out of 5.00 GB. The exact decimal makes the claim appear system-generated.
Many people do not know their provider’s current allowance. Five gigabytes sounds reasonable enough that the recipient may not question it.
The email does not explain which items consume the space, when the total was measured, or which plan provides the alleged limit.
A genuine portal can display folders, attachments, backups, and trash usage. The suspicious message presents only an unsupported total.
Step 2: The Red 98% Meter Creates Visual Urgency
A nearly complete progress bar communicates danger faster than a paragraph. The small remaining segment suggests that the situation could worsen at any moment.
Red color reinforces that interpretation. Recipients may click before considering whether the provider actually measures mailbox capacity this way.
The math itself is correct, which helps the story. However, correct arithmetic cannot prove that either number came from the account.
Scammers often use believable measurements because they look like telemetry. The values may be identical for every recipient.
Step 3: The Warning Connects Capacity to Lost Access
The message says users could stop receiving mail or lose access unless they manage storage immediately. Those consequences are plausible but deliberately broad.
Mailbox limits can affect delivery in real services. That fact gives the invented warning a foundation in ordinary technical behavior.
Yet providers normally show quota status inside webmail and give documented deletion or upgrade options. They do not require a password on an unrelated site.
The alert avoids naming specific rejected messages. Uncertainty lets each recipient imagine the correspondence they cannot afford to miss.
Step 4: The Manage Storage Button Leaves the Provider
The large button looks like an administrative shortcut. Its visible label does not disclose where the browser will actually go.
In the analyzed route, the destination belonged to neither the recipient’s mail service nor a recognized account-management domain.
Attackers can use content-delivery or application platforms to publish pages quickly. A reputable infrastructure provider does not endorse every customer’s uploaded content.
Redirects and encoded parameters may carry the email address forward. The final page then has enough information to choose a matching design.
Step 5: The Page Adapts to the Email Provider
The phishing kit can inspect the domain after the @ symbol. It may display a corresponding logo, color palette, or background.
That adaptation feels like account recognition, but it is only a visual lookup. The site has not authenticated with the real provider.
A fake storage bar may reappear beside fields for an address and password. The repeated numbers keep the original story consistent.
Submitting the form sends the values to the operator. The page cannot delete large messages, buy capacity, or change a genuine quota.
Step 6: The Captured Inbox Powers New Attacks
The criminal can attempt a real sign-in immediately. If successful, existing sessions and recent messages reveal valuable account context.
Searches for invoices, statements, identification, contracts, or recovery codes can locate sensitive information quickly.
New inbox rules may hide security notices or forward selected conversations. These changes can preserve access without obvious outgoing spam.
The attacker may then target contacts from a trusted address. A request sent inside a known conversation can be considerably harder to detect.
How to Verify a Mailbox Storage Warning
Check the Quota Inside Your Normal Mailbox
Open webmail through a saved bookmark or provider application. Look for storage information in settings, account management, or the folder list.
Compare the actual limit with 5.00 GB. Many plans use a different allowance, which can disprove the email instantly.
Review how storage is divided among mail, cloud files, photos, trash, and backups. Genuine dashboards provide details rather than one unexplained number.
Look for Real Signs of Capacity Trouble
Senders may receive a quota-related bounce when a mailbox is full. The owner may also see persistent warnings inside the authentic service.
Large attachments, deleted items, and archived mail can consume space, depending on provider policy. Check those locations directly.
If messages remain normal and the account shows ample room, the unsolicited 98% warning has no technical foundation.
Inspect the Sender and Button Destination
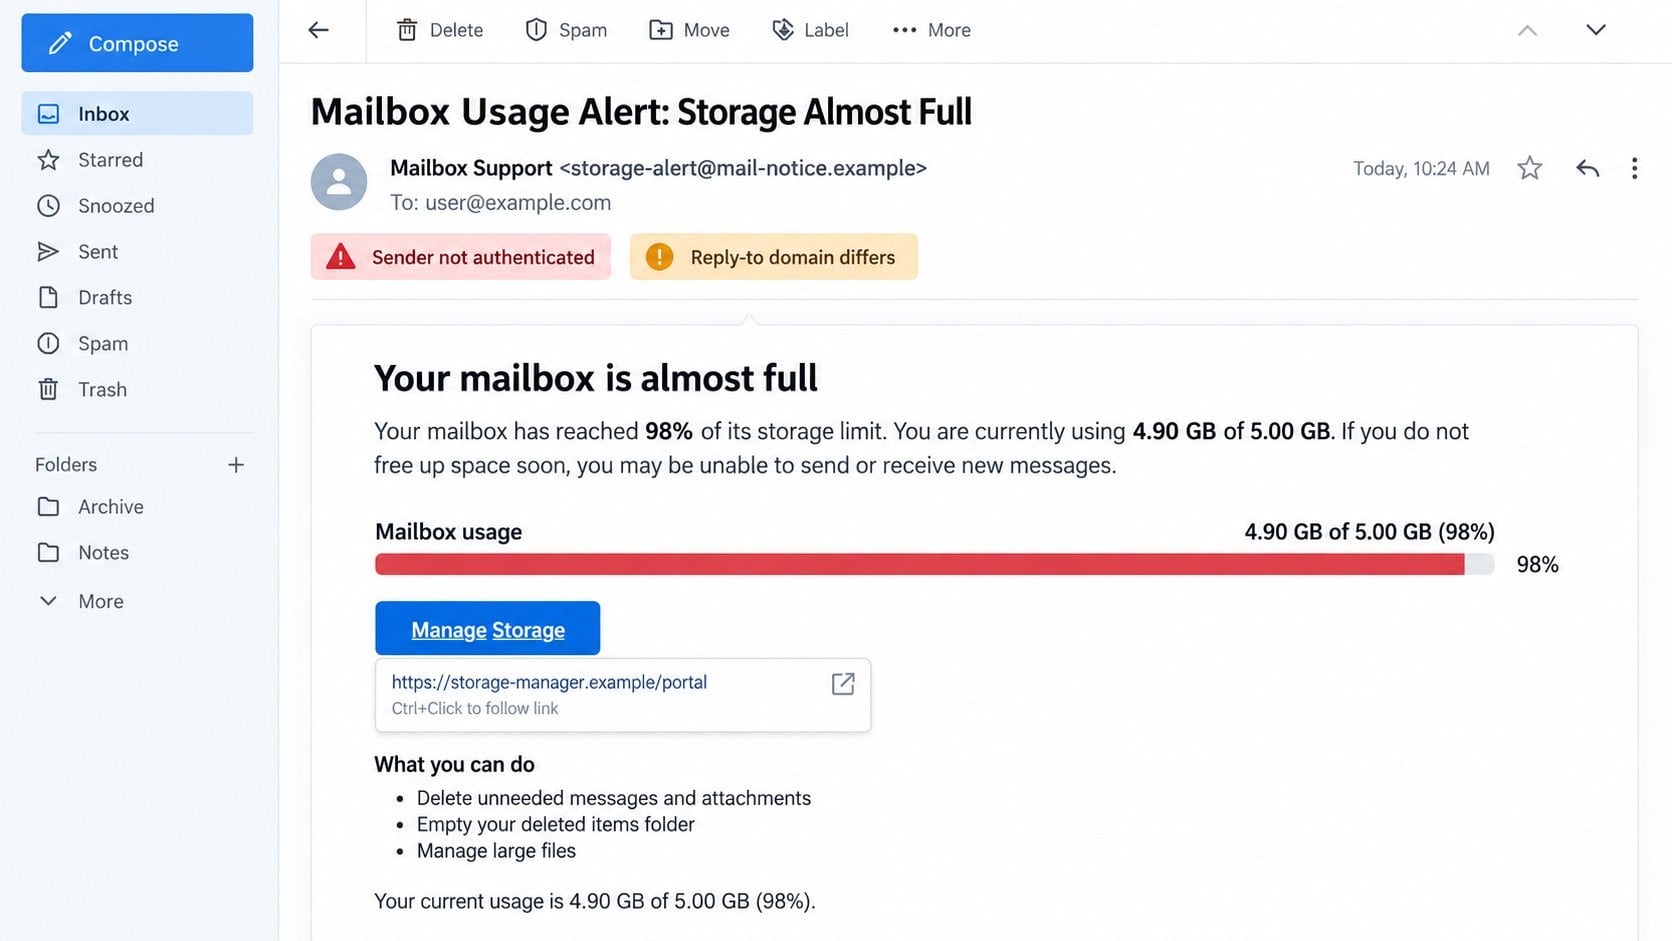
Expand the full From, Reply-To, and authentication details. A name such as “Mailbox Support” does not identify a company.
Preview the Manage Storage link. The registered domain should belong to the service that hosts the mailbox or its documented identity provider.
Do not trust a page because it recognizes the email brand. Provider-specific decoration can be generated from the address itself.
Use the Provider’s Documented Storage Tools
Delete or export large messages from the real mailbox. Empty trash only after confirming that nothing important needs recovery.
If extra capacity is required, reach billing from the signed-in dashboard. Do not purchase storage through a surprise email route.
Workplace users should contact their known administrator. Technical staff can inspect quotas and delivery logs without asking for the employee’s password.
What to Do If You Fell Victim to the Mailbox Usage Alert Scam
The response depends on what happened. A visit without submission is different from giving the counterfeit portal a working password.
- Close the fake storage manager.
Do not retry the form or provide another password. Preserve the original message, full headers, destination, and approximate interaction time.
If the email reached a workplace account, report it through the established security channel. Other employees may have received the same numbers.
- Change the genuine mailbox password.
Open the provider independently from a known device and create a strong, unique replacement. Begin official recovery if access has already changed.
Replace the same or similar password on every other account. Automated reuse attempts can happen quickly.
- End unauthorized sessions.
Review recent activity, connected devices, application passwords, and trusted browsers. Sign out anything you do not recognize.
Inspect recovery addresses and telephone numbers. Remove unfamiliar entries before they can be used to reclaim the account.
- Audit inbox rules and forwarding.
Look for filters that move, delete, or copy messages. Check delegates, aliases, sent mail, trash, spam, and archives.
Pay special attention to rules involving invoices, security alerts, or password resets. Those patterns suggest targeted surveillance.
- Protect linked services.
Review accounts that use this inbox for recovery. Start with banking, shopping, cloud storage, workplace systems, and social media.
Enable a passkey, hardware key, or authenticator-based multifactor protection where possible. Regenerate recovery codes that may have appeared in email.
- Scan if the page delivered a file.
The documented campaign used a web form, but related quota lures can offer cleanup tools. Scan any opened download with Malwarebytes.
AdGuard can block many known phishing and redirect domains. Keep it updated as an extra safeguard while still checking every unfamiliar storage prompt.
- Report secondary damage quickly.
Notify contacts if unusual messages left the compromised inbox. Tell financial teams to verify any new payment instructions through another channel.
Contact banks or relevant authorities when money or identity records were exposed. Keep screenshots, case numbers, and a timeline of recovery actions.
Is Your Device Infected? Run a Free Malware Scan
Slow performance, constant pop-ups, or strange behavior? These are classic signs of a malware infection. The fastest way to find out is to scan your device with Malwarebytes Free — one of the most trusted malware removal tools available.
The free version detects and removes the most common threats, including:
- Adware — the cause of those annoying pop-ups
- Browser hijackers — unwanted redirects and changed homepages
- Trojans and spyware — hidden programs stealing your data
- Potentially unwanted programs (PUPs) — software you never asked for
👉 Select your device below — Windows, Mac, or Android — then follow the simple steps to download Malwarebytes, scan your system, and remove any threats it finds. The scan usually takes 5 to 20 minutes.
Run a Malware Scan with Malwarebytes for Windows
Malwarebytes is one of the most popular and trusted anti-malware tools for Windows — and it’s completely free for removing infections. It catches threats that many antivirus programs miss, including adware, browser hijackers, and trojans. Follow the steps below to scan and clean your PC in just a few minutes.
Download Malwarebytes
Click the button below to download the latest version of Malwarebytes for Windows from the official source. The free version is all you need — it will scan your computer and remove adware, browser hijackers, and other malicious software at no cost.
Download MalwarebytesOfficial installer for Windows 11 and 10. Your download starts right away.Want real-time protection? See Malwarebytes Premium Malwarebytes Free for WindowsScans and removes malware at no cost
-
Install Malwarebytes
When the download finishes, open your Downloads folder and double-click the MBSetup file. If Windows shows a User Account Control pop-up, click “Yes” to allow the installation.

Follow the On-Screen Prompts to Install Malwarebytes
The setup wizard will walk you through a few quick screens:
-
Choose where you’re installing the program — “Personal Computer” or “Work Computer” — then click Next.

-
Malwarebytes will now install on your device. This usually takes under a minute.

-
When installation is complete, the “Welcome to Malwarebytes” screen will open automatically.

-
On the final screen, click Open Malwarebytes to launch the program.

-
Enable “Scan for Rootkits”
Before scanning, turn on rootkit detection so Malwarebytes can find even the most hidden threats. Click the Settings gear icon on the left side of the screen.

In the settings menu, find “Scan for rootkits” and click the toggle so it turns blue.

Done? Click “Dashboard” in the left pane to return to the main screen.
Start the Scan
Click the blue Scan button. Malwarebytes will automatically update its virus database and start checking your computer for malware.

-
Wait for the Scan to Finish
The scan checks your entire system for browser hijackers and other malicious programs, so it can take 5 to 20 minutes depending on your computer. Feel free to do something else — just check back occasionally to see the progress.

-
Quarantine the Detected Threats
When the scan is done, you’ll see a list of everything Malwarebytes found — malware, adware, and potentially unwanted programs. Click the “Quarantine” button to remove all of them at once.

Malwarebytes will now remove the malicious files and registry entries and move them safely into quarantine.

-
Restart Your Computer
Some threats can only be fully removed after a reboot. If Malwarebytes asks you to restart, click Yes. Once you’re logged back in, Malwarebytes has finished removing the threats it found.

That’s it — your Windows PC is now clean of trojans, adware, and other malware, and should be back to running smoothly.
If you are still having problems with your computer after completing these instructions, then please follow one of the steps:
- Run a computer scan with ESET Online Scanner
- Ask for help in our Windows Malware Removal Help & Support forum.
Run a Malware Scan with Malwarebytes for Mac
Malwarebytes for Mac is a free on-demand scanner that removes the malware other security software tends to miss — adware, browser hijackers, and unwanted programs included. Cleaning an infected Mac with Malwarebytes has always been completely free, and it’s our go-to recommendation. Follow the steps below to scan and clean your Mac in just a few minutes.
-
Download Malwarebytes for Mac
Click the button below to download the latest version of Malwarebytes for Mac.
Download MalwarebytesOfficial installer for macOS. Your download starts right away.Want real-time protection? See Malwarebytes PremiumMalwarebytes Free for MacScans and removes malware at no cost -
Open the Malwarebytes setup file
When the download finishes, open your Downloads folder and double-click the setup file to begin the installation.

-
Follow the On-Screen Prompts to Install Malwarebytes
The Malwarebytes for Mac Installer will guide you through a few quick screens. Click “Continue” and keep following the prompts until the installation completes.



When the installation is complete, Malwarebytes opens to the Welcome to Malwarebytes screen. Click “Get started“.
-
Select “Personal Computer” or “Work Computer”
Malwarebytes will ask what type of computer you’re installing it on. Click either Personal Computer or Work Computer, whichever applies.

-
Start the Scan
Click the “Scan” button. Malwarebytes will automatically update its detection database and begin checking your Mac for malware.

-
Wait for the Scan to Finish
Malwarebytes will scan your Mac for adware, browser hijackers, and other malicious programs. This can take a few minutes, so feel free to do something else — just check back occasionally to see the progress.

-
Quarantine the Detected Threats
When the scan is done, you’ll see a list of everything Malwarebytes found. Click the “Quarantine” button to remove all the threats at once.

-
Restart Your Mac
Malwarebytes will now remove all the malicious files it found. Some threats can only be fully removed after a reboot — if Malwarebytes asks you to restart, allow it. Once you’re logged back in, your Mac is clean.

That’s it — your Mac is now free of adware, rogue browser extensions, and other potentially harmful software.
If you are still experiencing problems while trying to remove a malicious program from your computer, please ask for help in our Mac Malware Removal Help & Support forum.
Run a Malware Scan with Malwarebytes for Android
Malwarebytes for Android automatically detects and removes dangerous threats like malware and ransomware so you don’t have to worry about your most-used device being compromised. Aggressive detection of adware and potentially unwanted programs keeps your Android phone or tablet running smooth.
-
Download Malwarebytes for Android.
You can download Malwarebytes for Android by clicking the link below.
Get Malwarebytes for AndroidOpens Google Play in a new tab.Want real-time protection? See Malwarebytes Premium for AndroidMalwarebytes for AndroidScans your phone and removes malware at no cost -
Install Malwarebytes for Android on your phone.
In the Google Play Store, tap “Install” to install Malwarebytes for Android on your device.

When the installation process has finished, tap “Open” to begin using Malwarebytes for Android. You can also open Malwarebytes by tapping on its icon in your phone menu or home screen.

-
Follow the on-screen prompts to complete the setup process
When Malwarebytes will open, you will see the Malwarebytes Setup Wizard which will guide you through a series of permissions and other setup options.
This is the first of two screens that explain the difference between the Premium and Free versions. Swipe this screen to continue.
Tap on “Got it” to proceed to the next step.
Malwarebytes for Android will now ask for a set of permissions that are required to scan your device and protect it from malware. Tap on “Give permission” to continue.
Tap on “Allow” to permit Malwarebytes to access the files on your phone.
-
Update database and run a scan with Malwarebytes for Android
You will now be prompted to update the Malwarebytes database and run a full system scan.

Click on “Update database” to update the Malwarebytes for Android definitions to the latest version, then click on “Run full scan” to perform a system scan.

-
Wait for the Malwarebytes scan to complete.
Malwarebytes will now start scanning your phone for adware and other malicious apps. This process can take a few minutes, so we suggest you do something else and periodically check on the status of the scan to see when it is finished.

-
Click on “Remove Selected”.
When the scan has been completed, you will be presented with a screen showing the malware infections that Malwarebytes for Android has detected. To remove the malicious apps that Malwarebytes has found, tap on the “Remove Selected” button.

-
Restart your phone.
Malwarebytes for Android will now remove all the malicious apps that it has found. To complete the malware removal process, Malwarebytes may ask you to restart your device.
That’s it — your Android phone is now clean — no more malicious apps, adware, or browser redirects.
If you are still having problems with your phone after completing these instructions, then please follow one of the steps:
- Restore your phone to factory settings by going to Settings > General management > Reset > Factory data reset.
- Ask for help in our Mobile Malware Removal Help & Support forum.
Stay Protected: Block Ads and Malicious Sites
Now that your device is clean, keep it that way. Most infections start with a malicious ad or a fake download button — so blocking them at the source is your best defense.
We recommend AdGuard, which blocks malicious ads, phishing pages, and dangerous redirects before they can reach you.
👉 Download AdGuard and browse safely
Why Storage Warnings Are Convincing
Mailbox capacity is invisible during ordinary use. People often discover the limit only when an alert appears, so an unexpected warning does not feel impossible.
The 4.90 GB figure is especially persuasive because it is close to, but not beyond, the alleged maximum.
A red progress bar makes the issue easy to understand on a small screen. The victim does not need to interpret a technical error.
Storage management also seems like a low-risk administrative task. Recipients may not expect a routine cleanup button to lead toward credential theft.
The campaign turns that assumption against them. The familiar problem becomes a reason to visit a destination chosen entirely by the attacker.
Safe Ways to Reduce Genuine Mailbox Usage
Sort messages by size inside the real provider interface. Old conversations with large attachments often offer more savings than deleting hundreds of short emails.
Export essential attachments before removal. Confirm that local or cloud copies open correctly before emptying trash.
Review sent mail as well as the inbox. Outgoing presentations, videos, and archives can consume substantial capacity.
Unsubscribe from legitimate newsletters using their established websites or trusted controls. Do not use an unsubscribe link inside the suspicious storage warning.
Check retention rules at work before deleting records. Legal, compliance, or customer-service obligations may govern how long certain mail must remain.
When a paid upgrade is appropriate, purchase it from account settings. Confirm the plan name, billing entity, renewal terms, and final price.
Administrators should provide quota alerts within webmail and document the official sender domain. Consistency makes fraudulent notices easier to reject.
Alerts for new forwarding rules and unusual sessions reduce damage when a password is still captured despite those precautions.
What a Legitimate Quota Notice Usually Provides
A real warning should identify the account, current plan, measured capacity, and a support route that users can reach independently.
Its figures should match the signed-in dashboard. If shared storage applies, the same total should appear across the connected services.
Providers generally explain what happens at the limit. They may describe rejected mail, read-only access, grace periods, or automatic retention behavior.
Useful notices link to published help documentation. Customers can locate that material through the provider’s own navigation without trusting the message.
A legitimate cleanup page lists large items and categories. It does not hide every management option behind a request for an existing password.
Billing upgrades should show currency, renewal frequency, taxes, and cancellation terms before purchase. A vague “continue” form supplies none of that context.
Work accounts may use custom quota policies. The internal administrator should be able to confirm the limit and identify any affected delivery records.
When these details are absent, the sender is asking for trust without supplying verifiable account knowledge. That imbalance is itself a warning.
Frequently Asked Questions
Is my mailbox really using 4.90 GB of 5.00 GB?
The email cannot prove that. Compare its figures with the storage dashboard inside your genuine provider account.
Does 98% usage automatically stop incoming mail?
Policies vary. Some providers reject new messages only at the limit, while others offer grace periods or shared storage. Check documented account rules.
Why did the fake page recognize my email provider?
The kit can read the address domain and load matching artwork. That visual adaptation is not a secure connection to the provider.
Can I safely click Manage Storage if I enter nothing?
Avoid the link. Open storage settings independently. If already visited, close the page, inspect downloads and permissions, then report the message.
Should I delete messages immediately after receiving this alert?
First verify the quota inside the real service. Do not erase important records merely because an unknown sender displayed a red meter.
Will a password change remove the attacker completely?
Not always. Revoke sessions and application passwords, then inspect forwarding, filters, recovery contacts, delegates, and connected applications.
The Bottom Line
The Mailbox Usage Alert scam invents a 4.90 GB total and a 98% capacity warning, then sends recipients to a provider-adaptive password collector.
Verify storage through your usual mailbox and manage space there. A precise meter inside an email never justifies entering credentials on an unfamiliar domain.








