

A mail server error is difficult to see from the inbox. The missing messages are supposedly somewhere else, waiting for the recipient to release them.
The Messages Delayed by Server Error email turns that invisible problem into a single teal button. Before using it, the alleged queue deserves independent verification.
Overview
The notification claims incoming mail is stuck
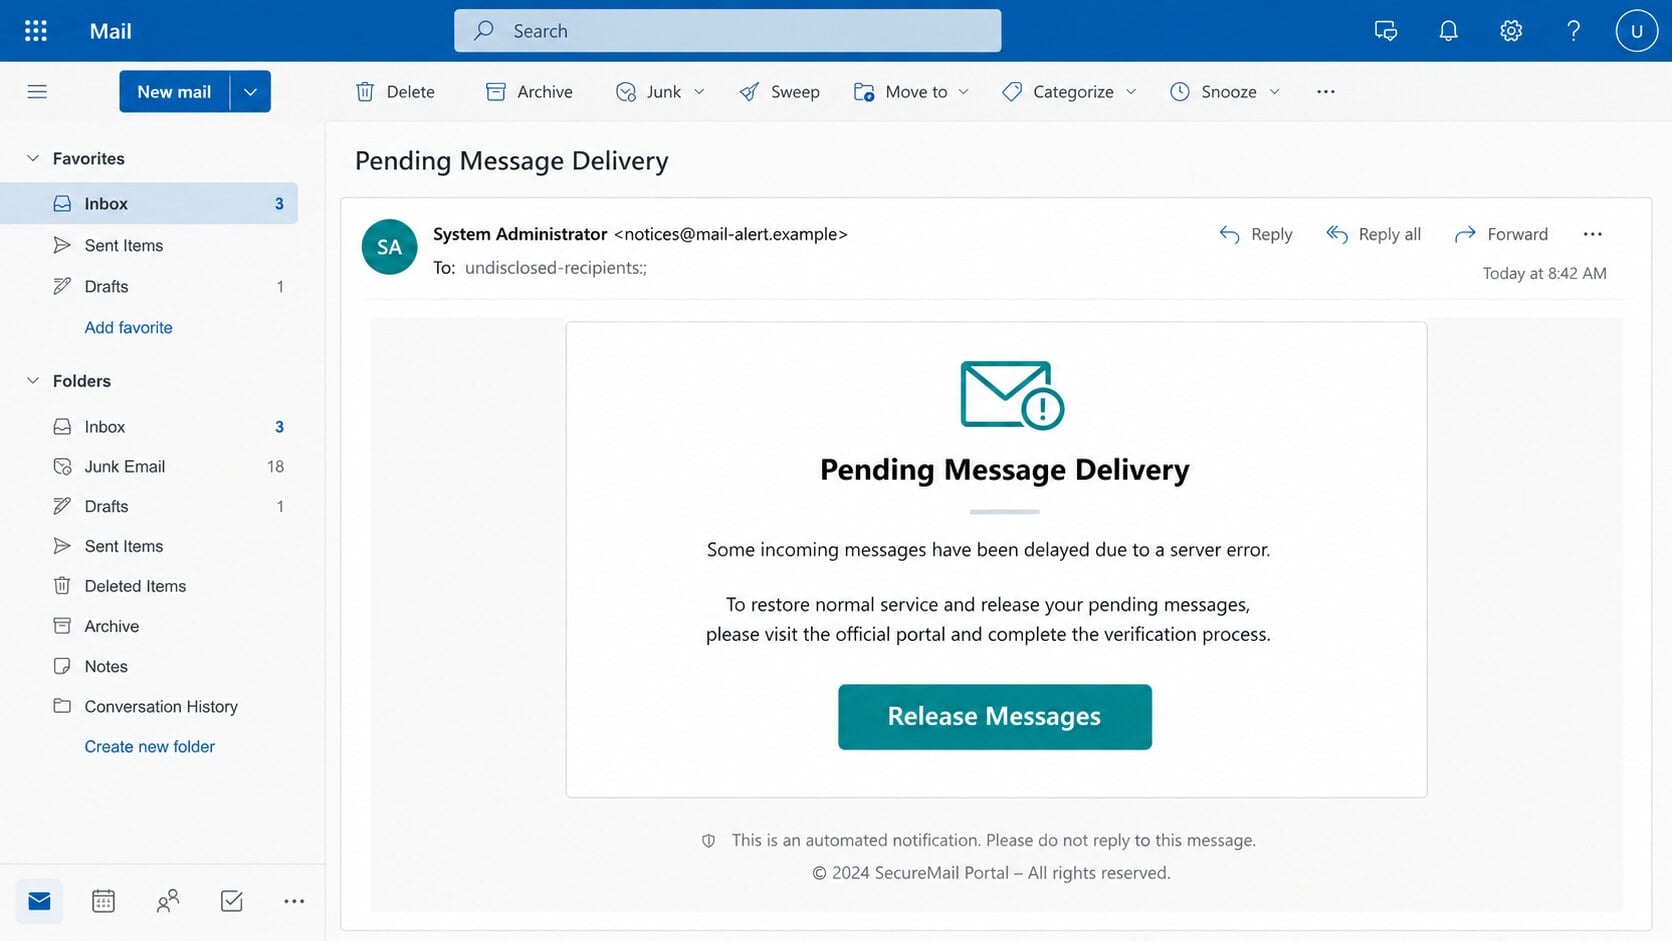
The email says some incoming messages have been delayed because the recipient’s mail server experienced an error.
It instructs the user to restore normal service and recover the missing mail through an “official portal.”
The only route supplied is a “Release Messages” button inside the same unverified notice.
- No delayed sender or subject is identified.
- The server error has no code or verifiable incident record.
- The recipient is pushed toward an embedded release button.
- The destination displays a counterfeit mail login.
The missing details are hidden behind urgency
The message does not say which provider failed, how many messages are affected, when the error began, or which server recorded it.
That vagueness allows the same template to target many domains. Each recipient may assume the notice refers to their own provider.
Curiosity about the unseen messages supplies the pressure that technical evidence does not.
The release page requests a password
The button opens a site designed to resemble a mail-service login, sometimes imitating the recipient’s provider.
The email address may appear automatically, while a password field blocks access to the claimed queue.
Entering credentials exposes them to the page operator. The form cannot prove that any delayed message exists.
The Psychology of an Invisible Mail Queue
A missing email could be important without the recipient knowing it. That uncertainty gives the warning unusual power.
People imagine invoices, travel details, job replies, reset links, or customer questions waiting beyond the error.
The message does not need to invent a dramatic consequence. Ordinary curiosity and fear of missed communication can produce the click.
Calling the link an “official portal” encourages trust without naming the organization that supposedly operates it.
The automated footer further reduces suspicion. It resembles the kind of no-reply language used by real infrastructure systems.
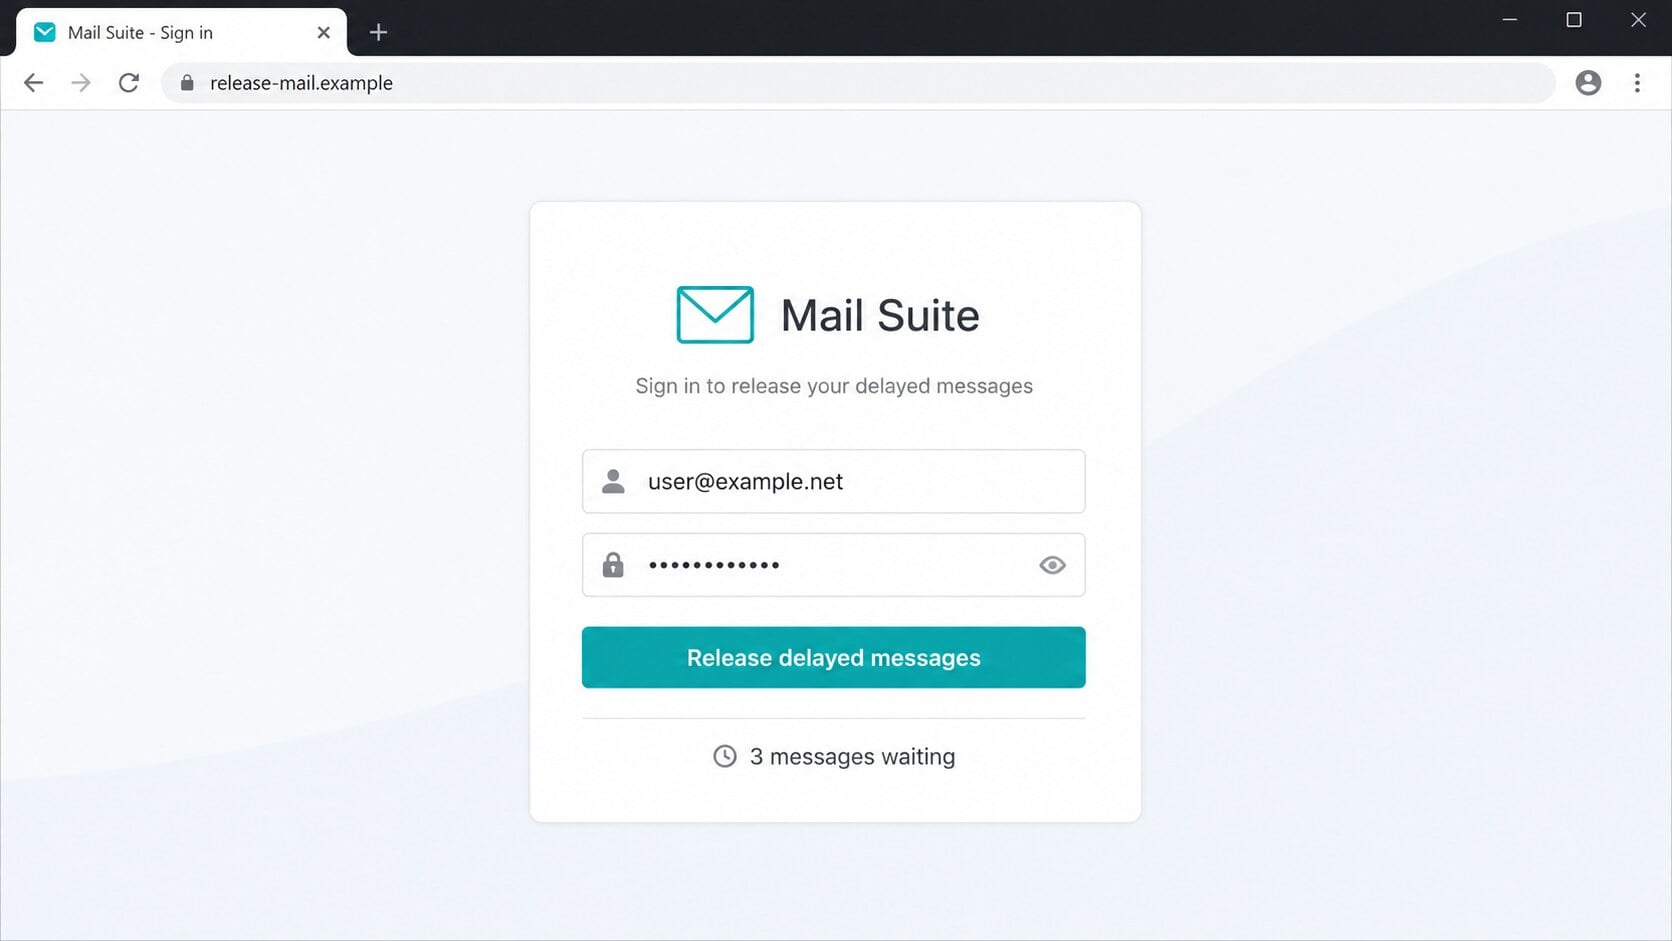
Once the page displays the recipient’s address, the warning can feel confirmed. That address may simply have traveled inside the link.
A small queue count or loading indicator adds another layer of false specificity.
None of these interface elements demonstrate access to the mailbox. They can be rendered before any connection to the real provider occurs.
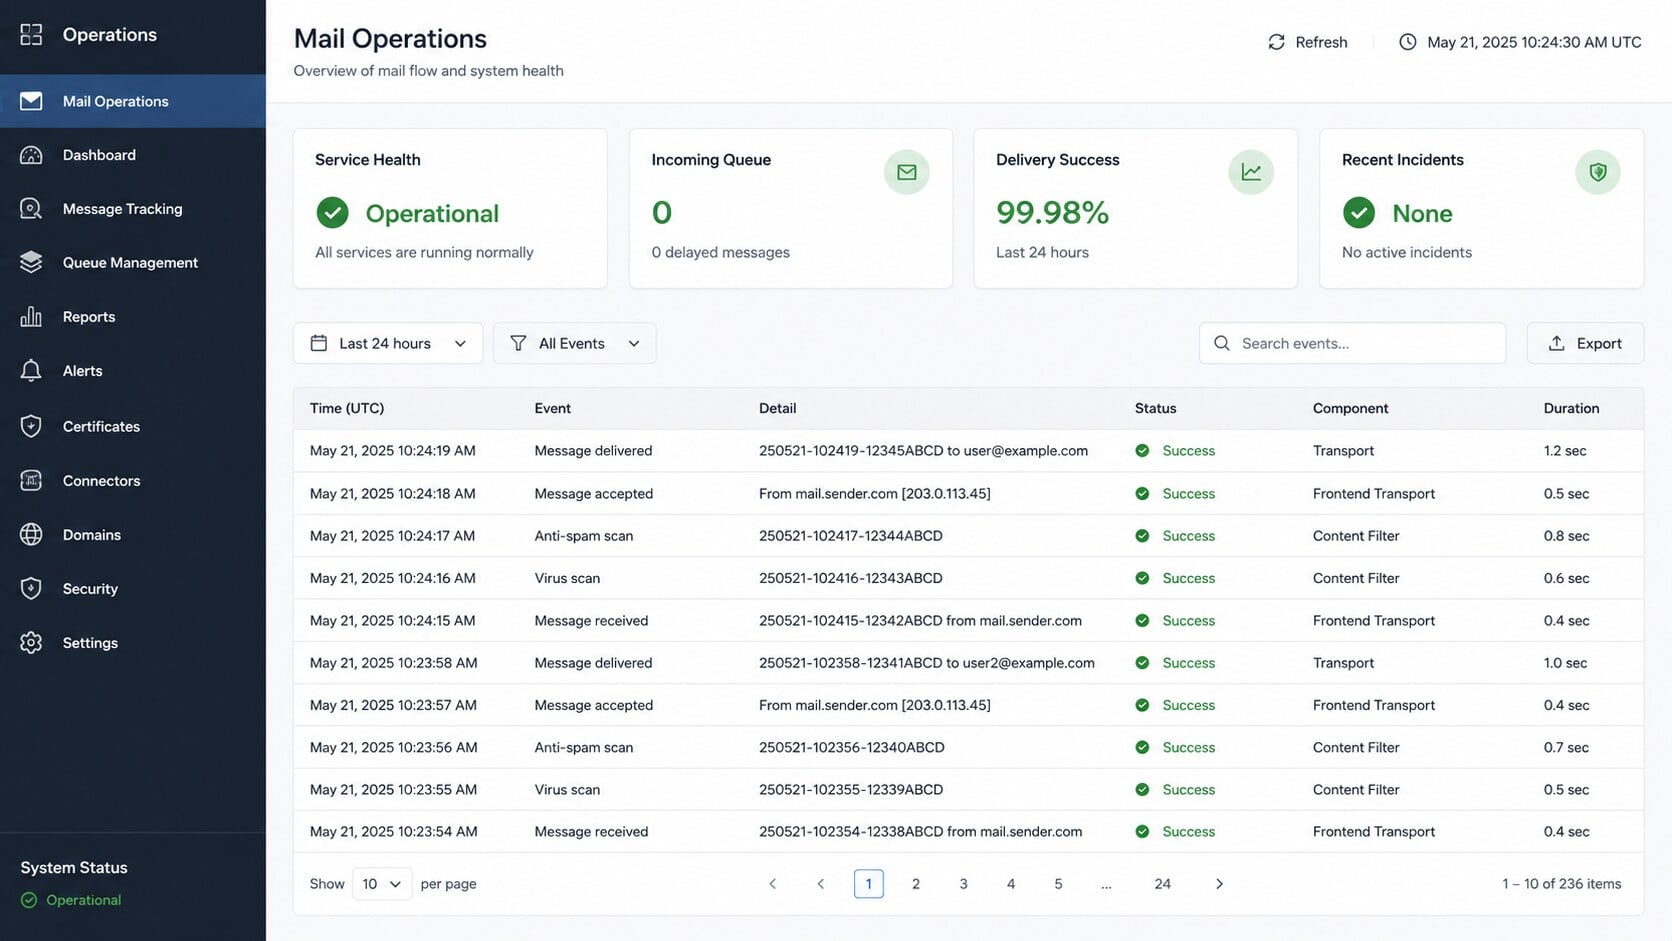
The reliable question is whether the genuine mail system shows the same incident when opened independently.
How the Messages Delayed by Server Error Scam Works
Step 1: The attacker sends a generic system notification
The campaign delivers email with a subject such as “Pending Message Delivery” or another mail-flow warning.
The sender may appear as System Administrator, Mail Support, or a label derived from the recipient’s domain.
Display names are easily controlled. The full sender and reply-to addresses may point somewhere unrelated.
Because every organization uses email, the story needs little targeting to sound relevant.
Step 2: A vague server error creates an inaccessible queue
The message says incoming mail has been delayed, but it withholds subjects, senders, timestamps, message IDs, and server responses.
No incident number or official status entry is offered. The cause remains broad enough to avoid technical contradictions.
The recipient is told that normal service depends on manually releasing the queue.
Ignoring the email therefore feels like accepting continued message loss.
Step 3: The release button becomes the only proposed solution
The button promises to recover mail immediately. It does not explain why the provider cannot process its own queue automatically.
Clicking moves the user away from the inbox and through a destination selected by the campaign.
Redirects, compromised websites, and disposable domains can conceal the final host or help the lure survive filtering.
A careful URL preview may reveal that the route has no connection to the actual provider.
Step 4: The destination imitates a mail service
The landing page may copy a Zoho Mail, Microsoft, Google, or generic webmail login, depending on the target.
Branding can be selected automatically after reading the email domain encoded in the original link.
The page displays a prefilled address and requests the current mailbox password to release delayed messages.
HTTPS may be present, but it only encrypts the connection to the phishing host.
Step 5: The submitted credential is recorded
Selecting the release or sign-in button sends entered values to the campaign operator.
The page may reject the password, show a fake processing screen, or claim that no messages remain.
A second prompt can collect a corrected entry or another password commonly used by the victim.
The theft can finish without installing software or changing anything visible on the device.
Step 6: Mailbox access is established quietly
Criminals test the password against the genuine service. If successful, they can read messages and request resets for connected accounts.
Forwarding rules, malicious app grants, delegates, or recovery changes can preserve access.
Attackers may hide sign-in alerts and continue monitoring the mailbox for useful conversations.
Business accounts expose customers, invoices, internal directories, and payment routines.
Step 7: The account is used against other people
Messages from a compromised address reach contacts with built-in trust. Existing threads make new links or requests appear credible.
Criminals may introduce altered bank details, malicious documents, or another fake mail-system alert.
Reused passwords can open additional services directly. Reset links inside the mailbox offer another route.
The alleged server delay becomes irrelevant once the stolen account supports wider fraud.
How Real Delivery Delays Are Normally Handled
Mail can be delayed by provider outages, routing problems, filtering, rate limits, full storage, or temporary destination errors.
Servers usually retry temporary failures automatically. Senders may receive a delay notice or bounce containing a technical response and message identifier.
Business administrators can inspect queues and logs from authenticated management tools.
Recipients do not normally release ordinary incoming mail by entering their password on an unrelated website.
Quarantine systems can require review, but they should be accessible through the provider’s known portal and identify the held items.
A genuine incident may also appear on an official service-status page or inside the account dashboard.
How to Verify the Alleged Server Error
Check the real mailbox and status page
Open the provider through a saved bookmark or established application. Review alerts, quarantine, storage, and service status there.
If the provider reports an outage, follow instructions published through its official channels.
An empty dashboard and normal status page undermine the email’s unsupported claim.
Ask an administrator to inspect logs
Workplace users should send the suspicious notice to IT through the organization’s standard reporting route.
Administrators can check message tracking, inbound queues, gateway events, and affected users without asking for the mailbox password.
They can also identify whether other employees received the same campaign.
Test ordinary delivery carefully
Send a harmless message from another account and confirm whether it arrives. Avoid including confidential information in the test.
Check Spam and quarantine through the genuine interface. A working test does not prove every message arrived, but it provides useful evidence.
Domain owners can examine delivery logs for more definitive results.
Read the link before opening it
Hover over the release button on a computer or use a safe preview function on mobile.
Identify the registered domain, not merely words such as “mail,” “confirmation,” or “secure” elsewhere in the address.
Do not follow a shortened or unfamiliar route merely to discover which provider the sender meant.
Sender, Incident, Destination, and Mailbox Checks
The sender must represent the real administrator
Expand the sender and reply-to addresses. A generic “System Administrator” label carries no identity by itself.
Compare the domain with normal provider notifications or internal IT mail.
- Is the provider or organization named correctly?
- Does the sender match approved notification domains?
- Can IT confirm a current delivery incident?
- Does the real account show delayed or held mail?
The incident needs verifiable detail
Look for an event time, incident number, server, affected service, queue count, and official status reference.
A vague server error and generic deadline provide pressure without creating evidence.
Do not confuse technical vocabulary with a diagnostic record.
The destination must belong to the mail service
The release page should use the provider’s recognized domain and normal authentication route.
A copied login on a lookalike or public hosting address cannot manage another company’s queue.
Password-manager behavior can offer a warning when saved credentials do not match the current domain.
The mailbox requires a full review after disclosure
Inspect recent sign-ins, sessions, forwarding, filters, delegates, recovery methods, app passwords, and connected applications.
Check sent, deleted, and archive folders for activity that occurred after the fake release form was used.
Workplace administrators should preserve logs before remediation when investigation or notification duties may apply.
Why the Prefilled Address Is Not Confirmation
Phishing links can carry information after a question mark, path segment, or encoded parameter.
The page reads that value and places it into the email field. It can also extract the domain and select matching colors or branding.
This happens before the victim proves ownership of the account. The page is displaying data the campaign already possessed.
A genuine provider also knows the address, but that shared capability does not make an unknown destination legitimate.
Focus on domain ownership, account history, and independent navigation instead of personalization.
If a page greets you correctly on the wrong domain, the personalization should increase scrutiny rather than reduce it.
Close the page and check the trusted mailbox for the alleged queue.
What the Email Leaves Unanswered
A real delivery incident affects identifiable systems. Administrators should be able to name the server, gateway, provider, or domain experiencing the problem.
The warning supplies none of that context. It also withholds the time the delay began and whether automatic retries are still running.
No sender, subject, or message identifier is listed for the supposed queue. The recipient cannot compare the claim with expected correspondence.
The message never explains why a password would repair a server error. Authentication and mail transport are separate functions.
It also avoids an independently reachable support channel. The same button that makes the allegation is presented as the only way to investigate it.
These omissions are more revealing than the polished graphics. The email describes a technical event while preventing every normal method of confirming that event.
What to Do if You Have Fallen Victim to This Scam
- Exit the fake release page. Do not submit a second password, approve a login request, or download anything offered as a mail repair.
- Change the mailbox password independently. Use the genuine service on a trusted device and choose a unique credential not used elsewhere.
- End unauthorized access. Revoke sessions, app passwords, unknown applications, delegates, remembered devices, and altered recovery methods.
- Inspect rules and folders. Remove suspicious forwarding, filters, and automatic replies. Review sent, deleted, drafts, and archived mail for misuse.
- Enable stronger authentication. Prefer passkeys, security keys, or an authenticator application. Reject approval prompts you did not initiate.
- Contact the real provider or IT team. Ask for login logs, token revocation, message tracking, and confirmation of actual delivery health.
- Replace reused passwords. Secure financial, cloud, workplace, shopping, and social accounts that shared the exposed credential.
- Warn contacts when needed. Tell recipients to distrust unexpected links, attachments, invoices, or payment changes sent from your address.
- Scan if additional content appeared. Malwarebytes can check for malicious files, extensions, or unwanted software delivered after the phishing page opened.
- Use layered malicious-site blocking. AdGuard can stop many known phishing destinations, while direct provider verification protects against newly created pages.
- Preserve evidence. Save the original email, headers, URL, screenshots, and account activity for administrators, providers, banks, or investigators.
Is Your Device Infected? Run a Free Malware Scan
Slow performance, constant pop-ups, or strange behavior? These are classic signs of a malware infection. The fastest way to find out is to scan your device with Malwarebytes Free — one of the most trusted malware removal tools available.
The free version detects and removes the most common threats, including:
- Adware — the cause of those annoying pop-ups
- Browser hijackers — unwanted redirects and changed homepages
- Trojans and spyware — hidden programs stealing your data
- Potentially unwanted programs (PUPs) — software you never asked for
👉 Select your device below — Windows, Mac, or Android — then follow the simple steps to download Malwarebytes, scan your system, and remove any threats it finds. The scan usually takes 5 to 20 minutes.
Run a Malware Scan with Malwarebytes for Windows
Malwarebytes is one of the most popular and trusted anti-malware tools for Windows — and it’s completely free for removing infections. It catches threats that many antivirus programs miss, including adware, browser hijackers, and trojans. Follow the steps below to scan and clean your PC in just a few minutes.
Download Malwarebytes
Click the button below to download the latest version of Malwarebytes for Windows from the official source. The free version is all you need — it will scan your computer and remove adware, browser hijackers, and other malicious software at no cost.
Download MalwarebytesOfficial installer for Windows 11 and 10. Your download starts right away.Want real-time protection? See Malwarebytes Premium Malwarebytes Free for WindowsScans and removes malware at no cost
-
Install Malwarebytes
When the download finishes, open your Downloads folder and double-click the MBSetup file. If Windows shows a User Account Control pop-up, click “Yes” to allow the installation.

Follow the On-Screen Prompts to Install Malwarebytes
The setup wizard will walk you through a few quick screens:
-
Choose where you’re installing the program — “Personal Computer” or “Work Computer” — then click Next.

-
Malwarebytes will now install on your device. This usually takes under a minute.

-
When installation is complete, the “Welcome to Malwarebytes” screen will open automatically.

-
On the final screen, click Open Malwarebytes to launch the program.

-
Enable “Scan for Rootkits”
Before scanning, turn on rootkit detection so Malwarebytes can find even the most hidden threats. Click the Settings gear icon on the left side of the screen.

In the settings menu, find “Scan for rootkits” and click the toggle so it turns blue.

Done? Click “Dashboard” in the left pane to return to the main screen.
Start the Scan
Click the blue Scan button. Malwarebytes will automatically update its virus database and start checking your computer for malware.

-
Wait for the Scan to Finish
The scan checks your entire system for browser hijackers and other malicious programs, so it can take 5 to 20 minutes depending on your computer. Feel free to do something else — just check back occasionally to see the progress.

-
Quarantine the Detected Threats
When the scan is done, you’ll see a list of everything Malwarebytes found — malware, adware, and potentially unwanted programs. Click the “Quarantine” button to remove all of them at once.

Malwarebytes will now remove the malicious files and registry entries and move them safely into quarantine.

-
Restart Your Computer
Some threats can only be fully removed after a reboot. If Malwarebytes asks you to restart, click Yes. Once you’re logged back in, Malwarebytes has finished removing the threats it found.

That’s it — your Windows PC is now clean of trojans, adware, and other malware, and should be back to running smoothly.
If you are still having problems with your computer after completing these instructions, then please follow one of the steps:
- Run a computer scan with ESET Online Scanner
- Ask for help in our Windows Malware Removal Help & Support forum.
Run a Malware Scan with Malwarebytes for Mac
Malwarebytes for Mac is a free on-demand scanner that removes the malware other security software tends to miss — adware, browser hijackers, and unwanted programs included. Cleaning an infected Mac with Malwarebytes has always been completely free, and it’s our go-to recommendation. Follow the steps below to scan and clean your Mac in just a few minutes.
-
Download Malwarebytes for Mac
Click the button below to download the latest version of Malwarebytes for Mac.
Download MalwarebytesOfficial installer for macOS. Your download starts right away.Want real-time protection? See Malwarebytes PremiumMalwarebytes Free for MacScans and removes malware at no cost -
Open the Malwarebytes setup file
When the download finishes, open your Downloads folder and double-click the setup file to begin the installation.

-
Follow the On-Screen Prompts to Install Malwarebytes
The Malwarebytes for Mac Installer will guide you through a few quick screens. Click “Continue” and keep following the prompts until the installation completes.



When the installation is complete, Malwarebytes opens to the Welcome to Malwarebytes screen. Click “Get started“.
-
Select “Personal Computer” or “Work Computer”
Malwarebytes will ask what type of computer you’re installing it on. Click either Personal Computer or Work Computer, whichever applies.

-
Start the Scan
Click the “Scan” button. Malwarebytes will automatically update its detection database and begin checking your Mac for malware.

-
Wait for the Scan to Finish
Malwarebytes will scan your Mac for adware, browser hijackers, and other malicious programs. This can take a few minutes, so feel free to do something else — just check back occasionally to see the progress.

-
Quarantine the Detected Threats
When the scan is done, you’ll see a list of everything Malwarebytes found. Click the “Quarantine” button to remove all the threats at once.

-
Restart Your Mac
Malwarebytes will now remove all the malicious files it found. Some threats can only be fully removed after a reboot — if Malwarebytes asks you to restart, allow it. Once you’re logged back in, your Mac is clean.

That’s it — your Mac is now free of adware, rogue browser extensions, and other potentially harmful software.
If you are still experiencing problems while trying to remove a malicious program from your computer, please ask for help in our Mac Malware Removal Help & Support forum.
Run a Malware Scan with Malwarebytes for Android
Malwarebytes for Android automatically detects and removes dangerous threats like malware and ransomware so you don’t have to worry about your most-used device being compromised. Aggressive detection of adware and potentially unwanted programs keeps your Android phone or tablet running smooth.
-
Download Malwarebytes for Android.
You can download Malwarebytes for Android by clicking the link below.
Get Malwarebytes for AndroidOpens Google Play in a new tab.Want real-time protection? See Malwarebytes Premium for AndroidMalwarebytes for AndroidScans your phone and removes malware at no cost -
Install Malwarebytes for Android on your phone.
In the Google Play Store, tap “Install” to install Malwarebytes for Android on your device.

When the installation process has finished, tap “Open” to begin using Malwarebytes for Android. You can also open Malwarebytes by tapping on its icon in your phone menu or home screen.

-
Follow the on-screen prompts to complete the setup process
When Malwarebytes will open, you will see the Malwarebytes Setup Wizard which will guide you through a series of permissions and other setup options.
This is the first of two screens that explain the difference between the Premium and Free versions. Swipe this screen to continue.
Tap on “Got it” to proceed to the next step.
Malwarebytes for Android will now ask for a set of permissions that are required to scan your device and protect it from malware. Tap on “Give permission” to continue.
Tap on “Allow” to permit Malwarebytes to access the files on your phone.
-
Update database and run a scan with Malwarebytes for Android
You will now be prompted to update the Malwarebytes database and run a full system scan.

Click on “Update database” to update the Malwarebytes for Android definitions to the latest version, then click on “Run full scan” to perform a system scan.

-
Wait for the Malwarebytes scan to complete.
Malwarebytes will now start scanning your phone for adware and other malicious apps. This process can take a few minutes, so we suggest you do something else and periodically check on the status of the scan to see when it is finished.

-
Click on “Remove Selected”.
When the scan has been completed, you will be presented with a screen showing the malware infections that Malwarebytes for Android has detected. To remove the malicious apps that Malwarebytes has found, tap on the “Remove Selected” button.

-
Restart your phone.
Malwarebytes for Android will now remove all the malicious apps that it has found. To complete the malware removal process, Malwarebytes may ask you to restart your device.
That’s it — your Android phone is now clean — no more malicious apps, adware, or browser redirects.
If you are still having problems with your phone after completing these instructions, then please follow one of the steps:
- Restore your phone to factory settings by going to Settings > General management > Reset > Factory data reset.
- Ask for help in our Mobile Malware Removal Help & Support forum.
Stay Protected: Block Ads and Malicious Sites
Now that your device is clean, keep it that way. Most infections start with a malicious ad or a fake download button — so blocking them at the source is your best defense.
We recommend AdGuard, which blocks malicious ads, phishing pages, and dangerous redirects before they can reach you.
👉 Download AdGuard and browse safely
Frequently Asked Questions
Are my incoming messages really delayed?
The email does not establish that. Check the genuine provider dashboard, service status, quarantine, and message tracking.
Ask IT when the account belongs to an organization.
Can mail servers experience real delivery errors?
Yes. Temporary errors, outages, filtering, and full storage can delay mail.
Real systems provide account-specific evidence through trusted interfaces or server notices.
Why does the page show my email address?
The campaign can place the address inside the link and copy it into the form.
That does not prove a connection to your provider.
What if I clicked but entered nothing?
Close the page and review browser permissions and downloads. Credentials were probably not exposed if nothing was submitted.
Scan if a file appeared.
Does HTTPS make the release portal legitimate?
No. HTTPS encrypts traffic to the host shown in the address bar.
It does not prove that the host represents your email service.
Should I delete messages to fix the warning?
First inspect real storage usage through the provider. Do not delete mail because an unverified sender claimed a generic server error.
Follow official retention and backup procedures.
The Bottom Line
The Messages Delayed by Server Error scam invents an unseen delivery queue, then uses a release button to move recipients onto a counterfeit mail login.
Verify service health through the real provider, and treat any password entered on the linked page as compromised.

Join the discussion
0 commentsShare your experience or ask a question about this article.
Discussion
Start the conversation
Have a question or something useful to share? Add the first comment.