


An invitation arrives with the sort of formal wording you see at work. Inside, a document opens, or an error suggests that something simply went wrong.
Neither outcome explains everything that may have happened. PapRAT is a reminder to look beyond the visible attachment when investigating an unexpected file.
Overview
A Remote-Access Threat Aimed at Windows Organizations
PapRAT is a Windows remote-access Trojan associated with a targeted campaign investigated by FortiGuard Labs.
The researchers attribute the activity to BITTER with high confidence. Their report concerns South Asian organizations, including government, energy, and engineering targets.
That is a research attribution, not an identification of every person behind every future sample. A consumer should not diagnose espionage from a strange filename.
Official-Looking Documents Conceal Several Entry Routes
FortiGuard’s original report describes three related routes involving shortcuts, native Windows utilities, and malicious installers.
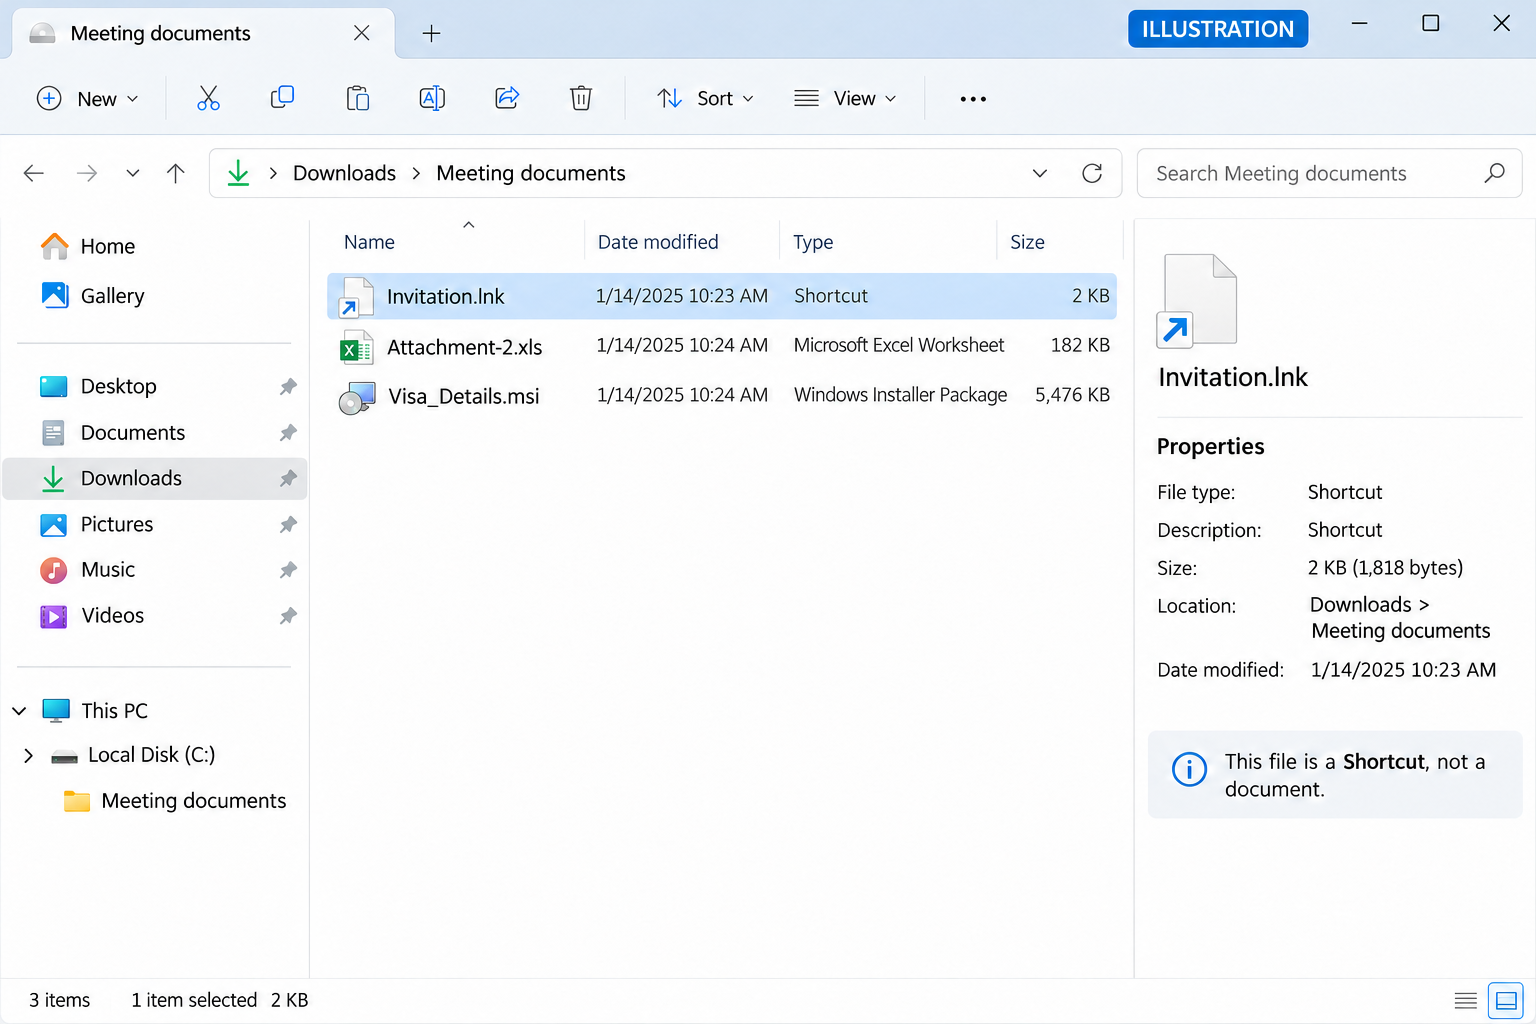
In one route, a disk image contains a shortcut that launches an installer while displaying a spreadsheet. The visible document distracts from the other action.
The campaign is not one universal sequence that every target sees. Different routes need different evidence, even when the invitation story feels similar.
Remote Access Changes the Response Priority
The reported implant can execute commands, transfer files, and capture screenshots. A Rust variant expands the command set, and one chain delivered another implant, WmRAT.
- Tell your organization’s security team immediately after a suspicious work-file interaction.
- Preserve the original message and attachment without running them again.
- Do not assume the displayed spreadsheet was the only action.
- Keep compromised systems away from sensitive sign-ins.
- Assess additional payloads and account exposure, not just the PapRAT detection.
A quiet screen does not establish that remote access is absent. Conversely, an unfamiliar process name alone does not prove this particular infection.
Why an Invitation Can Be More Effective Than an Obvious Warning
People expect to inspect documents associated with their job. A meeting request can offer a plausible reason for opening a file without creating immediate suspicion.
A decoy adds reassurance. If a spreadsheet appears, the recipient may assume the file did what it promised and return to ordinary work.
An error can serve a similar purpose. A failed document seems like a minor compatibility problem rather than evidence of another process running.
The safe question is not whether the document looked professional. It is whether the sender and delivery method were independently verified before execution.
For organizations handling sensitive correspondence, that verification should be part of the normal process. Employees should know where to send unusual invitations for review.
How the PapRAT Campaign Reaches a Computer
Step 1: A Work-Relevant Lure Creates a Reason to Open Files
The campaign uses themes such as diplomatic invitations and official correspondence. Their relevance is part of the social engineering.
A convincing subject does not require the attacker to control the organization named in it. Familiar institutional language can be copied.
Check an unexpected invitation through an established contact. Do not rely on a telephone number or reply address supplied only in the new message.
If the attachment format is unusual for that relationship, ask why. A change from ordinary documents to disk images or installers deserves scrutiny.
Step 2: A Shortcut Acts Like More Than Its Icon Suggests
A Windows shortcut can launch commands or programs. Its displayed icon does not limit it to opening the document pictured.
That distinction matters when a lure includes an LNK or URL file. The recipient may interpret it as a convenient document link.
Enable filename extensions through File Explorer’s View menu when checking ordinary files. Do not open a suspected malicious shortcut to inspect its behavior.
Your security team can examine the original artifact in a controlled environment. A screenshot of the icon cannot show everything the shortcut would execute.
Step 3: The Route Runs Commands or Deploys an Installer
Some reported activity abuses legitimate Windows tools. Other routes deliver an MSI package that installs the implant.
These are alternatives within the campaign, not proof that each victim experienced every branch. Keep that distinction when reconstructing an incident.
A genuine Windows utility is not automatically performing a genuine task. What launched it, which arguments it received, and what it contacted all matter.
Likewise, an MSI file is an installation package, not a contract format. A request to run one for an invitation needs independent approval.
Step 4: Persistence Allows Activity to Resume
The campaign uses scheduled tasks as part of maintaining access. Names that resemble update activity can make those entries seem routine.
Do not respond by deleting every task with an unfamiliar name. Legitimate maintenance and business applications also create scheduled entries.
A responder should correlate task actions, file paths, creation times, and network activity. The context is more useful than a label in isolation.
If suspicious components reappear after removal, preserve the new finding. Repeated deletion without identifying the relaunch mechanism can leave the underlying access intact.
Step 5: Operators Can Use the Implant and Add Other Tools
Remote command execution means the incident can extend beyond the first installer. The operator may act after the initial document interaction is over.
That is why assessment should include files, accounts, and other systems accessible from the endpoint. The detection name is a starting point, not the full scope.
Additional payloads are a documented concern in this campaign. Removing one known component does not establish that no other tool was deployed.
For a business, the response belongs with trained incident responders. A consumer scanner can assist, but it cannot replace organization-wide investigation.
What to Do If You Opened a Suspected PapRAT Lure
Do not worry about explaining the mistake perfectly. Give the security team the sequence you remember and preserve the original material.
- Disconnect and contact the real help desk.
Use another trusted device or established telephone number. Follow your organization’s containment instructions rather than continuing a conversation with the suspicious sender.
- Record what you actually opened.
Note the message, archive, disk image, shortcut, installer, and any document or error displayed. Do not repeat the interaction for a clearer screenshot.
- Preserve evidence before routine cleanup.
Keep detection reports and timestamps. Your responder may need running-process or memory evidence before authorizing a reboot, quarantine, or rebuild.
- Protect accounts from an unaffected device.
Tell administrators which work services were used. Revoke exposed access and change credentials through the real systems under their guidance.
- Check for follow-on access and other payloads.
Responders should assess related endpoints and accessible resources. Do not declare the network safe simply because a local PapRAT file was quarantined.
- Use a controlled removal or rebuilding plan.
For a personal Windows computer without organizational requirements, the illustrated scan below provides a practical starting point, followed by verification and escalation.
Remove PapRAT and Related Components From Windows
Step 1: Keep the System Isolated While Preparing
Disconnect Wi-Fi and Ethernet. Do not use the affected computer to change sensitive passwords while a remote-access threat may remain active.
On a managed endpoint, stop here until your responder approves cleanup. Installing software or restarting can change evidence that the investigation needs.
For an unmanaged device, obtain the trusted Windows installer below. Use another computer if security interference prevents a safe download.
Step 2: Run the Illustrated Malwarebytes Procedure
Download the Correct Windows Installer
Use the download below for Malwarebytes for Windows. Obtain the installer on a trusted computer if the affected machine cannot browse safely.
Download MalwarebytesOpens the official free-scanner page. Choose the Windows download.Optional real-time protection: Malwarebytes Premium
On the official page, choose the free scanner download for Windows. Save the installer; manual scanning and quarantine do not require a Premium purchase.
MalwareTips may earn a commission through its product links. Buying ongoing protection is optional and is not a condition for following this cleanup procedure.
Do not run an installer supplied by the suspicious message, a remote caller, or a search advertisement pretending to offer urgent technical help.
Install and Open Malwarebytes
Open Downloads and double-click the MBSetup installer. Approve the Windows permission prompt only after confirming that it belongs to the installer you obtained.
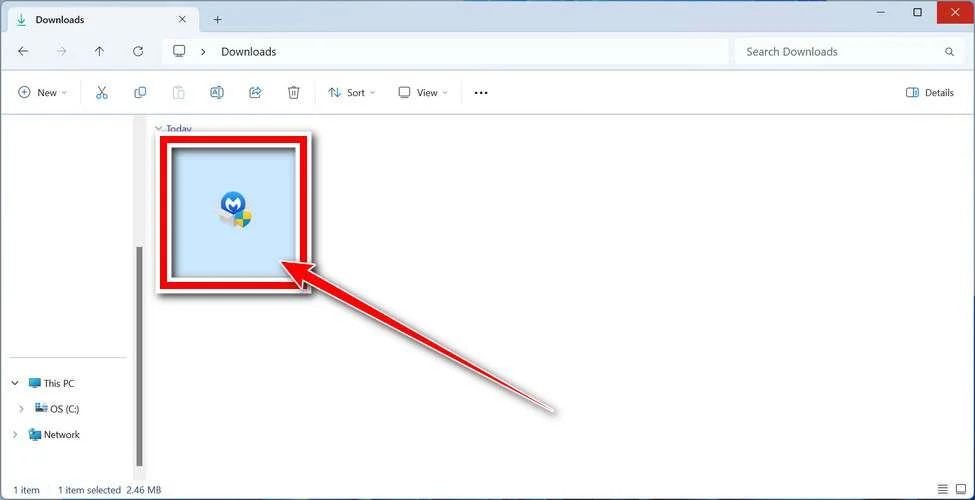
Follow the setup screens and choose the appropriate personal or work option. On a managed computer, obtain your security team’s approval before installing another tool.
Read optional offers carefully. You can skip an unwanted trial, browser add-on, or paid plan without abandoning a normal manual Windows scan.
Open the application when installation finishes. Let its detection information update if safe connectivity is available; do not reconnect an isolated business endpoint without authorization.
Run a Threat Scan, Then Check Other Affected Locations
From the dashboard, select Scan to start a Threat Scan. This checks common infection locations, memory, startup items, and the registry.
A Threat Scan is not a complete inspection of every drive. Use the Scanner tile’s three-dot menu and Advanced Scan for additional scanning choices.
Choose Custom Scan to inspect specific drives or folders. Select the Windows system drive and any other affected location your responder has approved.
Rootkit scanning is an optional Custom Scan setting on supported systems. Its absence on Windows ARM is not a reason to disable Windows protection.
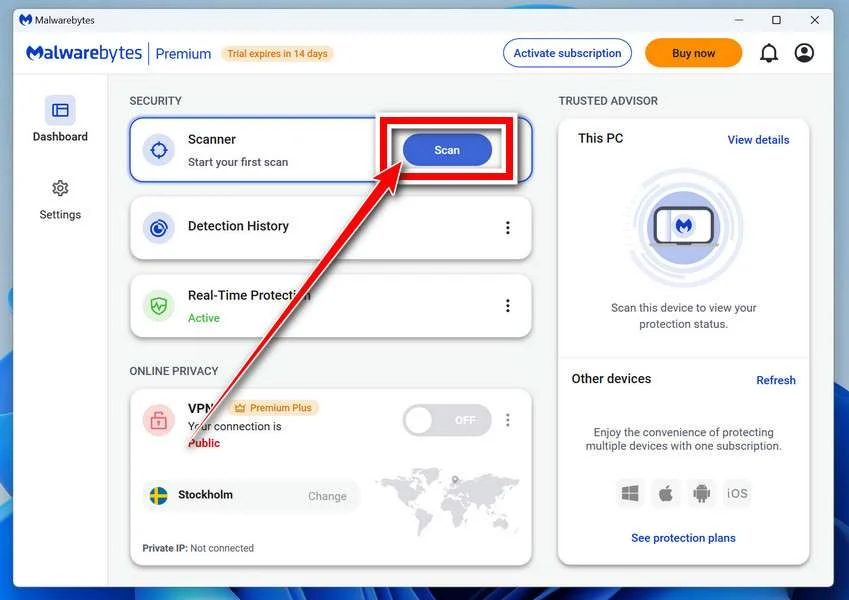
Allow the selected scan to finish. The duration depends on its scope, available storage, and the computer’s condition, so avoid a promised completion time.
If the application cannot update, start, or finish, save its error message. Repeatedly forcing a broken scanner is not a substitute for incident-response help.
When a report becomes available, review the detected names, locations, and actions. Keep a copy for whoever is helping investigate the compromise.
Review Detections and Quarantine Threats
Leave confirmed malicious items selected and choose Quarantine. Do not create an exclusion simply because a familiar program or system-looking filename appears in the report.
If a finding is unclear, record the detection and ask for advice. Do not manually delete random Windows files based only on their names.
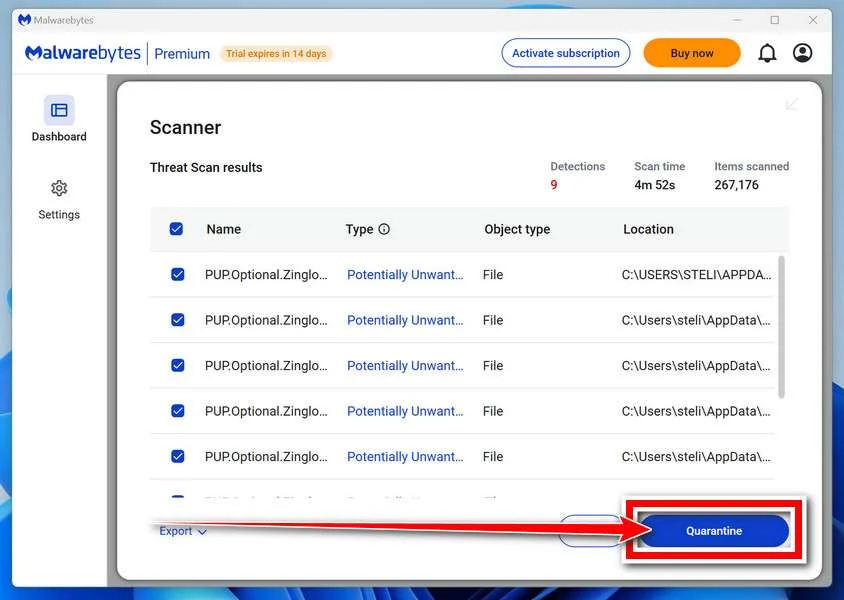
Quarantine isolates the items the tool identifies. Keep them there while the incident is assessed rather than restoring a suspicious file to test it.
Save the scan report after applying the actions. It can show a responder whether the original threat, related components, or potentially unwanted software was found.
A clean result does not undo earlier data theft. Continue the account and recovery actions relevant to this incident even when no active threat remains.
Restart if Requested and Review the Result
Save open work and allow a restart if Malwarebytes requests one. A managed-system responder may need to preserve evidence before approving that restart.
Keep backup storage disconnected during cleanup. Do not interpret a restart as permission to restore files or resume sensitive sign-ins immediately.
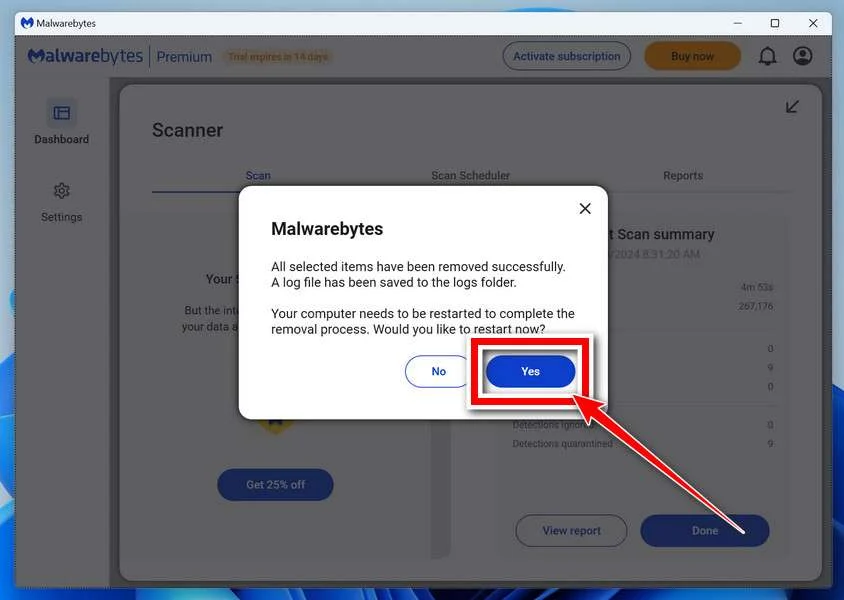
After Windows returns, reopen Malwarebytes and check the report. Run the follow-up scan appropriate to the affected locations and note any recurring detections.
Keep Windows Security and other established protection enabled. If threats return, stop ordinary use and obtain help rather than repeatedly excluding or deleting files.
For unresolved personal-device infections, ask in the MalwareTips malware-removal help forum. Do not post passwords, private logs, or confidential work documents publicly.
Step 3: Check Whether the Compromise Persists
Review the completed report and any new alerts. An infection that returns after restart needs investigation of its relaunch mechanism and possible additional components.
Do not restore quarantined files because their properties mention Microsoft. File descriptions can be misleading; verified origin and behavior are stronger evidence.
An optional Microsoft Defender Offline scan is available through Windows Security, Virus & threat protection, and Scan options on supported configurations.
Save work and confirm access to the BitLocker recovery key before a restart-based scan. Ask for help if the required recovery information is unavailable.
Keep detection logs for your helper. Avoid posting raw organizational records, private addresses, credentials, or sensitive correspondence in a public support request.
Step 4: Rebuild or Restore Carefully When Needed
If the scope remains unknown, a controlled rebuild may be more appropriate than repeatedly scanning a potentially compromised business system.
Preserve necessary documents under guidance and reinstall applications from approved sources. Do not restore the original lure or an unexamined collection of executables.
Confirm the original entry route has been addressed before reconnecting to normal work. Otherwise, a newly installed system can encounter the same malicious message.
What Administrators Should Investigate Beyond the Attachment
Correlate the file interaction with endpoint logs and network records. A useful timeline connects the message, child processes, scheduled tasks, and outbound communication.
Review relevant account use during the compromise window. Look for unexpected access to shared storage, administrative tools, or sensitive applications.
Do not equate a signature-looking file description with a valid digital signature. Preserve both the file’s identity and the security product’s findings.
Search for related messages sent to other employees. A narrowly targeted lure can still reach several people with similar responsibilities.
Keep organizational response separate from employee awareness advice. The immediate need is containment and evidence, not asking the recipient to investigate attacker infrastructure.
After recovery, explain the approved document-verification route clearly. A policy people can actually follow is more useful than a general warning to avoid attachments.
Frequently Asked Questions
Is PapRAT a legitimate remote-support program?
No. The reported PapRAT implant is malicious remote-access software. Do not confuse it with an authorized support session approved by your organization.
Does opening the spreadsheet mean only the spreadsheet ran?
No. A reported lure opened a decoy while running an installer. Give responders the full file sequence, not just the document that appeared.
Is every diplomatic invitation dangerous?
No. The campaign abuses that theme. Verify unexpected senders and unusual executable formats rather than treating an entire category of correspondence as malicious.
Should I delete a suspicious scheduled task myself?
Not based on its name alone. Preserve its details and get qualified advice; ordinary Windows and business programs also use scheduled tasks.
Can removing PapRAT restore files already stolen?
No. Cleanup addresses the endpoint. Potential data disclosure and account access require their own investigation and response.
Should an employee follow the consumer scan before contacting IT?
No. Contact the real security team first. They may need evidence preserved or require a managed cleanup procedure instead.
The Bottom Line
Do not run an unexpected shortcut or installer to view an invitation. Verify it through a known contact and report unusual file delivery.
If a suspected PapRAT lure already ran, isolate the system and involve trusted responders. Remove the malware, but assess remote access and secondary payloads too.

Join the discussion
0 commentsShare your experience or ask a question about this article.
Your progress
Did these steps help?
Let us know how the guide worked for you.
Describe what you see and the step you reached. Keep passwords and other private information out.
Discussion
Start the conversation
Have a question or something useful to share? Add the first comment.